
DIR-250 - Radio LENCO - Free user manual and instructions
Find the device manual for free DIR-250 LENCO in PDF.


| Product type | DAB+ / FM Digital Radio |
| Brand | Lenco |
| Model | DIR-250 |
| Frequency ranges | DAB+ (Band III): 174-240 MHz, FM: 87.5-108 MHz |
| Number of presets | 20 (10 DAB+, 10 FM) |
| Display | Backlit LCD screen |
| Speaker | Built-in 3 W speaker |
| Power supply | 5V / 1A mains adapter (included) or 4 LR6 (AA) batteries (not included) |
| Dimensions (W x H x D) | 200 x 120 x 80 mm |
| Weight | 0.5 kg |
| Main functions | Automatic station search, 20 presets, dual alarm, sleep timer, LCD display with DAB+ information (scrolling text, time) |
| Connectivity | 3.5 mm headphone jack, USB port for charging (charging only) |
| Care and cleaning | Use a soft, dry cloth. Do not use abrasive products or solvents. |
| Safety | Do not expose to moisture, heat sources, or direct sunlight. Unplug during thunderstorms or prolonged non-use. |
| Spare parts and repairability | Contact Lenco customer service for repairs. Do not attempt to open or repair yourself. |
| General information | Compliant with European directives. This device is intended for domestic use only. |
Frequently Asked Questions - DIR-250 LENCO
User questions about DIR-250 LENCO
0 question about this device. Answer the ones you know or ask your own.
Ask a new question about this device
Download the instructions for your Radio in PDF format for free! Find your manual DIR-250 - LENCO and take your electronic device back in hand. On this page are published all the documents necessary for the use of your device. DIR-250 by LENCO.
USER MANUAL DIR-250 LENCO
natural_image
Black Lenovo home audio amplifier front panel with control knobs and a digital display (no visible text or symbols on main body)USER MANUAL
Wifi/Lan Internet, Dab+, Fm Tuner with Bluetooth and Spotify Connect
HANDLEIDING
Wifi/Lan Internet, Dab+, Fm-tuner met Bluetooth en Spotify Connect
BEDIENUNGSANLEITUNG
Usage of controls or adjustments or performance of procedures other than those specified herein may result in hazardous radiation exposure.
KEEP THESE INSTRUCTIONS IN MIND:
- Do not cover or block any ventilation openings. When placing the device on a shelf, leave
5 cm (2") free space around the whole device. - Install in accordance with the supplied user manual.
- Keep the device away from heat sources such as radiators, heaters, stoves, candles and other heat-generating products or naked flame. The device can only be used in moderate climates. Extremely cold or warm environments should be avoided. Working temperature between 0^ and 35^ C.
- Avoid using the device near strong magnetic fields.
- Electrostatic discharge can disturb normal usage of this device. If so, simply reset and restart the device following the instruction manual. During file transmission, please handle with care and operate in a static-free environment.
- Warning! Never insert an object into the product through the vents or openings. High voltage flows through the product and inserting an object can cause electric shock and/or short circuit internal parts. For the same reason, do not spill water or liquid on the product.
- Do not use in wet or moist areas such as bathrooms, steamy kitchens or near swimming pools.
- The device shall not be exposed to dripping or splashing and make sure that no objects filled with liquids, such as vases, are placed on or near the apparatus.
- Do not use this device when condensation may occur. When the unit is used in a warm wet room with damp, water droplets or condensation may occur inside the unit and the unit may not function properly; let the unit stand in power OFF for 1 or 2 hours before turning on the power: the unit should be dry before getting any power.
- Although this device is manufactured with the utmost care and checked several times before leaving the factory, it is still possible that problems may occur, as with all electrical appliances. If you notice smoke, an excessive build-up of heat or any other unexpected phenomena, you should disconnect the plug from the main power socket immediately.
- This device must operate on a power source as specified on the specification label. If you are not sure of the type of power supply used in your home, consult your dealer or local power company.
- Keep away from animals. Some animals enjoy biting on power cords.
- To clean the device, use a soft dry cloth. Do not use solvents or petrol based fluids. To remove severe stains, you may use a damp cloth with dilute detergent.
- The supplier is not responsible for damage or lost data caused by malfunction, misuse, modification of the device or battery replacement.
- Do not interrupt the connection when the device is formatting or transferring files. Otherwise, data may be corrupted or lost.
- If the unit has USB playback function, the USB memory stick should be plugged into the unit directly. Don't use an USB extension cable because it can cause interference resulting in failing of data.
- The rating label has been marked on the bottom or back panel of the device.
- This device is not intended for use by people (including children) with physical, sensory or mental disabilities, or a lack of experience and knowledge, unless they're under
supervision or have received instructions about the correct use of the device by the person who is responsible for their safety.
-
This product is intended for non professional use only and not for commercial or industrial use.
-
Make sure the unit is adjusted to a stable position. Damage caused by using this product in an unstable position vibrations or shocks or by failure to follow any other warning or precaution contained within this user manual will not be covered by warranty.
-
Never remove the casing of this device.
-
Never place this device on other electrical equipment.
-
Do not allow children access to plastic bags.
-
Only use attachments/accessories specified by the manufacturer.
-
Refer all servicing to qualified service personnel. Servicing is required when the device has been damaged in any way, such as the power supply cord or the plug, when liquid has been spilled or objects have fallen into the device, when the device has been exposed to rain or moisture, does not operate normally, or has been dropped.
-
Long exposure to loud sounds from personal music players may lead to temporary or permanent hearing loss.
-
If the product is delivered with power cable or AC power adaptor:
- If any trouble occur, disconnect the AC power cord and refer servicing to qualified personnel.
- Don't step on or pinch the power adaptor. Be very careful, particularly near the plugs and the cable's exit point. Do not place heavy items on the power adaptor, which may damage it. Keep the entire device out of children's reach! When playing with the power cable, they can seriously injure themselves.
● Unplug this device during lightning storms or when unused for a long period.
● The socket outlet must be installed near the equipment and must be easily accessible.
- Do not overload ac outlets or extension cords. Overloading can cause fire or electric shock.
● Devices with class 1 construction should be connected to a main socket outlet with a protective earthed connection.
● Devices with class 2 construction do not require a earthed connection.
● Always hold the plug when pulling it out of the main supply socket. Do not pull the power cord. This can cause a short circuit.
- Do not use a damaged power cord or plug or a loose outlet. Doing so may result in fire or electric shock.
- If the product contains or is delivered with a remote control containing coin/cell batteries:
Warning:
- “Do not ingest battery, Chemical Burn Hazard” or equivalent working.
● [The remote control supplied with] This product contains a coin/button cell battery. If the battery is swallowed, it can cause severe internal burns in just 2 hours and can lead to death.
- Keep new and used batteries away from children.
- If the battery compartment does not close securely, stop using the product and keep it away from children.
- If you think batteries might have been swallowed or placed inside any part of the body, seek immediate medical attention.
- Caution about the use of Batteries:
● Danger of explosion if battery is incorrectly replaced. Replace only with the same or equivalent type.
● Battery cannot be subjected to high or low extreme temperatures, low air pressure at high altitude during use, storage or transportation.
● Replacement of a battery with an incorrect type that can result in an explosion or the leakage of flammable liquid or gas.
● Disposal of a battery into fire or a hot oven, or mechanically crushing or cutting of a battery, that can result in an explosion.
● Leaving a battery in an extremely high temperature surrounding environment that can result in an explosion or that leakage of flammable liquid or gas.
● A battery subjected to extremely low air pressure that may result in an explosion or the leakage of flammable liquid or gas.
● Attention should be drawn to the environmental aspects of battery disposal.
INSTALLATION
- Unpack all parts and remove protective material.
- Do not connect the unit to the mains before checking the mains voltage and before all other connections have been made.
Accessories:
User manual

natural_image
Simple line drawing of an open book with no text or symbols visiblePower supply
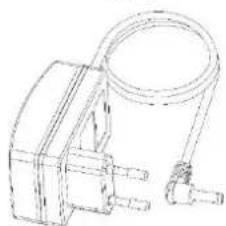
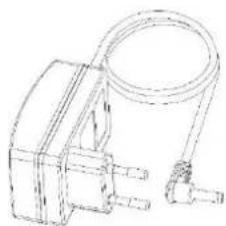
natural_image
Line drawing of a mechanical device with a coiled cable and two ports (no text or symbols)Remote control
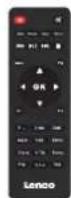
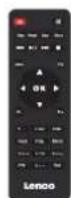
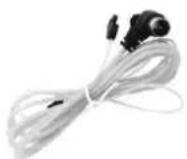
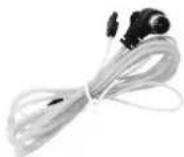
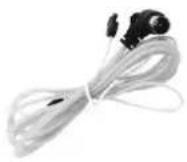
DAB/FM indoor antenna
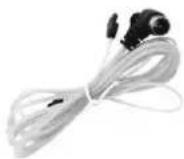
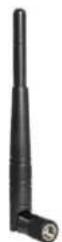
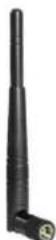
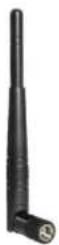
WIFI antenna
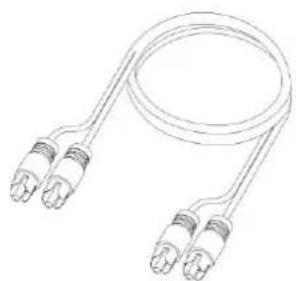
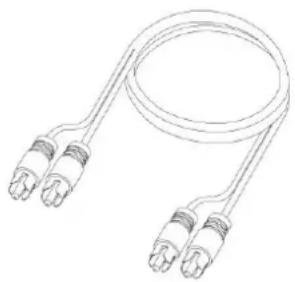
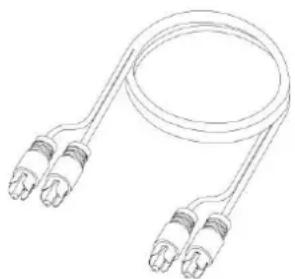
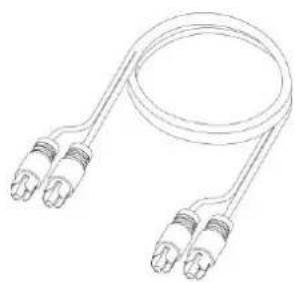
RCA cable
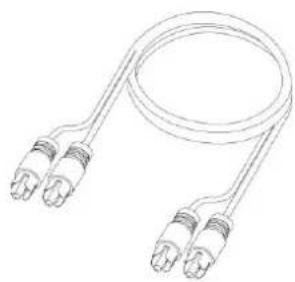
natural_image
Line drawing of a coiled cable with two connectors (no text or symbols)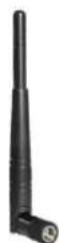
INSTALLATION
- Unpack all parts and remove protective material.
- Do not connect the unit to the mains before checking the mains voltage and before all other connections have been made.
FRONT VIEW
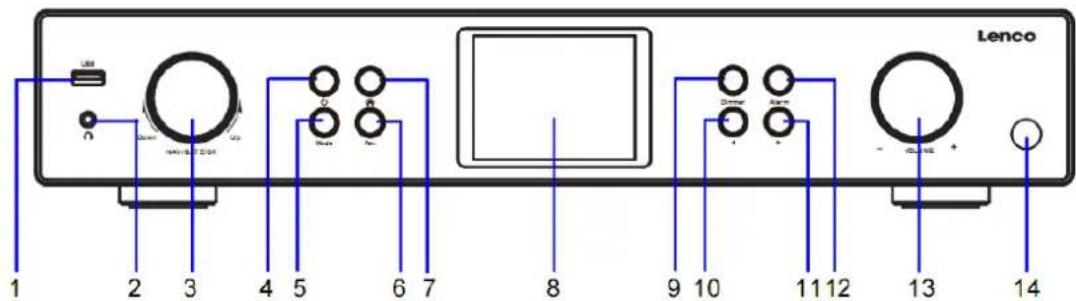
- USB Port 8. LCD Display
- Earphone Jack 9. Dimmer Button
- OK/NAVIGATE Swivel Knob 10. Left/Prev Button
- Standby Button 11. Right/Next Button
- MODE Button 12. Alarm Button
- Fav. Button 13. VOLUME Knob
- Home Button 14. Remote Control Sensor
REAR VIEW
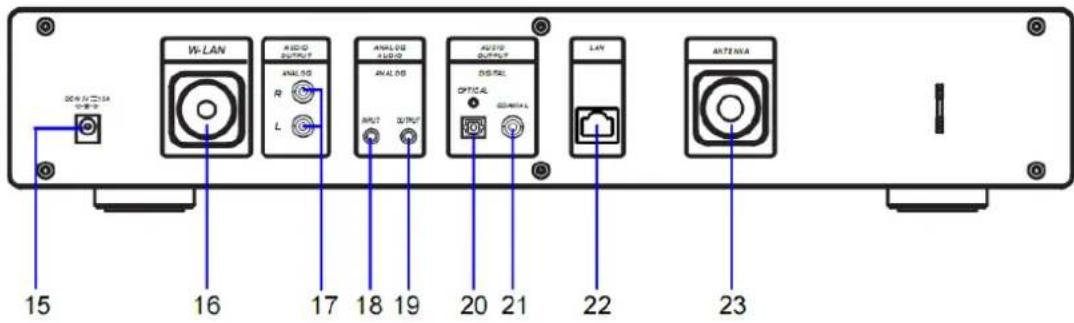
- DC IN Jack
- AUDIO OUTPUT DIGITAL OPTICAL Jack
- W-LAN Antenna Installation Port
- AUDIO OUTPUT DIGITAL COAXIAL Jack
- AUDIO OUTPUT ANALOG R/L Jack
- LAN INPUT Jack
- ANALOG AUDIO INPUT Jack
- Antenna Installation Port
- ANALOG AUDIO OUTPUT Jack
REMOTE CONTROL
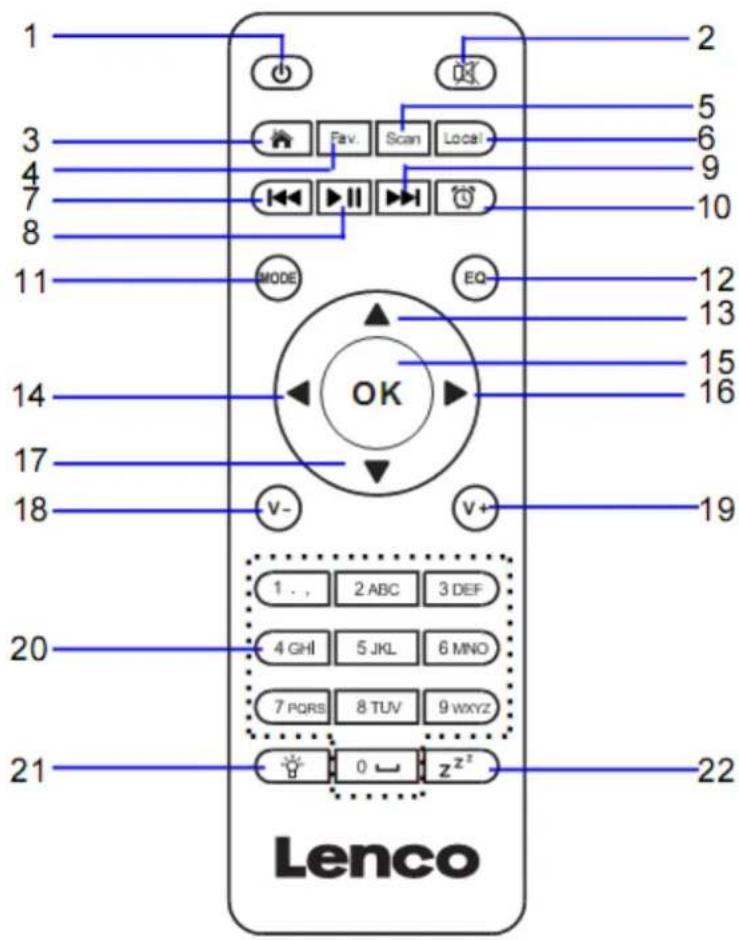
- Standby button
- EQ-Set button
- Switch speaker ON/OFF
- Up navigation button
- Main menu
- Left navigation button
- Saved stations, Favorites, etc
- Confirm selection
- DAB/FM scan
- Right navigation button
- Local station
- Down navigation button
- Go back one track
- Decrease volume
- Play/Pause
- Increase volume
- Go forward one track
- 0.....9 Select favorites/Fav.; input letters and numbers
- Alarm button
- Dimmer button 22. Sleep button
- MODE-Go to main menu items
Battery installation for remote control:
- Push on the 'open' marking of the battery cover and slide it downwards
- Install two (2) x AAA size batteries 1.5V into the battery compartment (check the correct polarity when inserting)
- slide the battery cover back
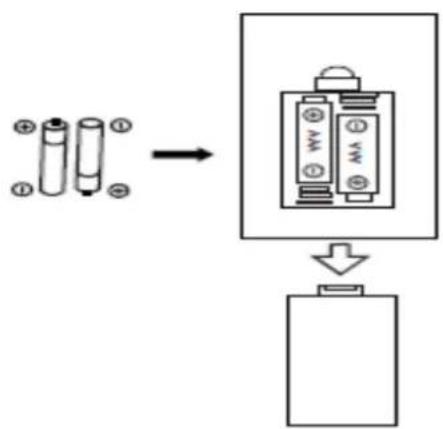
Battery Precautions:
Follow these precautions:
- Use only the type of battery specified in this manual.
- Be sure to follow the correct polarity when installing the battery as indicated in the battery compartment. A battery which is inserted in the wrong way may cause damage to the device.
- Do not try to recharge single use batteries. (Follow the battery manufacturer's directions.)
-
Do not throw batteries into fire because they may explode.
-
Clean the battery contacts of the device prior to replacing empty batteries.
Tighten the W-lan antenna clockwise by using the proper tool as illustrated.
Plug the pig-tail antenna into the Antenna port as illustrated.
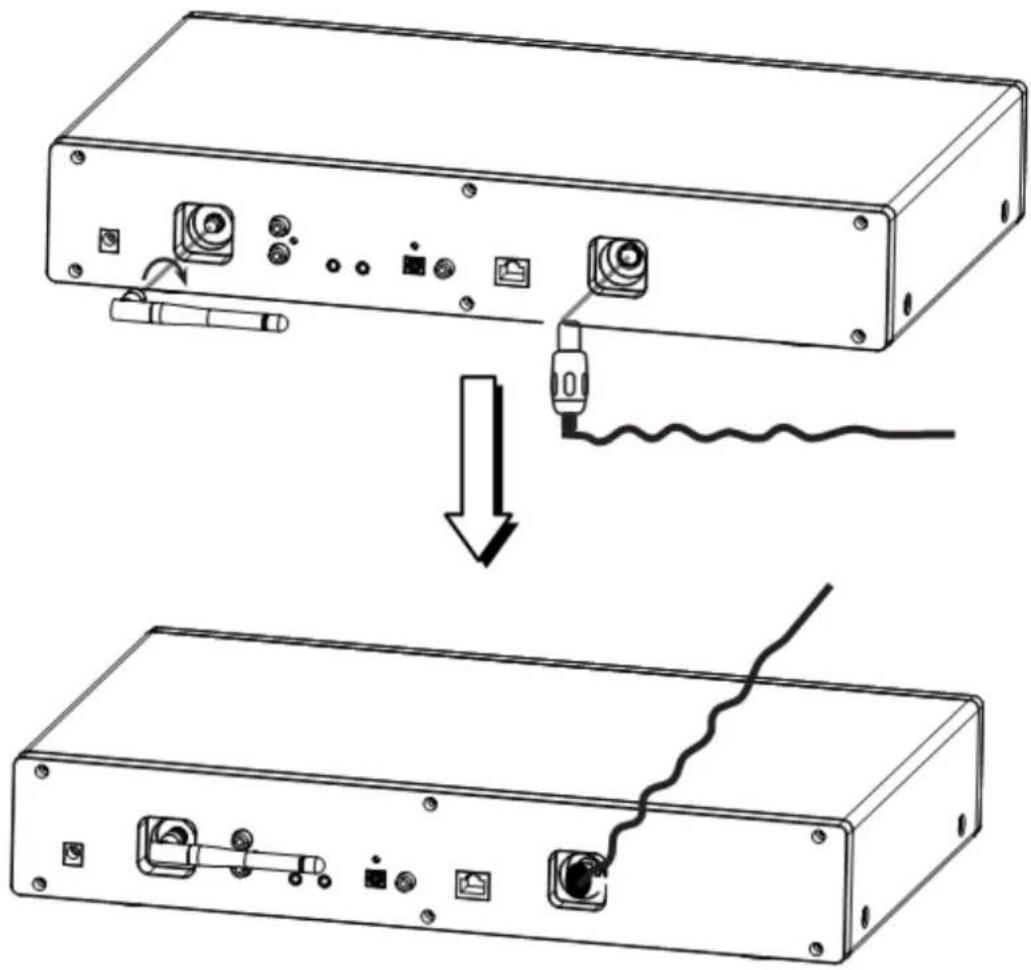
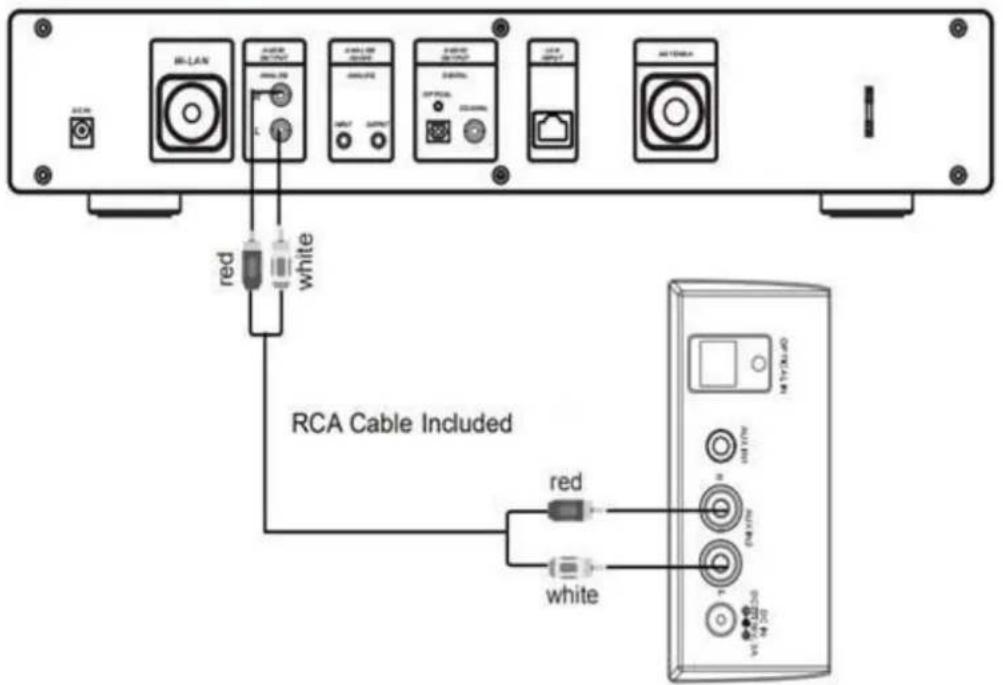
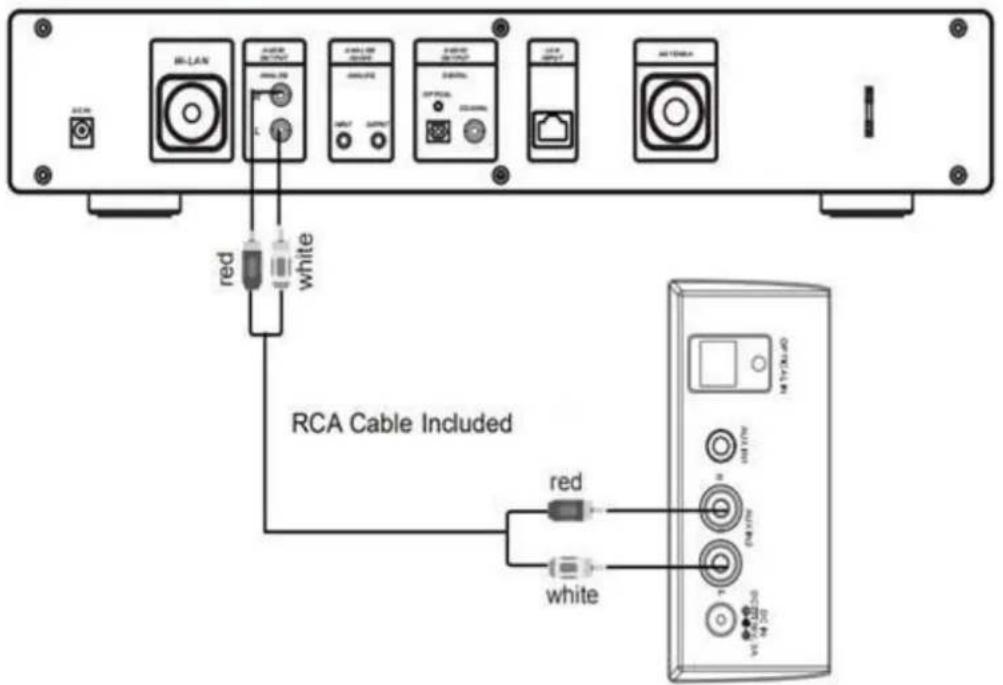
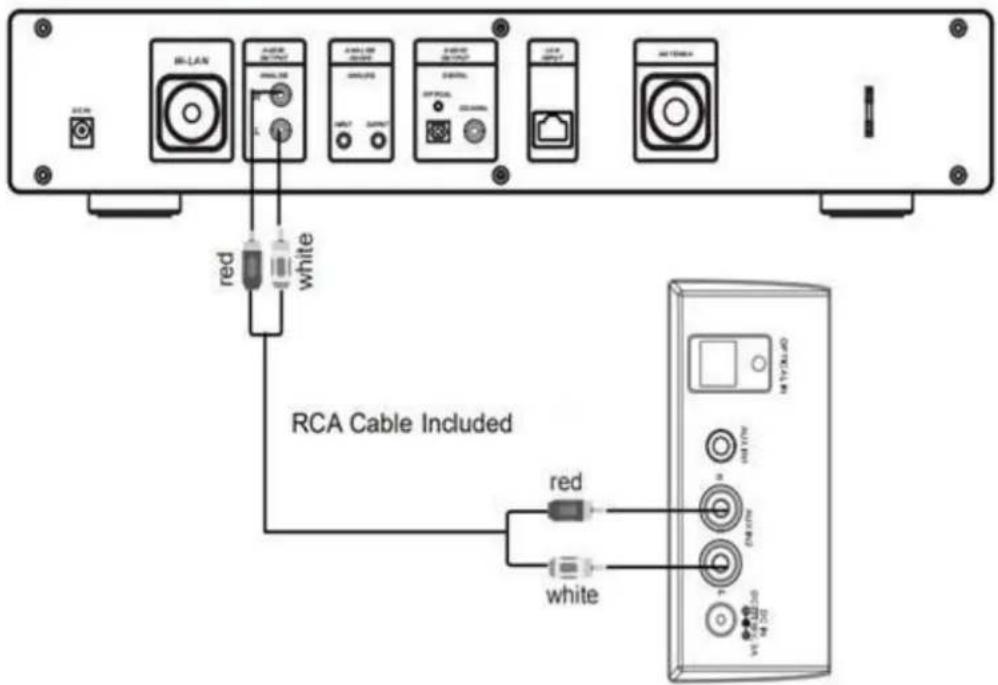
ANALOG AUDIO OUTPUT CONNECTIONS
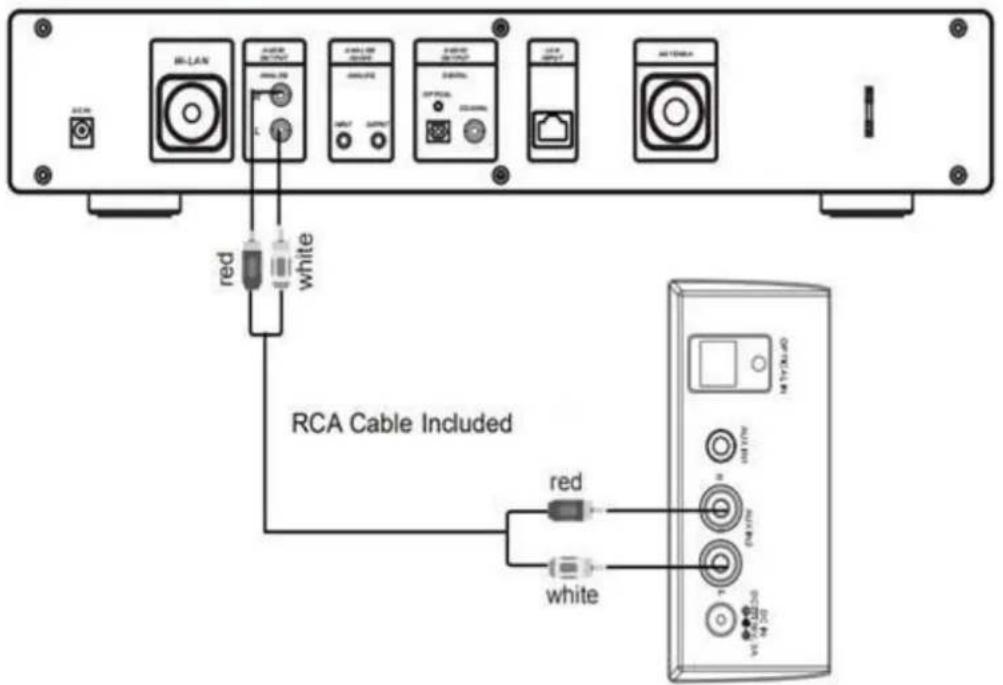
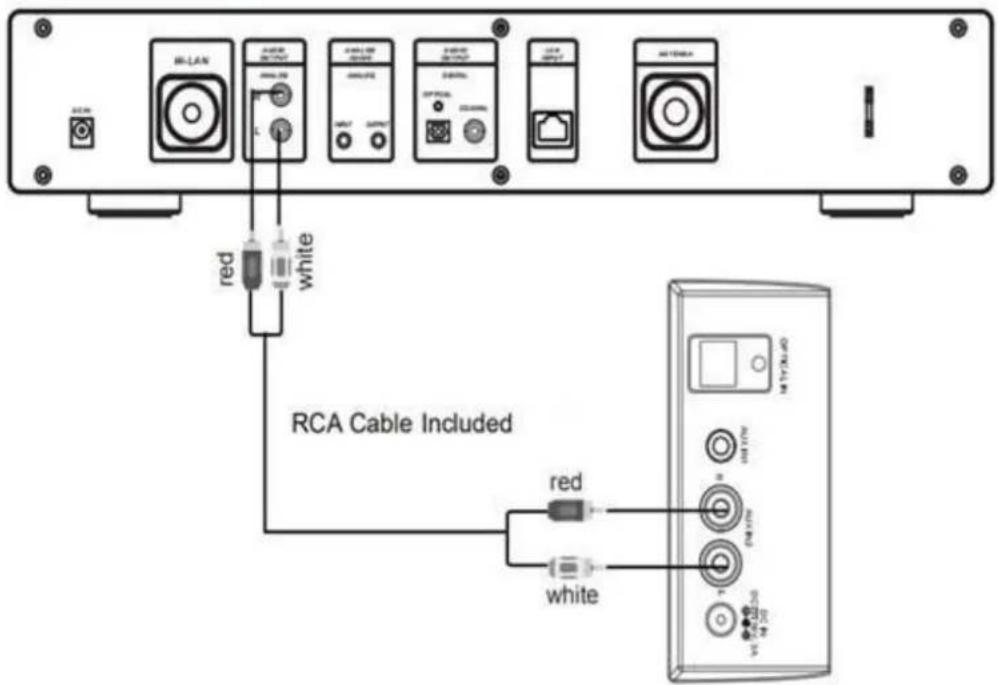
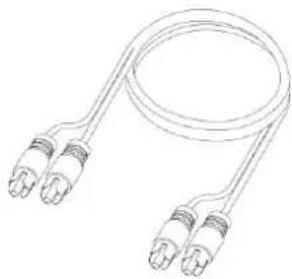
Connect the RCA cable as illustrated below.
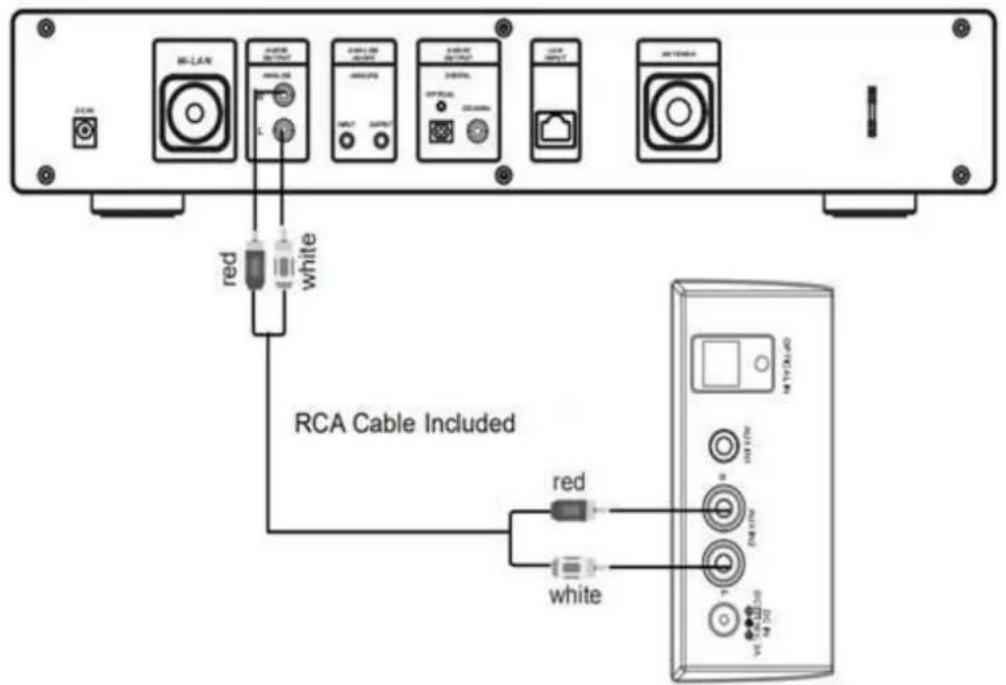
Rear View of the TV Soundbar, Tower Speaker etc.
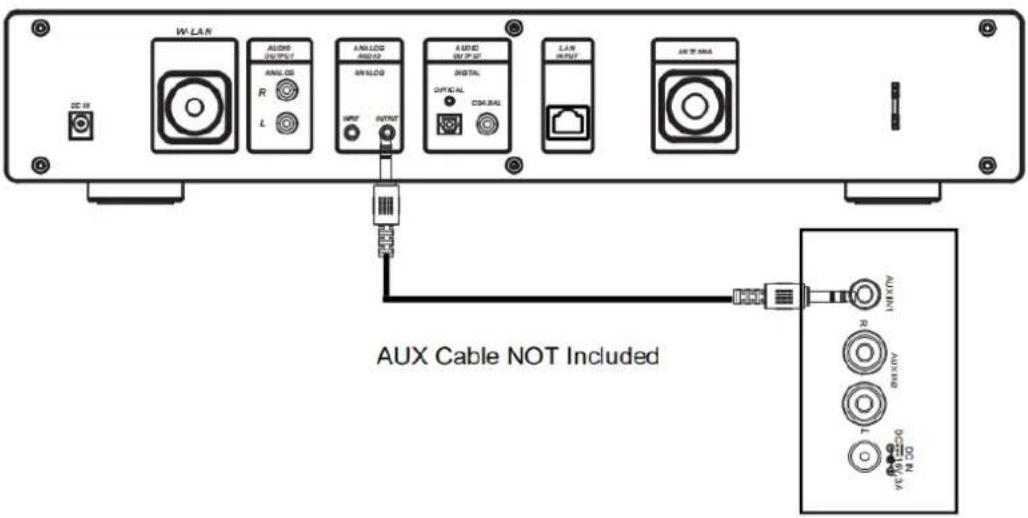
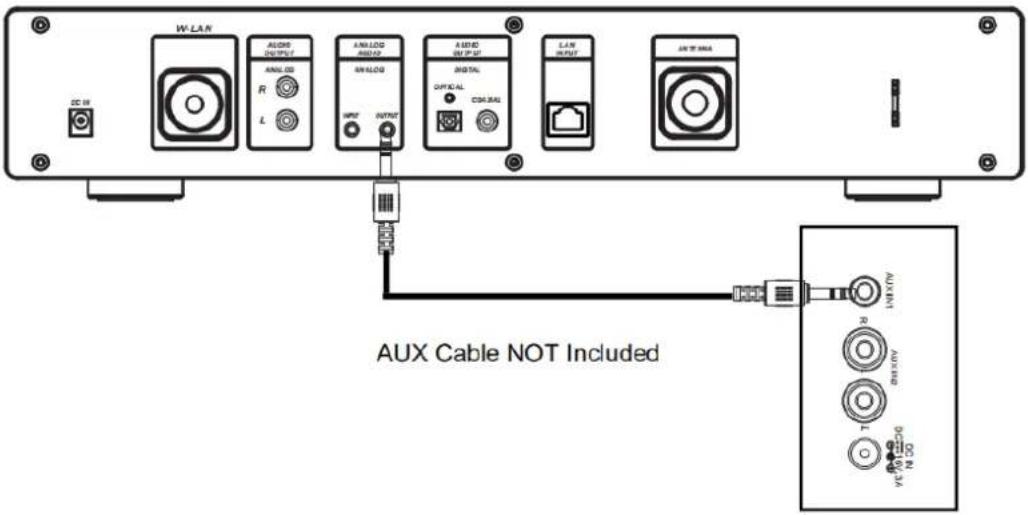
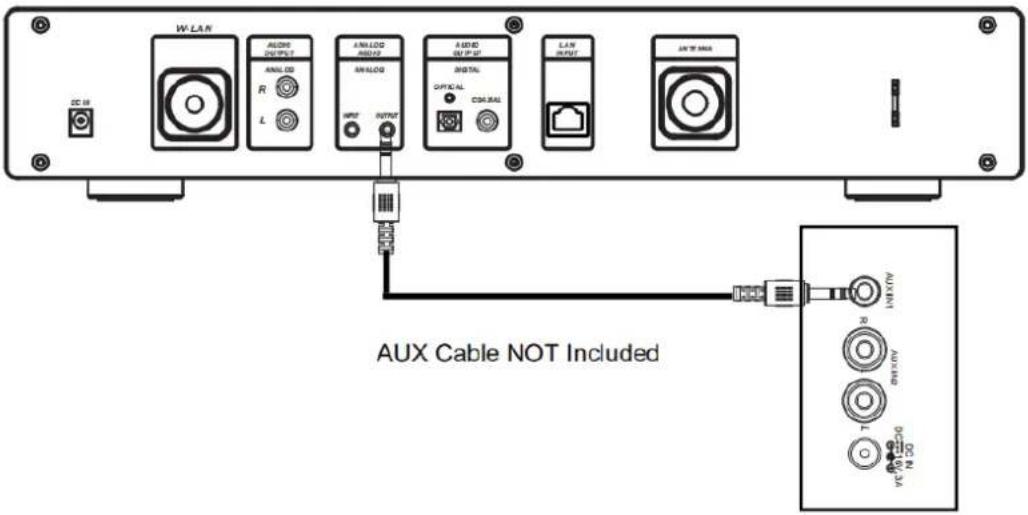
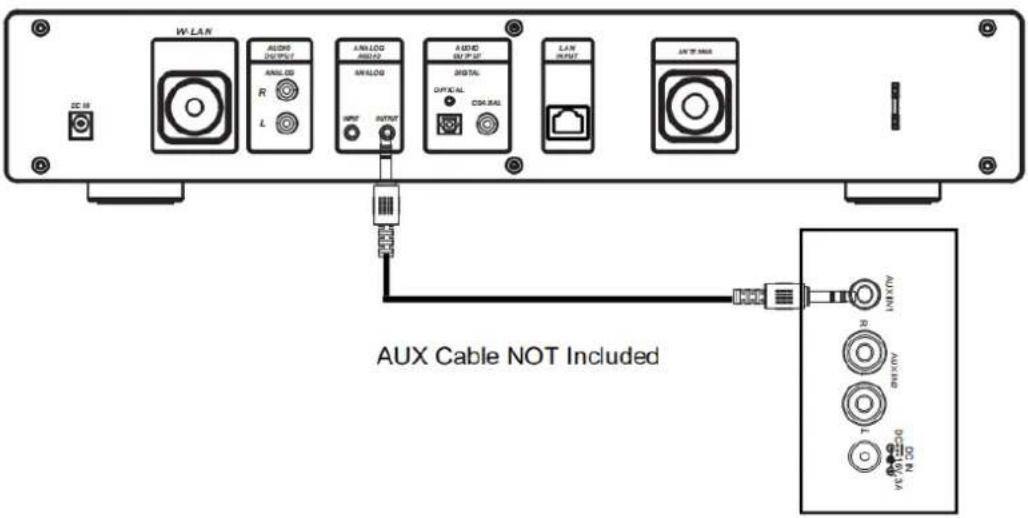
Connect the 3.5mm AUX OUT cable as illustrated below.
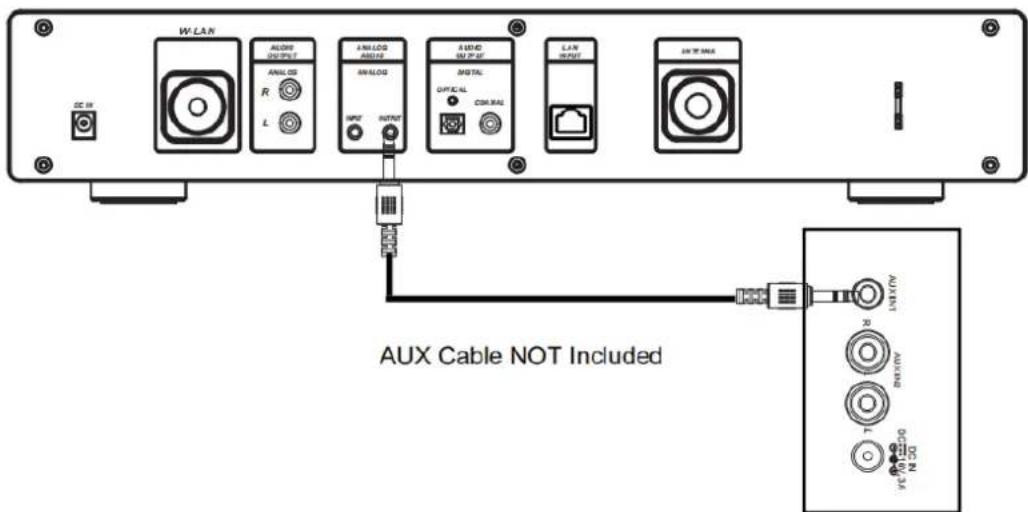
Rear View of the TV Soundbar, Tower Speaker, Mini Speaker etc.
DIGITAL AUDIO OUTPUT CONNECTIONS
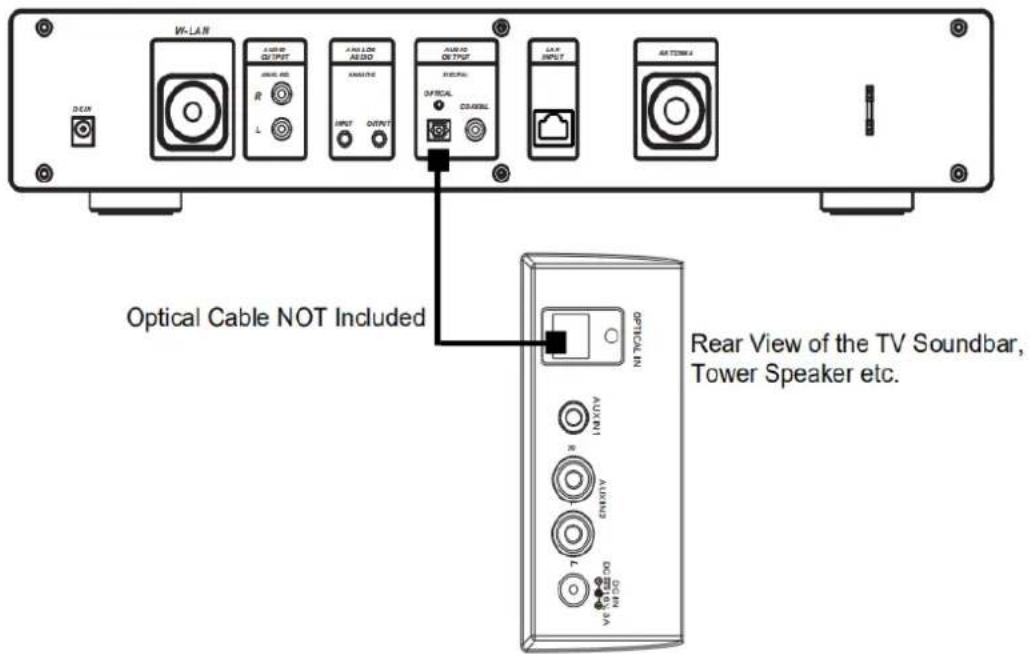
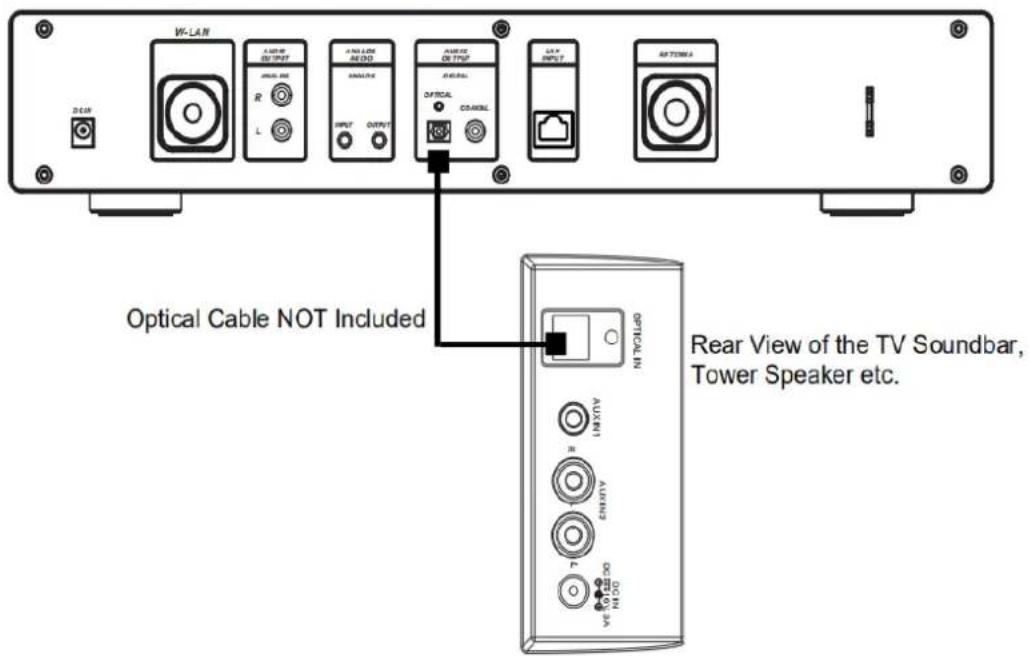
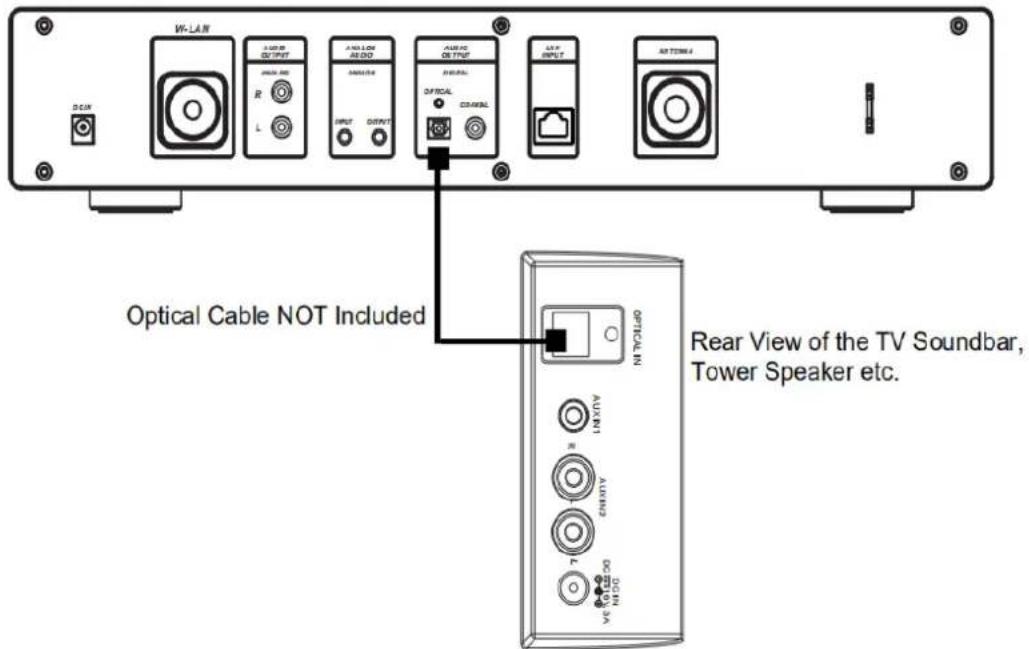
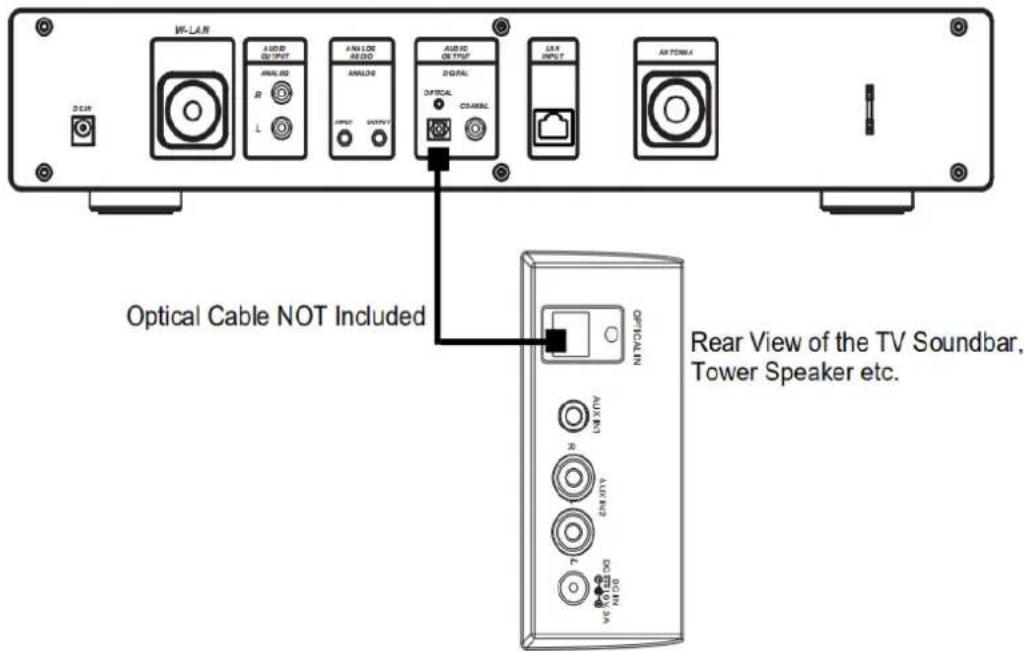
Connect the Optical cable as illustrated below.
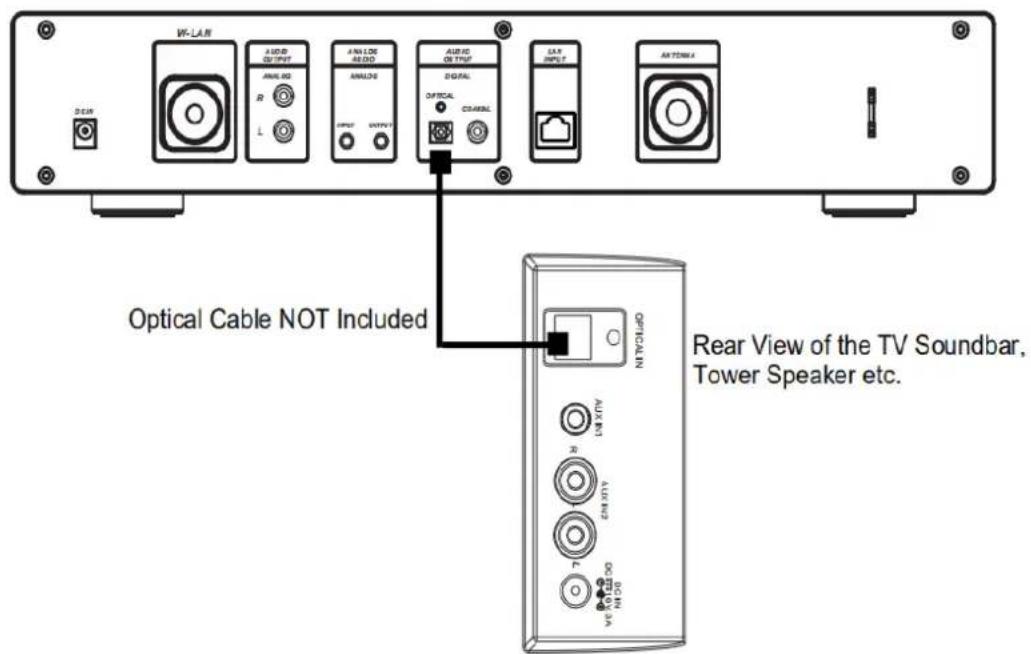
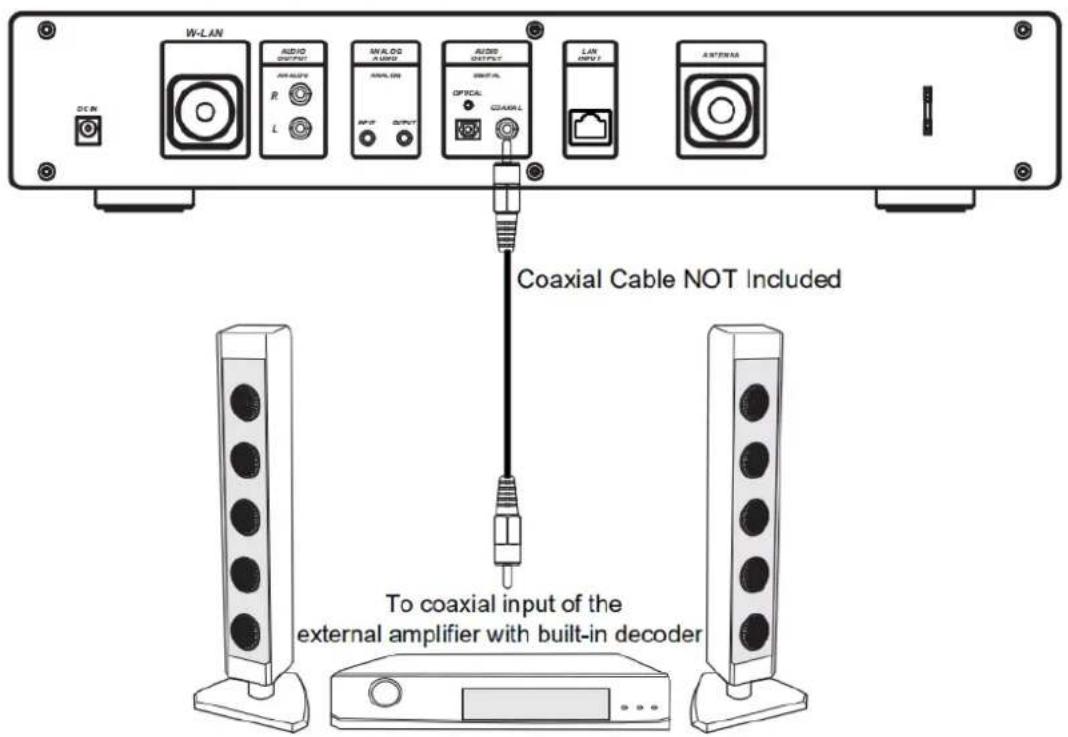
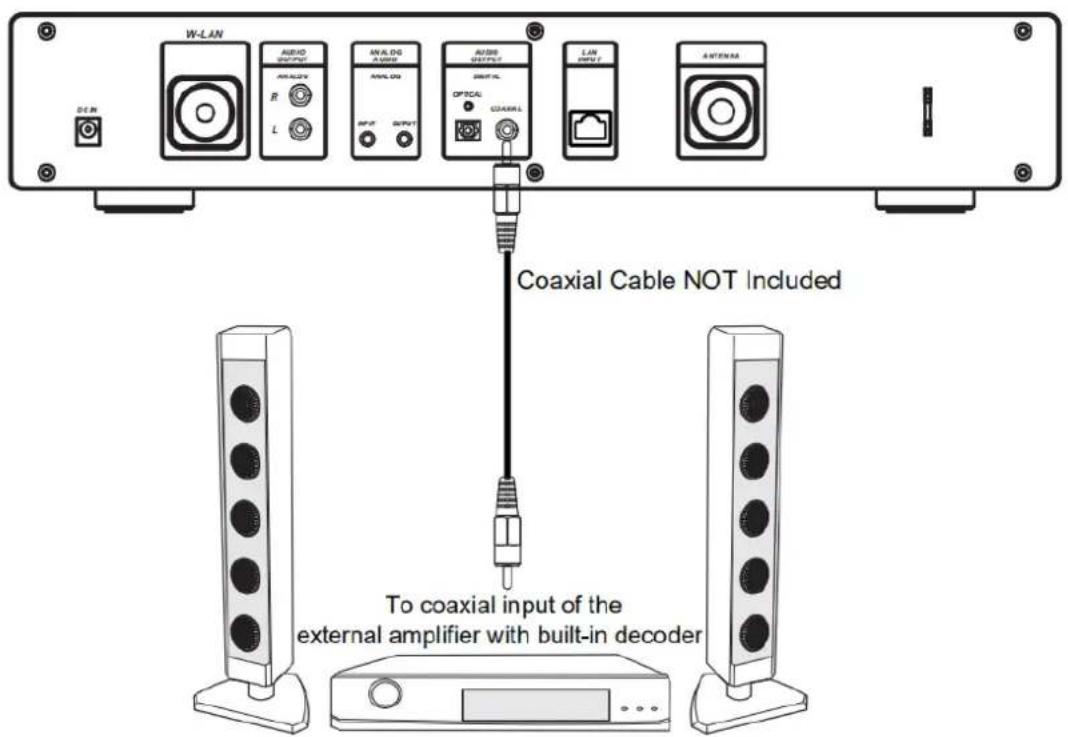
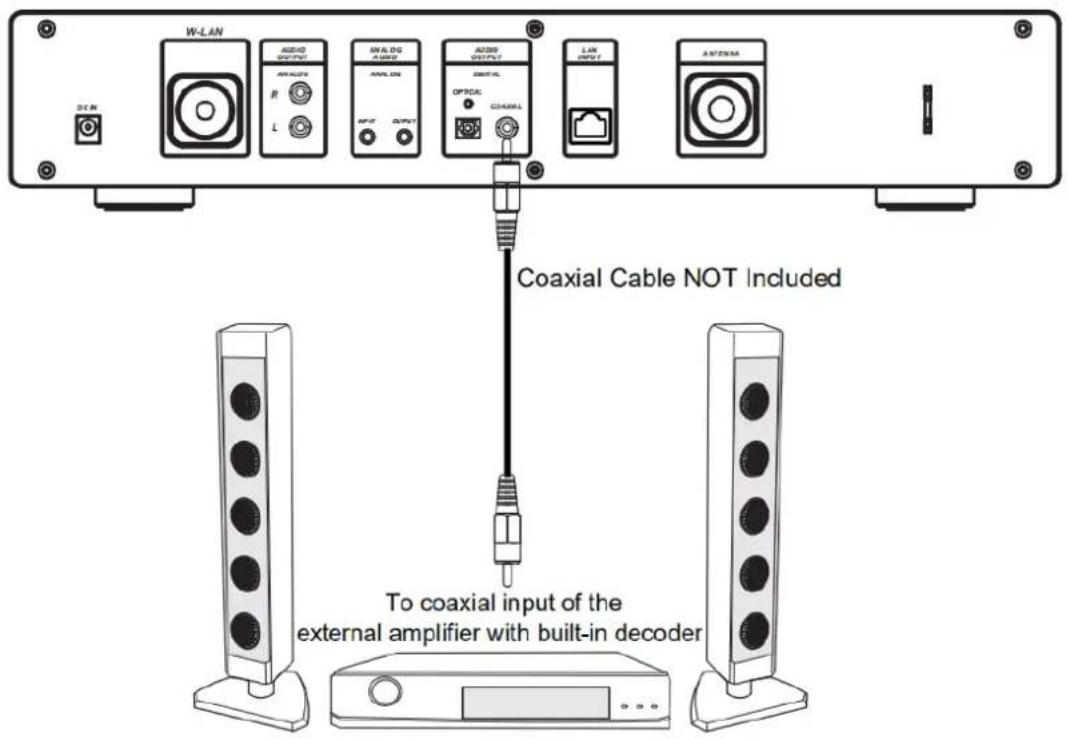
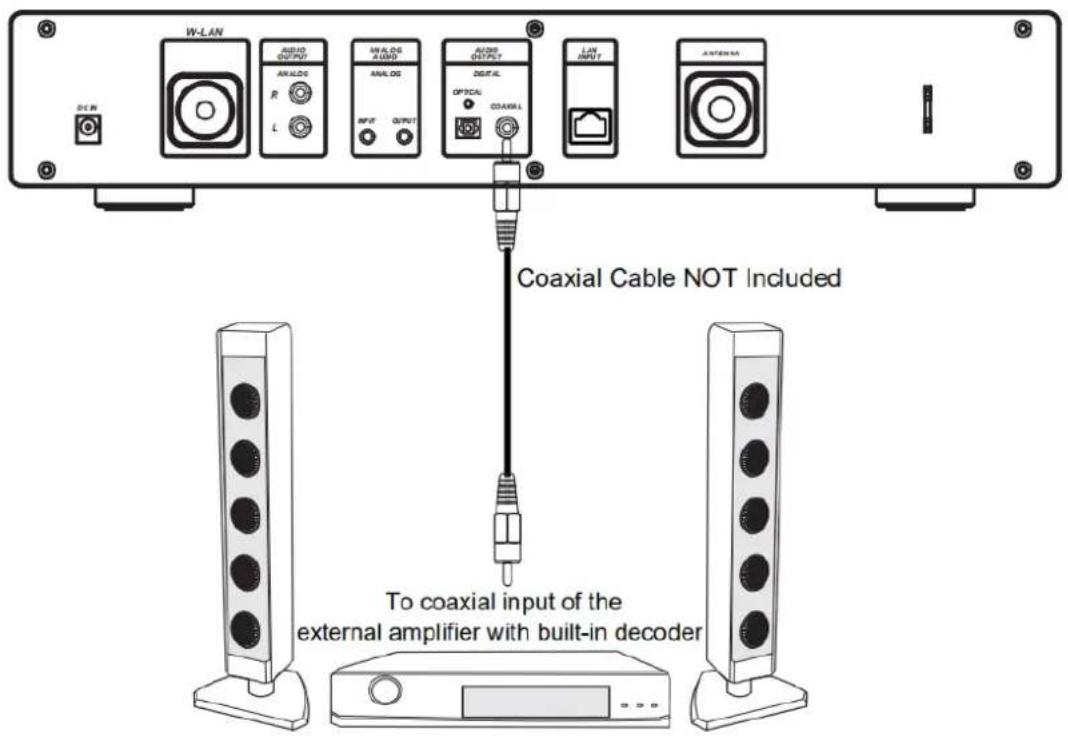
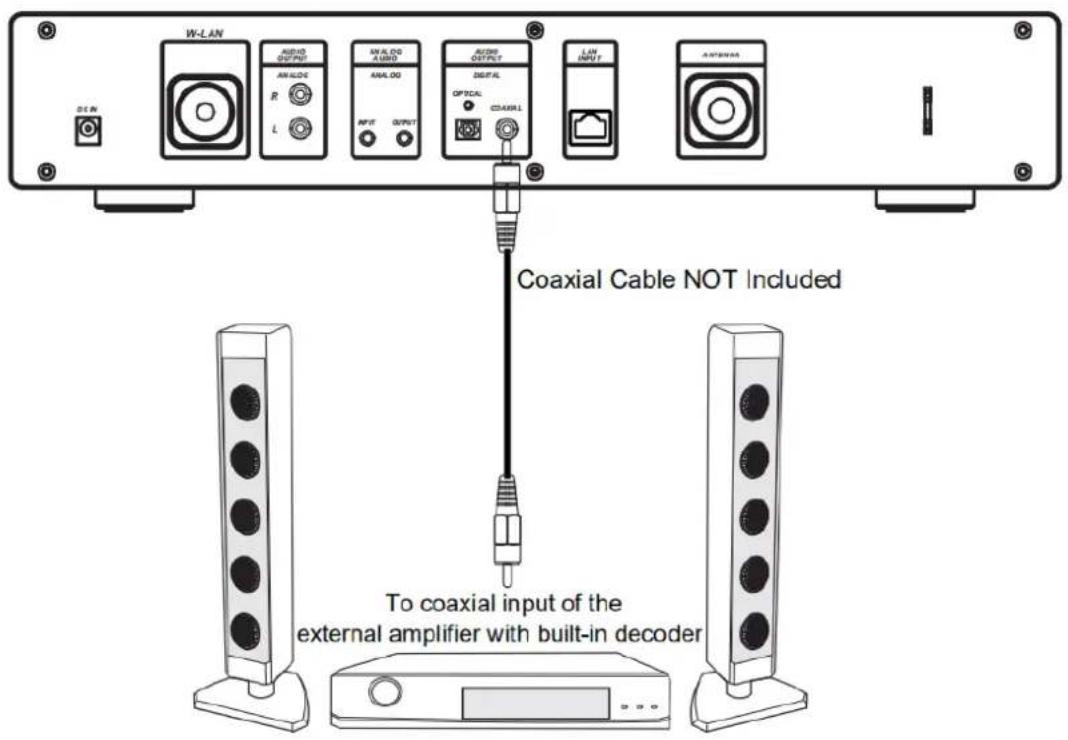
Connect the Coaxial cable as illustrated below.
1 Requirements for using the DIR-250
1.1 Network Requirements
Before using the DIR-250, the following requirements are needed:
- A broadband connection in combination with a wired/wireless access point, router or similar network device.
● The Wifi network router needs to support WIFI (802.11 b/g/n) wireless connection.
● A smart phone, tablet or pc which is on the same network as the DIR-250
Display symbols

establishing Connection

No wireless connection

Wireless connection established

Wired connection established

No wired connection

VHF radio reception: Mono

VHF radio reception: Stereo

VHF radio function selected

AUX function selected

Speaker off

Search

Alarm on

Internet radio station saved as Fav.

FM radio station saved
2 Getting started
2.1 Get the network ready
- For wireless W-LAN network connection: Check if WLAN LINK/ACT light of the wired/wireless access point or router is illuminated. Consult the user guide of that for any questions.
Note: WiFi allows data transfer over short distances within 20 meters without the need of cabling between the devices. Walls and ceilings may reduce WIFI range.
Therefore try to locate the DIR-250 and/or the access point within the distance above and avoid any obstacles between two devices.
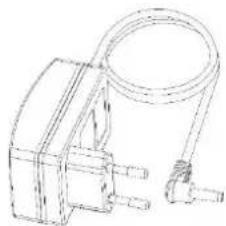
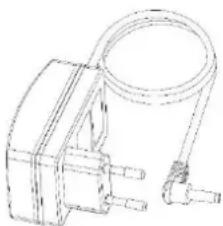
- Connect the power adaptor to the mains and plug the DC plug the adaptor into the DC-IN socket of the DIR-250
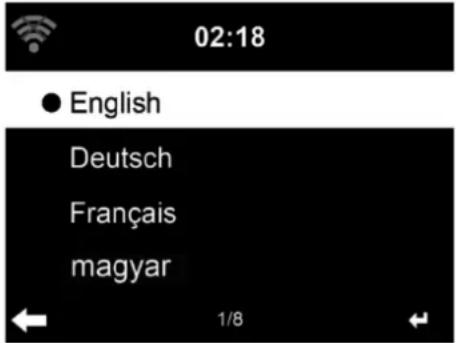
• On first use the DIR-250 will start with the installation wizard. The system will ask you to:
1 set Language and Network Configurations (fig 1.) (use the navigation knob(3) to select)
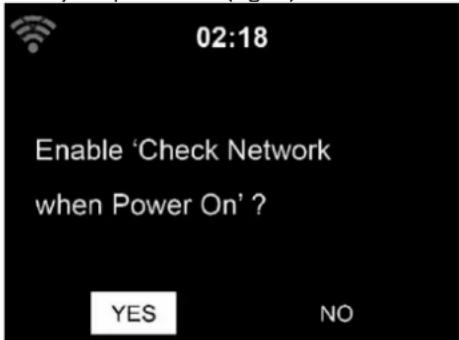
2 Check network availability on power on (fig 2.)
3 Configure the wifi network (fig 3.)
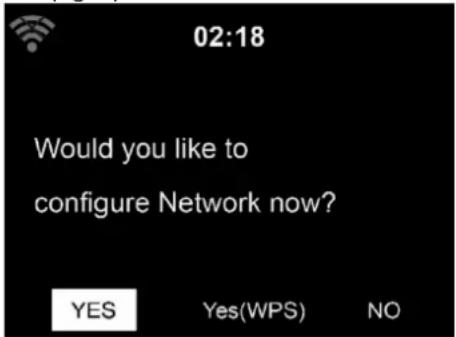
• Select Yes to establish connection to a network
- if you Select Yes(WPS)(Only for WPS routers) and then press the WPS button on your router.
If you answer 'Yes', the display goes to scanning for Wireless Network and a list of available wireless networks will appear.
NOTE: Only 2.4 Ghz networks are supported
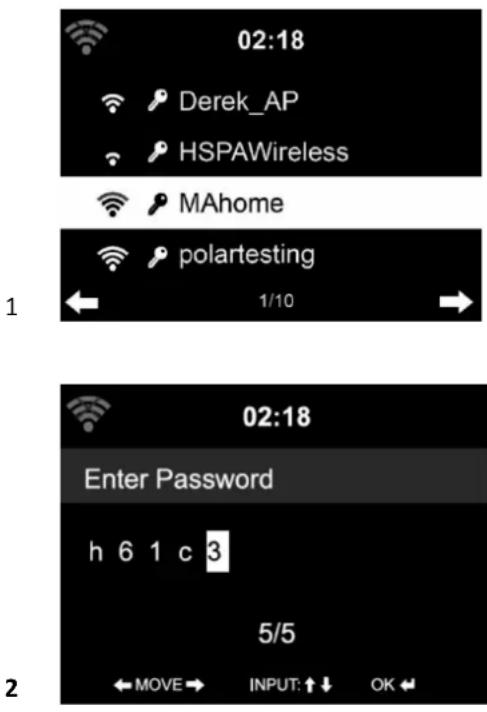
The number of bars in the wireless symbol in front the network name (SSID) indicate the signal strength of the network. The key symbol indicates that the network is password-protected.
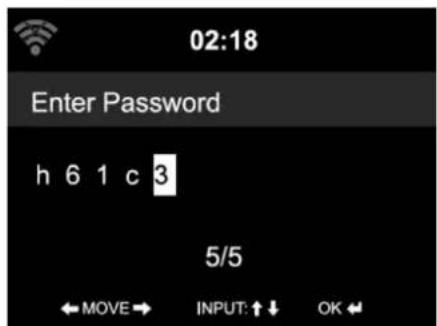
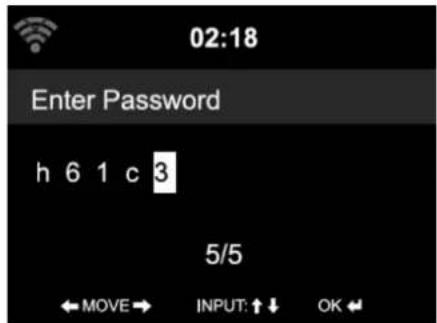
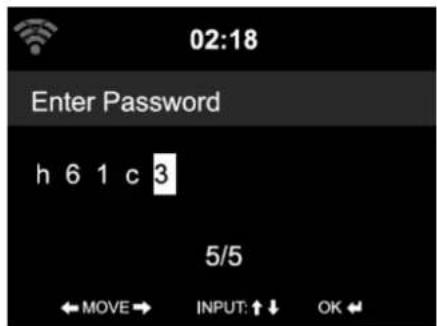
If the device does not find any wireless networks, a 'no wireless Networks found' appears on the display. Change your location and if necessary and check your WLAN router. You can find the SSID of your Access Point in the configuration of the Access Point (Router). Select your network and confirm with OK, If your WLAN is password-protected, you will be prompted to enter the wifi password.
Enter the password using the navigation control buttons on the device or remote control.
You can rotate the UP/DOWN knob to input the wifi password. if it is accidentally pressed
'▶' to move a redundant entry, press '◀' to correct.
With remote control
The cursor indicates the current entry space.
Press the corresponding number button repeatedly.
0 0(delete entry)
1 1(space) @" # \$ % & () * ' + - { \ | } < >?......
2 2 ABC abc
3 3DEFdef
4 4G H I g h i
5 5JKLjkl
6 6MNOmno
7 7PQRSpqrs
8 8TUVtuv
9 9WXYZwxyz
buttons:
Go to previous entry space, entry can be overwritten
▶Go to next entry space, the last entry is saved
' ▲▼ Select number/letter
Input via front panel
Rotate the UP/DOWN navigation knob(3) to input numbers/letters.
Once you are on the letter you want, press to move to the next entry.
When you are finnished, press OK to confirm. You may press ◀ to move to a previous character entry.
'OK' Confirm entire entry
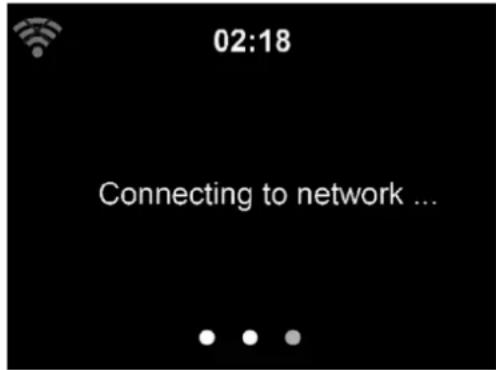
It may take a few seconds to establish the network connection.
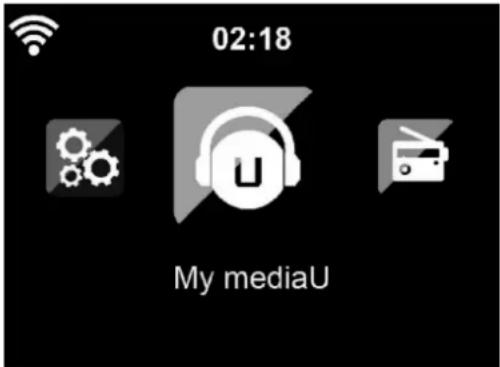
Once the connection is established, the main menu appears with the following menu items:
- Internet Radio: Access to worldwide radio stations
- Media Centre: Access to your UPnP devices via software with streaming capability.
- FM: Enter the FM radio mode
-
DAB/DAB+: Enter the DAB radio mode
-
Information Center: Access to weather, financial and system information, App
- AUX: Access to AUX mode
- Bluetooth: Enter the Bluetooth mode
- Configuration: Various system settings
- Local Radio: Access to radio stations in a particular region (e.g. only German stations)
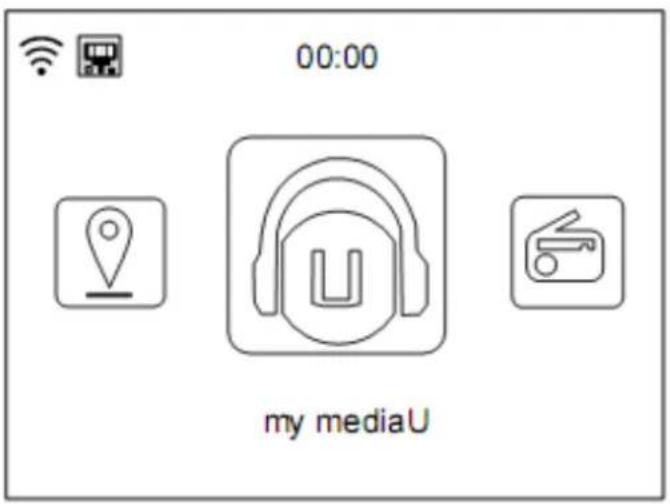
- My media U: Access to an online media library. This menu item only appears if the function has already been enabled in the configuration menu -> Manage my media U.
- Press the button to enter the standby mode. The time, date and any active Alarm time is shown on the screen.
![3/3/2018 Sat 12 9 3 6 [06:30] [08:00]](/content/2026/05/760506/images/b13c9bcdeac9c74a4d3337d6638f2a97fb6e9756e22e76b70415e731845ad939.jpg)
- If you configured a network connection, it will automatically connect to it when the DIR-250 is turned on again. If you need to change the network, go to the configuration -> network menu to change the connection.
3 About Music Streaming
You can stream music to the DIR-250 with DLNA. DLNA is an industry-wide standard for sharing data over a home network. Depending on the DLNA-compatible devices you own. With DLNA you are able to stream mp3 music stored from your laptop/NAS or other DLNA compatible device to play on the DIR-250.
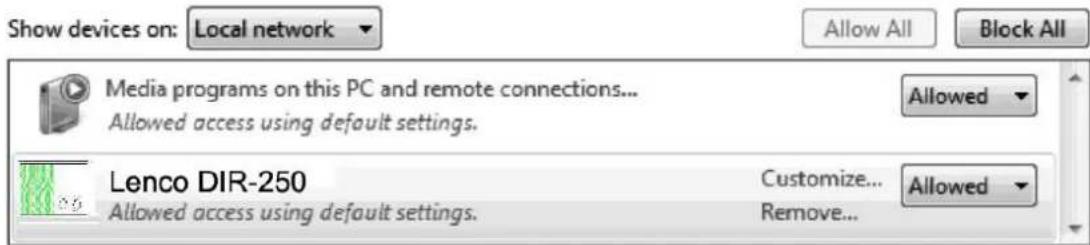
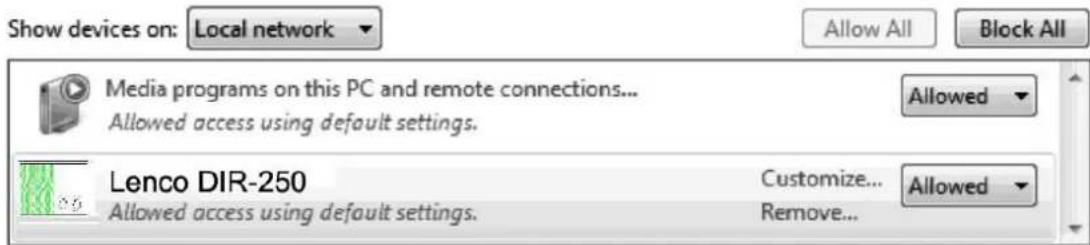
Lenco DIR-250 is the default device name on DLNA but you may rename it as you like. (See section 5.3)
The information below is the introduction of how to setup up media steaming from PC or other media server. Use the instruction manual of the software or hardware device you want to use.
Make sure the music files are in on of the following formats: MP3, WMA, WAV or AAC.
Refer to section 5.7 for the details of the control on DIR-250 for music steaming playback.
3.1 UPnP
• To enjoy the streaming music form PC, the following steps are to be done on the PC:
- Connect the PC to the network.
- Ensure the DIR-250 is powered on and connected to the same network.
- Open the UPnP platform Windows Media Player (11 or later).
Alternatively, other platforms or server such as Windows Media Connection may be used.
Below set up example is under windows XP and Windows Media player 11 version.
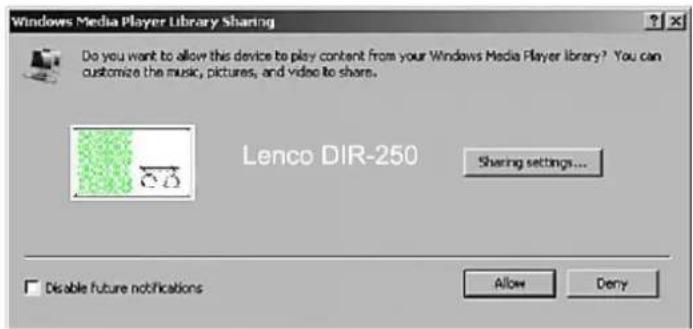
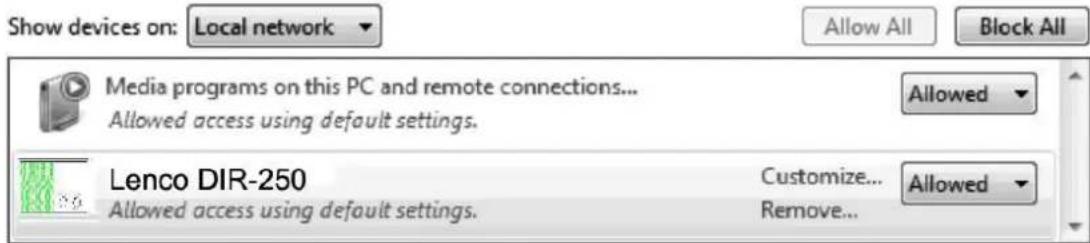
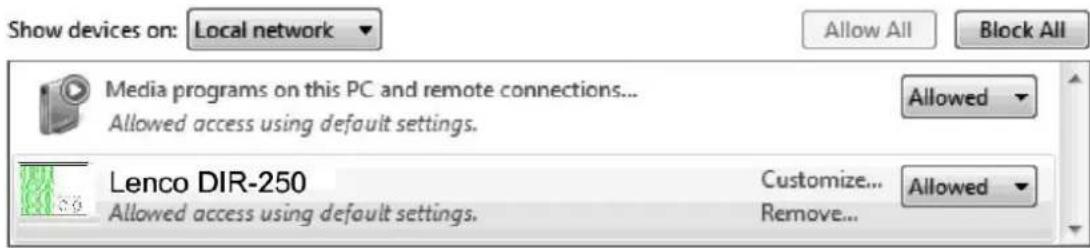
Allow to share your media to Lenco DIR-250
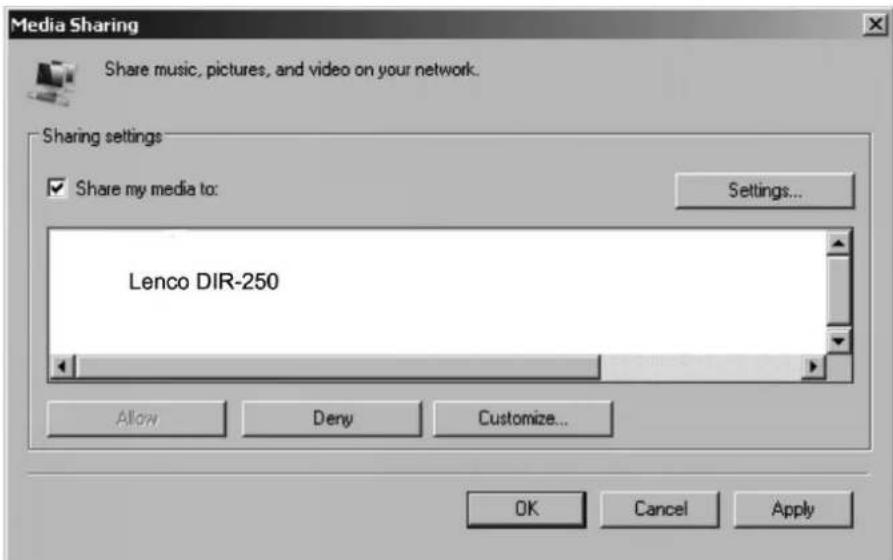
Add the audio files and folders you want to share with Lenco DIR-250 to the media library.
You may also enjoy the streaming music form other music server. Such as smart phone (Android platform):
- Connect the mobile to the network
- Search and install media sharing apps from Google Play.
- Add the audio files form your mobile you want to share.
• After setup the shared server, choose the music and control playback on the DIR-250. (See section 5.7)
4 DLNA Function
- Besides UPnP, DIR-250 supports DLNA function, you share the music files from PC or Android mobile, and you use your PC, Android mobile or iPhone/iPad to control music playback on
the DIR-250. (It is not required to control each playback on the DIR-250)
- The PC system requirement for DLNA is Windows 7 and Windows Media Player 12. Setup as below:
Firstly, share the media on your PC to DIR-250.
Control Panel > Network and Internet) Network and sharing COK > Media streaming options
Choose media streaming options for computers and devices

Name your media library:
My PC
Choose default settings...
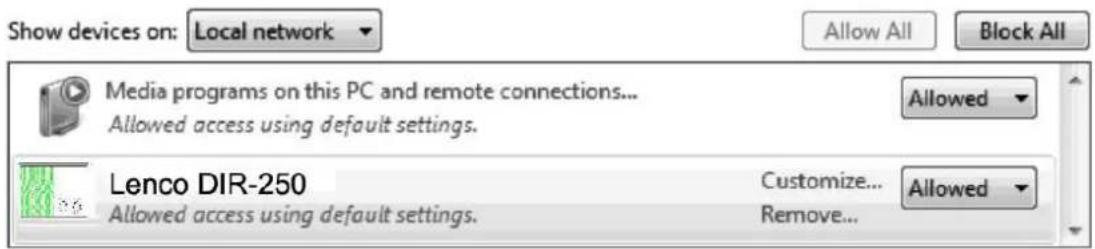
All devices are allowed to access your shared media.
Choose homegroup and sharing options
Choose power options
Tell me more about media streaming
Read the privacy statement online
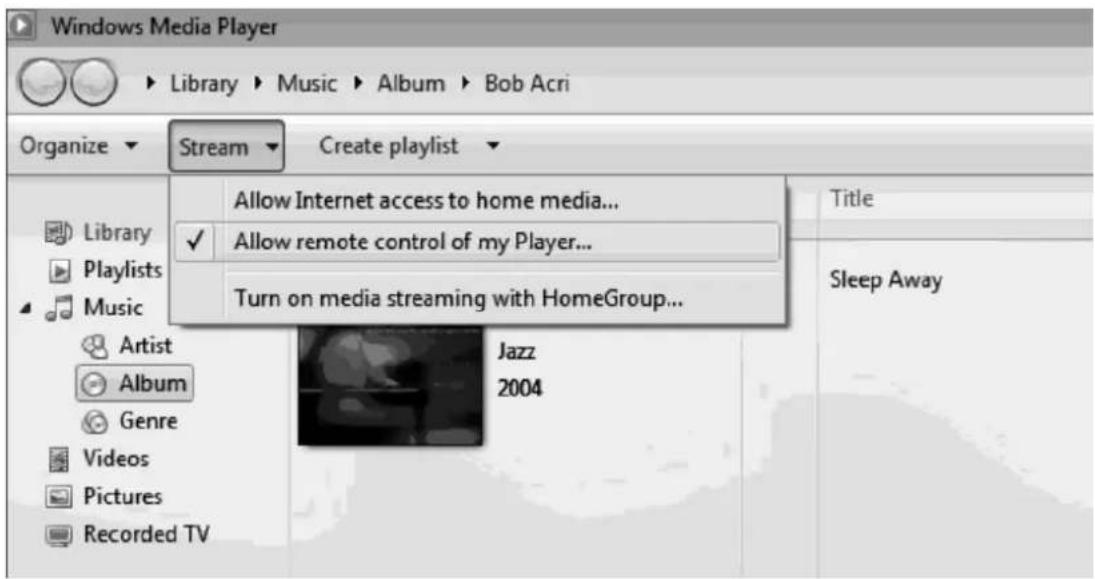
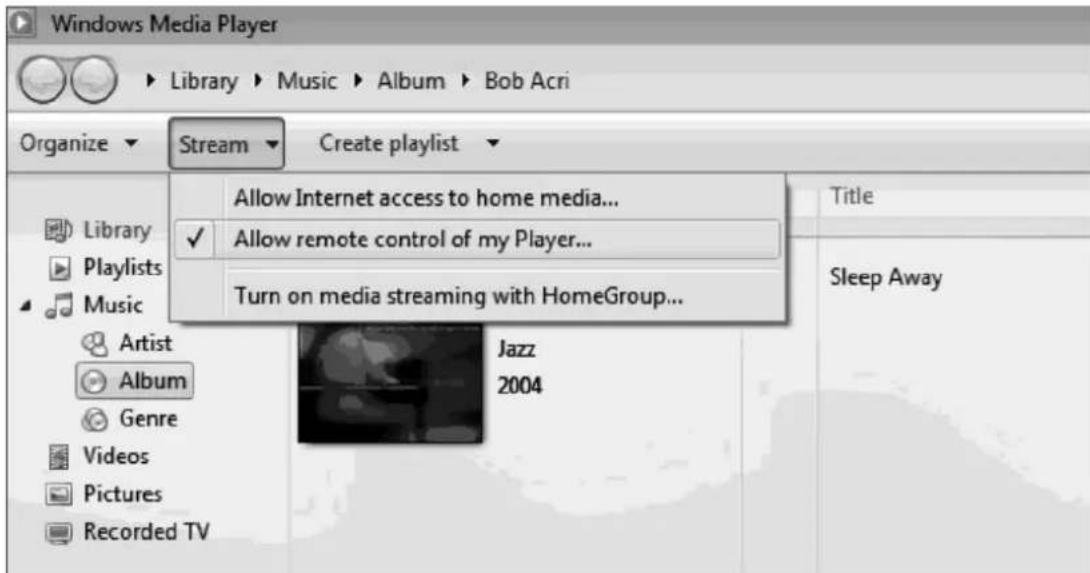
Open Windows Media Player to enable allow remote control of tried player.
Right click any music in the library and choose Play to Lenco DIR-250.
![Windows Media Player Library > Playlists > test Organize Stream Create playlist Title Length Rating 1 All Out of Love 4:06 Play all All-4- Play test Play next Play to Music Internet Radio NAP... Add to Artist Album Genre Videos Pictures Recorded TV Other media Properties Find in library iMediaShare [samsung] QuartetII-16:08:45 Edit Rate Find album info Remove from list Move up Move down](/content/2026/05/760506/images/962ba6191cfc73a4179fb7e4578a8d9717b0e130d1a54c415a7dc6533ec09f79.jpg)
There will be a window for controlling music playback on Lenco DIR-250.
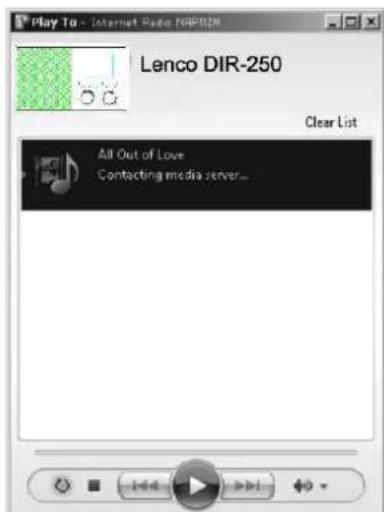
You may search and install any free or commercial DLNA apps from Google Play or Apple Store if you are using Android mobile, tablet or iPhone/iPad. It is suggested to use Bubble UPnP, Media Share on Android mobile, tablet or iPhone/iPad.
Some apps may not support streaming music form iPhone/iPod but iPhone/iPod could still be used to control steaming music from other servers.
Procedures for playing shared music on the app are as follows:
Select Lenco DIR-250 as the player. Some apps may allow to play the music to multi players at the same time.
Select music server and choose the music. Some app can create a playlist if you choose several music.
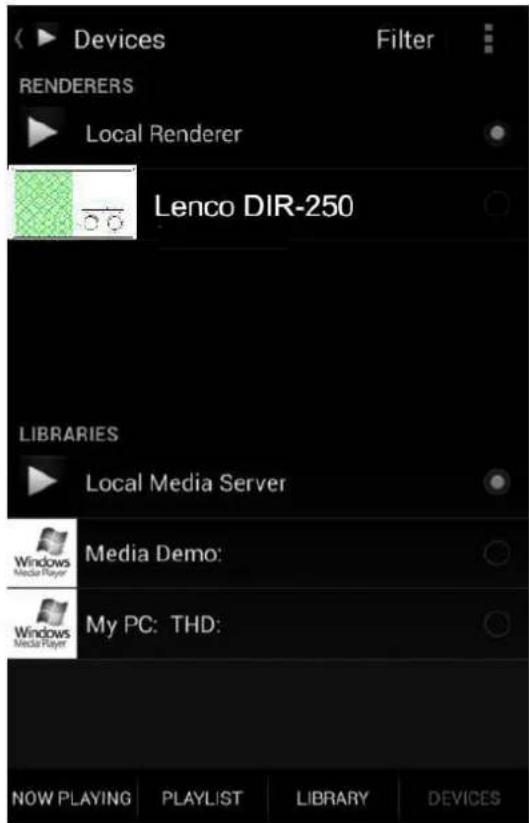
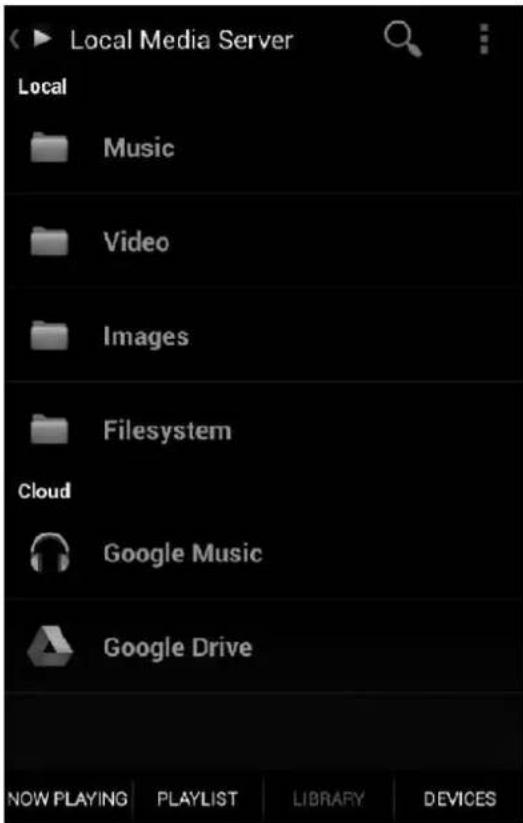
Select server and player Select music
- When using DLNA music steaming function on Music Link, you can only control the volume and standby via the unit. It is restricted to control the other functions.
- Stop DLNA on PC, mobile or tablet before you resume Music Link's own control.
5 DIR-250 Function
5.1 Overview
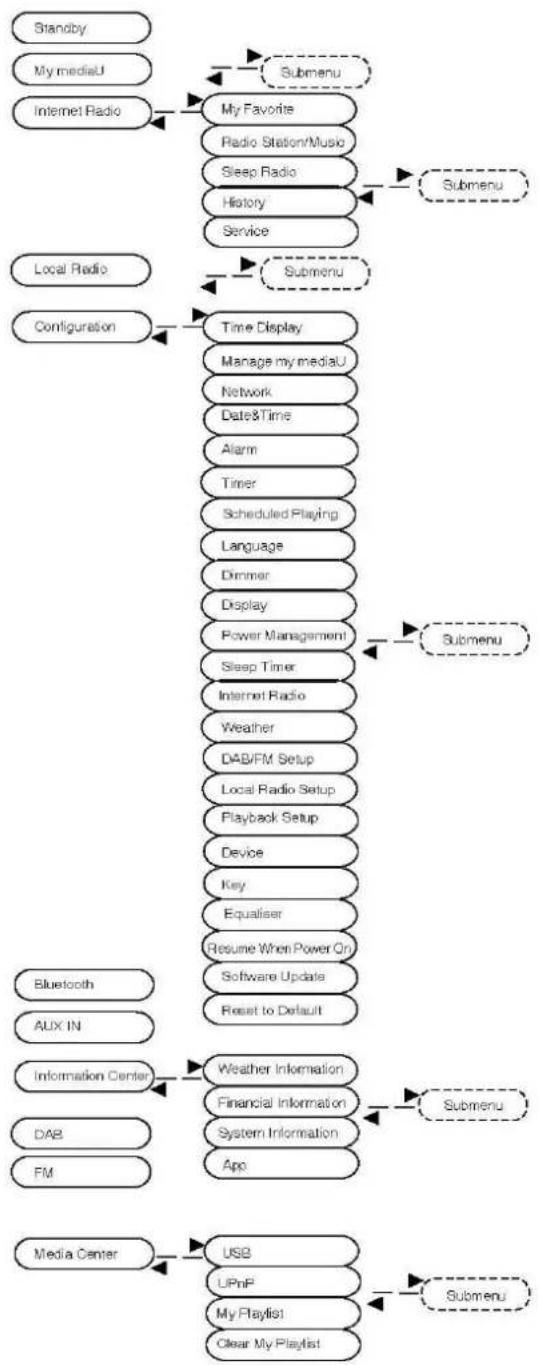
flowchart
graph TD
    A["Standby"] --> B["My mediaU"]
    B --> C["Internet Radio"]
    C --> D["Submenu"]
    D --> E["My Favorite"]
    E --> F["Radio Station/Music"]
    F --> G["Sleep Radio"]
    G --> H["History"]
    H --> I["Service"]
    I --> J["Submenu"]

    K["Local Radio"] --> L["Configuration"]
    L --> M["Time Display"]
    M --> N["Manage my mediaU"]
    N --> O["Network"]
    O --> P["Date&Time"]
    P --> Q["Alarm"]
    Q --> R["Timer"]
    R --> S["Scheduled Playing"]
    S --> T["Language"]
    T --> U["Dimmer"]
    U --> V["Display"]
    V --> W["Power Management"]
    W --> X["Sleep Timer"]
    X --> Y["Internet Radio"]
    Y --> Z["Weather"]
    Z --> AA["DAB/FM Setup"]
    AA --> AB["Local Radio Setup"]
    AB --> AC["Playback Setup"]
    AC --> AD["Device"]
    AD --> AE["Key"]
    AE --> AF["Equaliser"]
    AF --> AG["Resume When Power On"]
    AG --> AH["Software Update"]
    AH --> AI["Reset to Default"]

    AJ["Bluetooth"] --> AK["AUX IN"]
    AK --> AL["Information Center"]
    AL --> AM["Weather Information"]
    AM --> AN["Financial Information"]
    AN --> AO["System Information"]
    AO --> AP["App"]

    AQ["DA8"] --> AR["FM"]

    AS["Media Center"] --> AT["USB"]
    AT --> AU["UPnP"]
    AU --> AV["My Playlist"]
    AV --> AW["Clear My Playlist"]
    AW --> AX["Submenu"]
5.2 Main menu
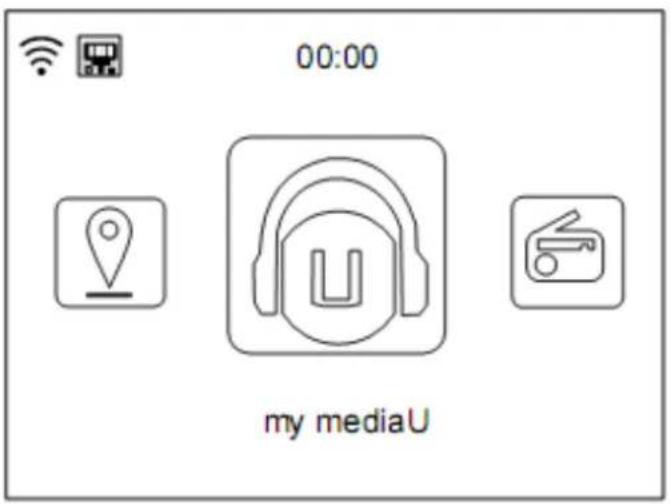
Under the main menu, you can scan the QR code to continue
5.3 Configuration
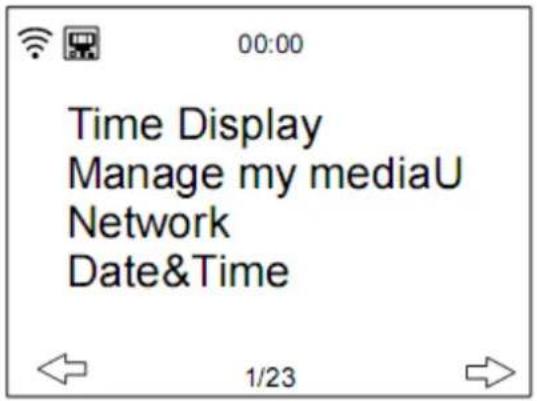
5.3.1 Time Display
Set the time display to analog or digital display.
5.3.2 Manage my mediaU
My mediaU media library – managing radio stations via Internet
In order to access your favourite radio stations worldwide, at any time and using any device with streaming capability, you can create a free account for a media library at www.mediayou.net and add as many devices as you like. You can access the service with a username and password of your choice.
natural_image
Black and white image of a device with music notes and an earphone icon (no text or symbols)Personalize Your Internet Radio
Register your radio that support 'my mediaU listen anywhere I
You must also know the MAC address of your device (called a serial number on Media You) in order to register this device under" Personalize Your Internet Radio".
You can find the MAC address of the Internet radio under Information Center > System information > Wireless Info > MAC Address.
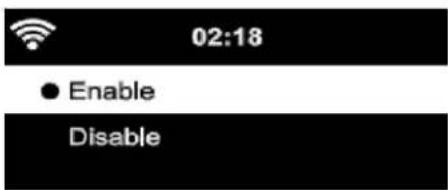
After registering the device, you must enable this function on the DIR-250 under menu Configuration > Manage my mediaU.
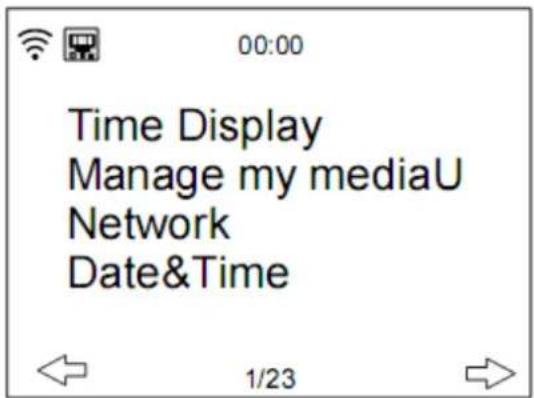
So that the Internet radio can access the media library.
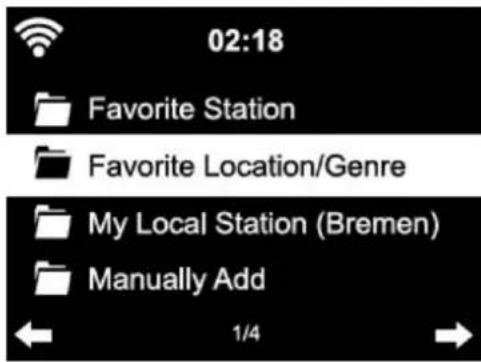
The device automatically connects to your account and displays what has been saved there:
- Favorite Station
- Favorite Location/Genre
- My Local Station
-
Manually Add
-
Depending on your personal My mediaU settings, the display on the Internet radio may look different.
- If the device has not yet been registered with MediaYou, a corresponding message appears when you wish to enable My mediaU.
- if you have registered a device with multiple accounts, these will be displayed after the activation and you can select the account you wish to use.
To manage your Media U by app you can scan the QR code with your Smartphone/tablet to show the QR code go to menu -> my media u
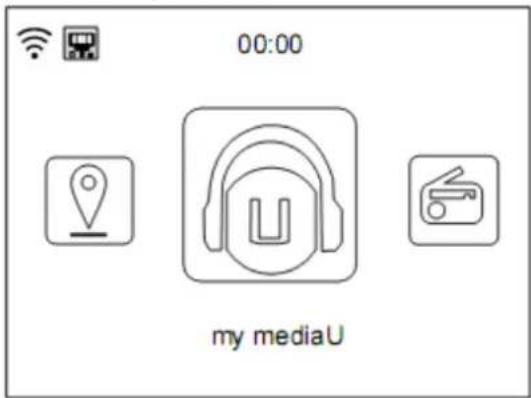
The menu Item my mediaU also appears in the main menu. You can find the selection again here:
- Favorite Station
- Favorite Location/Genre
- My Local Station
- Manually Add
You can also find this selection in the media library, where you can assign and manage the radio stations accordingly.
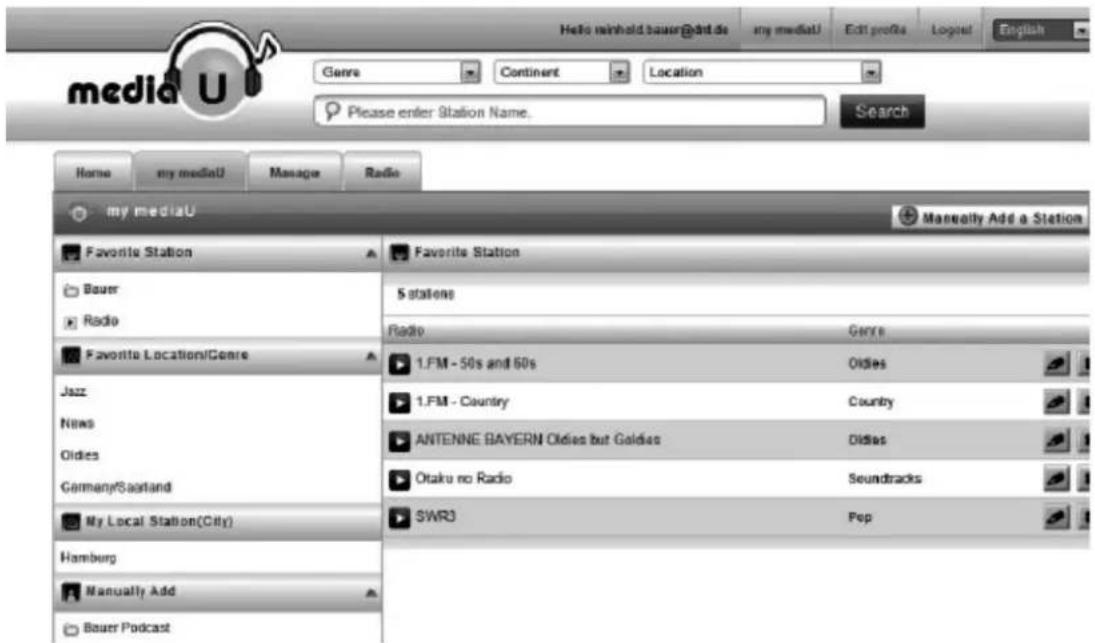
Under add manually, you can link the device to podcasts, for example.
You must know the URL of the podcast for this purpose.
- Fill in the highlighted fields in your MediaYou account under "Add Manually".
- On the Internet radio., go to Configuration > Manage my mediaU and enable once again.
- Under My mediaU>Manually Add, you can find all manually added folders and addresses and can select the podcast.
The following podcast formats are supported:
- asx
- m3u
- pls
- pure streaming with HTTP, RTSP, MMS protocol
5.3.3 Network
• Wired Network Configuration
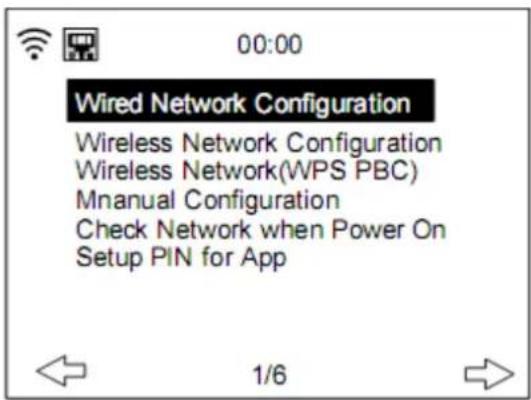
Enable/disable wired network connection
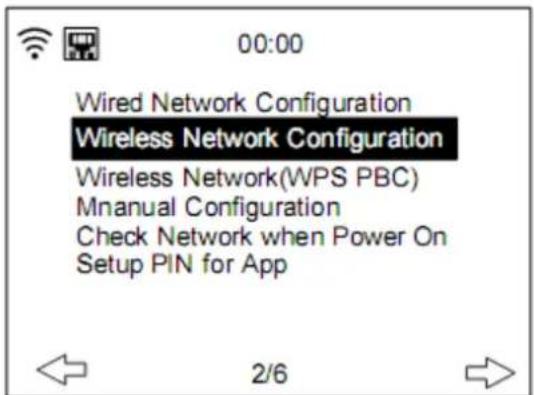
• Wireless Network Configuration
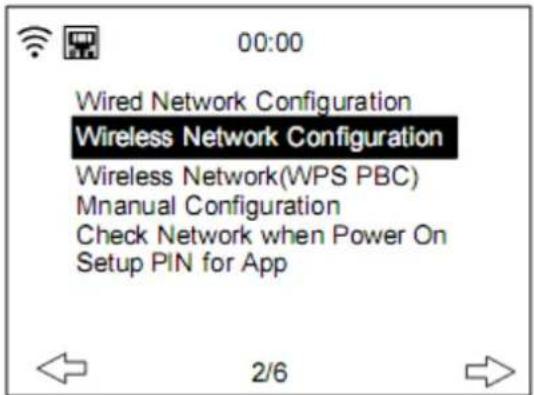
Enable/disable Wifi network. When you choose to enable the WiFi network, the system will automatically search for available Wifi networks. Select your required Wifi network. If the Wifi network is selected before, you don't have to re-enter the Wifi password.
You may refer to the section 3, Getting Started for the network setting.
• Wireless Network (WPS PBC)
If you are using a router with WPS/QSS button, you may want to set up the network connection via WPS function. Press the WPS/QSS button on your router within 120 seconds. The connection between the router and DIR-250 will then be configured automatically, so you don't have to type in the Wifi password.
02:18
Please press the
WPS button on
your router within
120 Secs.
- Manual Configuration
You can choose DHCP (which assigns the IP address automatically) or enter the IP address by yourself.
When you select manual setting for wired connection, the following to be entered:
- SSID (the name of Access Point);
- IP Address;
- Subnet Mask;
- Default Gateway;
- Preferred DNS Server;
- Alternate DNS Server.
You may choose (Manage) specific network if you have setup more than one network connection within an area.
- Check Network when Power On
Enable/disable WiFi or wired network.
When you enable the WiFi network, the system will automatically search the available AP. Select you required AP.
OK WEP or WPA code to connect the WIFI.
if the wireless network connection is not existed or failed, the icon at the top left corner will have a cross on it. When you enable the wired network, the system will make a connection check.
- Setup PIN for App
Enable or disable the PIN for App, when enabled, "237992" will prompt you.
5.3.4 Date & Time
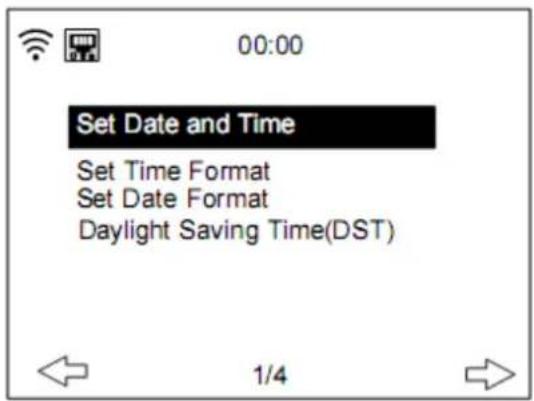
The date and time settings can only be made if the Internet radio is connected to a wireless network.
Set date and time: The internet radio takes the date and time automatically from a central server once a network connection has been established. However, you will need to change the time manually to account for the change from winter time to summer time.
Set time format display as 12 Hour or 24 Hour,
Set date format in the positions of YYYY (year), MM (month) and DD (day)-YYYY/MM/DD, DD/MM/YYYY or MM/DD/YYYY.
Turn on/off the Daylight Saving Time (DST).
Confirm with OK button on remote control or by pressing OK knob on the unit.
With a wireless network connected, GMT (+01:00) time is a time reference of time setting.
Add or deduce the hour according to your time zone when you set the time.
5.3.5 Alarm
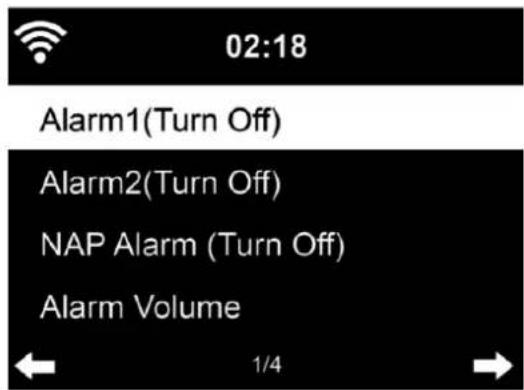
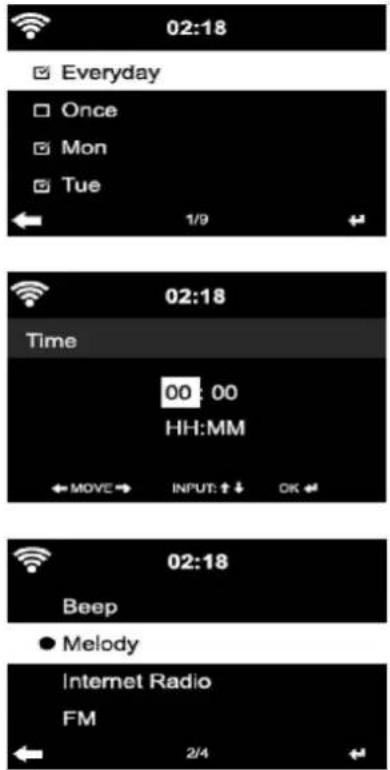
There are three independent alarms – 2 alarms of absolute time setting (Alarm 1 and Alarm 2) and 1 alarm for relative time setting (NAP Alarm).
Select Alarm in the configuration menu or press the alarm button (12) on the front panel.
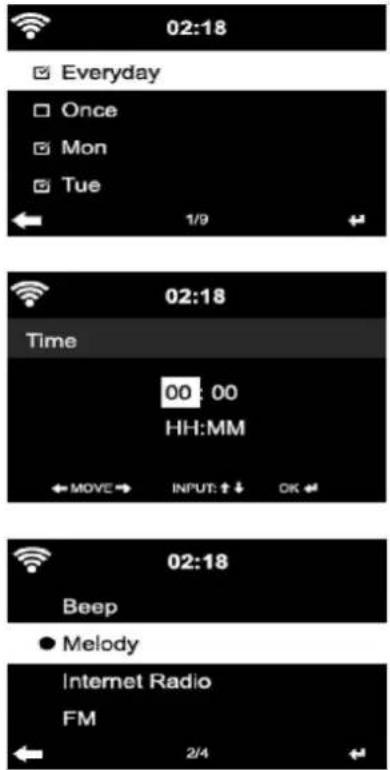
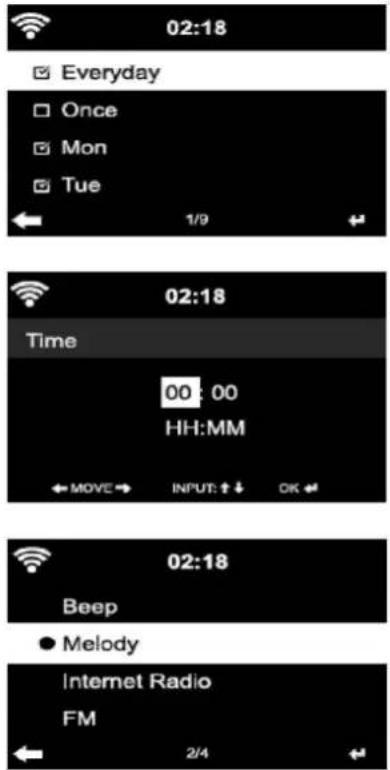
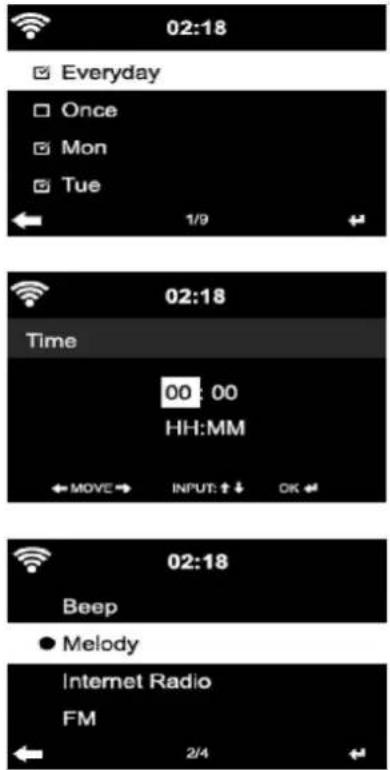
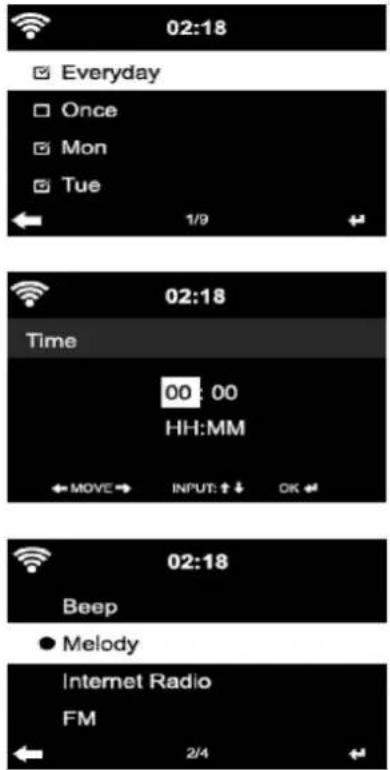
The first two alarms (Alarm 1 and 2): turn on alarm 1 or 2, then set the time and set it for Everyday, Once or every specific day of week.
Then Select the (Alarm) time and set the respective values using the Navigate/OK knob on the device or using the button of remote control and switch to the next entry field using the Confirm or by pressing the ok button on the remote or the Navigate/OK knob on the front panel.
Now choose 'Sound': to set the (alarm) sound to Beep, Melody or Internet Radio/FM/DAB DAB+/USB.
An alarm symbol 📋ll appear on the top of the display next to the time indicating that the alarm is active
Note: if you choose the (alarm) sound Internet Radio/FM/DAB. You have to select a previously stored 'Favorite' preset.
When the alarm source is set to internet Radio, the unit first has to connect to the internet. Therefore there may be some delay. If no network is connected in one minute, the alarm will automatically change to melody.
5.3.6 NAP Alarm:
Let's you do a little nap.
You can set, it for 5/10/20/30/60/90 or 120 minutes.
Now you can choose Alarm Volume to configure the volume of the alarms.
When the alarm(s) is/are set, there will be a clock icon with alarm time at the top of the display.
During alarm, press ⏻ button to stop the alarm, Press the SLEEP button on the device or press the button on the remote to enter the snooze mode. It will alarm again in 5 minutes.
Note that your external amplifier has to be active for the alarm(s) to be heard!
5.3.7 Scheduled Playing
Schedule your playing by setting the repeat mode (Everyday, once, Mon, Tue, Wed, Thu, Fri, Sat, Sun), time (00:00 HH:MM) and Sound from(Internet Radio, FM, DAB/DAB+).
5.3.8 Language
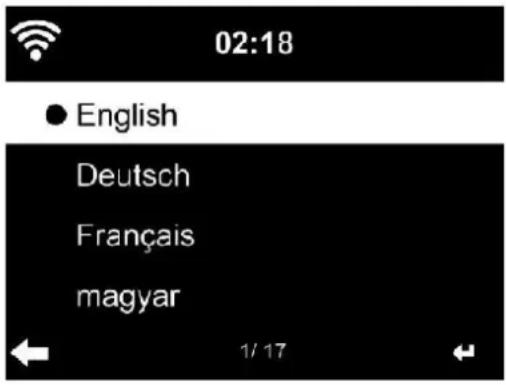
Select the OSD language:
English/German/French/Hungarian/Czech/Slovakian/Polish/Turkish etc, (in total 17 language are available)
5.3.9 Dimmer
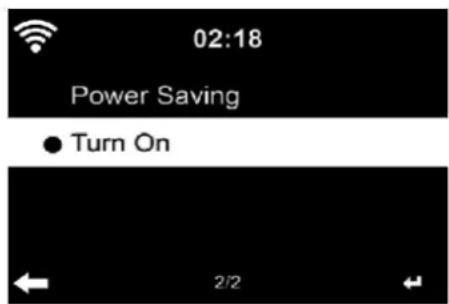
Configure the brightness of the display backlight
Select "Power Saving" to set the backlight brightness for the standby mode and select "Turn On" to set the brightness for operation mode.
5.3.10 Display
Set the display to Color display or Monochrome display.
5.3.11 Power Management
Here you can choose what time must exceed to switch to standby automatically.
Choose the power management timer (5/15/30mins).
The unit will automatically turn to standby when you are not using it. (not playing any music)
Choose "Turn Off" to ignore the power management function.
5.3.12 Sleep Timer
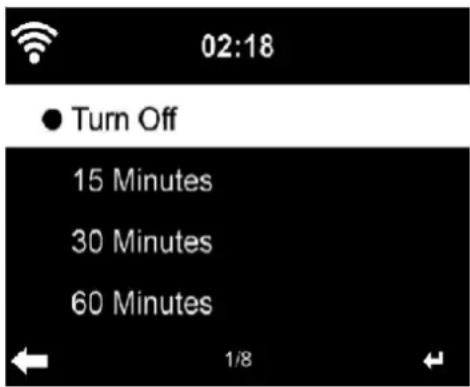
The Sleptimer can be used to fall asleep with your favorite music.
To use the sleeptimer, turn on the unit choose your favorite input source and press the 'zzz' button on the remote control or select 'sleep timer' from the configuration menu to set the duration time to 15/30/60/90/120/150/180 minutes. Once the time is set, there will be a bed icon with remaining minutes at the top right corner.
The DIR-250 will switch to standby when the configured time is expired.
5.3.13 Internet Radio
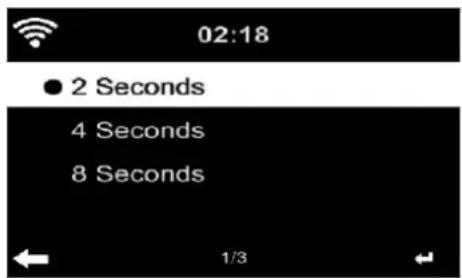
Buffer
Configure the buffer time of the music playback, 2/4/8 seconds
Sound quality.
Set the Sound Quality to High or Low.
5.3.14 Weather
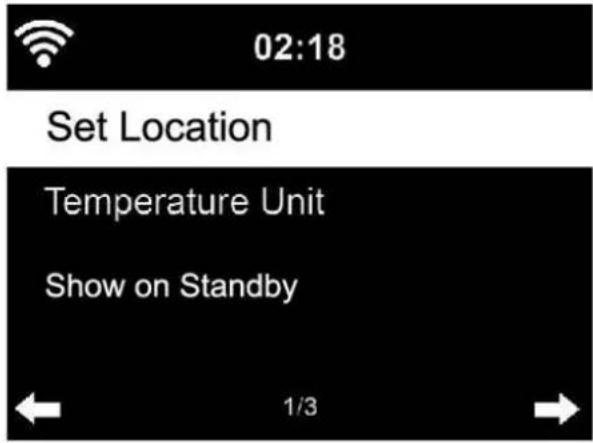
Set the Location for accuracy of weather information.
DIR-250 is able to display the current weather information in standby mode. Turn on Standby Display and set Temperature Unit (°C or °F) to get the weather displayed at the standby mode.
When it is turned on, the current time and the current weather will display in alternative 10 seconds.
5.3.15 DAB/FM Setup
FM Mode: Set to Mono or Stereo
FM Threshold: Seek Threshold by strong, default or weak mode. Stereo threshold by strong, default or weak mode.
DAB Threshold: Set to strong, default or weak mode.
Service following (FM-IR): Enable it to one of 7 continents or disable it.
Service following (DAB-IR): Enable it to one of 7 continents or disable it.
5.3.16 Local Radio Setup
Set location by Auto Detect (Country), Manual Setup (Country), Manual Setup (State)
Manual Setup (City), Manual Setup (US Zip Code)
5.3.17 Playback Setup
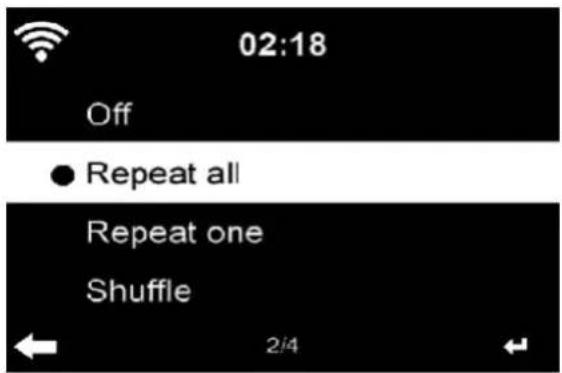
Select the playback mode of media Center – Off (no repeat or shuffle), Repeat all, Repeat one, or Shuffle.
5.3.18 Device
Enter to rename the unit or use the "App" option to display the QR code for app download.
5.3.19 Key
In this section, the following keys can be customized by the mode button on the unit or the remote control.
When the setting set to one of following keys, press mode button on the unit to realize their same function.
- Alarm (For example, when Alarm key set, press the Mode button to realize Alarm key function)
Dimmer
Equaliser
Local Radio
Mode
Preset
Sleep Timer
Timer
5.3.20 Equalizer
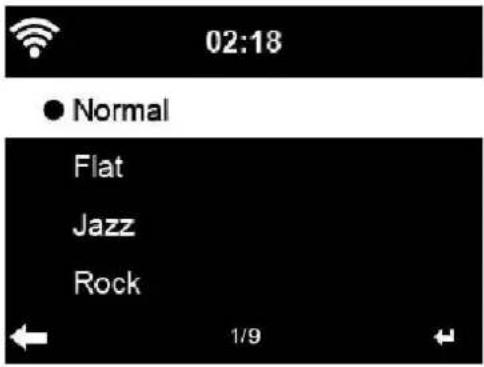
Default equalizer Setting is Normal.
Possible settings are: Normal, Flat, Jazz, Rock, Soundtracks, Classical, Pop, News or my EQ.
Press EQ button on the remote control to switch between the different EQ settings
5.3.21 Resume When Power On
The system is default to resume the main menu when switching on the unit. If turn this setting on, the system will remain in the internet radio playback. If you were listening to internet radio or media Center before switch off the unit.
5.3.22 Software Update
Update software. If there is an updated software version on the server, the system will notify you when you return to the main menu.
5.3.23 Reset to Default
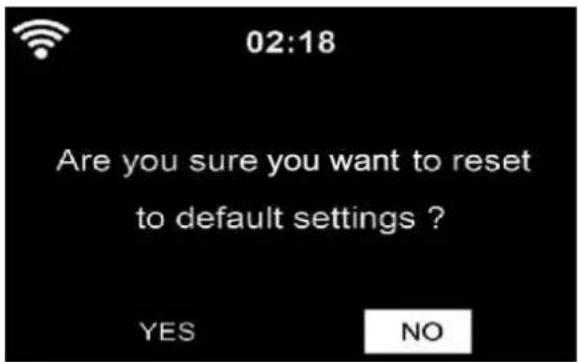
Restore to the default settings.
After the DIR-250 has been reset, the system will change to the Language setting menu and it will automatically turn to Network settings menu.
5.4 My MediaU
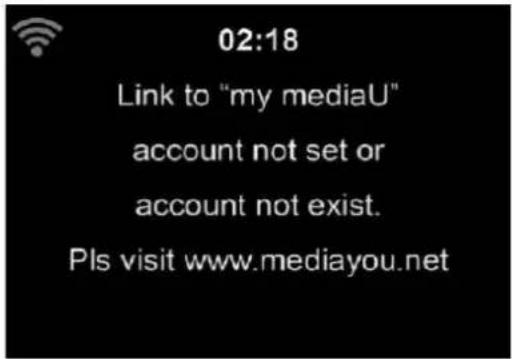
Display and playback your own mediaU station list from the mediaU server., but you have to setup your account first (see the section 5.3.2).
5.5 Internet Radio
After the connection of any station is succeeded, the information of the station will show on the screen.
5.5.1 Favorites
List of your favorite stations. It supports favorite entries including station and folder.
To save your favorite music station as favorite, press and hold the Fav. Button on the remote or front panel to save the station as my favorite. You may replace the previous saved station to the new one. The symbol appears in the top line of the display while the device is saving. Or press and hold the shortcut Fav. Key on the device to save the station. If the Selected station have been saved, you cannot save it again.
The saved stations are showed under this menu. You may also press Fav. button to enter the saved station list.
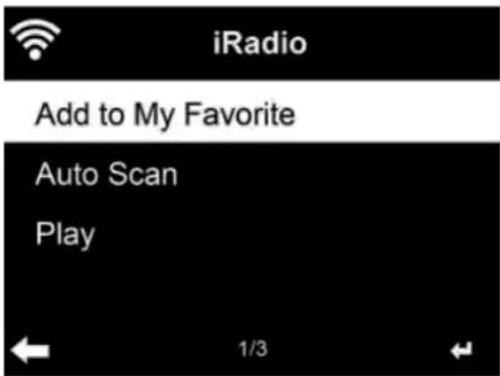
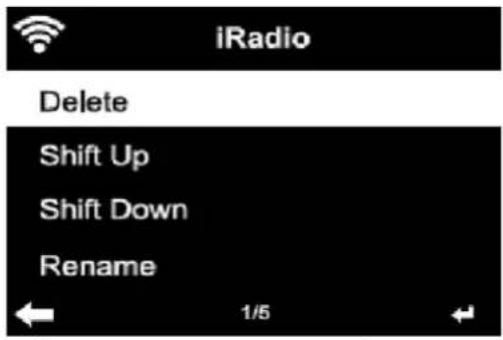
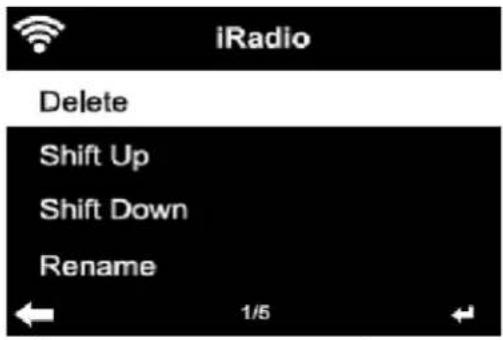
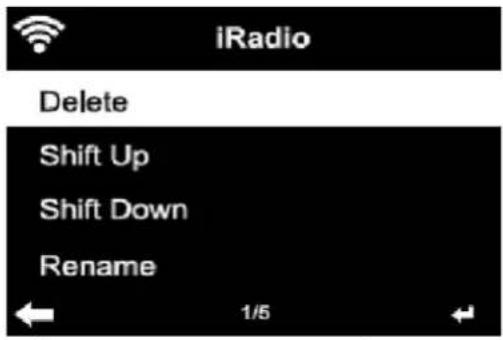
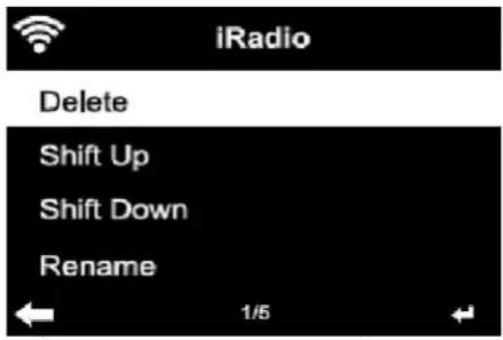
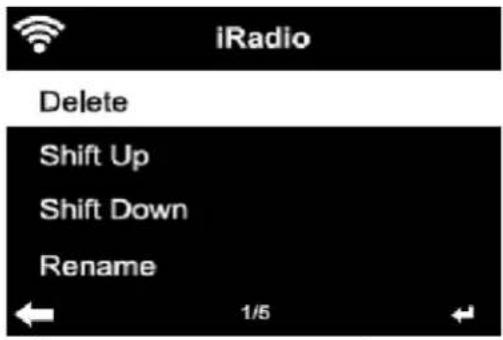
Under the Fav. station list, move to your station, press OK to listen, You may also press ▶ to OK its submenu to Delete (deletes a radio station from the favorites list), Shlft Up/down along the list, Rename (you can give the radio station a name of your choice), or Play.
Press FAV., then Rotate the UP/DOWN knob on the device or using the ▲/▼ of remote control to recall the saved station.
5.5.2 Radio Station/Music
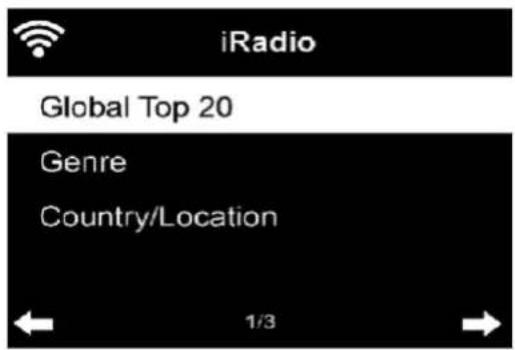
Stations are categorized into Global Top 20, Genre, Country/Location and Highlight. OK to continue the subcategories and choose the station to listen.
For each station, press OK to play directly. You may press Right to enter its submenu – you can Add to Favorite, Auto Scan or Play. When you choose Auto Scan, it becomes the playback of marquee for each station in the subcategory. Each station plays 30 seconds until all have played. Or press OK to stop the marquee listening.
5.5.3 Sleep Radio
Enter to choose one to listen from (Birds, Lullaby, Piano, Rain, Spa, Space, Wave, White noise) while sleeping.
5.5.4 History
A list of last listened stations.
For each station, press OK to play directly. You may press ▶ to OK its submenu – you can Add to Favorite, Auto Scan, or Play. When you choose Auto Scan, it becomes the playback of marquee for each station in the history. Each station plays 30 seconds until all have played or you press OK to stop the marquee listening.
5.5.5 Service
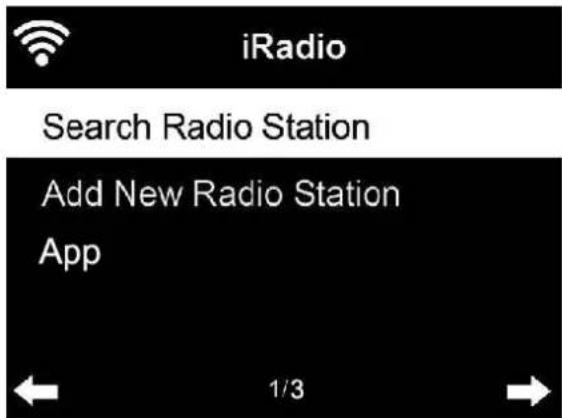
Search radio station - Enter your keyword to search radio station from the list.
Add new radio station – The added stations will be stored in My Favorite.
Note that the maximum character of the station name is 250.
App: Enter to scan the QR code.
5.6 Local Radio
There is a shortcut Local Radio under internet radio so that you can easily go to the radio station list of your location.
The device can use the IP address to detect its current location and can then automatically generate a list of local radio stations. However, you can also OK a different country.
5.7 Media Center
5.7.1 USB
Enter USB selection, if there is no USB device plugged in the unit, it will indicate "empty" on display.
Insert the USB device to USB port, then enter USB selection, there will be folders on display, rotate the NAVIGATE knob on the unit or press the button on the remote control to select the folder in USB device, press the NAVIGATE knob on the device and remote control to OK, then select desired file to play.
During playing:
Press the 📂 Button to pause/Play
Press the button to skip track back and forth
Press the button to return back to current playing file list
NOTE: USB device is selected when inserted
5.7.2 UPnP
If you have set up shared media, you should see the shared media form UPnP.
If you have more than one computer sharing media, the alternative are listed. SELECT the shared media you want to play.
TipS. The radio can only read the track with the file name less than 40 characters. And the characters should be in European language. If you encounter failure of reading the track under UPnP mode, you may try to rename the file.
However, if the track is still unable to play, you can try converting the file to different formats.
5.7.3 My Playlist
You can create a play list of favorite music from UPnP. When you playing the music, press and hold OK button on remote control to save it into My Playlist.
5.7.4 Clear My Playlist
You can remove all the saved music under My Playlist.
5.8 Information Center
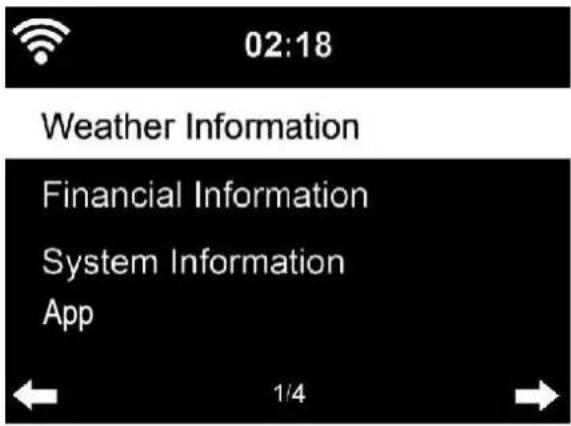
5.8.1 Weather Information
There are weather information and forecasts for 2000 cities. Select the country and then the city for the weather details.
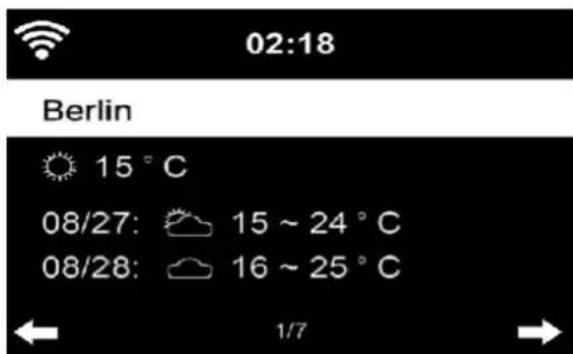
The DIR-250 is able to display weather information on standby mode.
When weather information is selected, you have to select your location, example 'europe' and press ok.
Now select the country and after that select your province and city.
On the weather information page, press Right, then it will show "Add to Standby Display", if you want the weather of your favorite city be displayed on Standby, press OK to set the city.
5.8.2 Financial Service
![02:18 [AEX General]373.5-1.2 [CAC 40] 4067.13 -2.34 [DAX] 8435.15 +18.16 [DOW JONES] 14946.46 -64.05 1/12](/content/2026/05/760506/images/2dbc4f9290ccb8645ac53372a0a4763980ac4652b49b528716b4dbe17f60289f.jpg)
View the stock index from around the world.
5.8.3 System Information
Check out the version of the system, and the details of connected network. The information includes MAC address which you are required to fill in when registration of my mediaU membership.
5.8.4 App
Enter to scan the QR code.
5.9 FM
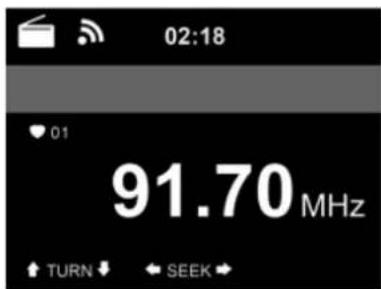
FM radio mode receives analogue radio from the FM band
Press and hold 📄 button on the remote control or press and hold the button on the unit to search FM station. The frequency display starts to run up as DIR-250 scans the
FM band, it stops when it has received a station. you may press on the remote control to fine tune station, each step moves 0.05MHz.
Press and hold the Fav. button on the remote control and the device to save the station.
You can save up to 20 station, press Fav. button on the remote control to enter storing station list, press the navigator on remote control to select and press OK button to play.
Alternatively, you can let the system scan ALL station for you by pressing OK, The searched station will automatically be stored in Fav. station list.
6 DAB
Press the MODE on the remote control and the device (if in FM mode) to switch to DAB mode. The display will show 'DAB/DAB+'.
* To listen to the stored DAB stations use either ◀◀ and ▶▶ buttons or either ◀ and ▶ buttons on the retome control to cycle through the stations. When you reach the desired station, press the OK button on the remote control and press the NAVIGATE/OK knob on the device in to begin playback of that station.
DAB quick scan
* Press the Scan button button on the remote control or Left button on the device to begin the scan. You will see the scan slide chart to indicate the progress.
* Once the scan has finished, the radio will select the first alphanumeric station and begin playback.
Fav. Recall
Press and hold the Fav. button on the remote control and the device to save the station.
You can save up to 20 station, Press Fav., then press on the remote control or press Fav. button on the device to recall the saved station.
7 Bluetooth
Press mode repeatedly until "Bluetooth" appears on the display.
Make sure that no other Bluetooth device is connected to the radio. "Bluetooth Disconnected" will appear on the display.
Enable the Bluetooth mode on the device that you want to connect to the DIR-250 and scan for new devices.
Select the Lenco DIR-250 from the devices found on your device. If you are required to enter a PIN code, enter 0000 (four zeros). Certain devices may also require you to approve the connection.
Once the connection has been successful, "Bluetooth Connected" will appear on the display of the Lenco DIR-250
You can now start playback from your Bluetooth device.
Control the playback from the Bluetooth device or from the radio using the Vol+/Vol- on the device and remote control, Adjust the volume both on the Bluetooth device and the radio.
To disconnect a connected Bluetooth device: Press and hold down the [Enter] button for 3 seconds. The message "Bluetooth Disconnected" will appear on the display.
This product operates at 2400 - 2483.5 MHz and is designated only to be used inside a normal household environment. This product is suited for this purpose within all EU countries.
"This product has a bluetooth reception function, you can not transmit any bluetooth sound with it: this means that you can only receive a bluetooth sound signal from an external source like a smartphone."
8 Remote Control Via Apps
Some apps for Android, e.g. Air Music Control, let you control the internet radio from your smart phone or tablet.
As soon as the devices are connected, the same menu structure shown on the internet radio will appear on the smart phone/tablet. You can select all functions just like on the radio. The selected functions/menu items shown on the radio will change according to the actions taken on your mobile device.
If you are controlling the internet radio via app, a UPnP connection to Windows Media Player may not be possible.
Spotify
Use your phone, tablet or computer as a remote control for Spotify.
If wifi is enabled on your DIR-250 you can even wake it up when selecting spotify on your smartphone and select play device Lenco DIR-250.
Go to spotify.com/connect to learn how.
The Spotify Software is subject to third party licenses found here: https://www.spotify.com/connect/third-partylicenses
Technical Specifications
| Connections | DC, 3.5mm AUX-IN/AUX-OUT, 3.5mmHeadphone-Out, Audio Output ( Analog); Digital Optical, Digital Coaxial; USB; W-lan; Antenna; |
| Input | 100-240VAC – 50/60Hz |
| Output | 5V/1.5A |
| Output power | No Built in speaker |
| Batteries in remote control | AAA*2 |
| Power consumption | Max 7.5W |
| Power consumption (standby) | <1W |
| Operating Temperature | 0°C-35°C |
| Operating position | Horizontal |
| Dim. unit | 430*287*72mm(main device) |
| 516*348*132mm (Gift box) | |
| Weight | 2.2KG (main device) |
| 3.2KG (Giftbox and all accessories included) |
Power supply adaptor: (For EU only)
Manufacturer:
SHENZHEN SHI GUANGKAIYUAN TECHNOLOGY., LTD
Model Number:
GKYPS0150050EU1
Use only original AC adaptor
Use only the power supply listed in the user instructions.
| Information | Value and and precision |
| Manufacturers name or trade mark, commercial registration and address | SHENZHEN SHIGUANGKAIYUANTECHNOLOGY., LTD |
| Model Identifier | GKYPS0150050EU1 |
| Input voltage | 100-240V |
| Input AC frequency | 50/60Hz |
| Output voltage | 5,0V |
| Output current | 0,5A |
| Output Power | 7,5W |
| Average active efficiency | 77,8% |
| Efficiency at low load (10%) | 70,27% |
| No load Power consumption | 0,06W |
Guarantee
Lenco offers service and warranty in accordance to European law, which means that in case of repairs (both during and after the warranty period) you should contact your local dealer.
Important note: It is not possible to send products that need repairs to Lenco directly.
Important note: If this unit is opened or accessed by a non-official service center in any way, the warranty expires.
This device is not suitable for professional use. In case of professional use, all warranty obligations of the manufacturer will be voided.
Disclaimer
Updates to Firmware and/or hardware components are made regularly. Therefore some of the instruction, specifications and pictures in this documentation may differ slightly from your particular situation. All items described in this guide for illustration purposes only and may not apply to particular situation. No legal right or entitlements may be obtained from the description made in this manual.
Disposal of the Old Device
natural_image
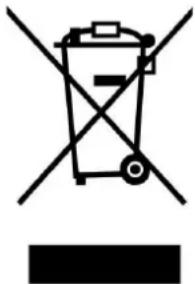
Symbol of a trash bin crossed out by two diagonal lines, with no text or labels present.This symbol indicates that the relevant electrical product or battery should not be disposed of as general household waste in Europe. To ensure the correct waste treatment of the product and battery, please dispose them in accordance to any applicable local laws of requirement for disposal of electrical equipment or batteries. In so doing, you will help to conserve natural resources and improve standards of environmental protection in treatment and disposal of electrical waste (Waste Electrical and Electronic Equipment Directive).
CE Marking
Hereby, Lenco Benelux B.V., Thermiekstraat 1a, 6361 HB Nuth, The Netherlands, declares that this product is in compliance with the essential EU directive requirements.
The declaration of conformity may be consulted via techdoc@commaxxgroup.com

Service
For more information and helpdesk support, please visit www.lenco.com
Lenco Benelux BV, Thermiekstraat 1a, 6361 HB, The Netherlands.
Nederlands
LET OP:
natural_image
Simple line drawing of an open book with no text or symbols visibleStroomvoorziening
natural_image
Line drawing of a mechanical clamp or connector with a coiled cable and two pins (no text or symbols)Afstandsbediening
RCA kable
natural_image
Line drawing of a three-pin electrical connector with coiled cable (no text or symbols)DAB/FM-binnenantenne
WIFI-antenne
INSTALLATIE
AANSLUITINGEN ANALOGE AUDIO-UITGANG
Connect the RCA cable as illustrated below.
Rear View of the TV Soundbar, Tower Speaker etc.
Connect the 3.5mm AUX OUT cable as illustrated below.
Rear View of the TV Soundbar, Tower Speaker, Mini Speaker etc.
| EN | NL |
| Connect the 3.5mm AUX OUT cable as illustrated below. | Sluit de 3,5 mm AUX OUT-kabel aan zoals hieronder afgebeeld. |
| AUX Cable NOT Included | AUX-kabel NIET inbegrepen |
| Rear View of the TV Soundbar, Tower Speaker, Mini Speaker etc. | Achteraanzicht van de tv-soundbar, torenluidspreker, miniluidspreker enz. |
AANSLUITINGEN DIGITALE AUDIO-UITGANG
Connect the Optical cable as illustrated below.
Connect the Coaxial cable as illustrated below.
| EN | NL |
| Connect the Coaxial cable as illustrated below. | Sluit de coaxkabel aan zoals hieronder afgebeeld. |
| Coaxial Cable NOT Included | Coaxkabel NIET inbegrepen |
| To coaxial input of the external amplifier with built-in decoder | Naar coaxiale ingang van de externe versterker met ingebouwde decoder |
2
Choose media streaming options for computers and devices

Name your media library: Choose default settings...
My PC
All devices are allowed to access your shared media.
Choose homegroup and sharing options
Choose power options
Tell me more about media streaming
Read the privacy statement online
natural_image
Black and white image of a portable electronic device with musical notes and a UI icon (no text or symbols)Personalize Your Internet Radio
Register your radio that support 'my media! listen anywhere!
Bekabelde netwerkverbinding in-/uitschakelen
- Wireless Network Configuration (Draadloze netwerkconfiguratie)
• Wireless Network (WPS PBC) [Draadloos netwerk (WPS PBC)]
Geluidskwaliteit.
Standaard instelling van de equalizer is Normal (Normaal).
natural_image
Symbol of a trash bin crossed out by two diagonal lines, with a blank rectangular base below (no text or labels)natural_image
Simple line drawing of an open book with no text or symbols visibleStromversorgung
natural_image
Technical line drawing of a mechanical component with a cylindrical housing and two protruding pins (no text or symbols)Fernbedienung
RCA-Kable
natural_image
Line drawing of a coiled cable with two connectors (no text or symbols)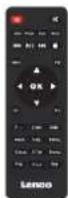
Connect the RCA cable as illustrated below.
Rear View of the TV Soundbar, Tower Speaker etc.
Connect the 3.5mm AUX OUT cable as illustrated below.
Rear View of the TV Soundbar, Tower Speaker, Mini Speaker etc.
Connect the Optical cable as illustrated below.
Connect the Coaxial cable as illustrated below.
3
1
2
Choose media streaming options for computers and devices

Name your media library:
My PC
Choose default settings...
All devices are allowed to access your shared media.
Choose homegroup and sharing options
Choose power options
Tell me more about media streaming
Read the privacy statement online
natural_image
Black and white image of a portable electronic device with music notes and an earphone icon (no text or symbols)Personalize Your Internet Radio
Register your radio that support 'my media! listen anywhere!
Klangqualität:
natural_image
Symbol of a trash bin crossed with a diagonal line, no text or numbers presenttechdoc@commaxxgroup.com

Service
natural_image
Simple line drawing of an open book with no text or symbols visiblenatural_image
Technical line drawing of a mechanical clamp or connector with a coiled cable (no text or symbols)Télécommande
RCA câble
natural_image
Line drawing of a coiled electrical connector with two terminal ports (no text or symbols)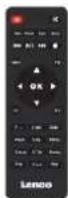
Précautions relatives aux piles:
RACCORDEMENTS DE SORTIE AUDIO ANALOGIQUE
Connect the RCA cable as illustrated below.
Rear View of the TV Soundbar, Tower Speaker etc.
Connect the 3.5mm AUX OUT cable as illustrated below.
Rear View of the TV Soundbar, Tower Speaker, Mini Speaker etc.
Connect the Optical cable as illustrated below.
Connect the Coaxial cable as illustrated below.
2
Choose media streaming options for computers and devices

Name your media library:
My PC
Choose default settings...
All devices are allowed to access your shared media.
Choose homegroup and sharing options
Choose power options
Tell me more about media streaming
Read the privacy statement online
natural_image
Black and white image of a portable electronic device with musical notes and a UI icon (no text or symbols)Personalize Your Internet Radio
Register your radio that support 'my media! listen anywhere!
- Favorite Station (Station favorite)
- Favorite Location/Genre (Emplacement favori/Genre)
- My Local Station (Ma station locale)
- Manually Add (Ajout manuel)
English/German/French/Hungarian/Czech/Slovakian/Polish/Turkish
Qualité sonore.
https://www.spotify.com/connect/third-partylicenses
natural_image
Symbol of a trash bin crossed out by two crossed lines, with a blank rectangular base below (no text or labels)natural_image
Simple line drawing of an open book with no text or symbols visiblenatural_image
Line drawing of a mechanical component with a circular top and attached rod (no text or symbols)Mando a distancia
RCA cable
natural_image
Line drawing of a coiled cable with two connectors (no text or symbols)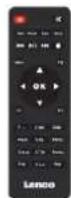
Antena interna DAB/FM
Antena WIFI
INSTALACIÓN
Connect the RCA cable as illustrated below.
Rear View of the TV Soundbar, Tower Speaker etc.
Connect the 3.5mm AUX OUT cable as illustrated below.
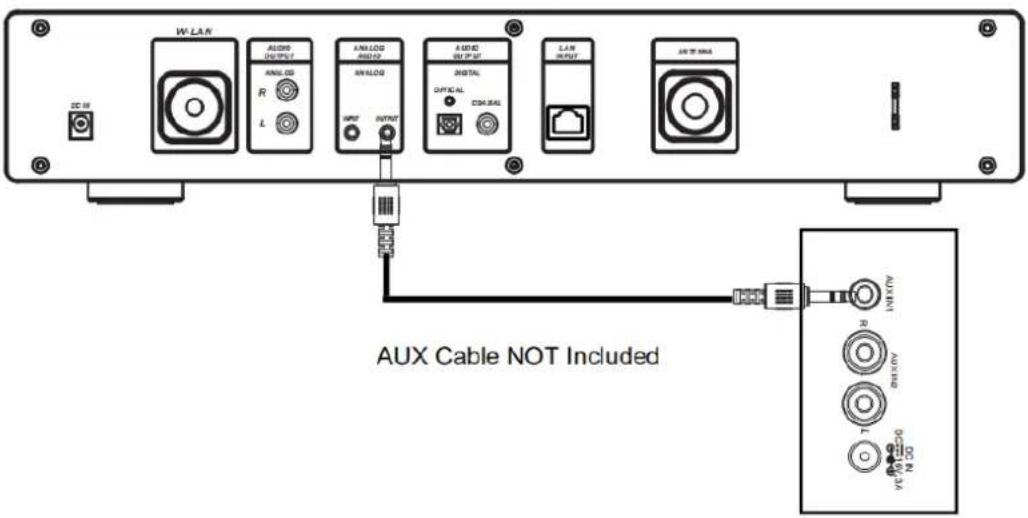
Rear View of the TV Soundbar, Tower Speaker, Mini Speaker etc.
| EN | ES |
| Connect the 3.5mm AUX OUT cable as illustrated below. | Conecte el cable de SALIDA DE AUDIO de 3.5mm tal y como se ilustra debajo. |
| AUX Cable NOT Included | Cable AUXILIAR NO incluido |
| Rear View of the TV Soundbar, Tower Speaker, Mini Speaker etc. | Vista posterior de la barra de sonido del TV, altavoz de torre, mino altavoz, etc. |
CONEXIONES DE LA SALIDA DE AUDIO DIGITAL
Connect the Optical cable as illustrated below.
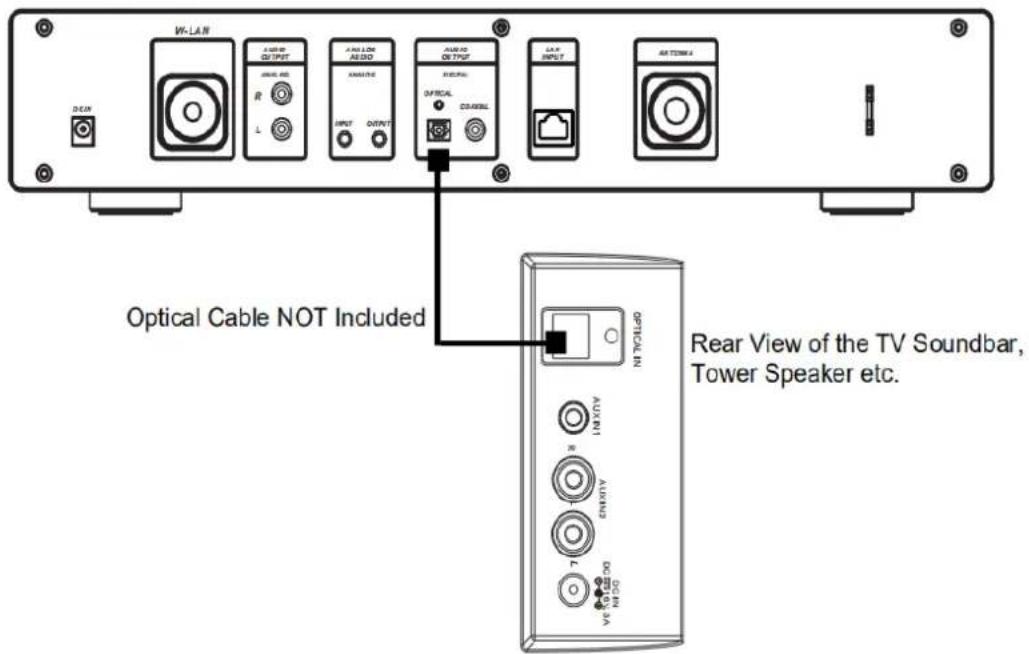
Connect the Coaxial cable as illustrated below.
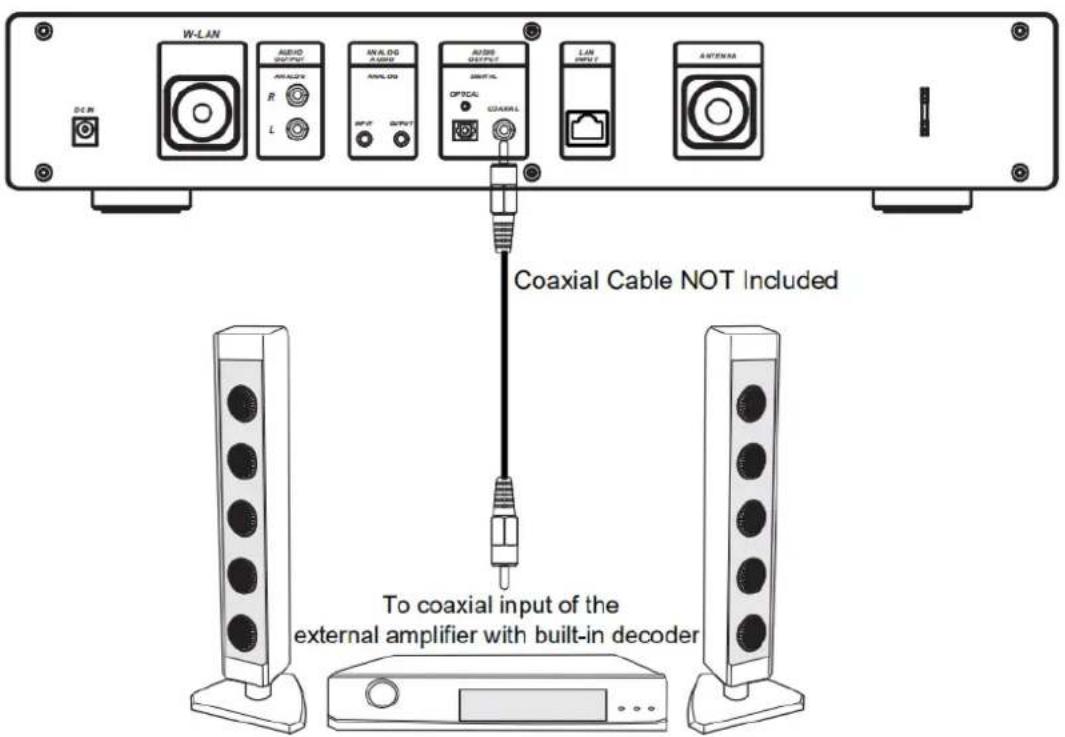
| EN | ES |
| Connect the Coaxial cable as illustrated below. | Conecte el cable coaxial tal y como se ilustra debajo. |
| Coaxial Cable NOT Included | Cable coaxial NO incluido |
| To coaxial input of the external amplifier with built-in decoder | A la entrada coaxial del amplificador externo con decodificador integrado |
Choose media streaming options for computers and devices

Name your media library:
My PC
Choose default settings...
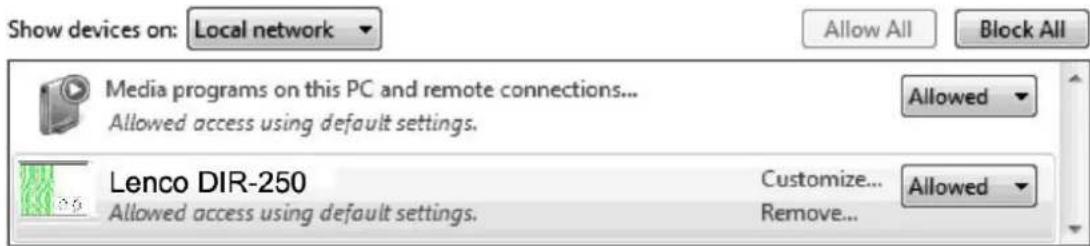
All devices are allowed to access your shared media.
Choose homegroup and sharing options
Choose power options
Tell me more about media streaming
Read the privacy statement online
Abra Windows Media Player para habilitar allow remote control of tried player (permitir el control remoto del reproductor que se está probando).
flowchart
```mermaid
graph TD
    A["Standby"] --> B["My mediaU"]
    B --> C["Internet Radio"]
    C --> D["Submenu"]
    D --> E["My Favorite"]
    E --> F["Radio Station/Music"]
    F --> G["Sleep Radio"]
    G --> H["History"]
    H --> I["Service"]
    I --> J["Submenu"]
    J --> K["Local Radio"]
    K --> L["Configuration"]
    L --> M["Time Display"]
    M --> N["Manage my mediaU"]
    N --> O["Network"]
    O --> P["Date&Time"]
    P --> Q["Alarm"]
    Q --> R["Timer"]
    R --> S["Scheduled Playing"]
    S --> T["Language"]
    T --> U["Dimmer"]
    U --> V["Display"]
    V --> W["Power Management"]
    W --> X["Sleep Timer"]
    X --> Y["Internet Radio"]
    Y --> Z["Weather"]
    Z --> AA["DAB/FM Setup"]
    AA --> AB["Local Radio Setup"]
    AB --> AC["Playback Setup"]
    AC --> AD["Device"]
    AD --> AE["Key"]
    AE --> AF["Equaliser"]
    AF --> AG["Resume When Power On"]
    AG --> AH["Software Update"]
    AH --> AI["Reset to Default"]

    AJ["Bluetooth"] --> AK["AUX IN"]
    AK --> AL["Information Center"]
    AL --> AM["DA8"]
    AL --> AN["FM"]

    AO["Media Center"] --> AP["USB"]
    AP --> AQ["UPnP"]
    AQ --> AR["My Playlist"]
    AR --> AS["Clear My Playlist"]

    subgraph Legend
        direction TB
        A
        B
        C
        D
        E
        F
        G
        H
        I
        J
        K
        L
        M
        N
        O
        P
        Q
        R
        S
        T
        U
        V
        W
        X
        Y
        Z
        AA
        AB
        AC
        AD
        AE
        AF
        AG
        AH
        AI
        AJ
        AK
        AL
        AM
        AN
        AP
        AQ
        AR
        AS
        AT
        AU
        AV
        AW
        AX
        AY
        AZ
        BA
        BB
        BC
        BD
        BE
        BF
        BG
        BH
        BI
        BJ
        BK
        BL
        BM
        BN
        BO
        BP
        BPB
        BPB
        BPB
        BPB
        BPB
    end

    %% Legend labels on the diagram; the diagram is a hierarchical structure of a multi-language audio system. The structure is labeled with 'Submenu' and 'Information Center'. The diagram contains multiple lines representing different audio types or functions. The diagram is structured in a grid-like format with arrows pointing to each line to the sub-conditions. The entire diagram is labeled 'Submenu' but contains no additional text labels for the diagram itself. Therefore, the diagram is not feasible for caption generation.

    %% Note: The diagram does not contain any data series (e.g., bar, line, or pie) due to the absence of labels or data. The output is empty as it is not possible.
5.2 Menú principal
natural_image
Black rectangular device with musical notes and a UI icon, no visible text or symbols on the device itself.Personalize Your Internet Radio
Register your radio that support 'my media! listen anywhere!
English/German/French/Hungarian/Czech/Slovakian/Polish/Turkish
Calidad del sonido
https://www.spotify.com/connect/third-partylicenses
natural_image
Symbol of a trash bin crossed out by two crossed lines, with a solid black rectangle below (no text or labels)natural_image
Simple line drawing of an open book with no text or symbols visibleAlimentazione
natural_image
Line drawing of a mechanical device with a coiled cable and two ports (no text or symbols)Telecomando
Cavo RCA
natural_image
Line drawing of a coiled audio jack with two leads (no text or symbols)Antenna per interni DAB/FM
Antenna Wi-Fi
INSTALLAZIONE
CONNESSIONI DELL'USCITA AUDIO ANALOGICA
Connect the RCA cable as illustrated below.
Rear View of the TV Soundbar, Tower Speaker etc.
Connect the 3.5mm AUX OUT cable as illustrated below.
Rear View of the TV Soundbar, Tower Speaker, Mini Speaker etc.
Connect the Optical cable as illustrated below.
Connect the Coaxial cable as illustrated below.
Choose media streaming options for computers and devices

Name your media library:
Choose default settings...
My PC
All devices are allowed to access your shared media.
Choose homegroup and sharing options
Choose power options
Tell me more about media streaming
Read the privacy statement online
natural_image
Black rectangular device with musical notes and a UI icon, no visible text or symbolsPersonalize Your Internet Radio
Register your radio that support 'my mediaU listen anywhere I
- Rete wireless (WPS PBC)
Qualità Audio
natural_image
Symbol of a trash bin crossed out by two diagonal lines, with a blank rectangular base below (no text or symbols)techdoc@commaxxgroup.com

Assistenza

- USER MANUAL
- HANDLEIDING
- BEDIENUNGSANLEITUNG
- KEEP THESE INSTRUCTIONS IN MIND:
- INSTALLATION
- Accessories:
- FRONT VIEW
- REAR VIEW
- Battery installation for remote control:
- Battery Precautions:
- ANALOG AUDIO OUTPUT CONNECTIONS
- DIGITAL AUDIO OUTPUT CONNECTIONS
- Requirements for using the DIR-250
- Network Requirements
- Display symbols
- Getting started
- Get the network ready
- NOTE: Only 2.4 Ghz networks are supported
- With remote control
- Input via front panel
- About Music Streaming
- UPnP
- DLNA Function
- Title Length Rating
- Select server and player Select music
- DIR-250 Function
- Overview
- Main menu
- Configuration
- Time Display
- Manage my mediaU
- Personalize Your Internet Radio
- Network
- Enable/disable wired network connection
- 02:18
- Date & Time
- Alarm
- NAP Alarm:
- Scheduled Playing
- Language
- Dimmer
- Display
- Power Management
- Sleep Timer
- Internet Radio
- Buffer
- Weather
- DAB/FM Setup
- Local Radio Setup
- Playback Setup
- Device
- Key
- Equalizer
- Resume When Power On
- Software Update
- Reset to Default
- My MediaU
- Internet Radio
- Favorites
- Radio Station/Music
- Sleep Radio
- History
- Service
- Local Radio
- Media Center
- USB
- UPnP
- My Playlist
- Clear My Playlist
- Information Center
- Weather Information
- Financial Service
- System Information
- App
- FM
- DAB
- DAB quick scan
- Fav. Recall
- Bluetooth
- Remote Control Via Apps
- Spotify
- Power supply adaptor: (For EU only)
- Guarantee
- Disclaimer
- Disposal of the Old Device
- CE Marking
- Service
- Nederlands
- LET OP:
- INSTALLATIE
- AANSLUITINGEN ANALOGE AUDIO-UITGANG
- AANSLUITINGEN DIGITALE AUDIO-UITGANG
- Bekabelde netwerkverbinding in-/uitschakelen
- Geluidskwaliteit.
- Choose media streaming options for computers and devices
- Klangqualität:
- Précautions relatives aux piles:
- RACCORDEMENTS DE SORTIE AUDIO ANALOGIQUE
- Qualité sonore.
- INSTALACIÓN
- CONEXIONES DE LA SALIDA DE AUDIO DIGITAL
- Menú principal
- Calidad del sonido
- INSTALLAZIONE
- CONNESSIONI DELL'USCITA AUDIO ANALOGICA
- Qualità Audio
- Assistenza
Brand : LENCO
Model : DIR-250
Category : Radio