
129659 - Sander SILVERLINE - Free user manual and instructions
Find the device manual for free 129659 SILVERLINE in PDF.
| Product type | Rotary sander-polisher |
| Brand | Silverline |
| Model | 129659 |
| Dimensions (L x W x H) | 485 x 200 x 200 mm |
| Weight | 2.99 kg |
| Supply voltage | 230 V~, 50 Hz |
| Power consumption | 1500 W |
| No-load speed | 1,000 - 3,200 rpm |
| Spindle thread | M14, male |
| Backing pad diameter | 180 mm |
| Power cable length | 2 m |
| Protection rating | IP20 |
| Protection class | II (double insulation) |
| Sound pressure (LpA) | 86.7 dB(A) |
| Sound power (LWA) | 97.7 dB(A) |
| Weighted vibration (main handle) | 3.403 m/s² |
| Speed control | Yes, adjustable |
| Hook-and-loop system | Yes, for discs and bonnets |
| Included accessories | Hook-and-loop backing pad, 120-grit abrasive disc, polishing bonnet, hex key, spare carbon brushes |
| Maintenance | Clean with a damp cloth and mild detergent; lubricate moving parts; replace carbon brushes if worn |
| Safety | Safety switch, on/off trigger, spindle lock, double insulation |
| Spare parts and repairability | Carbon brushes available; replacement base plate at toolsparesonline.com; repair by Silverline authorised centre |
| Warranty | 3 years (subject to registration within 30 days) |
Frequently Asked Questions - 129659 SILVERLINE
User questions about 129659 SILVERLINE
0 question about this device. Answer the ones you know or ask your own.
Ask a new question about this device
Download the instructions for your Sander in PDF format for free! Find your manual 129659 - SILVERLINE and take your electronic device back in hand. On this page are published all the documents necessary for the use of your device. 129659 by SILVERLINE.
USER MANUAL 129659 SILVERLINE
natural_image
Silverline C power tool with circular base and handle, no visible text or symbols on the device itself.


natural_image
Close-up of a hand using a power tool to cut or spread material, no visible text or symbolsEnglish ......04
Français ......10
Deutsch......16
Español......22
Italiano ......28
Nederlands ......34
Polski ......40
Introduction
Thank you for purchasing this Silverline tool. This manual contains information necessary for safe and effective operation of this product. This product has unique features and, even if you are familiar with similar products, it is necessary to read this manual carefully to ensure you fully understand the instructions. Ensure all users of the tool read and fully understand this manual.
Description of Symbols
The rating plate on your tool may show symbols. These represent important information about the product or instructions on its use.

Wear hearing protection.
Wear eye protection.
Wear breathing protection.
Wear head protection.

Wear hand protection.

Read instruction manual.

Toxic fumes or gases!

DO NOT use in rain or damp environments!

Always disconnect from the power supply when adjusting, changing accessories, cleaning, carrying out maintenance and when not in use!

Class II construction (double insulated for additional protection)

Environmental Protection
Waste electrical products should not be disposed of with household waste. Please recycle where facilities exist. Check with your local authority or retailer for recycling advice.

Conforms to relevant legislation and safety standards.

Caution!
Technical Abbreviations Key
| V Volts | |
| ~, AC Alternating current | |
| A, mA Ampere, milli-Amp | |
| Ah Amp hours (battery capacity) | |
| r_b | No load speed |
| n Rated speed | |
| Nm | Newton metres (torque) |
| ° Degrees | |
| ∅ Diameter | |
| Hz Hertz | |
| W, kW Watt, kilowatt | |
| /min or min^-1 | Operations per minute |
| rpm Revolutions per minute | |
| dB(A) Decibel sound level (A weighted) | |
| m/s^2 | Metres per second squared (vibration magnitude) |
Specification
Voltage: 230V\~, 50Hz
Power: 1500W
No load speed: 1000-3200min-1
Spindle thread: M14, male
Sanding pad diameter: 180mm
Cable length: 2.0m
Ingress protection: IP20
Protection class:
Dimensions (L x W x H): 485 x 200 x 200mm
Weight: 2.99kg
As part of our ongoing product development, specifications of Silverline products may alter without notice.
Sound and vibration information:
Sound Pressure L 86.7dB(A)
Sound Power L _w A: 97.7dB(A)
Uncertainty K: 3dB
Weighted vibration a : 3.403m/s ^2 (main handle)
3.403m/s² (aux handle)
Uncertainty K: 1.5m/s²
The sound intensity level for the operator may exceed 85dB(A) and sound protection measures are necessary.
WARNING: Always wear ear protection where the sound level exceeds 85dB(A) and limit the time of exposure if necessary. If sound levels are uncomfortable, even with ear protection, stop using the tool immediately and check the ear protection is correctly fitted and provides the correct level of sound attenuation for the level of sound produced by your tool.
⚠ WARNING: User exposure to tool vibration can result in loss of sense of touch, numbness, tingling and reduced ability to grip. Long term exposure can lead to a chronic condition. If necessary limit the length of time exposed to vibration and use anti-vibration gloves. Do not operate the tool with hands below a normal comfortable temperature, as vibration will have a greater effect. Use the figures provided in the specification relating to vibration to calculate the duration and frequency of operating the tool.
Sound and vibration levels in the specification are determined according to international standards. The figures represent normal use for the tool in normal working conditions. A poorly maintained, incorrectly assembled, or misused tool, may produce increased levels of noise and vibration. www.osha.europa.eu provides information on sound and vibration levels in the workplace that may be useful to domestic users who use tools for long periods of time.
General Power Tool Safety Warnings
WARNING: Read all safety warnings, instructions, illustrations and specifications provided with this power tool. Failure to follow all instructions listed below may result in electric shock, fire and/or serious injury.
Save all warnings and instructions for future reference.
The term "power tool" in the warnings refers to your mains-operated (corded) power tool or battery-operated (cordless) power tool.
1) Work area safety
a) Keep work area clean and well lit. Cluttered or dark areas invite accidents.
b) Do not operate power tools in explosive atmospheres, such as in the presence of flammable liquids, gases or dust. Power tools create sparks which may ignite the dust or fumes.
c) Keep children and bystanders away while operating a power tool. Distractions can cause you to lose control.
2) Electrical safety
a) Power tool plugs must match the outlet. Never modify the plug in any way. Do not use any adapter plugs with earthed (grounded) power tools. Unmodified plugs and matching outlets will reduce risk of electric shock.
b) Avoid body contact with earthed or grounded surfaces, such as pipes, radiators, ranges and refrigerators. There is an increased risk of electric shock if your body is earthed or grounded.
c) Do not expose power tools to rain or wet conditions. Water entering a power tool will increase the risk of electric shock.
d) Do not abuse the cord. Never use the cord for carrying, pulling or unplugging the power tool. Keep cord away from heat, oil, sharp edges or moving parts. Damaged or entangled cords increase the risk of electric shock.
e) When operating a power tool outdoors, use an extension cord suitable for outdoor use. Use of a cord suitable for outdoor use reduces the risk of electric shock.
f) If operating a power tool in a damp location is unavoidable, use a residual current device (RCD) protected supply. Use of an RCD reduces the risk of electric shock.
3) Personal safety
a) Stay alert, watch what you are doing and use common sense when operating a power tool. Do not use a power tool while you are tired or under the influence of drugs, alcohol or medication. A moment of inattention while operating power tools may result in serious personal injury.
b) Use personal protective equipment. Always wear eye protection. Protective equipment such as a dust mask, non-skid safety shoes, hard hat or hearing protection used for appropriate conditions will reduce personal injuries.
c) Prevent unintentional starting. Ensure the switch is in the OFF-position before connecting to power source and/or battery pack, picking up or carrying the tool. Carrying power tools with your finger on the switch or energising power tools that have the switch ON invites accidents.
d) Remove any adjusting key or wrench before turning the power tool ON. A wrench or a key left attached to a rotating part of the power tool may result in personal injury.
e) Do not overreach. Keep proper footing and balance at all times. This enables better control of the power tool in unexpected situations.
1) Dress properly. Do not wear loose clothing or jewellery. Keep your hair and clothing away from moving parts. Loose clothes, jewellery or long hair can be caught in moving parts.
g) If devices are provided for the connection of dust extraction and collection facilities, ensure these are connected and properly used. Use of dust collection can reduce dust-related hazards.
h) Do not let familiarity gained from frequent use of tools allow you to become complacent and ignore tool safety principles. A careless action can cause severe injury within a fraction of a second.
4) Power tool use and care
a) Do not force the power tool. Use the correct power tool for your application. The correct power tool will do the job better and safer at the rate for which it was designed.
b) Do not use the power tool if the switch does not turn it ON and OFF. Any power tool that cannot be controlled with the switch is dangerous and must be repaired.
c) Disconnect the plug from the power source and/or remove the battery pack, if detachable, from the power tool before making any adjustments, changing accessories, or storing
power tools. Such preventive safety measures reduce the risk of starting the power tool accidentally.
d) Store idle power tools out of the reach of children and do not allow persons unfamiliar with the power tool or these instructions to operate the power tool. Power tools are dangerous in the hands of untrained users.
e) Maintain power tools and accessories. Check for misalignment or binding of moving parts, breakage of parts and any other condition that may affect the power tool's operation. If damaged, have the power tool repaired before use. Many accidents are caused by poorly maintained power tools.
f) Keep cutting tools sharp and clean. Properly maintained cutting tools with sharp cutting edges are less likely to bind and are easier to control.
g) Use the power tool, accessories and tool bits, etc. in accordance with these instructions, taking into account the working conditions and the work to be performed. Use of the power tool for operations different from those intended could result in a hazardous situation.
h) Keep handles and grasping surfaces dry, clean and free from oil and grease. Slippery handles and grasping surfaces do not allow for safe handling and control of the tool in unexpected situations.
5) Service
a) Have your power tool serviced by a qualified repair person using only identical replacement parts. This will ensure that the safety of the power tool is maintained.
Sanding Polisher Safety
a) This power tool is intended to function as a sander or polisher. Read all safety warnings, instructions, illustrations and specifications provided with the power tool. Failure to follow all instructions listed below may result in electric shock, fire and/or serious injury.
b) Operations such as grinding, wire brushing or cutting-off are not recommended to be performed with this power tool. Operations for which the power tool was not designed may create a hazard and cause personal injury.
c) Do not use accessories which are not specifically designed and recommended by the tool manufacturer. Just because the accessory can be attached to your power tool it does not assure safe operation.
d) The rated speed of the accessory must be at least equal to the maximum speed marked on the power tool. Accessories running faster than their rated speed can break and fly apart.
e) The outside diameter and the thickness of your accessory must be within the capacity rating of your power tool. Incorrectly sized accessories cannot be adequately guarded or controlled.
f) The arbour size of wheels, flanges, backing pads or any other accessory must properly fit on the spindle of your power tool. Accessories with arbour holes that do not match the mounting hardware of the power tool will run out of balance, vibrate excessively and may cause loss of control.
g) Do not use a damaged accessory. Before each use inspect the accessory such as abrasive wheels for chips and cracks, backing pad for cracks, tear or excess wear, wire brush, wire, wire brush for loose or cracked wires. If power tool or accessory is dropped, inspect for damage or install an undamaged accessory. After inspecting and installing an accessory, position yourself and bystanders away from the plane of the rotating accessory and run the power tool at maximum no-load speed for one minute. Damaged accessories will normally break apart during this test time.
h) Wear appropriate grinding tool personal protective equipment. Depending on application, use face shield, safety goggles or safety glasses. As appropriate, wear dust a mask, hearing protectors, gloves and a workshop apron capable of stopping small abrasive or workpiece fragments. The eye protection must be capable of stopping flying debris generated by various operations. The dust mask or respirator must be capable of filtrating particles generated by your operation. Prolonged exposure to high intensity noise may cause hearing loss.
i) Keep bystanders at a safe distance away from the work area. Anyone entering the work area must wear personal protective equipment. Fragments of workpiece or of a broken accessory may fly away and cause injury beyond the immediate area of operation.
j) Hold the power tool by insulated gripping surfaces only, when performing an operation where the cutting accessory may contact hidden wiring or its own cord. Cutting accessory contacting a "live" wire may make exposed metal parts of the power tool "live" and could give the operator an electric shock.
k) Position the cord clear of the spinning accessory. If you lose control, the cord may be cut or snagged, potentially causing harm to the operator.
1) Ensure the power tool is switched off whilst carrying it at your side. Accidental contact with the spinning accessory could snag your clothing, pulling the accessory into your body.
m) Regularly clean the power tool's air vents. The motor's fan will draw in dust and debris into the housing. Excessive accumulation of powdered metals may cause electrical hazards.
n) Do not operate the power tool near flammable materials. Sparks could ignite these materials.
o) Do not use accessories that require liquid coolants. Using water or other liquid coolants may result in electrocution or shock.
- Use the correct type of sanding or polishing accessory for the task and material being worked on. Check the label on the disc or accessory to find out if it is appropriate to use on the workpiece.
- The maximum speed of the accessory must always be higher than the maximum speed of the machine on which they are mounted
- Ensure that the accessory is fitted correctly and securely before use. Run the machine with the disc or accessory fitted, but without load, for a reasonable time before attempting to cut/grind. If excessive vibration occurs, stop the machine, investigate and correct the cause before use. Seek professional guidance if you are in doubt about how to operate the machine safely
- All discs and accessories must be checked before installation. If a disc is damaged in any way, such as by being chipped, fractured, warped or misshapen, DO NOT USE AND DISCARD. If you are unsure about whether a disc is safe to operate, DO NOT USE AND DISCARD
- Always ensure that accessories are suitable to use. Check the expiry date on the label. Resin-based and other grinding and cutting discs CANNOT SAFELY BE USED beyond their expiry date
- Do not allow discs to become wet or contaminated with oil. If you suspect that a disc has degraded in storage, or if you are unsure about whether its expiry date has passed, DO NOT USE AND DISCARD
- Do not attempt to sand, polish, cut or grind magnesium or any alloy that has high magnesium content
- Hold the machine appropriately to ensure that debris produced does not land on skin or clothing
- Do not operate the spindle lock while the tool is running
- Discs will continue to rotate for some time after the machine has been switched off. Allow the moving parts to stop completely without interference. Do not try to stop the machine by holding an object against the disc. NEVER place the tool down until the disc has completely stopped moving
Product Familiarisation
| 1 On/Off Trigger Switch |
| 2 Rear Handle |
| 3 Safety Switch |
| 4 Speed Control Dial |
| 5 Auxiliary Handle |
| 6 Spindle Lock Button |
| 7 Gear Housing |
| 8 Handle Hex Screw |
| 9 Spindle |
| 10 Hook & Loop Backing Pad |
| 11 Brush Access Cap |
| 12 Motor Vents |
Accessories (not shown):
- 1 x Hex Key
- 1 x Spare Carbon Brushes
• 1 x 80 Grit Hook & Loop Sanding Disc
• 1 x Hook & Loop Polishing Bonnet
Intended Use
Hook & loop rotary polishing machine with variable speed and swivel-action adjustable handle, used for light to medium duty sanding and polishing tasks, using suitable polishing bonnets, sanding discs and compounds.
Unpacking Your Tool
- Carefully unpack and inspect your tool. Fully familiarise yourself with all its features and functions
- Ensure that all parts of the tool are present and in good condition. If any parts are missing or damaged, have such parts replaced before attempting to use this tool
Before Use
⚠ WARNING: Ensure the tool is disconnected from the power supply before attaching or changing any accessories, or making any adjustments.
Assembling the auxiliary handle
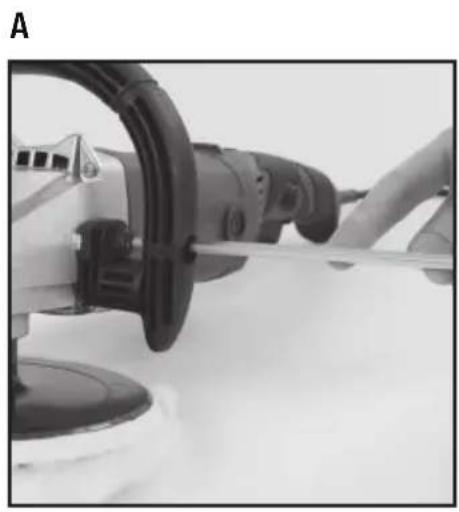
• The Auxiliary Handle (5) must be fitted to the machine before use:
1. Use the Handle Hex Screws (8) supplied to fit the Auxiliary Handle (5) via the fixing holes to either side of the Gear Housing (7), (Image A)
2. Use the supplied Hex Key and tighten the Handle Hex Screws firmly, to secure Auxiliary Handle in position
Fitting the Hook & Loop Backing Pad
• The Hook & Loop Backing Pad (10) must be securely fitted to the Spindle (9) before use:
1. Press and hold the Spindle Lock Button (6) with one hand, and slowly rotate the spindle with the other hand until you feel it lock
2. The Hook & Loop Backing Pad can now be screwed onto the Spindle and tightened
WARNING: The Hook & Loop Backing Pad is tightened by hand. Take care not to cross-thread or over-tighten.
3. Release the Spindle Lock Button
Fitting bonnets, polishing sponges and discs
- The Hook & Loop Polishing Bonnet, 80 Grit Hook & Loop Sanding Disc and other polishing accessories, such as polishing sponges (not included) can be pressed onto the face of the Hook & Loop Backing Pad (10)
• Slowly pull the fitted attachment off the Hook & Loop Backing Pad to remove
Note: Always make sure both hook & loop surfaces are free of dirt and debris prior to attaching any items (also see remarks 'Maintenance' section).
Operation
⚠ WARNING: ALWAYS wear eye protection, adequate respiratory and hearing protection, as well as suitable gloves, when working with this tool.
Switching ON & OFF
WARNING: Never switch the tool ON or OFF when it is in contact with the workpiece. This can cause serious injury to the operator and will significantly shorten the service life of the ON/OFF Trigger Switch (1).
- Connect the tool to the power supply
- Hold the tool securely with both hands with one hand on the Rear Handle (2) and the other hand on the Auxiliary Handle (5)
- Press in the Safety Switch (3)
- Squeeze the ON/OFF Switch to start the tool
- Allow the tool to reach the speed required before bringing the tool into contact with the workpiece
-
Remove the sander/polisher from the workpiece before switching OFF
-
To stop the tool, release the ON/OFF Switch
⚠ WARNING: ALWAYS wait until the tool has come to a standstill before placing it down.
Adjusting the tool speed
- The speed of the machine is controlled using the Speed Control Dial (4): A higher number indicates a higher speed setting
WARNING: Always set the speed control dial to the correct speed for the task at hand.
⚠ WARNING: Never exceed the maximum speed of the installed accessory.
Polishing tips
- Ensure the area to be polished is clean and dry
- Choose only polishing compounds that are compatible with the material to be polished, and with the method of application. Read and understand all information supplied with your polishing compound before use
- If using polishing sponges, apply polishing compound evenly to the polishing sponge and place the sponge against the work surface
- Hold the machine securely, using both hands, by the handles provided. The polishing sponge should make only light contact with the work surface
- Switch on the machine and work across the surface using a wide 'sweeping' motion. Stop and apply extra compound as required
- When the entire surface has been covered, stop the machine and allow the compound to dry (follow manufacturer's guidance)
- Attach a clean polishing bonnet to the machine and work across the surface as before, until all visible polishing compound is removed
Sanding tips
WARNING: This machine is primarily designed as a polishing tool. It is suitable for light duty sanding tasks, e.g. fine sanding as a preparation to polishing, but it has not been designed to remove large amounts of material. Use a different type of sander, e.g. a belt sander, should this be required.
WARNING: NEVER use this machine for wet sanding.
⚠ WARNING: ALWAYS use adequate respiratory protection when sanding.
- Allow the machine to reach the required speed before bringing the sanding paper into contact with the workpiece
- Start with a coarse grit paper and work through progressively finer grit papers until the desired finish is achieved
-
Apply only moderate pressure to the sander. Pressing too hard onto the work surface may overheat the motor or damage the work surface
-
Sand evenly over the work surface. The machine works in a rotary motion so it is not necessary to work with the grain
- Only use the sander 'flat on' to the work. Tilting the sander onto its edge will damage the workpiece
Accessories
- A range of accessories for your sander polisher, including polishing sponges and lambswool bonnets, sanding sheets and polishing compounds, is available from your Silverline stockist. Spare parts can be obtained from www.toolsparesonline.com
Maintenance
⚠ WARNING: ALWAYS disconnect from the power supply before carrying out any inspection, maintenance or cleaning.
General inspection
• Regularly check that all the fixing screws are tight
- Inspect the supply cord of the tool, prior to each use, for damage or wear. Repairs should be carried out by an authorised Silverline service centre. This advice also applies to extension cords used with this tool
Cleaning
WARNING: Be especially careful to clean the machine thoroughly if used for both wood and metal. Sparks from metal work can easily ignite wood dust.
- Keep your tool clean at all times. Dirt and dust will cause internal parts to wear quickly, and shorten the machine's service life. Clean the body of your machine with a soft brush, or dry cloth. If available, use clean, dry, compressed air to blow through the ventilation holes
- Clean the tool casing with a soft damp cloth using a mild detergent. Do not use alcohol, petrol or strong cleaning agents
- Never use caustic agents to clean plastic parts
Lubrication
- Slightly lubricate all moving parts at regular intervals with a suitable spray lubricant
Brushes
• Over time the carbon brushes inside the motor may become worn
- Excessively worn brushes may cause loss of power, intermittent failure, or visible sparking
- If you suspect that the brushes may be worn, have them replaced at an authorised Silverline service centre
Note: One set of Spare Carbon Brushes is supplied with this tool.
• To replace the brushes:
1. remove the Brush Access Caps (11) from both sides of the machine
2. Remove the worn brushes and replace
3. Replace the Brush Access Caps
• Alternatively, have the machine serviced at an authorised Silverline service centre
Hook & loop surfaces
- Hook and loop surfaces need to be clean, free of dirt and foreign matter, such as hair, fibres, sand etc.
- In order to provide adequate adhesion for securing accessories, hook and loop surfaces must be in good condition
- When used extensively, hooks and loops will become elongated or broken, and the mechanism cannot provide the required strength of adhesion anymore
Note: This sander's Hook & Loop Backing Pad (10) is NOT a warranty item. Replacements can be obtained from www.toolsparesonline.com.
Contact
For technical or repair service advice, please contact the helpline on (+44) 1935 382 222
Web: silverlinetools.com/en-GB/Support
Address:
Toolstream Ltd.
Boundary Way
Lufton Trading Estate
Yeovil, Somerset
BA22 8HZ, United Kingdom
Storage
- Store this tool carefully in a secure, dry place out of the reach of children
Disposal
Always adhere to national regulations when disposing of power tools that are no longer functional and are not viable for repair.
- Do not dispose of power tools, or other waste electrical and electronic equipment (WEEE), with household waste
- Contact your local waste disposal authority for information on the correct way to dispose of power tools
Silverline Tools Guarantee
This Silverline product comes with a 3 year guarantee
Register this product at www.silverlinetools.com within 30 days of purchase in order to qualify for the 3 year guarantee. Guarantee period begins according to the date of purchase on your sales receipt.
Registering your purchase
Registration is made at silverlinetools.com by selecting the Guarantee Registration button. You will need to enter:-
- Your personal details
• Details of the product and purchase information
Once this information is entered your guarantee certificate will be created in PDF format for you to print out and keep with your purchase.
Terms & Conditions
Guarantee period becomes effective from the date of retail purchase as detailed on your sales receipt.
PLEASE KEEP YOUR SALES RECEIPT
If this product develops a fault within 30 days of purchase, return it to the stockist where it was purchased, with your receipt, stating details of the fault. You will receive a replacement or refund.
If this product develops a fault after the 30 day period, return it to:
Silverline Tools Service Centre
PO Box 2988
Yeovil
BA21 1WU, UK
The guarantee claim must be submitted during the guarantee period.
You must provide the original sales receipt indicating the purchase date, your name, address and place of purchase before any work can be carried out.
You must provide precise details of the fault requiring correction.
Claims made within the guarantee period will be verified by Silverline Tools to establish if the deficiencies are related to material or manufacturing of the product.
Carriage will not be refunded. Items for return must be in a suitably clean and safe state for repair, and should be packaged carefully to prevent damage or injury during transportation. We may reject unsuitable or unsafe deliveries.
All work will be carried out by Silverline Tools or its authorized repair agents.
The repair or replacement of the product will not extend the period of guarantee
Defects recognised by us as being covered by the guarantee shall be corrected by means of repair of the tool, free of charge (excluding carriage charges) or by replacement with a tool in perfect working order.
Retained tools, or parts, for which a replacement has been issued, will become the property of Silverline Tools.
The repair or replacement of your product under guarantee provides benefits which are additional to and do not affect your statutory rights as a consumer.
What is covered:
The repair of the product, if it can be verified to the satisfaction of Silverline Tools that the deficiencies were due to faulty materials or workmanship within the guarantee period.
If any part is no longer available or out of manufacture, Silverline Tools will replace it with a functional replacement part.
Use of this product in the EU.
What is not covered:
Silverline Tools does not guarantee repairs required as a result of:
Normal wear and tear caused by use in accordance with the operating instructions eg blades, brushes, belts, bulbs, batteries etc.
The replacement of any provided accessories drill bits, blades, sanding sheets, cutting discs and other related items.
Accidental damage, faults caused by negligent use or care, misuse, neglect, careless operation or handling of the product.
Use of the product for anything other than normal domestic purposes.
Change or modification of the product in any way.
Use of parts and accessories which are not genuine Silverline Tools components.
Faulty installation (except installed by Silverline Tools).
Repairs or alterations carried out by parties other than Silverline Tools or its authorized repair agents.
Claims other than the right to correction of faults on the tool named in these guarantee conditions are not covered by the guarantee.
Introduction
3,403 m/s² (Zusatzgriff)
Silverline Tools Service Centre
PO Box 2988
Yeovil
Silverline Tools Service Centre
PO Box 2988
Yeovil
BA21 1WU, GB
Silverline Tools Service Centre
PO Box 2988
Yeovil
BA21 1WU, GB
Silverline Tools Service Centre
PO Box 2988
Yeovil
BA21 1WU, UK
natural_image
Black and silver power tool with circular base and handle, no visible text or symbolsGB 3 Year Guarantee. Register online within 30 days. Terms and Conditions apply.


- Introduction
- Description of Symbols
- Specification
- Sound and vibration information:
- General Power Tool Safety Warnings
- Save all warnings and instructions for future reference.
- Sanding Polisher Safety
- Accessories (not shown):
- Intended Use
- Unpacking Your Tool
- Before Use
- Assembling the auxiliary handle
- Fitting the Hook & Loop Backing Pad
- Fitting bonnets, polishing sponges and discs
- Operation
- Switching ON & OFF
- Adjusting the tool speed
- Polishing tips
- Sanding tips
- Accessories
- Maintenance
- General inspection
- Cleaning
- Lubrication
- Brushes
- Hook & loop surfaces
- Contact
- Address:
- Storage
- Disposal
- Silverline Tools Guarantee
- This Silverline product comes with a 3 year guarantee
- Registering your purchase
- Terms & Conditions
- PLEASE KEEP YOUR SALES RECEIPT
- Silverline Tools Service Centre
- PO Box 2988
- Yeovil
- BA21 1WU, UK
- What is covered:
- What is not covered:
- BA21 1WU, GB
Brand : SILVERLINE
Model : 129659
Category : Sander