
633629 - Air pistol SILVERLINE - Free user manual and instructions
Find the device manual for free 633629 SILVERLINE in PDF.

| Product type | Pneumatic blasting gun |
| Brand | Silverline |
| Model | 633629 |
| Operating pressure | 3 – 6 bar |
| Maximum operating pressure | 8 bar |
| Air consumption | 156 L/min |
| Projection nozzle diameter | 6 mm |
| Material nozzle diameter | 3 mm |
| Abrasive feed | By suction |
| Material feed hose | 10.5 x 18 mm, 1.5 m, rubber |
| Recommended abrasives | Corundum, sand, glass beads, silicon carbide, walnut shells |
| Air inlet connection | 1/4" BSP with quick couplings EN-6 and EQ-4 |
| Minimum air hose diameter | 9.5 mm |
| Weight | 0.45 kg |
| Sound pressure level | 90 dB(A) |
| Sound power level | 89 dB(A) |
| Vibration emission value | 2.03 m/s² |
| Hearing protection required | Yes, above 85 dB(A) |
| Recommended safety equipment | Safety glasses, gloves, respirator, helmet |
| CE conformity | Machinery Directive 2006/42/EC, EN 1953:1998+A1:2009 |
| Warranty | 3 years (upon registration within 30 days) |
| Maintenance | Regular cleaning with soft brush, lubrication of seals |
| Included spare parts | Spare projection nozzle, two quick couplings |
Frequently Asked Questions - 633629 SILVERLINE
User questions about 633629 SILVERLINE
0 question about this device. Answer the ones you know or ask your own.
Ask a new question about this device
Download the instructions for your Air pistol in PDF format for free! Find your manual 633629 - SILVERLINE and take your electronic device back in hand. On this page are published all the documents necessary for the use of your device. 633629 by SILVERLINE.
USER MANUAL 633629 SILVERLINE
natural_image
Exterior view of a gray industrial spray gun with nozzle and handle (no text or symbols visible)
text_image
YEAR GUARANTEE 3 REGISTER ONLINE*text_image
Labeled diagram of a welding torch and cable assembly with numbered parts for identificationDescription of Symbols
The rating plate on your tool may show symbols. These represent important information about the product or instructions on its use.

Wear hearing protection
Wear eye protection.
Wear breathing protection
Wear head protection

Wear hand protection

Read instruction manual

DO NOT use with compressed gas cylinders!

Toxic fumes or gases!

Conforms to relevant legislation and safety standards

Environmental Protection
Air tools should not be disposed of with household waste. They contain traces of oil and other lubricants. Please recycle where facilities exist. Check with your local authority or retailer for recycling advice.
Specification
Operating pressure: 3-6bar (43-87psi)
Maximum operating pressure: 8bar (116psi)
Air consumption: 156L/min (5.5cfm)
Air fluid nozzle diameter: 6mm
Material nozzle diameter: 3mm
Type of feed: Suction
Material feed hose: 10.5 x 18mm x
1.5m, rubber hose
Recommended abrasives:.... aluminium oxide, sand, glass beads, silicon carbide, walnut shells
Air inlet: .... ^1/4 " BSP, supplied with two male airline quick connectors (EN-6 'UK' and EQ-4 'European' types)
Minimum air supply hose diameter:....9.5mm (3/8")
Weight 0.45kg
Noise and vibration information:
Level of sound pressure according to EN 1953/A1:2009:
Sound pressure L PA = 90dB(A)
Sound power ....L wa=101dB(A)
Uncertainty K = 3dB
The sound intensity level for the operator may exceed 85dB(A) and sound protection measures are necessary.
Vibration emission value ....a h = 2.5m/s ^2
As part of our ongoing product development, specifications of Silverline products may alter without notice.
Noise and Vibration
Sound and vibration levels in the specification are determined according to ISO 28927-3. The figures given can be used to compare similar tools tested to this standard. These figures may be used to assess exposure to noise and vibration levels.
The figures represent normal use for the tool in normal working condition. A poorly maintained, incorrectly assembled or misused tool may produce increased levels of noise and vibration. The total working period that you can operate this tool must factor in periods where the tool is idle or switched off. Allow frequent rest breaks when operating this tool.
It is in the interest of users to maximise their safety using the correct safety equipment, like ear defenders that protect against loud or repetitive noise, and anti-vibration gloves that minimise vibration. Do not operate the tool with your hands below a normal comfortable temperature, as vibration will have a greater effect.
Sound
The noise directive was introduced to protect against the risk to health and safety arising or likely to arise from exposure to noise and risk of hearing. The Directive can be used to define noise exposure and the physical parameters, such as peak sound pressure and daily and weekly exposure level. Particular attention should be taken to exposure level and duration.
For more information on the Noise Directives 2003/10/EC and 2000/14/EC, please visit The European Agency for Safety and Health at work
- www.osha.europa.eu.
Vibration
The European Physical Agents (Vibration) Directive 2002/44/EC was introduced to control the exposure of vibration at work. The Directive enables users of tools to make informed decisions on the amount of time spent working. Those who regularly operate high vibration equipment over a sustained period of time are at a higher risk of health problems. ISO 28927-3 measures vibration in three directions which is known as tri-axial or vector sum measurement. When operating high vibration equipment, ensure not to exceed exposure levels. For more details on The Vibration Directive 2002/44/EC please visit The European Agency for Safety and Health at work -www.osha.europa.eu.
General Safety Warnings
- For multiple hazards, read and understand the safety instructions before installing, operating, repairing, maintaining, changing accessories on, or working near this tool. Failure to do so can result in serious bodily injury
- Only qualified and trained operators should install, adjust, or use this tool
- Do not modify this tool. Modifications can reduce the effectiveness of safety measures and increase the risks to the operator
- Do not discard the safety instructions; give them to the operator
- Do not use this tool if it has been damaged
- Tools shall be inspected periodically to verify that the ratings and markings required by this part of ISO 11148 are legibly marked on the tool. The employer/user should contact the manufacturer to obtain replacement marking labels when necessary
WARNING: This appliance is not intended for use by persons (including children) with reduced, physical or mental capabilities or lack of experience or knowledge unless they have been given supervision or instruction concerning use of the appliance by a person responsible for their safety. Children must be supervised to ensure that they do not play with the appliance.
Projectile Hazards
- Be aware that failure of the workpiece or accessories, or even of the inserted tool itself, can generate high-velocity projectiles
- Always wear impact-resistant eye protection during operation of this tool. The grade of protection required should be assessed for each use
- For overhead work, wear a safety helmet
- The risks to others should also be assessed at this time
- Ensure that the workpiece is securely fixed
Entanglement Hazards
- Choking, scalping and/or lacerations can occur if loose clothing, personal jewellery, neck wear, hair or gloves are not kept away from the tool and its accessories
Operating Hazards
- Use of the tool can expose the operator's hands to hazards, including cuts, abrasions and heat
- Wear suitable gloves to protect hands
- Operators and maintenance personnel should be physically able to handle the bulk, weight and power of the tool
- Hold the tool correctly; be ready to counteract normal or sudden movements and have both hands available
- Maintain a balanced body position and secure footing
- Release the start-and-stop device in the case of an interruption of the energy supply
- Use only lubricants recommended by the manufacturer
- Personal protective safety glasses should be used; suitable gloves and protective clothing are recommended
- Avoid direct contact with moving parts in order to prevent pinching or cutting of hands or other body parts. Wear suitable gloves to protect hands
- There is a risk of electrostatic discharge if used on plastic and other non-conductive materials
Repetitive Motions Hazards
- When using this tool to perform work-related activities, the operator can experience discomfort in the hands, arms, shoulders, neck or other parts of the body
- While using this tool, the operator should adopt a comfortable posture whilst maintaining secure footing and avoiding awkward or off-balance postures. The operator should change posture during extended tasks; this can help avoid discomfort and fatigue
- If the operator experiences symptoms such as persistent or recurring discomfort, pain, throbbing, aching, tingling, numbness, burning sensations or stiffness, these warning signs should not be ignored. The operator should inform the employer and consult a qualified health professional
Accessory Hazards
- Disconnect the tool from the energy supply before fitting or changing the inserted tool or accessory
- Avoid direct contact with the inserted tool during and after use, as it can be hot or sharp
- Use only sizes and types of accessories and consumables that are recommended by the manufacturer of this tool; do not use other types or sizes of accessories or consumables
Workplace Hazards
- Slips, trips and falls are major causes of workplace injury. Be aware of slippery surfaces caused by use of the tool and also of trip hazards caused by the air line or hydraulic hose
- This tool is not intended for use in potentially explosive atmospheres and is not insulated against contact with electric power
- Ensure that there are no electrical cables, gas pipes, etc., which can cause a hazard if damaged by use of the tool
Dust and Fume Hazards
- Dust and fumes generated when using this tool can cause ill health (for example cancer, birth defects, asthma and/or dermatitis); risk assessment and implementation of appropriate controls for these hazards are essential
- Risk assessment should include dust created by the use of the tool and the potential for disturbing existing dust
- Direct the exhaust so as to minimise disturbance of dust in a dust-filled environment
- Where dust or fumes are created, the priority should be to control them at the point of emission
- Use respiratory protection in accordance with employer's instructions and as required by occupational health and safety regulations
Noise Hazards
- Exposure to high noise levels can cause permanent, disabling hearing loss and other problems, such as tinnitus (ringing, buzzing, whistling or humming in the ears). Therefore, risk assessment and implementation of appropriate controls for these hazards are essential
- Appropriate controls to reduce the risk can include actions such as damping materials to prevent workpieces from 'ringing'
- Use hearing protection in accordance with employer's instructions and as required by occupational health and safety regulations
- Operate and maintain this tool as recommended in the instruction handbook, to prevent an unnecessary increase in the noise level
- Select, maintain and replace the consumable/inserted tool as recommended in the instruction handbook, to prevent an unnecessary increase in noise
- If the tool has a silencer, always ensure it is in place and in good working order when the tool is being operated
Vibration Hazards
This information shall draw attention to vibration hazards that have not been eliminated by design and construction and remain as residual vibration risks. It shall enable employers to identify the circumstances in which the operator is likely to be at risk from vibration exposure If the vibration-emission value obtained using ISO 28927-3 does not adequately represent the vibration emission in the intended uses (and foreseeable misuses) of the machine, additional information and/or warnings shall be supplied to enable the risks arising from vibration to be assessed and managed.
- Exposure to vibration can cause disabling damage to the nerves and blood supply of the hands and arms
- Wear warm clothing when working in cold conditions and keep your hands warm and dry
- If you experience numbness, tingling, pain or whitening of the skin in your fingers or hands, stop using the tool, inform your employer and consult a physician
- Operate and maintain the tool as recommended in the instruction handbook, to prevent an unnecessary increase in vibration levels
- Hold the tool with a light but safe grip, taking account of the required hand reaction forces, because the risk from vibration is generally greater when the grip force is higher
Additional Safety Instructions for Pneumatic Power Tools
Air under pressure can cause severe injury:
- Always shut off air supply, drain hose of air pressure and disconnect tool from air supply when not in use, before changing accessories or when making repairs
- Never direct air at yourself or anyone else
- Whipping hoses can cause severe injury. Always check for damaged or loose hoses and fittings
- Whenever universal twist couplings (claw couplings) are used, lock pins should be installed and whipcheck safety cables should be used to safeguard against possible hose-to-tool or hose-to-hose connection failure
- Do not exceed the maximum air pressure stated on the tool
- Never carry an air tool by the hose
Sand Blasting Equipment Safety
WARNING: Abrasive blasting with sands containing crystalline silica can cause silicosis, a serious respiratory disease that can be fatal.
WARNING: Never blast abrasive material towards a source of heat or ignition, as this may cause a fire or an explosion.
WARNING: Dust emissions from sandblasting may contribute to the formation of explosive atmospheres. Ensure proper ventilation and take precautions to prevent dust explosions.
- ALWAYS wear adequate personal protective equipment, including eye and hearing protection, suitable gloves, long sleeves and protective clothing when operating a sandblaster
- If large amounts of dust are created, helmets or hoods with air supply may be necessary
- Work gloves must protect the full forearm; protective clothing must provide suitable protection from rebounding abrasives
- Sandblasting operations are noisy. ALWAYS wear adequate hearing protection where sound levels exceed 85dB(A)
- Sandblasting equipment is likely to develop an electrostatic charge during operation. If an electrostatically conductive blast hose is not available the blast nozzle must be grounded
- NEVER direct the outlet nozzle towards people or animals
- DO NOT use other fluids than clean, dry, unoiled compressed air to power sandblasting equipment
- Wet, oily or otherwise contaminated compressed air will cause the abrasive to cake, and clog the sandblasting equipment
- NEVER use sandblasting equipment to spray solvents, acids or caustic agents
- DO NOT work near flammable items. Abrasive striking metal can cause sparks which may ignite flammable materials.
- Carefully cover areas of the workpiece that must not be sandblasted (e.g. insides of engine blocks, cylinder bores, and other functional surfaces)
- Refer to the abrasive manufacturer's instructions with regards to additional safety warnings, usage recommendations and disposal procedures
- ALWAYS disconnect the sandblasting equipment from the air supply when relocating or refilling the abrasive container
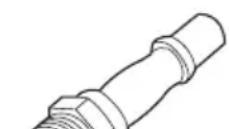
Product Familiarisation
1 Outlet Nozzle
2 Nozzle Locking Ring
3 Material Hose Connector
4 trigger
5 Quick Connector
6 Rubber Hose
7 Suction Nozzle
8 Suction Nozzle Hose Connector
9 Deaeration Pipe
10 Spare Outlet Nozzle
Intended Use
Compressed-air-powered sandblasting gun that sprays abrasive material on to surfaces in order to remove coatings, rust and contaminants. Can be used to shape surfaces and as preparation for the application of new surface coatings.
Unpacking Your Tool
- Carefully unpack and inspect your tool. Fully familiarise yourself with all its features and functions
- Ensure that all parts of the tool are present and in good condition. If any parts are missing or damaged, have such parts replaced before attempting to use this tool
Before Use
Fitting the quick connector
Note: This tool is supplied with two different male airline quick connectors: EQ-4 – commonly used in Europe
EN-6 – mainly used in the UK

EQ-4
Europe
EN-6
UK
- Please choose the connector that is compatible with the airline system you are using, and install as outlined below:
- Apply PTFE tape (not included) to the screw threads of the Quick Connector (5). This will help to maintain an airtight seal
Note: Apply PTFE tape tightly and in a clockwise direction, so it does not come off when the thread is screwed into the tool.
-
Remove the protective plug from the air inlet
-
Using a spanner (not included) screw the quick connector into the air inlet located at the base of the handle
-
Connect to airline, pressurise carefully and carry out a leak check (e.g. by spraying small amounts of soapy water on to the outside of the connectors)
- Air lines fitted with matching female quick connectors will now be a push fit to the tool
Air supply connection
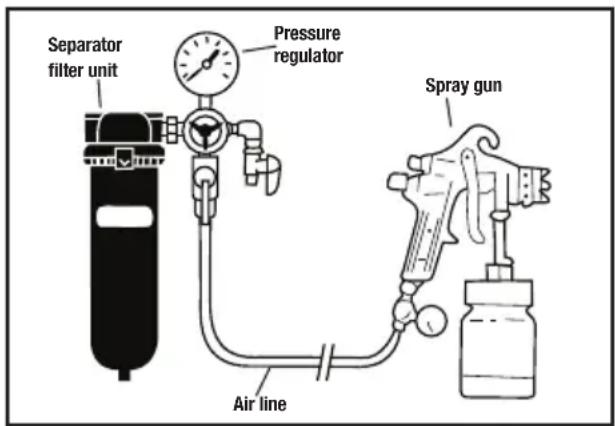
text_image
Separator filter unit Pressure regulator Air line Spray gunThis tool should be connected to a clean, dry air supply with water separator and filter
WARNING: Under no circumstances can the spray gun be used in a compressed air system with integrated oiler.
- Do not allow supply pressure to exceed the maximum stated (see 'Specifications')
- Ensure that water is drained from air system daily
- Ensure that all parts of the system (hoses, couplers, etc.) are correctly rated for the air pressure to be used
- Do not use non-conductive tubing to help prevent build-up of electrostatic charge
Setting tool power
- The tool power can be adjusted by reducing/increasing the air supply pressure within the range specified in 'Specification'
Setting up the sandblasting gun assembly
- Ensure the sandblasting gun has been correctly assembled, and the Nozzle Locking Ring (2) has been securely tightened
- Connect one end of the Rubber Hose (6) to the Suction Nozzle (7) and the other end of the hose to the Material Hose Connector (3)
Note: It is recommended to use conductive hose to connect the sandblasting gun and Suction Nozzle.
- Fill a suitable container with abrasive material
- Immerse the Suction Nozzle in the abrasive material, so that the tip of the Deaeration Pipe (9) protrudes above the surface of the abrasive material
Preparing the workpiece
- Workpieces contaminated with oil and grease should be degreased prior to sandblasting
- Remove dirt and other encrustations (e.g. dried mud, soil) from surfaces before sandblasting
- Carefully cover areas of the workpiece that must not be sandblasted (e.g. insides of engine blocks, cylinder bores, and other functional surfaces)
Operation
WARNING: Always wear personal protection equipment, including eye protection, suitable gloves and adequate respiratory protection, when working with this sandblaster.
- Connect the sandblasting gun to the air supply
- Adjust the air supply pressure according to the workpiece and abrasive used
WARNING: Ensure the air supply pressure does not exceed the maximum operating pressure stated in 'Specification'
WARNING: Ensure the pressure is suitable for the workpiece and does not damage the surface. ALWAYS test the effect of the abrasive on a scrap piece of material, or begin sandblasting at an inconspicuous place on the workpiece before starting the main job.
- Direct the Outlet Nozzle (1) towards the workpiece, and press the Trigger (4) to start the flow of abrasive
Note: When the Suction Nozzle (7) and Rubber Hose (6) are empty, it may take a few seconds for the abrasive to start flowing into the sandblasting gun. Keep the Trigger depressed until the abrasive exits the Outlet Nozzle. 4. Release the Trigger to stop sandblasting
WARNING: Be aware that air tools may hold residual pressure after use. Always bleed air pressure from the tool after shutting off air supply.
Maintenance
WARNING: Always disconnect from the air supply and depressurise before cleaning or carrying out any maintenance.
Note: There is very little that can go wrong with your air tool and it should be noted that when an air tool fails to work it is generally because the internal workings have corroded due to dirty, wet air and failure to follow the operating instructions.
Cleaning
- Keep your tool clean at all times. Dirt and dust will cause internal parts to wear quickly, and shorten the machine's service life. Clean the body of your machine with a soft brush, or dry cloth
- Before disassembly, reconnect the sandblasting gun to the air supply
- Remove the Suction Nozzle (7) from the abrasive container
- Direct the Outlet Nozzle (1) towards a safe place, and blow it through with air until all remaining abrasive is removed
- Disconnect from the air supply
- Remove the Rubber Hose (6) from the Material Hose Connector (3) and Suction Nozzle Hose Connectors (8)
- Remove the Nozzle Locking Ring (2) and Outlet Nozzle (1). Disassemble other components as necessary, referring to the 'Assembly Diagram'
- Clean the whole route of abrasive material thoroughly, taking care not to damage the Outlet Nozzle (1) and other internal parts
WARNING: Do not probe any of the holes in the nozzles with metal instruments. If mechanical cleaning becomes necessary, use only implements from materials softer than brass, such as specialised nozzle cleaning aids.
- Slightly lubricate all sealing surfaces and moving components with a suitable spray gun lubricant
- Reassemble the sandblasting gun, referring to the 'Assembly Diagram'
Replacing the Outlet Nozzle
- Disconnect the sandblasting gun from the air supply
- Disconnect the Rubber Hose (6) from the sandblasting gun
- Remove the Nozzle Locking Ring (2) and Outlet Nozzle (1)
- Clean all threads and sealing surfaces
- Install a new Outlet Nozzle, refit the Nozzle Locking Ring and tighten securely
Lubrication
- Even though the air and material passages of the spray gun must remain free of oil and other contaminants, some components require frequent lubrication
- Slightly lubricate all sealing surfaces, packings, bearings and dynamic O-rings with a specialised spray gun lube, and apply a small amount of petroleum jelly to springs
Storage
- Store this tool carefully in a secure, dry place out of the reach of children
Disposal
- As with other power tools, air tools should not be disposed of with household waste
- Air tools may contain traces of tool oil and other lubricants and so must be recycled accordingly
- Contact your local waste disposal authority for information on the correct way to dispose of power tools
- Surplus abrasive may be contaminated with the material it was used to remove. Recycle or dispose of accordingly
Troubleshooting
| Problem Possible Cause Solution | ||
| Material not blasting from gun | Pressure incorrect Set the correct air pressure according to the specification | |
| Material hose clogged Remove rubber hose and remove blockages | ||
| Air blockage | Check air supply; disassemble and clean sandblasting gun if necessary | |
| Incompatible abrasive (too coarse or too heavy) | Choose suitable abrasive | |
| Clogged gun | Damp abrasive Replace with dry abrasive (damp material can be dried and reused) | |
| Water in air supply Check compressor and filtration system | ||
| Incompatible abrasive (too coarse or too heavy) | Choose suitable abrasive | |
| Sputtering | Worn nozzle Replace nozzle | |
| Abrasive build-up around nozzle Remove nozzle and clean | ||
| Air leak | Check all fittings and hose for air leaks and correct issue by re-tightening, using PTFE tape or replacing | |
| Tool will not stop after Trigger (4) is fully released | Throttle valve O-ring or valve seat damaged Have the tool repaired at an authorised Silverline service centre | |
| If the above troubleshooting solutions fail, contact your dealer or an authorised Silverline service centre. | ||
Silverline Tools Guarantee
This Silverline product comes with a 3 year guarantee
Register this product at www.silverlinetools.com within 30 days of purchase in order to qualify for the 3 year guarantee. Guarantee period begins according to the date of purchase on your sales receipt.
Registering your purchase
Registration is made at silverlinetools.com by selecting the Guarantee Registration button. You will need to enter:-
- Your personal details
• Details of the product and purchase information
Once this information is entered your guarantee certificate will be created in PDF format for you to print out and keep with your purchase.
Terms & Conditions
Guarantee period becomes effective from the date of retail purchase as detailed on your sales receipt.
PLEASE KEEP YOUR SALES RECEIPT
If this product develops a fault within 30 days of purchase, return it to the stockist where it was purchased, with your receipt, stating details of the fault. You will receive a replacement or refund.
If this product develops a fault after the 30 day period, return it to:
Silverline Tools Service Centre
PO Box 2988
Yeovil
BA21 1WU, UK
The guarantee claim must be submitted during the guarantee period.
You must provide the original sales receipt indicating the purchase date, your name, address and place of purchase before any work can be carried out.
You must provide precise details of the fault requiring correction.
Claims made within the guarantee period will be verified by Silverline Tools to establish if the deficiencies are related to material or manufacturing of the product.
Carriage will not be refunded. Items for return must be in a suitably clean and safe state for repair, and should be packaged carefully to prevent damage or injury during transportation. We may reject unsuitable or unsafe deliveries.
All work will be carried out by Silverline Tools or its authorized repair agents.
The repair or replacement of the product will not extend the period of guarantee
Defects recognised by us as being covered by the guarantee shall be corrected by means of repair of the tool, free of charge (excluding carriage charges) or by replacement with a tool in perfect working order.
Retained tools, or parts, for which a replacement has been issued, will become the property of Silverline Tools.
The repair or replacement of your product under guarantee provides benefits which are additional to and do not affect your statutory rights as a consumer.
What is covered:
The repair of the product, if it can be verified to the satisfaction of Silverline Tools that the deficiencies were due to faulty materials or workmanship within the guarantee period.
If any part is no longer available or out of manufacture, Silverline Tools will replace it with a functional replacement part.
Use of this product in the EU.
What is not covered:
Silverline Tools does not guarantee repairs required as a result of:
Normal wear and tear caused by use in accordance with the operating instructions eg blades, brushes, belts, bulbs, batteries etc.
The replacement of any provided accessories drill bits, blades, sanding sheets, cutting discs and other related items.
Accidental damage, faults caused by negligent use or care, misuse, neglect, careless operation or handling of the product.
Use of the product for anything other than normal domestic purposes.
Change or modification of the product in any way.
Use of parts and accessories which are not genuine Silverline Tools components.
Faulty installation (except installed by Silverline Tools).
Repairs or alterations carried out by parties other than Silverline Tools or its authorized repair agents.
Claims other than the right to correction of faults on the tool named in these guarantee conditions are not covered by the guarantee.
CE Declaration of Conformity
The undersigned: Mr Darrell Morris
as authorised by: Silverline Tools
Declares that
This declaration has been issued under the sole responsibility of the manufacturer.
The object of the declaration is in conformity with the relevant Union harmonisation Legislation.
Identification code: 633629
Description: Air Sandblasting Kit
Conforms to the following directives and standards:
• Machinery Directive 2006/42/EC
• EN 1953:1998+A1:2009
The technical documentation is kept by: Silverline Tools
Date: 13/09/16
Signed:

text_image
Dum Mays DirectorMr Darrell Morris
Managing Director
Name and address of the manufacturer:
Powerbox International Limited, Company No. 06897059.
Registered address: Powerbox, Boundary Way, Lufton Trading Estate,
Yeovil, Somerset BA22 8HZ, United Kingdom.
natural_image
Technical line drawing of a threaded connector (no text or symbols on the component itself)
natural_image
Technical line drawing of a threaded pipe fitting labeled EN-6 UK (no additional text or symbols)text_image
M. Darrell MorrisDirecteur général
Silverline Tools Service Centre
PO Box 2988
Yeovil
text_image
Dr. M. Mary Mr. Darrell MorrisMr. Darrell Morris,
text_image
Dr. M. Ng Mr Darrell MorrisDirector General
text_image
D. M. Mays Signor Darrell Morrisnatural_image
Technical line drawing of a threaded connector labeled EN-6 UK (no additional text or symbols)Silverline Tools Service Centre
PO Box 2988
Yeovil
BA21 1WU, GB
text_image
Darrell MorrisAlgemeen directeur
natural_image
Exploded view diagram of a spray gun assembly showing disassembled parts and tool paths (no text or labels)
IMPORTANT NOTE: THE PARTS DIAGRAMS SUPPLIED IN THIS MANUAL ARE FOR REFERENCE ONLY. THE MANUFACTURER MAKES NO REPRESENTATION OR WARRANTY OF ANY KIND TO THE CUSTOMER THAT HE OR SHE IS QUALIFIED TO MAKE ANY REPAIRS TO THE PRODUCT, OR CARRY OUT OTHER ASSEMBLY/DISASSEMBLY PROCEDURES. THE MANU-FACTURER EXPRESSLY STATES THAT ALL REPAIRS AND PART REPLACEMENTS MUST BE UNDERTAKEN ONLY BY A CERTIFIED TECHNICIAN AT AN AUTHORISED SILVERLINE SERVICE CENTRE, AND NOT BY THE CUSTOMER. THE CUSTOMER ASSUMES ALL RISK AND LIABILITY ARISING THROUGH HIS OR HER REPAIRS TO THE ORIGINAL PRODUCT, REPLACEMENT OF PARTS OR OTHER MODIFICATION OF THE ORIGINAL PRODUCT. DIAGRAMS ARE FOR ILLUSTRATION PURPOSES ONLY. SILVERLINE DOES NOT SUPPLY SPARE PARTS FOR THIS ITEM.

IMPORTANT : LES DIFFÉRENTES PIÈCES ILLUSTRÉES DANS LE SCHÉMA FIGURANT DANS CE MANUEL NE SONT PRÉSENTÉES QU'À TITRE DE RÉFÉRENCE. LE FABRICANT N'OFFRE NI IMPLICATION NI GARANTIE QUE SES CLIENTS PUISSENT ÊTRE QUALIFIÉS POUR EFFECTUER DES RÉPARATIONS SUR L'APPAREIL, OU EFFECTUER LES OPÉRATIONS D'ASSEMBLAGE OU DE DÉSASSEMBLAGE. LE FABRICANT STIPULE EXPRESSÉMENT QUE TOUTE RÉPARATION ET TOUT REMPLACEMENT DE PIÈCES DOIVENT ÊTRE UNIQUEMENT RÉALISÉS PAR UN TECHNICIEN QUALIFIÉ DANS UN CENTRE DE RÉPARATION AGRÉÉ SILVERLINE, ET NON PAS PAR LE CLIENT. LE CLIENT ASSUME L'INTÉGRALITÉ DES RISQUES ET DES RESPONSABILITÉS DE SES PROPRES RÉPARATIONS, REMPLACEMENTS DE PIÈCES ET MODIFICATIONS EFFECTUÉS SUR LE PRODUIT INITIAL. LES SCHÉMAS NE SONT PRÉSENTÉS QU'À TITRE D'ILLUSTRATION. SILVERLINE NE FOURNIT AUCUNE PIÈCE DE RECHANGE POUR CE PRODUIT.

natural_image
Exterior view of a black spray gun with nozzle and handle (no visible text or symbols)3 Year Guarantee
*Register online within 30 days. Terms & Conditions apply