
Humidifier 2 Lite - Humidifier Xiaomi - Free user manual and instructions
Find the device manual for free Humidifier 2 Lite Xiaomi in PDF.

| Product type | Ultrasonic humidifier |
| Model | MJJSQ06DY |
| Brand | Xiaomi |
| Dimensions (diameter × height) | Φ 190 × 315 mm |
| Net weight | 1.4 kg |
| Power supply | 220-240 V~, 50/60 Hz |
| Rated power | 23 W |
| Standby power consumption | ≤ 0.3 W |
| Water tank capacity | 4 L |
| Humidification capacity | 300 mL/h |
| Noise level | ≤ 38 dB(A) |
| Operating temperature | 5 °C to 40 °C |
| Operating humidity | 10 % to 80 % RH |
| Status indicator | White (normal), Red (low water/tank removed) |
| Main functions | Ultrasonic humidification, continuous mist rate adjustment via rotary knob |
| Maintenance and cleaning | Clean the tank every 3 days; descale with citric acid; clean the air inlet/outlet |
| Safety | Automatic shut-off when tank is empty; overheat protection; do not use water >40 °C |
| Spare parts and repairability | Sponge filter, atomizer, water tank; contact after-sales service for repair |
Frequently Asked Questions - Humidifier 2 Lite Xiaomi
User questions about Humidifier 2 Lite Xiaomi
0 question about this device. Answer the ones you know or ask your own.
Ask a new question about this device
Download the instructions for your Humidifier in PDF format for free! Find your manual Humidifier 2 Lite - Xiaomi and take your electronic device back in hand. On this page are published all the documents necessary for the use of your device. Humidifier 2 Lite by Xiaomi.
USER MANUAL Humidifier 2 Lite Xiaomi
Read this manual carefully before use, and retain it for future reference.
- This appliance can be used by children aged from 8 years and above and persons with reduced physical, sensory or mental capabilities or lack of experience and knowledge if they have been given supervision or instruction concerning use of the appliance in a safe way and understand the hazards involved. Children shall not play with the appliance. Cleaning and user maintenance shall not be made by children without supervision.
- This appliance is not intended for use by persons (including children) with reduced physical, sensory or mental capabilities, or lack of experience and knowledge, unless they have been given supervision or instruction concerning use of the appliance by a person responsible for their safety.
- If the supply cord is damaged, it must be replaced by the manufacturer, its service agent or similarly qualified persons in order to avoid a hazard.
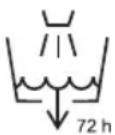
- Clean the water tank every 3 days.
- Be aware that high humidity levels may encourage the growth of biological organisms in the environment.
- Do not permit the area around the humidifier to become damp or wet. If dampness occurs, turn the output of the humidifier down. If the humidifier output volume cannot be turned down, use the humidifier intermittently. Do not allow absorbent materials, such as carpeting, curtains, drapes, or tablecloths, to become damp.
- Unplug the appliance during filling and cleaning.
- Never leave water in the reservoir when the appliance is not in use.
- Empty and clean the humidifier before storage. Clean the humidifier before next use.
-
Empty the water tank and refill every third day. Before refilling, clean it with fresh tap water or cleaning agents if required by the manufacturer. Remove any scale, deposits, or film that has formed on the sides of the water tank or on interior surfaces, and wipe all surfaces dry.
-
WARNING: Micro-organisms that may be present in the water or in the environment where the appliance is used or stored, can grow in the reservoir and be blown in the air causing very serious health risks when the water is not renewed and the tank is not cleaned properly every 3 days.
- Do not plug in or unplug the humidifier with wet hands so as to avoid the risk of electric shocks.
- Do not attempt to disassemble, repair, or modify the humidifier by yourself.
- Do not touch the vaporizer once the humidifier is turned on. Otherwise, you may feel a sting.
- Do not tangle, damage, or place heavy objects on the power cord so as to avoid the risk of electric shocks, short circuits, or fire.
- Immediately unplug the humidifier if there is an error during use, and contact after-sales service team.
- During the working of the humidifier, do not remove the water tank from the base, and never touch the water conduits or any components inside the reservoir.
- Unplug the humidifier during thunderstorms or when you do not plan to use it for an extended period of time.
- Do not turn the humidifier upside down when it is working or there is water in the tank so as to avoid damage to the internal electronic components.
- Please strictly follow the instructions in this user manual when using the humidifier. Users are responsible for any loss or damage that may arise from improper use of the humidifier.
Product Overview
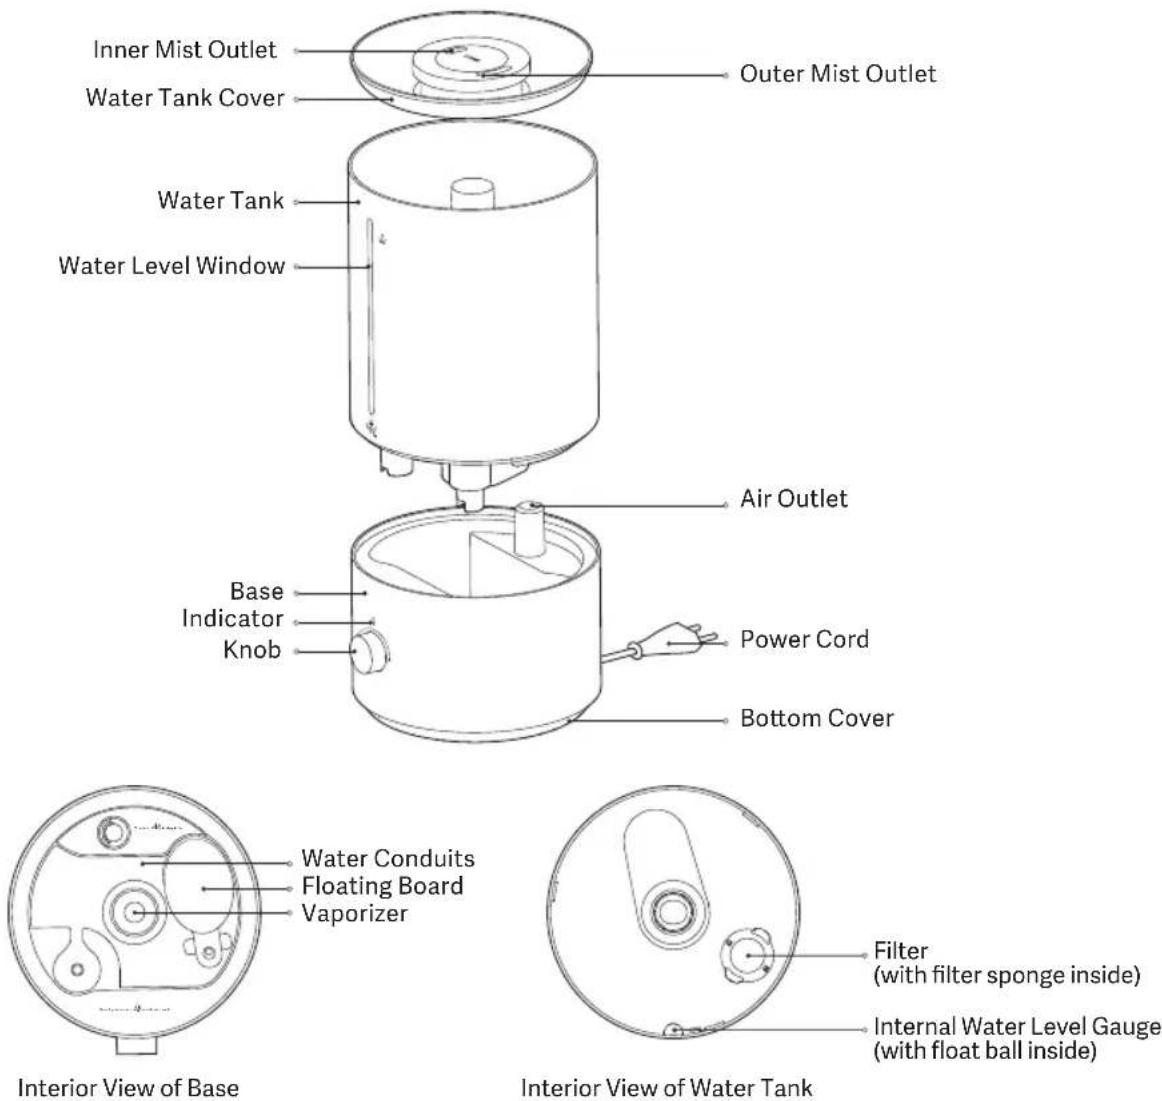
Note: Illustrations of product, accessories, and user interface in the user manual are for reference purposes only.
Actual product and functions may vary due to product enhancements.
How to Use
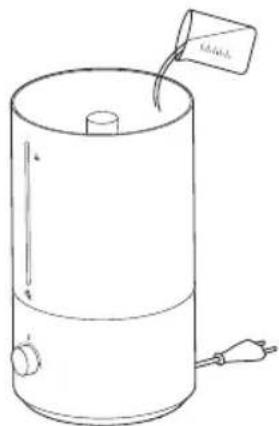
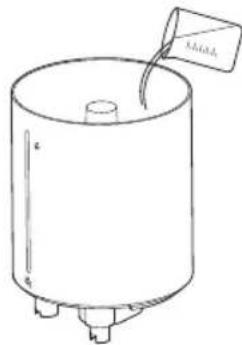
- Water Adding
It is recommended to add clean tap water or purified water in the following three methods:
Method 1: Add an appropriate amount of water to the water tank from the hollow part of the water tank cover.
Method 2: Open the water tank cover to add water to the water tank.
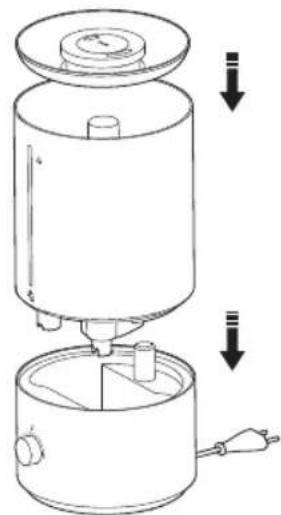
Method 3: Remove the water tank and place it on a level surface, then add water to the water tank. Or you can directly carry the water tank to a faucet, and add water after cleaning the tank.
CAUTION: Ensure that the humidifier is placed on a level surface and the water does not exceed the maximum water level.
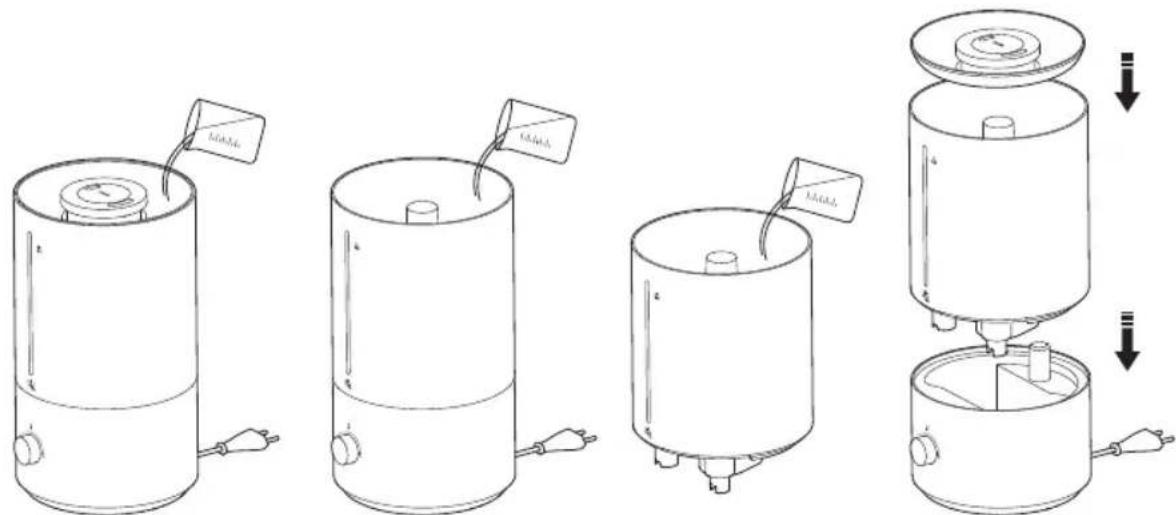
InstallingMethod 3Method 1 Method 2
- Connecting to Power: Plug the humidifier into an electrical outlet that meets the humidifier's requirements to connect to power.
- Turning on: Rotate the knob clockwise.
- Turning off: Rotate the knob counterclockwise to "OFF".
-
Adjusting the Mist Volume: Rotate the knob clockwise to increase the mist volume, and rotate the knob counterclockwise to decrease it.
-
Indicator Status Descriptions
| Humidifier Indicator | |
| Working normally | White |
| Insufficient water | Red |
| Water tank removed | Red |
| Off | Off |
Precautions
Installing the Humidifier
• To avoid electric shocks, fires, personal injury, or other damage, make sure the humidifier is properly used.
- Do not connect the humidifier to the electrical outlet until it is fully assembled.
- Do not disassemble the humidifier.
Moving the Humidifier
- Turn off and unplug the humidifier before moving it.
- When transporting or moving the humidifier, empty the water tank first.
Placing the Humidifier
- When using the humidifier for the first time in a new environment, leave it at room temperature for 30 minutes before use; otherwise, the water tank may be damaged due to sudden temperature changes.
- Do not place the humidifier directly on wooden surfaces to prevent surfaces from being damaged or deformed caused by moisture.
- Do not place the humidifier within a distance of two meters from furniture and appliances to protect furniture and appliances from moisture.
- Keep the humidifier away from heat sources and avoid exposing it to direct sunlight.
• Empty the water tank before placing it separately. - Do not use the humidifier on a blanket or towel to avoid blocking the air inlet and wetting the table.
Water Tank
- Do not add water over 40^ into the water tank to avoid damage to the humidifier.
- Do not add water through the mist outlets.
- When there is water at the bottom of the humidifier, wipe the water off with a dry cloth to avoid damaging the humidifier.
- Do not use the humidifier in environments where the temperature is below 0^ , as the water in the water tank may freeze and cause damage to the humidifier. Always empty the water out of the water tank in such environments.
- Do not place any metal objects, chemicals, or detergent into the water tank when the humidifier is in use; otherwise, the humidifier will be damaged and air quality will deteriorate.
• Always turn off and unplug the humidifier before emptying the water tank.
Using the Humidifier
- Immediately stop using the humidifier if it makes unusual sounds, gives off bad odors, or overheats.
- Keep hair and fabrics away from the humidifier to prevent them from being caught in or blocking the air inlet and the air outlet.
- Do not sit on, lean on or tilt the humidifier.
- When using the humidifier in conjunction with gas-fueled appliances, such as gas stoves and gas heaters, make sure there is sufficient ventilation to avoid carbon monoxide poisoning.
Usage Restrictions
Follow the instructions below to avoid electric shocks, fires, or other damage:
- Always place the humidifier on a level surface. Otherwise, the water level reading may be incorrect or the water tank may overflow.
- The voltage of the power source must be the same as the rated voltage of the humidifier. Do not use the humidifier if the voltages do not match.
Care & Maintenance
• Always turn off and unplug the humidifier before cleaning it.
- The humidifier can be wiped directly with a clean, soft, and damp cloth, and it is recommended to clean it once a week.
- To remove the scale in the water tank, you can pour citric acid (sold separately) into the tank, wipe off the scale with a cotton swab or soft brush, and then clean the tank with water.
- If the humidifier will not be used for an extended period, pour out the remaining water out of the base and the water tank. Clean and dry all the parts before storing the humidifier.
Specifications
Name: Humidifier
Model: MJJSQ06DY
Rated Voltage: 220–240 V\~
Rated Power: 23 W
Rated Frequency: 50/60 Hz
Operating Temperature: 5°C to 40°C
Power Consumption
Off mode: ≤ 0.3 W
Humidifying Capacity: 300 mL/h *
Noise: ≤ 38 dB(A)
Net Weight: 1.4 kg
Water Tank Capacity: 4 L
Item Dimensions: Φ 190 × 202 × 315 mm
Operating Humidity: 10%–80% RH
Time to Enter the Condition
Off mode: ≤ 20 min
* The humidifying capacity was tested by CVC Testing Technology Co., Ltd. according to the standard GB/T 23332-2018. The tested mist dispensing angle is 180°. Test Report No.: WTS2022-8608.
Troubleshooting
| Issue Possible Cause Solution | ||
| The humidifier cannot turn on normally. | The humidifier is not connected to power.The water is running out in the water tank. | Check if the humidifier is plugged in properly.Add water to the water tank. |
| The humidifier does not generate wind or mist when it is working. | Fan errorThe vaporizer is damaged. | Contact the after-sales service team. |
| The mist volume is too small. | The air inlet or the mist outlet is blocked. | Clean the air inlet or the mist outlet. |
Note: If you cannot fix the issues with the above solutions, please contact the after-sales service team.
Regulatory Compliance Information
WEEE Disposal and Recycling Information
All products bearing this symbol are waste electrical and electronic equipment (WEEE as in directive 2012/19/EU) which should not be mixed with unsorted household waste. Instead, you should protect human health and the environment by handing over your waste equipment to a designated collection point for the recycling of waste electrical and electronic equipment, appointed by the government or local authorities. Correct disposal and recycling will help prevent potential negative consequences to the environment and human health. Please contact the installer or local
authorities for more information about the location as well as terms and conditions of such collection points.
EU Declaration of Conformity

We, Guangdong Deerma Technology Co., Ltd., hereby declare that this equipment is in compliance with the applicable Directives and European Norms, and amendments. The full text of the EU declaration of conformity is available at the following internet address: http://www.mi.com/global/service/support/declaration.html
For detailed e-manual, please go to www.mi.com/global/support/user-guide
Read this manual carefully before use, and retain it for future reference.
Read this manual carefully before use, and retain it for future reference.
RACCOLTA DIFFERENZIATA
natural_image
Cross-sectional diagram of a mechanical or electrical component with no visible text or symbolsnatural_image
Technical line drawing of a mechanical component with circular base and central hub (no text or symbols)Methode 3 Methode 1 Methostation
natural_image
Line drawing of a cylindrical water heater with a label and power outlet (no text or symbols on the device itself)الطريقة 1
natural_image
Line drawing of a cylindrical water heater with a label and power outlet (no text or symbols)الطريقة 2
natural_image
Simple line drawing of a cylindrical container with a side arm and three legs (no text or symbols)الطريقة 3
natural_image
Line drawing of a cylindrical device with internal components and two downward arrows indicating flow or movement (no text or symbols)تثبيت
http://www.mi.com/global/service/support/declaration.html
Para consultar o manual detalhado online, visite www.mi.com/global/support/user-guide
Bezpečnostní pokyny
InstalareaMetoda 3Metoda 1 Metoda
http://www.mi.com/global/service/support/declaration.html
For further information, please go to www.mi.com
Manufactured for: Xiaomi Communications Co., Ltd.
Manufactured by: Guangdong Deerma Technology Co., Ltd.
(a Mi Ecosystem company)
Address: No.4-1 Longhui Road, Malong Village Committee, Beijiao Town, Shunde District, Foshan City, Guangdong Province, China
User Manual Version: V1.0
Dirección: No.4-1 Longhui Road, Malong Village Committee, Beijiao Town, Shunde District, Foshan City, Guangdong Province, China
Адрес: No.4-1 Longhui Road, Malong Village Committee, Beijiao Town, Shunde District, Foshan City, Guangdong Province, China
Adresse : No.4-1 Longhui Road, Malong Village Committee, Beijiao Town, Shunde District, Foshan City, Guangdong Province, China
Indirizzo: No.4-1 Longhui Road, Malong Village Committee, Beijiao Town, Shunde District, Foshan City, Guangdong Province, China
Adresse: No.4-1 Longhui Road, Malong Village Committee, Beijiao Town, Shunde District,
Foshan City, Guangdong Province, China
Adres: No.4-1 Longhui Road, Malong Village Committee, Beijiao Town, Shunde District,
Foshan City, Guangdong Province, China
No.4-1 Longhui Road, Malong Village Committee, Beijiao Town, Shunde District, : العنوان
Foshan City, Guangdong Province, China
Adres: No.4-1 Longhui Road, Malong Village Committee, Beijiao Town, Shunde District,
Foshan City, Guangdong Province, China
Morada: No.4-1 Longhui Road, Malong Village Committee, Beijiao Town, Shunde District,
Foshan City, Guangdong Province, China
Adresa: No.4-1 Longhui Road, Malong Village Committee, Beijiao Town, Shunde District, Foshan City, Guangdong Province, China
Dirección: No.4-1 Longhui Road, Malong Village Committee, Beijiao Town, Shunde District, Foshan City, Guangdong Province, China
Adresă: No.4-1 Longhui Road, Malong Village Committee, Beijiao Town, Shunde District, Foshan City, Guangdong Province, China
Xiaomi Technology Netherlands B.V.
Prinses Beatrixlaan 582, 2595BM, The Hague, The Netherlands
contact@support.mi.com
UK REP.
Xiaomi Technology UK Limited
Davidson House, Forbury Square, Reading, Berkshire RG1 3EU
contact@support.mi.com


Please scan the QR code to obtain the e-manual
- Product Overview
- How to Use
- Precautions
- Installing the Humidifier
- Moving the Humidifier
- Placing the Humidifier
- Water Tank
- Using the Humidifier
- Usage Restrictions
- Care & Maintenance
- Specifications
- Regulatory Compliance Information
- WEEE Disposal and Recycling Information
- EU Declaration of Conformity
- RACCOLTA DIFFERENZIATA
- Bezpečnostní pokyny
Brand : Xiaomi
Model : Humidifier 2 Lite
Category : Humidifier