02026 - Vacuum Cleaner Maxxmee - Free user manual and instructions
Find the device manual for free 02026 Maxxmee in PDF.
| Product Type | Rechargeable cordless stick vacuum cleaner |
| Model | 02026 (anthracite-pink), 02046 (anthracite-blue), 02076 (anthracite-turquoise) |
| Power supply | Li-Ion battery pack 22.2 V DC, 2200 mAh |
| Power | 150 W max |
| Charging time | 4 to 5 hours |
| Runtime | Approximately 20 to 30 minutes (full charge) |
| Power adapter | Model CZH013270050EUWH, input 100-240 V~ 50/60 Hz, output 27 V DC 0.5 A |
| Filters | HEPA13 filter (air outlet), metal filter, EPA8 filter |
| Suction levels | 2 levels |
| Included nozzles | Floor nozzle (with rotating brush and LED lighting), crevice tool, upholstery and 2-in-1 brush tool |
| Included accessories | Extension tube, wall mount, nozzle holder, connection cable (power adapter) |
| Filter maintenance | Cleaning by tapping and brushing; rinsing with clean water possible, dry completely before reassembly |
| Emptying the dust container | Press the flap release button; clean after each use |
| Safety instructions | Do not vacuum liquids, hot or sharp objects; keep out of reach of children; use only the supplied power adapter |
| Storage | On wall mount or in a dry place, away from sunlight; charge every 3 months when not in use |
| Disposal | Do not dispose of with household waste; take to a collection point; remove batteries for recycling |
| After-sales service | Contact via the manufacturer's website |
Frequently Asked Questions - 02026 Maxxmee
User questions about 02026 Maxxmee
0 question about this device. Answer the ones you know or ask your own.
Ask a new question about this device
Download the instructions for your Vacuum Cleaner in PDF format for free! Find your manual 02026 - Maxxmee and take your electronic device back in hand. On this page are published all the documents necessary for the use of your device. 02026 by Maxxmee.
USER MANUAL 02026 Maxxmee
Nozzles and Extension Tube 16
Wall Mounting Bracket 17
Charging Up the Battery 17
Use 18
Cleaning and Storage 18
Troubleshooting 20
Disposal 21
Technical Data 22

IMPORTANTNOTICES! PLEASE KEEP FOR REFERENCE!
SYMBOLS


Danger symbols: These symbols indicate possible hazards. Read the associated safety notices carefully and follow them.
Supplementary information
Read the operating instructions before use!
Alternating current
Direct current
Energy efficiency class VI
Only use indoors!
Protection class II
⊖—⊕ Polarity of the barrel connector
Switching power supply

Safe electrical isolation
SIGNAL WORDS
Signal words indicate hazards if the associated notices are not followed.
DANGER – high risk, results in serious injury or death
WARNING – medium risk, may result in serious injury or death
CAUTION – low risk, may result in minor or moderate injury
NOTICE – may result in risk of damage to material
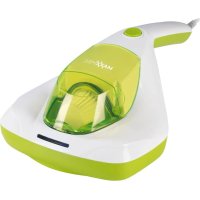
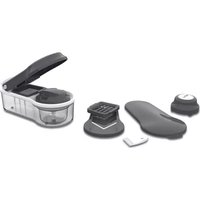
ITEMS SUPPLIED
(Picture A)
1 2 in 1 upholstery and brush nozzle (1 x)
2 Connecting cable (power supply with cable and barrel connector) (1 x)
3 Motor unit incl. exhaust air filter (HEPA13 filter), metal filter and EPA8 filter (1 x each)
4 Wall mounting bracket incl. fixings (1x)
5 Extension tube (1 x)
6 Nozzle holder (1 x)
7 Floor nozzle (1 x)
8 Crevice nozzle (1 x)
Operating instructions (1 x)
Check the items supplied for completeness and the components for transport damage. If you find any damage, do not use the device but contact our customer service department.
Remove any possible films, stickers or transport protection from the device.
Never remove the rating plate and any possible warnings!
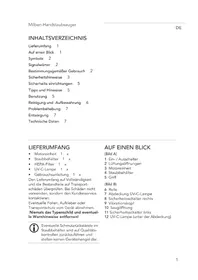
AT A GLANCE
(Picture B)
9 Suction level 1 display
10 Suction level 2 display
11 On / Off button (2 suction levels)
12 Handle
13 Charge control lamps
14 Charging socket
15 Battery (in the housing)
16 Dust container flap
17 Metal filter
18 HEPA13 filter
19 Button for opening the dust container flap
20 Dust container
21 Suction opening
22 Exhaust air filter compartment
23 Filter compartment cover
24 Release button for the filter compartment cover
INTENDED USE
■ This device is designed for vacuum cleaning normal household dust.

On no account should the device be used to suck up the following:
- liquids or wet substances (e.g. wet carpet shampoo)
- glowing ash, cigarette ends, matches, etc.
- inflammable or explosive substances
- very fine dust (e.g. concrete dust), ash or toner
- pointed, hard objects such as large pieces of broken glass
■ The device is for personal use only and is not intended for commercial applications.
■ The device should only be used as described in the operating instructions. Any other use is deemed to be improper.
■ The warranty does not cover faults caused by incorrect handling, damage or attempted repairs. The same applies to normal wear and tear.
EN
Dear Customer,
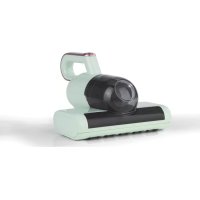
We are delighted that you have chosen the MAXXMEE cordless handheld & floor vacuum cleaner. This vacuum cleaner is cordless and is as flexible as a handheld vacuum cleaner, as thorough as a floor vacuum cleaner – and in any version it is incredibly quiet, light and easy to use. With the extension tube and one of the three nozzles, you can assemble it however you wish. The specially developed floor nozzle uses the electrically rotating cleaning brush to dislodge even ingrained dirt and animal hairs. Thanks to the LED lighting, you will not miss any dust under the furniture either. The crevice nozzle extends into the corners and with the 2 in 1 upholstery and brush nozzle you can easily remove dust and dirt from car seats, keyboards and stairs.
If you have any questions about the device and about spare parts/accessories, contact the customer service department via our website: www.ds-group.de/kundenservice
We hope you have a lot of fun with your MAXXMEE cordless handheld & floor vacuum cleaner.
Information About the Operating Instructions
Before using the device for the first time, please read through these operating instructions carefully and keep them for future reference and other users. They form an integral part of the device. The manufacturer and importer do not accept any liability if the information in these operating instructions is not complied with.
SAFETY NOTICES

WARNING: Note all safety notices, instructions, illustrations and technical data provided with this device. Failure to follow the safety notices and instructions may result in electric shock, fire and / or injuries.
This device may be used by children aged 8 and over and by people with reduced physical, sensory or mental abilities or a lack of experience and/or knowledge if they are supervised or have received instruction on how to use the device safely and have understood the dangers resulting from this.
■ Children must not play with the device.
■ Cleaning and user maintenance must not be carried out by children, unless they are older than 8 years of age and are supervised.
■ Children younger than 8 years of age and animals must be kept away from the device and the connecting cable.
■ The device must always be disconnected from the mains power when it is left unattended and before it is assembled, disassembled or cleaned.
■ Only ever charge up the battery using the power supply that is supplied (CZH013270050EUWH). Do not use the power supply that comes with the device to charge up any other devices.
- Do not make any modifications to the device. The LEDs in the floor nozzle cannot be replaced. Also do not replace the connecting cable yourself. If the device, the connecting cable or the accessories of the device are damaged, they must be replaced by the manufacturer, customer service department or a specialist workshop in order to avoid any hazards.

DANGER – Danger of Electric Shock
- Charge and store the device only in closed rooms.
■ Do not use, charge or store it in rooms with high humidity.
■ Never touch the device and the connecting cable with wet hands when these components are connected to the mains power.
■ Never assemble wet or damp components or attach them to the motor unit!
■ Never suck up liquids. Do not pour any liquids into the dust container. Keep the motor unit away from moisture or wet conditions!
If the device is to be used for cleaning a car, ensure that the device is not exposed to rain or moisture.
■ Never immerse the device and the connecting cable in water or other liquids and ensure that these components cannot fall into water or become wet.
If the device falls into water while it is connected to the mains power, switch off the power supply immediately! Only after this should you pull the device out of the water.

WARNING – Danger of Injury!
- Keep the packaging material away from children and animals. There is a danger of suffocation.
■ Make sure that the connecting cable is always kept out of the reach of small children and animals. There is a danger of strangulation.
■ Lay the connecting cable in such a way that it does not present a trip hazard. - Keep animals, hair, jewellery, wide clothing, fingers and all other body parts away from the nozzles of the device. They could become stuck to the device. Should the vacuum cleaner become stuck, switch the device off immediately.

WARNING – Danger from Rechargeable Batteries
- Do not take apart the battery. Protect it from: fire, high temperatures of over 40°C, direct sunlight and sub-zero temperatures. The battery could ignite or explode. Do not store the battery in a vehicle where it might be exposed to extreme temperatures.
■ Ensure that the motor unit and the battery cannot get wet. Do not use the device if liquid has got inside it. The battery could ignite or explode.
EN
If the battery leaks, do not allow your skin, eyes and mucous membranes to come into contact with the battery acid. There is a danger of burns. If you do come into contact with battery acid, rinse the affected areas with abundant clear water straight away and seek medical assistance immediately.
■ Do not use the device if the battery has leaked.

WARNING – Danger of Fire!
■ Do not charge up the device in the vicinity of highly flammable materials (curtains, textiles, etc.).
■ Do not cover the device or the power supply during operation or charging in order to prevent it from catching fire. Do not insert anything into the ventilation openings of the device and make sure that they do not become clogged.
NOTICE – Risk of Damage to Material and Property
■ The device should only be used if it has been fully and correctly assembled! The filters must be inserted and must not be damaged! If dirt were to get inside the motor unit, this could damage the motor.
■ Do not charge up the device in the vicinity of highly flammable materials (curtains, textiles, etc.).
- Do not cover the device or the power supply during operation or charging in order to prevent it from catching fire. Do not insert anything into the ventilation openings of the device and make sure that they do not become clogged.
NOZZLES AND EXTENSION TUBE
Floor Nozzle
The electric floor nozzle (7) is suitable for both carpets and hard floors. It has LED lighting and a rotating cleaning brush to make it easier to pick up hair and fluff.
2 in 1 Upholstery and Brush Nozzle
The 2 in 1 upholstery and brush nozzle (1) has a flexible brush attachment. Press the button on it and slide it forwards or backwards until it engages (Picture C).
If the brush attachment is at the front, the nozzle is suitable for dusting all uneven objects, furniture, lamp shades, picture frames, keyboards, books etc.
If the brush attachment is at the back, the nozzle acts as an upholstery nozzle for cleaning all kinds of upholstery (e.g. sofas, car seats etc.).
Crevice Nozzle
The crevice nozzle (8) is suitable for places which are hard to get to, such as corners, crevices or recesses. Upholstery and all nooks and crannies that cannot be reached with other nozzles.
Extension Tube
The extension tube (5) is intended to be used with the floor nozzle for cleaning floors (Picture D). In addition, it makes it easier to reach ceilings and corners.
Nozzle Holder
The crevice nozzle and the 2 in 1 upholstery and brush nozzle can be plugged onto the nozzle holder (6) for storage.
This is clamped onto the extension tube (Picture E).
WALL MOUNTING BRACKET
Please Note!
■ Make sure that the surface on which the wall mounting bracket is attached is stable.
■ Use suitable fixings to attach the wall mounting bracket. If you are unsure whether the fixings supplied are suitable for the wall, seek advice from a specialist retailer.
■ Before drilling, ensure that there are no pipes or power cables behind the intended drilling point.
The device can be stored in the wall mounting bracket (4) and charged up there for its next use (Picture E).
The wall mounting bracket can be affixed or screwed onto the wall. The items supplied include 2 screws and anchors to allow you to do this.

Ideally attach the wall mounting bracket near to an easily accessible plug socket so that the device can be charged.
The cord of the connecting cable (2) can be tucked in on the small hook on the wall mounting bracket.
Sticking On the Wall Mounting Bracket
Make sure that the spot on which the wall mounting bracket is to be stuck is clean, dry and free of dust.
- Peel off the protective strips from the adhesive pads on the back of the wall brackets.
- Stick the wall mounting bracket straight onto the wall and press it on firmly.
Screwing On the Wall Mounting Bracket
- Place the wall mounting bracket straight against the wall and mark out two drill holes.
- Drill holes into the wall and place anchors in them.
- Screw on the wall mounting bracket.
Inserting the Motor Unit
Insert the dust container (20) into the wall mounting bracket so that the button for opening the dust container flap (19) rests in the hollow of the wall mounting bracket.
CHARGING UP THE BATTERY
Please Note!
■ Only connect the power supply to a plug socket that is properly installed and matches the technical data of the device. The plug socket must be readily accessible so that the connection to the mains can quickly be isolated.
■ Pull the power supply out of the plug socket if an error occurs during charging or before a thunderstorm.
■ Only use suitable extension cables whose technical data is the same as that of the power supply.
It is essential that you charge up the battery fully before you first use the device in order to achieve the maximum charging capacity. If the battery is fully discharged during use, it must be fully charged up again before it is next used.
- Plug the barrel connector of the connecting cable (2) into the charging socket (14).
EN
- Connect the power supply to a plug socket. The charge control lamps (13) start to flash and the battery (15) is charging. If all charge control lamps are constantly lit, the battery is fully charged.
USE
Please Note!
■ Make sure that there are no large, sharp objects on the surface which is to be cleaned.
■ Note the MAX marking of the dust container. If the marking is reached during use, empty the dust container. Empty and clean the dust container after every use. The filters must also be regularly cleaned in order to prevent overloading of the motor.
■ Switch off the device after you finish cleaning each surface to significantly increase the operating time on each battery charge. Charge up the battery after use (see the "Charging Up the Battery" chapter).

The device cannot be operated when it is connected to the mains power. Disconnect the connecting cable (2) prior to use.
- Select a nozzle (see the "Nozzles and Extension Tube" chapter) and plug it into the suction opening (21). You must hear it engage. For a longer reach, plug the extension tube (5) in between.
- To pull a nozzle or the extension tube out again, press the respective release button.
- Switch on the device and guide the nozzle over the area to be cleaned. To switch on at suction level I, press the
On/Off button (11) once. If the

On / Off button is pressed again, the suction power increases to level 2.
- To switch off the device, press the ⏻ On / Off button a third time.
- To ensure optimum performance of the device, empty and if necessary clean the dust container after every use (see next chapter).
CLEANING AND STORAGE
Please Note!
■ Do not use any sharp or abrasive cleaning agents to clean the device. They may damage the surfaces.

The filters may lose some of their colour over time. This is normal and does not have any adverse effect on function.
Emptying the Dust Container
Take off the extension tube (5) if it is located on the device.
- Hold the dust container (20) over an open dustbin and press the button for opening the dust container flap (19). The dust container flap (16) opens and the dirt drops out.
- To close it, press the dust container flap onto the dust container. You must hear it engage.
Cleaning the Dust Container, Metal Filter and EPA8 Filter
- Open the dust container, reach in and twist the bottom of the metal filter (17) a little until it is detached from the device.
- Take the metal filter out of the dust container.
-
The EPA8 filter (18) is inserted in the metal filter. Twist it a little and pull it out.
-
Tap out both filters and clean them with a soft brush if necessary. They can also be rinsed out with clear water, but they must be completely dry before they are assembled!
- Wipe the dust container with a damp cloth if necessary and then dry it or allow it to dry in the air. Never assemble wet or damp components or attach them to the motor unit (3)!
- When all components are dry, insert the EPA8 filter into the metal filter and twist it anticlockwise to secure it.
- Insert the metal filter into the dust container and twist it anticlockwise to secure it.
- Close the dust container.
Cleaning the Exhaust Air Filter
- Press the release button (24) to open the filter compartment cover (23).
- Pull the exhaust air filter out of the exhaust air filter compartment (22).
- Tap out and brush out the exhaust air filter and the exhaust air filter compartment. The exhaust air filter can also be rinsed out with clear water, but it must be completely dry before it is assembled!
- Insert the cleaned exhaust air filter into the exhaust air filter compartment and flip the filter compartment cover shut.
Cleaning the Motor Unit, Extension Tube and Nozzles
- Wipe down the motor unit (3), the extension tube (5) and the nozzles (1, 7, 8) with a damp cloth if necessary. Then wipe them dry.
- Remove hair and fluff from the nozzles and brushes.
Cleaning the Floor Nozzle
To make it easier to clean, the brush can be removed from the floor nozzle (7):
- Turn over the floor nozzle so that the bottom is pointing upwards.
- On the right side there is a catch next to the small wheel. Slide the catch outwards.
- Take out the brush and remove any dirt and contamination.
- Reinsert the brush. When you do this, insert the end with the star-shaped recess first. Then press the other end into the holder until it engages.
- Slide back the catch.
Storage
- Store the device and accessories in a cool, dry place which is protected from direct sunlight and is out of the reach of children and animals.
- The 2 in 1 upholstery and brush nozzle (1) and crevice nozzle (8) can be plugged onto the nozzle holder (6) on the extension tube (5) (Picture E).
- Hang the motor unit (3) with the suction opening (21) facing downwards into the wall mounting bracket (4). The button for opening the dust container flap (19) must rest in the hollow of the wall mounting bracket.

To prevent a deep discharge of the battery, charge it up every 3 months if it is not used for a prolonged period.
EN
TROUBLESHOOTING
If the device does not work properly, check whether you are able to rectify the problem yourself. If the problem cannot be solved with the steps below, contact the customer service department.

Do not attempt to repair an electrical device yourself!
The device does not start.
The battery (15) is empty.
▶ Charge up the battery.
The device is connected to the mains power.
▶ Disconnect the connecting cable (2)
Low suction force.
The battery (15) is weak.
▶ Charge up the battery.
The dust container is too full.
▶ Empty the dust container.
The filters are dirty.
Clean the filters.
The suction opening (21), the nozzle (1, 7, 8) or the extension tube (5) is blocked.
▶ Switch off the device and remove the blockage.
The dirt particles are too large or too heavy.
▶ Switch off the device and remove dirt particles by hand.
Dust escapes from the device during cleaning.
The dust container (20) is not closed correctly.
▶ Close the dust container flap (16) until it is heard to engage.
The filters are not fitted correctly.
▶ Correct the fit of the filters.
The filters are dirty.
Clean the filters.
The filters are worn or damaged.
▶ Replace the filters.
The charge control lamps (13) do not flash when the device is connected to the mains power.
The power supply is not inserted in the plug socket correctly or the barrel connector is not inserted in the charging socket (14) of the device correctly.
▶ Correct the fit.
The plug socket is defective.
▶ Try another plug socket.
Unusual odour
The device is being used for the first time.
▶ A new odour is normal when the device is used for the first time; it disappears after a while.
DISPOSAL

Dispose of the packaging material in an environmentally friendly manner so that it can be recycled.
The adjacent symbol (crossed-out bin underlined) means that used devices should not be disposed of in the domestic waste, but should instead be taken to special collection and return systems.
Owners of used devices must remove from the used device any used batteries or rechargeable batteries which are not encapsulated by the used device and can be removed in a non-destructive way and dispose of them separately (see also the section on battery disposal).
Owners of used devices from private households can take them free of charge to the collection points of the public waste disposal authorities or the disposal points which are set up by manufacturers and distributors under the Electrical Equipment Act so that they can be disposed of in an environmentally friendly way and valuable raw materials can be recovered. If they are not disposed of properly, toxic ingredients may escape into the environment and cause harm to the health of humans, animals and plants. Businesses which market electrical and electronic devices are also obliged to take back used devices.

(Rechargeable) batteries must not be disposed of along with the household waste. Consumers are legally obliged to dispose of (rechargeable) batteries separately. (Rechargeable) batteries can be handed in free of charge at a collection point of the local authority/district or in retailers so that they can be disposed of in an environmentally friendly way and valuable raw materials can be recovered. If they are not disposed of properly, toxic ingredients may escape into the environment and cause harm to the health of humans, animals and plants.
Only dispose of (rechargeable) batteries when they are discharged. If possible, use rechargeable batteries rather than single-use batteries. In the case of (rechargeable) batteries containing lithium, tape over the poles before you dispose of them to prevent a short circuit. A short circuit may cause a fire or explosion.
Waste prevention makes an even more valuable contribution to protecting the environment. This means if possible, as well as continuing to use or repair a device yourself, passing it on to another user also represents an ecologically beneficial alternative to disposal.
EN
Removing the Battery
Please Note!
■ The device must not be connected to the mains power while the battery is being removed / inserted.
■ The battery must not be disassembled, thrown into a fire, immersed in liquids or short-circuited.
■ You should never open the battery!
To remove the battery from the device, proceed as follows:
- Turn the motor unit upside down.
-
Undo the two screws on the bottom of the battery compartment with a screwdriver (Picture G).
-
Use a screwdriver to press in the locking lugs which are located centrally on both sides of the battery compartment to release the cover(Picture H).
- Remove the cover (Picture I).
- Take out the battery pack (Picture J) and turn it over.
- Release three plug connections (Picture K).
- Sever the two remaining cables with pliers (Picture L).
- Dispose of the battery pack in accordance with the statutory regulations governing the disposal of batteries.
TECHNICAL DATA
Article number: 02026 (anthracite-pink); 02046 (anthracite-blue); 02076 (anthracite-turquoise)
ID of the operating instructions: Z 02026_02046_02076 M DS V4 1023 as
Device
Model number: CBL-SV1606
Voltage supply: 22.2 V DC (Li-ion battery pack; 2 200 mAh)
Power: 150 W max.
Battery charge time: 4 – 5 hours
Battery operating time: approx. 20 - 30 minutes (with fully charged battery)
Power supply
∅ efficiency in operation: 86.52 %
Efficiency on low load (10 %): 87.42 %
Power consumption on no-load: 0.08W

All rights reserved.
SOMMAIRE
Symboles 23