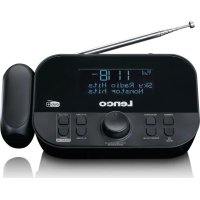
CR615 - Alarm Clock LENCO - Free user manual and instructions
Find the device manual for free CR615 LENCO in PDF.


| Product type | Radio alarm clock with projection and dual alarm |
| Brand and model | Lenco CR615 |
| Dimensions (main unit) | 181 x 95 x 85 mm |
| Weight (main unit) | 340 g |
| Power supply | AC adapter 100-240 V AC, 50/60 Hz, output 5 V / 1 A |
| Power consumption | 5 W max |
| Radio bands | DAB/DAB+ (174-240 MHz) and FM (87.5-108 MHz) |
| Audio output power | 1 W |
| Main functions | DAB+/FM radio, dual alarm with snooze, time projection, brightness dimmer, sleep timer, station presets |
| Connectivity | 3.5 mm headphone jack, telescopic antenna |
| Display | Backlit screen with time, date, radio information |
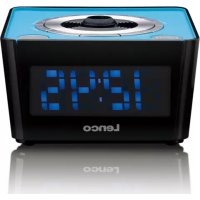
| Projection | Time projection onto ceiling or wall, 180° rotation |
| Time setting | Automatic via DAB or manual via menu |
| Alarms | 2 independent alarms with source selection (FM, DAB, buzzer), daily, weekly or weekend repetition |
| Operating temperature | 0 to 35 °C |
| Materials and finish | Plastic casing, compact design |
| Care and cleaning | Soft dry cloth, do not use solvents |
| Safety | Do not expose to moisture, do not block ventilation, unplug during storms |
| Spare parts and repairability | AC adapter referenced OBL-0501000E, repair by qualified personnel only |
| General information | Warranty and after-sales service: www.lenco.com. CE certified. Compliant with directive 2014/53/EU. |
Frequently Asked Questions - CR615 LENCO
User questions about CR615 LENCO
0 question about this device. Answer the ones you know or ask your own.
Ask a new question about this device
Download the instructions for your Alarm Clock in PDF format for free! Find your manual CR615 - LENCO and take your electronic device back in hand. On this page are published all the documents necessary for the use of your device. CR615 by LENCO.
USER MANUAL CR615 LENCO
Usage of controls or adjustments or performance of procedures other than those specified herein may result in hazardous radiation exposure.
KEEP THESE INSTRUCTIONS IN MIND:
- Do not cover or block any ventilation openings. When placing the device on a shelf, leave 5 cm (2") free space around the whole device.
- Install in accordance with the supplied user manual.
- Keep the device away from heat sources such as radiators, heaters, stoves, candles and other heat-generating products or naked flame. The apparatus can only be used in moderate climates. Extremely cold or warm environments should be avoided. Working temperature between 0^ and 35^ C.
- Avoid using the device near strong magnetic fields.
- Electrostatic discharge can disturb normal usage of this device. If so, simply reset and restart the device following the instruction manual. During file transmission, please handle with care and operate in a static-free environment.
- Warning! Never insert an object into the product through the vents or openings. High voltage flows through the product and inserting an object can cause electric shock and/or short circuit internal parts. For the same reason, do not spill water or liquid on the product.
- Do not use in wet or moist areas such as bathrooms, steamy kitchens or near swimming pools.
- The apparatus shall not be exposed to dripping or splashing and make sure that no objects filled with liquids, such as vases, are placed on or near the apparatus.
- Do not use this device when condensation may occur. When the unit is used in a warm wet room with damp, water droplets or condensation may occur inside the unit and the unit could maybe not work properly; let the unit stand in power OFF for 1 or 2 hours before turning on the power: the unit should be dry before getting any power.
- Although this device is manufactured with the utmost care and checked several times before leaving the factory, it is still possible that problems may occur, as with all electrical appliances. If you notice smoke, an excessive build-up of heat or any other unexpected phenomena, you should disconnect the plug from the main power socket immediately.
- This device must operate on a power source as specified on the specification label. If you are not sure of the type of power supply used in your home, consult your dealer or local power company.
- Keep away from rodents. Rodents enjoy biting on power cords.
- To clean the device, use a soft dry cloth. Do not use solvents or petrol based fluids. To remove severe stains, you may use a damp cloth with dilute detergent.
- The supplier is not responsible for damage or lost data caused by malfunction, misuse, modification of the device or battery replacement.
- Do not interrupt the connection when the device is formatting or transferring files. Otherwise, data may be corrupted or lost.
- If the unit has USB playback function, the usb memory stick should be plugged into the unit directly. Don't use an usb extension cable because it can cause interference resulting in failing of data.
- The rating label has been marked on the bottom or back panel of the apparatus.
-
This device is not intended for use by people (including children) with physical, sensory or mental disabilities, or a lack of experience and knowledge, unless they're under supervision or have received instructions about the correct use of the device by the person who is responsible for their safety.
-
This product is intended for non professional use only and not for commercial or industrial use.
- Make sure the unit is adjusted to a stable position. Damage caused by using this product in an unstable position vibrations or shocks or by failure to follow any other warning or precaution contained within this user manual will not be covered by warranty.
- Never remove the casing of this apparatus.
- Never place this apparatus on other electrical equipment.
- Do not allow children access to plastic bags.
- Only use attachments/accessories specified by the manufacturer.
- Refer all servicing to qualified service personnel. Servicing is required when the apparatus has been damaged in any way, such as the power supply cord or the plug, when liquid has been spilled or objects have fallen into the apparatus, when the apparatus has been exposed to rain or moisture, does not operate normally, or has been dropped.
- Prolonged exposure to loud sounds from personal music players may lead to temporary or permanent hearing loss.
-
If the product is delivered with power cable or AC power adaptor:
-
If any trouble occur, disconnect the AC power card and refer servicing to qualified personnel.
- To completely disconnect the power input, the mains plug of the apparatus shall be disconnected from the mains, as the disconnect device is the mains plug of apparatus.
- Don't step on or pinch the power adaptor. Be very careful, particularly near the plugs and the cable's exit point. Do not place heavy items on the power adaptor, which may damage it. Keep the entire device out of children's reach! When playing with the power cable, they can seriously injure themselves.
● Unplug this device during lightning storms or when unused for a long period. - The socket outlet must be installed near the equipment and must be easily accessible.
- Do not overload ac outlets or extension cords. Overloading can cause fire or electric shock.
● Devices with class 1 construction should be connected to a main socket outlet with a protective earthed connection.
● Devices with class 2 construction do not require a earthed connection. - Always hold the plug when pulling it out of the main supply socket. Do not pull the power cord. This can cause a short circuit.
-
Do not use a damaged power cord or plug or a loose outlet. Doing so may result in fire or electric shock.
-
If the product contains or is delivered with a remote control containing coin/cell batteries: Warning:
-
“Do not ingest battery, Chemical Burn Hazard” or equivalent working.
- [The remote control supplied with] This product contains a coin/button cell battery is swallowed, it can cause severe internal burns in just 2 hours and can lead to death.
- Keep new and used batteries away from children.
- If the battery compartment does not close securely, stop using the product and keep it away from children.
-
If you think batteries might have been swallowed or placed inside any part of the body, seek immediate medical attention.
-
Caution about the use of Batteries:
-
Danger of explosion if battery is incorrectly replaced. Replace only with the same or equivalent type.
- Battery cannot be subjected to high or low extreme temperatures, low air pressure at high altitude during use, storage or transportation.
-
Replacement of a battery with an incorrect type that can result in an explosion or the leakage of flammable liquid or gas.
-
Disposal of a battery into fire or a hot oven, or mechanically crushing or cutting of a battery, that can result in an explosion.
- Leaving a battery in an extremely high temperature surrounding environment that can result in an explosion or that leakage of flammable liquid or gas.
- A battery subjected to extremely low air pressure that may result in an explosion or the leakage of flammable liquid or gas.
- Attention should be drawn to the environmental aspects of battery disposal.
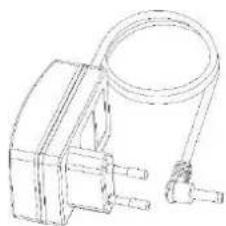
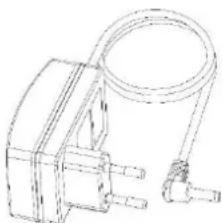
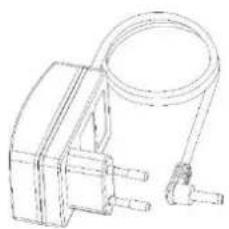
Accessories:
User manual

natural_image
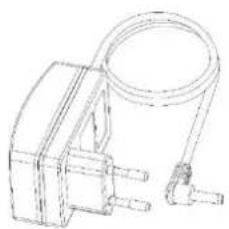
Simple line drawing of an open book with no text or symbols visiblePower supply
natural_image
Line drawing of a mechanical clamp or connector with a coiled cable (no text or symbols)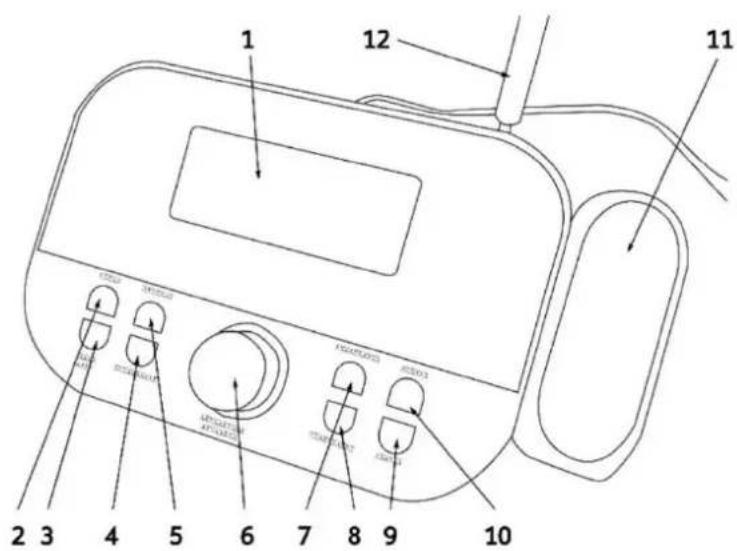
Command
- Display
- "DIMMER" button
- " /MODE" button
- "PRESET SCAN" button
- "MENU/INFO" button
- "VOLUME/SCROLL/ENTER/SNOOZE" dial
-
"P+/TUNE+" button
-
"P-/TUNE-" button
- "Projection ON/OFF" button
- "180° FLIP" button
- Projector
- Antenna (Extend and reposition for better reception)
- DC-IN jack (not shown)
- Headphone jack (not shown)
Getting Started
Insert the plug of the supplied power adapter into the power supply socket (13) and connect the power supply to a 110-230V \~ 50/60Hz power socket.
OPERATION
Power On/Standby:
- Press "⏻/MODE" button to power on the unit.
- Press and hold for 2 seconds "☐/MODE" button to put the unit in Stand-by mode (the display shows time and date).
Volume adjustment
Turn the "VOLUME/SCROLL/ENTER/SNOOZE" dial (6) to increase or decrease the volume.
Time Setting
The time will be set automatically by turning on the device in DAB mode, if you want to set it manually:
- Press "↓/MODE" button to switch on the radio.
- Hold down the "MENU/INFO" button (5) for 2 seconds.
- Turn the "VOLUME/SCROLL/ENTER/SNOOZE" dial (6) and select "System", press the "VOLUME/SCROLL/ENTER/SNOOZE" dial (6) to select it.
- Turn the "VOLUME/SCROLL/ENTER/SNOOZE" dial (6) and select "Time", press the "VOLUME/SCROLL/ENTER/SNOOZE" dial (6) to select it.
- Turn the "VOLUME/SCROLL/ENTER/SNOOZE" dial (6) and select "Set Time/Date", press the VOLUME/SCROLL knob (6) to select it.
- Turn the "VOLUME/SCROLL/ENTER/SNOOZE" dial (6) to adjust the hour and press the "VOLUME/SCROLL/ENTER/SNOOZE" dial (6) to confirm it and go to setting the minutes.
- Also adjust the date using the "VOLUME/SCROLL/ENTER/SNOOZE" dial (6).
Setting Alarm
To set alarm 1 or 2, follow the next steps:
- In clock mode (Stand-by), press and hold for 2 seconds "MENU/INFO" button (5), select "System" and press the "VOLUME/SCROLL/ENTER/SNOOZE" dial (6) to confirm.
- Turn the "VOLUME/SCROLL/ENTER/SNOOZE" dial (6) and select the "Alarm" item, press it to select it.
- Turn the "VOLUME/SCROLL/ENTER/SNOOZE" dial (6) and select "Alarm 1" or "Alarm 2", press it to confirm.
- Turn the "VOLUME/SCROLL/ENTER/SNOOZE" dial (6) to adjust the hour and press it to confirm it and move on to the minute setting.
- Turn the "VOLUME/SCROLL/ENTER/SNOOZE" dial (6) to adjust the duration and press to confirm.
- Turn the "VOLUME/SCROLL/ENTER/SNOOZE" dial (6) to select the ringtone type (FM, DAB or BUZZER) and press it to confirm it.
- Turn the "VOLUME/SCROLL/ENTER/SNOOZE" dial (6) to select the frequency (once, daily, weekly, weekend only) and press it to confirm.
- Turn the "VOLUME/SCROLL/ENTER/SNOOZE" dial (6) to adjust the start date and press to confirm it.
- Turn the "VOLUME/SCROLL/ENTER/SNOOZE" dial (6) to adjust the volume and press it to confirm.
- Rotate the "VOLUME/SCROLL/ENTER/SNOOZE" dial (6) to activate or deactivate the alarm and press it to confirm.
Once the alarm is activated, the bell symbol will appear on the display with the number 1 for the first alarm and number 2 for the second alarm.
Turn off the alarm
To stop the alarm completely (ringtone or radio) press "⏻/MODE" button (1).
To temporarily stop the alarm sound, press the "VOLUME/SCROLL/ENTER/SNOOZE" dial (6), the interruption lasts 9 minutes, after which the alarm goes back on.
DAB/DAB+ Radio
Automatic Station Memory
- Adjust the antenna extension and the angle to get the best reception.
- Press and hold the PRESET SCAN button (4) for a few seconds to start the automatic scan of the DAB stations. During the scan, the display will show the progress bar and the number of stored stations.
- Hold down the "P+/TUNE+" button (7) or "P-/TUNE-" button (8) for a few seconds, turn the "VOLUME/SCROLL/ENTER/SNOOZE" dial (6) to select the desired station; press the "VOLUME/SCROLL/ENTER/SNOOZE" dial (6) to confirm and start listening to the station.
Note:
- It may be necessary to wait a few seconds for the unit to tune to the new channel.
- In DAB mode the date and time of the device are synchronized with those of the station being listened to.
Manual Scan
- Hold down the "MENU/INFO" button (5) for 2 seconds.
- Turn the "VOLUME/SCROLL/ENTER/SNOOZE" dial (6) and select the "Manual Tune" item, press the "VOLUME/SCROLL/ENTER/SNOOZE" dial (6) to select it.
- Turn the "VOLUME/SCROLL/ENTER/SNOOZE" dial (6) to select the desired channel (5A-13F), press the "VOLUME/SCROLL/ENTER/SNOOZE" dial (6) to select it.
Note: Up to 30 stations can be stored. A stored frequency can be erased from the memory by storing another frequency in its place.
DAB/DAB+ information
In DAB function press the “MENU/INFO” button (5) repeatedly to change the information displayed:
Top line:
station channel and frequency for the current station will be shown on the top line.
Bottom line:
a. Scrolling text broadcast by most DAB stations
b. DAB ensemble
c. Type of content being broadcast. E.g. Sport, Pop music.
d. DAB Station name
e. DAB frequency
f. Signal error
g. 80kbps/DAB
DAB/DAB+ Menu
- In DAB mode, hold down the "MENU/INFO" button (5) for a few seconds.
- Turn the "VOLUME/SCROLL/ENTER/SNOOZE" dial (6) to select the desired item from: Full Scan, Manual tune, DRC, Prune, TA, System.
- Press the "VOLUME/SCROLL/ENTER/SNOOZE" dial (6) to select the desired item and enter its settings.
A) Full Scan – Automatically scan DAB+ stations
B) Preset Recall - select a radio station from those stored.
C) Preset Store - allows you to store a station.
D) Manual Tune – manual tune
E) DRC – off, low, high. When activated, DRC reduces the volume of louder sounds and boosts the volume of quieter sounds. Good when you listen at low volume.
F) Prune – yes, no. when activated, the stations with no signal will not be shown anymore on the display.
G) TA - On, Off. This function is traffic info.
H) System –
- Sleep-off, 15, 30, 45, 60, 90 (minutes)
- Alarm - To set Alarm 1 and Alarm 2.
- Time:
- Set Time/Date
- Auto update - Automatic update of date and time from source or Off. It is advisable to keep it set to "Update from DAB" to avoid continuous time shifts.
- Set 12/24 hour - Set AM/PM or 24-hour.
-
Set date format - DD MM YYYY, MM DD YYYY
-
Language – English, Deutsch, Italiano, Francais, Nederlands, Espanol, Dansk, Portugese.
-
factory reset – No or Yes
-
SW version
FM Radio
Automatic Station Memory
- Press and hold for 3 seconds "PRESET SCAN" button (4) to start scanning and automatic preset of the stations.
- At the end of the scan, use the "P+/TUNE+" button (7) or "P-/TUNE-" button (8) to select a memorized radio station.
Note: The automatic scan sensitivity is adjustable by Menu.
Manual search and storage:
-
Press and hold the "P+/TUNE+" button (7) or "P-/TUNE-" button (8) for a few seconds to tune in to the next or previous radio station.
-
To store a radio station:
-
Move to the frequency to be stored and press the "PRESET SCAN" button (4).
- Turn the "VOLUME/SCROLL/ENTER/SNOOZE" dial (6) to select the number where to store the station.
- Press the "VOLUME/SCROLL/ENTER/SNOOZE" dial (6) to confirm.
FM broadcast information
Press MENU/INFO (5) button to view:
Top line:
Station name, reception type.
Bottom line:
a. Information (provided by the radio station).
b. information relating to the type of program broadcast.
c. Frequency.
d. Stereo/mono.
e. Time.
f. Date.
FM Menu
- In FM mode, hold down the "MENU/INFO" button (5) for a few seconds.
- Turn the "VOLUME/SCROLL/ENTER/SNOOZE" dial (6) to select the desired item from: Preset Recall, Preset Store, Scan Setting, Audio setting, System.
- Press the "VOLUME/SCROLL/ENTER/SNOOZE" dial (6) to select the desired item and enter its settings.
A) Scan setting
- All Stations
- Strong Stations
B) Audio setting
- Stereo Allowed
- Forced Mono
C) System
- Sleep – Choose between OFF, 15, 30, 45, 60, 90 minutes
- Alarm - To set Alarm 1 and Alarm 2.
-
Time:
-
Set Time/date
-
Auto update - Automatic update of date and time from source or Off. It is advisable to keep it set to "Update from DAB" to avoid continuous time shifts.
-
Set 12/24 hour - Set AM/PM or 24-hour.
-
Set date format - DD MM YYYY, MM DD YYYY
-
Language – English, Deutsch, Italiano, Francais, Nederlands, Espanol, Dansk, Portugese.
- Factory reset – No or Yes
- SW version
Projection
Power ON/OFF and adjustment
- Press the "Projection ON/OFF" button (9) to switch on the projection.
- Press the "180° FLIP" button (10) to rotate the projection 180° if necessary.
- Press the "Projection ON/OFF" button (9) to switch off the projection.
Dimmer
Press the DIMMER button (2) several times to change the display light.
Technical Specifications
| Connections | DC, 3,5mm Headphone-Out, Antenna |
| Input | 100-240VAC – 50/60Hz |
| Output | 5V/1.0A |
| Output Power | 1W |
| Power consumption | Max 5W |
| FM band reception | 87.5 – 108 MHz |
| DAB/DAB+ band reception | 174.928 – 239.200 MHz |
| Operating temperature | 0 degree to 35 degree |
| Dimension Unit | 181 x 95 x 85mm (Main Device) |
| Weight | 340gr. (Main Device) |
Power Supplier Adaptor (For EU only)
Manufacturer: DongGuan Obelieve Electronics Co., Ltd
Model Number: OBL-0501000E
Use only original AC adaptor
Use only the power supply listed in the user manual
| Information | Value and and precision |
| Manufacturers name or trade mark, commercial registration and address | DongGuan Obelieve Electronic Co., Ltd |
| Model Identifier | OBL-0501000E |
| Input voltage | AC 100-240V |
| Input AC frequency | 50/60 Hz |
| Output voltage | 5,0V |
| Output current | 1,0A |
| Output Power | 5,0W |
| Average active efficiency | 74,1% |
| Efficiency at low load (10%) | 74,1% |
| No load Power consumption | 0,06W |
Guarantee
Commaxx B.V. offers service and warranty in accordance to European law, which means that in case of repairs (both during and after the warranty period) you should contact your local dealer.
Important note: It is not possible to send products that need repairs to Commaxx B.V. directly.
Important note: If this unit is opened or accessed by a non-official service center in any way, the warranty expires.
This device is not suitable for professional use. In case of professional use, all warranty obligations of the manufacturer will be voided.
Disclaimer
Updates to Firmware and/or hardware components are made regularly. Therefore some of the instruction, specifications and pictures in this documentation may differ slightly from your particular situation. All items described in this guide for illustration purposes only and may not apply to particular situation. No legal right or entitlements may be obtained from the description made in this manual.
Disposal of the Old Device
natural_image
Symbol of a trash bin crossed out by two crossed lines, with a blank rectangular base below (no text or labels)This symbol indicates that the relevant electrical product or battery should not be disposed of as general household waste in Europe. To ensure the correct waste treatment of the product and battery, please dispose them in accordance to any applicable local laws of requirement for disposal of electrical equipment or batteries. In so doing, you will help to conserve natural resources and improve standards of environmental protection in treatment and disposal of electrical waste (Waste Electrical and Electronic Equipment Directive).
DECLARATION OF CONFORMITY
Hereby, Commaxx declares that the radio equipment type [Lenco CR-615] is in compliance with directive 2014/53/EU. The full text of the EU declaration of conformity is available at the following internet address:
https://commaxx-certificates.com/doc/cr-615_doc.pdf
| Type RF | Frequency range (MHz) | Power (dBm) |
| DAB | 174-240 | - |
| FM | 87.5-108 | - |
Service
For more information and helpdesk support, please visit www.lenco.com
Commaxx B.V. Wiebachstraat 37, 6466 NG Kerkrade, The Netherlands.
LET OP:
natural_image
Simple line drawing of an open book with no text or symbols visibleStroomvoorziening
natural_image
Line drawing of a mechanical component with a coiled cable and two protruding pins (no text or symbols)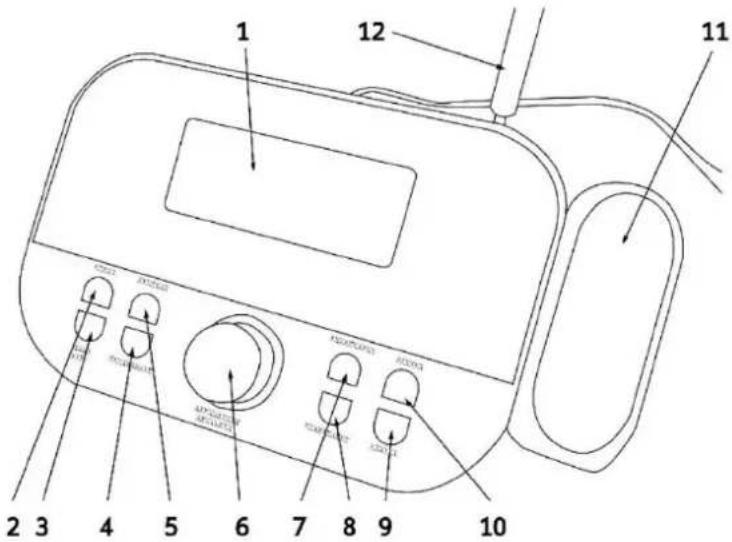
Bediening
| Information | Value and and precision |
| Manufacturers name or trade mark, commercial registration and address | DongGuan Obelieve Electronic Co., Ltd |
| Model Identifier | OBL-0501000E |
| Input voltage | AC 100-240V |
| Input AC frequency | 50/60 Hz |
| Output voltage | 5,0V |
| Output current | 1,0A |
| Output Power | 5,0W |
| Average active efficiency | 74,1% |
| Efficiency at low load (10%) | 74,1% |
| No load Power consumption | 0,06W |
Garantie
natural_image
Symbol of a trash bin crossed out by two crossed lines, with a solid black rectangle below (no text or labels)natural_image
Simple line drawing of an open book with no text or symbols visibleStromversorgung
natural_image
Line drawing of a mechanical component with a coiled cable and two pins (no text or symbols)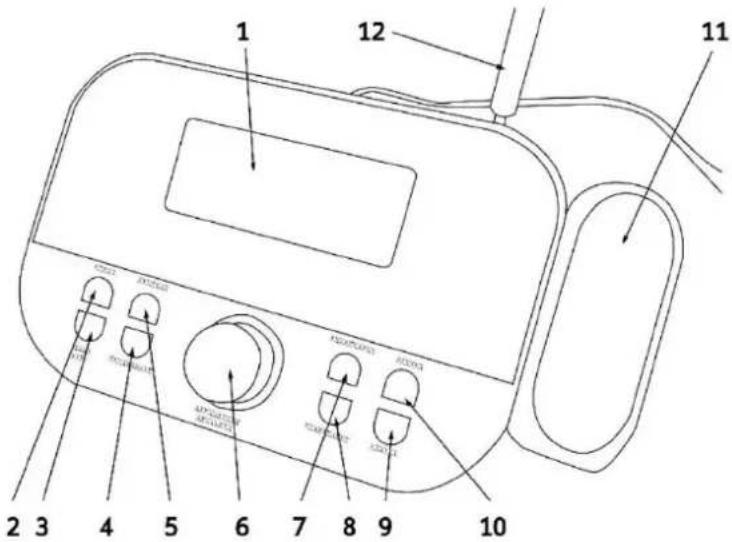
Bedienelement
natural_image
Symbol of a trash bin crossed with no visible text or labelsnatural_image
Simple line drawing of an open book with no text or symbols visiblenatural_image
Line drawing of a mechanical device with a coiled cable and two ports (no text or symbols)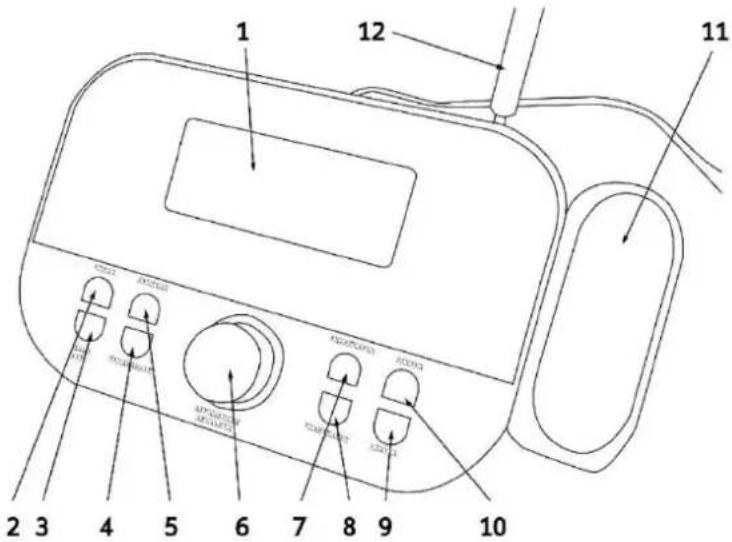
Fabricant : DongGuan Obelieve Electronics Co., Ltd
natural_image
Symbol of a trash bin crossed out by two diagonal lines, with a blank rectangular base below (no text or labels)natural_image
Simple line drawing of an open book with no text or symbols visiblenatural_image
Line drawing of a mechanical device with a coiled cable and two protruding pins (no text or symbols)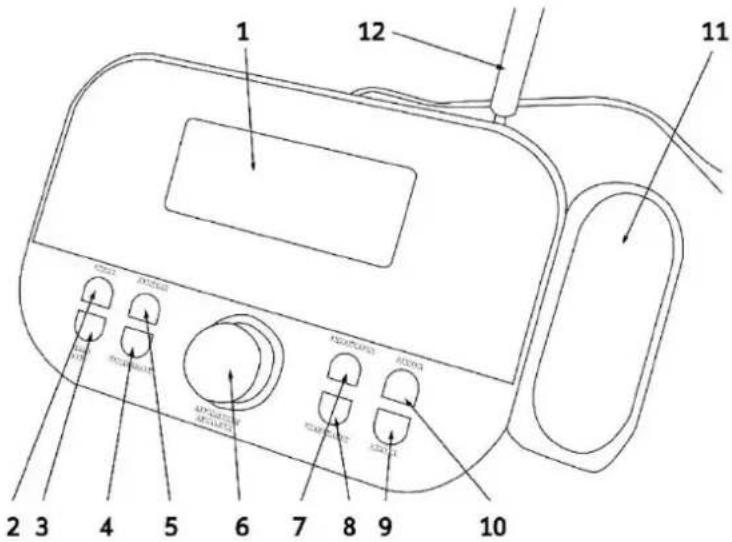
Comando
natural_image
Symbol of a trash bin crossed out by two crossed lines, with a solid black rectangle below (no text or labels)natural_image
Simple line drawing of an open book with no text or symbols visibleStrømforsyning
natural_image
Line drawing of a mechanical clamp or connector with a coiled cable (no text or symbols)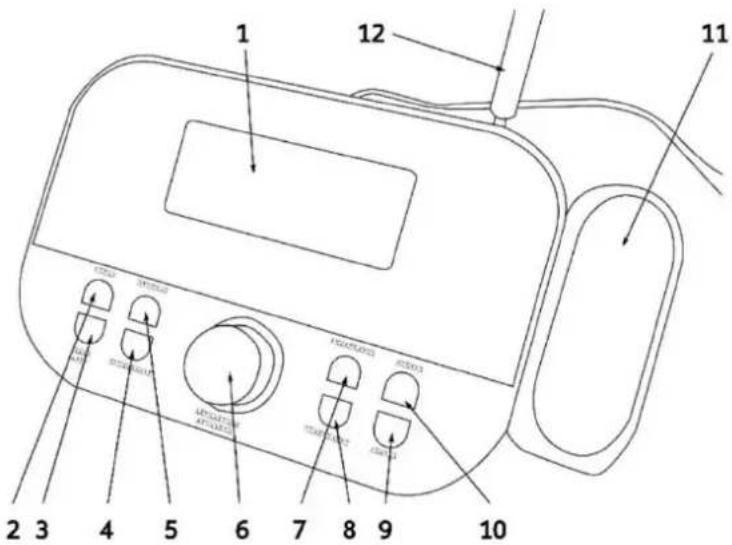
Kommando
- Skæ rm
- Knappen "DÆ MPNING"
- Knappen "/∅LSTAND"
- Knappen "S∅ G EFTER FORUDINDSTILLING"
- Knappen "MENU/INFO"
- Drejeknappen "LYDSTYRKE/RUL/ENTER/UDSÆ T"
-
Knappen "P+/TUNING+"
-
Knappen "P-/TUNING-"
- Knappen "Projicering TIL/FRA"
- Knappen "SPEJLVEND 180°"
- Projektor
- Antenne (træ k ud, og flyt for at få en bedre modtagelse)
- Indgangsstik til jæ vnstrøm (ikke vist)
- Stik til hovedtelefoner (ikke vist)
Kom godt i gang
Projection (Projicering)
Producent: DongGuan Obelieve Electronic Co., Ltd
Modelnr.: OBL-0501000E
Brug kun den originale strømforsyning
natural_image
Symbol of a trash bin crossed out by two crossed lines, with a solid black rectangle below (no text or labels)natural_image
Simple line drawing of an open book with no text or symbols visibleStrömförsörjning
natural_image
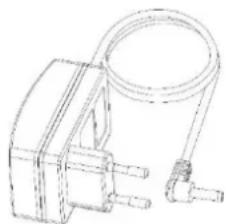
Line drawing of a mechanical clamp or connector with a coiled cable (no text or symbols)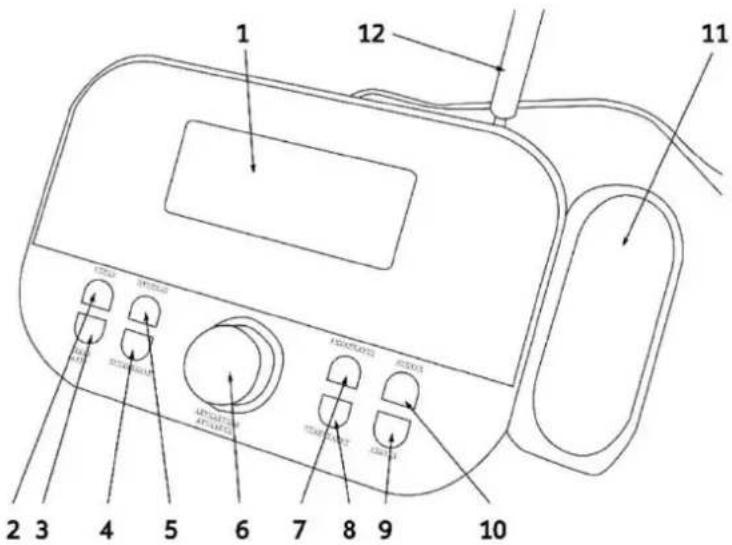
Kommando
- Skärm
- Knappen "DIMNING"
- Knappen "/AGE"
- Knappen "SÖ K FÖ RINSTÄLLDA"
- Knappen "MENY/INFO"
- Vredet "VOLYM/BLÄDDRA/ANGE/SNOOZE"
-
Knappen "P+/SÖ KA+"
-
Knappen "P-/SÖ KA-"
- Knappen "Projicering PÅ/AV"
- Knappen "ROTERA 180°"
- Projektor
- Antenn (förläng och flytta för bättre mottagning)
- DC-IN-uttag (visas inte)
- Hörlursuttag (visas inte)
Komma igång
natural_image
Symbol of a trash bin crossed with a diagonal line and a horizontal bar below (no text or labels)natural_image
Simple line drawing of an open book with no text or symbols visibleVirtalähde
natural_image
Line drawing of a mechanical clamp or connector with a coiled cable (no text or symbols)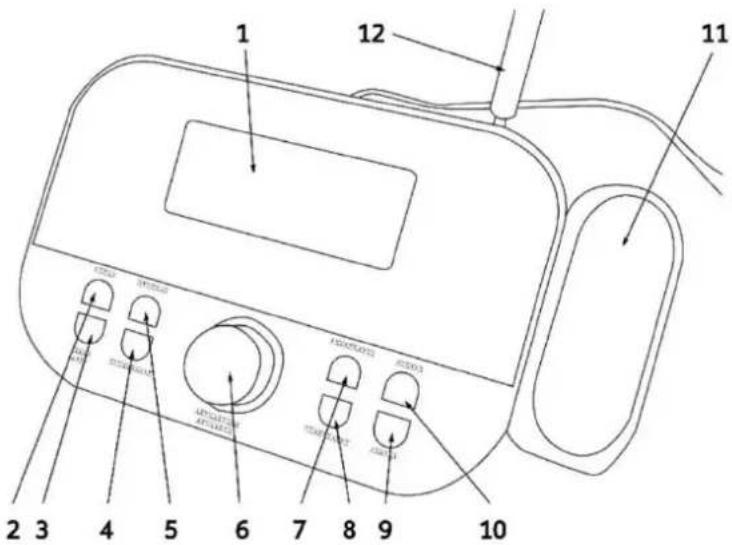
Komento
natural_image
Symbol of a trash bin crossed with no visible text or labels
- KEEP THESE INSTRUCTIONS IN MIND:
- Accessories:
- Command
- Getting Started
- OPERATION
- Power On/Standby:
- Volume adjustment
- Time Setting
- Setting Alarm
- Turn off the alarm
- DAB/DAB+ Radio
- Automatic Station Memory
- Note:
- Manual Scan
- DAB/DAB+ information
- Top line:
- Bottom line:
- DAB/DAB+ Menu
- FM Radio
- Manual search and storage:
- FM broadcast information
- FM Menu
- Projection
- Power ON/OFF and adjustment
- Dimmer
- Guarantee
- Disclaimer
- Disposal of the Old Device
- DECLARATION OF CONFORMITY
- Service
- LET OP:
- Bediening
- Garantie
- Bedienelement
- Comando
- Kommando
- Kom godt i gang
- Projection (Projicering)
- Komma igång
- Komento
Brand : LENCO
Model : CR615
Category : Alarm Clock