
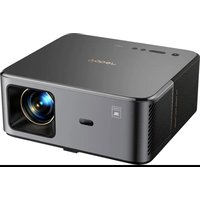
Y61 - Projector Yaber - Free user manual and instructions
Find the device manual for free Y61 Yaber in PDF.
| Product Type | LCD Projector |
| Brand | Yaber |
| Model | Y61 |
| Native Resolution | 1280 × 720 (supports 1920 × 1080) |
| Light Source | LED |
| Rated Power | 110-240 V ~ 50/60 Hz |
| Weight | 1.4 kg |
| Image Formats | 16:9 / 4:3 |
| Projection Size | 50 to 200 inches |
| Projection Distance | 1.5 to 5 meters |
| Keystone Correction | Manual, ±15° |
| Video Inputs | HDMI (x2), VGA, AV, USB |
| Audio Output | 3.5 mm headphone jack |
| Included Accessories | 3-in-1 AV cable, power cable, HDMI cable, remote control, cleaning kit, support base |
| Main Functions | USB media playback, image settings (mode, color temperature, ratio), sound settings (mode, balance, surround), timer, manual keystone correction |
| Maintenance and Cleaning | Unplug before cleaning; use a damp cloth with mild detergent; do not use solvents |
| Safety | Do not expose to moisture, dust, or smoke; ensure adequate ventilation; ceiling installation by a professional |
| Warranty | 3 years (contact: service@yabertech.com) |
| Remote Control Batteries | 2 AA batteries (not included) |
| Supported Video Formats | MPG, AVI, TS, MOV, MKV, DAT, MP4 |
Frequently Asked Questions - Y61 Yaber
User questions about Y61 Yaber
0 question about this device. Answer the ones you know or ask your own.
Ask a new question about this device
Download the instructions for your Projector in PDF format for free! Find your manual Y61 - Yaber and take your electronic device back in hand. On this page are published all the documents necessary for the use of your device. Y61 by Yaber.
USER MANUAL Y61 Yaber
natural_image
Line drawing of a projector with visible internal components and top panel (no text or symbols)INSTRUCTION MANUAL
YABER Y61
Language
EN 01-12
FR 13-23
IT 24-34
ES 35-45
JP 46-63
YABER Lifetime Professional Support
Dear Customer,
Woohoo! Your projector is already in your hands! Let's get started!
Do you have any questions on how it works? Please read this manual thoroughly before using the projector.
Are you satisfied with your projector? If you have any issues, email your order number and description of your issue to:service@yabertech.com. Send your email ASAP, as we want to fix your issues the first time you have them.
Customers sometimes can experience some confusion when using the projector. Rather than trying to communicate directly with us, many buyers instead just leave a review on the product page. However, most negative reviews are caused by non-standardized use rather than a defect in the product itself.
Actually, many problems can be easily solved by setting, such as no signal, no sound, cannot connect with WiFi etc. We promise all the projectors have been carefully checked and packaged before shipping.
Therefore, if you have any questions, please contact us and give us an opportunity to improve. We guarantee that we will provide you more satisfactory solution.
Thanks for your understanding! Best regards, YABER TEAM
Product description

- Channel+ / Up
- Channel- / Down
- Volume- / Left
- Volume+ / Right
- Source
- Menu
- Return
-
OK
-
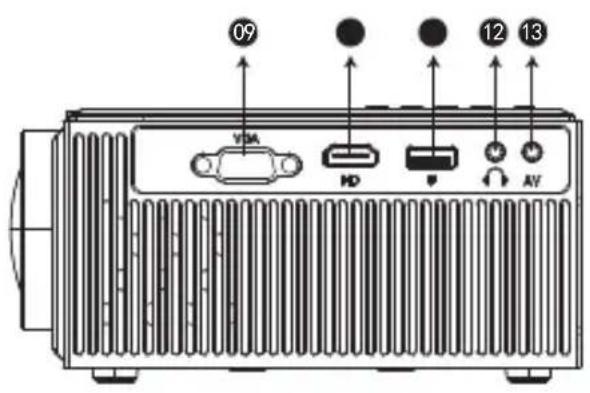
VGA Port
- HDMI Port
- USB Port
- Audio Output
- AV Port
- Power Button
- Keystone Correction
- Manual Focus
Pictures shown are for illustration purpose only. Actual product may vary due to product enhancement.
| YABER Y61 Projector | |
| Imaging System: LCD | Power: 110-240V~50/60HZ |
| Light Source: LED | Resolution:1280*720 (Support 1920*1080) |
| Projection Distance: 1.5M-5M | Interface Input:HDMI/USB/VGA/AV/Headphone Jack(3.5mm) |
| Projection Size: 50"-200" | Keystone Correction: ±15°Manual |
| Aspect Ratio: 16:9/ 4:3 | Projector Weight: 1.4KG |
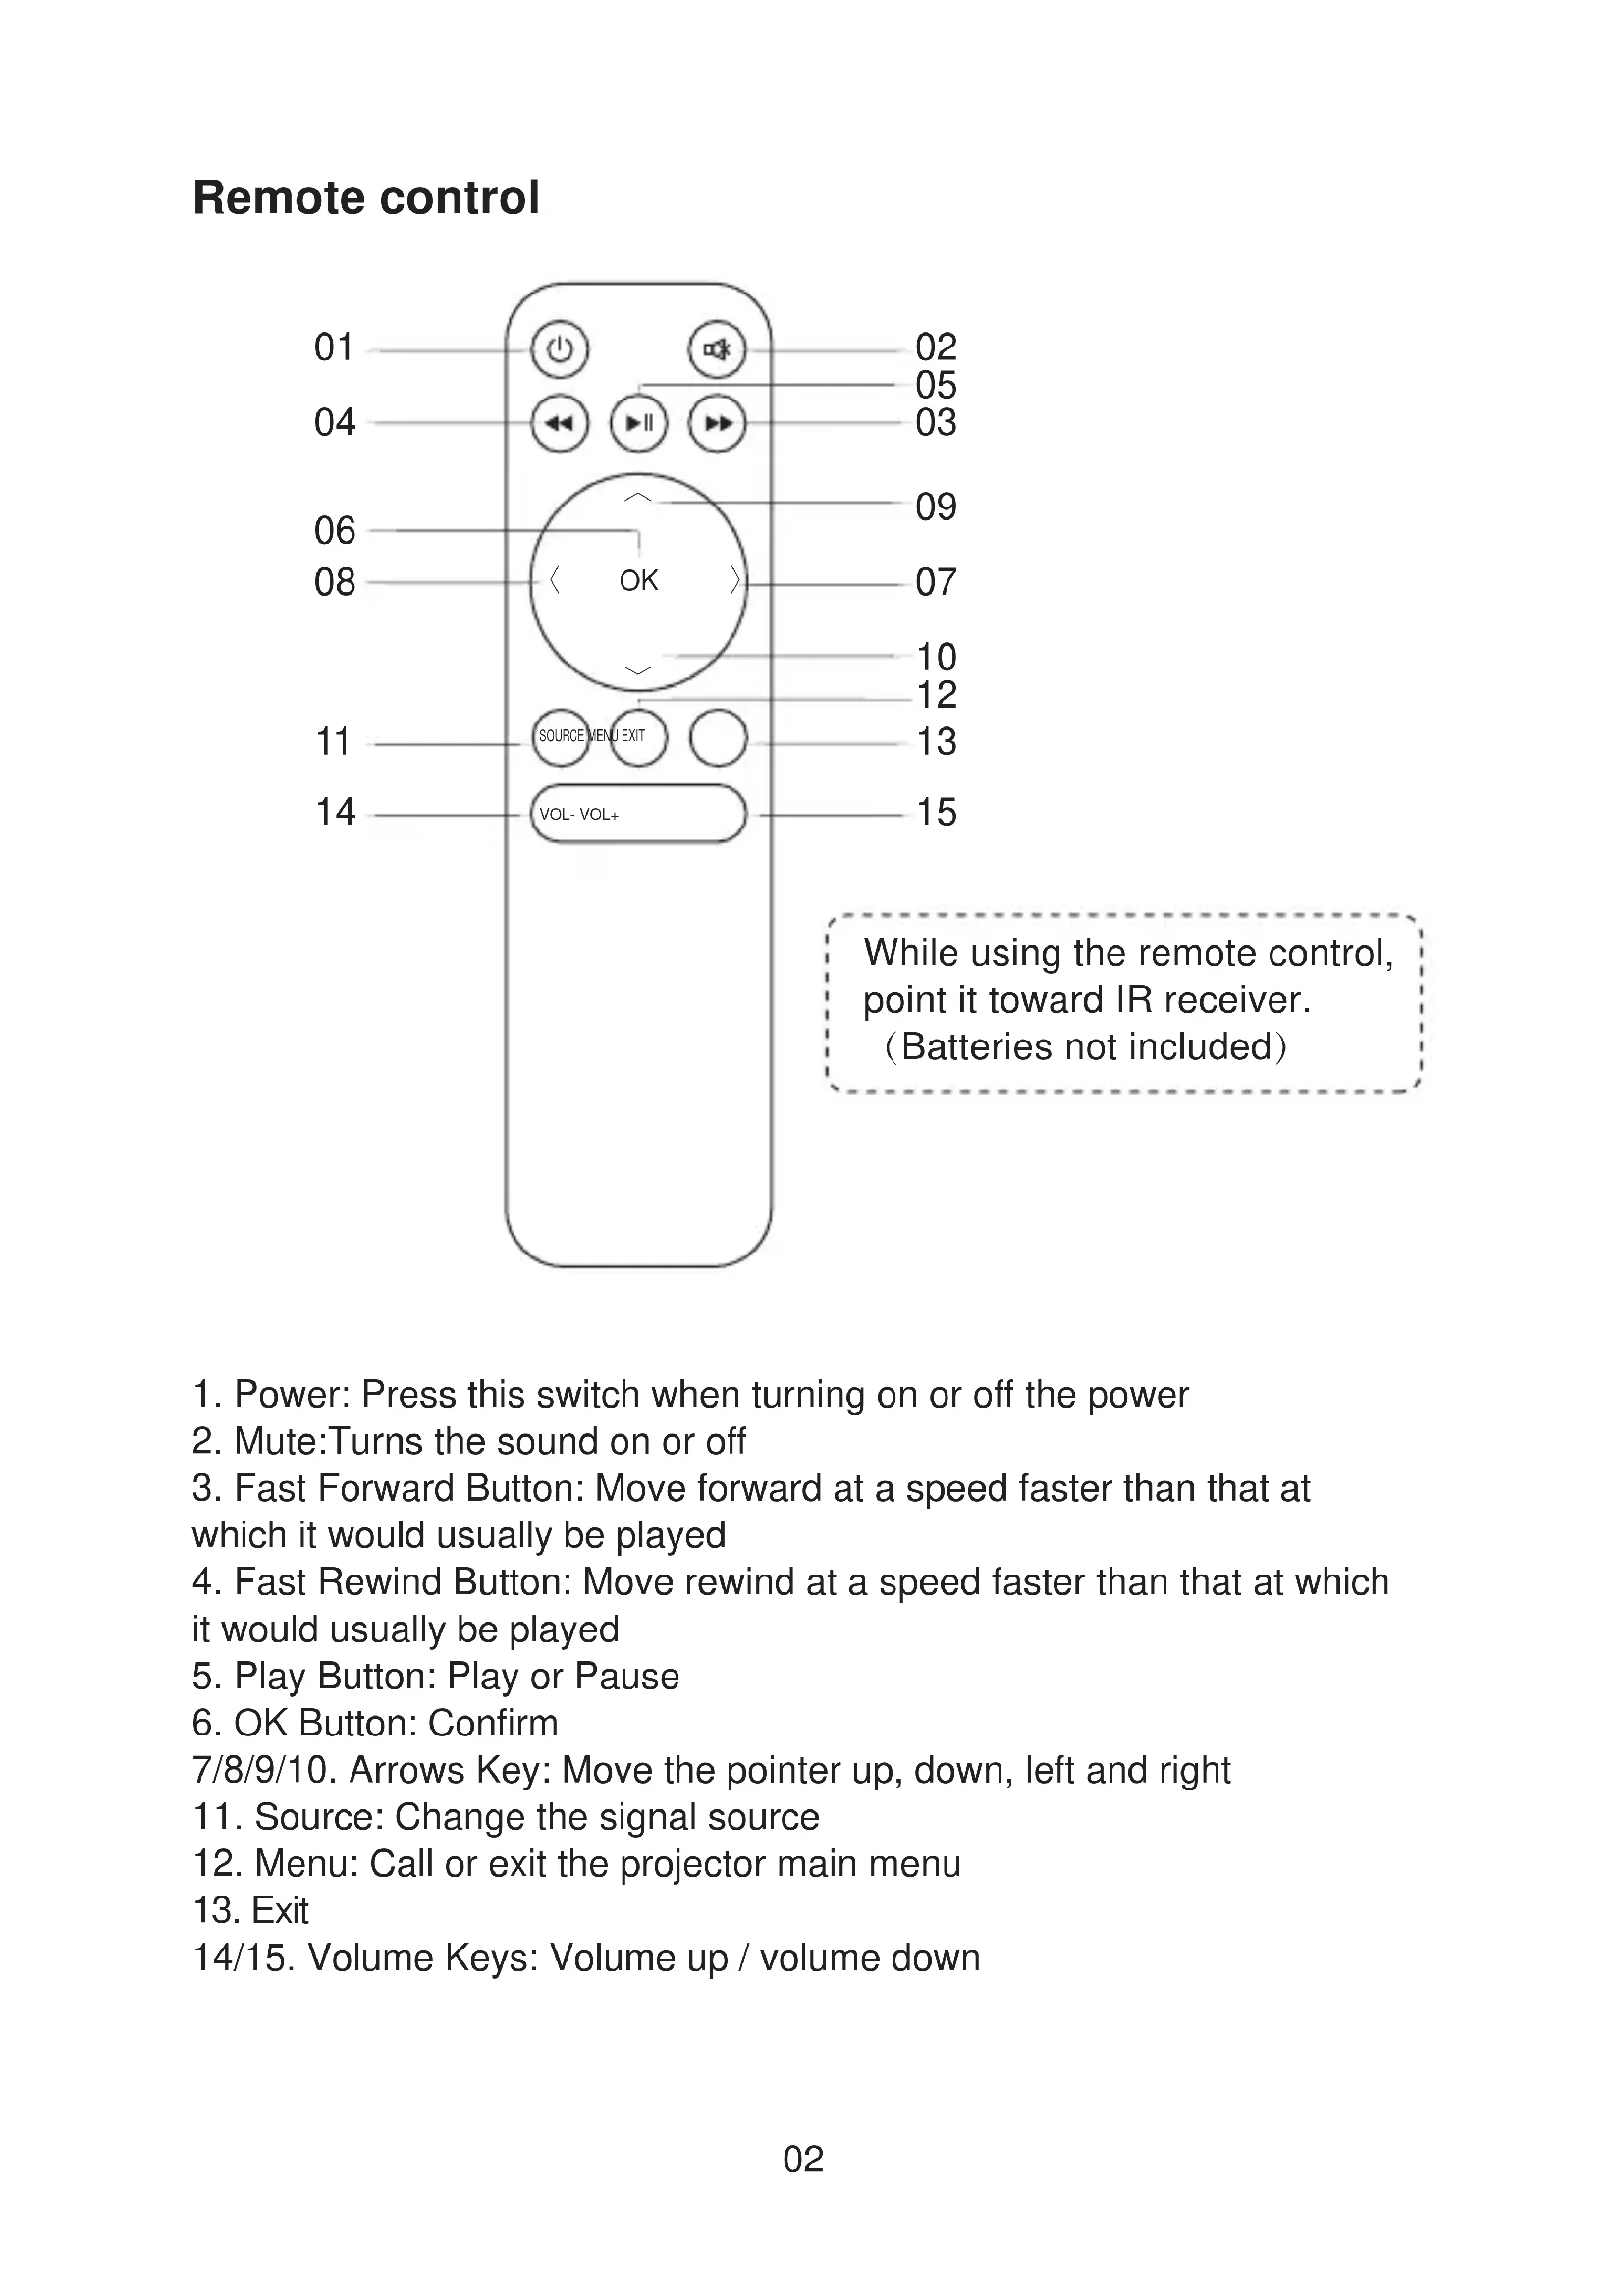
Remote control
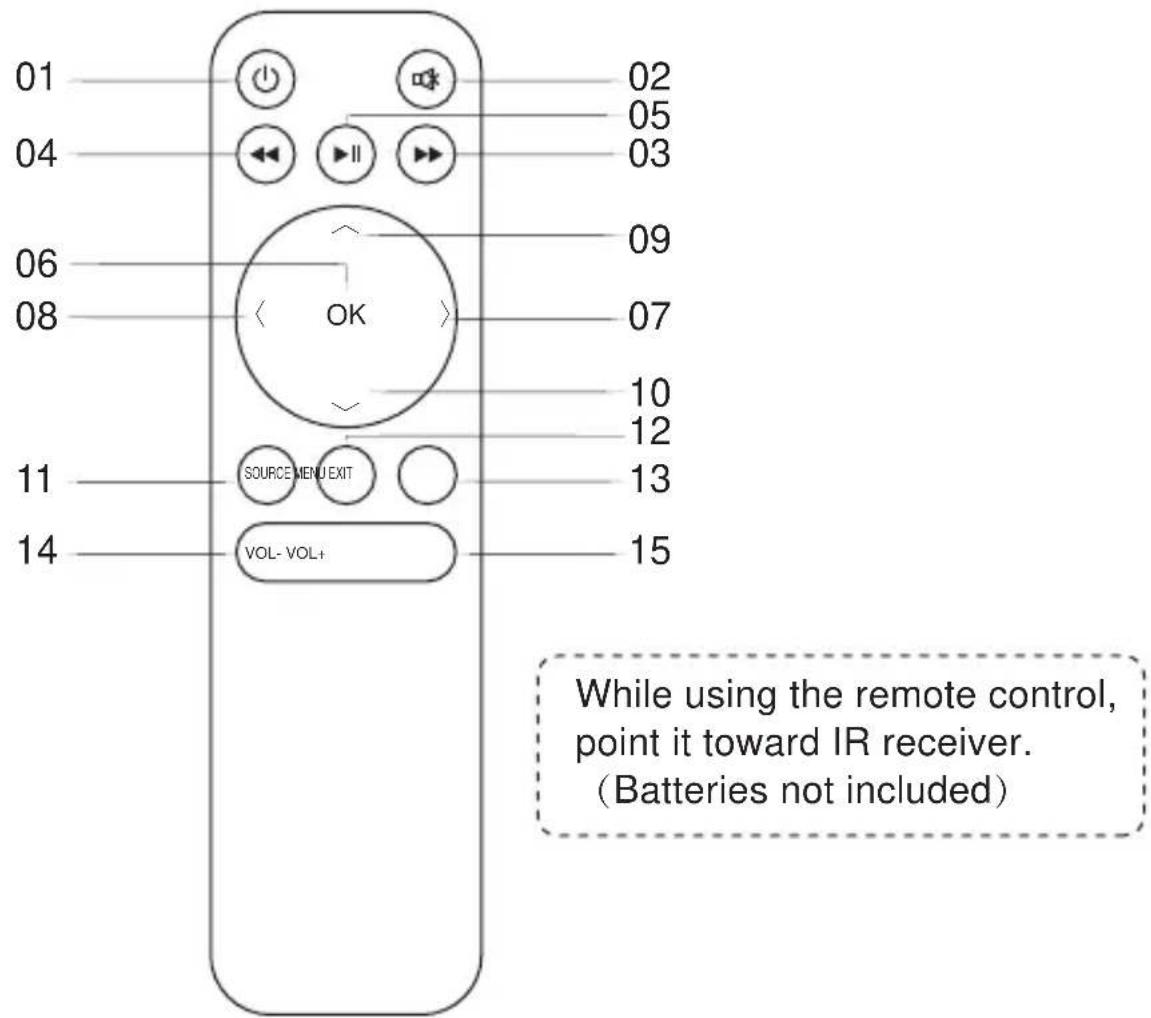
- Power: Press this switch when turning on or off the power
- Mute:Turns the sound on or off
- Fast Forward Button: Move forward at a speed faster than that at which it would usually be played
- Fast Rewind Button: Move rewind at a speed faster than that at which it would usually be played
- Play Button: Play or Pause
- OK Button: Confirm
7/8/9/10. Arrows Key: Move the pointer up, down, left and right - Source: Change the signal source
- Menu: Call or exit the projector main menu
- Exit
14/15. Volume Keys: Volume up / volume down
Replace the remote control battery
- Push to open the battery cover.
- Remove both old batteries and install new ones (AA). Make sure that the polarity of the batteries (+/-) is correctly aligned.
Included
| Main unit of the projector * 1 | Remote control * 1 |
| Instruction manual * 1 | Power cord * 1 |
| 3 in 1 * 1 AV cable | Lens cleaning * 1 |
| HDMI cable * 1 Support Base*1 |
Thanks
Thank you very much for purchasing the YABER Y61 projector.
Please read this instruction manual carefully before use. Also, please keep it handy so you can check it at any time.
If in doubt, do not hesitate to contact service@yabertech.com
We can provide after-sales service until satisfaction.
Observation
Part of the video in Netflix and the main video formats can not be exported externally due to copyright protection (HDCP protocol). But since Amazon Fire TV is HDCP compatible, you can play Netflix and the first video via Amazon fire.
Important safeguards
These safety instructions are to ensure the long life of the projector and to prevent fires and shocks. Read them carefully and pay attention to all warnings.
Installation
- For best results, use the projector in a dark room.
-
Place the projector on a flat, level surface in a dry area away from dust and moisture.
-
Exposure to direct sunlight, smoke or steam may damage internal components.
- Handle the projector carefully. Falling or shaking can damage internal components.
- Do not place heavy objects on top of the projector.
Supply
- The projector is designed to operate with a 110-240 V \~ 50/60 Hz AC adapter. Ensure that the power supply meets this requirement before attempting to use the projector.
- Handle the power cord carefully and avoid bending it too much. A damaged cord can cause electric shock or fire.
- If the projector will not be used for a long time, unplug the power cord from the outlet.
Cleaning
- Unplug the projector before cleaning it.
- Periodically clean the cabinet with a damp cloth. If it is very dirty, use a mild detergent. Never use strong detergents or solvents such as alcohol or thinners.
- Use a blower or lens paper to clean the lens and be careful not to scratch or damage the lens.
FAQ
- At the time of switching on, the indicative light does not work
①. The power supply may not be well connected
②. Check the overheating protection system
- Pressing the power button on the remote control does not turn on the projector
①. The remote control batteries are empty
②. The signal between the remote control and the IR sensor is obstructed
③. Strong direct light on the IR sensor?
- No image on the screen
①. Is the channel setting correct?
②. Is there an input signal?
③. Is the input cable inserted correctly or is it in the wrong position?
④. In PC mode the refresh rate is> 75KHz?
- The image works but there is no sound
①. Are the input cables connected correctly?
②. Volume at minimum or silent
③. Check that the audio format of the video is in the supported list
- Turns off automatically after being turned on for a while
①. Is there a barrier around the fan?
②. Small or large voltage fluctuations
③. Check the overheating protection system
- I can not find devices connected with hard drives or flash drives
①. Re-insert the device
②. Check if the device is working
- Unable to play video
①. Is the video format correct?
②. The file is corrupted?
③. The device is damaged
Connection device
1. Connecting a PC
-
Use the supplied VGA cable to connect the PC to the projector.
-
Turn on the projector and the computer.
* NOTE: You can also connect an HDMI cable, remember that VGA connections do not transmit audio, so the sound will be output from the computer. If you connect an HDMI cable, the audio will be output to the projector.


2. Connecting a smartphone
Connect a phone with Android system:
(Note: check if your Android phone supports MHL function.) MHL-HDMI cable not included)
- Connect the projector and the Android smartphone with the MHL-HDMI cable.
- Choose the signal source: "HDMI"
Connect a phone with IOS system:
- Connect the projector and iPhone with Lightning-to-HDMI cable (not included)
- Choose the signal source: "HDMI"
Connect with an Anycast:
1: Plug in Anycast with the micro usb port and another usb port to your power adapter.
2: Connect Anycast to your Projector's HDMI port and switch the Projector source to HDMI.
3: You will see the Anycast main menu on the Projector screen.
3. Connecting a DVD player
- Use the supplied AV cable to connect the DVD player to the projector.
- Turn on the projector and DVD player.
If your player has an HDMI output, it is best to use it over the analog (AV) option. Audio output must be configured from the DVD player menu if external speakers are installed.

natural_image
Front panel of a computer RAM module showing ports (HD, U) and a dial indicator (AV), no text or symbols present.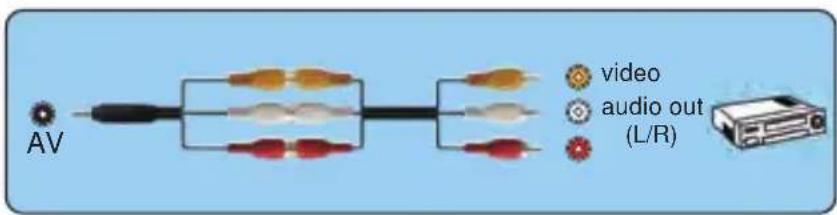
(3-in-3 AV cable not included)
4. Connect the soundbar
- Use the supplied AV cable to connect the soundbar to the projector.
- Turn on the projector and the sound bar.

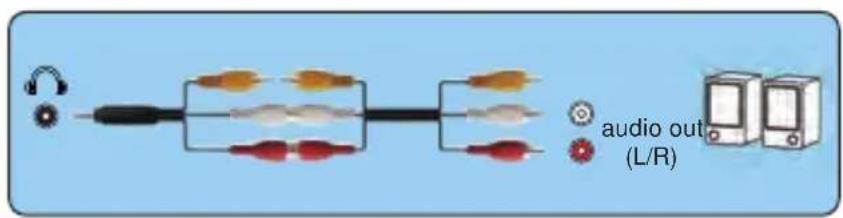
(3-in-3 AV cable not included)
Adjust the Tilt Base and Hang Ceiling
Adjust the tilt base:
Install the screws (included in the package) to place ①, lift the front edge of the projector to the desired height, turn the presser foot and release the button to lock the tilt base to the appropriate position.
Hang ceiling:
Please purchase the projector stand and 1/4 inch screw additionally.
Install the projector stand to place ②, and hang the projector on the ceiling.
( Note: You can install the Tripod Stand to the place ② )

Starting the projector
Turn on the projector by connecting the supplied power cord to the outlet, and then pressing the main power switch. The projector will go into standby mode and the power indicator will light red.
Only after pressing the "POWER" button on the projector or remote control will the power indicator turn green and the projector will become ready to use.
Select the signal source:
Press the "source" button on the remote control or the projector and choose between: "AV", "PC-RGB", "HDMI 1", "HDMI 2", "USB".
- Adjust the image size to get the best image size by moving the projector back and forth, then use the focus ring to get the best focus.
Select the language menu
Language menu you have to select it when you turn on the projector for the first time, you will see the interface in English. You can select one of the menu languages: German, French, Italian, Spanish, Japanese and so on.
Please follow these steps:
-
Press the "meun" button and find the "OPTION" interface, then find the "OSD Language English".
-
Press the ENTER button to execute the selection.
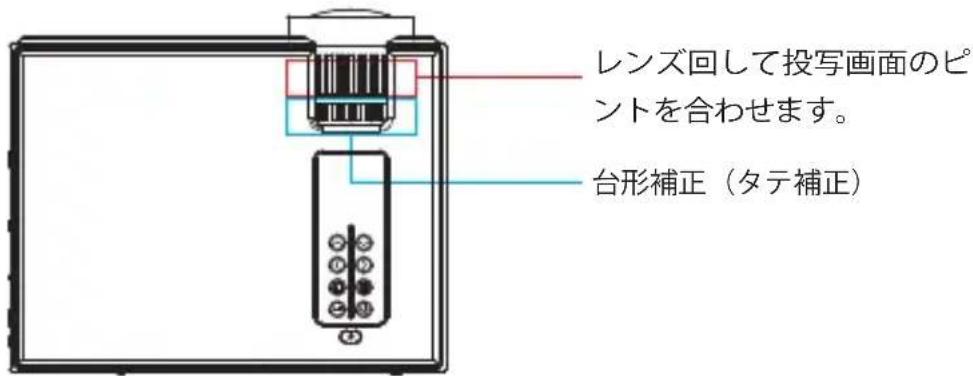
Keystone and Focus
If the projected image is in a trapezoidal shape, it can be resolved by Keystone correction. ( Do Manual Keystone Correction )

Note: If the Keystone correction fail to resolve image shape, please reduce the vertical height of the projector in relation to the center of the screen.

natural_image
Three gray geometric shapes with arrow indicators, no text or symbols presentThe projected image may be blurry or difficult to see, this is due to lack of Focus adjustment with the lens, please follow the processes below to adjust the Focus. ( Do Manual Focus, find the most sharpness picture on the screen )

flowchart
graph LR
    A["Fish Icon"] --> B["Single Fish Icon"]
    B --> C["Arrow Left"]
    C --> D["Single Fish Icon"]
Note: It is normal when sharpness in the central, blur in the edge.
Multimedia File Specification
Image Format
| Support | File Extension |
| JEPG, PNG, BMP, MPO | .jpg / .png / .bmp |
Audio Format
| Support | File Extension |
| MPEG1, MPEG2, LPCM, MP3 | .avi / .ts / .dat / .vob / .wav / .mkv / .mp3 / .mp4 / .m4a |
Doesn't Support : Dolby AC3 / AAC, DTS, WMA, DivX, VC1, etc
Video Format ( Bit Rate up to 30\~40 Mbs )
| Support | File Extension |
| MPEG1, MPEG2, H.263, H.264, AVS, VC1, MJPEG, RV30, RV40, HEVC | .dat / .ts / .mp4 / .mpg / .mpeg / .avi / .mkv / .mov / .wmv / .asf / .flv / .3gp. / .3gpp / .tp / .trp |
Doesn't support : MSVC / CRAM, MP42, GMC, IV32, RLE, cvid, RV20, DivX, RM, RMVB, VC1, FLV, etc.
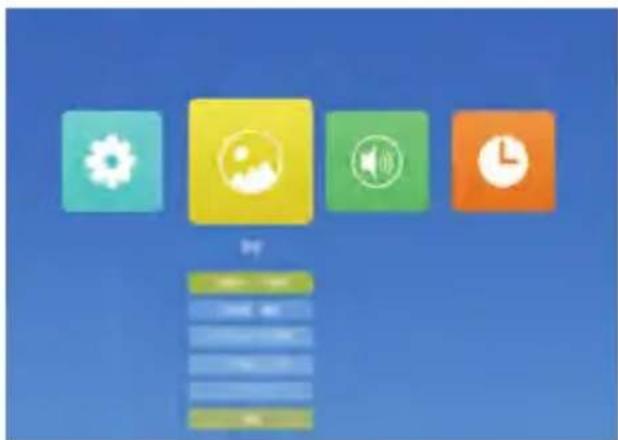
Setting the Main Menu:
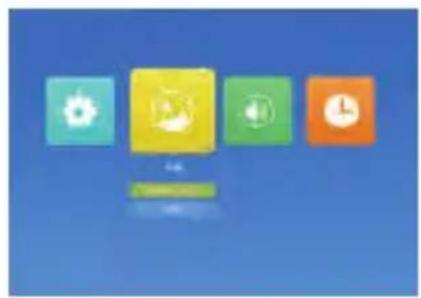
Press the "MENU" button on the projector or remote control, there are 4 menu options: "Movie", "Music", "Photo", "Text".

Option Menu

| OPTION Menu included Function | ||
| OSD Language | 20 kinds of languages:English, France, Italian, Spanish, Japanese etc | Choose a language |
| Restore Factory Default | Reset | Reset the device to original manufacturer settings |
| Blending | Off, Low, Middle, High | Adjust the sound quality |
| OSD Duration | Off, 5Sec, 10Sec, 15Sec | Adjust the on-screen display time |
| Blue Screen | On, Off | Adjust the background color of the screen |
| Software Update (USB) | Update software | Update software |
PICTURE MENU
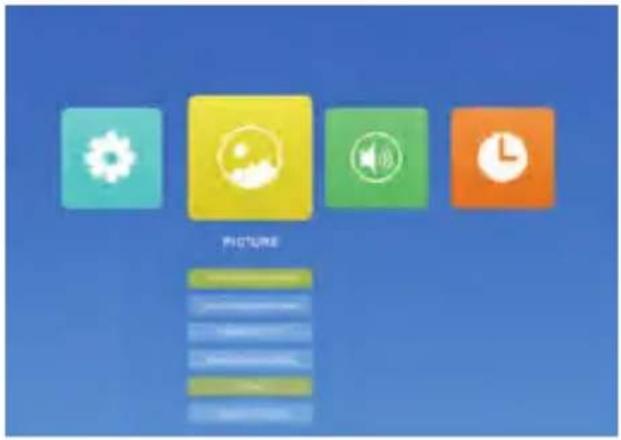
| PICTURE MENU | Mode Function | |
| Picture Mode Standard | Soft, User, Vivid | 4 image modes |
| Color Temperature | Medium, Warm, User, Cool | Adjusts the color temperature |
| Aspect Ratio | Auto/ 4:3/ 16:9 | Aspect Ratio lets you configure how images are displayed |
| Noise Reduction | Off, Low, Middle, High, Default | Adjust the Noise reduction mode |
| Projection Direction | Front/Rear on Desk, Front/ Rear on Ceiling | Adjust the projection direction |
| HDMI Mode AV/PC | ||
| Reduce Display | 75%-100% | Reduce the projection size |
Sound Menu

| Sound Menu Mode Function | ||
| Sound Mode | Standard, Music, Movie, Sports, User | Adjust the sound mode |
| Balance | -50~50 | Adjust the balance degree |
| Auto Volume | On, Off | Automatic volume adjustment |
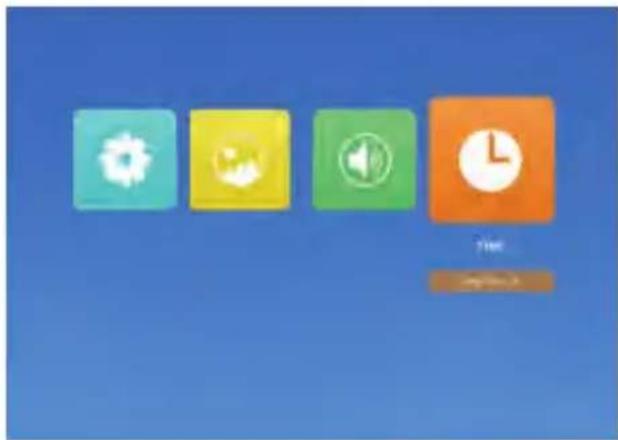
Time Menu
Projection Distance and Size
Please follow the data in chart below, to adjust the image size and the distance. (Aspect Ratio: 16 : 9, Default)
| Distance | Screen size |
| 1.5m | 50” |
| 2.15m | 72” |
| 2.95m | 100” |
| 3.55m | 120” |
| 5m | 200” |
The image size depends on the distance between projector and screen,
Thank you very much for purchasing the YABER Y61 projector. Please read this instruction manual carefully before use. Also, please keep it handy so you can check it at any time.
If you have any problem, please feel free to contact us (Email: service@yabertech.com), we will always try to offer you a satisfactory solution.
Précautions
- Channel+ / Up
- Channel- / Down
- Volume- / Gauche
- Volume +/ Droite
- Source
- Menu
- Retour
-
Confirmer
-
Port VGA
- Port HDMI
- Port USB
- sortie audio
- Port AV
- Bouton d'alimentation
- Correction du trapèze
- Mise au point manuelle
natural_image
Diagram showing three gray rectangular shapes with arrows indicating direction, no text or symbols presentflowchart
graph LR
    A["Fish Icon"] --> B["Single Fish Icon"]
    B --> C["Arrow Left"]
    C --> D["Single Fish Icon"]
natural_image
Diagram showing VGA, VGA connector, and laptop connected via cable (no text or symbols on components)Connector la barre de son
natural_image
Front panel of a computer RAM module showing ports HD, U, and AV (no text or symbols beyond labels)
Format audio: MP3, WMA, AAC
Format d'image: JPG, JPEG, BMP, PNG.
4. Collega la soundbar
MENU immagine

natural_image
Three gray geometric shapes with black arrows indicating direction, no text or symbols presentflowchart
graph LR
    A["Fish Icon"] --> B["Arrow to Right"]
    B --> C["Fish Icon"]
    C --> D["Arrow Left"]
    D --> E["Fish Icon"]
flowchart
graph TD
    A["Device with 3D arrangement"] --> B["Transmission to a device"]
    C["Device with 2D arrangement"] --> D["Transmission to a device"]
    E["Device with 1D arrangement"] --> F["Transmission to a device"]
flowchart
graph LR
    A["Stage 1"] --> B["Stage 2"]
    B --> C["Stage 3"]
flowchart
graph LR
    A["Fish Icon"] --> B["Single Fish Icon"]
    B --> C["Arrow Left"]
    C --> D["Arrow Right"]
natural_image
Front panel of a computer RAM module showing ports HD, U, and AV (no text or symbols beyond labels)
写真メーニュ
natural_image
Four colored square icons (wheel, app, speaker, clock) on a blue background, no text or symbols present.
natural_image
Close-up of a train front panel with two buttons and a red circle highlighting the button (no text or symbols visible)natural_image
White USB drive with connector cable (no visible text or symbols)natural_image
Close-up of black USB cable and connector with a black CPU socket (no text or symbols visible)natural_image
Front panel of a computer RAM module showing ports HD, U, and AV (no text or symbols beyond labels)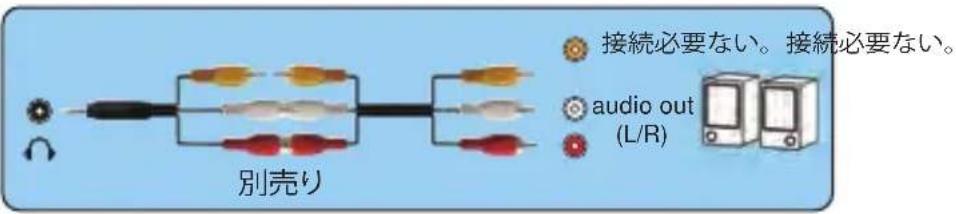
natural_image
Illustration of a meeting with a speaker at a table and a projection screen showing a speaker (no text or symbols present)固定位置での投影 マウント搭 載

natural_image
Illustration of a meeting with a projection light and audience members seated at a table (no text or symbols)
natural_image
Illustration of a meeting scene with a group of people seated at a table facing a large flag (no text or symbols visible)リアプ ロ ラック搭 載リアプ ロ

natural_image
Illustration of a meeting scene with a speaker at the front and a projection screen on the right (no text or symbols)載リアプ ロ
natural_image
Line drawing of a rectangular electronic device with a cylindrical sensor mounted on top, no text or symbols present.投写イメージの調整
画像の台形歪みの補正と明瞭さの微調整
flowchart
graph LR
    A["User 1"] <--> B["User 2"]
2.1 台形補正(タテ補正)
natural_image
Three gray geometric shapes with arrow indicators, no text or symbols presentflowchart
graph LR
    A["User Icon"] <--> B["User Icon"]
natural_image
Four colored square icons (clock, Wi-Fi, alarm clock, clock tower) arranged horizontally on a blue background, with no text or symbols.3.映像の高さを調整する
natural_image
Illustration of a projector with a circular lens and control panel (no text or symbols)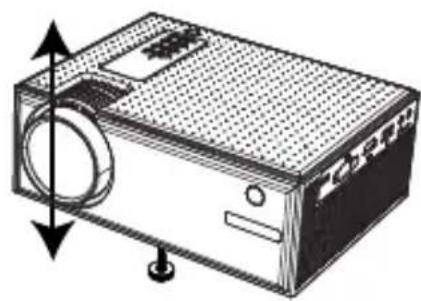
natural_image
Technical line drawing of a rectangular electronic device with a circular component and directional arrows indicating motion (no text or symbols)
- INSTRUCTION MANUAL
- Language
- YABER Lifetime Professional Support
- Product description
- Remote control
- Replace the remote control battery
- Thanks
- Observation
- Important safeguards
- Installation
- Supply
- Cleaning
- FAQ
- Connection device
- Connecting a PC
- Connecting a smartphone
- Connecting a DVD player
- Connect the soundbar
- Adjust the Tilt Base and Hang Ceiling
- Starting the projector
- Keystone and Focus
- Multimedia File Specification
- Setting the Main Menu:
- PICTURE MENU
- Sound Menu
- Time Menu
- Projection Distance and Size
- Précautions
- Connector la barre de son
- Collega la soundbar
- MENU immagine
- 投写イメージの調整
- 3.映像の高さを調整する
Brand : Yaber
Model : Y61
Category : Projector