bestätigten. Es stehen folgende Profile zur Verfügung:
Normal / Klassik / Jazz / Pop / Rock / Sprache / Mein EQ
Einrichten von „Mein EQ":
Dazuitte zu „Mein EQ Ein." navigieren und mit bestätigten. Im nachfolgenden Menu können nun „Bass" und „Hohen" eingestellt werden. Bestätigten Sie die Menü „Bass" oder „Hohen" mit der Taste , undnehmen Sie die entsprechenden Einstellungen mit den Tasten oder vor und bestätigten diese mit der Taste . Alternativ können diese Einstellungen auch mit den Regler vorgenommen werden. Zusätzlich konnen Sie die Funktion „Loudness" aktivieren oder deaktivieren. Das aktive Klangprofil wird mit „✓" gekennzeichnet.
9.4 Uhrzeit
Im Menu „Uhrzeit" können Einstellungen für Zeit und Datum vorgenommen werden. Dabei stehen folgenden Optionen zur Verfügung:
Hier können Zeit und Datum manuell eingestellt werden. Mit den Tasten oder auf der Fernbedienung, oder dem Regler können die Werte verändert werden. Mit den Tasten , oder werden die einzelnen Zahlenblöcke ausgewählt und die Werte auch gespeichert.
Hier können Sie festlegen aus welcher Quelle Uhrzeit und Datumactualisiert werden sollen. Folgende Optionen stehen zur Auswahr:
Von Allen: Zeit und Datum werden über DAB und UKWactualisiert.
Von DAB: Zeit und Datum werden über DAB aktualisiert.
Von UKW: Zeit und Datum werden UKW aktualisiert.
Kein Update: Zeit und Datum müssen manuell eingestellt werden.
Die aktuell ausgewählte Option ist mit „√“ gekennzeichnet.
In diesen Menu können Sie festlegen ob die Anzeige der Uhr im 12- oder 24-Stunden Format erfolgen soll. Auswahlen mit den Tasten oder , die Bestätigung erfolgt mit der Taste . Die aktuell ausgewählte Option ist mit „✓“ gekennzeichnet.
In dieser Menu können Sie das Format der Daten sanzeige festlegen. Die Auswahl erfolgt mit den Taten oder , die Bestätigung mit der Taste . Die aktuell ausgewählte Option ist mit „✓" gekennzeichnet.
9.5 Beleuchtung
Die Display-Beleuchtung kann in 3 Helligeitsstufen programmiert werden. Folgende Einstellungen können im Menu „Beleuchtung" vorgenommen werden:
"Zeitabschaltung": Zeit, bis das Display auf die Beleuchtungsstufe „Dim-Einstellung" geregelt wird.
Auswahlmöglichkeiten: „Ein / 10 / 20 / 30 / 45 / 60 / 90 / 120 / 180 Sekunden"
"Ein" bedeutet, dass das Radio immer in der Helligeitsstufe der "An-Einstellung" bleibt.
"An-Einstellung": Helligkeit des Displays wenn das Radio eingeschaltet wird.
Auswahlmöglichkeiten: „Hoch“ / „Mittel“ / „Niedrig“
"Dim-Einstellung": Helligkeitseinstellung für Betrieb und Standby.
Auswahlmöglichkeiten: „Mittel“ / „Niedrig“
Die ausgewählten Optionen sind mit „✓“ gekennzeichnet. Mit der Taste auf der Fernbedi-nung laßt sich die Beleuchtung in 3 Stufen einstellen.
9.6 Sprache
Im Menu „Sprache" können Sie die Menüsprache des Radios festlegen. Zum Auswahlen einer Sprache benutzen Sieitte die Tasten < HOCH> oder < RUNTER> und bestätigen diese durch Drucken der Taste < OK> . Alternative kann die Auswahl auch mit dem < NAVIGATE> Regler vorgenommen werden.
Folgende Sprachen stehen zur Auswahl:
Dänisch, Deutsch, Englisch, Finnisch, Französisch, Italienisch, Niederlandisch, Norwegisch, Polnisch, Portugiesisch, Schwedisch, Spanisch, Türkisch
9.7 Werkseinstellung
Um das Radio in den Auslieferungszustand zurückzusetzen, wahren Sieitte "JA"im Menu Werkeinstellung".Beider Auswahl von "NEIN" wird der Vorgang abgebrochen.
9.8. Software-Version
Hier können Sie die Versionnummer der aktuellen Firmware abrufen.
10. Störungsbehebung
Bitte überprüfen Sie bei Fehlfunktionen die folgenden Punkte:
Kein Ton
Stecken Sie das Steckernetzteil ordnungsgemäß ein.
Stellen Sie die Lautstärke auf den richtig Pegel.
Stellen Sie sicher, dass die gewünschte Quelle ausgewähl ist.
Das System reagiert nicht auf Tastendruck
Ziehen Sie das Steckernetzteil ab und schlieBen Sie es wieder an.
Probleme beim Radioempfang
Richten Sie die Antenne neu aus.
Suchen Sie einen geeigneteren Standort.
Andere Elektrogeräte stören den Empfang.
Standort nicht für den Empfang von DAB+ Signalen geeignet.
11. Wartung und Pflege
Reinigung des Gehäuses: Benutzen Sie ein mit einem milden Reinigungsmittel leicht angefeuchtetes Tuch. Benutzen Sie keine Reinigungsmittel, die Alkohol, Ammoniak oder Scheuermittel enthalten.
Vorsichtshinweise zur Kondensationsbildung
Kondensation (Tau) kann sich im Innern des Geräts bilden, wenn zwischen der Temperatur des Geräts und der Umgebungstemperatur ein wesentlicher Unterschied besteht. Sollte im Innern des Geräts Kondensati- on auftreten, ist eine einwandfrei Funktion nicht mehr gewährleistet. In thisem Fall muss einige Stunden gewartet werden; nachdem die Feuchtigkeit getrocknet ist, kann das Gerät wieder verwendet werden.
Besondere Vorsicht ist unter den folgenden Umständen geboten
Wenn das Gerät von einem Ort zu einem anderen bewegt wird, der eine wesentlich höhere oder niedrigere Temperatur aufweist, oder wenn sich die Luftfeuchtigkeit am Aufstellort des Geräts erhöht, usw.
12. Entsorgung
Entsorgung von gebrauchten elektrischen und elektronischen Geräten und Batterien.
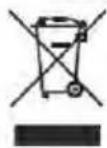

Das Symbol (durchgestrichene Mülltonne) auf dem Produkt oder seiner Verpackung weist daraufhin, dass diesen Produkt nicht als normaler Haushaltsabfall gehalt werden darf, sondern an einer Annahmestelle für das Recycling von elektrischen und elektronischen Geräten und Batterien abgegeben werden muss. Durch ihren Beitrag zur korrekten Entsorgung these Produkte schätzen Sie die Umwelt und die Gesundheit ihrer Mitmenschen. Unsachgemäß oder falsche Entsorgung gefährden Umwelt und Gesundheit. Weitere Informationen über das Recycling these Produkte erhalten Sie von ihrer Gemeinde oder den communalen Entsorgungsbetrieben. Achtung: Das Zeichen „Pb" unter dem Symbol für Batterien zeigt an, dass diese Batterie Blei enthalt.
Die Bluetooth® Wortmarke und Logos sind eingetragene Marken von Bluetooth SIG Inc. und jegliche Verwendung dieser Marken durch die JVCKENWOOD Corporation erfolgt unter Lizenz. Andere Marken und Handelsnamen sind die ihrer jeweiligen Eigentümer.
13. Technische Daten CR-ST80DAB
| Spannungsversorgung Wechselspannung 100 - 240 V | |
| Eingangswechselstromfrequenz 50/60 Hz | |
| Hersteller Netzadapter Dongguan Guanjin Electronics Technology Co.Ltd |
| Marke und Modellkennung Netzadapter KPTEC | TM K25V120200G |
| Ausgangspannung / -strom / -leistung Gleichspannung 12 | 0 V / 2,0 A / 24,0 W |
| Aufnahmeileistung im Bereitschaftsbetrieb 0,9 Watt | |
|
| Tuner UKW/DAB+ |
| DAB-Abstimmbereich BAND III 174,928 MHz - 239,200 MHz |
| UKW-Abstimmbereich 87,50 MHz - 108,00 MHz | |
| USB |
| USB Geräte USB ist nur für Software-Updates (Service) vorgesehen. Nicht für Musikwiedergabe oder Geräteladung. |
| BLUETOOTH |
| BLUETOOTH Version V5.0 | |
| Leistungsklasse Klasse 1 | |
| Maximale Sendeleistung | 7,52 dbm |
| Reichweite ca. 10 Meter (kann je nach Umgebung abweichen) | |
| Frequenzbereich 2,402 GHz - 2,480 GHz | |
| BLUETOOTH Profile A2DP (Advanced Audio Distribution Profile, AVRCP (Audio/Video Remote Control Profile) |
| Line-Out 3,5 mm Klinkenbuchse | |
| Aux-In | 3,5 mm Klinkenbuchse |
| Verständerteil |
| Ausgangsleistung | 2 x 10 Watt RMS |
| Frequenzbereich 40 Hz - 20 kHz | |
| Maße und Gewichte |
| Haupteinheit | (B x H x T) 245 x 145 x 105 mm / 1,7 kg |
| Temperaturbereich | 0°C bis 35°C |
14. Garantie
Sehr geehrter Kunde,
wir danken Ohnen für den Kauf these Kenwood-Producks. Soltte these Product unter normalen Betriebsbedingungen Material- oder Verarbeitungsmangel aufweisen, werden wir die in Übereinstimmung mit den nachfolgenden Garantiebestimmungen kostenb beseitigen, bzw. das Gerat umtauschen.
Bitte bewahren Sie diese Garantiekarte sorgfällig auf.
Kenwood gewährt auf these Geräine Garantie von zwei Jahren ab Kaufdatum laut Rechnung oder Kaufbeleg des Kenwood-Händlers.
These Garantie erstreckt sich auf Material- und Verarbeitungs-Mängel. Wir behalten uns das Recht vor, das Produkt umzuauschen, falls eine wirtschaftliche Instandsetzung nicht mehr möglich ist. Kosten für Verpackung und Installation sowie Kosten und Risiken im Zusammenhang mit der eigentlichen Instandsetzung sind nicht in der Garantieleistung enthalten und werden in Rechnung gestellt.
Bedingungen
A. Zur Geltendmachung von Garantieansprüchen sind zusätzlich zur Vorlage dieser Garantiekarte folgende Angaben erforderlich:
(a) Ihr Name mit vollständiger Anschrift
(b) Der Kassenbeleg oder die Rechnung eines in einem EU-Staat ansässigen Einzelhändlers, aus der das ursprüngliche Kaufdatum hervorgelt.
(c) Der vollständige Name und die Anschrift des Einzelhändlers, bei dem das Produkt gekauft wurde.
(d) Die Seriennummer und die Modellbezeichnung des Produkts.
Kenwood behalt sich das Recht vor, Garantieleistungen abzulehnen, wenn die vorgenannten Informationen fehlen oder wenn seit Ersterwerb Veränderungen am Produkt vorgenommen wurden.
B. Zum Zeitpunkt der Auslieferung an den Handel erfuelt these Produkt alle im Bestimmungsland gultigen Normen und Sicherheitsvorschriften. Erforderliche Modifikationen zum Betrieb des Gerätes in Ländern außerhalb des Bestimmungslandes fallen nicht unter die vorgenannten Garantiebestimmungen. Außer dem übernehmen wir keinerlei Haftung fur Arbeitsien in thisem Zusammenhang oder fur Beschädigungen des Produktes, die durch solche Arbeitsen entstehen.
Wird das Produkt in einem Land benutzt, fur das这点 nicht konzipiert und hergestellt worden ist, dann werden Garantiarbeiten nur dann ausgegehrt, wenn die Kosten für Umrüstung des Gerätes auf national gültige Normen und Sicherheitsvorschriften vom Benutzer getragen werden. Unterscheidet sich außer dem das Produkt von den durch den officiellen Importeur vertriebenen Produkten und sollenn für die Reparatur desses Produktes Eratsteile nicht verfügbar sein, muß der Benutzer die Kosten für Hin- u. Rücktransport des Gerätes in das Kauflandlagen. Gleiches gilt, wenn im betreffenden Land aus anderen berechtigten Gründen keine Garantieleistungen angeboten werden können.
C. Ausgenommen von den Garantieleistungen sind:
(a) Veränderungen am Produkt, sowie normale Wartungs und Justage-Arbeiten, einschließlich der in der in der Bedienungsanleitung erwähnten regelmäßigen Kontrollen.
(b) Schaden am Produkt, die durch mangelhafte oder nicht fachgerechte Arbeiten entstanden sind, wenn diese Arbeiten von Dritten vorgenommen wurden, die nicht zur Durchführung von Garantieleistungen im Name des Herstellers ermächtigt sind.
(c) Schaden durch Nachlüssigkeit, Unfälle, Änderungen, unsachgemäß Montage, mangelhafte Verpackung, Fehlbedienung oder Verwendung falscher Ersatzteile bei einer Reparatur.
(d) Schaden durch Feuer, Wasserschaden, Blitzschlag, Erdbeben, unzureichende Belüftung, höhere Gewalt, Anschluß an falsche Netzspannung oder sonstige von Kenwood nicht zu verantwortende Ursachen.
(e) Schaden an Laufsprechem durch den Betrieb an hohenen Leistungen als den angegebenen. Schaden an Schallplatten, Tonbändern, Ton- und Videokassetten, CD-Kompaktschallplatten und anderen Gegenständen, die nicht Bestandteil des Produkts sind.
(f) Verbrauchs- oder VerschleiBiele, die im Rahmen des normalen Kundendienstes auszutauschen sind, wie z.B.: Tonabnehmersysteme, Nadeln, Antriebsriemen, Tonkopfe, Einschübe, Tonmöbel, Trockenbatterien, wiederaufladbare Akkus, Leistungs-Endrohren u.s.w.
(g) Alle Produkte, bei denen die Seriennummer(n) gaz oder teilweise entfern, verändert oder unkennlich gemacht wurde(n).
These Garantie kann von allen Personen beansprucht werden, die das Produkt legal erworben haben.
In der Übereinstimmung mit den vorgenannten Garantiebedingungen, wird das Produkt kostenlos instandgesetzt oder umgetauscht. Dieses Recht beeinträchtigt in keiner Weise sonstige Rechte des Benutzers im Rahmen der gultigen rechtlichen Bestimmungen.
Instandsetzung oder Austausch bewirken keine Veränderung der Garantiezeit.
Weitergehende Ansprüche sind ausgeschlossen, insbesondere solche auf Wandelung, Minderung oder Schadenersatz.
Kontaktadresse:
JVCKENWOOD DEUTSCHLAND GMBH
Konrad-Adenauer-Allee 1-11, 61118 Bad Vilbel
Tel. 06101-4988 0, www.kenwood.de
Für ihre Notizen:
KENWOOD
KENWOOD
DAB + Compact Stereo Radio
CR-ST80DAB
OPERATING INSTRUCTIONS
JVCKENWOOD Corporation
Table of contents
Content
Page
1.Before switching on the power supply 3
2. Start-up 6
3. Components and functions 7
4. Main menu 8
5. Digital radio (DAB+) 9
6.FM Radio 11
7. Bluetooth Audio 12
8. Analogue connections 13
9. System settings 13
9.1.Sleep 13
9.2.Alarm clock 13
9.3. Equalizer 15
9.4.Time 15
9.5.Backlight 16
9.6.Language 16
9.7. Factory Reset 16
9.8.Software version 16
0. Troubleshooting 17
1. Maintenance 17
12. Disposal 184
3. Technical specifications 19
14.Guarantee 20
1. Before switching on the power supply
IMPORTANT SAFETY INSTRUCTIONS
Attention: Read this page carefully to ensure safe operation of the device.
Read instructions carefully!
- Follow all safety and operating instructions when using this product.
Keep the instructions in a safe place!
- You should keep the safety and operating instructions for future reference.
Follow the warning instructions!
- You should strictly follow all warnings provided on the product and listed in the operating instructions.
1.1 Clean only with a dry cloth!
- Unplug the mains adapter of this device from the mains socket before cleaning this product. Never use liquid cleaning detergents or cleaning sprays. Use only a damp cloth for cleaning.
1.2 Accessories
- Use only the accessories specified by the manufacturer.
1.3 Do not use this device near water
- The device should never be exposed to water droplets or water splashes, such as those found near a bathtub, wash basin, kitchen sink, washing machine, wet basement or swimming pool. Never place containers filled with liquids, such as e.g. flower vases, on the device.
1.4 Ventilation
- Slots and openings in the housing are used to ventilate the device to ensure reliable operation of the device and to protect the device from overheating and possible autoignition. Do not block the ventilation holes. Install the device according to the manufacturer's instructions. Never block the ventilation holes by placing the device on a bed, sofa, rug, or similar soft surfaces. This device should not be installed in a bookshelf or built-in wardrobe unless adequate ventilation is ensured.
1.5 Power supply
- This device may only be connected to the mains voltage with the supplied mains adapter. Use the plug-in power supply only for the Compact Radio CR-ST80DAB. In any case, make sure that the local mains voltage matches the specifications on the mains adapter. If you are unsure about the type of power supply in your home, contact your specialised dealer or power company.
1.6 Mains adapter
- Make sure that you can not trip over the cable or that it is disconnected in the immediate vicinity of a power outlet, including auxiliary sockets. Also, at the exit from the mains adapter, the cable must not be squeezed under any circumstances.
1.7 Thunderstorm
- The device should be disconnected from the mains during thunderstorms and if it is not used for a long time.
1.8 Overload
- Never overload mains sockets, extension cords or multiple sockets, otherwise there is a risk of fire or electric shock.
1.9 Penetration of foreign material and liquid
- Be careful not to allow foreign material or liquid to enter this device through ventilation holes, otherwise it may come into contact with high voltage components or short circuit resulting in a fire or electric shock. Never spill liquids of any kind on this device.
1.10 Maintenance
- Never attempt to carry out the maintenance of this device yourself, because live parts can be exposed through the openings or by removing covers, contacting which can be hazardous. Leave all maintenance to qualified service personnel.
1.11 Damage requiring repair
- Maintenance and repair work should only be carried out by a qualified customer service.
Maintenance/repair is required if the device has been damaged (e.g. the mains adapter) if liquid has entered the device, if objects have entered the device, if the device has been exposed to rain or moisture, when it stops working properly or has fallen down.
1.12 Spare Parts
- If replacement parts are required, make sure that the customer service technician uses spare parts specified by the manufacturer or that have the same characteristics as the original parts. Unauthorised parts may cause fire, electric shock or other accidents.
1.13 Safety test
- After completing service or repair of this device, ask the customer service technician to perform a safety test to determine if the equipment is in good working order.
1.14 Heat
- Do not install the device near hot surfaces, such as radiators, fan heaters, stoves or other devices (including amplifiers) that can be hot. Never place objects with open flame, such as candles or lanterns, on or near the device. The installed batteries should not be exposed to excessive heat such as direct sunlight, fire or the like.
1.15 Batteries
- If you do not use the radio for a month or more, remove the batteries from the battery compartment of the remote control to prevent it from leaking. Immediately dispose of leaking batteries properly and observe all relevant legal regulations. Leaking batteries can cause injury and damage the device. Never mix batteries of different types or old and new batteries.
To minimize the risk of electric shock, fire, etc.
-
do not remove screws, covers or body parts.
-
the power button does not completely disconnect the power supply in any position.
To completely disconnect the device from the mains, unplug the mains adapter from the socket.
1.16 Risks associated with high volume
- The device is not designed for listening with headphones. To prevent possible hearing damage, do not listen at high volume for long periods.
1.17 Remote Control
- Exposing the remote control sensor to direct sunlight or high-frequency fluorescent light may cause malfunction. In such cases, you should move the system to a different location to avoid such malfunction.
- The supplied batteries are intended for functional testing and may have a limited lifetime. If the range of the remote control decreases, replace the old battery with a new one.
1.18 Automatic energy saving function
The radio is equipped with an automatic energy saving function. This switches the device to standby mode within 15 minutes if it is played at a very low volume or if the radio is muted. This setting cannot be changed.
Caution!
Danger of explosion if the battery is replaced by a incorrect type;
- high or low extreme temperatures to which a battery may be exposed during use, storage or transport;
- low air pressure at high altitude;
- the replacement of a battery by an incorrect type that can bypass a fuse (for example, some lithium battery types);
- the disposal of a battery in fire or a hot oven, or the mechanical crushing or cutting of a battery;
- leaving a battery in an extremely high temperature environment that may cause an explosion or leakage of flammable liquids or gases;
- a battery that is exposed to extremely low air pressure, which may cause an explosion or leakage of flammable liquids or gases.
Hereby, JVCKENWOOD Corporation declares that the radio equipment type CR-ST80DAB complies with Directive 2014/53/EU. The full text of the EU Declaration of Conformity is available at the following Internet address:
http://www.kenwood.com/cs/eudoc/
Manufacturer:
JVCKENWOOD Corporation
3-12. Moriyacho, Kanagawa-ku, Yokohama-shi, Kanagawa 221-0022, JAPAN
Authorised Representative (EU):
JVCKENWOOD EUROPE B.V.
Amsterdamseweg 37, 1422 AC UITHOORN, THE NETHERLANDS
2. Start-up
2.1 Unpacking
Carefully unpack the device and make sure all accessories are present:
- Infrared remote control
- Mains adapter
- Operating instructions
- 2 x AAA/LR03 batteries
Audio cable 1.5 meters - 3.5mm jack plug
2.2 Connect
- Connect the mains adapter to the radio and to the mains socket.
- Open the battery compartment of the remote control and insert the batteries with correct polarity.
The specified polarity (+ / -) is marked in the battery compartment.
2.3 DAB + / FM telescopic antenna
- Carefully unlock the antenna on the left side of the casing.
- Turn the antenna upwards and pull out all the elements completely.
- Align the antenna for the best reception.
2.4 Remote control
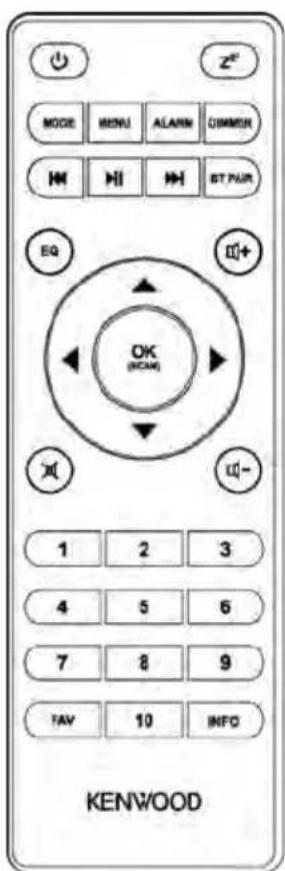
Standby On/Off; Alarm clock off Set snooze
MODE Open/close source selection
MENU Open/close menu
ALARM Set alarm clock
DIMMER 3-stage dimmer
Start, pause playback
Select track
BT PAIR Bluetooth coupling; Disconnect
High; FM: Set frequency
Down; FM: Set frequency
Left; step back
Right; Next Step
OK Confirm input; FM: Search; (SCAN)
Radio image, slide show in full screen mode
EQ Select equalizer preset
Mute, Unmute
- Softer / louder
3. Components and functions
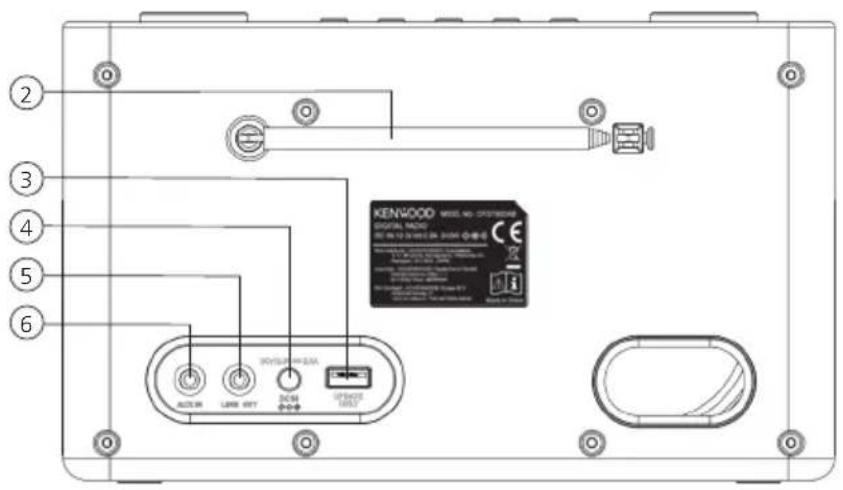
1 - Display
2-FM/DAB+antenna
3 - USB connection
(Firmware updates only)
4 - Connection power supply
5 - Line-out connection
6 - Aux-in connection
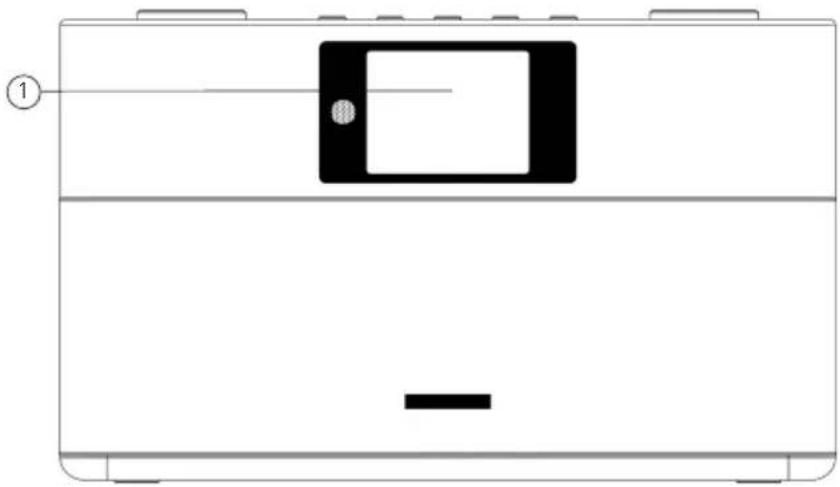
Front side

Backside
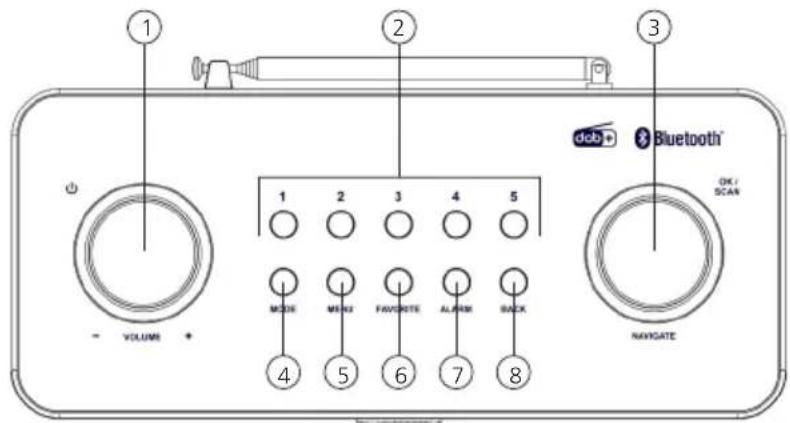
Top view
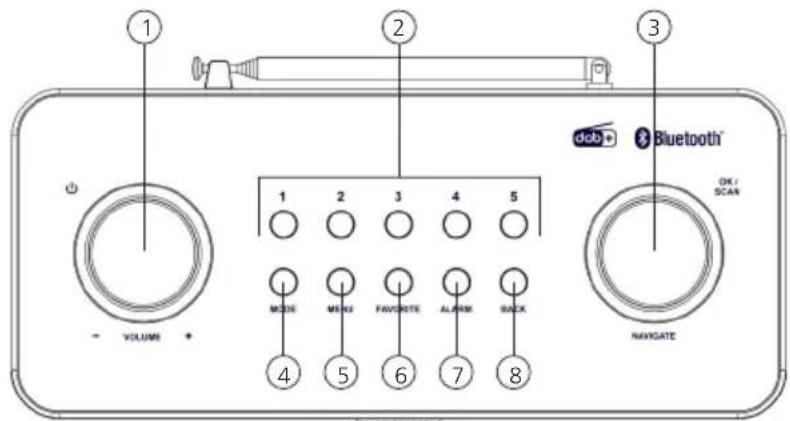
1 - Volume / Standby
2 - Station buttons (1 - 5)
3 - Select / Confirm
4 - Source selection
5 - Menu
6 - Favorites (Presents)
7 - Alarm clock
8 - Back
3.1 Switching On / Off (standby)
Press the button on the remote control or on the device to switch on the radio. Press the button again to put the device into standby mode. To switch it off completely, disconnect it from the power supply.
You can navigate through the menus by pressing the buttons on the remote control. The selection is confirmed by pressing the button. These operating steps can also be carried out on the device using the knob. Turn the knob to navigate through the menus, confirm a menu item by pressing the knob.
3.3 Adjusting volume and "Mute"
You can adjust the volume by pressing the and buttons on the remote control or by turning the knob on the device. Pressing the button mutes the radio. The "Volume muted" appears briefly in the display and a crossed-out speaker symbol appears in the lower part of the display. Another pressing of the button restores the original volume.
By repeatedly pressing the button, depending on the source and station, additional information can be displayed:
Description
- Name of the station, the current program, content, topics, etc..
Genre
The program style (genre) of the station is displayed.
- Signal level and signal error
- Bit rate
- Channel information
Today's date and current time
Depending on the audio source, symbols for RDS, stereo reception and reception strength are shown in the lower area of the display.
3.5 Initial setup
When the device is started for the first time, a DAB+ station search is started, so please extend the antenna completely. The menu language is English.
To change the menu language, please refer to Chapter 9.6 in the Operating Instructions.
4. Main menu
In the main menu you can select the different audio sources:
Digital radio (DAB+)
FM
- Bluetooth
- Aux input
With the audio source selected, press the key on the remote control or on the device to call up the source selection.
5. Digital radio DAB+
To receive the digital radio DAB+, please switch to the source "Digital Radio" in the main menu. When switching for the first time, an automatic station search is started. The "Search" appears on the display, as well as the number of stations found so far and a corresponding progress bar. Some stations offer additional information as a so-called Slideshow.
To display these on the radio display in large format, press the button on the remote control or on the radio. Pressing the button again switches the display back.
5.1 Station search
To search for receivable stations, you can start an automatic search. To do this, use the