ODL 32653HSTB - TV OK - Free user manual and instructions
Find the device manual for free ODL 32653HSTB OK in PDF.
| Product Type | LED TV HD Ready |
| Brand | OK |
| Model | ODL 32653HSTB |
| Screen Size | 81 cm (32 inches) |
| Screen Resolution | 1366 x 768 pixels |
| Energy Efficiency Class | A |
| Energy Consumption (operation) | 41 W |
| Energy Consumption (standby) | 0.31 W |
| Supply Voltage | 100-240 V~ 50/60 Hz |
| Total Audio Power | 2 x 8 W |
| Dimensions with stand (W x H x D) | 730.3 x 471.4 x 185.2 mm |
| Dimensions without stand (W x H x D) | 730.3 x 429.9 x 80.2 mm |
| Net Weight with stand | 3.53 kg |
| Net Weight without stand | 3.45 kg |
| Reception Systems | DVB-T/T2/C/S/S2, ATV PAL/SECAM |
| Connectivity | HDMI, USB, RF Antenna, CI, Digital Audio Output |
| Main Functions | Electronic Program Guide (EPG), Teletext, Parental Control, Hotel Mode, HDMI-CEC |
| Care and Cleaning | Clean with a soft, dry cloth. Do not use chemical products. |
| Safety | Minimum ventilation space of 10 cm around the device. Do not expose to moisture or excessive heat. |
| Repairability | Spare parts available through after-sales service (contact the manufacturer). |
Frequently Asked Questions - ODL 32653HSTB OK
User questions about ODL 32653HSTB OK
0 question about this device. Answer the ones you know or ask your own.
Ask a new question about this device
Download the instructions for your TV in PDF format for free! Find your manual ODL 32653HSTB - OK and take your electronic device back in hand. On this page are published all the documents necessary for the use of your device. ODL 32653HSTB by OK.
USER MANUAL ODL 32653HSTB OK
natural_image
Front view of a modern flat-screen TV with black screen and stand (no visible text or symbols)IM_ODL32653HS-TB_190617_V02

text_image
Technical diagram showing a bolted joint with labeled dimensions and a corresponding schematic view of a rectangular component with points A, B, C.natural_image
Illustration of two hand gestures: one holding a remote control, the other adjusting its device (no text or symbols present)EWS Local Postal Codes
Warning and Precaution 24
TV Button 28
Terminal Connection....29
Remote Control Function 30
Electronic Program Guide 32
Menu Control....33
Menu Operation....33
Channel 33
Picture 34
Sound....34
Time 35
Lock 35
Setup 35
USB Control 36
Timeshift 36
USB Operation 36
Photo Menu 37
Music Menu....37
Movie Menu....38
Text Menu....38
Troubleshooting 39
Specification....40
License....42
Note:
-
The graphics in this manual are only for reference.
-
Your TV's OSD may be slightly different from that shown in this manual.
-
The information in this document is subject to change without notice. The manufacturer accepts no liability for damage resulting directly or indirectly from faults, incompleteness or discrepancies between the user manual and the product described.
-
In dry environment due to static electricity, the product may restart and return to the main OSD interface, USB player interface or the previous source mode. It is normal and please continue to operate the TV as you will.
EN
Warning and Precaution
Congratulations
Thank you for choosing an OK. product. Please read the instructions carefully and retain them for future reference.
Note: A detailed instruction manual for this TV is available on the following website: http://de.ok-online.com/nc/de/service/downloads.html
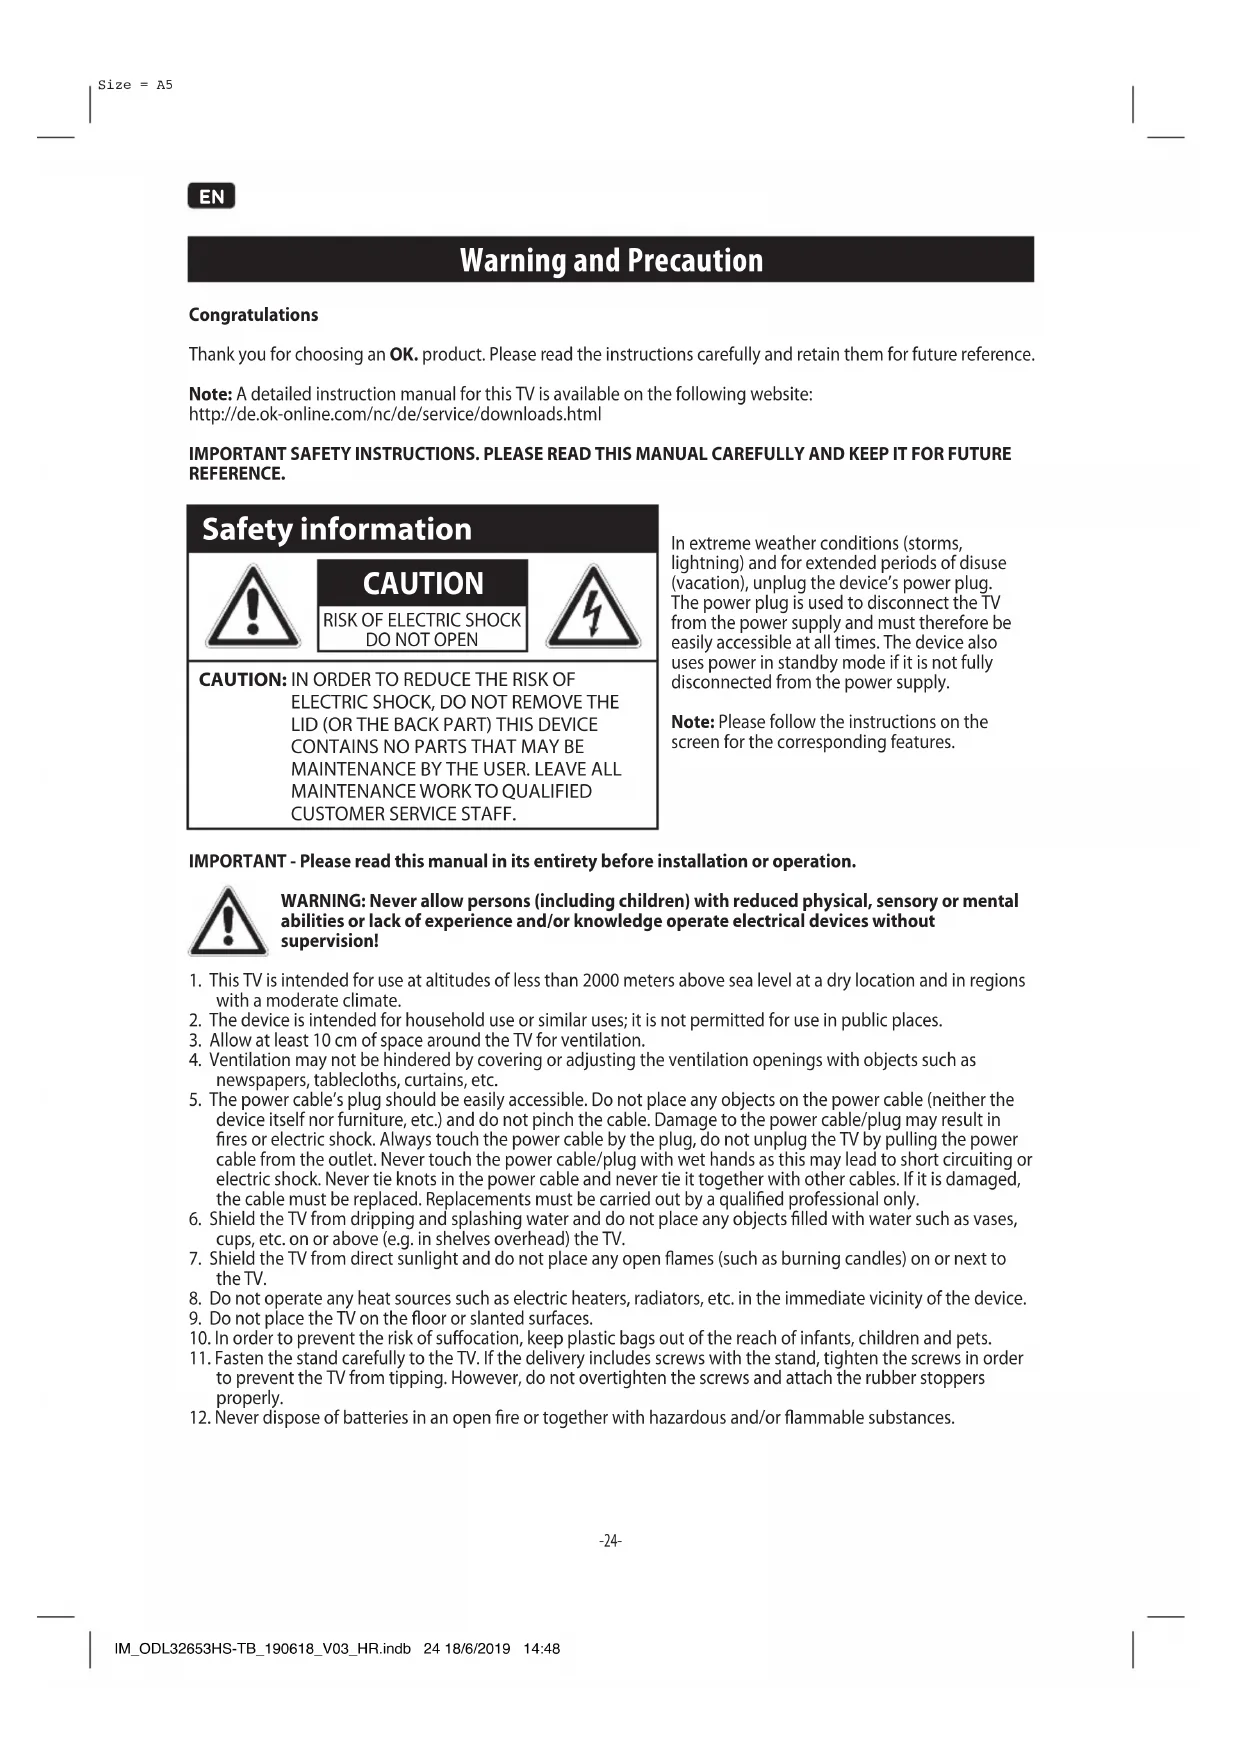
IMPORTANT SAFETY INSTRUCTIONS. PLEASE READ THIS MANUAL CAREFULLY AND KEEP IT FOR FUTURE REFERENCE.
Safety information

CAUTION
RISK OF ELECTRIC SHOCK DO NOT OPEN

CAUTION: IN ORDER TO REDUCE THE RISK OF ELECTRIC SHOCK, DO NOT REMOVE THE LID (OR THE BACK PART) THIS DEVICE CONTAINS NO PARTS THAT MAY BE MAINTENANCE BY THE USER. LEAVE ALL MAINTENANCE WORK TO QUALIFIED CUSTOMER SERVICE STAFF.
In extreme weather conditions (storms, lightning) and for extended periods of disuse (vacation), unplug the device's power plug. The power plug is used to disconnect the TV from the power supply and must therefore be easily accessible at all times. The device also uses power in standby mode if it is not fully disconnected from the power supply.
Note: Please follow the instructions on the screen for the corresponding features.
IMPORTANT - Please read this manual in its entirety before installation or operation.

WARNING: Never allow persons (including children) with reduced physical, sensory or mental abilities or lack of experience and/or knowledge operate electrical devices without supervision!
- This TV is intended for use at altitudes of less than 2000 meters above sea level at a dry location and in regions with a moderate climate.
- The device is intended for household use or similar uses; it is not permitted for use in public places.
- Allow at least 10 cm of space around the TV for ventilation.
- Ventilation may not be hindered by covering or adjusting the ventilation openings with objects such as newspapers, tablecloths, curtains, etc.
- The power cable's plug should be easily accessible. Do not place any objects on the power cable (neither the device itself nor furniture, etc.) and do not pinch the cable. Damage to the power cable/plug may result in fires or electric shock. Always touch the power cable by the plug, do not unplug the TV by pulling the power cable from the outlet. Never touch the power cable/plug with wet hands as this may lead to short circuiting or electric shock. Never tie knots in the power cable and never tie it together with other cables. If it is damaged, the cable must be replaced. Replacements must be carried out by a qualified professional only.
- Shield the TV from dripping and splashing water and do not place any objects filled with water such as vases, cups, etc. on or above (e.g. in shelves overhead) the TV.
- Shield the TV from direct sunlight and do not place any open flames (such as burning candles) on or next to the TV.
- Do not operate any heat sources such as electric heaters, radiators, etc. in the immediate vicinity of the device.
- Do not place the TV on the floor or slanted surfaces.
- In order to prevent the risk of suffocation, keep plastic bags out of the reach of infants, children and pets.
- Fasten the stand carefully to the TV. If the delivery includes screws with the stand, tighten the screws in order to prevent the TV from tipping. However, do not overtighten the screws and attach the rubber stoppers properly.
- Never dispose of batteries in an open fire or together with hazardous and/or flammable substances.
Warning and Precaution
Warning: Batteries may not be exposed to excessive heat such as direct sunlight, fire or the like.

Caution Severe or fatal risk of injury
Risk of electric shock Risk of dangerous voltage

Maintenance Important maintenance components
Label on the device
The follow symbols are used on the device as labels for restrictions and safety precautions as well as safety instructions. Each label should be followed only if it is present on the device. Please heed this information for reasons of safety.

Protection class II device:
This device was designed to not require a protective conductor (electrical grounding) for connection to the power supply.

Protection class II device with functional protective conductor:
This device was designed to not require a protective conductor (electrical grounding) for connection to the power supply. The protective conductor serves functional purposes.

Protective conductor (grounding):
The marked terminal is intended for connection to the protective conductor (grounding) connected to the power supply line.

Potentially fatal terminal:
The marked terminal(s) is/are potentially fatal in normal operation mode.

Caution. Please follow the instruction manual:
The marked area(s) contain(s) coin-cell batteries that must be replaced by the user.
EN
Warning and Precaution
WARNING
Batteries may not be swallowed as they pose a risk of chemical burns.
This device or the included accessories may contain a coin-cell battery. If a coin-cell battery is swallowed, this will lead within 2 hours to potentially fatal, serious internal burns.
Keep new and used batteries out of the reach of children.
If the battery compartment is not securely closed, stop using the device and keep it out of the reach of children.
If you suspect that batteries have been swallowed or inserted in any body part, seek medical attention immediately.
Please dispose of batteries in accordance with all relevant regulations and restrictions. Remove the batteries from the product before disposal of the product.
WARNING: Do not expose batteries to extreme heat such as direct sunlight or fire.
ATTENTION: Replace the batteries only with the same or equivalent type of battery. Never attempt to recharge non-rechargeable batteries.
WARNING
Do not place the TV on an unstable or slanted surfaces. Otherwise the TV may tip over and cause potentially fatal, serious injury. Many injuries, especially involving children, can be avoided if the following simple safety precautions are taken;
• Only use TV furniture or stands recommended by the device manufacturer.
• Only use furniture that can carry the weight of the TV.
• Make sure that the TV does not extend beyond the edges of the furniture.
- Do not place the TV on high pieces of furniture (e.g. shelves or bookshelves) without securely supporting the furniture itself and the TV.
- Do not place the TV devices on fabrics or other materials that are located between the TV and the furniture.
- Inform your children about the dangers of climbing on high pieces of furniture to reach the TV or the remote control. If you change the location of your TV, follow the same safety precautions.
WARNINGS FOR WALL MOUNTING
- Read the instruction manual thoroughly before mounting the device to the wall.
- The set for wall mounting is optional. It can be purchased from a local retailer if you did not purchase it with your device.
• Do not mount the TV to the ceiling or a slanted wall.
- Only use the intended screws and accessory parts for wall mounting.
- Tighten the screws for wall mounting securely to prevent the TV from falling. Do not overtighten the screws.
WARNING
Connecting devices that are connected to the building's protective grounding via a network connection or other devices or to a TV distribution system via a coaxial cable may pose a fire hazard. Connection via a cable distribution system is only permitted when the device provides insulation below a certain frequency range (galvanic insulation, see EN 60728-11).
Warning and Precaution
Positioning the TV
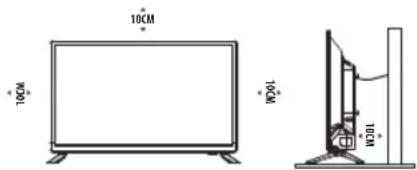
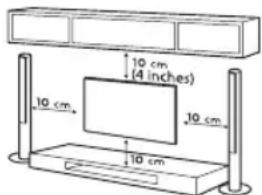
• Install Display on solid horizontal surface such as a table or desk. For ventilation, leave a space of at least 10 cm free all around the set. To prevent any fault and unsafe situations, please do not place any objects on top of the set. This apparatus can be used in tropical and/or moderate climates. Fixing the rear of enclosure to wall. Below picture is different from actual item, thus it is only for reference. (only for some countries)
text_image
10CM 10CM 10CM 10CM- Warning: Never place a television set in an unstable location. A television set may fall, causing serious personal injury or death. Many injuries, particularly to children, can be avoided by taking simple precautions such as:
-Using cabinets or stands recommended by the manufacturer of the television.
-Only using furniture that can safely support the television.
- Ensuring the television is not overhanging the edge of the supporting furniture.
-Not placing the television on tall furniture (for example, cupboards or bookcases) without anchoring both the furniture and the television set to a suitable support.
-Not placing the television set on cloth or other materials that may be located between the television set and supporting furniture.
-Educating children about the dangers of climbing on furniture to reach the television or its controls.
- If your existing television set is being retained and relocated, the same considerations as above should be applied. (Only for the TV with mass exceeds 7 kg)
Wall-hanging bracket
- An optional wall mount can be used with your television. Consult with your local dealer to purchase the recommended wall mount bracket. Carefully attach the wall mount bracket at the rear of the TV. Install the wall mount bracket on a solid wall perpendicular to the floor. If you are attaching the TV to other building materials, please contact qualified personnel to install the wall mount. Detailed instructions will be included with the wall mount. Please use a wall mount bracket where the devices is adequately secured to the wall with enough space to allow connectivity to external devices.
text_image
10 cm (4 inches) 10 cm 10 cm 10 cm- Disconnect the power before moving or installing the TV. Otherwise electric shock may occur.
- Remove the stand before installing the TV on a wall mount by performing the stand attachment in reverse.
- If you install the TV on a ceiling or slanted wall, it may fall and result in severe injury. Use an authorized wall mount and contact the local dealer or qualified personnel. Otherwise it is not covered by the warranty.
- Do not over tighten the screws as this may cause damage to the TV and void your warranty.
- To prevent injury, this apparatus must be securely attached to the floor/wall in accordance with the installation instructions.
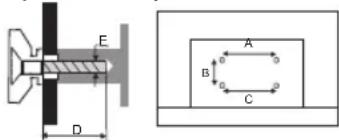
- Use the screws and wall mounts that meet the following specifications. Any damages or injuries buy misuse or using an improper accessory are not covered by the warranty.
text_image
E D A B C| Model Size: 32" Top Down | ||||
| Screw | Diameter (mm) "E" M4 M4 | |||
| Depth (mm)"D" | Max 6 | 6 | ||
| Min 5 | 5 | |||
| Quantity 2 2 | ||||
| VESA (A x B x C) 100 x 100 x 100 | ||||
Note:
1) The pictures in this manual are for reference only.
2) For the TV sets with terminals towards the wall, in order to leave enough space to use the terminals, a rubber cushion is needed together with the screw to fix the wall mount. It is a small hollow pillar whose internal diameter is 8 mm, external diameter is 18 mm and height is ≥ 30 mm.
3. The information in this document is subject to change without notice. The manufacturer accepts no liability for damage resulting directly or indirectly from faults, incompleteness or discrepancies between the user manual and the product described.
4. In dry environment due to static electricity, the product may restart and return to the main OSD interface, USB player interface or the previous source mode. It is normal and please continue to operate the TV as you will.
5. In dry environment due to static electricity, the product may disconnect WLAN network, and please restart the TV to recover the WLAN connection automatically.
EN
Warning and Precaution
Operating Environment
- Do not install this equipment in a confined space such as a bookcase or similar unit.
- Do not use the set near damp, and cold areas, protect the set from overheating.
- Keep away from direct sunlight.
• Do not use the set near dust place. - Do not attach candle to accessible opening area, to avoid flammable foreign material from entering the TV.
Precautions For Using Remote Control
- Use the remote control by pointing it towards the remote sensor. The items between the remote control and the remote sensor will interfere the normal operation.
- Do not make remote control vibrate violently. Also, do not splash liquid on the remote control, also do not put the remote control in high humidity place.
- Do not place remote control under direct sunlight which will cause deformation of the unit by heat.
- When the remote sensor is under direct sunlight or strong lighting, the remote control will not work. If so please change the lighting or TV's position, or operate the remote control closer to the remote sensor.
Precautions For Using Battery
Improper using of the battery will cause leakage. So please do as the following methods and use carefully.
- Please note the batteries' polarity, to avoid short circuit.
- When the battery's voltage is insufficient which affect the use range, you should replace new battery. Remove the batteries from the remote control unit if you do not intend to use it for a long time.
- Do not use different types of batteries (for example, Manganese and Alkaline batteries) together.
- Do not put the battery into fire, and charge or decompose the battery.
- Please dispose batteries abide by relevant environmental protection regulation.
- WARNING: The batteries (battery pack or batteries installed) shall not be exposed to excessive heat such as sunshine, fire or the like.
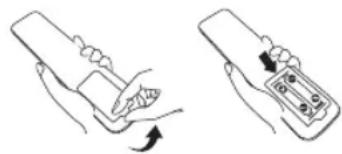
Install Remote Control Battery
Place two AAA size batteries in the remote controls battery compartment, making sure to match the polarity markings inside the compartment.
natural_image
Illustration of two hand gestures: one holding a remote device, the other holding a remote control with a keypad (no text or symbols)Note: The picture is only for reference.
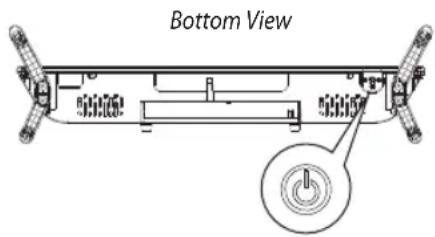
TV Button
Note: The pictures are only for reference.
text_image
Bottom ViewTurn on the TV:
In standby mode, short press TV button to turn on the TV.
Soft keyboard function:
After turning on the TV, short press TV button to call out the following soft keyboard showing on the screen. Short press TV button to select the item you want. Long press TV button to enter the item you have selected.

| Soft Keyboard | ||
| Icon N | Name Function | |
| VΛ | Up/Down | Change to previous or next Channels in TV mode.Move down or up to select the item you want in menu settings. |
| - + | Left/Right | Decrease or increase the sound volume in TV mode.Move left or right to select the item you want in menu settings. |
| Main Menu Access the main menu settings | ||
| Source Access the interface of input source | ||
| Standby Turn the TV standby | ||
Terminal Connection
Terminal
CI CI card port.
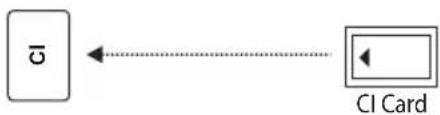
flowchart
graph LR
    A["σ"] --> B["CI Card"]
    style A fill:#fff,stroke:#000
    style B fill:#fff,stroke:#000
USB USB port.
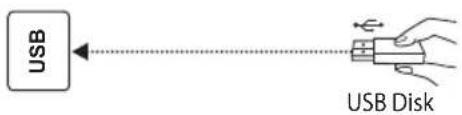
text_image
USB USB DiskHDMI IN
Connect HDMI input signal from signal source such as DVD.
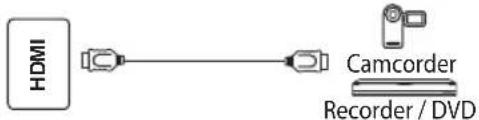
flowchart
graph LR
    A["HDMI"] --> B["Camcorder"]
    B --> C["Recorder / DVD"]
AC IN
Connect the AC power cord.

ANTENNA IN
Connect a coaxial cable to receive signal from the antenna, cable or satellite.
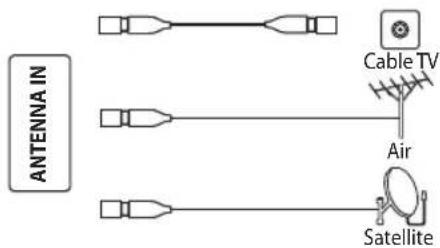
text_image
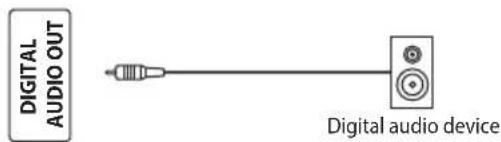
ANTENNA IN Cable TV Air SatelliteDIGITAL AUDIO OUT
Use a coaxial cable to output your TV audio signal to a compatible audio receiver.
text_image
DIGITAL AUDIO OUT Digital audio deviceNote:
- The pictures are only for reference.
- External equipment and cables shown herein are not supplied with the TV.
- Some terminals may differ by different regions or models, and please take your actual TV set as the standard.
EN
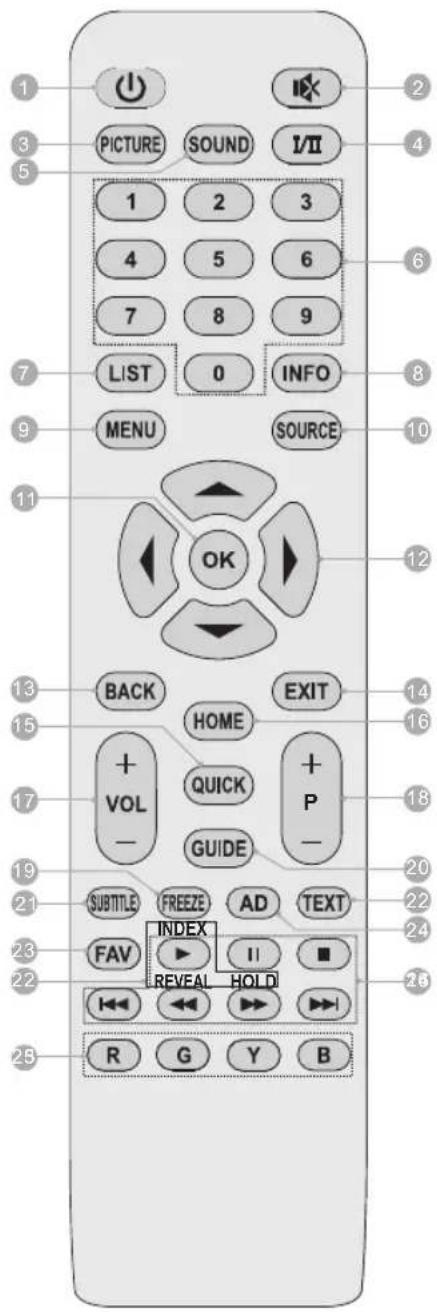
Remote Control Function
Note:
- The picture is only for reference.
- Some buttons may not be available for some regions or some models.
text_image
1 2 3 4 5 6 7 8 9 LIST 0 INFO MENU SOURCE 10 11 12 13 14 15 16 17 18 19 20 21 22 23 24 25 R G Y B PICTURE SOUND I/II 1 2 3 4 5 6 7 8 9 OK BACK HOME QUICK GUIDE EXIT P + - + - +VOL SUBTITLE FREEZE AD TEXT INDEX FAV II ■ REVEAL HOLD- POWER ( Turn the TV on or standby.
- MUTE ( )Mute or restore the sound.
- PICTURE: Select the picture mode.
- I/II: Select desired sound output depending on the broadcasting channel.
- SOUND: Select the sound mode.
- Number Buttons (0\~9): Choose the channel directly, or input a number.
- LIST: Access the channel list.
- INFO: Show the detailed information of current program.
- MENU: Access the main menu.
- SOURCE: Select the input source.
- OK: Confirm, enter or execute the selection.
- Navigation Buttons (Up/Down/Left/Right (▲ /▼ /◄ /►): Navigate the menu to select what you need.
- BACK: Return to the upper-level menu, or return to the previously-viewed channel.
- EXIT: Exit the current screen or operation.
- QUICK: No Function.
- HOME: No Function.
- Volume Up/Down (VOL +/-): Increase or decrease the volume.
- Program Up/Down (P +/-): Change to next or previous program.
- FREEZE: Freeze or unfreeze the picture on the screen, (it's not available in USB mode)
- GUIDE: Access the interface of Electronic Program Guide in DTV mode.
- SUBTITLE: Open or close the subtitle.
- Teletext Buttons (May not be available)
TEXT: Enter or exit the teletext menu.
HOLD: Hold or release the teletext page.
INDEX: Display the index page.
REVEAL: Display or hide the concealed teletext information. - FAV: Access the favourite list, or add/remove the selected program to/from the favourite list in the setting of Programme Edit.
- AD: Turn on or turn off the function of audio description in DTV mode.
- Color Buttons (RED/GREEN/YELLOW/BLUE):
Execute the prompt function in specific mode. - USB Play Control Buttons
PLAY (▶): Start the playback.
PAUSE (I): Pause the playback, or enable the timeshift function in DTV mode for some models.
STOP (■: Stop the playback.
Fast Backward (last reverse the playback.
Fast Forward (▶) Fast forward the playback.
PREVIOUS (1) Skip to the previous file.
NEXT (▶▶▶): Skip to the next file.
Basic Operation
Turn on or turn off the TV
Step 1. Insert the power cord into the wall outlet, then the TV goes to standby mode, press POWER button on the remote control to turn on the unit, and you will be ready to use its features.
Step 2. When the TV is turned on, press POWER ⏻ button to turn off the TV, and it will go to standby mode.
Step 3. If you want to power off the TV completely, please pull out the power cord from the wall outlet.
Initial Setup
The first time you power on the TV, there will show a setup wizard, press ▲ / ▼ / ◀/▶ and OK/ENTER button to start and finish the following steps:
Step 1. Select the menu language as you need.
Step 2. Select your country.
Step 3. (May not be available) Select the usage environment you want.
Step 4. Tuning setup.
Step 5. (Only for some countries) Input the EWS local postal codes.
Step 6. Channel tuning (Search for programs automatically).
After finishing the tuning setup, press OK/ENTER to start the auto tuning. Press MENU or EXIT button to select whether or not to exit the auto tuning. Press ▶ button to exit auto tuning, and press ▶ button to continue auto tuning. After auto tuning, the programs will be saved automatically and initial setup will be completed.
Note:
- Before powering on the TV, you need to connect the TV signal cable to the tuner terminal well on the back of the TV.
- If you want to reset the above settings after the initial setup, you can access "Setup" menu and select "First Time Installation".
Input Source
Step 1. Press SOURCE button to enter the list of input source.
Step 2. Press ▲/▼ button to select a source.
Step 3. Press OK/ENTER button to enter the selected source.
Step 4. Press EXIT button to exit the input source selection.
EN
Electronic Program Guide
Electronic Program Guide is supplied by the program providers and offers information about the programs to be broadcast. You can access it in digital mode by pressing EPG/GUIDE button on the remote control.
- Press EPG/GUIDE button to access the interface of Electronic Program Guide, and the channel you are watching now is highlighted. Press ▲ / ▼ button to select the desired channel and press OK/ENTER button to play it now.
- There are total eight days of program guides in the TV, which includes today and seven coming days. Press YELLOW button to access the program guide of previous day. Press BLUE button to access the program guide of next day.
- (Only for some models) Press GREEN button to setup a reminding schedule. You can also access the "Schedule List" in "CHANNEL" menu to setup details for reminding schedule. In "Schedule List", press RED button to delete a schedule, press YELLOW button to add a new schedule and press BLUE button to edit a schedule.
Menu Control
For lasting update and upgrade, below descriptions of menu settings may not be in compliance with your TV, this is normal and the actual content on your TV shall govern.
Menu Operation
Step 1. Press MENU button to enter the main menu.
Step 2. Press ◀ /▶ button to select a submenu.
Step 3. Press OK/ENTER button to enter the selected submenu.
Step 4. Press ▲/▼button to select an item.
Step 5. Press OK/ENTER button to enter the selected item.
Step 6. Press ▲ / ▼ or / ◀ button to adjust the item.
Step 7. Press MENU button to return to the upper-level menu.
Step 8. Press EXIT button to exit main menu setting.
Note: Some settings may not be available for some sources, some regions or some models.
Channel (Only for TV source)
Auto Tuning
Search for programs automatically. Before auto tuning, you need to setup related items firstly. After finishing related settings, press OK/ENTER button to start auto tuning. If you want to stop searching, press EXIT button to pop out a dialog asking you whether or not to exit the auto tuning. Press
-
Setup for DVB-C/T/T2 auto tuning Need to setup "Country", "Tune Type", "Digital Type", "Scan Type", "Network ID", "Frequency" and "Symbol Rate". Note: "Scan Type", "Network ID", "Frequency" and "Symbol Rate" are only available for DVB-C.
-
Setup for Satellite (DVB-S/S2) auto tuning Need to setup "Country", "Satellite", "Scan Mode", "Channel Type", and "Service Type".
-
Setup for ATV auto tuning Need to setup "Country" and "Tune Type".
ATV Manual Tuning (Only for ATV)
Search for ATV programs manually. Press ▼/▼/ button to highlight and adjust related settings (Current CH, Color System, Sound System and Fine-Tune). Then press ▼ button to highlight "Search" and press ◀/▶ to start the search. If you want to stop the search, press EXIT button.
Press for the unit to search towards higher frequency.
Press for the unit to search towards lower frequency.
- Fine-Tune
Use to make small adjustments to tuning of an individual channel. Fine-tune is not necessary under normal conditions. However, in area of inferior broadcast conditions where adjustments are necessary for a better picture and sound, use fine-tune.
DTV & CADTV Manual Tuning
Search for DVB-T/T2 or DVB-C programs manually. Press ▲ /▼/ button to highlight and adjust related settings (DVB-T/T2: Channel. DVB-C: Frequency, symbol and QAM Type). Then press OK/ENTER button to start the search.
Note: Before searching, you need to select "DVB-C" or "DVB-T" in "Digital Type" of "Auto Tuning"
EN
Menu Control
Programme Edit
Edit the programs. Firstly press ▲ button to select the program.
- Press Red button to delete the selected program.
- Press Yellow button to move the selected program to the position you want.
- Press Blue button to skip the selected program.
Schedule List
You can check, delete, edit or add a reminding schedule. It is only available for some models.
Signal Information
Press to show the signal information of current channel.
CI Information
Enables the user to select from the CAM-provided menu.
EWS Local Postal Codes
Input your EWS local postal codes. It is only available for some countries.
5V antenna power
Turn on to provide power to the antenna. It is only available for some models.
Dish Setup (Only for satellite)
When selecting satellite as the input source, it is better to adjust related dish settings (Satellite, Transponder, LNB Type, LNB Power, 22KHz, Toneburst, Diseqc1.0, Diseqc1.1 and motor) before auto tuning.
- Satellite - Select the satellite for the TV.
- Transponder - Select the transponder for the TV.
- LNB Type - Make sure the LNB type is corresponding to your satellitedish.
- LNB Power - Select the power supply for the LNB.
- 22KHz - Select the 22KHz to set 22K switch to ON/OFF. The auto mode is used to switch 22KHz on or off depending on the LNB type.
- DiSEqC1.0/1.1 - Select the DiSEqC mode for the selected LNB.
- Motor - Select to control and rotate the dish to face satellite position in the sky more accurately.
Picture
Picture Mode: Select the appropriate picture mode for different purposes.
Contrast: Adjust the difference between light and dark areas of the picture.
Brightness: Adjust the lightness of the picture.
Colour: Adjust the colour richness of the picture.
Tint: (Only for NTSC signal) Adjust the colour tint of the picture.
Sharpness: Adjust the edge of the picture.
Colour Temp: Select the overall colour temperature of the picture.
Noise Reduction: Reduce the noise generated with the picture signal.
HDMI Mode: (Only for HDMI source) Select the appropriate HDMI mode among Auto, Video and PC.
Sound
Sound Mode: Select the desired sound mode.
Treble: Adjust the high frequency sound.
Bass: Adjust the low frequency sound.
Balance: Control the sound balance between the right and left speaker.
Auto Volume Level: Turn on to adjust the sound volume automatically according to the input signal.
SPDIF Mode: Select the SPDIF mode.
AD Switch: Turn on or turn off the Audio description. When turn on the audio description, a narrator will describe what is happening on the screen for blind or visually impaired viewers.
Menu Control
Time
Clock: Get the TV clock time automatically.
Time Zone: Select the desired time zone.
Sleep Timer: Setup the timer in minute to turn off the TV automatically.
Auto Standby: Setup the timer in hour to turn off the TV automatically when there is no operation during the designated time duration. Choices are Off, 3H, 4H, and 5H.
OSD Timer: Setup the time in second to keep the menu on the screen without disappearing during the designated time when there is no menu operation.
Lock
System Lock: You will be prompted to enter the password. The default password is 0000.
Set Password: Use to change the current Lock Password.
Channel Lock (Only in TV mode): Setup to restrict access to specific channel. Press Green button to lock or unlock the channel.
Parental Guidance (Only in TV mode): Setup to restrict access to specific programs based on age rating.
Key Lock: Lock the TV button to prevent it from undesired usage.
Hotel Mode: Turn on the "Hotel Mode" to enable the related settings. It is only available for some models.
Note: If you change the password and forget it, you can use the super password 4711 to enter the lock system.
Setup
Language: Select the desired menu language.
TT Language: Select the teletext language as you want.
Audio Languages: Select the primary and secondary audio language.
Subtitle Language: Select the primary and secondary subtitle languages.
Hearing Impaired: Turn on to help the deaf or hearing-impaired viewers to enjoy a better watching experience.
Aspect Ratio: Select the desired aspect ratio of the picture. Choices vary depending on the input source or the model.
Blue Screen: Turn on or turn off the function of blue screen.
First Time Installation: Enter to restart the initial setup.
Reset: Reset user settings to the factory defaults. Some settings like System Lock, searched channels, etc. may not be cleared after executing this operation.
Software Update (USB): Select to update the TV software from USB.
Environment: Select the usage environment between "Home Mode" and "Shop Mode". It will consume more energy if you select "Shop Mode". It is only available for some models.
HDMI LINK: Command and control HDMI devices connected to the TV set. It is only available for some models.
• LINK Control - Turn on or turn off HDMI LINK function.
• Auto Receiver - Turn on or turn off audio receiver function.
- Device Auto Power Off - Turn off connected HDMI device automatically when you turn off the TV set.
• TV Auto Power On - Turn on the TV set automatically when you turn on the connected HDMI device.
• Device List - Show the list of HDMI devices connected to the TV.
• Device Menu - Access the HDMI device menu.
EN
USB Control
Timeshift
If you want to leave a while and watch the program without missing the contents after coming back, you can press ▶ button to stop the program, and press button again to start watching.
The recorded program for time shift will be cleared automatically after stopping timeshift or playing the recorded program.
USB Operation
You can view movie, text, music and photo files from your USB storage devices.
Step 1. Connect USB storage device to USB input terminal.
Step 2. Press SOURCE button and select "Media" to enter the USB interface.
Step 3. Press ◀/▶ to select the USB file type: Photo, Music, Movie or Text.
Step 4. Press OK/ENTER button to enter the USB disk.
Step 5. Press ▲ /▼ /◄/► button to select the file folder you need.
Step 6. Press OK/ENTER to enter the file folder.
Step 7. Press ▲ /▼ /◄/► button to select the file you want to play.
Step 8. Press OK/ENTER button to start or pause the playing.
Step 9. Press EXIT button to exit the playing.
Note: Please select the file to play which is the same type selected in USB interface. For example, if you select 'Movie' type in USB interface, you need to select a movie in your USB disk to play. Otherwise, you will not play it correctly.
Gentle Reminder When Using the USB Player
- Some USB storage devices may not be compatible to operate smoothly with this TV.
- Back up all of the data in the USB storage device in case data was lost due to an unexpected accident. We do not assume any liability for the losses by misuse or malfunction. Data backup is consumer's responsibility.
- For large file sizes, the loading speed may be slightly longer.
- The recognition speed of a USB storage device may depend on each device.
- When connecting or disconnecting the USB storage device, ensure that the TV is not in USB mode otherwise the USB storage device or the files stored in it may be damaged.
- Please use only a USB storage device which is formatted in FÄT32 file system provided with the Windows operating system. In case of a storage device formatted as a different utility programme which is not supported by Windows, it may not be recognized.
- When using a USB Hard Disk Drive which requires electric power source, ensure its power does not exceed 500 mA. If the power of the USB hard Disk exceed 500 mA, the TV system may be changed into standby mode, you should pull away the USB hard Disk and restart the TV system.
- An "Not support" or "Unsupported" message will be displayed if the file format is unsupported or corrupted.
- FHD big picture needs longer time to process, which is not caused by the TV. Please be patient to wait.
- This TV may not support some multimedia files changed and upgraded as the change of encoding format or other technical advances.
USB Control
Photo Menu
- Press INFO button to show or exit the photo menu when viewing photos.
- Press ◀/▶ button to select the menu operation, and press OK/ENTER button to execute the operation.
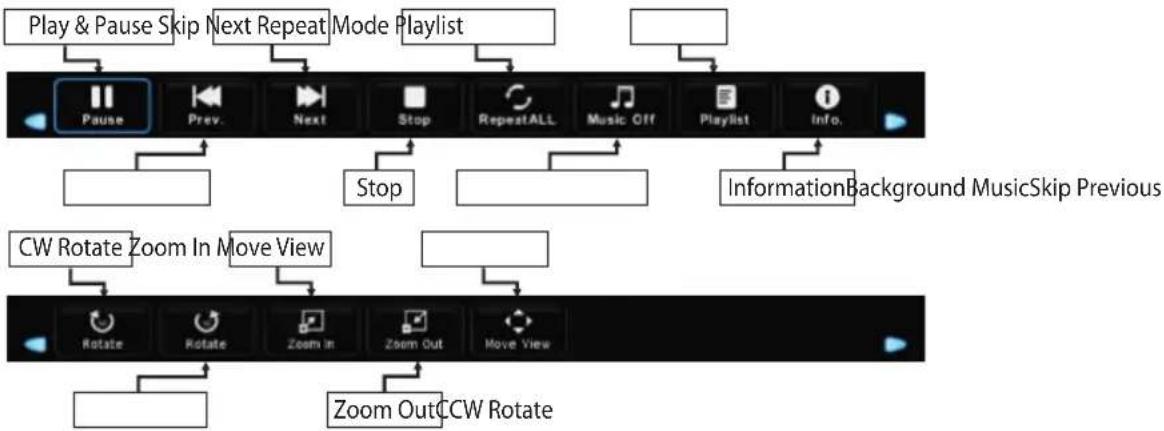
flowchart
graph TD
    A["Play & Pause Skip"] --> B["Next Repeat Mode"]
    B --> C["Playlist"]
    D["Pause"] --> E["Prev."]
    E --> F["Next"]
    F --> G["Stop"]
    G --> H["RepeatALL"]
    H --> I["Music Off"]
    I --> J["Playlist"]
    J --> K["Info."]
    L["Information Background MusicSkip Previous"] --> M["Stop"]
    M --> N["Stop"]
    O["CW Rotate Zoom In Move View"] --> P["Rotate"]
    P --> Q["Rotate"]
    Q --> R["Zoom In"]
    R --> S["Zoom Out"]
    S --> T["Move View"]
    U["Zoom Out CCW Rotate"] --> V["Rotate"]
    V --> W["Rotate"]
    W --> X["Zoom In"]
    X --> Y["Zoom Out"]
Note: The pictures are for reference only.
Music Menu
- Press INFO button to show or exit the music menu when playing musics.
- Press ◀/▶ button to select the menu operation, and press OK/ENTER button to execute the operation.
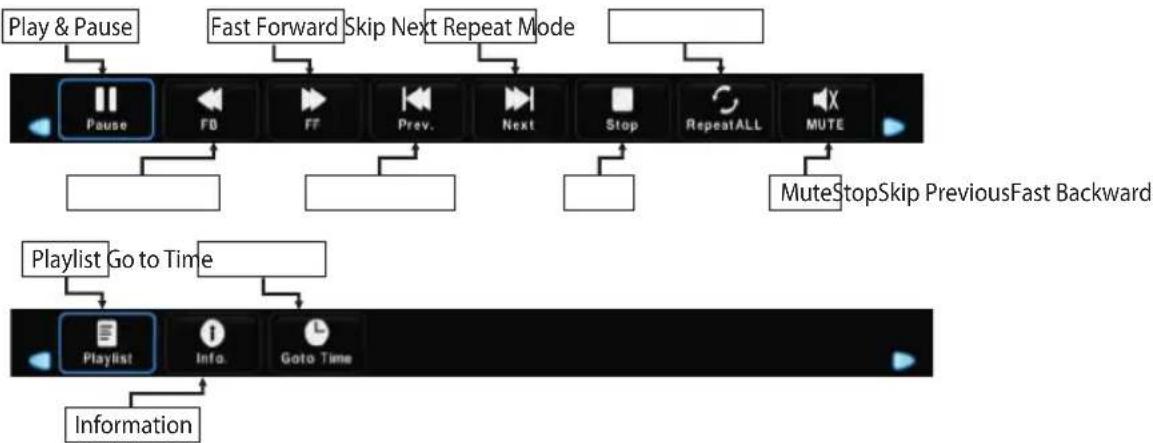
flowchart
graph TD
    A["Play & Pause"] --> B["Pause"]
    C["Fast Forward Skip Next Repeat Mode"] --> D["FF"]
    E["Prev."] --> F["Next"]
    G["Stop"] --> H["RepeatALL"]
    I["MuteStopSkip PreviousFast Backward"] --> J["MUTE"]
    K["Playlist Go to Time"] --> L["Playlist"]
    M["Information"] --> N["Info."]
    M --> O["Goto Time"]
Note: The pictures are for reference only.
EN
USB Control
Movie Menu
- Press INFO button to show or exit the movie menu when watching movies.
- Press ◀/▶ button to select the menu operation, and press OK/ENTER button to execute the operation.

flowchart
graph TD
    A["Play & Pause Fast Forward Skip Next Character Set"] --> B["Play"]
    B --> C["Stop"]
    C --> D["Repeat ModeSkip PreviousFast Backward"]
    E["A/B Set Information Step Play Zoom In"] --> F["Set A"]
    F --> G["Zoom OutGo to TimeSlow PlayPlaylist"]
    H["Aspect Ratio"] --> I["Aspect Ratio"]
    I --> J["Move View"]
Note: The pictures are for reference only.
Text Menu
- Press INFO button to show or exit the text menu when reading texts.
- Press ◀/▶ button to select the menu operation, and press OK/ENTER button to execute the operation.
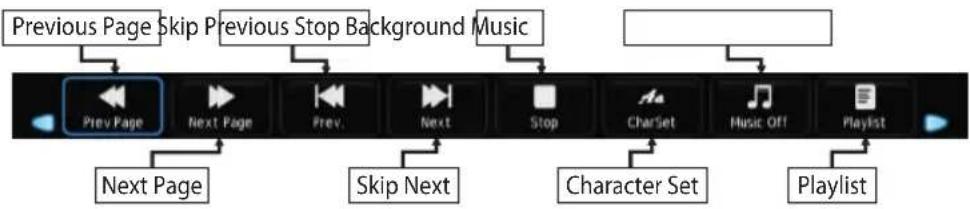
flowchart
graph LR
    A["Previous Page"] --> B["Skip"]
    B --> C["Previous Stop Background Music"]
    C --> D["Next Page"]
    D --> E["Skip Next"]
    E --> F["Character Set"]
    F --> G["Playlist"]
Note: The pictures are for reference only.
Troubleshooting
Before calling a service technician, please check the following table for a possible cause of the symptom and some solutions.
General Problem / Solution
Remote control does not work
- Check the remote sensor on the remote control.
- Change the batteries.
• Batteries are not installed correctly.
• Main power is not connected.
Poor Signal
This is usually caused by interference from cell phones, walkie-talkie, automotive ignition system; neon, electric drill or other electronic equipment or radio interference sources.
Picture & Sound / Solution
No picture, no sound
- Check the signal source.
- Plug another electrical device into the outlet to make sure it is working or turned on.
• Power Plug is bad contact with the outlet. - Check the signal.
No sound, picture OK
- If no sound, do not mute or increase the sound volume.
- Open the sound menu and adjust 'Balance'.
Abnormal picture
• For no color or bad picture quality, you may:
- Adjust the color option in menu settings.
- Keep the TV at a sufficient distance from other electronic products.
- Try another channel, maybe exit broadcasting signal problem.
• Bad TV signal (Display mosaic or snowflakes)
- Check the signal cable and adjust the antenna.
- Fine tune the channel.
- Try another channel.
Multimedia Player / Solution
'Unsupported File' appears or audio is normal but video is abnormal
- The media file maybe damaged, check if the file can be played on the PC.
• Check if video and audio codec is supported.
'Unsupported audio' appears or video is normal but audio is abnormal
- The media file maybe damaged, check if the file can be played on the PC.
• Check if video and audio codec is supported.
■ Network / Solution (May not be available) Network failure
• Check if the router works well.
- For models needing USB dongle to connect to internet, check if the USB dongle is inserted well.
• Make sure the TV has connected to the router successfully.
Browser / Solution (May not be available)
Web page can not be displayed completely
• Flash is not supported.
Browser is forced to be shut down
- Web page include too many large pictures, thus lead to sufficient memory and close the browser.
EN
Specification
Model ODL 32653HS-TB
Working voltage 100 - 240 V\~ 50/60 Hz
Rated power consumption 60 W
Audio output power (L+R) 8W + 8W
Dimensions (W x H x D) with stand 730.3 X 471.4 X 185.2 mm
Dimensions (W x H x D) without stand 730.3 X 429.9 X 80.2 mm
Net weight with stand 3.53 Kg
Net weight without stand 3.45 Kg
RF aerial input 75 ohm unbalanced
Language of OSD Multiple options
System DTV: DVB - T/T2/C/S/S2
Channel coverage DVB-S/S2: 1 \~ 12750 MHz
ATV: PAL-BG/DK/I, SECAM - BG/DK
DVB-T/T2/C: 50 MHz \~ 230 MHz,
474 MHz \~ 862 MHz
ATV: 48.25 MHz \~ 863.25 MHz
Environment
(only for Tropical climates zone)
Working temperature: 5 °C\~45 °C
Working humidity: 20%\~80%
Storage temperature: -15 °C\~50 °C
Storage humidity: 10%\~90%
Environment
(only for Moderate climates zone)
Working temperature: 5 °C\~35 °C
Working humidity: 20%\~80%
Storage temperature: -15 °C\~45 °C
Storage humidity: 10%\~90%
The information in this product data sheet is given in accordance with Annex III of the Commission delegated Regulation (EU) No 1062/2010 supplementing Directive 2010/30/EU of the European Parliament and of the Council with regard to energy labelling of televisions.
| a) | Supplier's trade mark | OK. | |
| b) | Model Identification | ODL 32653HS-TB | |
| c) | Energy efficiency class | A | |
| Value | Unit | ||
| d) | Visible screen diagonal | ||
| in centimeters | 81 | cm | |
| in inches | 32 | " | |
| e) | On-mode power consumption | 41,0 | W |
| f) | Annual energy consumption1 | 60,0 | kWh/year |
| g) | Power consumption in standby mode | 0,31 | W |
| Power consumption in off mode | No off-mode | ||
| h) | Screen resolution in physical | ||
| Horizontal pixel count | 1366 | ||
| Vertical pixel count | 768 | ||
1 Based on the power consumption of the television operating 4 hours per day for 365 days.
The actual energy consumption will depend on how the television is used.

text_image
OK. ODL 32653HS-TB A++ A+ A B C D E ENERGIA - EHEPTIR ENEPTIEA - ENERGUA ENERGY - ENERGIE ENERGI 41 Watt 60 kWh/annum 81 cm 32 inch 2010/1062-2017Specification
Country restrictions
This device is intended or household and/or office use in all EU countries (and other countries where the corresponding EU guideline is in place) without any restrictions excluding the countries listed below.
| Country Restriction | |
| Bulgaria General permit for outdoor use and use in public facilities | |
| France Use in closed spaces only for 2454-2483.5 MHz. | |
| Italy A general permit is required for use outside of private spaces. | |
| Greece Use in closed spaces only for 5470-5725 MHz. | |
| Luxembourg General permit for network and service offers (not for spectrum) | |
| Norway Broadcasting radio waves is not permitted in a geographic radius of 20 km around the center of Ny-Ålesund. | |
| Russian Federation Use in closed spaces only permitted | |
The regulations of individual countries are subject to change at any time. It is recommended that the user make an inquiry to the relevant agencies about the current stand of national regulations for 2.4 GHz and 5 GHz WiFi.
ENVIRONMENTAL INFORMATION
Throughout the development of this TV, great value was set upon environmental performance. In order to lower energy consumption, proceed as follows:
The following methods are effective for lowering energy consumption:
- Reduce the TV's backlight
• Turn off the "Wake-on-WiFi" (WoW) function
- Reduce the time after which the TV automatically power off (automatic power-off)
Turn the product off and unplug the power cord when the TV is not in use. This will also reduce energy consumption.
User information on the disposal of used devices and batteries
Devices that bear this symbol may not be disposed of with household waste. Please inform yourself about suitable recycling centers or systems to dispose of these products.
DISPOSAL

The symbol with the crossed-out waste bin requires separate disposal of waste electrical and electronic devices (WEEE). Electrical and electronic devices may contain materials which represent a health and environmental hazard. Do not dispose of this device with unsorted household waste; dispose at a designated collection point for waste electrical and electronic devices. In this way, you will do your part to protect our natural resources and environment. For further information, please contact your retailer
or your local authorities.

Please dispose of batteries in an environmentally friendly manner. Do not throw batteries away with household waste. Please use local recycling and collection points or contact the retailer where you purchased the product.
EN
License
HDMI®
The Adopted Trademarks HDMI, HDMI High-Definition Multimedia Interface, and the HDMI Logo are trademarks or registered trademarks of HDMI Licensing Administrator, Inc. in the
United States and other countries.
The terms HDMI and High Definition Multimedia Interface and the HDMI logo are trademarks or registered trademarks of HDMI Licensing Administrator, Inc. in the USA and other countries. Manufactured under license from Dolby Laboratories.
Dolby, Dolby Audio and the double D symbol are trademarks of Dolby Laboratories.
This product contains free software that is subject to the GNU General Public License (GPL) and/or the GNU Lesser General Public License (LGPL). You may redistribute and/or publish it under the terms of the GNU General Public License or the GNU Lesser General Public License as published by the Free Software Foundation, either according to Version 2 or (at your option) any later version.
This program is published in the hope that it is of use to you but WITHOUT ANY GUARANTEE and especially without the implicit guarantee of BEING READY FOR THE MARKET or USE FOR A CERTAIN PURPOSE. You can find details in the GNU General Public License (GPL) and the GNU Lesser General Public License (LGPL). You can obtain the software from Imtron GmbH's customer service (per email at contact@imtron.eu or via the postal address Imtron GmbH, Wankelstr. 5,85046 Ingolstadt, Germany). You can download the GNU General Public License (GPL) and the GNU Lesser General Public License (LGPL) atwww.gnu.org/licenses/.
This device is suited solely for use in closed spaces. This device may be used in all EU countries.
Imtron GmbH hereby declares that the radio equipment ODL 32653HS-TB complies with the EU directive 2014/53/EU. Click on the following link to read the full text of the EU Declaration of Conformity: http://de.ok-online.com/nc/de/service/downloads.html
Contenu
Contenu 43
RISQUE D'ÉLECTROCUTION, NE PAS OUVRIR
ATTENTION : POUR LIMITER LE RISQUE D'ÉLECTROCUTION, NE RETIREZ PAS LE COUVERCLE (NI LE PANNEAU ARRIÈRE). CET APPAREIL NE CONTIENT AUCUNE PIÈCE RÉPARABLE PAR L'UTILISATEUR. CONFIEZ TOUT TRAVAIL DE MAINTENANCE AU PERSONNEL DE SERVICE APRESVENTE QUALIFIÉ.
Support mural de suspension
text_image
Technical diagram showing a mechanical assembly with labeled parts A, B, C, D and a cross-sectional view.natural_image
Illustration of two hands holding remote devices, one with a curved arrow indicating rotation (no text or symbols)Image et son/Solution
Pas de son, image OK
text_image
Technical diagram showing a bolted joint with labeled dimensions and a corresponding schematic view of a rectangular component with points A, B, C.natural_image
Illustration of two hand gestures: one holding a remote device with an arrow indicating rotation, the other holding a control panel (no text or symbols)Specificaties....104
Licentie....106
Opmerking:
natural_image
Illustration of two hand gestures: one with a pencil, the other with a remote control (no text or symbols)Stap 2. Selecteer uw land.