L92 - Turntable LENCO - Free user manual and instructions
Find the device manual for free L92 LENCO in PDF.

User questions about L92 LENCO
0 question about this device. Answer the ones you know or ask your own.
Ask a new question about this device
Download the instructions for your Turntable in PDF format for free! Find your manual L92 - LENCO and take your electronic device back in hand. On this page are published all the documents necessary for the use of your device. L92 by LENCO.
USER MANUAL L92 LENCO
natural_image
Vintage typewriter with open lid and stand, showing black vinyl record and mechanical components (no visible text or symbols)User manual – Belt drive turntable with PC encoding and auto return
Usage of controls or adjustments or performance of procedures other than those specified herein may result in hazardous radiation exposure.
KEEP THESE INSTRUCTIONS IN MIND:
-
Do not cover or block any ventilation openings. When placing the device on a shelf, leave 5 cm (2") free space around the whole device.
-
Install in accordance with the supplied user manual.
-
Keep the device away from heat sources such as radiators, heaters, stoves, candles and other heat-generating products or naked flame. The device can only be used in moderate climates. Extremely cold or warm environments should be avoided. Working temperature between 0^ and 35^ C.
-
Avoid using the device near strong magnetic fields.
-
Electrostatic discharge can disturb normal usage of this device. If so, simply reset and restart the device following the instruction manual. During file transmission, please handle with care and operate in a static-free environment.
-
Warning! Never insert an object into the product through the vents or openings. High voltage flows through the product and inserting an object can cause electric shock and/or short circuit internal parts. For the same reason, do not spill water or liquid on the product.
-
Do not use in wet or moist areas such as bathrooms, steamy kitchens or near swimming pools.
-
The device shall not be exposed to dripping or splashing and make sure that no objects filled with liquids, such as vases, are placed on or near the apparatus.
-
Do not use this device when condensation may occur. When the unit is used in a warm wet room with damp, water droplets or condensation may occur inside the unit and the unit may not function properly; let the unit stand in power OFF for 1 or 2 hours before turning on the power: the unit should be dry before getting any power.
-
Although this device is manufactured with the utmost care and checked several times before leaving the factory, it is still possible that problems may occur, as with all electrical appliances. If you notice smoke, an excessive build-up of heat or any other unexpected phenomena, you should disconnect the plug from the main power socket immediately.
-
This device must operate on a power source as specified on the specification label. If you are not sure of the type of power supply used in your home, consult your dealer or local power company.
-
Keep away from animals. Some animals enjoy biting on power cords.
-
To clean the device, use a soft dry cloth. Do not use solvents or petrol based fluids. To remove severe stains, you may use a damp cloth with dilute detergent.
-
The supplier is not responsible for damage or lost data caused by malfunction, misuse, modification of the device or battery replacement.
-
Do not interrupt the connection when the device is formatting or transferring files. Otherwise, data may be corrupted or lost.
-
If the unit has USB playback function, the USB memory stick should be plugged into the unit directly. Don't use an USB extension cable because it can cause interference resulting in failing of data.
-
The rating label has been marked on the bottom or back panel of the device.
-
This device is not intended for use by people (including children) with physical, sensory or mental disabilities, or a lack of experience and knowledge, unless they're under supervision or have received instructions about the correct use of the device by the person who is responsible for their safety.
-
This product is intended for non-professional use only and not for commercial or industrial use.
-
Make sure the unit is adjusted to a stable position. Damage caused by using this product in an unstable position vibrations or shocks or by failure to follow any other warning or precaution contained within this user manual will not be covered by warranty.
-
Never remove the casing of this device.
-
Never place this device on other electrical equipment.
-
Do not allow children access to plastic bags.
-
Only use attachments/accessories specified by the manufacturer.
-
Refer all servicing to qualified service personnel. Servicing is required when the device has been damaged in any way, such as the power supply cord or the plug, when liquid has been spilled or objects have fallen into the device, when the device has been exposed to rain or moisture, does not operate normally, or has been dropped.
-
Long exposure to loud sounds from personal music players may lead to temporary or permanent hearing loss.
-
If the product is delivered with power cable or AC power adaptor:
If any trouble occurs, disconnect the AC power cord and refer servicing to qualified personnel.
- Don't step on or pinch the power adaptor. Be very careful, particularly near the plugs and the cable's exit point. Do not place heavy items on the power adaptor, which may damage it. Keep the entire device out of children's reach! When playing with the power cable, they can seriously injure themselves.
■ Unplug this device during lightning storms or when unused for a long period.
■ The socket outlet must be installed near the equipment and must be easily accessible.
■ Do not overload ac outlets or extension cords. Overloading can cause fire or electric shock.
■ Devices with class 1 construction should be connected to a main socket outlet with a protective earthed connection.
■ Devices with class 2 construction do not require a earthed connection.
■ Always hold the plug when pulling it out of the main supply socket. Do not pull the power cord. This can cause a short circuit.
Do not use a damaged power cord or plug or a loose outlet. Doing so may result in fire or electric shock.
- If the product contains or is delivered with a remote control containing coin/cell batteries:
Warning:
■ "Do not ingest battery, Chemical Burn Hazard" or equivalent working.
■ [The remote control supplied with] This product contains a coin/button cell battery. If the battery is swallowed, it can cause severe internal burns in just 2 hours and can lead to death.
- Keep new and used batteries away from children.
If the battery compartment does not close securely, stop using the product and keep it away from children.
If you think batteries might have been swallowed or placed inside any part of the body, seek immediate medical attention.
- Caution about the use of Batteries:
■ Danger of explosion if battery is incorrectly replaced. Replace only with the same or equivalent type.
Battery cannot be subjected to high or low extreme temperatures, low air pressure at high altitude during use, storage or transportation.
■ Replacement of a battery with an incorrect type that can result in an explosion or the leakage of flammable liquid or gas.
■ Disposal of a battery into fire or a hot oven, or mechanically crushing or cutting of a battery that can result in an explosion.
■ Leaving a battery in an extremely high temperature surrounding environment that can result in an explosion or that leakage of flammable liquid or gas.
A battery subjected to extremely low air pressure that may result in an explosion or the leakage of flammable liquid or gas.
■ Attention should be drawn to the environmental aspects of battery disposal.
INSTALLATION
- Unpack all parts and remove protective material.
- Do not connect the unit to the mains before checking the mains voltage and before all other connections have been made.
Deliver Content
1 x Manual

natural_image
Simple line drawing of an open book with no text or symbols visible1 x Power Adaptor

1 x UK plug
1 x CE plug
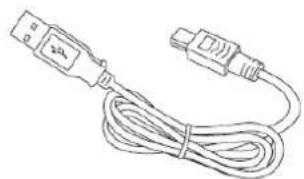
1 x USB connection cable

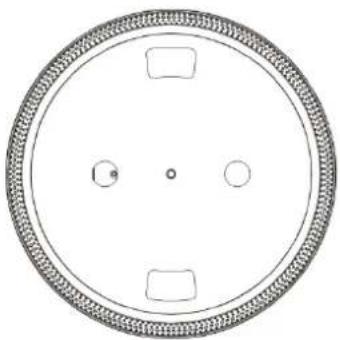
natural_image
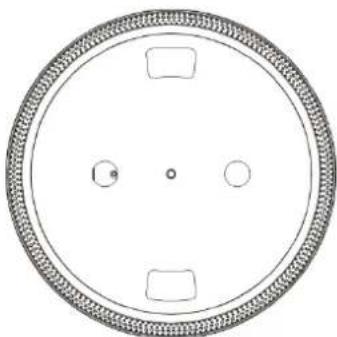
Line drawing of a USB cable with two connectors (no text or symbols)1 x Platter

natural_image
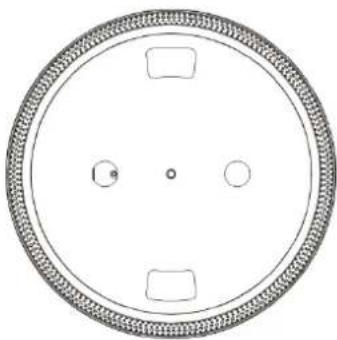
Circular diagram with four rectangular cutouts and a central dot, no text or symbols present1x Felt Mat

natural_image
Simple hand-drawn oval shape with a small dot at center (no text or symbols)PRODUCT FEATURES
- 33/45 RPM SELECTABLE TURNTABLE
- BELT DRIVEN SYSTEM
- AUTO-RETURN TONE ARM
- LIFT LEVER
- RCA LINE-OUT
- DETTACHABLE HEADSHELL
- PC LINK: CONNECTION WITH COMPUTER VIA USB PORT FOR TURNTABLE RECORDING
- +/- 50% PITCH CONTROL
-
ACCESSORIES INCLUDED:
-
TURNTABLE PLATTER
- SLIP MAT
- DUST COVER
- 45 RPM ADAPTOR
- WEIGHT COUNTER
- AUDIO TECHNICA CARTRIDGE AT-3600L
- USB CABLE
- OPERATION MANUAL
- EXTERNAL POWER ADAPTOR
PARTS OF DEVICE
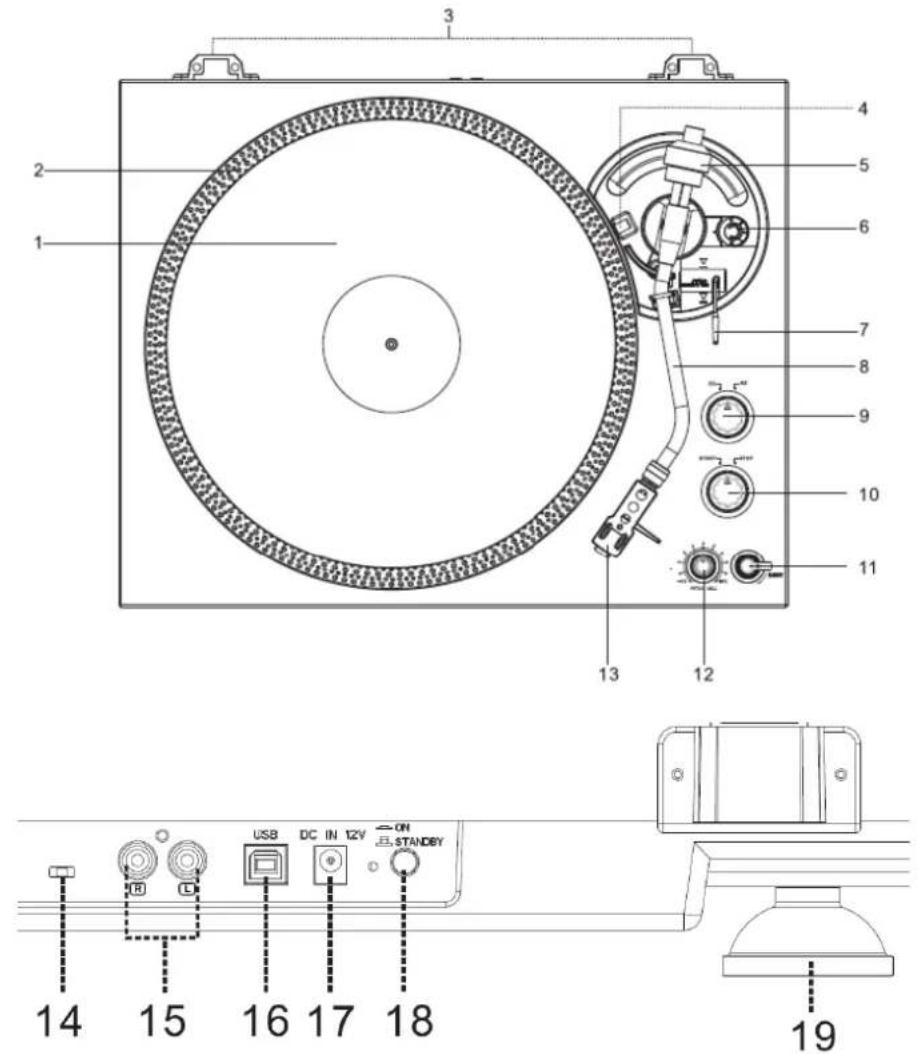
text_image
Technical diagram of a CD/DVD machine with numbered components and labeled ports including USB, DC in 12V, and STANDBY.1) TURNTABLE PLATTER
2) STROB DOTS
3) HINGE FOR DUST COVER
4) STROB LIGHT
5) WEIGHT COUNTER
6) ANTI SKATE KNOB
7) LIFT LEVER
8) TONE ARM
9) 33RPM / 45RPM SPEED SELECTOR
10) PLAY/STOP SWITCH
11) RETURN SWITCH
12) PITCH CONTROL KNOB (+/- 50%)
13) HEADSHELL
USAGE OF CONTROLS OR ADJUSTMENTS OR PERFORMANCE OF PROCEDURES OTHER THAN THOSE SPECIFIED HEREIN MAY RESULT IN HAZARDOUS RADIATION EXPOSURE.
THIS UNIT SHOULD NOT BE ADJUSTED OR REPAIRED BY ANYONE EXCEPT QUALIFIED SERVICE PERSONNEL.
WARNING:
- THE APPARATUS SHALL NOT BE EXPOSED TO DRIPPING OR SPLASHING AND THAT NO OBJECTS FILLED WITH LIQUIDS, SUCH AS VASES, SHALL BE PLACED ON THE APPARATUS.
- THE MAINS PLUGS OR AN APPLIANCE COUPLER IS USED AS THE DISCONNECT DEVICE, AND THE DISCONNECT DEVICE SHALL REMAIN READILY OPERABLE.
PRECAUTIONS FOR USE
INSTALLATION
• UNPACK ALL PARTS AND REMOVE PROTECTIVE MATERIAL.
- DO NOT CONNECT THE UNIT TO THE MAINS BEFORE CHECKING THE MAINS VOLTAGE AND BEFORE ALL OTHER CONNECTIONS HAVE BEEN MADE.
- DO NOT COVER ANY VENTS AND MAKE SURE THAT THERE IS A SPACE OF SEVERAL CENTIMETERS AROUND THE UNIT FOR VENTILATION.
CONNECTION
- CONNECT THE EXTERNAL POWER ADAPTOR WITH EXTERNAL POWER ADAPTOR SOCKET.
- PLUG THE EXTERNAL POWER ADAPTOR INTO A SUITABLE MAINS SOCKET
- PUSH IN THE ON/STANDBY BUTTON ON THE BACK PANELTO SWTICH ON THE UNIT FROM STANDBY MODE.
OPERATION
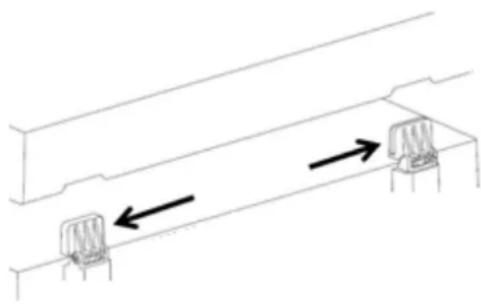
- INSTALL THE DUST COVER INTO HINGE ON THE UPPER CABINET.

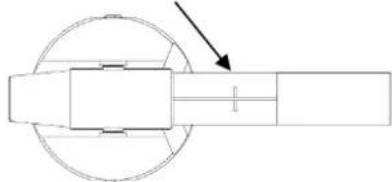
natural_image
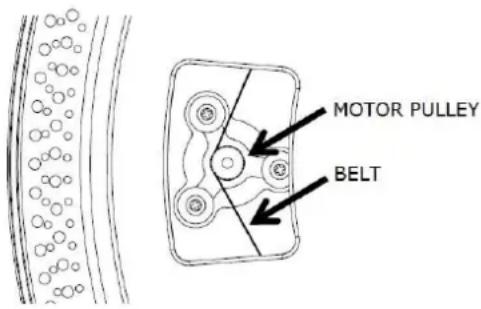
Pure technical line drawing of a mechanical assembly with two vertical supports and directional arrows indicating motion (no text or symbols)- SET THE TURNTABLE PLATTER ONTO THE CENTER SPINDLE.
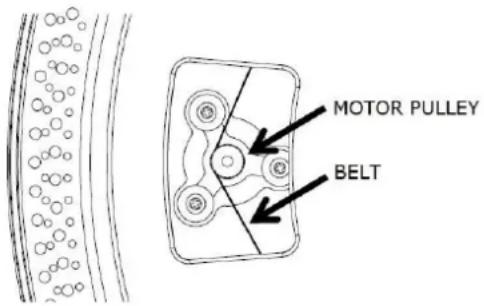
- ATTACH THE DRIVE BELT: POSITION THE BELT ON THE MOTOR PULLY, THE DRIVE BELT IS TIGHTENED UNDER THE TURNTABLE PLATTER.

text_image
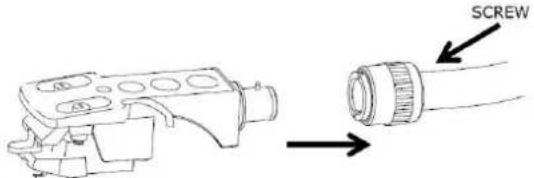
MOTOR PULLEY BELT- PLACE THE SLIP MAT ON THE TURNTABLE PLATTER.
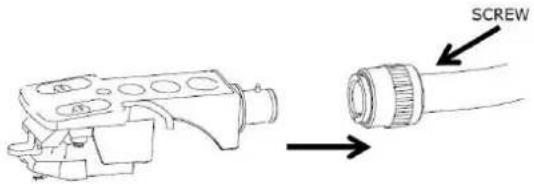
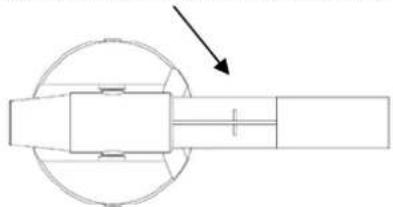
- INSERT THE HEADSHLL INTO THE FRONT END OF THE TONEARM, THEN SCREW THE LOCK NUT WITH THE HEADSHELL FIRMLY HELD HORIZONTALLY.
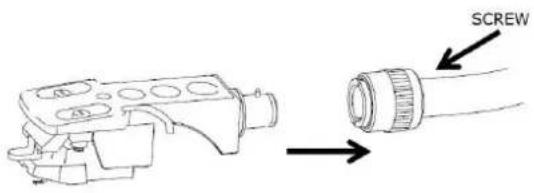
text_image
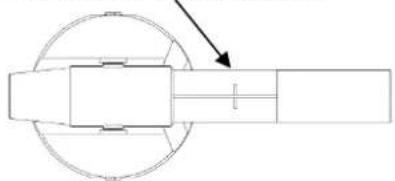
SCREWINSTALL THE COUNTERWEIGHT
- SLIDE COUNTERWEIGHT ONTO THE TONEARM. TWIST IT LIGHTLY AND IT WILL SCREW INWARDS ONTO THE REAR END OF THE TONEARM. EVERY FULL TURN OF THE SCALE RING REPRESENTS AROUND 2.4 GRAM (+/-0.4 GRAM).

text_image
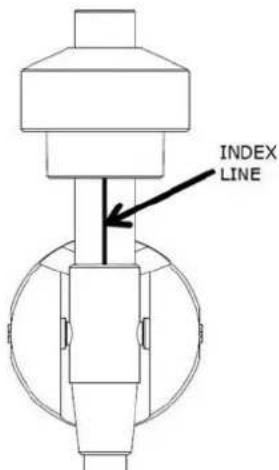
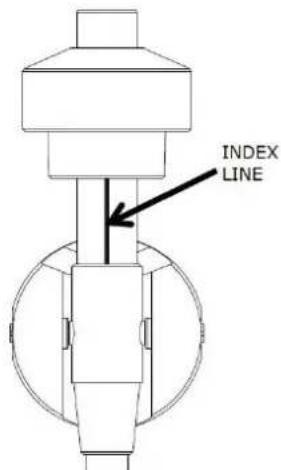
COUNTERWEIGHT COUNTERWEIGHT SCALE RING SCALE RING- FOR THE DEFAULT AUDIO-TECHNICA AT-3600L CARTRIDGE, TURN THE COUNTERWEIGHT INWARDS UP TO THE HORIZONTAL LINE ON THE REAR END OF THE TONEARM.
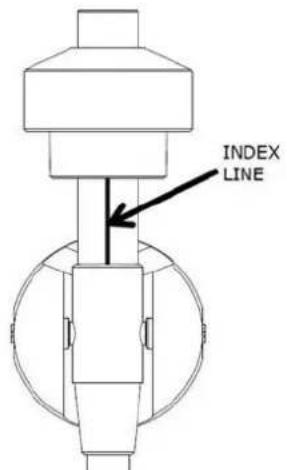
natural_image
Pure mechanical diagram showing a rotating shaft and housing with an arrow indicating direction (no text or symbols)- HOLD THE COUNTER WEIGHT WITH ONE HAND, TURN SCALE RING TO "3" AGAINST THE INDEX LINE ON THE SHAFT YOUR ANOTHER HAND AND MAKE SURE NOT TO TURN THE COUNTER WEIGHT, ONLY TURN THE SCALE RING! THE TRACKING FORCE WILL BE AROUND 3.0 GRAM (+/-0.4 GRAM).
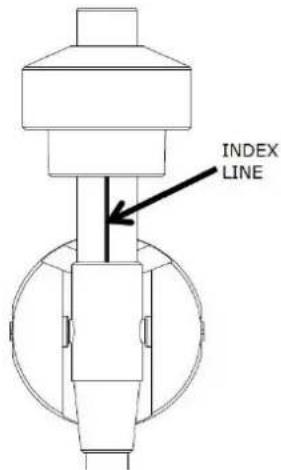
text_image
INDEX LINE- IF NECESSARY, TURNING THE COUNTER WEIGHT INWARDS INCREASES THE TRACKING FORCE, WHILE TURNING THE COUNTER WEIGHT BACKWARDS DECREASES THE TRACKING FORCE.
- FOR OTHER CARTRIDGES, YOU CAN ADJUST THE TRACKING FORCE BY TURNING COUNTERWEIGHT INWARDS OR BACKWARDS. EACH NUMBER ON THE SCALE RING CORRESPONDS TO AROUND 0.4GRAM OF TRACKING FORCE.
ANTI-SKATING ADJUSTMENT
The anti-skate adjustment prevents the TONEARM ASSEMBLY from skipping across the record from the centrifugal force that is caused spinning rotation of the PLATTER. The ANTI-SKATING control knob should be set to the same value as the stylus pressure. For example if your COUNTERWEIGHT is set to 3 grams the ANTI-SKATE value should also be set to 3.
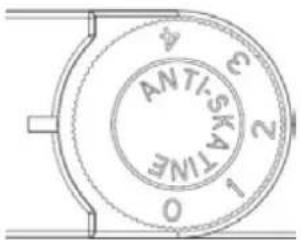
text_image
0 1 2 3 4 5 6 ANTI-SKATIMEPICKUP SELECTOR
- LINE / PHONO SELECTOR IS LOCATED AT THE BACK PANEL.
- SELECT "PHONO", AUDIO SIGNAL WILL BY PASS INTERNAL PRE-AMPLIFIER WITHOUT ANY PROCESSOR. THEN TURNTABLE HAS TO BE CONNECTED WITH EXTERNAL PRE-AMPLIFIER OR PHONO CONNECTOR OF AN AMPLIFIER IF AVAILABLE FOR MUSIC PLAYBACK.
- SELECT "LINE", AUDIO SIGNAL WILL BE PROCESSED BY INTERNAL PRE-AMPLIFIER. TURNTABLE CAN BE DIRECTLY CONNECTED WITH AN ACTIVE SPEAKER OR LINE IN CONNECTOR OF AN AMPLIFIER FOR MUSIC PLAYBACK.

text_image
LINE PHONO- REMOVE THE STYLUS PROTECTOR.
- BE SURE THAT THE TONE ARM IS BEING DETACHED FROM THE TONE ARM REST PART BEFORE OPERATING AND RE-SECURED AGAIN AFTERWARDS.
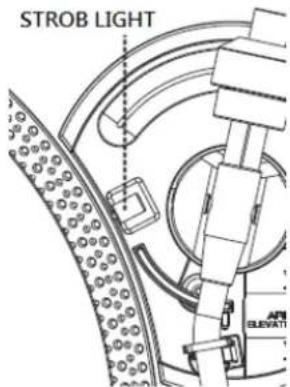
- PUSH THE LIFT LEVER UPWARD TO RAISE THE TONE ARM FROM THE ARM PARK, AND THEN SLOWLY MOVE IT TO THE RECORD SIDE. THE PLATTER WILL START TO ROTATE.
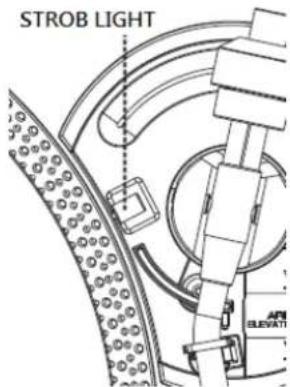
text_image
STROB LIGHT AIR ELEVATI- USE THE 45 RPM ADAPTOR IF REQUIRED.
- AT THE END OF RECORD, THE PLATTER WILL AUTOMATICALLY STOP ROTATING, TONE ARM WILL AUTOMATICALLY RETURN TO THE TONE ARM REST PART.
- TRIGGER THE RETURN SWITCH DURING RECORD PLAYING, TURNTABLE WILL STOP GENTLY AND TONE ARM WILL AUTOMATICALLY RETURN TO THE TONE ARM REST PART.
Warning: The tone-arm can return automatically during normal 33RPM in LP and 45RPM in EP. For 45RPM in LP the tone arm cannot return automatically unless using the "Return" switch to activate auto return!
RETURN
LINE OUT SOCKET
- THIS SYSTEM CAN BE CONNECTED WITH EXTERNAL DEVICE (EG. AMPLIFIER AND ACTIVE SPEAKER) BY RCA LINE-OUT SOCKETS AT REAR CABINET.
DIGITALIZING TURNTABLE INTO COMPUTER
Download the Audacity software from https://www.audacityteam.org/download/
Connect the Lenco L-92 to your computer with the USB cable
Audacity software overview
Audacity is free software, licensed under the GNU General Public License (GPL). More information as well as open source code can be found on the web at https://www.audacityteam.org/download/
* Please ensure you have installed the software before starting.
Setting up your PC to work with Audacity
- Connect the provided USB cable to the turntable.
- Connect the left USB plug of this USB cable to your pc.
- Install the Audacity recording software.
- Open the Audacity program.
- Select Preference from the Edit tab in the Audacity Menu.
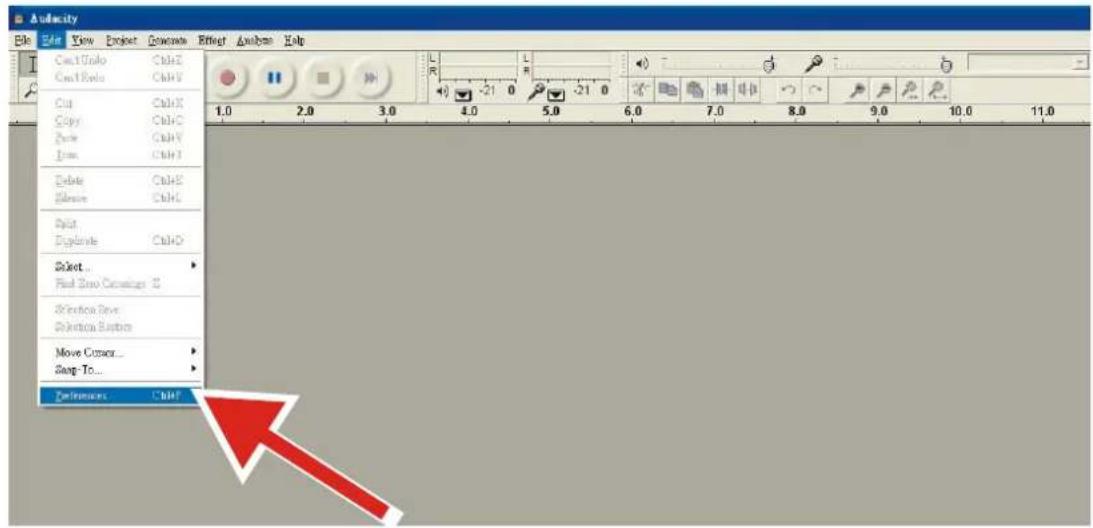
text_image
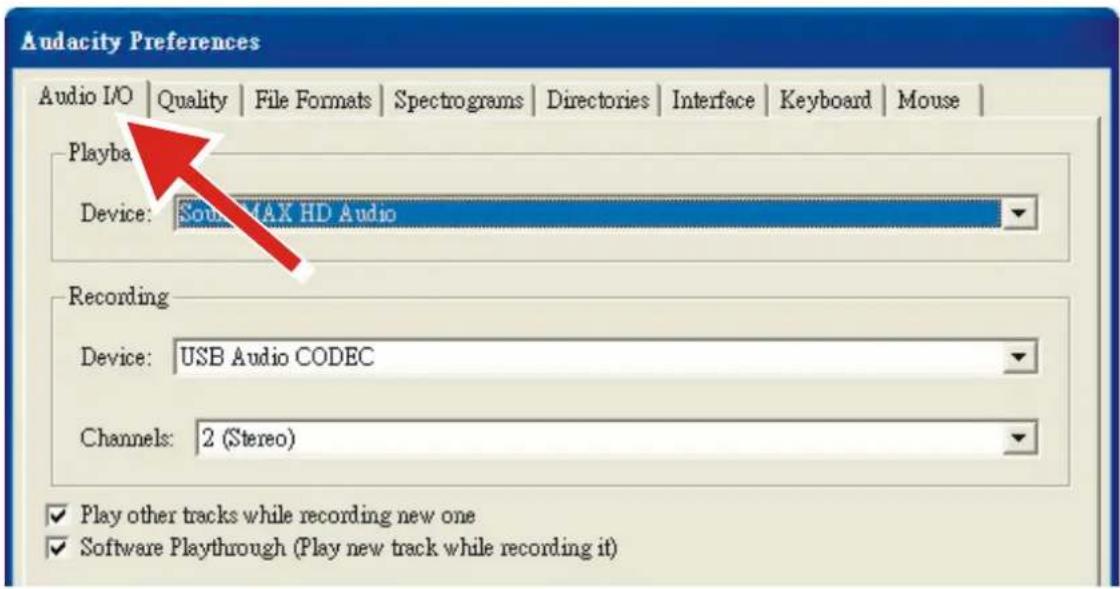
Audiacity File Edit View Project Generate Effect Analysis Help Cut Ctrl+Z Copy Ctrl+C Paste Ctrl+V Insert Ctrl+T Delete Ctrl+E Rename Ctrl+L Split Explains Ctrl+D Select... First Save Currency S Selection Save: Selection Button Move Cursor... Snap-To... Transform Ctrl+Y- Select Audio I/O tab at the top left.
• Under Playback, Device, select your internal sound card.
• Under Recording, Device, select USB Audio CODEC.
• Under Recording, Channels, select 2 (Stereo).
- Check the box marked Play other tracks while recording new one.
- Check the box marked Software Playthrough.
text_image
Audacity Preferences Audio I/O | Quality | File Formats | Spectrograms | Directories | Interface | Keyboard | Mouse | Playba Device: Sound MAX HD Audio Recording Device: USB Audio CODEC Channels: 2 (Stereo) ✓ Play other tracks while recording new one ✓ Software Playthrough (Play new track while recording it)Recording Albums with Audacity
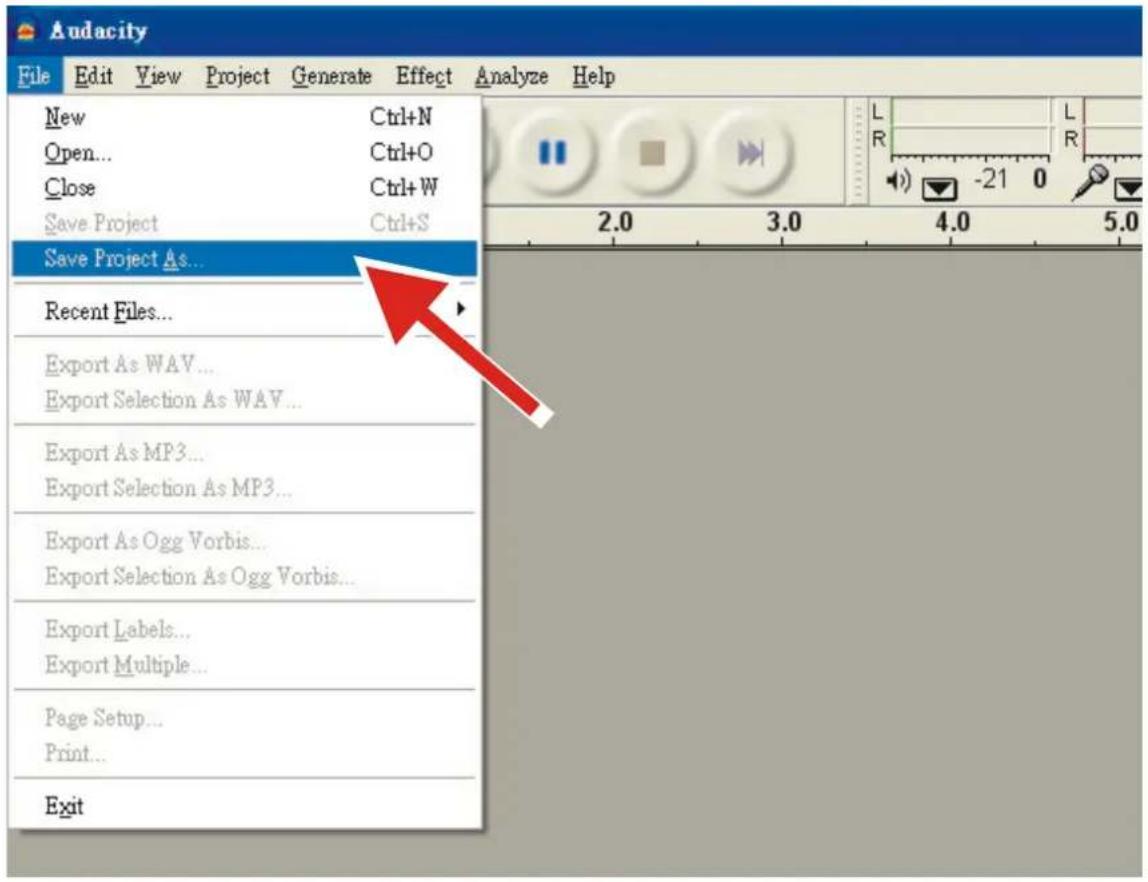
1. Saving a project
- Audacity writes all the changed and recorded audio to a directory called Projectname_data, which is located right where you saved the project file itself.
- Thus, select Save Project as from your Audacity File tab and choose a location and filename for your project.
- Please note that when you startup Audacity fresh, only the "Save As..." menu option is available.
text_image
Audacity File Edit View Project Generate Effect Analyze Help New Ctrl+N Open... Ctrl+O Close Ctrl+W Save Project Ctrl+S Save Project As... Recent Files... Export As WAV... Export Selection As WAV... Export As MP3... Export Selection As MP3... Export As Ogg Vorbis... Export Selection As Ogg Vorbis... Export Labels... Export Multiple... Page Setup... Print... Exit2. How to record
- Set your USB turntable up to play the song or album you want to record.
- Click on the red Record button to begin recording.
- Lower tone arm on USB turntable onto album and track you want to record.
- Click on the blue Pause button ☐ to pause the recording. Press it again to continue.
- Click on the yellow Stop button .
That's it. You can now play around with your recording and explore the editing capabilities of Audacity. Remember that you can use the Undo function almost without limits while the project is open.
General Specification
| Model: | L-92WA |
| Dimensions: | 450(W) x 355(D) x 130(H)mm |
| Weight: | 3.6Kg |
| Power supply: | AC ADAPTER 100V-240V 50/60Hz 0.65A |
| Power consumption: | 3W |
| Standard test condition: | Ambient Temperature: 20 +/- 2 deg.C |
| Relative Humidity: | 65% +/- 5% |
NOTE: Measurements can be carried out between 5 deg.C to 35 deg.C and 45% to 85% relative humidity.
Turntable Section:
| Type: | 2-speed full manual |
| Motor: | Miniature permanent magnet DC brushes |
| Driving Method: | Belt drive |
| Turntable Platter: | 332mm (Aluminum) |
| Speeds: | 33 and 45rpm |
| Wow and Flutter: | Less than 0.3% WRMS (JIS WTD) with 33 rpm |
| S/N Ratio: | More than 50dB (DIN-B) |
| Pitch Controls: | +/- 50% |
| Starting Torque: | N/A |
| Braking System: | Electronic brake |
| Starting Time: | Less than 2 sec. |
| Braking Time: | Less than 2sec. |
| Time for Speed Change: | Less than 2 sec. from 33 to 45 rpm. |
| Less than 2 sec. from 45 to 33 rpm. | |
| USB Function: | PC link (recording from turntable to computer by USB port) |
| Computer interface: | USB 1.1 compliant 7/8/10 or MAC OSX |
Tonearm section:
| Type: | Static balanced S-shaped tone arm |
| Effective Arm Length: | 200mm |
| Overhang: | 10mm |
| Tracking Error Angle: | Less than 3 degree |
| Tracking Force Adjustment Range: | 3-4g |
| Cartridge MM Type: | Audio Technica AT-3600L |
| Stylus pressure: | 3.0 ± 0.5 g |
| Cartridge weight: | 2.5 ± 0.5 g |
| Anti-skating Range: | 0~4g |
| Channel Separation: | More than 18 dB |
| Channel Balance: | Within 2.5dB at 1KHz |
Pre-Amplifier
| Output: | 150mV +/-4dB (IN: 2.5mV 1KHz) |
| RIAA (Frequency Response): | 20Hz~20KHz +1/-3dB (IN: 1.5mV 1KHz) |
Power supply adaptor
Use only the power supply listed in the user instructions
| Information | Value and precision |
| Manufacturers name or trade mark, commercial registration and address | Shenzhen Tianhangxing Electronics Co., Ltd.5/F, Building 10, Zhengzhong Industrial Park, Qiaotou Village, Fuyong Town, Baoan District. Shenzhen, Guangdong 518103 P.R. China |
| Model Identifier | THX-120050KB |
| Input voltage | 100-240VAC |
| Input AC frequency | 50/60Hz |
| Output voltage | 12.0V |
| Output current | 0.5A |
| Output Power | 6.0W |
| Average active efficiency | 73% |
| Efficiency at low load (10%) | N/A |
| No load Power consumption | ≤0.1W |
Guarantee
Lenco offers service and warranty in accordance with the European law, which means that in case of repairs (both during and after the warranty period) you should contact your local dealer.
Important note: It is not possible to send products that need repairs to Lenco directly.
Important note: If this unit is opened or accessed by a non-official service center in any way, the warranty expires.
This device is not suitable for professional use. In case of professional use, all warranty obligations of the manufacturer will be voided.
Disclaimer
Updates to Firmware and/or hardware components are made regularly. Therefore some of the instruction, specifications and pictures in this documentation may differ slightly from your particular situation. All items described in this guide for illustration purposes only and may not apply to particular situation. No legal right or entitlements may be obtained from the description made in this manual.
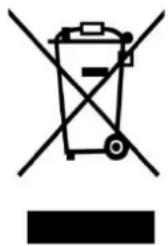
Disposal of the Old Device
natural_image
Symbol of a trash bin crossed out by two crossed lines, with a blank rectangular base below (no text or symbols)This symbol indicates that the relevant electrical product or battery should not be disposed of as general household waste in Europe. To ensure the correct waste treatment of the product and battery, please dispose them in accordance to any applicable local laws of requirement for disposal of electrical equipment or batteries. In so doing, you will help to conserve natural resources and improve standards of environmental protection in treatment and disposal of electrical waste (Waste Electrical and Electronic Equipment Directive).
CE Marking

Products with the CE marking comply with the EMC Directive (2014/30/EU) and the Low Voltage Directive (2014/35/EU) issued by the Commission of the European Community. Hereby, Lenco Benelux BV, Thermiekstraat 1a, 6361 HB Nuth, The Netherlands, declares that this product is in compliance with the essential requirements. The declaration of conformity may be consulted at techdoc@lenco.com
Service
For more information and helpdesk support, please visit www.lenco.com
Lenco Benelux BV, Thermiekstraat 1a, 6361 HB Nuth, The Netherlands.
LET OP:
natural_image
Simple line drawing of an open book with no text or symbols visible1 x voedingsadapter
1 x UK-stekker

1 x CE-stekker

1x USB-kabel
natural_image
Line drawing of a USB cable with two connectors (no text or symbols)1x plateau
natural_image
Circular diagram with four rectangular cutouts and a central dot, no text or symbols present1x viltmat

natural_image
Simple hand-drawn oval shape with a small dot at center (no text or symbols)text_image
Technical diagram of a CD or X-ray receiver with numbered components and labeled ports1) PLATENSPELERPLATEAU
2) STROBOSCOOPPUNTEN
3) SCHARNIER VOOR STOFKAP
4) STROBOSCOOPLAMP
5) CONTRAGEWICHT
6) ANTI-SKATING KNOP
7) LIFTMECHANISME
8) TOONARM
9) SNELHEIDSSCHAKELAAR 33/45 TOEREN
10) SCHAKELAAR AFSPELEN/STOPPEN
11) UITWERPSCHAKELAAR
12) REGELKNOP TEMPO (+/- 50%)
13) KOPBEHUIZING
14) SCHAKELAAR LIJN/PLATENSPELER
15) AANSLUITING RCA LIJN-UIT
16) USB-POORT
17) AANSLUITING EXTERNE VOEDINGSADAPTER
18) KNOP AAN/STAND-BY
19) PLATENSPELERVOET
LET OP:
HET GEBRUIK VAN BEDIENING OF INSTELLINGEN OF HET UITVOEREN VAN PROCEDURES ANDERS DAN ZOALS ZIJ HIERIN STAAN BESCHREVEN, KAN LEIDEN TOT BLOOTSTELLING AAN GEVAARLIJKE STRALING.
DIT APPARAAT MAG ALLEEN WORDEN AFGESTELD OF GEREPAREERD DOOR GEKWALIFICEERD ONDERHOUDSPERSONEEL.
WAARSCHUWING:
- HET APPARAAT MAG NIET WORDEN BLOOTGESTELD AAN DRUPPELS OF SPETTERS EN ER MOGEN GEEN VOORWERPEN GEVULD MET VLOEISTOFFEN, ZOALS VAZEN, OP HET APPARAAT WORDEN GEPLAATST.
- DE NETSTEKKER OF AANSLUITING OP HET TOESTEL WORDT ALS HOOFDSCHAKELAAR GEBRUIKT EN MOET ALTIJD KUNNEN WORDEN BEDIEND.
VOORZORGSMAATREGELEN
INSTALLATIE
- PAK ALLE ONDERDELEN UIT EN VERWIJDER HET VERPAKKINGSMATERIAAL.
- SLUIT HET APPARAAT NIET OP DE NETSPANNING AAN, VOORDAT U DE NETSPANNING HEBT GECONTROLEERD EN VOORDAT ALLE ANDERE AANSLUITINGEN ZIJN GEMAAKT.
- BEDEK GEEN VAN DE VENTILATIEOPENINGEN EN ZORG VOOR ENKELE CENTIMETERS VRIJE RUIMTE RONDOM HET APPARAAT VOOR VENTILATIE.
AANSLUITINGEN
- VERBIND DE EXTERNE VOEDINGSADAPTER MET DE AANSLUITING VAN DE EXTERNE VOEDINGSADAPTER.
- SLUIT DE EXTERNE VOEDINGSADAPTER AAN OP EEN GESCHIKT STOPCONTACT
- DRUK DE KNOP ON/STANDBY OP HET ACHTERPANEEL IN OM HET APPARAAT VANUIT DE STAND-BYMODUS IN TE SCHAKELEN.
WERKING
- PLAATS DE STOFKAP IN HET SCHARNIER VAN DE BOVENSTE BEHUIZING.
natural_image
Pure technical line drawing of a mechanical assembly with two vertical supports and directional arrows indicating motion (no text or symbols)- ZET HET PLATENSPELERPLATEAU OP DE MIDDENAS.
- BEVESTIG DE AANDRIJFRIEM: PLAATS DE RIEM OP DE MOTORPOELIE, DE AANDRIJFRIEM WORDT ONDER HET PLATENSPELERPLATEAU GESPANNEN.

text_image
MOTOR PULLEY BELT| EN | NL |
| MOTOR PULLEY | MOTORPOELIE |
| BELT | RIEM |
- PLAATS DE SLIPMAT OP HET PLATENSPELERPLATEAU.
- PLAATS DE NAALDHOUDER IN HET VOORSTE EINDE VAN DE TOONARM, DRAAI DAN DE BORGMOER AAN MET DE NAALDHOUDER STEVIG HORIZONTAAL GEHOUDEN.

text_image
SCREW| EN | NL |
| SCREW | SCHOEF |
natural_image
Pure mechanical assembly diagram without any text, numbers, or symbols- HOUD HET CONTRAGEWICHT MET ÉÉN HAND VAST, DRAAI DE SCHAALRING NAAR "3" TEGEN DE INDEXLIJN OP DE AS MET DE ANDERE HAND EN ZORG ERVOOR DAT HET CONTRAGEWICHT NIET DRAAIT, MAAR ALLEEN DE SCHAALRING! DE TRACKINGKRACHT IS ONGEVEER 3,0 GRAM (+/-0,4 GRAM).
text_image
INDEX LINE| EN | NL |
| INDEX LINE | INDEXLIJN |
- INDIEN NODIG, VERHOOG DE TRACKRINGKRACHT DOOR HET CONTRAGEWICHT NAAR BINNEN TE DRAAIEN, OF VERLAAG DE TRACKINGKRACHT DOOR HET CONTRAGEWICHT NAAR ACHTEREN TE DRAAIEN.
- VOOR ANDERE PATRONEN KUNT U DE TRACKINGKRACHT AANPASSEN DOOR HET CONTRAGEWICHT NAAR BINNEN OF NAAR ACHTEREN TE DRAAIEN. ELK CIJFER OP DE SCHAALRING KOMT OVEREEN MET ONGEVEER 0,4 GRAM TRACKINGKRACHT.
AANPASSING ANTI-SKATING
text_image
LINE PHONO- VERWIJDER DE NAALDBESCHERMING.
- ZORG ERVOOR DAT DE TOONARM IS LOSGEKOPPELD VAN DE TOONARMSTEUN VOORDAT U DEZE GEBRUIKT EN DAARNA WEER WORDT VASTGEZET.
- DUW HET LIFTMECHANISME OMHOOG OM DE TOONARM OMHOOG TE BRENGEN, EN VERPLAATS DEZE LANGZAAM NAAR DE RAND VAN DE PLAAT. HET PLATEAU ZAL BEGINNEN TE DRAAIEN.
- ZET HET LIFTMECHANISME OMLAAG OM DE TOONARM TE LATEN ZAKKEN EN VOORZICHTIG DE PLAAT AAN TE RAKEN. DE PLATENSPELER BEGINT AF TE SPELEN.
- DRUK HET LIFTMECHANISME OMHOOG OM DE TOONARM VAN DE ARMSTEUN OMHOOG TE BRENGEN, NU ZAL HET PLATEAU NOG STEEDS DRAAIEN, MAAR HET AFSPELEN VAN DE PLATENSPELER ZAL STOPPEN. OM DOOR TE GAAN MET AFSPELEN MOET U HET LIFTMECHANISME OMLAAG ZETTEN.
- DRAAI DE SNELHEIDSREGELAAR NAAR 33 OF 45 TOEREN AFHANKELIJK VAN HET AF TE SPELEN PLAAT, DE KNOPINDICATOR ZAL OPLICHTEN.
- DRUK OP DE SCHAKELAAR START/STOP OM HET DRAAIEN VAN DE PLATENSPELER TE STOPPEN OF AAN TE ZETTEN.
- STROBOSCOOPPUNTEN OP HET PLATENSPELERPLATEAU OM DE SNELHEID TE CONTROLEREN. BOVENSTE RIJEN MET GROTERE PUNTEN VOOR 33 TOEREN, BOVENSTE RIJEN MET KLEINERE PUNTEN VOOR 45 TOEREN. PAS INDIEN NODIG DE SNELHEID AAN MET DE TEMPOREGELAAR (+/- 50%). DE GESCHIKTE PUNTEN ZULLEN ONDER DE STROBOSCOOPLAMP STABILISEREN ALS DE SNELHEID CORRECT IS.
text_image
STROB LIGHT APE ELEVAT| EN | NL |
| STROB LIGHT | STROBOSCOOPLAMP |
- GEBRUIK INDIEN NODIG DE 45-TOEREN-ADAPTER.
- AAN HET EINDE VAN DE PLAAT ZAL HET PLATEAU AUTOMATISCH STOPPEN MET DRAAIEN, DE TOONARM ZAL AUTOMATISCH TERUGKEREN NAAR DE TOONARMSTEUN.
- ACTIVEER DE TERUGKEERSCHAKELAAR TIJDENS HET AFSPELEN VAN DE PLAAT, DE PLATENSPELER ZAL LANGZAAM STOPPEN EN DE TOONARM ZAL AUTOMATISCH TERUGKEREN NAAR HET TOONARMSTEUNDEEL.
text_image
Audiacity File Edit View Project Drawman Help Review Help Cut Ctrl+2 Copy Ctrl+C Paste Ctrl+V From Ctrl+Y Delete Ctrl+E Balance Ctrl+L Edit Duplicate Ctrl+O Select... Find Zero Currency Selection Save Selection Backoff Move Curator... Snap-To... Preferences Ctrl?text_image
Audacity Preferences Audio I/O | Quality | File Formats | Spectrograms | Directories | Interface | Keyboard | Mouse | Playba Device: South MAX HD Audio Recording Device: USB Audio CODEC Channels: 2 (Stereo) ✓ Play other tracks while recording new one ✓ Software Playthrough (Play new track while recording it)text_image
Audacity File Edit View Project Generate Effect Analyze Help New Ctrl+N Open... Ctrl+O Close Ctrl+W Save Project Ctrl+S Save Project As... Recent Files... Export As WAV... Export Selection As WAV... Export As MP3... Export Selection As MP3... Export As Ogg Vorbis... Export Selection As Ogg Vorbis... Export Labels... Export Multiple... Page Setup... Print... Exit2. Opnemen
natural_image
Simple line drawing of an open book with no text or symbols visible1 x Netzadapter

natural_image
Line drawing of a USB cable with connector port (no text or symbols)1 x Plattenteller

natural_image
Circular diagram with four rectangular cutouts and a central dot, no text or symbols present1 x Filzmatte
natural_image
Simple hand-drawn oval shape with a small dot at the center (no text or symbols)text_image
Technical diagram of a CD or X-ray receiver with numbered components and labeled ports1) PLATTENTELLER
2) STROBOSKOPPUNKTE
3) SCHARNIER FÜR DIE STAUBSCHUTZHAUBE
4) STROBOSKOPLICHT
5) GEGENGEWICHT
6) ANTISKATING-DREHKNOPF
7) TONARMLIFTHEBEL
8) TONARM
9) 33/45-U/MIN-UMSCHALTER
10) WIEDERGABE/STOPP-UMSCHALTER
11) TONARM-ZURÜCK-SCHALTER
12) PITCH-DREHKNOPF (±50 %)
13) TONABNEHMER
14) LINE/PHONO-UMSCHALTER
15) LINE-CINCHAUSGANGSBUCHSE
16) USB-PORT
17) ANSCHLUSSBUCHSE FÜR DEN EXTERNEN NETZADAPTER
18) EIN/STANDBY-TASTE
19) PLATTENSPIELERSTANDFUSS
ACHTUNG:
EINE ANDERE ALS DIE HIER BESCHRIEBENE BENUTZUNG DER BEDIENELEMENTE ODER EINSTELLUNG ODER DURCHFÜHRUNG VON ABLÄUFEN KANN ZU EINEM GEFÄHRLICHER STRAHLUNG AUSGESETZT WERDEN FÜHREN. DIESES GERÄT DARF AUSGENOMMEN VON QUALIFIZIERTEM SERVICEPERSONAL VON NIEMANDEN EINGESTELLT ODER REPARIERT WERDEN.
WARNUNG:
natural_image
Pure technical line drawing of a mechanical component with two vertical supports and directional arrows indicating motion (no text or symbols)- STECKEN SIE DEN PLATTENTELLER AUF DIE MITTELSPINDEL.
- MONTIEREN SIE DEN ANTRIEBSRIEMEN: FÜHREN SIE DEN ANTRIEBSRIEMEN ÜBER DIE MOTORROLLE UND SPANNEN SIE IHN ANSCHLIESSEND UNTER DEM PLATTENTELLER.
text_image
MOTOR PULLEY BELT| EN | DE |
| MOTOR PULLEY | MOTORROLLE |
| BELT | ANTRIEBSRIEMEN |
- LEGEN SIE DIE ANTIRUTSCHMATTE AUF DEN PLATTENTELLER.
- STECKEN SIE DEN TONKOPF AUF DAS VORDERE ENDE DES TONARMS UND DREHEN SIE ANSCHLIESSEND DIE KONTERMUTTER AUF DEN TONKOPF, UM DIESEN HORIZONTAL ZU FIXIEREN.
text_image
SCREW| EN | DE |
| SCREW | SCHRAUBEN |
natural_image
Pure mechanical diagram showing a shaft and wheel assembly without any text, numbers, or symbolstext_image
INDEX LINE| EN | DE |
| INDEX LINE | MARKIERUNGSLINIE |
text_image
LINE PHONOtext_image
Avidentity Edit View Project Generation Effect Options Help Cut Ctrl+X Delete Ctrl+C Zoom Ctrl+V Zoom Ctrl+Y Delete Ctrl+X Remove Ctrl+C Split Duplicate Ctrl+O Select... Find Zero Currency Selection Zone Selection Range Move Cursor... Snap-To... References Ctrl+Ptext_image
Audacity Preferences Audio I/O | Quality | File Formats | Spectrograms | Directories | Interface | Keyboard | Mouse | Playba Device: South MAX HD Audio Recording Device: USB Audio CODEC Channels: 2 (Stereo) ✓ Play other tracks while recording new one ✓ Software Playthrough (Play new track while recording it)text_image
Audacity File Edit View Project Generate Effect Analyze Help New Ctrl+N Open... Ctrl+O Close Ctrl+W Save Project Ctrl+S Save Project As... Recent Files... Export As WAV... Export Selection As WAV... Export As MP3... Export Selection As MP3... Export As Ogg Vorbis... Export Selection As Ogg Vorbis... Export Labels... Export Multiple... Page Setup... Print... Exit2. Aufzeichnen
natural_image
Symbol of a trash bin crossed with no visible text or labelsnatural_image
Simple line drawing of an open book with no text or symbols visiblenatural_image
Line drawing of a USB cable with two connectors (no text or symbols)1 plateau
natural_image
Circular diagram with four rectangular cutouts and a central dot, no text or symbols present1 tapis de feutre

natural_image
Simple hand-drawn oval shape with a small dot at the center (no text or symbols)CARACTÉRISTIQUES DU PRODUIT
- TOURNE-DISQUE À VITESSE DE ROTATION RÉGLABLE 33/45 TR/MIN
- ENTRAÎNEMENT PAR COURROIE
- BRAS DE LECTURE À RETOUR AUTOMATIQUE
- RELÈVE-BRAS
- SORTIE DE LIGNE RCA
- PORTE-CELLULE AMOVIBLE
- LIAISON POUR ORDINATEUR : CONNEXION À UN ORDINATEUR VIA UN PORT USB POUR L'ENREGISTREMENT DU DISQUE
- RÉGLAGE DE LA VITESSE +/-50 %
-
ACCESSOIRES FOURNIS :
-
PLATEAU DE TOURNE-DISQUE
- TAPIS ANTIDÉRAPANT
- COUVERCLE ANTIPOUSSIÈRE
- ADAPTATEUR POUR DISQUE 45 TOURS
- CONTREPOIDS
- CELLULE AUDIO TECHNICA AT-3600L
- CÂBLE USB
- MANUEL D'UTILISATION
- ADAPTATEUR D'ALIMENTATION EXTERNE
PIÈCES DE L'APPAREIL

text_image
Technical diagram of a CD/DVD machine with numbered components and labeled ports including USB, DC in 12V, and STANDBY.1) PLATEAU DE TOURNE-DISQUE
2) POINTS STROBOSCOPIQUES
3) CHARNIÈRE DU COUVERCLE ANTIPOUSSIÈRE
4) LUMIÈRE STROBOSCOPIQUE
5) CONTREPOIDS
6) POMMEAU ANTIPATINAGE
7) RELÈVE-BRAS
8) BRAS DE LECTURE
9) SÉLECTEUR DE VITESSE 33/45 TR/MIN
10) COMMUTATEUR LECTURE/STOP
11) CONTACT DE RETOUR
12) BOUTON DE RÉGLAGE DE LA VITESSE (+/-50 %)
13) TÊTE DE LECTURE
14) SÉLECTEUR LIGNE/PHONO
15) CONNECTEUR DE SORTIE DE LIGNE RCA
16) PORT USB
17) PRISE POUR L'ADAPTATEUR D'ALIMENTATION EXTERNE
18) BOUTON MARCHE/VEILLE
19) PIEDS DU TOURNE-DISQUE
ATTENTION :
L'UTILISATION DE COMMANDES OU DE RÉGLAGES OU L'EXÉCUTION DE PROCÉDURES AUTRES QUE CEUX SPÉCIFIÉS DANS CE MANUEL PEUT ENTRAÎNER UNE EXPOSITION À DES RAYONNEMENTS DANGEREUX.
CETTE UNITÉ NE DOIT PAS ÊTRE RÉGLÉE OU RÉPARÉE PAR QUICONQUE, SAUF DU PERSONNEL DE SERVICE QUALIFIÉ.
AVERTISSEMENT :
- L'APPAREIL NE DOIT PAS ÊTRE EXPOSÉ À DES ÉCOULEMENTS OU DES ÉCLABOUSSURES ET AUCUN OBJET CONTENANT UN LIQUIDE, TEL QU'UN VASE, NE DOIT ÊTRE POSÉ SUR L'APPAREIL.
- LES FICHES PRINCIPALES OU LE DISPOSITIF DE RACCORDEMENT DE L'APPAREIL SERVENT DE DISPOSITIF DE DÉCONNEXION. ILS DOIVENT RESTER ACCESSIBLES À TOUT MOMENT.
natural_image
Technical line drawing of a mechanical assembly with two vertical supports and directional arrows indicating motion (no text or symbols)- PLACEZ LE PLATEAU DU TOURNE-DISQUE SUR LA BROCHE CENTRALE.
- INSTALLEZ LA COURROIE D'ENTRAÎNEMENT : POSITIONNEZ LA COURROIE SUR LA POULIE DU MOTEUR, LA COURROIE D'ENTRAÎNEMENT EST TENDUE SOUS LE PLATEAU DU TOURNE-DISQUE.
text_image
MOTOR PULLEY BELTEN
FR
| MOTOR PULLEY | POULIE DE MOTEUR |
| BELT | COURROIE |
- PLACEZ LE TAPIS ANTIDÉRAPANT SUR LE PLATEAU DU TOURNE-DISQUE.
- INSÉREZ LA TÊTE DE LECTURE AU BOUT DU BRAS DE LECTURE, PUIS VISSEZ L'ÉCROU DE BLOCAGE AVEC LA TÊTE DE LECTURE FERMEMENT MAINTENUE À L'HORIZONTALE.

text_image
SCREW| EN | FR |
| SCREW | VIS |
INSTALLER LE CONTREPOIDS
- FAITES GLISSER LE CONTREPOIDS SUR LE BRAS DE LECTURE. TOURNEZ-LE LÉGÈREMENT POUR LE VISSER SUR L'EXTRÉMITÉ ARRIÈRE DU BRAS DE LECTURE. CHAQUE TOUR COMPLET DE L'ANNEAU GRADUÉ REPRÉSENTE ENVIRON 2,4 GRAMMES (+/-0,4 GRAMME).

text_image
COUNTERWEIGHT COUNTERWEIGHT SCALE RING SCALE RING| EN | FR |
| COUNTERWEIGHT | CONTREPOIDS |
| SCALE RING | ANNEAU GRADUÉ |
- POUR LA CARTOUCHE AUDIO PAR DÉFAUT DE 3 600 L, TOURNEZ LE CONTREPOIDS VERS L'INTÉRIEUR JUSQU'À LA LIGNE HORIZONTALE À L'EXTRÉMITÉ ARRIÈRE DU BRAS DE LECTURE.
natural_image
Pure mechanical assembly diagram without any text, numbers, or symbols- TENEZ LE CONTREPOIDS D'UNE MAIN, TOURNEZ L'ANNEAU GRADUÉ À « 3 » CONTRE LA LIGNE D'INDEX SUR L'ARBRE AVEC L'AUTRE MAIN ET ASSUREZ-VOUS DE NE PAS TOURNER LE CONTREPOIDS, MAIS SEULEMENT L'ANNEAU GRADUÉ ! LA FORCE D'APPUI SERA D'ENVIRON 3,0 GRAMMES (+/-0,4 GRAMME).
text_image
INDEX LINE| EN | FR |
| INDEX LINE | LIGNE D'INDEX |
- SI NÉCESSAIRE, UNE ROTATION DU CONTREPOIDS VERS L'INTÉRIEUR AUGMENTE LA FORCE D'APPUI, TANDIS QUE LA ROTATION DU CONTREPOIDS VERS L'ARRIÈRE DIMINUE LA FORCE D'APPUI.
- POUR LES AUTRES CARTOUCHES, VOUS POUVEZ AJUSTER LA FORCE D'APPUI EN TOURNANT LE CONTREPOIDS VERS L'INTÉRIEUR OU VERS L'ARRIÈRE. CHAQUE CHIFFRE SUR L'ANNEAU GRADUÉ CORRESPOND À ENVIRON 0,4 GRAMME DE FORCE D'APPUI.
RÉGLAGE DE L'ANTIPATINAGE
text_image
Audiety File Edit View Project Generate Effect Analysis Help Cut Ctrl+2 Copy Ctrl+C Paste Ctrl+V From Ctrl+T Delete Ctrl+K Balance Ctrl+L Style Duplicate Ctrl+O Reset... Print Zero Currency-2 Selection Drive Selection System Move Camera... Snap To... Preferences Ctrl+Ptext_image
Audacity Preferences Audio I/O | Quality | File Formats | Spectrograms | Directories | Interface | Keyboard | Mouse | Playba Device: South MAX HD Audio Recording Device: USB Audio CODEC Channels: 2 (Stereo) Play other tracks while recording new one Software Playthrough (Play new track while recording it)text_image
Audacity File Edit View Project Generate Effect Analyze Help New Ctrl+N Open... Ctrl+O Close Ctrl+W Save Project Ctrl+S Save Project As... Recent Files... Export As WAV... Export Selection As WAV... Export As MP3... Export Selection As MP3... Export As Ogg Vorbis... Export Selection As Ogg Vorbis... Export Labels... Export Multiple... Page Setup... Print... Exitnatural_image
Symbol of a trash bin crossed out by two crossed lines, with a blank rectangular base below (no text or symbols)natural_image
Simple line drawing of an open book with no text or symbols visiblenatural_image
Line drawing of a USB cable with two connectors (no text or symbols)1 plato
natural_image
Circular diagram with four rectangular cutouts and a central dot, no text or symbols presentnatural_image
Simple hand-drawn oval shape with a small dot at center (no text or symbols)CARACTERÍSTICAS DEL PRODUCTO
text_image
Technical diagram of a CD or X-ray receiver with numbered components and labeled ports1) PLATO DEL TOCADISCOS
natural_image
Technical line drawing of a mechanical assembly with two vertical supports and directional arrows indicating motion (no text or symbols)natural_image
Pure mechanical diagram showing a shaft and housing assembly without any text, numbers, or symbols- SUJETE EL CONTRAPESO CON UNA MANO, GIRE EL ANILLO GRADUADO HASTA "3" CONTRA LA LÍNEA ÍNDICE DEL EJE CON LA OTRA MANO Y ASEGÚRESE DE QUE NO GIRA EL CONTRAPESO, ¡SOLO GIRA EL ANILLO GRADUADO! LA FUERZA DE SEGUIMIENTO SERÁ DE APROXIMADAMENTE 3.0 GRAMOS (+/-0.4 GRAMOS).

text_image
INDEX LINE| EN | ES |
| INDEX LINE | LÍNEA DE ÍNDICE |
- SI ES NECESARIO, GIRAR EL CONTRAPESO HACIA DENTRO AUMENTA LA FUERZA DE SEGUIMIENTO, MIENTRAS QUE GIRAR EL CONTRAPESO HACIA ATRÁS DISMINUYE LA FUERZA DE SEGUMIENTO.
- PARA OTROS CARTUCHOS, PUEDE AJUSTAR LA FUERZA DE SEGUIMIENTO GIRANDO EL CONTRAPESO HACIA DENTRO O HACIA ATRÁS. CADA NÚMERO DEL ANILLO GRADUADO SE CORRESPONDE CON APROXIMADAMENTE 0.4 GRAMOS DE FUERZA DE SEGUIMIENTO.
AJUSTE ANTIPATINAJE
text_image
0 1 2 3 S T I A V A N T I A S T I A V A N T I A S T I A N T I A S T I A N T I A S T I A N T I A S T I A N T I A S T I A N T I ASELECTOR DEL TOCADISCOS
text_image
LINE PHONO- RETIRE EL PROTECTOR DE LA AGUJA.
- ASEGÚRESE DFE QUE EL BRAZO SE SEPARA DE LA PIEZA DEL SOPORTE DEL BRAZO ANTES DE OPERARLO Y VUELVA A ASEGURARLOS DE NUEVO POSTERIORMENTE.
text_image
Adobe File Edit View Project Generate Effect Analysis Help Cut Ctrl+2 Copy Ctrl+C Paste Ctrl+S From Ctrl+T Delete Ctrl+K Balance Ctrl+C Split Duplicate Ctrl+O Select... Print Zero Command-S Selection Dot Selection Event Move Censor_ Snap To... Preferences Ctrl?text_image
Audacity Preferences Audio I/O | Quality | File Formats | Spectrograms | Directories | Interface | Keyboard | Mouse | Playba Device: South MAX HD Audio Recording Device: USB Audio CODEC Channels: 2 (Stereo) Play other tracks while recording new one Software Playthrough (Play new track while recording it)text_image
Audacity File Edit View Project Generate Effect Analyze Help New Ctrl+N Open... Ctrl+O Close Ctrl+W Save Project Ctrl+S Save Project As... Recent Files... Export As WAV... Export Selection As WAV... Export As MP3... Export Selection As MP3... Export As Ogg Vorbis... Export Selection As Ogg Vorbis... Export Labels... Export Multiple... Page Setup... Print... Exit2. Cómo grabar
natural_image
Symbol of a trash bin crossed with no visible text or labelsnatural_image
Simple line drawing of an open book with no text or symbols visiblenatural_image
Line drawing of a USB cable with two connectors (no text or symbols)1 x Piatto

natural_image
Circular diagram with four rectangular cutouts and a central dot, no text or symbols present1 x Tappetino in feltro

natural_image
Simple hand-drawn oval shape with a small dot at center (no text or symbols)CARATTERISTICHE DEL PRODOTTO
- GIRADISCHI SELEZIONABILE 33/45 RPM
- SISTEMA CON TRASMISSIONE A CINGHIA
- BRACCIO CON RITORNO AUTOMATICO
- ACCESSORI INCLUSI:
-
PIATTO GIREVOLE
-
TAPPETINO ANTISCIVOLO
-
COPERTURA ANTIPOLVERE
-
ADATTATORE 45 RPM
-
CONTRAPPESO
-
TESTINA AUDIO TECHNICA AT-3600L
-
CAVO USB
-
MANUALE D'USO
-
ALIMENTATORE ESTERNO
text_image
Technical diagram of a CD or X-ray receiver with numbered components and labeled ports1) PIATTO GIREVOLE
2) PUNTI STROBO
natural_image
Pure technical line drawing of a mechanical assembly with two vertical supports and directional arrows indicating motion (no text or symbols)- IMPOSTARE IL PIATTO DEL GIRADISCHI SUL MANDRINO CENTRALE.
- FISSARE LA TRASMISSIONE A CINGHIA: POSIZIONARE LA CINGHIA SULLA PULEGGIA MOTORE, LA CINGHIA DI TRASMISSIONE È SERRATA SOTTO IL PIATTO DEL GIRADISCHI.

text_image
MOTOR PULLEY BELT| EN | IT |
| MOTOR PULLEY | PULEGGIA MOTORE |
| BELT | CINGHIA |
- PORRE IL TAPPETINO ANTISCIVOLO SUL PIATTO GIREVOLE.
- INSERIRE IL PORTATESTINA ALL'ESTREMITÀ ANTERIORE DEL BRACCIO, QUINDI AVVITARE IL DADO DI BLOCCAGGIO CON IL PORTATESTINA TENUTO FERMO ORIZZONTALMENTE.
text_image
SCREW| EN | IT |
| SCREW | VITE |
INSTALLAZIONE DEL CONTRAPPESO
- FAR SCORRERE IL CONTRAPPESO SUL BRACCIO. GIRARLO LEGGERMENTE E SI AVVITERÀ VERSO L'INTERNO SULLA PARTE POSTERIORE DEL BRACCIO. OGNI GIRO COMPLETO DELL'ANELLO A SCALA EQUIVALE A CIRCA 2,4 GRAMMI (+/-0,4 GRAMMI).

text_image
COUNTERWEIGHT COUNTERWEIGHT SCALE RING SCALE RING| EN | IT |
| COUNTERWEIGHT | CONTRAPPESO |
| SCALE RING | ANELLO DI SCALA |
- SE SI UTILIZZA LA TESTINA STANDARD AUDIO-TECHNICA AT-3600L, GIRARE IL CONTRAPPESO VERSO L'INTERNO FINO ALLA LINEA ORIZZONTALE SULLA PARTE POSTERIORE DEL BRACCIO.
natural_image
Pure mechanical diagram showing a shaft and wheel assembly without any text, numbers, or symbols- TENENDO IL CONTRAPPESO CON UNA MANO, GIRARE L'ANELLO DELLA SCALA SU "3" CONTRO LA LINEA DI RIFERIMENTO SULL'ALBERO CON L'ALTRA MANO. ASSICURARSI DI NON GIRARE IL CONTRAPPESO, MA SOLO L'ANELLO DELLA SCALA! LA FORZA DI TRACKING SARÀ CIRCA 3,0 GRAMMI (+/-0,4 GRAMMI).
text_image
INDEX LINEtext_image
LINE PHONO- RIMUOVERE LA PROTEZIONE DELLA PUNTINA.
ASSICURARSI CHE IL BRACCIO SIA STACCATO DAL SUPPORTO PRIMA DI UTILIZZARLO E RIPRISTINARLO DOPO. - PREMERE IL BRACCIO DI SOLLEVAMENTO VERSO L'ALTO PER SOLLEVARE IL BRACCIO DAL SUPPORTO, E QUINDI SPOSTARLO LENTAMENTE AL LATO DEL DISCO. IL PIATTO INIZIA A GIRARE.
- ABBASSARE LA LEVA DI SOLLEVAMENTO PER PRENDERE IL BRACCIO E TOCCARE IL DISCO DELICATAMENTE. LA RIPRODUZIONE DEL DISCO INIZIA ORA.
- SPINGERE LA LEVA DI SOLLEVAMENTO VERSO L'ALTO PER SOLLEVARE IL BRACCIO DALLA SUPPORTO, IL PIATTO GIRA ANCORA MA LA RIPRODUZIONE SI ARRESTA. PER CONTINUARE LA RIPRODUZIONE, L'UTENTE DEVE ABBASSARE LA LEVA DI SOLLEVAMENTO.
- GIRARE IL SELETTORE DI VELOCITÀ SU 33 RPM O 45 RPM, A SECONDA DEL DISCO DA RIPRODURRE.
- RUOTARE L'INTERRUTTORE AVVIO/ARRESTO PER ARRESTARE LA ROTAZIONE DEL GIRADISCHI O RIPRENDERE IL FUNZIONAMENTO.
- PUNTI STROBO SUL PIATTO ROTANTE PER CONTROLLO DELLA VELOCITÀ. FILE SUPERIORI DI PUNTI PIÙ GRANDI PER 33RPM, FILE SUPERIORI DI PUNTI PIÙ PICCOLI PER 45RPM. SE NECESSARIO, REGOLARE LA VELOCITÀ MEDIANTE IL CURSORE DI CONTROLLO DELLA FREQUENZA (+/-50%). I PUNTI ADATTI SI MANTENGONO STABILIZZATI SOTTO LA LUCE STROBO SE LA VELOCITÀ È CORRETTA.
text_image
STROB LIGHT APE ELEVATION| EN | IT |
| STROB LIGHT | LUCE STROBO |
- SE NECESSARIO, UTILIZZARE L'ADATTATORE 45 RPM.
- ALLA FINE DELLA REGISTRAZIONE, IL PIATTO SMETTE DI RUOTARE AUTOMATICAMENTE, IL BRACCIO RITORNA AUTOMATICAMENTE SUL SUPPORTO DEL BRACCIO.
- AZIONARE L'INTERRUTTORE DI RITORNO DURANTE LA RIPRODUZIONE DELLA REGISTRAZIONE, IL GIRADISCHI SI ARRESTA E IL BRACCIO RITORNA AUTOMATICAMENTE SUL SUPPORTO DEL BRACCIO.