LS-470 - Turntable LENCO - Free user manual and instructions
Find the device manual for free LS-470 LENCO in PDF.

User questions about LS-470 LENCO
0 question about this device. Answer the ones you know or ask your own.
Ask a new question about this device
Download the instructions for your Turntable in PDF format for free! Find your manual LS-470 - LENCO and take your electronic device back in hand. On this page are published all the documents necessary for the use of your device. LS-470 by LENCO.
USER MANUAL LS-470 LENCO
Usage of controls or adjustments or performance of procedures other than those specified herein may result in hazardous radiation exposure.
KEEP THESE INSTRUCTIONS IN MIND:
- Do not cover or block any ventilation openings. When placing the device on a shelf, leave 5 cm (2") free space around the whole device.
- Install in accordance with the supplied user manual.
- Keep the device away from heat sources such as radiators, heaters, stoves, candles and other heat-generating products or naked flame. The device can only be used in moderate climates. Extremely cold or warm environments should be avoided. Working temperature between 0^ and 35^ .
- Avoid using the device near strong magnetic fields.
- Electrostatic discharge can disturb normal usage of this device. If so, simply reset and restart the device following the instruction manual. During file transmission, please handle with care and operate in a static-free environment.
- Warning! Never insert an object into the product through the vents or openings. High voltage flows through the product and inserting an object can cause electric shock and/or short circuit internal parts. For the same reason, do not spill water or liquid on the product.
- Do not use in wet or moist areas such as bathrooms, steamy kitchens or near swimming pools.
-
The device shall not be exposed to dripping or splashing and make sure that no objects filled with liquids, such as vases, are placed on or near the apparatus.
-
Do not use this device when condensation may occur. When the unit is used in a warm wet room with damp, water droplets or condensation may occur inside the unit and the unit may not function properly; let the unit stand in power OFF for 1 or 2 hours before turning on the power: the unit should be dry before getting any power.
- Although this device is manufactured with the utmost care and checked several times before leaving the factory, it is still possible that problems may occur, as with all electrical appliances. If you notice smoke, an excessive build-up of heat or any other unexpected phenomena, you should disconnect the plug from the main power socket immediately.
- This device must operate on a power source as specified on the specification label. If you are not sure of the type of power supply used in your home, consult your dealer or local power company.
- Keep away from animals. Some animals enjoy biting on power cords.
- To clean the device, use a soft dry cloth. Do not use solvents or petrol based fluids. To remove severe stains, you may use a damp cloth with dilute detergent.
- The supplier is not responsible for damage or lost data caused by malfunction, misuse, modification of the device or battery replacement.
- Do not interrupt the connection when the device is formatting or transferring files. Otherwise, data may be corrupted or lost.
- If the unit has USB playback function, the USB memory stick should be plugged into the unit directly. Don't use an USB extension cable because it can cause interference resulting in failing of data.
- The rating label has been marked on the bottom or back panel of the device.
- This device is not intended for use by people (including children) with physical, sensory or mental disabilities, or a lack of
experience and knowledge, unless they're under supervision or have received instructions about the correct use of the device by the person who is responsible for their safety.
- This product is intended for non professional use only and not for commercial or industrial use.
- Make sure the unit is adjusted to a stable position. Damage caused by using this product in an unstable position vibrations or shocks or by failure to follow any other warning or precaution contained within this user manual will not be covered by warranty.
- Never remove the casing of this device.
- Never place this device on other electrical equipment.
- Do not allow children access to plastic bags.
- Only use attachments/accessories specified by the manufacturer.
- Refer all servicing to qualified service personnel. Servicing is required when the device has been damaged in any way, such as the power supply cord or the plug, when liquid has been spilled or objects have fallen into the device, when the device has been exposed to rain or moisture, does not operate normally, or has been dropped.
- Long exposure to loud sounds from personal music players may lead to temporary or permanent hearing loss.
- If the product is delivered with power cable or AC power adaptor:
- If any trouble occur, disconnect the AC power cord and refer servicing to qualified personnel.
- Don't step on or pinch the power adaptor. Be very careful, particularly near the plugs and the cable's exit point. Do not place heavy items on the power adaptor, which may damage it. Keep the entire device out of children's reach! When playing with the power cable, they can seriously injure themselves.
-
Unplug this device during lightning storms or when unused for a long period.
-
The socket outlet must be installed near the equipment and must be easily accessible.
- Do not overload ac outlets or extension cords. Overloading can cause fire or electric shock.
- Devices with class 1 construction should be connected to a main socket outlet with a protective earthed connection.
- Devices with class 2 construction do not require a earthed connection.
- Always hold the plug when pulling it out of the main supply socket. Do not pull the power cord. This can cause a short circuit.
-
Do not use a damaged power cord or plug or a loose outlet. Doing so may result in fire or electric shock.
-
If the product contains or is delivered with a remote control containing coin/cell batteries:
Warning:
- "Do not ingest battery, Chemical Burn Hazard" or equivalent working.
- [The remote control supplied with] This product contains a coin/button cell battery. If the battery is swallowed, it can cause severe internal burns in just 2 hours and can lead to death.
- Keep new and used batteries away from children.
- If the battery compartment does not close securely, stop using the product and keep it away from children.
-
If you think batteries might have been swallowed or placed inside any part of the body, seek immediate medical attention.
-
Caution about the use of Batteries:
-
Danger of explosion if battery is incorrectly replaced. Replace only with the same or equivalent type.
-
Battery cannot be subjected to high or low extreme temperatures, low air pressure at high altitude during use, storage or transportation.
-
Replacement of a battery with an incorrect type that can result in an explosion or the leakage of flammable liquid or gas.
- Disposal of a battery into fire or a hot oven, or mechanically crushing or cutting of a battery, that can result in an explosion.
- Leaving a battery in an extremely high temperature surrounding environment that can result in an explosion or that leakage of flammable liquid or gas.
- A battery subjected to extremely low air pressure that may result in an explosion or the leakage of flammable liquid or gas.
- Attention should be drawn to the environmental aspects of battery disposal.
INSTALLATION
- Unpack all parts and remove protective material.
-
Do not connect the unit to the mains before checking the mains voltage and before all other connections have been made.
-
Those instruction are related only to products using power cable or AC power adaptor.
Product Description
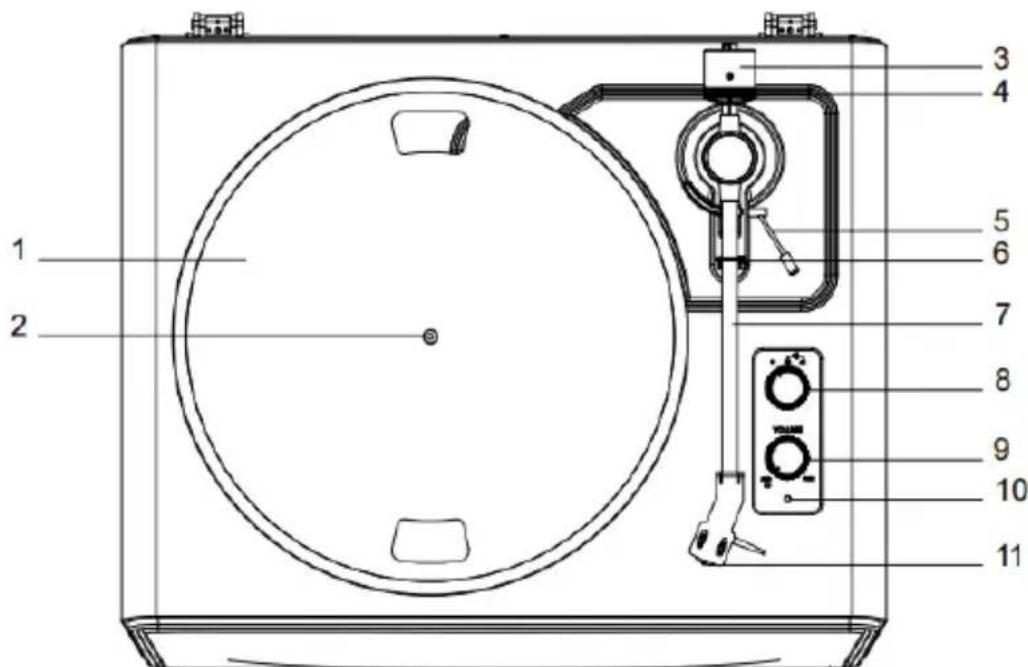
- Turntable Platter
- Turntable Spindle
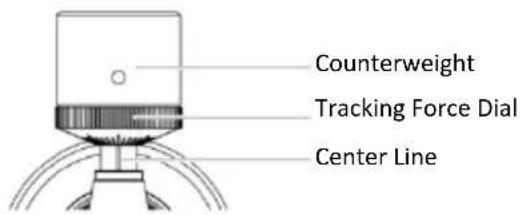
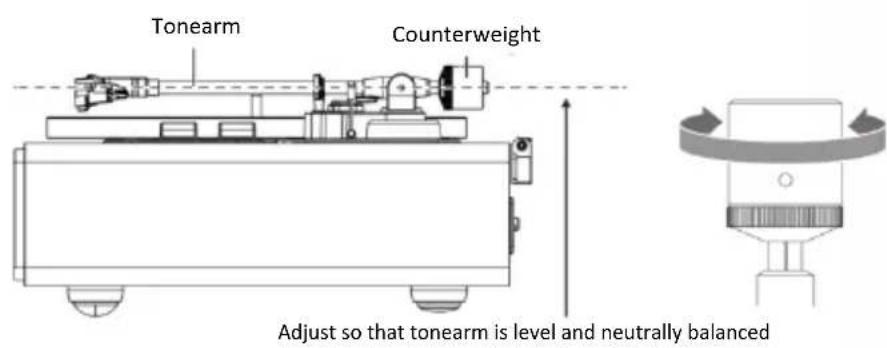
- Counterweight
- Tracking Force Dial
- Tonearm Lift Lever
- Tonearm Clip
- Tonearm
- Function Knob
-
Power& Volume Knob
-
Indicator
- Cartridge
- Power Switch
- USB-PC Jack
- Power Jack
- Phono & AUX OUT Switch
- AUXIN Jack
- RCA Jacks of Phono & AUX OUT
Included Items
Before installing the turntable, check the package contents to ensure all parts below are included and free of visible damage. Please retain the original packaging materials for exchange or return purposes.
- Turntable Unit
- Power Adapter
- Turntable Lid
- Slip Mat
- Platter with Belt
-
Counterweight
-
Cartridge Alignment
Protractor
- 45 RPM Adapter
- Instruction Manual
- USB Cable
Installing the turntable
. Mount the turntable on a level surface.
. To avoid the effects of vibrations and acoustic pressure, do not mount the turntable next to items such as speakers.
. The turntable may pick up radio static if placed next to a radio. Therefore, try to keep the turntable away from radios.
. If the turntable is near equipment (cell phone, etc.) that emits strong radio waves, noise may occur.


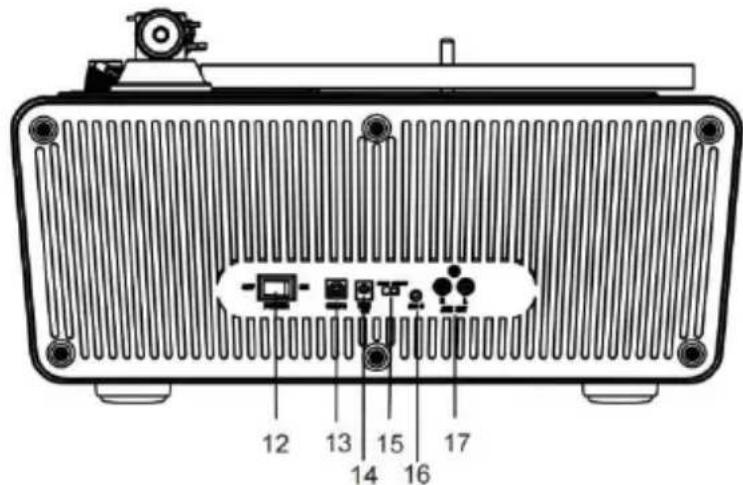
Turntable Platter and Belt Setup
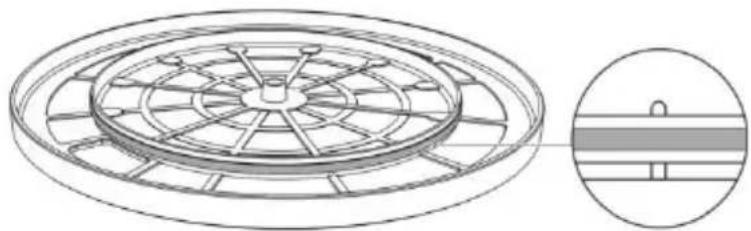
- Turn the platter over and check the belt position.
Make sure that the drive belt is looped in the middle of the circle. The drive belt located too high or too low in this circle may cause the drive belt to fall off or speed to be unstable.
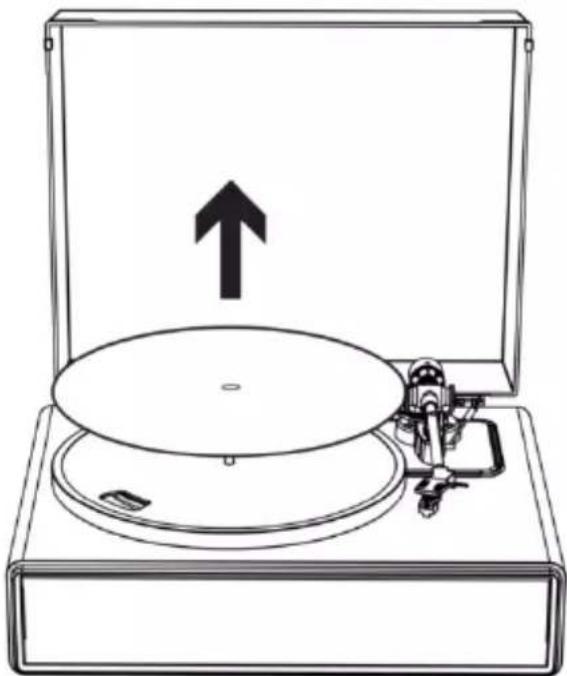
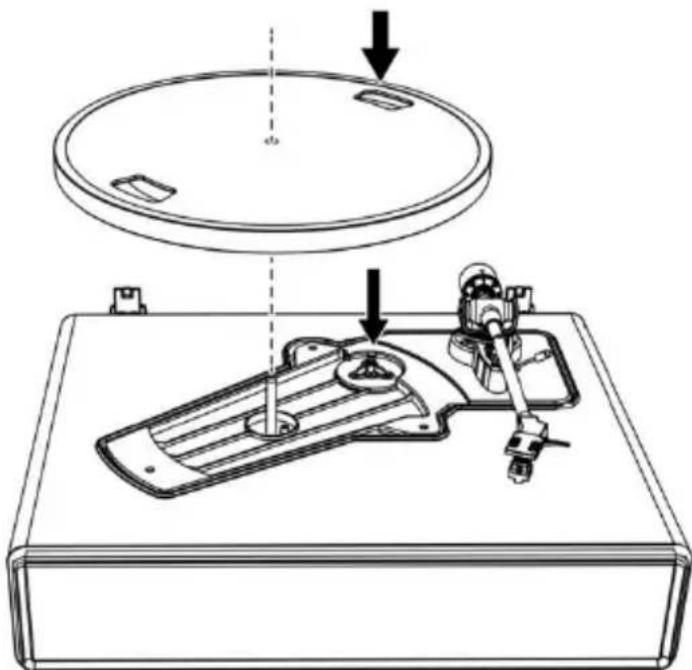
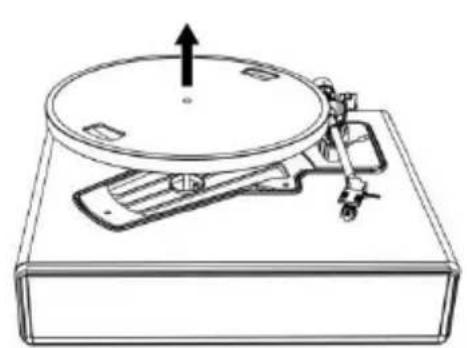
- Set the platter on the spindle.
Make sure the platter is fully seated on the spindle.
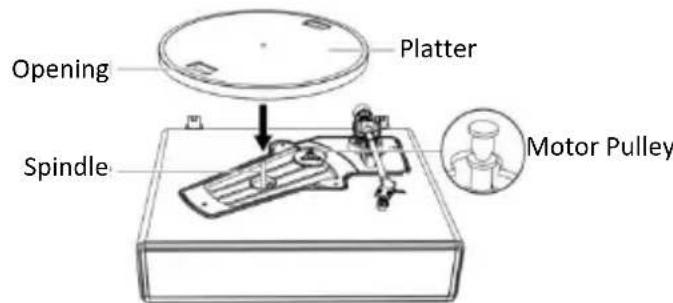
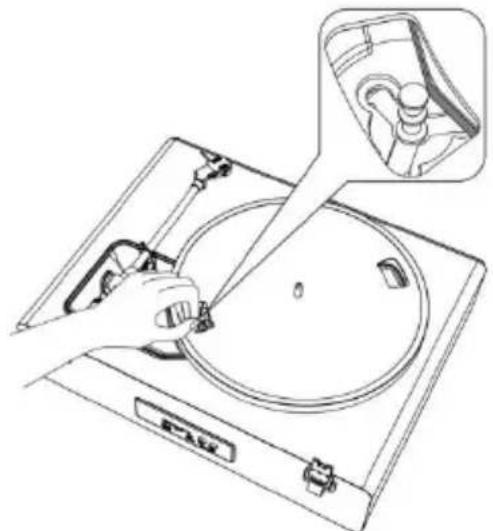
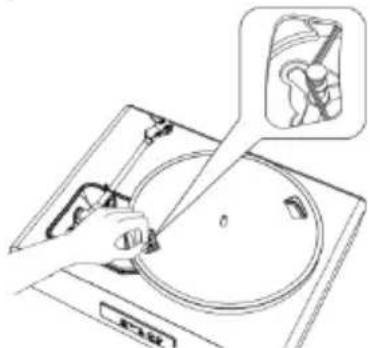
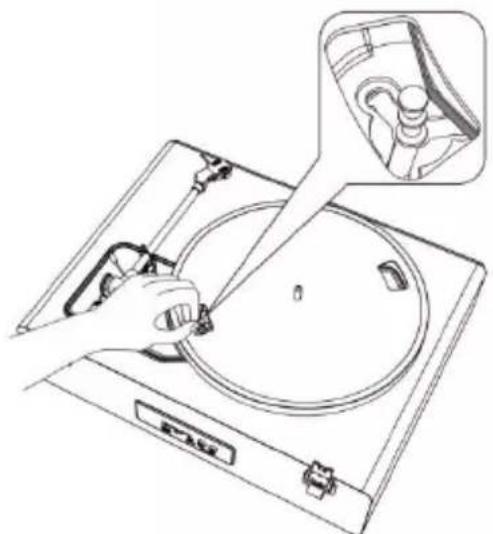
- Place the belt on the motor pulley.
Align one of the platter openings with the motor pulley, and while pulling both ends of the red ribbon that comes attached to the belt, place the belt on the motor pulley, as per the diagram. When doing this, be careful not to twist the belt.
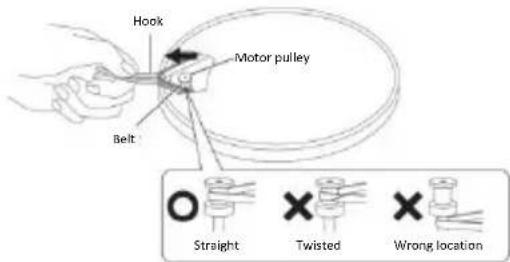
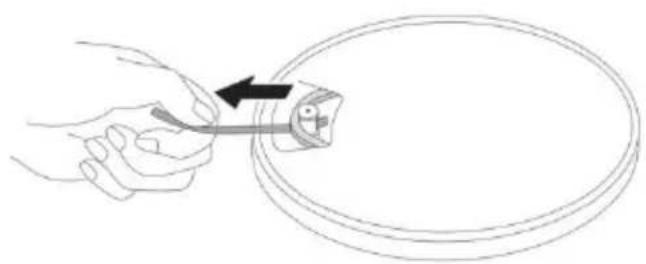
- Remove the red ribbon from the belt.
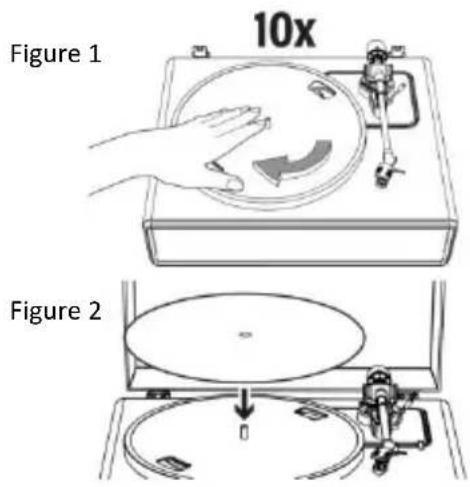
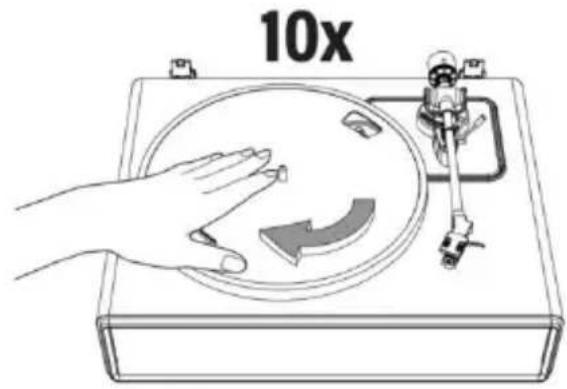
Rotating the Platter
- Using your hands, slowly rotate the platter ten times in a clockwise direction (Figure 1).
- This step is for resetting the auto mechanism, getting rid of any twists in the belt and making sure the belt rides smoothly along the drive rim on the underside of the platter.
- Place the slip mat on top of the platter. Make sure the logo on the mat is facing up (Figure 2).
Cartridge Tracking Force Adjustment
The supplied Counterweight is suitable for cartridges weighing between 3.0-6.0g.
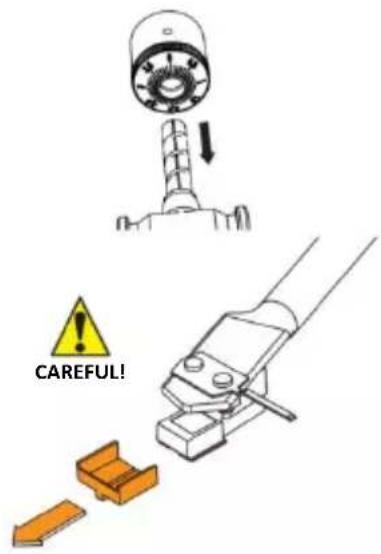
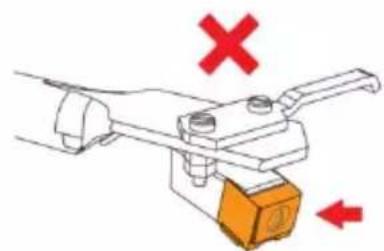
- Gently push and turn the counterweight onto the rear of the tonearm (with the dial facing toward the front of the turntable).
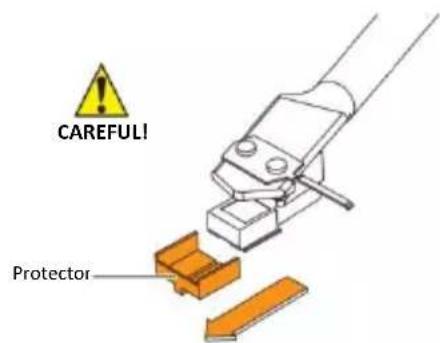
- Pull the protector straight forward to remove it.
NOTE: Applying a downward force may cause the stylus to come off the body. Only low volume is output if the stylus has come off, or is about to come off, so refer to "Replacing the stylus" to reattach the stylus correctly.
- Remove the tie-wrap and unlock the tonearm.
- Lower the tonearm lift lever and position the cartridge in the space between the tonearm rest and platter.
- Carefully rotate the counterweight until the tonearm achieves a neutral balance. The tonearm should return to this balanced position if it is moved up or down. This adjustment must be done carefully.
- Once the tonearm is correctly balanced, return the tonearm to its rest. Without moving the position of the counterweight, gently rotate the tracking force dial until the zero is in line with black center line on the rear of the tonearm. Check to make sure the tonearm is still neutrally balanced.
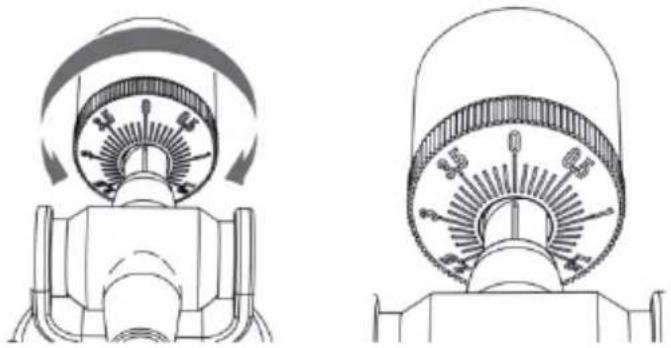
- Finally, rotate the counterweight and tracking force dial together counterclockwise (as seen from the front) to adjust the tracking force according to the cartridge manufacturer's recommendations.
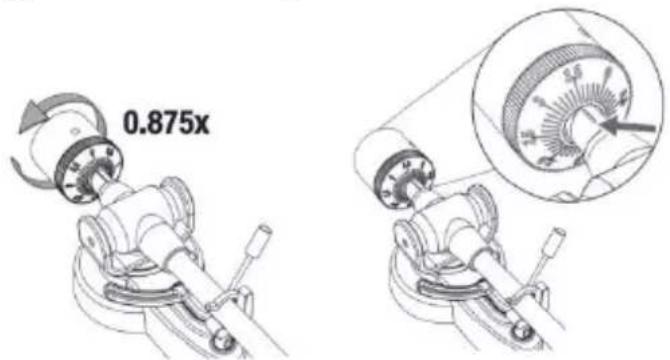
Note: Each mark on the scale represents 0.1g. The recommended tracking force for the factory-installed cartridge is 3.5g ± 0.5g . Carefully rotate the tracking force dial. When "3.5" is centered over the black line on the top of the tonearm please stop.
Connection to External Speaker with RCA Audio Cable
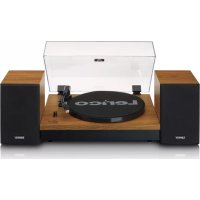
This turntable includes 4 built-in speakers and a built-in phono amplifier. If you wish to use your own amplifier or speakers, please follow the instructions below:
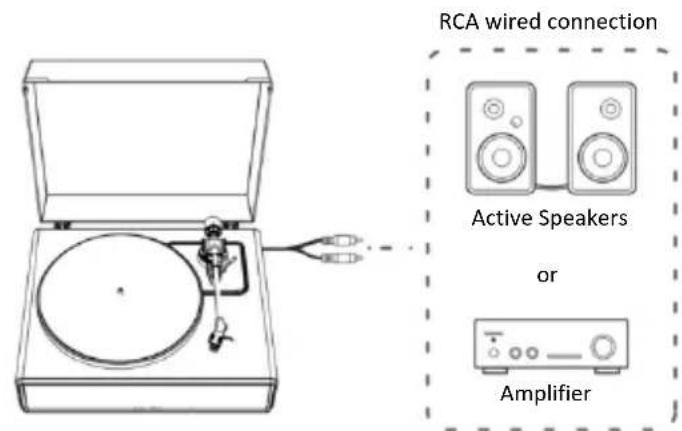
NOTE: In order to achieve the best sound, it is advised to set the turntable volume to a minimal level. Then the turntable's audio will be played back through your own amplifier, speakers, etc.
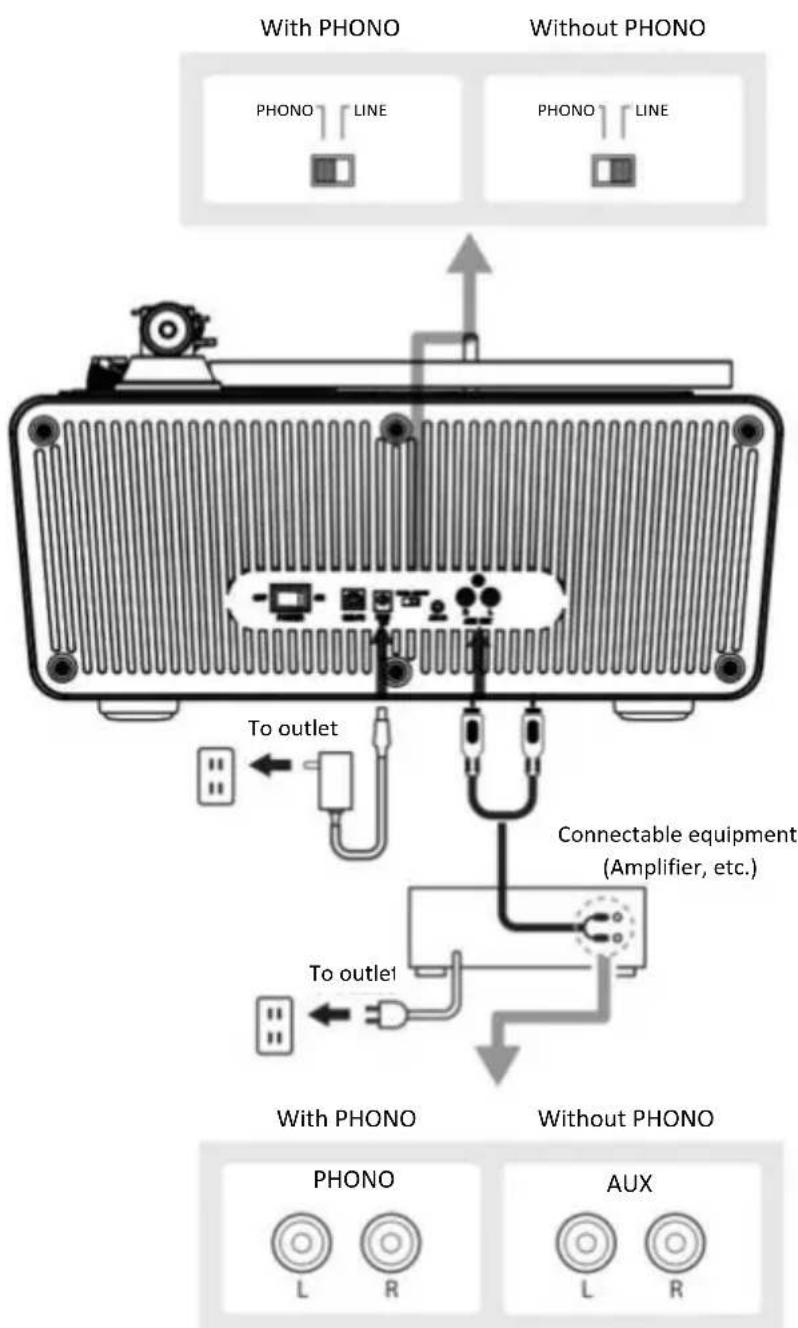
1. Setting pre-amplifier selector switch
This product has a built-in phono amplifier function. You can use the product even if you do not have a phono amplifier or connectable equipment with a built-in phono amplifier.
Use the pre-amplifier selector switch to set the output, as shown below.
| Connectable equipment being used | Position of pre-amplifier selector switch | Where to connect RCA audio cable |
| Device with phono input | PHONO | Phono input jack and ground (earth) terminal of connectable equipment |
| Device without phono input | LINE | AUX or line input jack of connectable equipment |
NOTE: The RCA Jacks are not designed to be connected directly to the passive/unpowered speakers on LINE mode. If connected to the passive speakers, there will be no sound.
2. Connecting the device
Align the settings for the pre-amplifier selector switch and connect the RCA audio cable to an input jack that is compatible with the connectable equipment you are using (amplifier, active speakers, etc.).
- The RCA audio cable's red jack is for the right (R) channel, and the white jack is for the left (L) channel.
Main Power Connection
- Insert the DC plug of the AC adapter cord into the DC INPUT Jack at the back of the turntable.
- Plug the AC adapter into a normal power outlet.
NOTE: Do not plug the AC power adapter into a power outlet before all turntable assembly is completed. Before turning on turntable power, recheck all connections to make sure they are correct and secure. Always turn off the turntable before connecting or disconnecting from power.
Power Management Function
The turntable will automatically power off after 20 minutes of inactivity.
The indicator light will turn off.
To resume operation, press the ON/OFF button again.
Playing a Record
1. Before playing a record
1.1. Pull the protector straight forward to remove it.
NOTE: Applying a downward force may cause the stylus to come off the body. Only low volume is output if the stylus has come off, or is about to come off, so refer to "Replacing the stylus" to reattach the stylus correctly.
1.2. Place the record on the felt mat so that the center hole aligns with the spindle.

2. Turntable Operation
Sufficiently lower the volume of the amplifier and speakers first.
2.1. Connect the included power adapter to the turntable, power on this unit by the power switch at the back side. Turn the power& volume knob to turn on this unit. The indicator will light in red.
2.2. Remove the stylus protector from the stylus.
2.3. Place the record on the slip mat.
2.4. Switch the function knob to choose 33 or 45 RPM speeds according to the type of record.
2.5. Unlock the tonearm clip and set the tonearm lift lever to the up position.
2.6. Position the tonearm over the desired location (groove) on the record. The platter will start turning automatically.
2.7. Carefully lower the tonearm on the record by setting the tonearm lift lever to the down position.
2.8. Turn up the volume of the turntable as needed.
2.9. When you are finished playing the record, raise the tonearm, return it to rest on the arm clip and press the ON/OFF switch at the back side to turn off the turntable.
2.10. The platter will stop turning if there is no sound output from the speakers in 3 minutes. Get the tonearm back to the arm rest and repeat the process 2.6 if you want to play the record again.
Bluetooth Operation
Bluetooth Receiver
- Connect the included power adapter to the turntable and power on this unit, the indicator will light in red.
- Switch the function knob to Bluetooth mode. The indicator light turns blue and flash quickly. You will hear an activation sound from the turntable.
- Turn on the Bluetooth feature of your media device and search for and select "Lenco LS-470" to pair the media device and turntable.
- Once your media device is successfully paired with the turntable, the turntable will play a short confirmation sound.
- Play and stream music from your media device to the turntable. The indicator light will become solid blue.
Note: Bluetooth version: 5.0
"This product has a Bluetooth reception function, you can not transmit any Bluetooth sound with it: this means that you can receive wirelessly a Bluetooth sound signal from an external source like a smartphone."
AUX-IN Operation
This turntable includes an auxiliary audio signal input jack for connecting external audio devices like MP3 players, CD players, and older, non-dockable iPods, so you can listen to your external source through the turntable's speakers.
- Use an audio cable (not included) with one 3.5mm stereo connection on each end of the cable.
-
Plug one end into the AUX-IN jack on the turntable and the other end to the Line Out jack of the audio device.
-
Power on the turntable and audio device. The indicator light of turntable is red.
- The volume level can be controlled through the turntable. Operate all the functions on the auxiliary device as usual.
- Please note that AUX-IN function is a first-priority function. Even if the indicator light for PHONO/BT is on, these functions won't work while the AUX-IN function is in use. Please unplug the AUX-IN cable before using the PHONO/BT functions.
NOTE:
- Make sure the tone arm is securely locked to avoid any damage.
- When you are done, don't forget to turn off the power on the turntable and your external device.
Care
Turntable Body
- When the turntable body is dirty or dusty, first disconnect the AC adapter and then wipe off the dirt and dust with a soft, dry cloth.
- Do not use benzenes, thinners, etc.
- When storing the product for a long time, disconnect the AC adapter from the outlet and wrap the product in plastic; do not allow it to become damp; the drive belt should be removed to prevent unequal stretching.
Stylus Tip
- If dirt and grime are stuck to the stylus tip, clean it with a commercially sold brush.
- We recommend using a stylus cleaner (not included) if the stylus tip is considerably dirty. Clean the stylus tip by moving the brush from the rear to the front of the stylus tip.
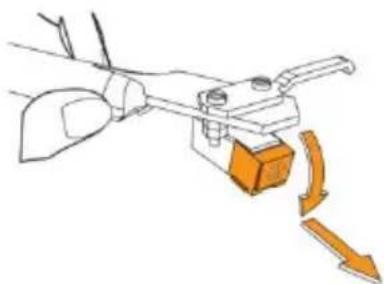
Replacing the Stylus
It's suggested to replace the stylus after 400 hours of use.
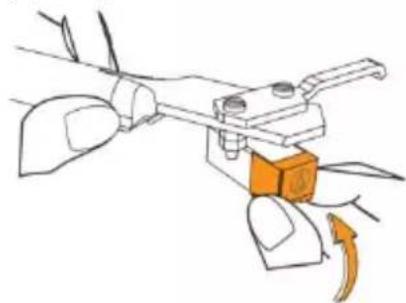
Removing the Stylus
- In addition to the deterioration of sound quality, records may also be damaged as the cartridge's stylus tip wears down.
- Be sure to disconnect the product's AC adapter from the outlet.
- When replacing the stylus, hold the headshell and the cartridge body tightly. Rotate the front of the stylus in a forward and down motion.
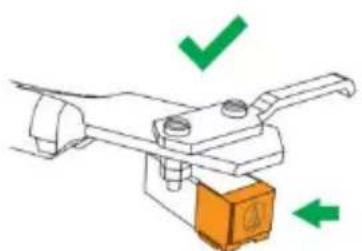
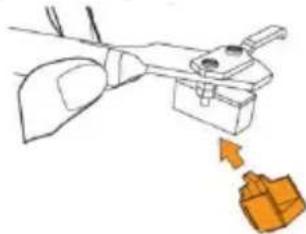
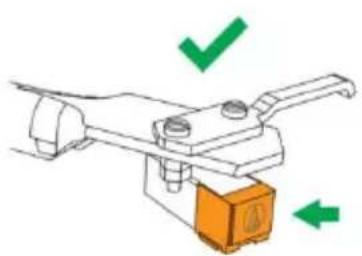
Installing a New Replacement Stylus
- Mount the new replacement stylus to the cartridge.

Engage in body first
- Lift the stylus up until you hear a click.

- Make sure there is no gap between the headshell and the cartridge.

Replacing the Belt
- The belt is a consumable part. Replace the belt if the speed of playback slows down or irregular rotation occurs. As a rule of thumb, we suggest replacing the belt once a year.
- Before replacing the belt, be sure to disconnect the product's AC adapter from the outlet.
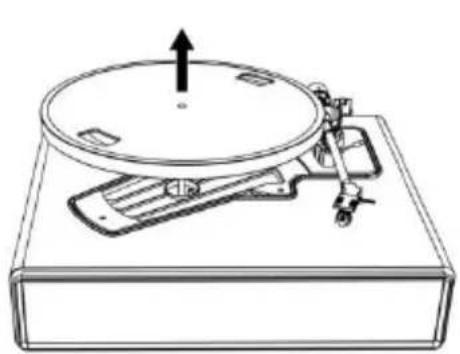
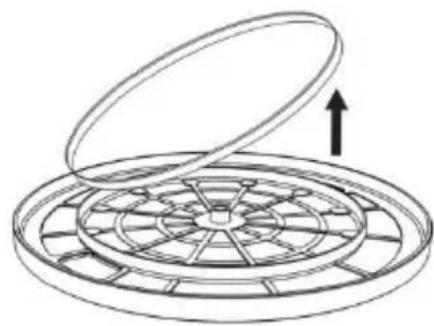
1. Remove the slip mat.
- Remove the belt from the motor pulley.
- Remove the main platter and then remove the old belt.
- Turn the platter over and you will see a raised circle. Loop the new belt along the middle circle.
5. Attach the platter.
Align one of the openings with the position of the brass-colored motor pulley.
6. Place the belt on the brass-colored motor pulley
Grasp the belt that was attached in step 4 and, while pulling it, place it on the brass motor pulley.
- Using your hands, slowly rotate the platter ten times in a clockwise direction as shown by the arrow below.
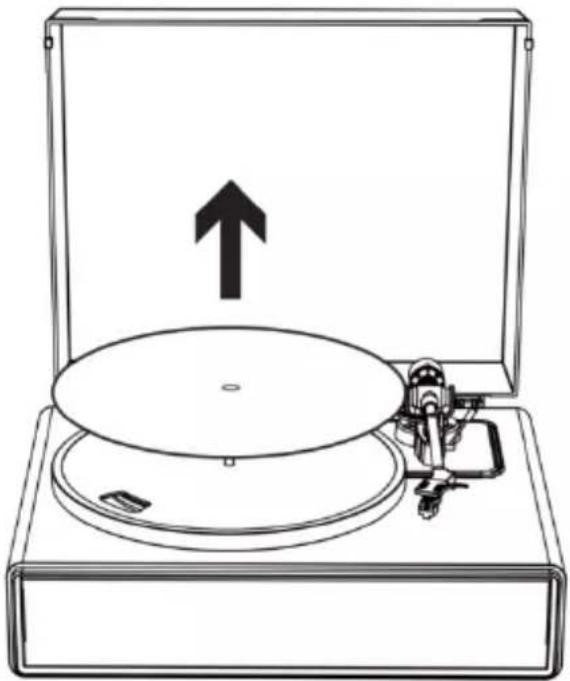
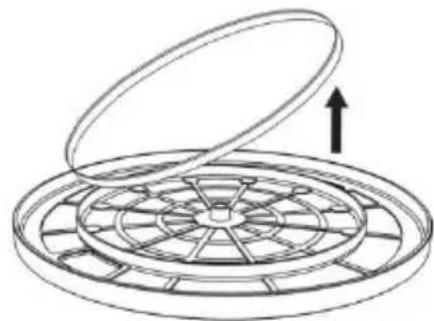
When the Turntable is Moved
Using the product's original packing materials, wrap the turntable in the reverse order from when you unwrapped it. If you do not have the packaging materials, take the following measures:
- After disconnecting the AC adapter from the outlet, remove the felt mat and platter, and then wrap them so that they do not get damaged.
- Attach the protector to the cartridge.
- Use a string or something similar to tie the tonearm to the rest so that it does not become dislodged.
- Wrap the turntable body with paper or a soft cloth so that it does not get damaged.
Audacity software overview
Audacity is free software, licensed under the GNU General Public License (GPL). More information as well as open source code can be found on the web at https://www.audacityteam.org/download/
- Please ensure you have installed the software before starting.
Setting up your PC to work with Audacity
- Connect an input source to the unit.
- Connect the USB lead to your computer.
- Install the Audacity recording software.
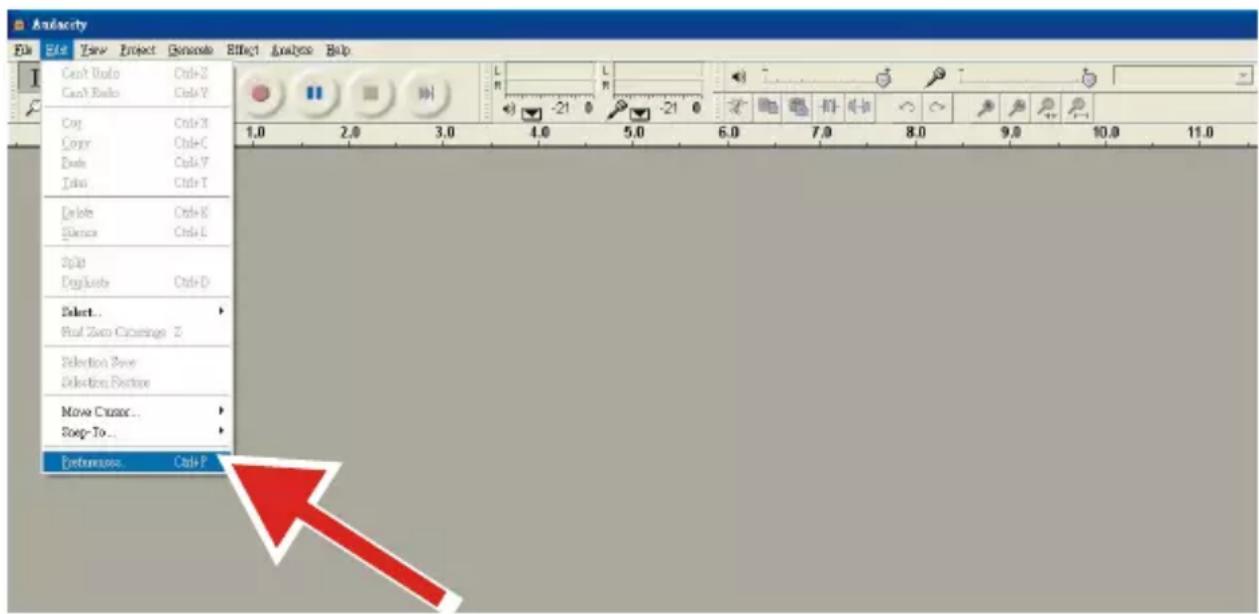
- Open the Audacity program.
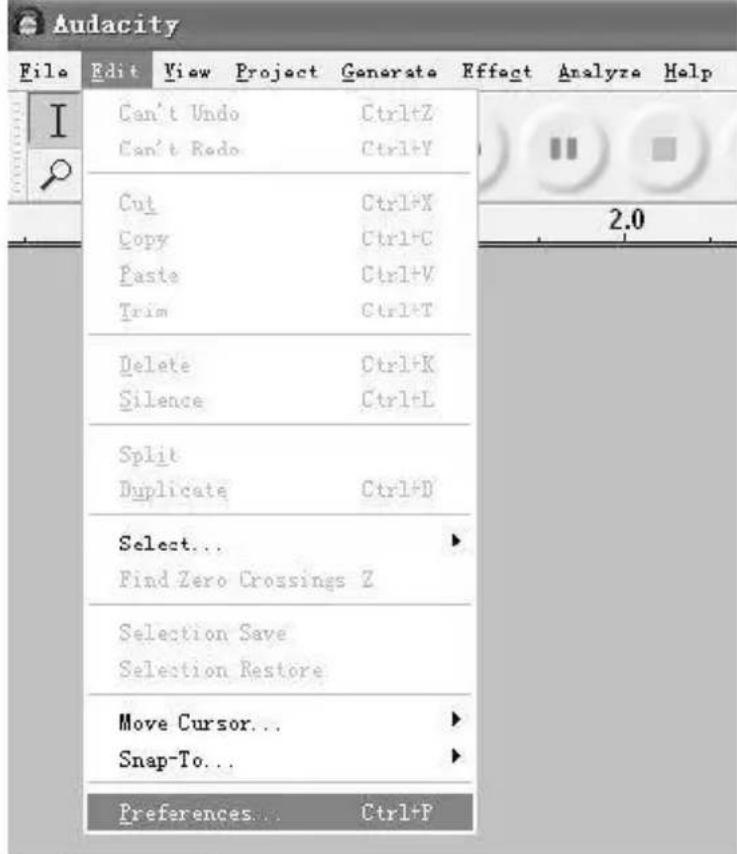
- Select Preference from the Edit tab in the Audacity Menu.
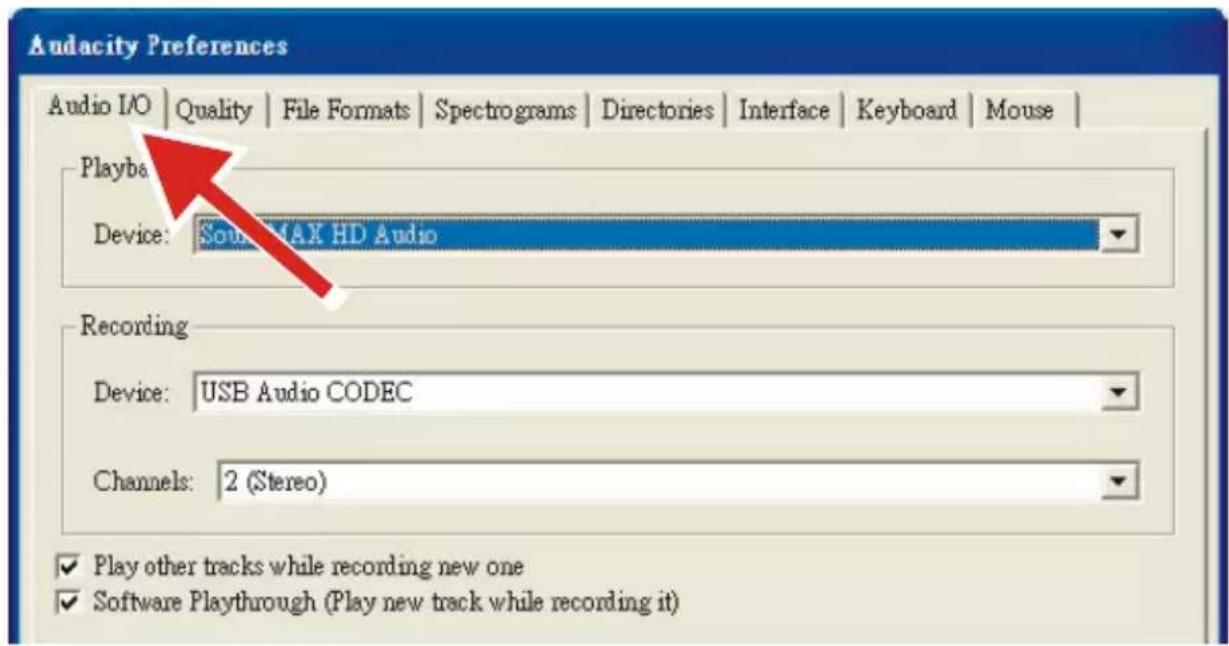
-
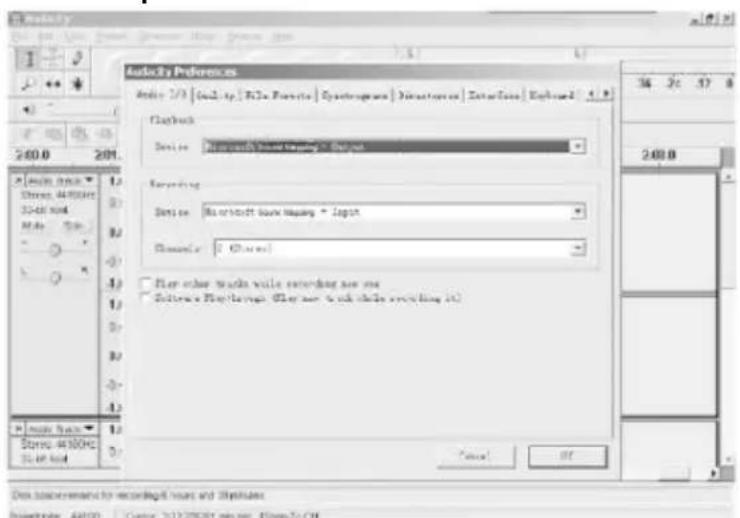
Select Audio I/O tab at the top left.
-
Under Playback, Device, select your internal sound card.
- Under Recording, Device, select USB Audio CODEC.
- Under Recording, Channels, select 2 (Stereo).
-
Check the box marked Play other tracks while recording new one.
-
Check the box marked Software Playthrough.
Recording Albums with Audacity
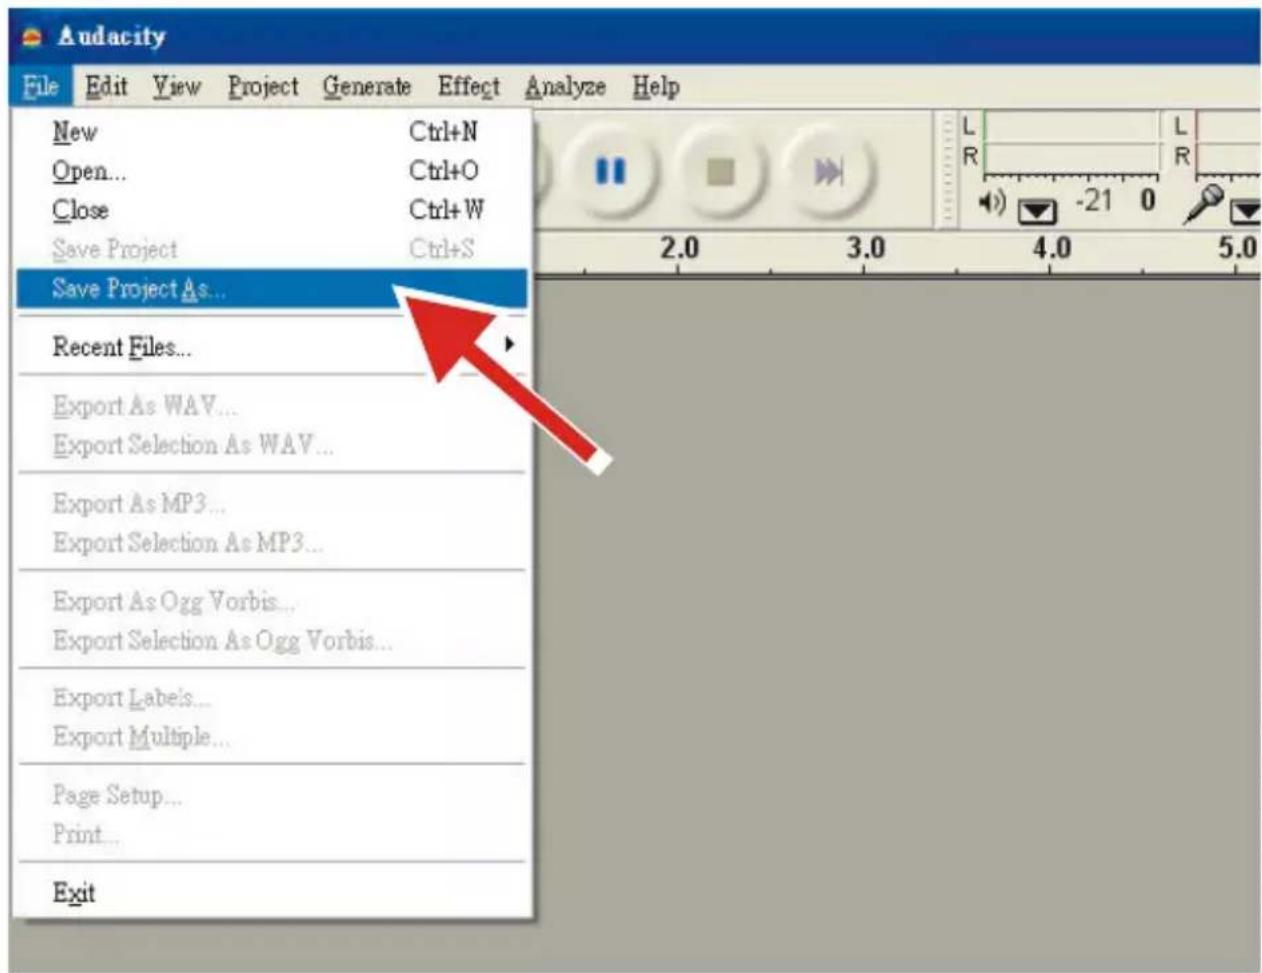
1. Saving a project
- Audacity writes all the changed and recorded audio to a directory called Projectname_data, which is located right where you saved the project file itself.
- Thus, select Save Project as from your Audacity File tab and choose a location and filename for your project.
- Please note that when you startup Audacity fresh, only the "Save As..." menu option is available.
2. How to record
- Set your USB turntable up to play the song or album you want to record.
- Click on the red Record button to begin recording.
- Lower tone arm on USB turntable onto album and track you want to record.
- Click on the blue Pause button to pause the recording. Press it again
to continue.

- Click on the yellow Stop button.

That's it. You can now play around with your recording and explore the editing capabilities of Audacity. Remember that you can use the Undo function almost without limits while the project is open.
NOTE: CD's cannot be burned directly from the Audacity application. Other CD burning applications should be used.
Troubleshooting
| Problem | Solution |
| The platter does not spin. | ·Is the AC adapter connected to the outlet? -Connect the AC adapter to the outlet. ·What's the status of the indicator light? -The indicator light is blue. That means the turntable is in Bluetooth mode. Please switch the function knob to Turntable mode. -The red indicator light will indicate Turntable mode. ·Has the belt slipped from the platter? -Correctly place the belt on the platter. ·Is the belt placed on the motor pulley? -Check that the belt is placed on the motor pulley (brass-colored) correctly. ·Has the belt been damaged? -Replace it with a new belt. ·Is the AUX-IN cable plugged in? - AUX-IN function is a first-priority function. Please unplug the AUX-IN cable before using the PHONO/BT functions. |
| The platter spins, but there is no sound from the turntable? | ·Is the stylus damaged? -Check the stylus and replace it, if necessary. It's suggested to replace the stylus after 400 hours of use. ·Is the stylus placed correctly on the body of the cartridge? -Check the cartridge and adjust it, if necessary. |
| The stylus skips. | ·Is the record warped? -Check the record. ·Is the record scratched? -Check the record. ·Is the stylus pressure correct? -Refer to "Cartridge Tracking Force Adjustment" to readjust the tracking force. |
| The turntable is making a strange 'howling' sound. | ·Is the product picking up excessive vibrations from the floor, surfaces of the walls, or nearby speakers? -Decrease the vibrations or mount the product on a surface that is not subject to the effects of vibrations. ·Is the product mounted on an unstable surface? -Check whether the surface on which the product is mounted is suitable. |
| There is noise when the record is playing. | • Is there dust on the cartridge's stylus tip? - If dust is stuck to the stylus tip, clean it with a commercially sold brush. |
| The sound when the record is playing is either too fast or too slow. | • Are the speed settings for this product correct? - Please select the correct speed for the type of record being played. |
| Playback speed slows down or there is irregular rotation. | • Is the belt stretched out? - Replace with a new belt. • Is the belt installed correct? - Refer to "Turntable Platter and Belt Setup" to setup the belt. |
Specifications
Turntable
| Power Supply | AC100-240V, DC output 15V 2400mA |
| Power Consumption | 36W |
| Turntable Speed | 33 1/3, 45 RPM |
| Speakers output | 2 x 30W + 2 x 10W |
| Dimensions (LxWxH) | 435 x 355 x 250 mm |
| Weight | 8,00 kg |
Stylus
| Model | Audio-Technica AT3600 |
| Frequency Response | 20Hz-20kHz |
| Channel Balance | <2.5dB |
| Channel Separation | >18dB |
| Output Voltage | 2.5mV |
| Recommended Load Resistance | 47kΩ |
| Amplifier Connection | MM (Moving Magnet) - input |
| Recommended Tracking Force | 3.5±0.5g |
| Weight | 0.18oz (5.1 g) |
Note: Design and specifications are subject to change without notice.
Power supply adaptor:
Manufacturer: Brightpower Optoelectronic Technonlgy Co., Ltd.
Model Number: SW1502400-IM/S036A1502400M
Use only the power supply listed in the user instructions
| Information | Value and and precision |
| Manufacturers name or trade mark, commercial registration and address | BRIGHTPOWER OPTOELECTRONIC TECHNOLOGY CO., LTD |
| Model Identifier | SW1502400-IM/S036A1502400M |
| Input voltage | 100-240V |
| Input AC frequency | 50-60Hz |
| Output voltage | DC 15V |
| Output current | 2400mA |
| Output Power | 36W |
| Average active efficiency | 87.58% |
| Efficiency at low load (10%) | 84% |
| No load Power consumption | 0.080W |
1. Guarantee
Lenco offers service and warranty in accordance to European law, which means that in case of repairs (both during and after the warranty period) you should contact your local dealer.
Important note: It is not possible to send products that need repairs to Lenco directly.
Important note: If this unit is opened or accessed by a non-official service center in any way, the warranty expires.
This device is not suitable for professional use. In case of professional use, all warranty obligations of the manufacturer will be voided.
2. Disclaimer
Updates to Firmware and/or hardware components are made regularly. Therefore some of the instruction, specifications and pictures in this documentation may differ slightly from your particular situation. All items described in this guide for illustration purposes only and may not apply to particular situation. No legal right or entitlements may be obtained from the description made in this manual.
3. Disposal of the Old Device

This symbol indicates that the relevant electrical product or battery should not be disposed of as general household waste in Europe. To ensure the correct waste treatment of the product and battery, please dispose them in accordance to any applicable local laws of requirement for disposal of electrical equipment or batteries. In so doing, you will help to conserve natural resources and improve standards of environmental protection in treatment and disposal of electrical waste (Waste Electrical and Electronic Equipment Directive).
4. DECLARATION OF CONFORMITY
Hereby, Commaxx declares that the radio equipment type [Lenco LS-470] is in compliance with directive 2014/53/EU. The full text of the EU declaration of conformity is available at the following internet address: https://commaxx-certificates.com/doc/ls-470_doc.pdf
| Type RF | Frequency range (MHz) | Power (dBm) |
| Bluetooth | 2402-2480 | <6 |
5. Service
For more information and helpdesk support, please visit
www.lenco.com
Commaxx B.V. Wiebachstraat 37, 6466 NG Kerkrade, The Netherlands.
Nederlands
VOORZICHTIG:
Udpak alle dele, og fjern beskyttelsematerialerne.
- Slut/DD is a good idea to use the following two methods:
- Slut/DD is a good idea to use the following two methods:
- Slut/DD is a good idea to use the following two methods:
- Slut/DD is a good idea to use the following two methods:
- Slut/DD is a good idea to use the following two methods:
Installation of plodespiller
Obs! Bluetooth version: 5.0
MEPbI PPEIOCTOPOXHOCTN IPEED NcNoJb3OBAHNEM
HEO6XODIMO COBLODAb CLEyIOUne IHCTPYKUN:
- He 3aKpbIbaiTe n He 3aRopaxnBaIte BeHTnlaOnHbIe OTBepCTnI. Ppi pa3MeueHnn yctpoiCTBa Ha noJIke Tpe6yeTc8 5 cm (2 dIOma) CBO6oJHO rnooctpaHCTBa BOKpyr yctpoiCTBa co BCex CTOpOH.
- YcTaHOBnTe B COOTBeTCTBnC npIlaRaembIM pyKOBOdCTBOM NO 3KcPnyaTaun.
- Держinte устюсто Вдали OT Истонков Teпla, Таши Ка Кадиаторы OTОплени, обогравaten, Neу, С党支部а DTугпесуства, Вдделяшке ТЕПLO, Или Истонник OTКрьTORO ORHЯ. Yстюсто можно Истользоваты ТOLTКВУСLOВИХ УмepeHHORO KIMMaTа. Следует ИЗбегаты сизkom Иизkom сизkom BBICOKnx Temnéратур. Paбочая Temnéратур: ot 0°do 35°C.
- Избегаite Исторовая усторическая веди Спьньх Магинтны полей.
- Θlektropoctatauueckn pa3pnd mojket co3daTb nomexn B pa6oTe daHHoro yctpoiCTBa. B taKOM clyuae Heo6xOdmo BblIOJHnTb c6poc daHHbIX n pepe3aIpy3ky yctpoiCTBa, cIeDy INHcTpYkCnM B pyKOBoDCTBe NO 3KcPlyatau. Ppr nepeDaue daHHbIX Tpe6yeTc8 OCTOpOJXHOCTb N o6ecneueHne pa60tby yctpoiCTBa B cpeDe, CBO6oJHO8 OT nomex.
- BhIMaHHe! HnKoIda He BCTabIaTe NoCTOpOHHe IpeDMtbl BVcTPOcTBO Uepe3 BeHTnlaZIOHHbIe N dpyrHe OTBepCTnJype3 YcTPOcTBO IpoxoDIT BbICOKoe HaPjaKeHne, N BCTaBkaNoCTOpOHHeTo IpeDMeta MoXeT npVBecTN K nopaxKeHIO 3JIeKTpUueCKM TOKOM n/INI KOPOTKOMy 3aMbIKaHIO HaBVHTpeHHx 3JIeMeHTax UcTPOcTBa. Po ToJ Jke npuHHe HeJIb3a
YCTaHOBka HOBOI nIblbI
- YcTaHOBInTe HOByIO INrIy B rOJOBky.
Chaujia yctaHOBHTb Ha KOpIyC
2.Двигаite ngly BBepxdo ueuka.
- y6eIntecb B OTCyTCTBn 3a3opa Mejdy roJIOBkoN KOpnycom.
3ameha pemhry
-
PemeNb - 3TO paCXoHbI MaTePnaI. OH noJleKHT 3aMeHe npi 3aMeJLeHn CKOpocTn BocIpOn3BeDeHn IIn HepaBHOmePHOM BpaSeHn. KaN npaBnlo, peKOMeHdyetc eXeRODHa 3aMeHa peMnI.
-
Перацл заменш ремня обязатьно отcoeindHTe aanTepперemeHHoro TOKa yctpoiCTBa OT po3etkn.
-
CHMNTe cPNTMaT.
- Chmnte peMeHb co uKnBa dBnrateJ.
- Chnmtte ochobho nck, a 3aTe m chmnte peMeHb,
PonLexkaun 3ameHe.
Instruction for PC Encoding
-
Software instruction
1.1 Поdkлючnte USB kaбель к прогрьВаTeи И KOMnbIoTepy. YctaHOBka dpaaiBepOB He Tpe6yeTcra.
1.2СачайтepnpогамmyAudacityccaiTa http://audacity.sourceforge.net/ CneунTe nHCTpyKuIN NO yCTaHOBKe. -
3a\Pncn
2.1 OtkpoiTe nporpaMMy
2.2 Bыберптункт "Edit", за tem "Preferences";
3 HacrtpoKn
EcnBbI He BnDInTe 3ByKOBOI NOTOK B INHTeppeIce npoRpaMMbl, CJeNyIte CJeDyUOuIM WaRam:
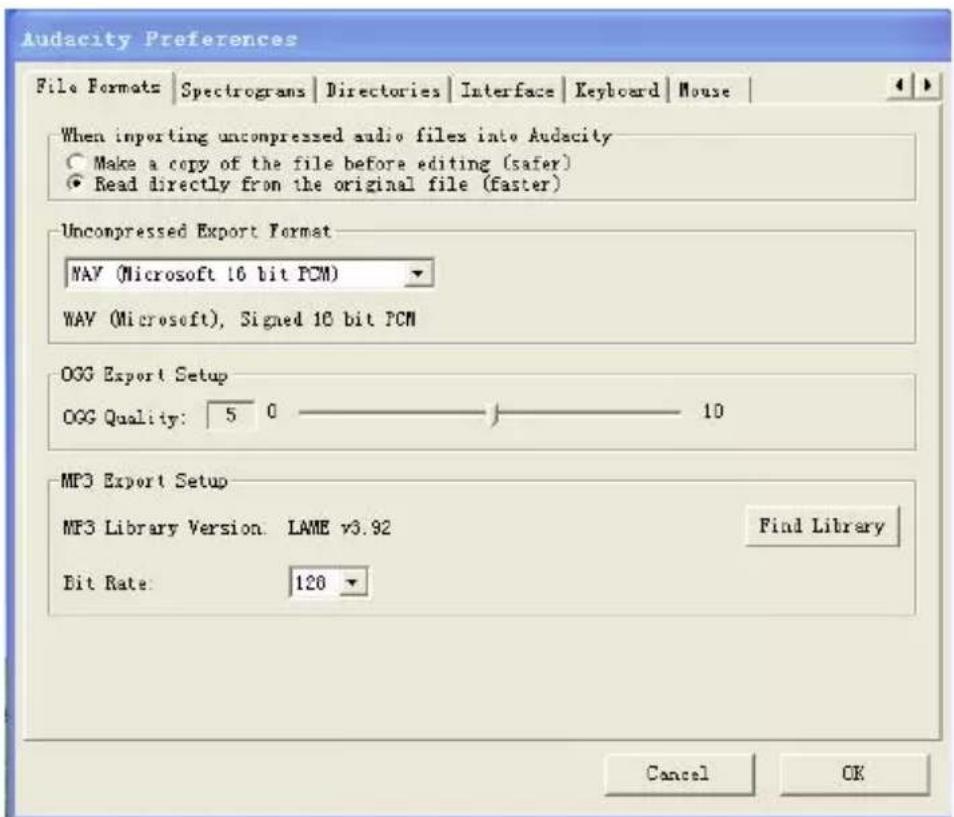
1)Сачайт e "lame enc.dll"и установпг На сбов ПК.
2) OtkpoiTe "Audacity", КликнITE на Главhoe MeHIO, ВьберпTe "edit", "Parameter", "File Formats", и заlem "Searcher".
Iata n3roTOBLeHn npOdyKcnn
Iod n Mecau n3roTOBLeHn npOdyKcHn yKa3aHbI B Homepe napTnN I cepHOM Homepe npOdykTa. Hxke OncCaHbI cNoCo6bl yToUHeHn 3Toi daTbI.
- По homepy naptni (Homep naptni yka3aH ly6o Ha ynaKOBKe yctpoiCTBa, ly6o Ha TpaHcnpTnpOBOuHOy ynaKOBKe).
ΦopmatHomepa naptnn:AAAABDDMY - По сершиму Homepy подукta (сершиму Homep уka3aH ha yстpoистve).
ΦopMaT cepnHoro Homepa: AAAABDDMYSSSSS
Гдe M (вocьмои симьол слева) paBeH Mecaу npOn3BOdCTBa, a Y (ДeВЯтbiN cIMBOL cIeBa) paBeH roDy npOn3BOdCTBa. Mecau npOn3BOdCTBa yKa3bIBaetcra OndHoi n3 6ykb LaTInHcKOrO aIΦaBnTa.
CoOTBcTbIe 6yKBeHHbIX 06o3HaueHn MeCra npOn3BOdCTBa: