04313 - Lawn mower Maxxmee - Free user manual and instructions
Find the device manual for free 04313 Maxxmee in PDF.

| Product type | Cordless lawn mower |
| Brand | Maxxmee |
| Model | 04313 |
| Cutting diameter | 20 cm |
| Weight | 1,2 kg |
| Rated voltage | 12 V DC |
| Battery type | Integrated Li-Ion |
| Battery capacity | 1200 mAh |
| Power | 28 W |
| Rated speed | 8000 rpm |
| Charger | Input 100-240 V ~ 50-60 Hz, output 12.6 V / 500 mA |
| Sound power level | 80 dB(A) |
| Vibrations (handle) | 1.475 m/s² |
| Cutting elements | Cable ties (up to 8 mm) or cutting line |
| Telescopic handle | Adjustable in length |
| Edge guide | Included for edge cutting |
| Flower guard loop | Foldable |
| Maintenance | Clean with dry or damp cloth; no lubrication required |
| Spare parts | Cable ties ref. 44313180100, cutting line ref. 44313180200 |
| Use | Domestic, for small grass areas and borders |
| Warranty | Excludes normal wear and improper use |
Frequently Asked Questions - 04313 Maxxmee
User questions about 04313 Maxxmee
0 question about this device. Answer the ones you know or ask your own.
Ask a new question about this device
Download the instructions for your Lawn mower in PDF format for free! Find your manual 04313 - Maxxmee and take your electronic device back in hand. On this page are published all the documents necessary for the use of your device. 04313 by Maxxmee.
USER MANUAL 04313 Maxxmee
Vibration Handgriff: 1,475 m/s²
Translation of the Original Operating Instructions
LIST OF CONTENTS
Items Supplied 14
At A Glance 14
Symbols 15
Signal Words 15
Intended Use 16
General Safety Notices
for Power Tools 16
Before Initial Use 20
Mounting and Settings
of the Device 20
Charging Up the Battery 21
Use 21
Maintenance and Storage 22
Troubleshooting 23
Disposal 23
Technical Data 24
ITEMS SUPPLIED
- Trimmer unit 1 ×
- Telescopic rod with handle 1 ×
- Protective cover 1 x
- Edge guide 1 x
- Screw 2 x
- Tool 1 x
- Cable tie 24 x
- Trimmer thread 20x
- Battery charger 1 x
- Operating instructions 1 x
Check the items supplied for completeness and the components for transport damage. If you find any damage, do not use the device but contact our customer service department.
Remove any possible fi Ims, stickers or transport protection from the device.
Never remove the rating plate and possible warnings!
AT A GLANCE
(Picture A)
1 Safety switch
2 On switch
3 Gripping surface
4 Fixing
5 Telescopic rod
6 Release button
7 Edge guide
8 Protective cover
9 Cable tie
10 Flower protection bar
11 Trimmer unit with built-in battery
12 Ventilation slots
13 Charging socket with silicone cover
Dear Customer,
We are delighted that you have chosen the MAXXMEE cordless lawn trimmer. The device works both with conventional cable ties and with trimmer threads and no cumbersome tool is required to replace them. Thanks to the adjustable telescopic handle, the device can be adjusted to the individual size and the built-in battery means you can work without any disruptive cable.
If you have any questions about the device and about spare parts / accessories, contact the customer service department via our website: www.dspro.de/kundenservice
We hope you have a lot of fun with your MAXXMEE cordless lawn trimmer.
Information About the Operating Instructions
Before using the device for the first time, please read through these operating instructions carefully and keep them for future reference and other users. They form an integral part of the device. The manufacturer and importer do not accept any liability if the information in these operating instructions is not complied with.
SYMBOLS
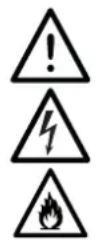
Danger symbols: These symbols indicate dangers of injury. Read through the associated safety notices carefully and follow them.

Wear safety goggles and hearing protection!
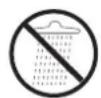
Do not expose the device to any rain or a wet or very damp environment.

Caution: Danger of injury from flying dirt particles!

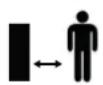
Keep people who are not involved away from the working area. Maintain a safe distance from people standing nearby.

Polarity of the barrel connector (battery charger)

Noise Level Rating L_WA in dB

Do not grab hold of rotating cutting element. Wait until they have come to a complete standstill.
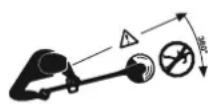
Ensure that uninvolved persons are not hit and injured by thrown away particles.

Only use indoors!

Protection class II

Supplementary information

Read operating instructions before use!

Symbol for direct current
SIGNAL WORDS
DANGER warns of serious injuries and danger to life
WARNING warns of possible serious injuries and danger to life
CAUTION warns of slight to moderate injuries
NOTICE warns of material damage
INTENDED USE
The device is intended to be used exclusively for trimming small dry areas of lawn and lawn edges. The device is not suitable for trimming bushes, hedges or similar shrubs.
The device is for personal use only and is not intended for commercial applications.
The device should only be used as described in the operating instructions. Any other use is deemed to be improper.
The warranty does not cover faults caused by incorrect handling, damage or attempted repairs. The same applies to normal wear and tear.
GENERAL SAFETYNOTICES FOR POWERTOOLS

This chapter reproduces the general safety notices which are preformulated in the standard DIN EN 62841-1 for electric motor-operated hand-held tools. The safety notices for avoiding an electric shock which are specified under "2) Electrical safety notices" are not applicable to battery-operated garden tools.

Warning: Note all safety notices, instructions, illustrations and technical data provided with this power tool. Failure to follow the instructions below may result in electric shock, fire and/or serious injuries.
Keep all safety notices and instructions for the future.
The term "power tool" used in the safety notices refers to mains-operated (corded) power tools and to battery-operated (cordless) power tools.
1) Workplace Safety
- Keep the working area clean and well lit. Cluttered or dark areas invite accidents.
- Do not operate the power tool in potentially explosive atmospheres containing flammable liquids, gases, or dusts. Power tools create sparks which may ignite the dust or fumes.
- Keep children and bystanders away while operating the power tool. If you are distracted, you may lose control of the power tool.
2) Electrical Safety
The power tool mains plug must fit in the plug socket. The plug may not be modified in any way. Do not use any adapter plugs with earthed (grounded) power tools. Unmodified mains plugs and matching sockets will reduce the risk of electric shock.
- Avoid body contact with earthed or grounded surfaces such as pipes, radiators, ranges and refrigerators. There is an increased risk of electric shock if the body is earthed or grounded.
- Keep power tools away from rain or moisture. Water entering a power tool will increase the risk of electric shock.
- Do not misuse the mains cable for carrying, suspending or unplugging the power tool. Keep the mains cable away from heat, oil, sharp edges or moving parts. Damaged or entangled mains cables increase the risk of electric shock.
- When operating a power tool outdoors, only use extension cables that are also suitable for outdoor use. Use of an extension cable that is suitable for outdoor use reduces the risk of electric shock.
If operating the power tool in a damp location is unavoidable, use a residual current device (RCD) protected supply. Use of an RCD reduces the risk of electric shock.
3) Personal Safety
- Remain alert, pay attention to what you are doing, and use common sense when operating a power tool. Do not use a power tool while you are tired or under the influence of drugs, alcohol or medication. A moment of inattention while operating power tools may result in serious personal injury.
Wear personal protective equipment and always wear safety goggles. Wearing personal protective equipment such as a dust mask, non-skid safety shoes, a hard hat, or hearing protection, depending on how and where the power tool is used, will reduce the risk of personal injury. - Avoid accidental start-up. Ensure that the power tool is switched off before connecting it to the power supply and / or battery, picking up or carrying the power tool. Carrying power tools with your finger on the switch or energising power tools that have the switch on invites accidents.
- Remove any adjusting tools or wrenches before the power tool is switched on. A tool or wrench left attached to a rotating part of the power tool may result in injuries.
- Avoid adopting an abnormal posture. Maintain a secure footing, especially on slopes, and balance at all times. Walk, do not run. This enables better
control of the power tool in unexpected situations.
Wear suitable clothing. Do not wear loose clothing or jewellery. Keep hair and clothing away from moving parts. Loose clothing, jewellery or long hair may become entangled in moving parts.
If dust extraction and collection equipment can be mounted, it should be connected and used properly. Use of dust extraction can reduce dust-related hazards.
- Do not have a false sense of security and do not ignore the safety rules for power tools even if you are familiar with the power tool after using it many times. Careless actions can result in serious injuries in fractions of a second.
4) Power Tool Use and Care
- Do not overload the power tool. Only ever use the designated power tool for the activity that is to be performed. With the appropriate power tool, you will work better and more safely in the specified power range.
-
Do not use a power tool whose switch is defective. Any power tool that cannot be controlled with the switch is dangerous and must be repaired.
Pull the mains plug out of the plug socket and / or remove a detachable battery before any device settings are made, tool bits are changed or the power tool is put to one side. This preventive measure reduces the risk of starting the power tool accidentally.
Store idle power tools out of the reach of children. Do not allow people who are unfamiliar with the power tool or have not read these instructions to operate the power tool. Power tools are dangerous in the hands of inexperienced people. -
Handle power tools and tool bits with care. Check whether moving parts function perfectly and do not jam and check whether parts are broken or damaged in such a way that the function of the power tool is impaired. Have damaged parts repaired before using the power tool. Many accidents are caused by poorly maintained power tools.
- Keep cutting tools sharp and clean. Properly maintained cutting tools with sharp cutting edges are less likely to bind and are easier to control.
Use the power tool, tool bits etc. in accordance with these instructions. Take account of the working conditions and the work to be performed. Use of power tools for operations different from those intended could result in a hazardous situation.
5) Service
Have the power tool repaired only by a qualifi ed expert using only genuine replacement parts. This will ensure that the safety of the power tool is maintained.
6) Device-Specific Safety Notices


Always wear safety goggles and hearing protection when working with the device!
Keep people who are not involved away. The machine must never be operated if there are people, in particular children, or pets nearby.
Objects which are propelled may present an accident risk around the working area, so make sure that a sufficient distance is maintained from people, animals and objects (vehicles, window panes etc.).
Always wear sturdy footwear and long trousers when working with the device. We also recommend using robust work gloves and wearing a fine dust mask if necessary.
Only ever operate the device with replacement cutting elements from the manufacturer. Never use metal cutting elements!
- Do not reach into the rotating cutting elements. Always wait until the cutting elements have come to a complete standstill. Only remove blockages or foreign bodies when the device is switched off.
Danger from loud noises! Personal hearing protection, e. g. ear defenders or other hearing protection, is recommended when working with and in the vicinity of the switched-on device. Limit the length of exposure where possible. If in spite of hearing protection any kind of discomfort arises, stop work immediately and check the hearing protection to establish whether it fits and works properly. Make sure that it provides an appropriate level of protection for the noise level which is produced by the device which is used.
Only ever transport the device with the cutting blades at a standstill.
Danger from vibrations!
- When the device is used, the user is exposed to vibrations which may lead to loss of the sense of touch, numbness, a tingling sensation and a reduction in the gripping strength of the hand. Long-term exposure may result in chronic complaints. If possible, limit the level of exposure to vibrations and wear vibration-reducing gloves.
The vibration strengths which are quoted in the "Technical Data" restrict the period of use. Adapt the period of time for which you use the device and the frequency and length of the breaks you take to your individual physical condition in order to keep vibration shocks as low as possible.
Pleases NOTE: The actual vibration strength may differ from the fi gures which are quoted in these operating instructions when using the device. This may have the following causes:
non-designated use,
incorrect operation,
insuffi cients maintenance.
To reduce the risks posed by vibrations, comply with the following instructions:
If possible, do not operate the device in cold ambient temperatures.
- Keep your body and in particular your hands warm in cold ambient temperatures.
Take sufficient breaks and during the breaks move or loosen your hands and fingers to get the blood flowing through them.
If you experience an unpleasant sensation or the colour of the skin on your hands changes while you are using the device, stop performing the work with the device immediately!
7) General Safety Notices
- Keep children and animals away from the packaging material. There is a danger of suffocation.
This device is not intended to be used by people (including children) with reduced sensory or mental abilities or a lack of experience and / or knowledge.
Follow country-specific or regional and local regulations which may include age specific cations for devices of this type.
Children must be supervised to ensure that they do not play with the device.
The device should only be used if it has been correctly assembled! Check before each use whether the cutting elements have been attached to the trimmer unit correctly and securely!
- Do not insert anything into the ventilation slots of the device and make sure that they do not become clogged.
The device must be switched off in the following cases:
when the device is left unattended;
before removing any blockages, foreign bodies or similar objects;
before checking the integrity of the device and before doing any cleaning or maintenance;
before attaching or detaching any accessories;
if there are any faults or the device comes into contact with foreign bodies and then has to be inspected;
if the device experiences excessive vibrations.
- Protect the device from heat sources, naked fl ames, sub-zero temperatures, persistent moisture, wet conditions and impacts.
In the interest of your own safety, inspect the device for damage each time before you use it. Do not use the device if the device or the accessories are damaged.
The device is only guaranteed to work perfectly if the manufacturer's original accessories are used.
BEFORE INITIAL USE
- Assemble the device (see the "Mounting and Settings of the Device" chapter - "Assembly").
- Attach cutting elements (see the "Mounting and Settings of the Device" chapter - "Attaching / Detaching Cutting Elements").
- Charge up the battery (see the "Charging Up the Battery" chapter).
MOUNTING AND SETTINGS OF THE DEVICE
Assembly
- Place the edge guide (7) with the inwardly curved side at the bottom on the trimmer unit (11) and press it on. When you do this, make sure that the castor of the edge guide is pointing to the front left.
- Place the protective cover (8) with the outwardly curved side at the bottom on the edge guide and press it on. When you do this, make sure that the protective cover is oriented backwards.
- Use the two screws and the tool which is supplied to screw the protective cover and the edge guide on the trimmer unit.
- Insert the telescopic rod (5) into the corresponding mount on the trimmer unit. You must hear and feel it engage.
Proceed in the reverse order to take it apart. Please Note: To detach the telescopic rod, press the release button (6) and pull the telescopic rod out of the trimmer unit at the same time.
Attaching / Detaching Cutting Elements
The device can be used both with cable ties and with a trimmer thread as the cutting element. These are attached as follows:
- Lay down the trimmer unit (11) so that the bottom is facing upwards.
- Hold the rotatable end piece of the trimmer unit securely with one hand and at the same time undo the locking screw anticlockwise and remove it.
3a. Introduce two cable ties into the recess of the thread (A) and fix them with the locking screw (B) (Picture B1 + B2) OR
3b. Introduce one trimmer thread into the recess of the thread (A) and fix it with the locking screw (B) (Picture C1 + C2). When you do this, make sure that the marking on the trimmer thread is positioned in the thread.
Proceed in the reverse order to remove.
Adjusting the Telescopic Rod (Picture D + E)
The length of the telescopic rod (5) can be varied, which means it can be individually adjusted to suit your body size.
- Undo the fixing (4) by turning it clockwise (towards the 6 symbol).
- Extend the telescopic rod to the length you want.
- Twist the fixing anticlockwise to secure it (towards the symbol).
CHARGING UP THE BATTERY
Please Note!
- Only connect the battery charger to a plug socket that is properly installed and matches its technical data. The plug socket must be readily accessible after connection so that the connection to the mains can quickly be isolated.
Only use suitable extension cables whose technical data is the same as that of the battery charger.
Pull the battery charger out of the plug socket if an error occurs during charging or before a thunderstorm.
Only ever charge up the battery using the battery charger that is supplied (WJG-Y091260500WZ). Do not use the battery charger that is supplied to charge up any other devices.
It is essential that you charge up the battery fully before you first use the device in order to achieve the maximum charging capacity.

If the battery is fully discharged during use, it must be fully charged up again before it is next used.
We recommend detaching the telescopic rod (5) from the trimmer unit (11) prior to charging to prevent the device from accidentally being switched on.
- Pull the silicone cover off the charging socket (13).
- First plug the barrel connector of the battery charger into the connecting socket and then plug the battery charger into a plug socket. The control lamp on the battery charger lights up red during the charging process.
When the control lamp lights up green, the battery is fully charged.
- First disconnect the battery charger from the mains power and then disconnect the barrel connector from the trimmer unit (11).
USE
Please Note!
Always remain alert while using the device. Only work with good visibility and light conditions.
- Do not use the device in poor weather conditions, in particular not if there is an imminent risk of lightning.
Always inspect the area you are working in - clear any coarse dirt and objects lying around which may be spread around by the device or become caught in the device.
After the device is switched off, the cutting elements continue to rotate for a few more seconds. Wait until they have come to a complete standstill.
Only place down the device once the cutting elements have come to a complete standstill.
Always switch off the device before leaving the area you are working in, e.g. when crossing paths or similar terrain.
- Never use the device without or with a damaged protective cover.
Always guide the device using two hands. Always keep the handle and the gripping surface dry, clean and free of grease to ensure that the device can be held securely and firmly during use.
If there is an imminent danger or in an emergency, switch the device off immediately and detach the trimmer unit from the telescopic rod.
Comply with any country-specific or municipal regulations governing lawn trimming.
EN
- Familiarise yourself with all the features and functions of the device.
- Put on suitable clothing and protective equipment and make sure that the area you are working in is clear of any objects that may get in the way.
- Adjust the device to your individual needs and the task to be performed (see the "Mounting and Settings of the Device" chapter).
- Assume a stable position and hold the device so that the opening of the protective cover (8) is always facing away from your body.
- Switch on the device by pushing the safety switch (1) forwards and pressing and holding down the On switch (2) at the same time. The cutting elements start to rotate. The safety switch can now be let go of.
- Guide the trimmer unit (11) at an even speed over the lawn using the appropriate technique (see the following sections). When you do this, make sure that the cutting elements do not get too close to stones or similar obstacles.
- As soon as the On switch is released again, the device switches off and the safety switch reverts back to the starting position.
Technique - Trimming the Lawn
- Align the trimmer unit (11) parallel with the ground. The angle of the trimmer unit to the ground should not exceed 20^ (Picture F).
- Guide the device in an arc at the height you want over the lawn from one side to the other. With tall grass, trim it gradually to the length you want (Picture G).
- Move one step further and then repeat the process.
If necessary, fold out the flower protection bar (10) (Picture H).
Technique - Trimming Along A Kerbstone
- Align the trimmer unit (11) parallel with the ground. The angle of the trimmer unit to the ground should not exceed 20^ (Picture F).
- Hold the edge guide (7) against the kerbstone, wall or similar structure.
- Slide the device forwards along the kerbstone or similar structure (Picture I).
MAINTENANCE AND STORAGE
Please Note!
All moving parts are maintenance-free.
Do not use any degreasing agents.
- Do not use any caustic or abrasive cleaning agents! These may damage the surface.
General Inspection
- Regularly inspect all screws to make sure they fit securely as over time they can become loose due to vibrations.
- Check the device and all accessories for damage on a regular basis. Do not use them if they are damaged.
- Regularly check the condition and the secure fit of the cutting elements.
Cleaning
Keep the device clean at all times. Dust and dirt will cause the parts to wear more quickly and the lifespan of the device may be reduced.
- Clean the device with a soft brush or a damp cloth.
- Clean the ventilation slots with a brush, a vacuum cleaner or clean, dry compressed air – if available.
Lubrication
It is not necessary to lubricate any moving parts of the device.
Maintenance
- Damaged or worn cutting elements must be replaced. Spare cable ties or trimmer threads are available from www.dspro.de/kundenservice (spare part number for cable ties 44313180100 and trimmer threads 44313180200).
Storage
Store the device and the accessories in a dry, clean place which is protected from the effects of weather and temperature and is out of the reach of children and animals.
TROUBLESHOOTING
Users of this device may only carry out maintenance and care tasks which are described in these operating instructions. More advanced repairs may only be carried out by authorised distributors.
The battery is not charging.
The battery charger is not inserted in the plug socket correctly or the barrel connector is not inserted in the connecting socket (13) correctly.
Check the fit of the parts and correct it if necessary.
The plug socket is defective.
Try another plug socket.
There is no mains voltage.
Check the electrical distributor (fuse box).
The fuse in the fuse box is triggered.
Too many devices connected to the same circuit.
Reduce the number of devices in the circuit.
The device does not start up when it is switched on.
The battery is too weak.
Charge up the battery.
The grass is not cleanly trimmed.
The cutting elements are worn.
Replace the cable tie or trimmer thread.
DISPOSAL

Dispose of the packaging material in an environmentally friendly manner so that it can be recycled.

This device is governed by the European Directive 2012/19/EU on waste electrical and electronic equipment (WEEE). Do not dispose of this device with a built-in battery as normal domestic waste, but rather in an environmentally friendly manner via an offi cially approved waste disposal company.
TECHNICAL DATA
Article number: 04313
ID of operating instructions: Z 04313 M DS V1 0620 dk
Device
Model number: GT100
Rated speed: 8000 rpm
Rated voltage: 12 V DC (Li-ion battery; 1200 mAh)
Power: 28 W
Cutting diameter: approx. 20cm
Weight: approx. 1.2kg
Cable tie width: up to 8 mm
Battery charger
Type of protection: IP20
efficiency in operation: 80.75%
Efficiency on low load (10%): 68.1%
Power consumption on no-load: 0.0616 W

Sound and vibration values
Sound pressure level L_PA 60 dB(A)
Sound power level L_WA : 80 dB(A)
Uncertainty factor K: 2.63 dB(A)
Vibration of handle: 1.475 m/s²
Uncertainty factor K: K = 1.5m / s^2
* Please Note:
- The specified values are emission values and they do not therefore also represent safe workplace values. Although there is a correlation between emission and immission levels, it cannot reliably be inferred from this whether additional precautionary measures are necessary or not. Factors which influence the current immission level existing at a workplace include the nature of the workspace, other
noise sources, e.g. the number of machines and other working processes taking place nearby. The permitted workplace values can also vary from country to country. However, this information should help you to be able to make a better assessment of hazard and risk.
- The specified total vibration value and the specified noise emission values have been measured using a standardised testing method and can be used to compare one power tool with another one. The emission values can also be used to make a preliminary assessment of the level of pollution.
- The vibration and noise emissions may vary from the specified values when the power tool is actually used, depending on the way in which the power tool is used, in particular what kind of workpiece is being machined. Please Note: The information about noise and vibrations specified in the Technical Data is determined in accordance with EN 60745 / DIN EN 62841-1 or comparable international standards. The values specified relate to normal use of the tool under normal working conditions. Poorly maintained, incorrectly fitted and inappropriately used tools may display higher sound levels and vibration values. You can find more information about the EU Vibration Directive and about levels of exposure to noise and vibrations, which may also be relevant to DIY enthusiasts, on the website of the European Agency for Safety and Health at Work:
www.osha.europa.eu.
Chere cliente, cher client,
INSTANDHOLDING EN OPSLAG
Opgelet!
De contactdoos is defect.