Conga 1390 - Vacuum Cleaner CECOTEC - Free user manual and instructions
Find the device manual for free Conga 1390 CECOTEC in PDF.
Download the instructions for your Vacuum Cleaner in PDF format for free! Find your manual Conga 1390 - CECOTEC and take your electronic device back in hand. On this page are published all the documents necessary for the use of your device. Conga 1390 by CECOTEC.
USER MANUAL Conga 1390 CECOTEC
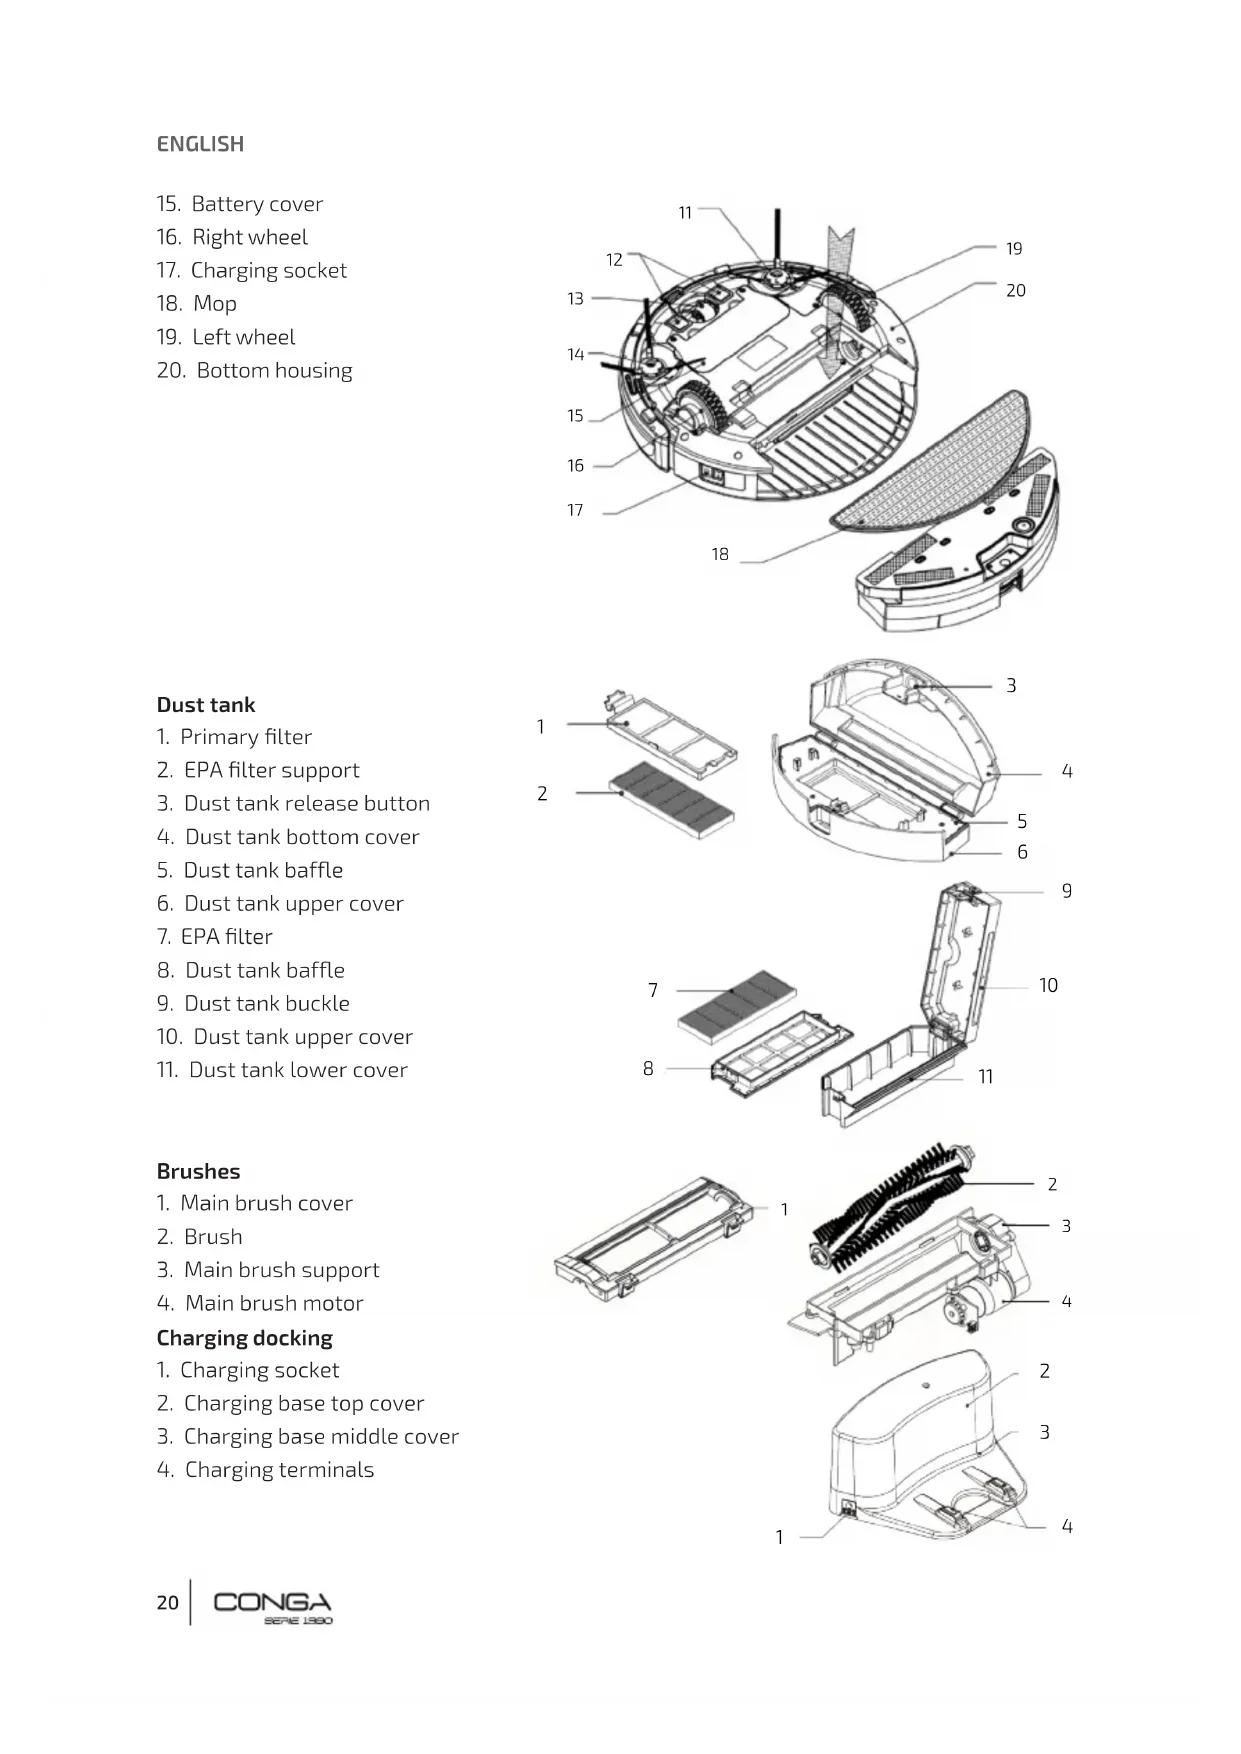
1. Parts and components
5. Cleaning and maintenance
8. Disposal of old electrical appliances
9. Technical support service and warranty
13. Omnidirectional wheel
3. Dust tank release button
4. Dust tank bottom cover
6. Dust tank upper cover
10. Dust tank upper cover
11. Dust tank lower cover
3. Main brush support
2. Charging base top cover
3. Charging base middle cover
4. Charging terminals
5. Water intensity/time settings
8. Mode (only operates from standby mode)
- The remote control requires 2 x AAA-type batteries.
- If the remote control is used near the charging base, the device might not recognize the command.
- Remove the batteries from inside the remote control if the robot is not going to be used for a long time.
2. SAFETY INSTRUCTIONS
Read these instructions thoroughly before using the appliance. Keep this instruction manual for future reference or new users.
- This product must be used in accordance with the directions in this instruction manual. Cecotec cannot be held liable or responsible for any damages or injuries caused by improper use.
- Make sure that the mains voltage matches the voltage stated on the rating label of the appliance and that the wall outlet is grounded.
- This product can only be disassembled by qualied personnel.
- Do not touch wires, power supplies or power adapters with wet hands.
- Keep the robot away from clothing, curtains and any other similar materials.
- Do not sit or place heavy or sharp objects on top of the appliance.
- Do not operate the appliance close to heat sources, ammable substances, wet surfaces where it can fall or be pushed into water or allow it to come into contact with water or other liquids. Do not operate outdoors.
- Do not use the charging base if it has a damaged cord or plug or if it is not operating properly. In case of fault or malfunction, contact the ofcial Technical Support Service of Cecotec.
- Do not operate the device on tables or chairs where it could fall.
- Do not operate the product in places where the temperature is below 0 ºC or above 40 ºC.
- The appliance can only be operated with the provided battery and power adapter. TheENGLISH
use of other components or accessories could cause risk of re, electric shock or product damage.
- Before operating the robot, please remove any objects on the ground such as clothing, papers, power cords or other items that may obstruct the device.
- The appliance is not intended to be used by children under the age of 8. It can be used by children over the age of 8, as long as they are given continuous supervision.
- This appliance can be used by children aged 8 and above, and persons with reduced physical, sensory or mental capabilities or lack of experience and knowledge, as long as they have been given supervision or instruction concerning the use of the appliance in a safe way and understand the hazards involved. Children shall not play with the appliance.
- Supervise young children to make sure that they do not play with the appliance. Close supervision is necessary when the appliance is being used by or near children.
Main brush and mops installation
1. Install the main brush into the robot’s main
2. Install the main brush’s cover.
3. Adjust the mop to the tank’s bottom part
and press with your hand to make sure it is well attached.ENGLISH
Water and dust tank installation
4. Open the water-lling opening, ll the tank
with water and close it again following the arrows on the picture.
5. Completely dry the connecting plates.
6. Introduce the dust tank into the
compartment and lower the handle.
7. Introduce the 2-in-1 tank (water and dust)
into the product’s main body.
4. APP DOWNLOAD AND CONNECTION VIA WI-FI
In order to access all the robot’s functions from anywhere, it is suggested to download the Conga S1390 App. You will be able to control the robot in the most efcient way, enjoying the excellence of cleaning. APP ADVANTAGES:
- Control your robot in an easy and intuitive wat.
- Activate the cleaning process from any point.
- Carry out settings and daily scheduling.
- Choose between its different cleaning modes.
- View how the robot creates an interactive map as it is cleaning.
- Check the cleaned surface and the time taken.
- Check the cleaning history. CONFIGURATION:
- Download the Conga S1390 App from App Store or Google Play.
- Create an account with your e-mail and a
- Connect to Wi-Fi WARNINGS:
- The App does not support 5G networks.
- The Wi-Fi name and password cannot exceed 32 bits.
- If the network conguration fails to connect, follow the below steps:
- Press the start button for 5 seconds, the robot will enter sleeping mode and the Wi-Fi light indicator will blink fast indicating connection error. Retry connecting the robot again following the steps in the before section.
- If the connection fails again, check if:
- The robot is too far away from the router.
- The Wi-Fi password is incorrect.
- The Wi-Fi networks is not 2.4G Hz.
Note: on the robot and on the remote control has the same function.
- Press to start the robot up.
- From the standby mode: - Press to start auto cleaning mode. - Press for 3 seconds to enter network conguration. - Press for 5 seconds to enter sleeping mode.
- During operation: - Press to stop operation.
- During charging: - Press to enter auto cleaning mode.
2. Wi-Fi indicator light
- When entering network conguration (see before section), the white light will blink slowly.
- When the device connects to the Wi-Fi, the white light will turn steady.
- If the device fails to connect, the white light will blink faster.
3. Battery indicator light
- The light will turn red when the battery is low.
- The light will switch from blue to red alternately during charging.
- The light will turn steady blue when it is totally charged. BATTERY CHARGING
- Place the charging base against the wall.
- Remove any obstacle from around the charging base, following the safety distances shown on the below picture:
- Always turn the robot’s power switch ON before placing it on the charging base.
- a. Plug one of the adapter ends into the robot’s charging socket and the other to the power supply. (Fig. a)
- b. While the charging base is connected to the power supply, press on the remote control for the robot to automatically return to the charging base. (Fig. b).
Note: if the robot’s battery is low during operation, it will automatically return to the charging base before running out.
3. Battery’s service life
In order to lengthen the battery’s service life:
- Allow the robot to charge for 5 hours during the rst charge.
- Charge the robot as soon as possible when the battery is low.
- If the robot is not going to be used for a long time: fully charge the battery, switch the robot off and store it in a cool and dry place.
- If the robot has been stored for a long time, allow it to charge for 5 hours before operating it again.ENGLISH
ON/OFF/STANDBY/SLEEP
- Make sure the robot’s power switch is ON.
- During standby mode, press on the robot or on the remote control to start the robot up.
- During sleeping status, press once to switch the robot to standby mode and then again to start cleaning.
During this status, the robot is switched on and waiting for user operation.
- During operation, press to stop and switch the robot to standby mode.
During sleep status, press on the robot or on the remote control to start the robot up.
- During standby mode, press on the robot for 5 seconds to enter sleep mode.
- During standby mode, the robot will enter sleep mode after 10 minutes of no operation.
- Short press to adjust the water intensity during scrubbing mode. Select between 1: high, 2: medium, or 3: low. The display will show 1, 2 or 3 and the robot will emit the number of beeps respectively.
- Long press the button to enter the time-settings mode. Use the direction buttons to select the desired hour and minutes, and then short press to save the settings. POWER
- Long press the POWER button for 3 seconds to select the suction power level. Choose between 1: high, 2: medium or 3: low. The display will show 1, 2 or 3 and the robot will emit the number of beeps respectively.
TIME AND SCHEDULE SETTINGS
1. Setting time from the remote control
- Press any button from the remote control to turn the display on. The display will show the remote control’s current time and day.
- Press to switch to minutes and use buttons and to increase or decrease the minute digits.
- Press , the display will show the current week day blinking. Press to select the week day.
- Press to save the time and week settings.
Note: when setting the scheduled cleaning task, the display will show the time left between the current time and the set cleaning time. Example: the robot’s current time is 8:00 am, the time on the remote control is 1:30. The robot will start cleaning at 9:30 am. Note: for safety reasons, the scheduling will be deleted when the robot’s power switch is turned off.
- Make sure the robot is switched on and in standby mode.
- Long press on the remote control in order to enter the schedule mode. The digits will blink. Use the and to increase or decrease the hour digits, then use to switch to minutes and use buttons and to increase or decrease the minute digits and the same for the day of the week.
- After setting, aim the remote control at the robot and press . A beep sound will conrm the settings have been saved.
3. Cancel scheduled tasks
- During the scheduling process, press on the remote control. CLEANING MODES The robot offers different cleaning modes which adapt to different cleaning needs.
1. Auto cleaning mode
- From the standby mode, press on the robot or the remote control and the robot will automatically start operating.
- It is the most frequent cleaning mode and it is used to clean the 100 % of the house’s surface. The robot vacuums the oor’s dust automatically, in and organized and efcient way, as it features memory and gyroscopic navigation. Moreover, it changes direction when it nds obstacles throughout its route and it returns to the charging base in a smart and direct way once the cleaning is over.
2. Edge mode: the display will show MODE 1 and the robot will clean along the edges.
3. Area mode: the display will show MODE 2 and the robot will clean a 2*2 m area.ENGLISH
4. Random mode: the display will show MODE 3 and will start cleaning in a random way.
5. DeepCleaning mode: the display will show MODE 4 and the robot will clean over the same
spot 2 times for a deeper cleaning.
Press the button to enter the water-intensity mode and select the desired intensity and select between 1, 2 or 3 (see WATER INTENSITY/TIME SETTINGS section).
- Do not use the mop outdoors.
- Remove the carpets before operating the robot under this mode.
- During operation, control the water level on the water tank. If it empties, ll it up again before continuing scrubbing.
- Take the water tank and the mop out before charging the robot. Note: in order to ensure perfect scrubbing, moisten the mop before starting scrubbing.
7. Schedule cleaning
- The robot can be programmed to operate automatically at the desired time.
8. Magnetic restricted area
- Use the magnetic stripe provided to delimit a certain zone, to which the robot will not be able to access and clean.
- For example, place the magnetic stripe from one door’s frame to the other in order to forbid the robot from crossing to a room.
- Make sure the side brushes are in good conditions.
- If the bristles are deformed, introduce the side brush into water.
- Clean them regularly in order to keep them in good conditions.
CLEANING WATER, DUST TANK AND FILTERS
- Empty and clean the dust tank after each use.
- Wash the lters each 15-30 days to lengthen their service life.
- Dry completely the lters before placing them back in their position.
- Do not expose the lters to direct sunlight.
- The maximum service life of the primary and EPA lter is 6 months.ENGLISH
Holding from the bottom of the dust tank, press the release button to take out the dust tank. Lift up the dust tank handle. Remove the dust tank from the water tank. Open the dust tank cover. Take the primary and EPA lter out. Empty the dust tank. Wash the dust tank and the primary lter using water. Clean the EPA lter with a brush, avoid washing it under water. Install the primary lter and the EPA lter into dust tank.
CLEANING SENSORS AND WHEELS
- Use a soft damp cloth to clean wheels and sensors.ENGLISH
CLEANING CHARGING TERMINALS
- Use a soft damp cloth to clean the charging terminals on the robot and on the charging base.
- Use a dry cloth to wipe the charging bones if the connection is poor.
CLEANING MAIN BRUSH KIT
- Remove the main brush kit from the product’s main body, separate the cover from the brush and clean them separately.
- The brush can be washed in soap and water.
WARNING: do not introduce the main brush back in its place unless it is completely dry.
BATTERY REMOVAL AND REPLACEMENT
1. Remove the screws on the battery cover with a screw driver.
2. Remove the battery cover.
3. Remove the insulating tape on both sides of the battery and take it out.
4. Unplug the wire connector that links the battery and the robot.
5. Introduce the new battery and make sure the side with printed words is facing upwards.
6. Connect the cable from the battery to the robot.
7. Introduce the battery into the compartment.
8. Screw back the battery’s cover.
Note: only use the original battery provided by Cecotec, the use of a different one could cause product damage.ENGLISH
The power switch is off while charging Check if the power switch is on or off and turn it on The robot’s display ashes quickly 1 long beep
Left side free-fall sensor error Place the robot on a at stable surface The robot’s display lights up in blue and ashes quickly 1 long beep
Right side free-fall sensor error The robot’s display lights up in blue and ashes slowly 1 long beep
Left wheel off the ground 1 long beep
Right wheel off the ground 1 long beep
Low battery Charge the robot Battery indicator light lights up red 4 short beeps
Wi-Fi connec- tion failure Check the Wi-Fi connection and try connecting again Wi-Fi light indicator blinks quickly 0 beeps.ENGLISH
Note: If none of the solutions solve the problem, try the below steps:
1. Switch off and switch back on the robot.
2. Contact the Technical Support Service of Cecotec.
The European directive 2012/19/EU on Waste Electrical and Electronic Equipment (WEEE), species that old household electrical appliances must not be disposed of with the normal unsorted municipal waste. Old appliances must be collected separately, in order to optimize the recovery and recycling of the materials they contain, and reduce the impact on human health and the environment. The crossed out “wheeled bin” symbol on the product reminds you of your obligation to dispose of the appliance correctly. If the product has a built-in battery or uses batteries, they should be removed from the appliance and disposed of appropriately. Consumers must contact their local authorities or retailer for information concerning the correct disposal of old appliances and/or their batteries.
9. TECHNICAL SUPPORT SERVICE AND WARRANTY
This product is under warranty for 2 years from the date of purchase, as long as the proof of purchase is submitted, the product is in perfect physical condition, and it has been given proper use, as explained in this instruction manual. The warranty will not cover the following situations:
- The product has been used for purposes other than those intended for it, misused, beaten, exposed to moisture, immersed in liquid or corrosive substances, as well as any other fault attributable to the customer.
- The product has been disassembled, modied, or repaired by persons, not authorised by the ofcial Technical Support Service of Cecotec.
- Faults deriving from the normal wear and tear of its parts, due to use. The warranty service covers every manufacturing defects of your appliance for 2 years, based on current legislation, except consumable parts. In the event of misuse, the warranty will not apply. 34 963 210 728.FRANÇAIS