Rydell Radio - Radio GPO - Free user manual and instructions
Find the device manual for free Rydell Radio GPO in PDF.
User questions about Rydell Radio GPO
0 question about this device. Answer the ones you know or ask your own.
Ask a new question about this device
Download the instructions for your Radio in PDF format for free! Find your manual Rydell Radio - GPO and take your electronic device back in hand. On this page are published all the documents necessary for the use of your device. Rydell Radio by GPO.
USER MANUAL Rydell Radio GPO
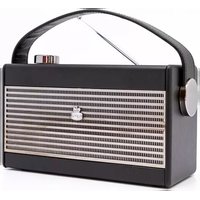
natural_image
Two vintage-style radio fans, one beige and one black, displayed against a plain background with no visible text or symbols.
Rydell Radio

USER MANUAL
Content
English 3
German 13
French 25
Dutch 37
Spanish 49
Introduction
Thanks for purchasing this product from ProtelX. Please read the instructions carefully before use and store in a safe place for future reference.
What's in the box
1 x GPO Rydell DAB Radio
1 x Power Supply Unit
1 x User Manual
Unpacking
Remove packing material and set the unit on a flat, supportive surface. Make sure to remove additional items from packaging.
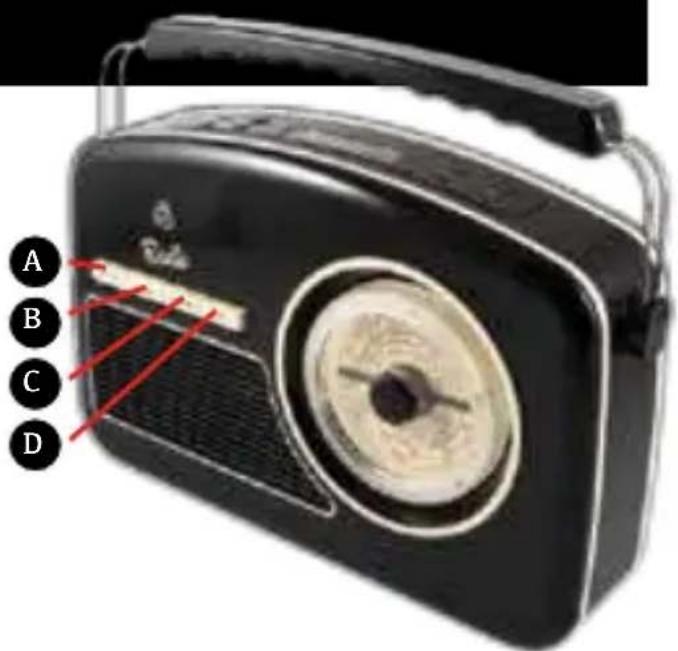
Location of Controls
A On/off Button
B Standby Button
C Function Button
D Info Button
E Sleep/snooze/alarm Button
F Auto Scan/enter Button
G Vol- Button
H Vol+ Button
I Tune Up Button
J Tune Down Button
K Setup Button
L Preset Button
M Display
N Antenna
0 Power Cord Socket
P Battery Compartment
text_image
A B C D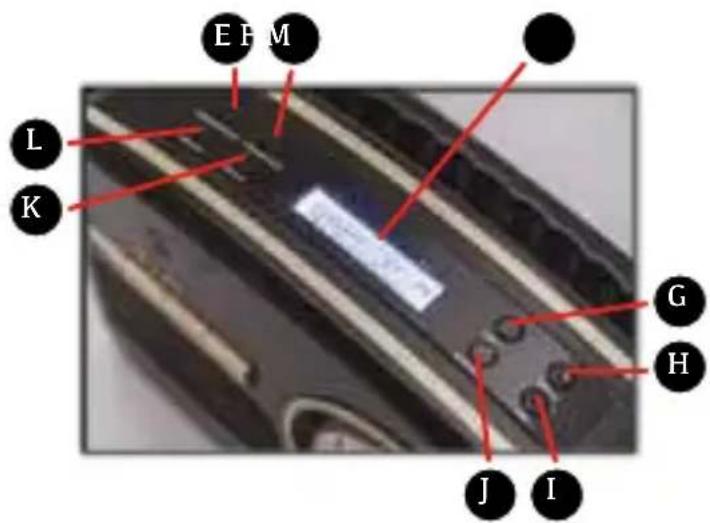
text_image
E P M L K G H J I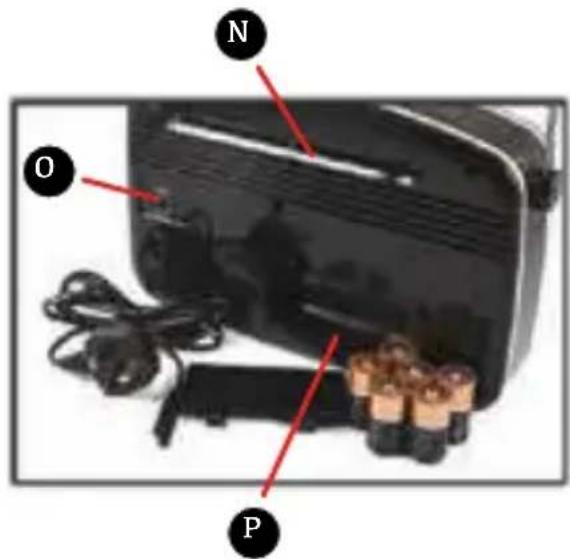
text_image
N O POperation Instructions
Insert one end at the supplied power cord to the DC 9V IN Jack located at the rear of the unit and the other end into the wall socket.
- To play your unit on batteries, the power cord must be disconnected from the player.
- Unplug the power cord from the unit and insert 6 size "C" batteries (not provided) in the compartment.
- Close the battery compartment door.
Note:
Check your batteries regularly. Old or discharged batteries should be replaced. If the unit is not to be used for some time or is being run exclusively on AC electrical current, remove batteries from the battery compartment to avoid leakage.
BATTERY SAFETY PRECAUTIONS:
Keep batteries away from children and pets.
Insert the batteries observing the proper polarity (+/-). Failure to properly align the battery polarity can cause personal injury and/or property damage.
Remove old or discharged batteries from the product. Remove the batteries when the product will not be used for extended periods of time to prevent damage due to rusted or corroded batteries
Never throw batteries into a fire, do not expose batteries to fire or other heat sources
Battery Disposal:
Old or discharged batteries must be properly disposed of and recycled in compliance with all applicable laws.
OPERATION
Press the ON/OFF button to turn on the power supply. Press the STANDBY button to the turn ON/OFF the unit.
IN DAB MODE
- In power on mode, Press the STANDBY button to select DAB radio mode
Auto select : Press the AUTO-SCAN/ENTER button, “Scanning” will show on the display, and the number of DAB stations will shown on the upper right corner, and it will automatically play the first station. Pressing UP/DOWN button to choose the next or previous station., short press AUTO-SCAN/ENTER button to confirm selection.
IN FM MODE
-
Press the FUNCTION button to select FM radio mode, Press the AUTO SCAN/ENTER button, when a radio is found, the frequency on display will stop running and start playback automatically.
-
If reception is no good, Press the UP/DOWN button to fine tune. FM radio presetting is same as DAB radio presetting
INFO Button
A. The UNIT has DAB information modes which are shown on the bottom line of the display.
Short Press
the INFO key to see the available types.
- program type
Displays the type of station content being broadcast e.g. Classic, Pop, News, etc. 2. Ensemble Freq.
Displays the DAB station frequency such as 13F 239.200MHz.
- Audio Bit Rate Displays the data rate in kilo Bits per second and the audio mode e.g. Stereo.
- Ensemble name Displays the name of the multiplex to which the Digital1 Network current station belongs
- Signal strength Displays the signal strength for the station being listened to.
- Time/Date Displays current time and date, received off-air.
- DLS (Dynamic Link Segment) Scrolling text which includes messages such as Artist and track name, phone numbers, program details, etc.
The UNIT has six FM information modes which are shown on the bottom line of the display.
Short
Press the INFO button to see the available types.
1 .PTY (program type)
Displays the type of station content being broadcast e.g. Classic, Pop, News, etc.
2. Signal strength Displays the signal strength for the station being listened to.
3. Time and Date Displays current time and date, received off-air.
4. Station frequency Displays the frequency of the station being listened to.
5. Audio mode Displays the current audio mode setting i.e. Auto(Stereo) or Mono.
6. Radio Text Scrolling text which includes messages such as Artist and track name, phone numbers, program details, etc.
TIME SETTINGS Manual setting
- In FM mode, Press the SETUP button until the FM menu is shown.
-
Press the UP/DOWN button to select Main menu and short Press AUTO SCAN/ENTER to confirm
-
In Main menu. Use the UP/DOWN button to select time setup and short Press the AUTO SCAN/ENTER to confirm.
- In Time setup menu, Use the UP/DOWN button to select set clock and short press the AUTO SCAN/ENTER to confirm
- In Set clock menu, the hour begin to flash and you can press UP/DOWN button to set. Press the AUTO SCAN/ENTER to confirm.
- The minute flashes and can now be set, and then short Press AUTO SCAN/ENTER button to confirm.
Note: In time setup menu, you can set clock, date, auto update, 12/24 hour following the same operation.
Automatical setting
- In DAB mode, Press the SETUP button until the DAB menu is shown.
- Press the UP/DOWN button to select Main menu and short Press AUTO SCAN/ENTER to confirm
- In Main menu. Use the UP/DOWN button to select time setup and short Press the AUTO SCAN/ENTER to confirm.
- In Time setup menu, Use the UP/DOWN button to select Auto update and short press the AUTO SCAN/ENTER to confirm
- In Auto update menu, use the UP/DOWN button to select from radio.
ALARM 1 SETTINGS
- In FM or DAB mode, Press the SLEEP/SNOOZE/ALARM button until the Alarms menu is shown.
- Press the UP/DOWN button to select alarm1 and short Press AUTO SCAN/ENTER to confirm
- In alarm detail menu. Use the UP/DOWN button to select time and short Press the AUTO SCAN/ENTER button to confirm.
- The hour begin to flash and you can press UP/DOWN button to set. Press the AUTO SCAN/ENTER to confirm.
-
The minute flashes and can now be set, and then short Press AUTO SCAN/ENTER button to confirm.
-
Back to alarm detail menu. Use the UP/DOWN button to select save and press the AUTO SCAN/ENTER to make the alarm setting is active.
Note: turn on the alarm1 function in the alarm detail menu.
ALARM 2 SETTINGS
- In FM or DAB mode, Press the SLEEP/SNOOZE/ALARM button until the Alarms menu is shown.
- Press the UP/DOWN button to select alarm2 and short Press AUTO SCAN/ENTER to confirm
- In alarm detail menu. Use the UP/DOWN button to select time and short Press the AUTO SCAN/ENTER button to confirm.
- The hour begin to flash and you can press UP/DOWN button to set. Press the AUTO SCAN/ENTER to confirm.
- The minute flashes and can now be set, and then short Press AUTO SCAN/ENTER button to confirm.
- Back to alarm detail menu. Use the UP/DOWN button to select save and press the AUTO
SCAN/ENTER to make the alarm setting is active.
Note: turn on the alarm1 function in the alarm detail menu.
Note: In alarm detail menu, you can set other alarm functions such as alarm Off, alarm time, alarm Days, alarm Mode, alarm Last listened, alarm, volume & alarm Save.
SHUT OFF CANCEL
To cancel the Alarm when it has activated. Press STANDBY button to stop the alarm sound, the alarm will reset for next day.
TO TURN OFF THE ALARM COMPLETELY
Short Press the SLEEP/SNOOZE/ALARM button the press AUTO SCAN/ENTER button repeatedly until to enter Alarm detail settings mode, PRESS the UP/DOWN button to select alarm OFF then Press AUTO SCAN/ENTER button to confirm.
SNOOZE FUNCTION
When the Alarm activates, Press the SLEEP/SNOOZE/ALARM button. Then the alarm will turn off and will ring again 5 minutes later.
SET THE SLEEP TIMER
- With the UNIT switched ON and playing any of the inputs i.e. DAB or FM, Press and hold the SLEEP/SNOOZE/ALARM button until the Sleep menu is shown.
- The minutes are now flashing. Short Press SLEEP button to change the Sleep time (such as 15mins, 30mins, 45mins, 60mins, 90mins)
- Available Sleep time is 15 to 90 minutes, in 15 minutes increments. Set the required time and short Press AUTO SCAN/ENTER button to confirm.
- The display will show the settings sleep time on the right upper corner. The UNIT plays for the selected time and then switches to Standby.
CANCEL SLEEP TIMER
- With the UNIT switched ON and playing any of the inputs i.e. DAB or FM, Press and hold the SLEEP/SNOOZE/ALARM button until the Sleep menu is shown.
- The minutes are now flashing. Short Press SLEEP/SNOOZE/ALARM button to change the Sleep time to OFF and press AUTO SCAN/ENTER button to confirm.
SYSTEM RESET
System Reset can be used to clear the station list, the presets and all Alarm and Sleep settings. This is useful if you move the UNIT to a different location (when you move house for instance) as some stations may not be available in the new area.
-
In DAB mode, Press the SETUP button then press UP/DOWN button to select DAB MAIN MEMU. Press the AUTO SCAN/ENTER button to confirm.
-
In MAIN MENU setting mode, press UP/DOWN button to select Factory reset Short and Press the AUTO SCAN/ENTER button 2 times to confirm.
- The UNIT will now clear the internal memory and automatically start a quick scan.
Product Care
Ventilation - The appliance should be situated so that its location or position does not interfere with its proper ventilation. For example, the appliance should not be situated on a bed, sofa, rug or similar surface that may block the ventilation openings, or placed in a built-in installation, such as a bookcase or cabinet, that may impede the flow of air through the ventilation openings.
Heat - The appliance should be situated away from heat sources such as radiators, heat registers, stoves, or other appliances (including amplifiers) that produce heat.
Power Sources - The product should be operated only with the type of power supply indicated on the marking label. If you are not sure of the type of power supply to your home, consult your product dealer or local power company. For products intended to operate from battery power, or other sources, refer to the operating instructions.
Product Support
Looking for more help? Visit www.gporetro.com. For your personal safety, do not attempt to open the device.
There are no serviceable parts inside and the warranty is void if the device is opened.
German
Einführung
text_image
EPM L K G H J I
text_image
N O PBedienungshinweise
BETRIEB DES GERÄTS ÜBER NETZSTROM
text_image
EPM L K G H J I
text_image
N O Ptext_image
E B M L K G H J I
text_image
N O Ptext_image
EPM L K G H J I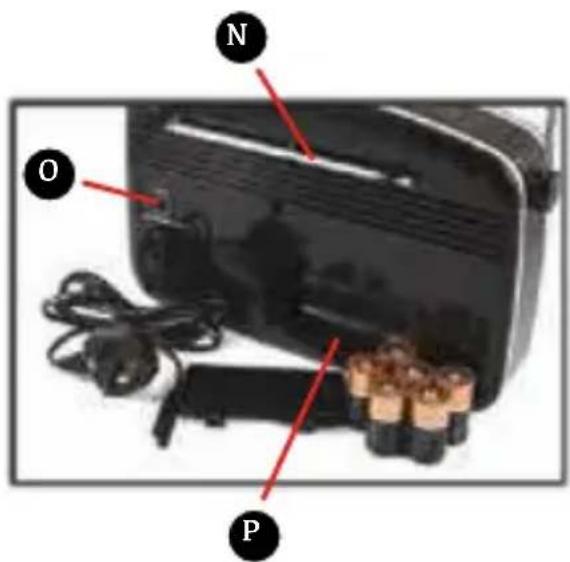
text_image
N O PHereby ProtelX, declares that this equipment (GPO Rydell DAB Radio) is in compliance with the essential requirements and other relevant provisions of Directive, you can access a copy of this certificate on www.gporetro.com/Certificate-of-Conformity
DE
ProTelX Ltd, Unit 6, Park 17 Industrial Estate, Moss Lane, Whitefield, Manchester, M45 8FJ UK