Darcy - Radio GPO - Free user manual and instructions
Find the device manual for free Darcy GPO in PDF.
| Product type | AM/FM Clock Radio |
| Brand | GPO |
| Model | Darcy |
| Power supply | Mains via adapter (included); 4× C batteries (LR14, not included) |
| Power consumption | Not specified |
| Radio bands | AM (MW), FM |
| Presets | 10 FM stations + 10 AM stations |
| Functions | 24h clock, dual alarm (AL1/AL2), sleep, snooze, backlight |
| Volume control | Rotary VOLUME +/- knob |
| Display | Backlit digital |
| Headphone jack | 3.5 mm stereo jack (rear) |
| Dimensions (approx.) | 18 × 12 × 10 cm |
| Weight (approx.) | 700 g |
| Materials | Plastic |
| Color | Retro (not specified) |
| Included accessories | Mains adapter, user manual |
| Care and cleaning | Use a soft, dry cloth; do not use abrasive products |
| Safety | Keep batteries out of reach of children; observe polarity; do not expose to fire |
| Declaration of conformity | By ProtelX, compliant with European Directive – certificate available at www.gporetro.com/Certificate-of-Conformity |
Frequently Asked Questions - Darcy GPO
User questions about Darcy GPO
0 question about this device. Answer the ones you know or ask your own.
Ask a new question about this device
Download the instructions for your Radio in PDF format for free! Find your manual Darcy - GPO and take your electronic device back in hand. On this page are published all the documents necessary for the use of your device. Darcy by GPO.
USER MANUAL Darcy GPO
text_image
GPO Darcy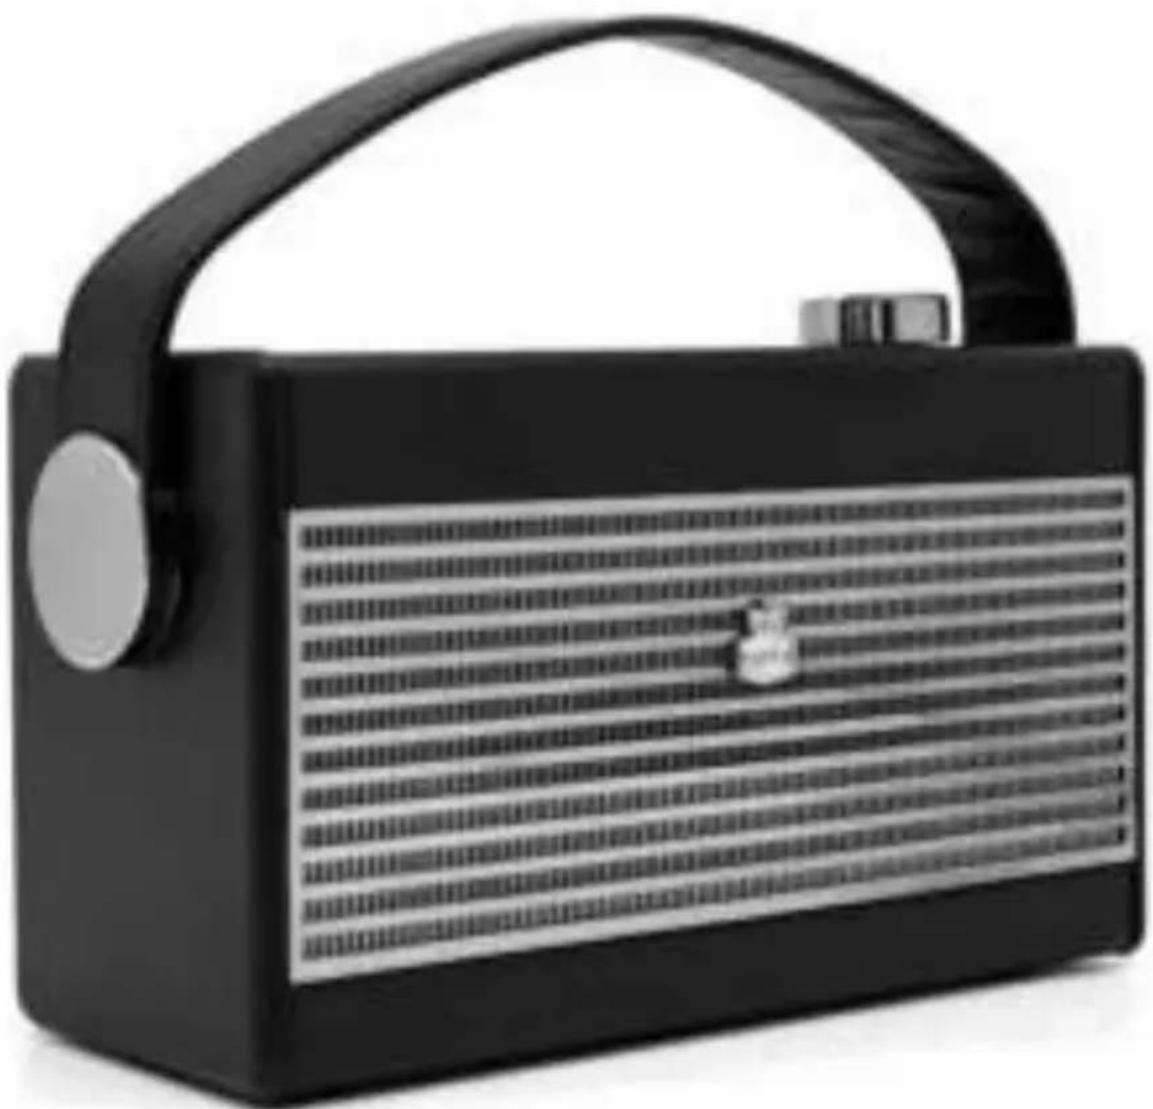
natural_image
Black portable radio with a curved handle and textured grille (no visible text or symbols)CONTENT
English 5
German 15
French 25
Dutch 35
Spanish 45
Italian 55
ENGLISH
LOCATION OF CONTROLS
- LCD DISPLAY
- AM/FM BUTTON
- SET BUTTON
- SNOOZE/SLEEP BUTTON
- STATION - BUTTON
- VOLUME +/- KNOB
- STANDBY BUTTON
- PRESET BUTTON
- ALARM BUTTON
- STATION + BUTTON
- HANDLE
- BATTERY DOOR
- HEADPHONE JACK
- DC JACK
- FM TELESCOPE ANTENNA
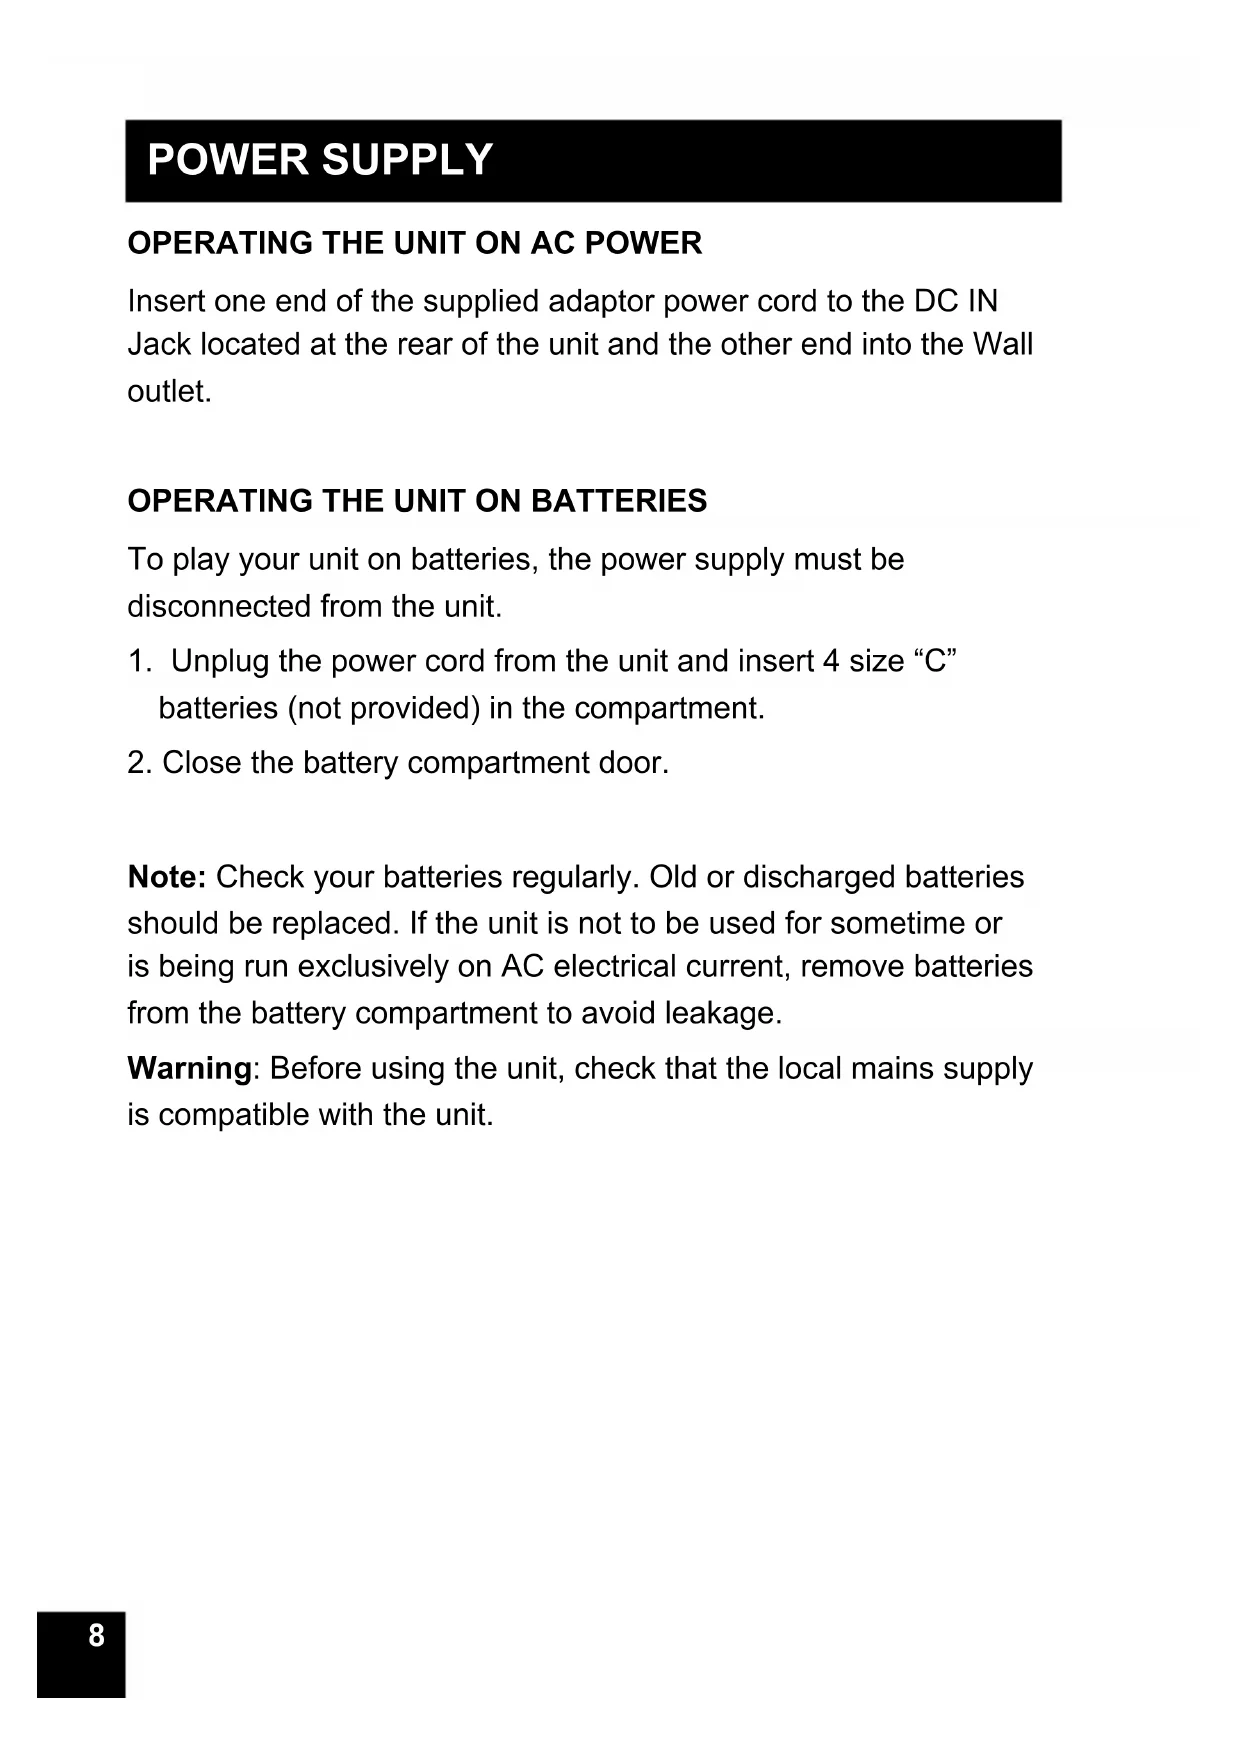
POWER SUPPLY
Insert one end of the supplied adaptor power cord to the DC IN Jack located at the rear of the unit and the other end into the Wall outlet.
To play your unit on batteries, the power supply must be disconnected from the unit.
- Unplug the power cord from the unit and insert 4 size "C" batteries (not provided) in the compartment.
- Close the battery compartment door.
Note: Check your batteries regularly. Old or discharged batteries should be replaced. If the unit is not to be used for sometime or is being run exclusively on AC electrical current, remove batteries from the battery compartment to avoid leakage.
Warning: Before using the unit, check that the local mains supply is compatible with the unit.
BATTERY SAFETY PRECAUTIONS:
- Keep batteries away from children and pets.
- Insert the batteries observing the proper polarity (+/-). Failure to properly align the battery polarity can cause personal injury and/or property damage.
- Remove old or discharged batteries from the product. Remove the batteries when the product will not be used for extended periods of time to prevent damage due to rusted or corroded batteries.
- Do not expose batteries to fire or other heat sources.
- Battery Disposal: Old or discharged batteries must be properly disposed of and recycled in compliance with all applicable laws. For detailed information, contact your local solid waste authority.
- Follow the battery manufacturer's safety, usage, and disposal instructions.
OPERATING INSTRUCTIONS
Turn on or off
- To turn the product on, press STANDBY BUTTON the product switches to the last selected source.
- To turn the product off, press STANDBY BUTTON again.
Adjusting the volume
Rotate the VOLUME +/- knob clockwise to increase the volume.
Rotate the VOLUME +/- knob anti-clockwise to decrease the volume.
Check the display, which will confirm the volume setting.
TO SET THE TIME
In standby mode, press the SET button for approximately 2 seconds to trigger TIME SET MODE and hour will start blinking. Press the STATION+/- button to set the Hour and press the SET button to confirm. Then the minute will begin to blink. Press the STATION+/- button to set the minute and press the SET button to confirm.
Note: Time is displayed in 24 hours mode.
TO SET THE ALARM
In Standby mode:
- Press and hold the ALARM button to trigger alarm set mode then AL1 or AL2 will begin to flash.
- Press the STATION +/- button to scroll to
. Press and release the ALARM button. - The Alarm 1 hour will begin to flash then press the STATION +/- button to adjust and press ALARM button to confirm.
- Press the STATION +/- button to scroll to the hour for the alarm and press and release the ALARM button.
- The minutes will now flash. Press the STATION +/- button to scroll to the minutes for the alarm and press and release the ALARM button.
- Press the STATION +/- button to scroll to the sound source for the alarm. You can choose from Buzzer, FM & AM. Press and release the ALARM button
- Press the STATION +/- button to choose Alarm On and press and release the ALARM button to confirm.
- AL1 symbol in the left of the radio display will confirm that an alarm has been set.
Note: The radio will then prompt you to set the time. An alarm can only be set after the time has been set.
Note: Alarm 2 setting is same as Alarm 1.
Stop the Alarm
- When the alarm sounds, press and release the Standby button.
- Note: If you press the STANDBY BUTTON to stop the alarm, the alarm symbol will remain in the display and the alarm will sound again at the same time the next day.
- Turn off the Alarm
Follow the steps for 'TO SET THE ALARM' and select 'Off' in step 7.
SLEEP CONTROL
- Press the STANDBY button to turn on the unit.
- Press and hold SNOOZE/SLEEP button to enter sleep setting mode, Press SNOOZE/SLEEP button repeatedly to choose the Device-Sleep time from 120, 90, 60, 45, 30, 15, and 5 minutes.
- Device will turn off after the displayed minutes from the minutes you selected.
- To turn this off press the SNOOZE/SLEEP button until the display shows "off" in sleep setting mode.
BACKLIGHT
Press the SNOOZE/SLEEP button to turn on/off the backlight.
TO SNOOZE
- Simply press the “snooze” button and it will shut off the buzzer for 9 minutes before the music or buzzer sounds again. This can be repeated.
TO PLAY THE RADIO
- Press the STANDBY button to turn on the unit.
- Press the AM/FM button to switch to desired AM/FM band. The current chosen band will be displayed. If AM is chosen, the AM indicator will light up. If FM is chosen, the FM indicator will light up.
- Use the STATION- button and the STATION + button to adjust the radio frequency.
Note: Press STATION- button to lower the radio frequency.
Press and hold this button to activate auto scanning into the lower frequency ranges.
Press STATION+ button to increase the radio frequency.
Press and hold this button to activate auto scanning into the upper frequency ranges.
- Rotate the VOLUME +/- knob button to adjust the volume as instructed above.
- Press the STANDBY button again to turn off the unit.
Storing an AM/FM station preset
Your Radio can store up to 10 FM and 10 AM radio stations in its preset memories for instant access to your favourite stations.
- Tune the Radio to the AM or FM radio station that you wish to preset.
- Press and hold the Preset button for approximately 2 seconds until Pxx is displayed, where 'xx' is the number of the preset (01-10).
- Use the STATION +/- button to move to the preset location that you would like to store the radio station to (01-10).
- Press and release the PRESET button to confirm.
Note: If there is already an existing AM or FM station stored under a preset, it will be over written when you store the new station.
Tune to an AM/FM station preset
In AM or FM mode:
- Press and release the Preset button. Pxx is displayed, where 'xx' is the number of the preset (01-10).
- Press the STATION +/- button to move to the Preset location and station that you would like to listen to (01-10). The radio will instantly tune to that station and begin to play.
HEADPHONES
A 3.5mm socket for connecting a set of stereo headphones (not included) is located on the rear of the unit. The internal loudspeaker is muted when headphones are plugged-in.
Avoid listening to headphones at high volume levels to prevent possible hearing damage.
GERMAN
natural_image
Symbol of a trash bin with crossed lines indicating lanes, no text or numbers presentMILIEUBESCHERMING
Hereby ProtelX, declares that this equipment (GPO DARCY) is in compliance with the essential requirements and other relevant provisions of Directive, you can access a copy of this certificate on www.gporetro.com/Certificate-of-Conformity
DE
ProTelX Ltd, Unit 6, Park 17 Industrial Estate, Moss Lane, Whitefield, Manchester, M45 8FJ UK