Relaxx'x ProSilence 66 BGS5A33S - Vacuum Cleaner BOSCH - Free user manual and instructions
Find the device manual for free Relaxx'x ProSilence 66 BGS5A33S BOSCH in PDF.
Download the instructions for your Vacuum Cleaner in PDF format for free! Find your manual Relaxx'x ProSilence 66 BGS5A33S - BOSCH and take your electronic device back in hand. On this page are published all the documents necessary for the use of your device. Relaxx'x ProSilence 66 BGS5A33S by BOSCH.
USER MANUAL Relaxx'x ProSilence 66 BGS5A33S BOSCH
ance with the specifications on the rating plate. Never vacuum without the dust bag or dust contain- er, motor protection or exhaust filter. => This may damage the vacuum cleaner. Always keep the vacuum cleaner away from your head when using nozzles and tubes. => This could cause injury!
hen vacuuming stairs, the appliance must always be positioned below the user. Do not use the power cord or the hose to carry or transport the vacuum cleaner. For safety reasons, if this appliance's mains power cable becomes damaged, it must be replaced by the manufacturer, their after-sales service department or a similarlyqualified person. If using the appliance for longer than 30 minutes, pull out the power cord completely. When disconnecting the appliance from the mains, pull on the plug itself to remove it; do not pull on the power cord. Do not pull the power cord over sharp edges or allow it to be-come trapped. When the cable is being automatically rewound, ensure that the mains plug is not thrown towards persons, body parts, animals or objects. => Use the mains plug to guide the power cord. Pull out the mains plug before carrying out any work on the vacuum cleaner. Do not operate the vacuum cleaner if it is damaged. Unplug the appliance from the mains if a fault is detected. For safety reasons, only authorised after-sales ser- vice personnel are permitted to carry out repairs and fit replacement parts to the vacuum cleaner. Protect the vacuum cleaner from the weather, mois- ture and sources of heat. Do not pour flammable substances or substances containing alcohol onto the filters (dust bag, motor protection filter, exhaust filter, etc.). The vacuum cleaner is not suitable for use on con- struction sites. => Vacuuming up building rubble could damage the appliance. When not in use, switch off the appliance and pull out the mains plug. At the end of its life, the appliance should immedi- ately be rendered unusable, then disposed of in an appropriate manner. !Please note
he mains socket must be protected by at least a 16
mp circuit breaker. If a circuit breaker is tripped when you switch on the vacuum cleaner, this may be because other electrical appliances which have a high current draw are con- nected to the same power circuit. To prevent the circuit breaker from tripping, select the lowest power setting before switching the appli- ance on, and increase the power only once it is run-
ing. Disposal information Packaging The packaging is designed to protect the vacuum
leaner from being damaged during transportation. It is made of environmentally friendly materials and can therefore be recycled. Dispose of packaging that is no longer required at an appropriate recycling point. Old appliance Old appliances still contain many valuable materials. Therefore, please take appliances that have reached the end of their service life to your retailer or recy- cling centre so that they can be recycled. For current disposal methods, please enquire at a retailer or your local council. Disposal of filters and dust bags Filters and dust bags are manufactured from envi- ronmentally friendly materials. Provided they do not contain substances that are not permitted in house- hold waste, you can dispose of them with your nor- mal household waste. Notes on the energy label This vacuum cleaner is a general purpose vacuum cleaner. To achieve the declared energy efficiency and cleaning performance class on carpet and hard floor, please use the interchangeable universal nozzle. Please use the enclosed "powerClean Stone & Co" hard-floor tool to achieve the specified energy-efficien- cy level and cleaning class on hard floors with joints and gaps. The values provided on the energy label have been determined according to the prescribed measuring process (in accordance with EN60312-1). Bedienung_BGS5_8001 002 792_GS 50 14.04.2014 11:23 Seite 45 Les enfants ne doivent pas jouer avec l'appareil. Le nettoyage et la maintenance ne doi- vent pas être effectués par des enfants sans surveillance. Les sacs plastiques et les films doivent être conservés hors de la portée de jeunes enfants et être éliminés. => Il y a risque d'asphyxie ! Utilisation correcte Raccorder et mettre l'aspirateur en service unique- ment selon les indications figurant sur la plaque signalétique. Ne jamais aspirer sans sac aspirateur ou bac à pous-
Bedienung_BGS5_8001 002 792_GS 50 14.04.2014 11:23 Seite 3738 Congratulations on your purchase of the Bosch Relaxx´x vacuum cleaner. This instruction manual describes various Relaxx´x models, which means that some of the equipment fea-
ures and functions described may not apply to your
odel. You should only use original Bosch accessories, which have been specially developed for your vacuum cleaner, to achieve the best possible vacuuming results. Please keep this instruction manual for future referen- ce. If you pass the vacuum cleaner on to someone else,
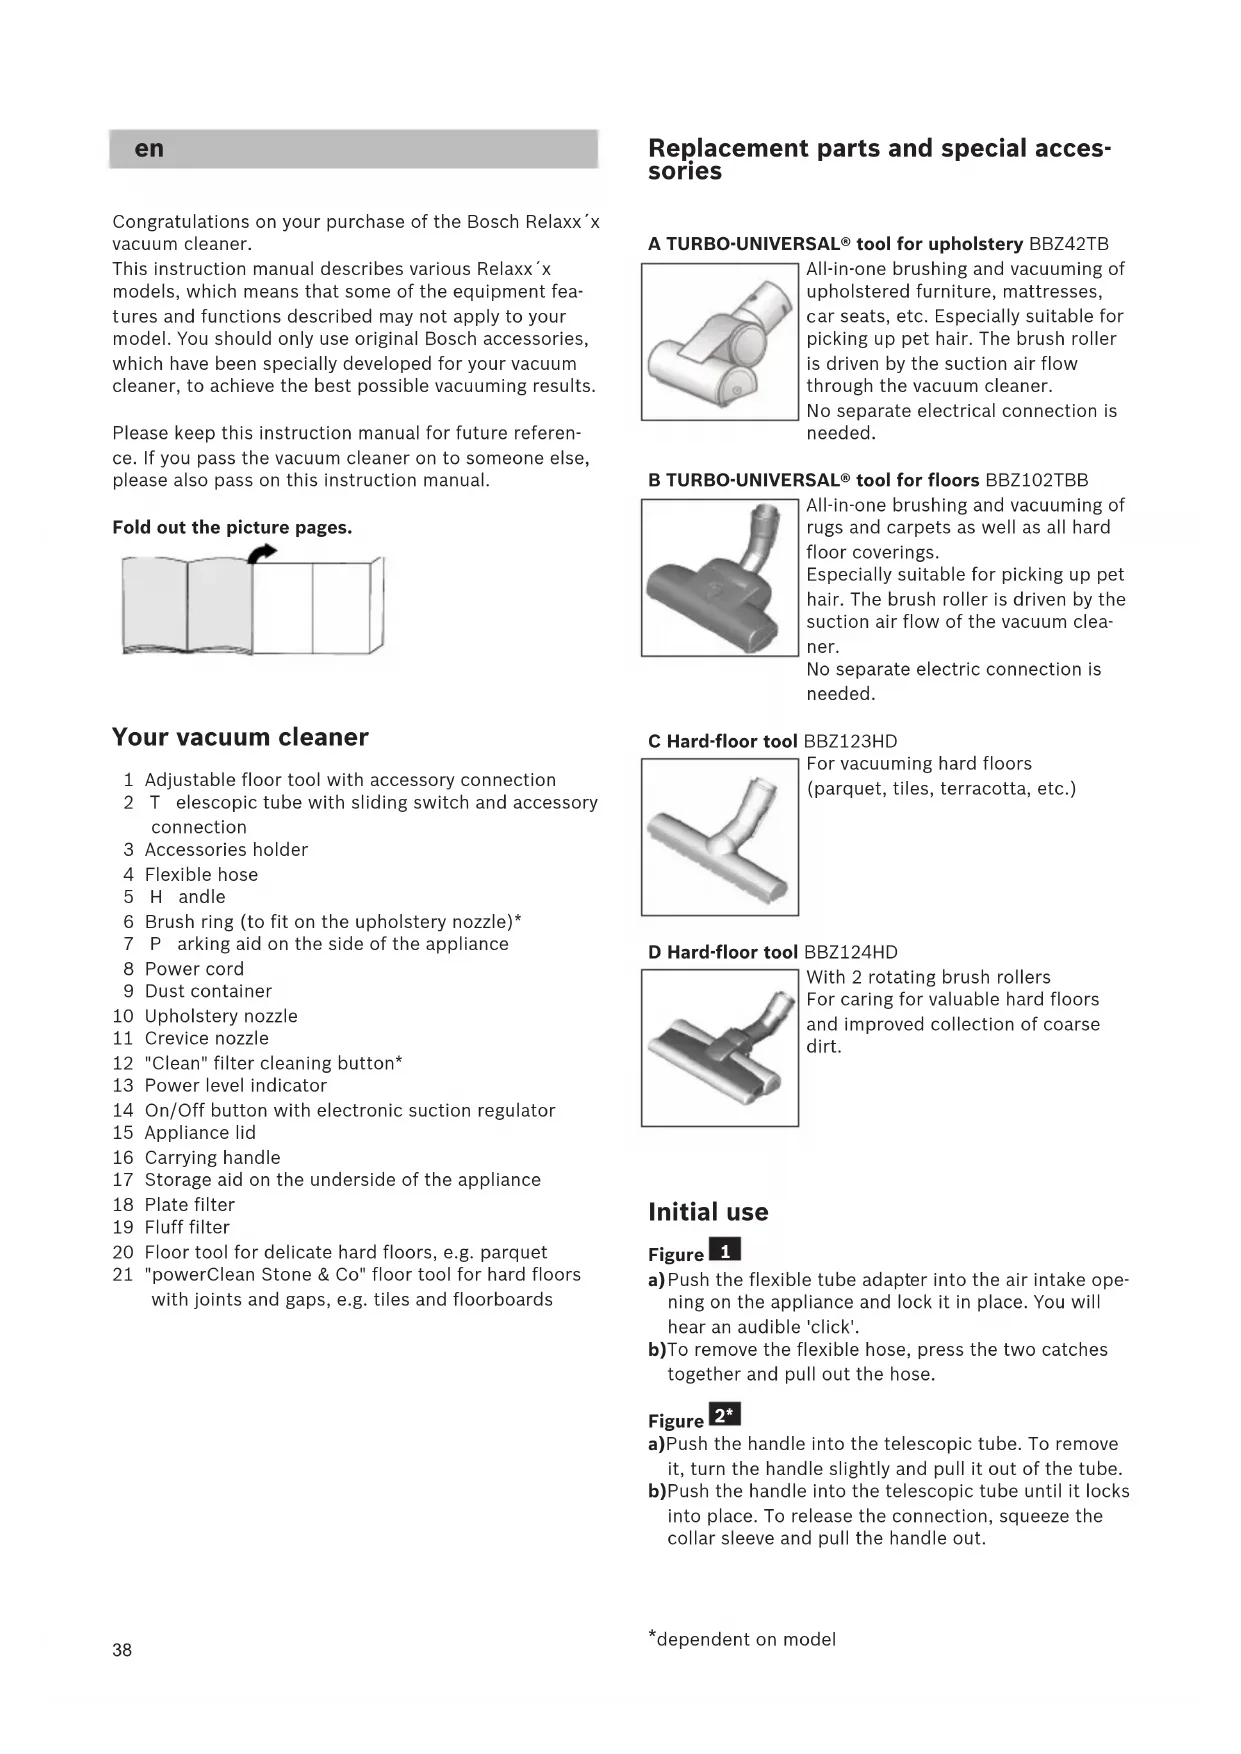
lease also pass on this instruction manual. Fold out the picture pages. Your vacuum cleaner 1 Adjustable floor tool with accessory connection 2Telescopic tube with sliding switch and accessory connection 3 Accessories holder 4 Flexible hose 5Handle 6 Brush ring (to fit on the upholstery nozzle)* 7Parking aid on the side of the appliance 8 Power cord 9 Dust container 10 Upholstery nozzle 11 Crevice nozzle 12 "Clean" filter cleaning button* 13 Power level indicator 14 On/Off button with electronic suction regulator 15 Appliance lid 16 Carrying handle 17 Storage aid on the underside of the appliance 18 Plate filter 19 Fluff filter 20 Floor tool for delicate hard floors, e.g. parquet 21 "powerClean Stone & Co" floor tool for hard floors with joints and gaps, e.g. tiles and floorboards Replacement parts and special acces- sories A TURBO-UNIVERSAL® tool for upholstery BBZ42TB All-in-one brushing and vacuuming of upholstered furniture, mattresses,
ar seats, etc. Especially suitable for
icking up pet hair. The brush roller is driven by the suction air flow through the vacuum cleaner.
o separate electrical connection is
eeded. B TURBO-UNIVERSAL® tool for floors BBZ102TBB All-in-one brushing and vacuuming of rugs and carpets as well as all hard floor coverings.
specially suitable for picking up pet hair. The brush roller is driven by the suction air flow of the vacuum clea- ner. No separate electric connection is needed. C Hard-floor tool BBZ123HD For vacuuming hard floors (parquet, tiles, terracotta, etc.) D Hard-floor tool BBZ124HD With 2 rotating brush rollers For caring for valuable hard floors and improved collection of coarse dirt. Initial use Figure a)Push the flexible tube adapter into the air intake ope- ning on the appliance and lock it in place. You will hear an audible 'click'. b)To remove the flexible hose, press the two catches together and pull out the hose. Figure a)Push the handle into the telescopic tube. To remove it, turn the handle slightly and pull it out of the tube. b)Push the handle into the telescopic tube until it locks into place. To release the connection, squeeze the collar sleeve and pull the handle out.
*dependent on model Bedienung_BGS5_8001 002 792_GS 50 14.04.2014 11:23 Seite 3839 Figure a)Insert the telescopic tube into the connecting piece of the floor tool. To release the connection, turn the tube slightly and pull it out of the floor tool.
)Push the telescopic tube into the connecting piece of the floor tool until it locks in place. To release the connection, press on the locking collar and pull out the telescopic tube. Figure
Unlock the telescopic tube by moving the sliding
witch in the direction of the arrow and adjust to the desired length. The slide resistance on carpet is at its lowest when the telescopic tube has been com- pletely pulled out. Figure
)Place the accessories holder in the required position on the telescopic tube. b)Use some pressure to insert the upholstery nozzle with brush ring and the crevice nozzle into the acces- sories holder from above or below. Figure ● Holding the power cord by the plug, pull out to the required length and insert the plug into the mains socket. Figure ● To switch the vacuum cleaner on or off, press the ON/OFF button. Figure Controlling the suction level The required suction level can be set to any level by turning the control knob. Low power range => For vacuuming delicate materials, such as delicate upholstery, curtains, etc. Medium power range => For daily vacuuming of floors which are only slightly dirty. High power range => For vacuuming durable floor coverings, hard floors and heavy deposits of dirt. Vacuuming
Caution Floor tools are subject to a certain amount of wear, depending on the type of hard floors you have (e.g. rough, rustic tiles). Therefore, you must check the underside of the floor tool at regular intervals. Worn undersides of floor tools may have sharp edges that can damage sensitive hard floors, such as parquet or linoleum. The manufacturer does not accept any res- ponsibility for damage caused by worn floor tools.
Figure Set the adjustable floor tool: Rugs and carpets =>
ard floors/parquet => If you are vacuuming up larger particles, make sure that you vacuum them up successively and carefully to ensu- re that the vacuum channels of the floor tool do not become blocked.
f necessary, you should raise the nozzle in order to
etter vacuum up the dirt particles. Figure Vacuuming with accessories Attach the nozzles to the suction pipe or hand grip as required: a)Crevice nozzle for vacuuming crevices and corners,
tc. b)Upholstery nozzle for vacuuming upholstered furnitu- re, curtains, etc. c)Upholstery nozzle with fixed brush ring for vacuu- ming window frames, cupboards, profiles, etc. After use, reinsert the crevice nozzle and upholstery nozzle into the accessories holder. d)Floor tool for delicate hard floors, e.g. parquet e)"powerClean Stone & Co" floor tool for hard floors with joints and gaps, e.g. tiles and floorboards Figure Cleaning the hard-floor tool a)Vacuum from below to clean the tool. b)Use scissors to cut through threads and hairs wound round the rollers, then vacuum them up. Figure You can use the parking aid on the side of the vacuum cleaner if you wish to stop vacuuming for a short time. ● After switching off the appliance, slide the hook on the floor tool into the parking aid. Figure When vacuuming stairs, the appliance must be positio- ned at the bottom of the stairs. If it does not reach far enough, the appliance can also be carried using the carrying handle. When your work is finished Figure ● Switch off the appliance. ● Pull out the mains plug. ● Briefly pull the power cord and release. (The power cord retracts automatically).
*dependent on model Bedienung_BGS5_8001 002 792_GS 50 14.04.2014 11:23 Seite 3940 Figure ● Unlock the telescopic tube by moving the sliding switch in the direction of the arrow and slide one tube into the other. Figure To store the appliance, use the storage aid on the underside. a)Stand the appliance up by the handle. b)Slide the hook on the floor tool into the storage aid.
mptying the dust container Figure In order to achieve good vacuuming results, the dust container should be emptied after every use or, at the latest, when dust or dirt has visibly collected on the
luff filter or when dust at one point in the container has reached the height of the marking. When emptying the dust container, always check how dirty the fluff filter is and, if necessary, clean it as detailed in the "Cleaning the fluff filter" instructions. Figure Figure a)Open the appliance lid by pulling the locking tab. b)Use the handle to remove the dust container from the appliance. Figure a)Release the filter unit of the dust container by pres- sing the release button. b)Take the filter unit out of the dust container and empty the dust container. Figure a)Insert the filter unit into the dust container, making sure it is correctly seated. The arrow on the filter cover must point in the direction of the locking tab. b)Press on the container lid until you hear it click into place. c)When reinserting the dust container into the applian- ce, make sure it is correctly seated. Close the appli- ance lid until the locking tab clicks into place again.
Caution If you notice any resistance when closing the lid, check that the filter is complete and that the filter and dust container are correctly seated. Filter care Cleaning the plate filter Your appliance is equipped with a "Sensor Control" Function. Figure + Figure . This function constantly monitors whether your vacuum cleaner is reaching its optimum power level. The indica- tor light lets you know when you need to clean the plate filter, so that the vacuum cleaner can reach its optimum power level once more.
23*21* Vacuum cleaner with “RotationClean” function Figure The indicator lights up blue when the appliance is wor- king at its optimum level. Once the indicator turns red
nd flashes, the plate filter must be cleaned. The appli- ance is automatically adjusted back to the lowest power setting. Figure ● Switch the appliance off in order to clean the plate
Caution: the filter can only be cleaned if the appli- ance is switched off. ● Open the appliance lid by pulling the locking tab. ● To clean the plate filter, turn the knob at least three
urns through 180°. You can also clean the filter if the suction is becoming less powerful, even if the indicator has not lit up. We recommend that you clean the plate filter each time before emptying the dust container. It must be cleaned at the latest when the “Sensor Control” indicator lights up. If the indicator flashes three times in quick succession, even though the plate filter is clean, this is probably due to a dirty fluff filter or a blockage. In this case, the appliance automatically adjusts to the lowest power setting and the indicator lights up red permanently. ● Switch the appliance off, empty the dust container and clean the fluff filter according to the instructions in "Cleaning the fluff filter". Figure Vacuum cleaner with “SelfClean” function Figure The indicator lights up blue when the appliance is wor- king at its optimum level. Once the indicator turns red and flashes, the appliance switches off automatically Filter cleaning is activated and performed by the inte- grated cleaning motor. If the appliance cleans three times in quick succession, this is probably due to a dirty fluff filter or a blockage. In this case, the appliance automatically adjusts to the lowest power setting and the indicator lights up red. ● Switch the appliance off, empty the dust container and clean the fluff filter according to the instructions in "Cleaning the fluff filter". Figure Figure If required, you can also activate the cleaning procedu- re manually by pressing the "Clean" filter cleaning but- ton when the appliance is switched on. If suction power is reducing, you can also clean the fil- ter even if the indicator has not lit up. We recommend that you clean the plate filter each time before empty- ing the dust container.
24* *dependent on model Bedienung_BGS5_8001 002 792_GS 50 14.04.2014 11:23 Seite 4041 Figure If the plate filter is particularly dirty, the dirt can also be washed off. a)Turn the bottom part of the filter unit anticlockwise
s far as it will go. Take the plate filter out of the filter unit. b)Wash the plate filter under running water. c)When it has dried completely, insert the plate filter into the filter unit and lock the bottom part by tur- ning it clockwise. Under normal circumstances, and when vacuuming nor-
al household dust, the plate filter does not need to be removed or cleaned manually in order to achieve the vacuum cleaner's optimum power level.
aution: do not brush the plate filter. ● For simple cleaning without water, simply tap the fil- ter around the edge of the cap. ● For more thorough cleaning, rinse the filter from the outside with water, and allow it to dry completely before using it in the vacuum cleaner again. Cleaning the fluff filter The fluff filter should be cleaned at regular intervals in order to ensure optimum operation of the vacuum clea- ner. Figure ● Open the appliance lid and remove the dust contai- ner from the appliance. Figure a)Take the filter unit out of the dust container. b) Clean the fluff filter. ● It is usually sufficient to lightly shake or tap out the filter housing when the dust container is emptied to dislodge any particles of dirt. ● If you want to wash the fluff filter, you must first remove the plate filter from the filter unit. The plate filter must only be reinserted into the filter unit after the fluff filter has completely dried. Cleaning the motor protection filter The motor protection filter should be cleaned regularly by knocking out the dirt and rinsing. Figure a)Open the appliance lid and remove the motor protec- tion filter. b)Clean the motor protection filter by tapping out the dirt. If it is very dirty, the motor protection filter should be rinsed. Then allow the filter to dry comple- tely. c)After cleaning the motor protection filter, reinsert it into the appliance and close the appliance lid. Cleaning the exhaust filter The exhaust filter is designed so that it does not need to be replaced, provided the appliance is used as inten- ded in the household.
To ensure that the vacuum cleaner is working at its optimum power level, the exhaust filter should be rin- sed out after 1 year. The filtering action of the filter remains intact, even if the filter surface becomes dis- coloured. Cleaning the HEPA filter Figure ● Open the appliance lid and remove the dust contai- ner. Figure
)Pull the two locking tabs to unlock the filter unit with HEPA filter and remove it from the appliance. c)Tap out the filter unit and rinse it under running water. d)Only reinsert the filter unit into the appliance after it has dried completely and ensure that it audibly clicks
nto place. e)Close the side flap until you hear the locking tab click into place again. f) Insert the dust container into the appliance and close the appliance lid. Cleaning the micro filter Figure ● Open the appliance lid and remove the dust contai- ner. Figure a)Use the locking tab to open the side flap. b)Pull the two locking tabs to unlock the filter unit with foam filter and micro filter and remove it from the appliance. c)Remove the foam filter and micro filter from the filter frame. d)Foam filter and micro filter and rinse it under running water. e)Do not re-insert the foam filter and the micro filter into the filter frame until it has dried completely f) Insert the filter unit in the appliance and ensure that the locking tabs audibly click into place. g)Close the side flap until you hear the locking tab click into place. h)Insert the dust container into the appliance and close the appliance lid. Cleaning instructions Always switch off the vacuum cleaner and disconnect the power cord from the mains before cleaning the vacuum cleaner. The vacuum cleaner and plastic acces- sories can be cleaned with an ordinary plastic cleaner.
Caution: do not use a scourer, glass-cleaning agent or multipurpose cleaning product. Never immerse the vacuum cleaner in water. Subject to technical modifications. 28*
2QOLQH$XIWUDJVVWDWXV)LOWHUEHXWHO
(XURSHDQ7UDGH&HQWHU%XLOGLQJ
PDLOWRFKHUVDW]WHLO#EVKJFRP
ZZZERVFKKRPHFRP CY Cyprus, ȀȪʌȡȠȢ
%6+,NLDNHV6\VNHYHV6HUYLFH
(JRPL1LNRVLD/HINRVLD
PDLOWR&$8%RVFK#EVKJFRP
2QOLQH$XIWUDJVVWDWXV)LOWHUEHXWHO
(XURSHDQ7UDGH&HQWHU%XLOGLQJ
PDLOWRFKHUVDW]WHLO#EVKJFRP
ZZZERVFKKRPHFRP CY Cyprus, ȀȪʌȡȠȢ
%6+,NLDNHV6\VNHYHV6HUYLFH
(JRPL1LNRVLD/HINRVLD
PDLOWR&$8%RVFK#EVKJFRP
FR France %6+(OHFWURPpQDJHU6$6
GR Greece, ǼȜȜȐȢ %6+,NLDNHV6LVNHYHV$%(
%6++RPH$SSOLDQFHV/LPLWHG
DLOWRKLEDEHMHOHQWHV#EVKKX
PDLOWRDONDWUHV]UHQGHOHV#EVKKX
ZZZERVFKKRPHFRPKX IE Republic of Ireland
0D0DDGKHOL0DMHHGKHH0DJX
PDLOWREVKQ]FV#EVKJFRP
((waste electrical and electronic equipment - WEEE