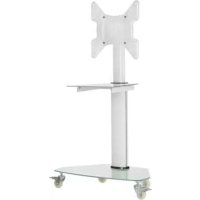
DDR1327SFC - TV Stand Tripp Lite - Free user manual and instructions
Find the device manual for free DDR1327SFC Tripp Lite in PDF.
| Product Type | Flat panel mount (desk clamp) |
| Brand | Tripp Lite |
| Model | DDR1327SFC |
| Compatible VESA Standard | 75x75 mm / 100x100 mm |
| Mounting Type | Desk clamp mount (edge or through-hole) |
| Material | Steel and plastic |
| Main Functions | Flexible arm, height adjustment, tilt, swivel |
| Cable Management | Yes, integrated cable cover |
| Warranty | 5 years (limited) |
| Intended Use | Indoor only |
| Package Contents | Adapter bracket, pole, desk clamp, VESA plate, base, cushion, screws, hex keys |
| Maintenance | Check condition and safety every 3 months |
| Safety | Do not exceed load capacity, installation by qualified person |
| Supported Weight (estimated) | Not specified, but typical for this type of mount |
Frequently Asked Questions - DDR1327SFC Tripp Lite
User questions about DDR1327SFC Tripp Lite
0 question about this device. Answer the ones you know or ask your own.
Ask a new question about this device
Download the instructions for your TV Stand in PDF format for free! Find your manual DDR1327SFC - Tripp Lite and take your electronic device back in hand. On this page are published all the documents necessary for the use of your device. DDR1327SFC by Tripp Lite.
USER MANUAL DDR1327SFC Tripp Lite
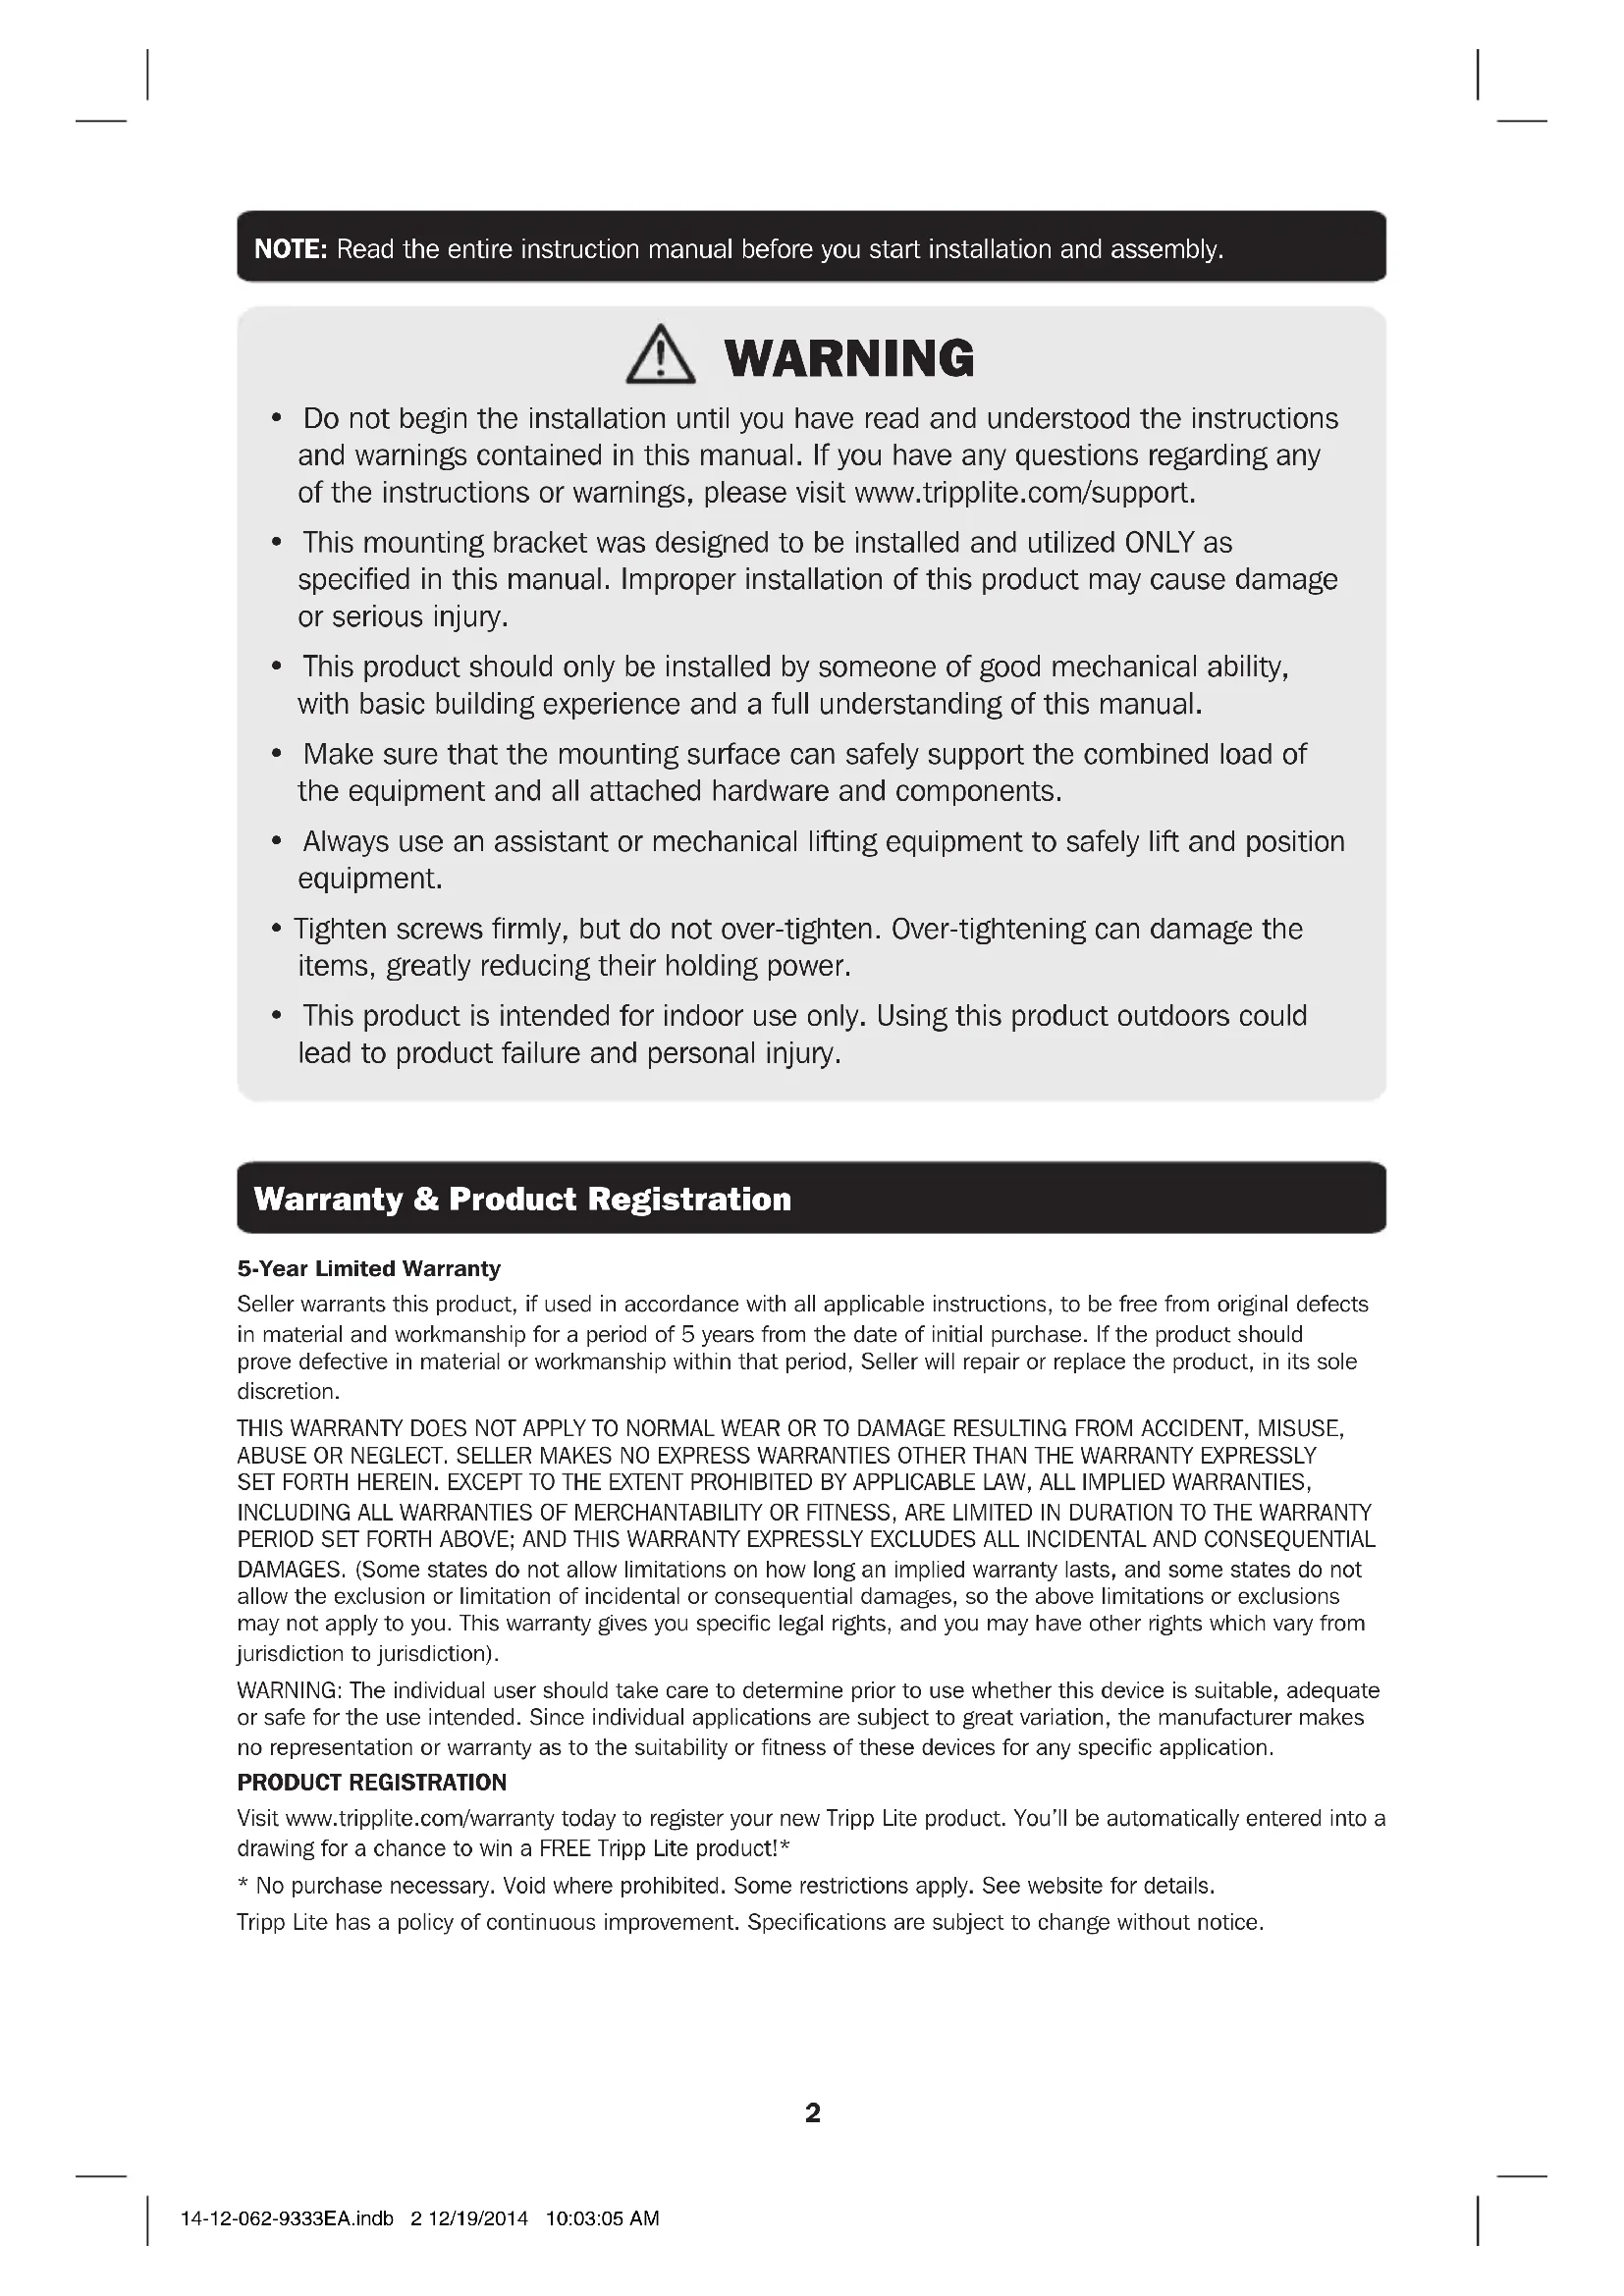
Single Flat Screen Flex Arm Desk Clamp
MODEL: DDR1327SFC
Espanol 12 • Français 23 • Pycckn 34 • Deutsch 45

CAUTION: DO NOT EXCEED MAXIMUM LISTED WEIGHT CAPACITY. SERIOUS INJURY OR PROPERTY DAMAGE MAY OCCUR!

75x75/100x100


PROTECT YOUR INVESTMENT!
Register your product for quicker service and ultimate peace of mind.
You could also win an ISOBAR6ULTRA surge protector—a $50 value!
www.triplite.com/warranty


1111 W. 35th Street, Chicago, IL 60609 USA • www.triplite.com/support
Copyright © 2014 Tripp Lite. All rights reserved.
NOTE: Read the entire instruction manual before you start installation and assembly.

WARNING
- Do not begin the installation until you have read and understood the instructions and warnings contained in this manual. If you have any questions regarding any of the instructions or warnings, please visit www.triplite.com/support.
- This mounting bracket was designed to be installed and utilized ONLY as specified in this manual. Improper installation of this product may cause damage or serious injury.
- This product should only be installed by someone of good mechanical ability, with basic building experience and a full understanding of this manual.
- Make sure that the mounting surface can safely support the combined load of the equipment and all attached hardware and components.
- Always use an assistant or mechanical lifting equipment to safely lift and position equipment.
- Tighten screws firmly, but do not over-tighten. Over-tightening can damage the items, greatly reducing their holding power.
- This product is intended for indoor use only. Using this product outdoors could lead to product failure and personal injury.
Warranty & Product Registration
5-Year Limited Warranty
Seller warrants this product, if used in accordance with all applicable instructions, to be free from original defects in material and workmanship for a period of 5 years from the date of initial purchase. If the product should prove defective in material or workmanship within that period, Seller will repair or replace the product, in its sole discretion.
THIS WARRANTY DOES NOT APPLY TO NORMAL WEAR OR TO DAMAGE RESULTING FROM ACCIDENT, MISUSE, ABUSE OR NEGLECT. SELLER MAKES NO EXPRESS WARRANTY OTHER THAN THE WARRANTY EXPRESSLY SET FORTH HEREIN. EXCEPT TO THE EXTENT PROHIBITED BY APPLICABLE LAW, ALL IMPLIED WARRANTYES, INCLUDING ALL WARRANTYES OF MERCHANTABILITY OR FITNESS, ARE LIMITED IN DURATION TO THE WARRANTY PERIOD SET FORTH ABOVE; AND THIS WARRANTY EXPRESSLY EXCULES ALL INCIDENTAL AND CONSEQUENTIAL DAMAGES. (Some states do not allow limitations on how long an implied warranty lasts, and some states do not allow the exclusion or limitation of incidental or consequential damages, so the above limitations or exclusions may not apply to you. This warranty gives you specific legal rights, and you may have other rights which vary from jurisdiction to jurisdiction).
WARNING: The individual user should take care to determine prior to use whether this device is suitable, adequate or safe for the use intended. Since individual applications are subject to great variation, the manufacturer makes no representation or warranty as to the suitability or fitness of these devices for any specific application.
PRODUCT REGISTRATION
Visit www.triplite.com/warranty today to register your new Tripp Lite product. You'll be automatically entered into a drawing for a chance to win a FREE Tripp Lite product!*
- No purchase necessary. Void where prohibited. Some restrictions apply. See website for details.
Tripp Lite has a policy of continuous improvement. Specifications are subject to change without notice.
Component Checklist
IMPORTANT: Ensure that you have received all parts according to the component checklist prior to installing. If any parts are missing or faulty, visit www.triplite.com/support for service.
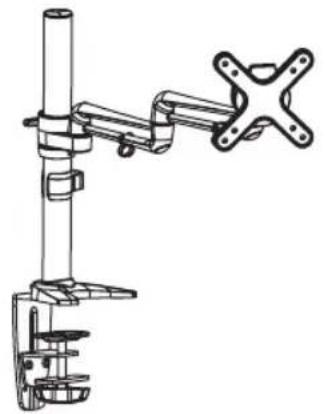
Adapter Bracket Assembly (x1)

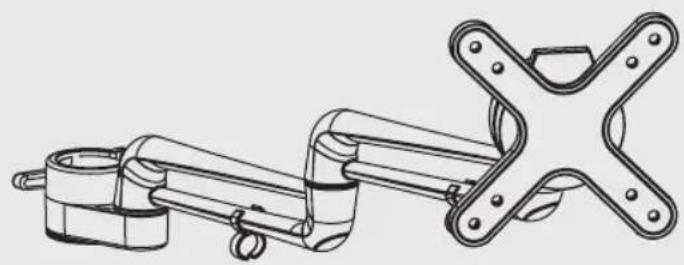
Pole (x1) Desk Clamp Assembly (x1)
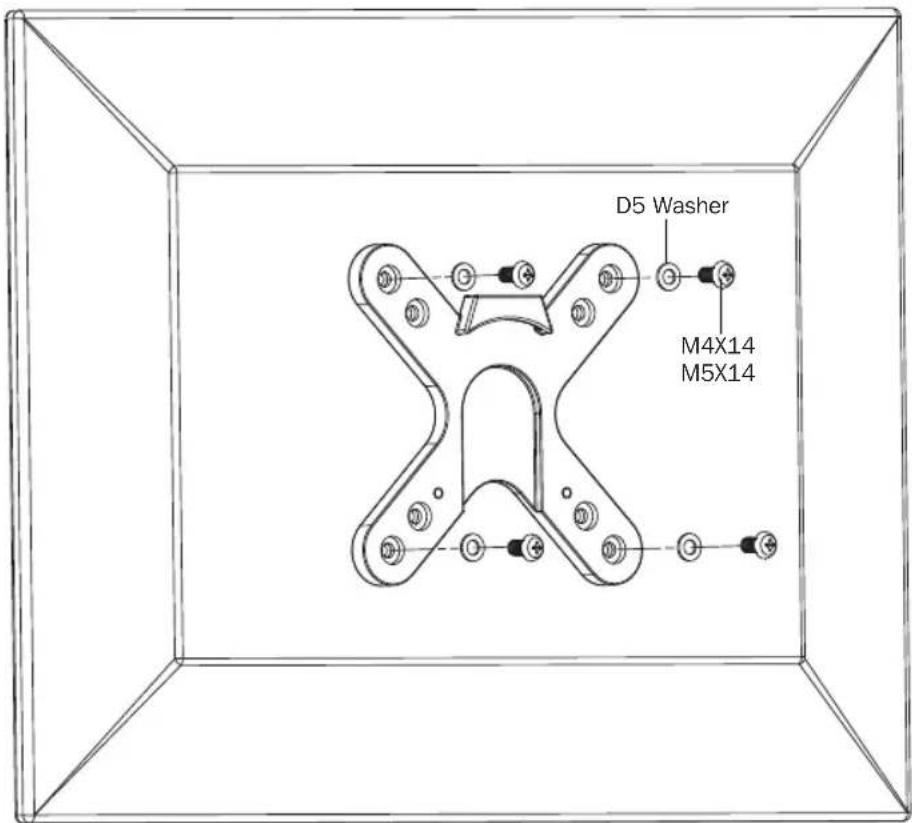
Package M

M4X14 (x4)
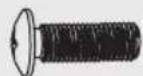
M5X14 (x4) D5 Washer (x4)

Package P
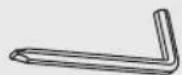
3mm Hex Key (x1)
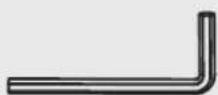
4mm Hex Key (x1)
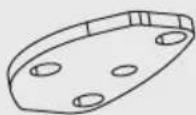
Base Plate (x1)
Pad (x1)
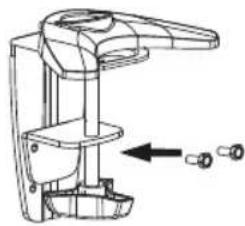
1. Remove the VESA Plate
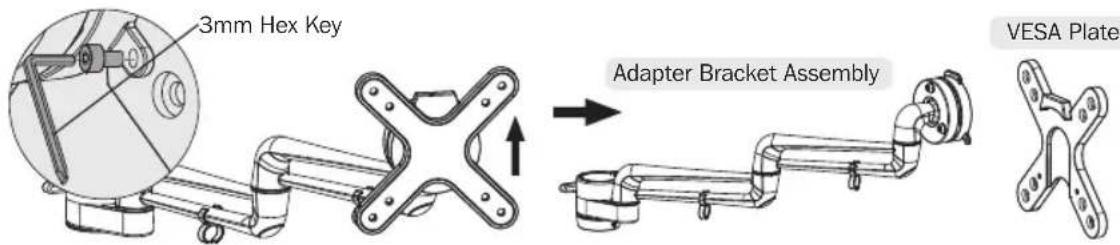
- Use Hex Key to loosen the screws in order to separate the VESA plate from the Adapter Bracket Assembly.
- Retain these screws for later use.
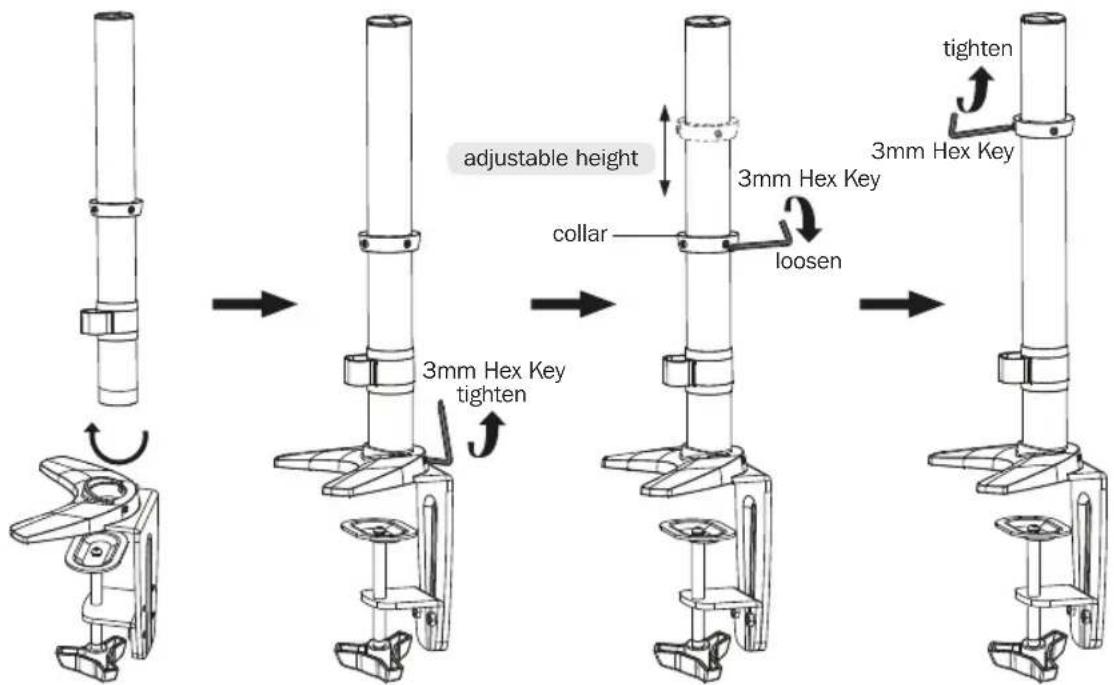
2. Install the Pole and Desk Clamp Assembly
3. Desk Installation
- Determine approximate location for mount, keeping in mind display size, height adjustment and pitch/roll requirements.
- Slip the desk mount assembly over the edge of desk so that clamp fully contacts desk edge.
- Turn the knob to adjust the clamp to edge of desk and secure it tightly.
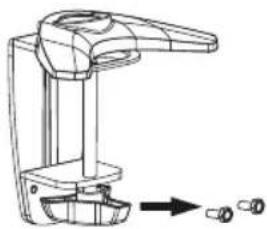
Note: If more secure clamping pressure is needed for thinner desktop surfaces, adjust the clamp adjustment plate by removing the two screws from the desk clamp assembly, then align the clamp adjustment plate with the desk clamp assembly's upper holes and reattach using the same screws.
3. Desk Installation
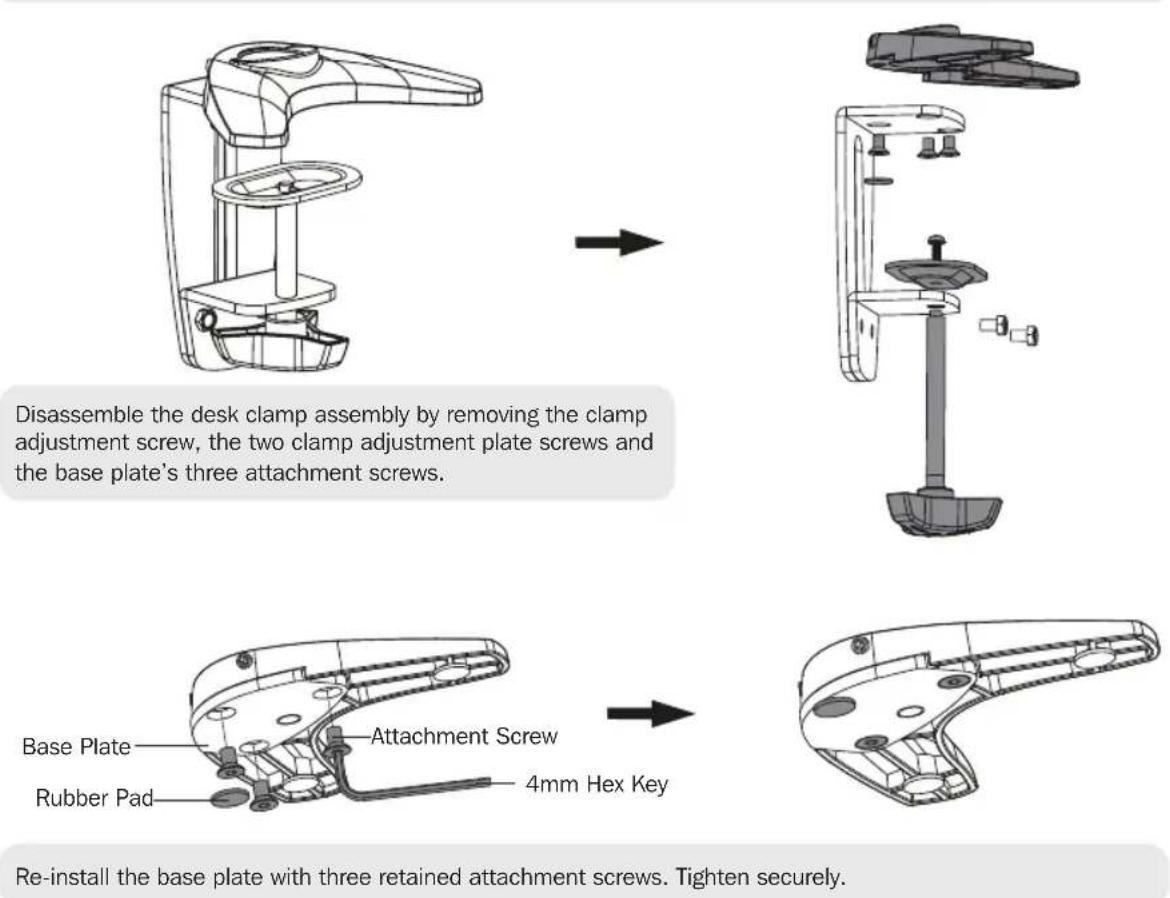
3b. Hole Installation

From below the desk, insert retained clamp adjustment screw through pad and up through the hole in the desk. Thread screw by turning the knob into base plate, but do not tighten completely at this time. Center the desk mount assembly over the hole and then securely tighten the Clamp Adjustment Screw.
4. Install Adapter Bracket Assembly
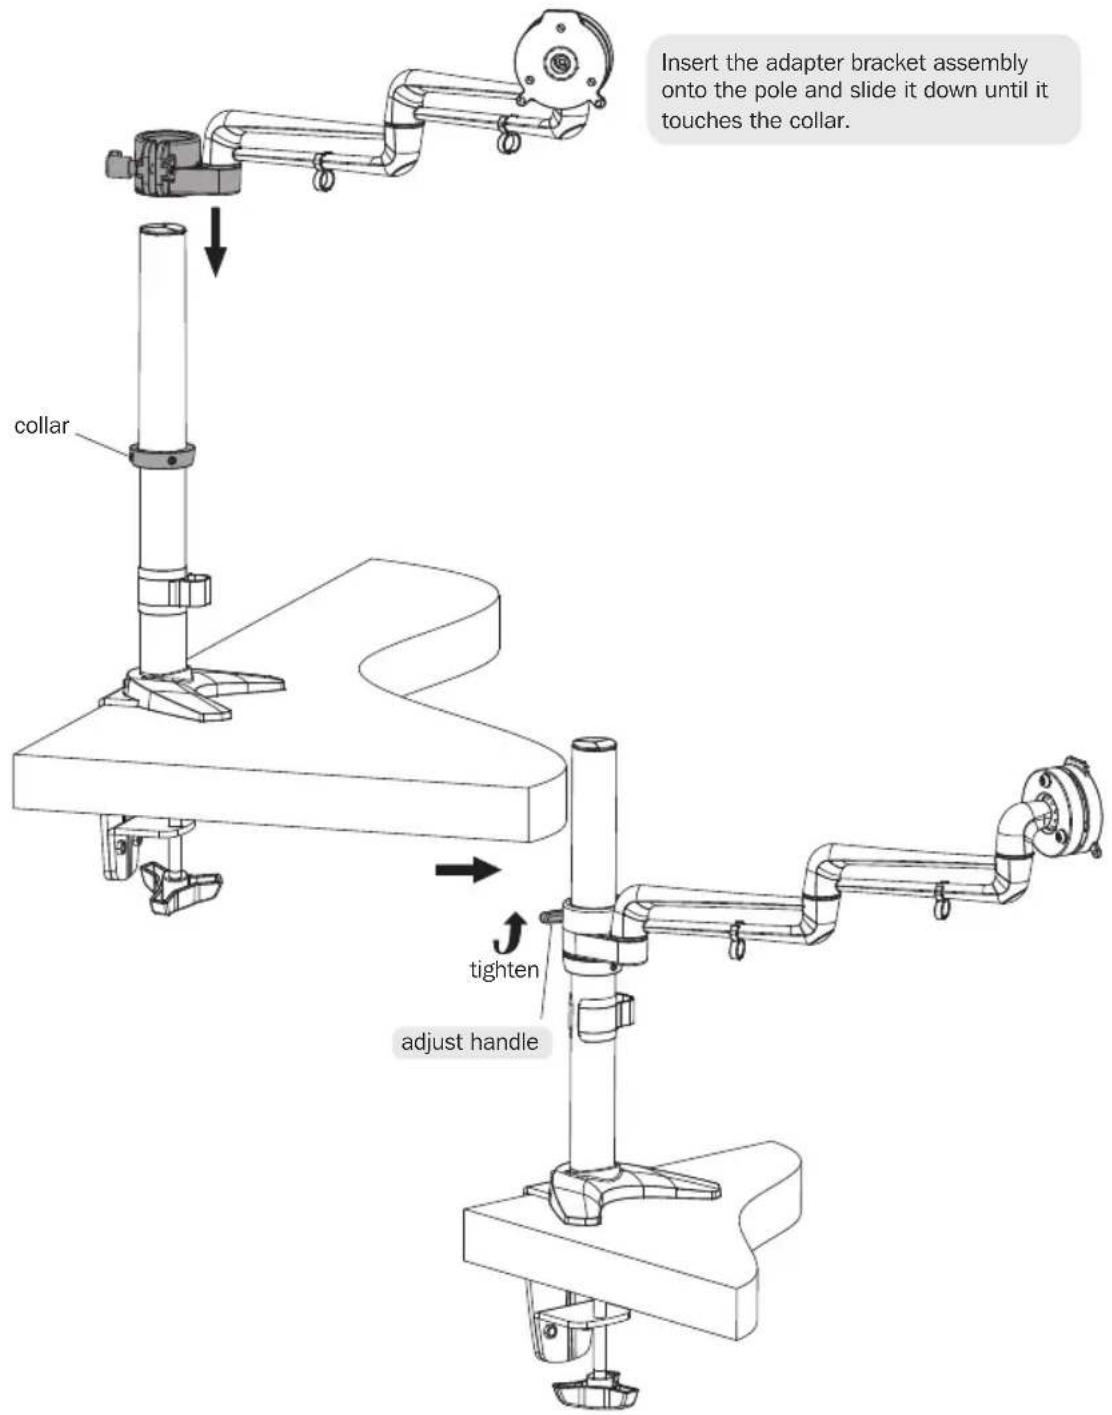
To tighten the adapter bracket assembly, push the plastic handle in and turn upward until it can turn no more. Then pull the plastic handle out to disengage from the hex bolt and turn it down to the bottom position. Once again, tighten by pushing the plastic handle in and turning upward until it can turn no more. Continue process until firmly secured.
Note: Repeat the same process to loosen, except push the plastic handle downward from the top position.
5. Install VESA Plate
Lift the display and align the rear mounting holes with the mount's VESA plate.
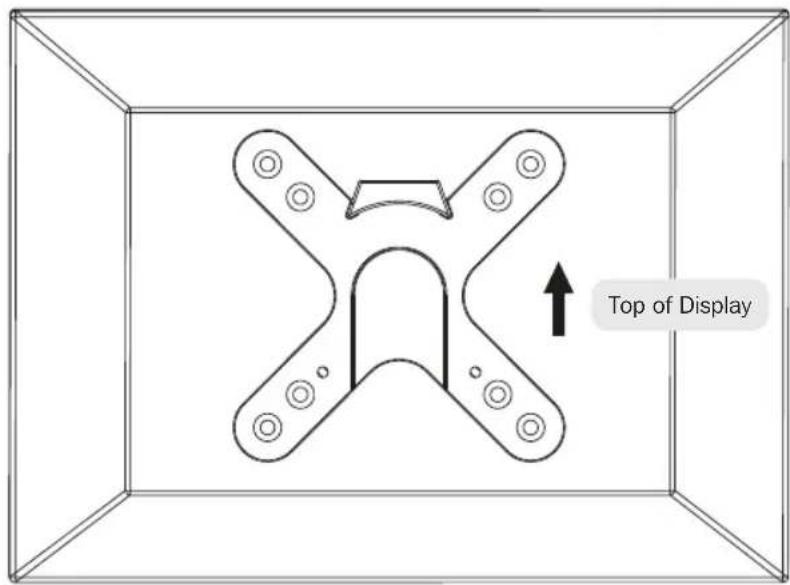
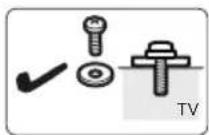
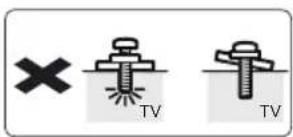

Attach the display to the VESA plate with the appropriate included screws.
Do not over-tighten screws.
6. Install the Display
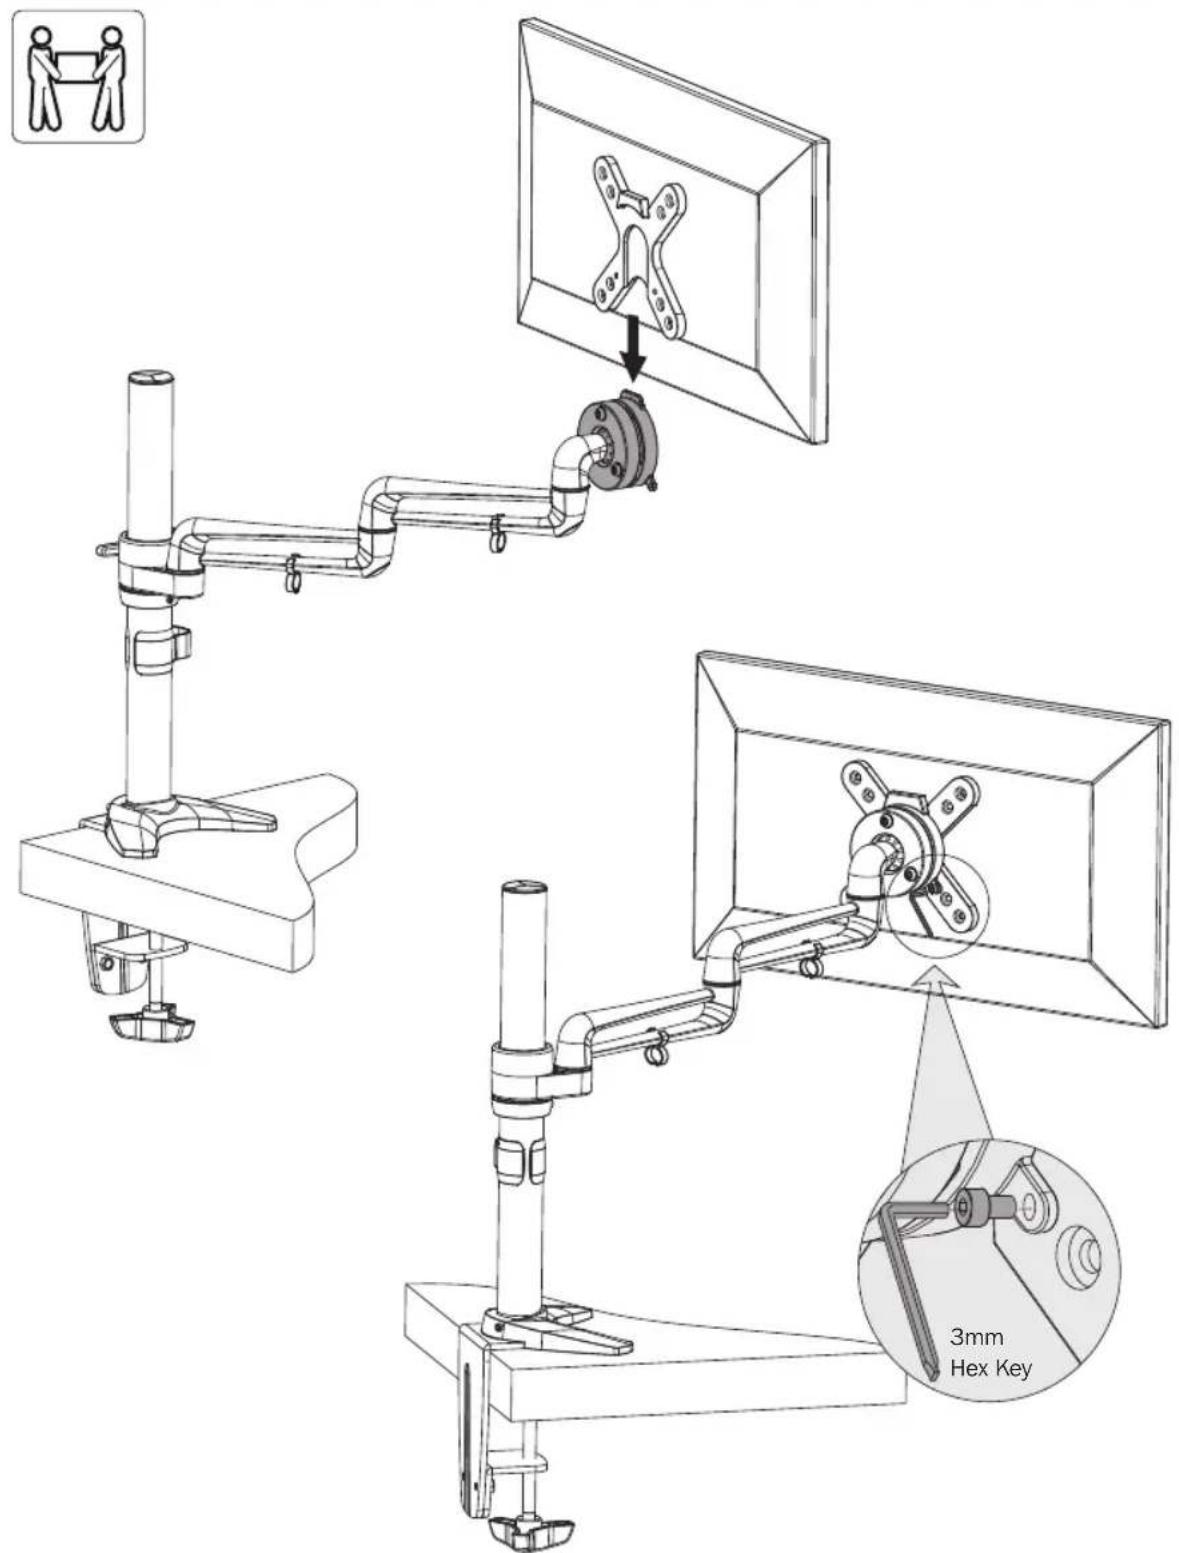
Using an assistant or mechanical lifting equipment, lift the display with attached VESA plate and slide onto the head of the adapter bracket assembly. Use the screws removed in Step 1 to secure the VESA plate and display to the adapter bracket assembly. Make sure the display is safely secured before releasing.
7. Cable Management
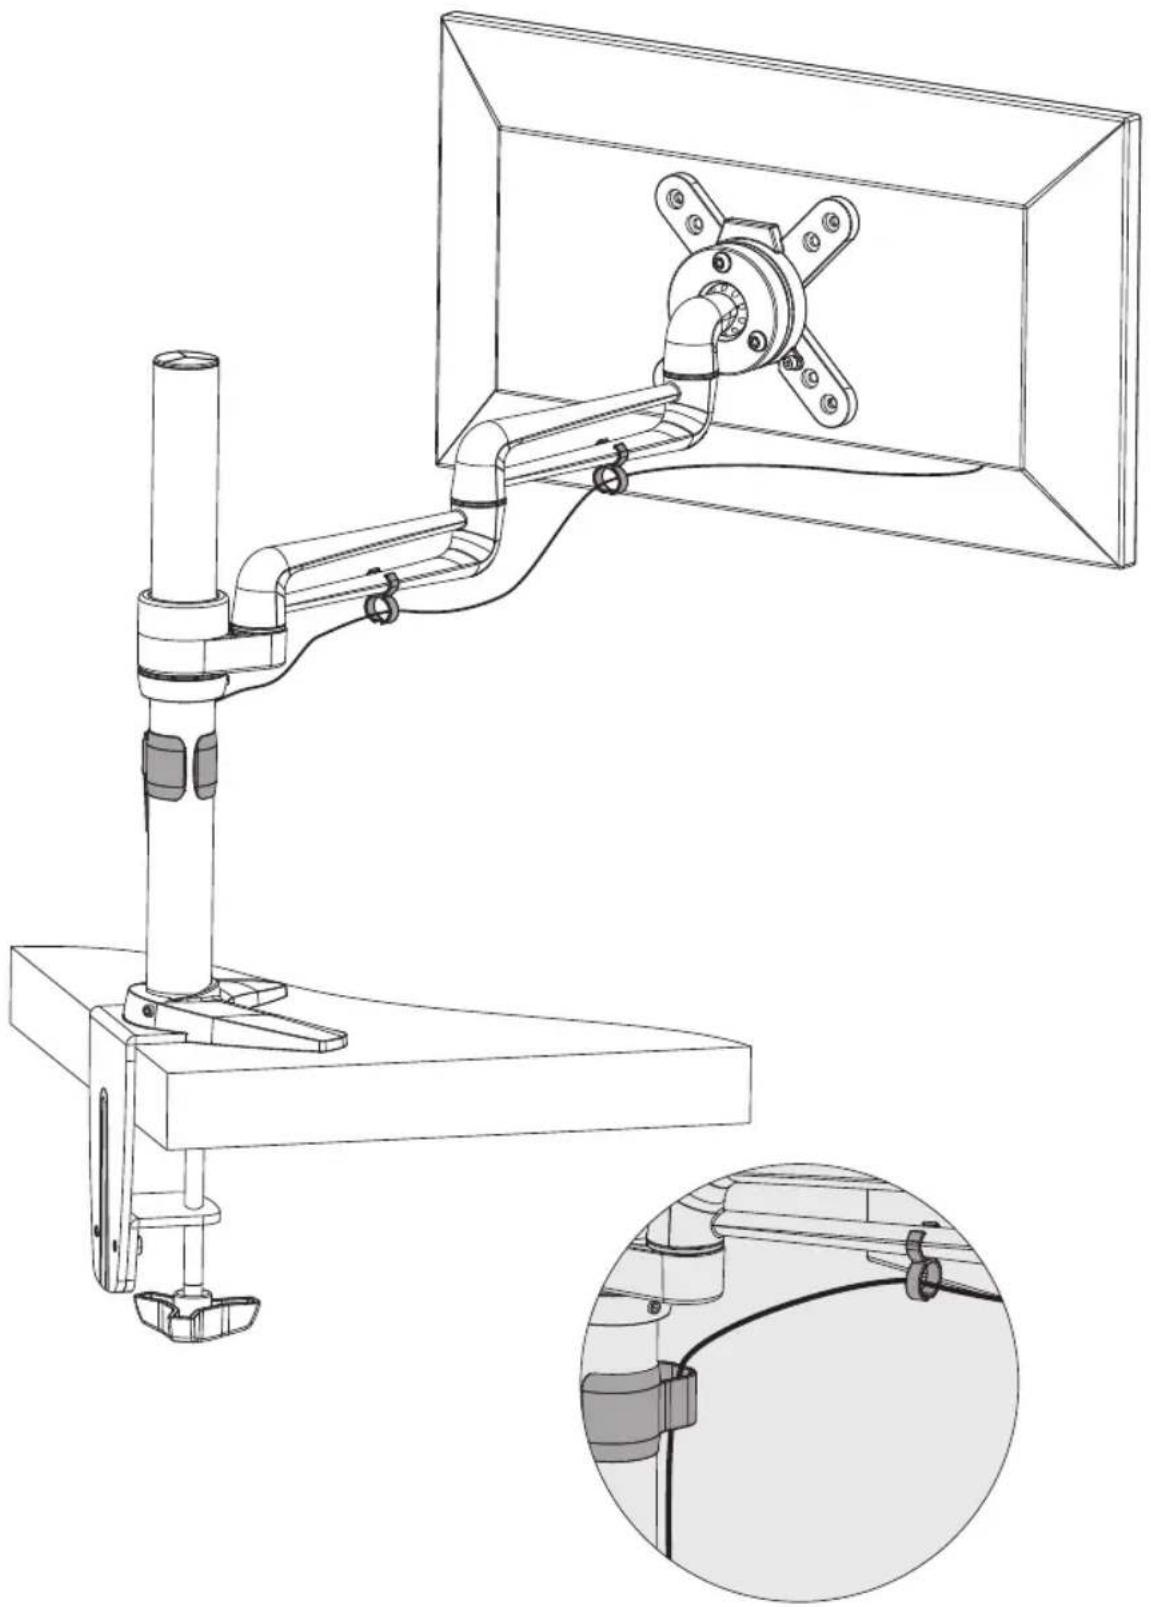
Use clips for routing the cables.
Note: Leave slack in the cable for arm movement.
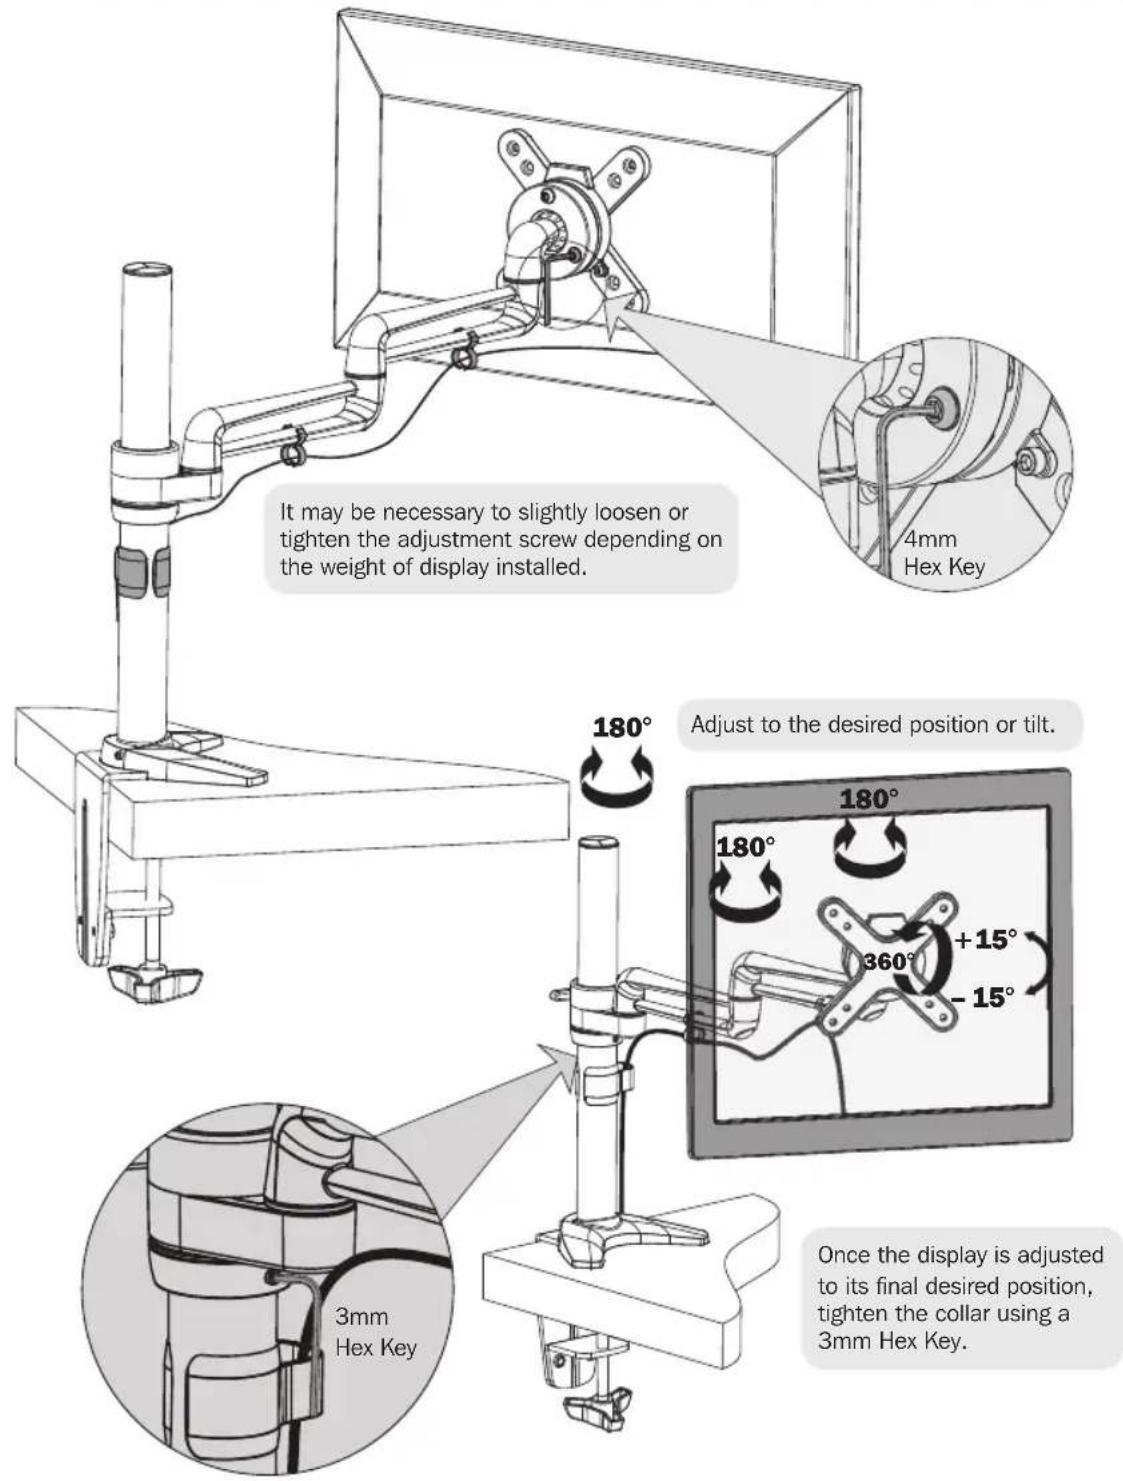
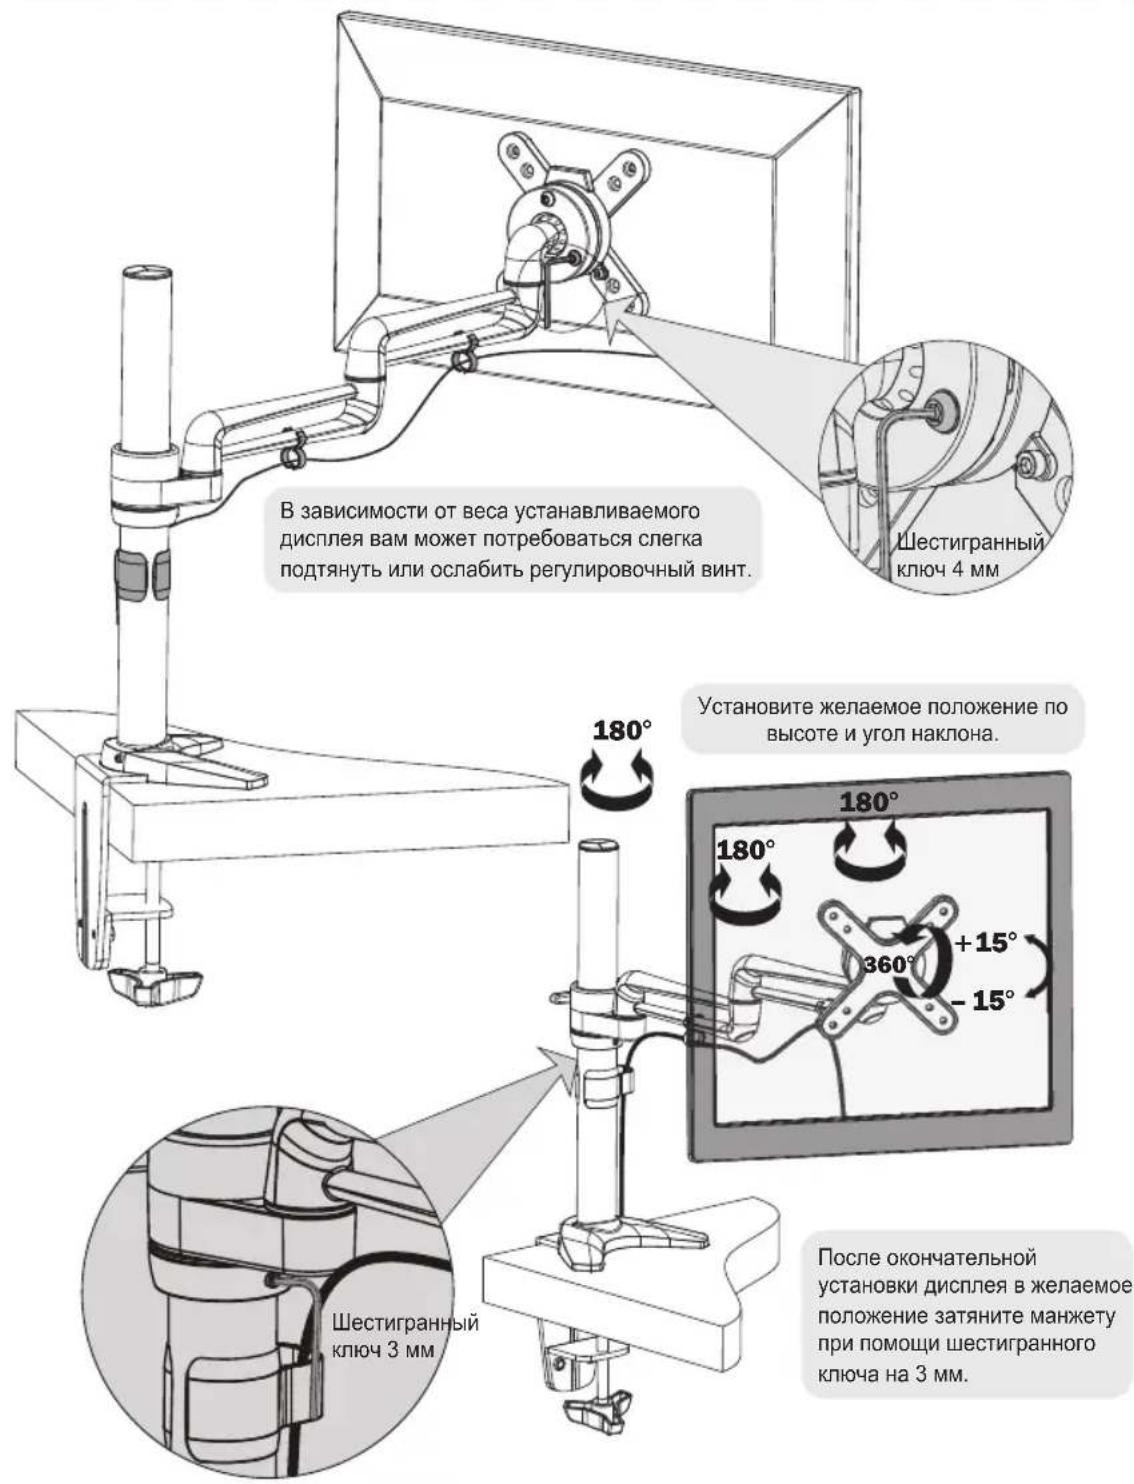
8. Adjustment
Maintenance
- Check that the bracket is secure and safe to use at regular intervals (at least every three months).
- Please visit www.triplite.com/support if you have any questions.


1111 W. 35th Street, Chicago, IL 60609 USA • www.triplite.com/support
1111 W. 35th Street, Chicago, IL 60609 USA • www.triplite.com/support
1111 W. 35th Street, Chicago, IL 60609 USA • www.triplite.com/support
PykoBODCTBO NOIb3OBaTeJia
OdHomeCTbI 3aXnM c r6kI m pIeYOM dJa KpeJIeHna PLOCKOTo 3KpaHa K CTOJy
MOДЕЛБ: DDR1327SFC
English 1 • Espanol 12 • Français 23 • Deutsch 45

BHIMAHHE! HE IPREBbIaIe MAKcIMANbHO DOyCTMbI BEC. 3TO MOKET IINHHTc CYIecTBEHbI BPeI 3IOPOBbIO JIODEI NII MATEPNAJIbHbI yUePSI

75x75/100x100


1111 W. 35th Street, Chicago, IL 60609 USA • www.triplite.com/support
OxpanheTcA BTOPCKIM npaBOM © 2014 Tripp Lite. Nepeneuatka zanpeuaetc.
PIMMEUHNE. Npeed nauJOM yCTAHOBKn i c6opKn MOyJN BHNMaTeNbHO n3yUHTe BCE pa3JeIbI pyKOBOcTBA.

BHIMAHNE
He naHnaiTe yCTaHOBky Do Tex nop, noka He O3HaKOMTecb Co BCEMn yKa3aHnmaN i npedynpejckdeHnAIMN, n3IOKeHHbIMN B HAcTOIeM pyKOBOdCTBe, n He noMeTe IX Cmbl. B cnyae Bo3HnKHOBeHnY bac KaNX-Im6 BOBpOcOB OTHCnTeNbHO JIO6bX yKa3aHn Nnn npedynpejckdeHn npirnaaem Bac nocetntb CTpaHnCy www.triplite.com/support.
- 3TOT MONTAXHbI KPOHHTeIN IpeHa3Hauen IINy YCTaHOBn INCIOHB0BaHn TOJbKO B COOTBeTCTBm C yKa3aHnMn, N3IOKeHHbIMn B HAcToIeM pyKoBOcTBe. HenpaBnHnaYCTaHOBka DaHHoro MOyJI MaOxyET PnBEcTN K pNpUHeHnO MaTePnAIBHO rUep6a nn CyueCTBeHHoro BpeDa 3DopOBbIO JIOJe.
YCTAHOBKa DaHHoro N3dJIeNIA DOJIIXHA IPOIN3BOIDITbCRA TOJIbKO CNEIaJIINCTOM C DOCTaTOOH TeHXHueCKo KBaINΦnkaUeN 6a3OBbIMN HABbIKAMN CTPOINTeJIbCTBA, B NOJHO Mepe HOHMAOUM CMbICN INΦOpMaUIn, IN3IOXeHHoB H HAcTOrIeM pyKOBODCTBe.
- Y6eIITecb B TOM, YTO MOHTaXHnA NOBepxHOCTb MOKeT C 3aNacom BblpeKnBaTb CyMMapHyO Harpy3Ky, CO3dAbaEMyoOBopyIDobAHnEM IN BCEMN BXODJUIMN B KOMPNEKT DeTaJIaMn OCHACTKN I DpyTNMI KOMIOHEHTAMN.
- ⅡIЯ 6e3oNacHOrO NOBbEma HnAaJcero pa3MeUeHnO bOpyOBaHn O6ra3aTeNbHO 6paauTecb 3a nOMoubIO IIN NOnb3yITecb MExaHueckIMrpy30NObEMHbIM CpeDCTBaMn.
BnHTbI cneDyET 3aTgNBaTb IIOTHO, HO He nepeTgNBaBx. IpeTgNBaHHe MOKET npuBecTu K NOBpeXdEHNO KpeNEXHbIX DeTaJe, YTO 3HaHTeNbHO yXyDUn TpoUHOcTB KpenJIeHnA.
-Данhoeи3делпретнэзчehо ДЯИСПОЛБ3OBAHNY TOьКВ 3akpbIbIX NOMEUHIX.ИспОЛБ3OBaHNe ДАнHOrO ИЗдELNЯ HA OTKpbITOM BO3dYxe MoKET ПиВeCTN K eRO BbIXOdy I3 CTPOI npuHHeHIO BpeDa 3dOpOBbI OIOdeN.
TapaHTnHbIe 063aTeNbCTBa
YcnoBn5-JeTHNeOrpaHueHHoIraPANTN
poDaBe rapaHTnpyET OTCyTCTBne N3HaayabHbIX DepeKToB MaTePnAa ININ N3ROTOBHeNn B TeeHne 5 let C MOMeTa nepBOI NOKyni DaHHoro N3DeJInr pRn yCNOBNr ERO NCIOJIb3OBAHNr B COOTBEcTCTBNr CO BCEMn PnIMeHMblm K HEmy yKa3AHmN. B cnyae npoRbEnHn KaNX-Im6o DepeKToB MaTePnAa ININ N3ROTOBHeNn B TeeHne yKa3AHORo Nepnoa IpoDaBeocUyecTbLnE t peMOHT ININ 3ameHy daHHoro N3DeJInr NCKIOUHTenbHO IO CBOEMY yCMOTpeHIO.
ДЕСТВИЕ HACTОUIE ГАРАNTИНЕ PACПОCTPAHЯETССHA CLYUAN ECTECTBEHHORO N3HOCA INIINIOBPEXDEHIN B PE3YJbTATE ABAPIN, HEHADJIEXKAUSERO ICSNOJIb3OBAHNIA, HAPUYEHNIPABINJ3KCNIIYATAUIN INIIN XAIATHOCTN. ПОДALECUHE ПЕДОCTABJARETNIKAKNX YBHO BbIPAXEHHbIXГАРАNTI 3A NCKIQUEHNEМПЯMO N3LOXEHONB HACTOUIEM DOKUMEHTE.3A NCKIQUEHNEMCLYUAEB, 3APUESEHHbIX DEIECTBYOUZIM 3AKOHODATEJBCTBOM, BCE NOДРASMEBAEMBIE ГАРАNTIN, BKIOUCHA BCE ГАРАNTIN PIPRODHOCTNДЯ ПОДAJN INI INCNOJIb3OBAHNIA NO HA3HAUEHIO, OPGAHUNeHBI NO PPOJOJIJKITEJIbHOCTN DEICTBNUB BblJEYKA3AHHBIM TAPAHNTINHbIM CPOKOM; KPOMETOI, IN3 HACTOUIE TAPAHNTIN YBHbIM OBPA3OM NCKIQUAOTCRBCE IOBOOCHBIE, CLYUAYHbIE INKOCBEHHbIE YbItKN. (B HeKOTOpbIX WtTaTX He DoNYCKaETcB BBeDEHne ORpAHueHIN Ha pOdoJIKNTeNbHocTBdeCTBnTex INI INhIX NOp4zMBAeMbIX rapaHTN, a B HeKOTOpbIX - NCKIQUEHNE INI ORpAHueHIne pa3MepaNo6OuHbIX INI INKoCBENbIX y6bITKOB. B 3tIX CNyuaX BblJeN3LOXeHNBIE ORpAHueHIN INI NCKIQUEHN MOrYT ha Bac HepacnpocTpaHantbcr. HactoIaRraPANTNпpeOCTabJIeT Bam KOHKpeTHbIe IopNiDneckne npaba, a HabOp dpynx Baunx npab MoKet 6bITb pa3NIuHbIM B 3aBNCIMOCtN OT opncdnkun).
BHIMAHIE! Do nayana nCOnb3OBAHn DaHnoro yCTpoiCTBa NoJIb3OBATeN BoJKeH y6eHTbcra B TOM, YTO OHO ABJRAcT pynroDhBM, COOTBETCTByUoM INI 6e3OnaChBM dIN PpeDnoraemoro npimHeHn. B C8r3n c 60nbHM pa3Hoobpa3nEM KOHKpeTHbIX pImHeHn IpnO3BOuTeNB He DaET KAKnx-1n6o 3aBepeHn INI rapaHTn OTHCtEnbHO pInroDnOCTn DaHHbx IN3dEIN Dn KaKOrO-Ni6o KOHKpeTHORO npimHeHn INI INx COOTBETCTBnA KAKIM-JIN6O KOHKpeTHbIM Tpe6OBaHnM.
KoMaHn Tripp Lite nocToHHo COBepueHCTByeT CBOIO npOykuHIO. B cBa3N C 3TNM BO3MOXHO H3MeHeHne TexHnuecknx XapakTePncIHK 6e3 npEdbapntelbHoro yBeDOMJeHHa.
IpeueHb KOMnJIeKtauIN
BHIMAHHE!
Ipeed hauanom yctahOBkynybeintecb TOM,HTO BAMN NONYeHb BCE Detanin cornachO
IpeuHIO KOMnJIeKTAaun. B cnyae OTCyTCTBna IIN NObpeXdHn KaKnx- nbo DeTaeJe
obpatnttecb 3a nomoosno Ha ctpanu www.triplite.com/support.

IepexoHbI KpoHHTeH B c6ope (x1)

YCTaHOBtE OCHOBHHe Ha MeCTO C NOMOUsbTo TpeX OCTaBUnxscr KpeNekhBix BnHTOB. IIOITHO 3aTAYHtE BnHTbI.
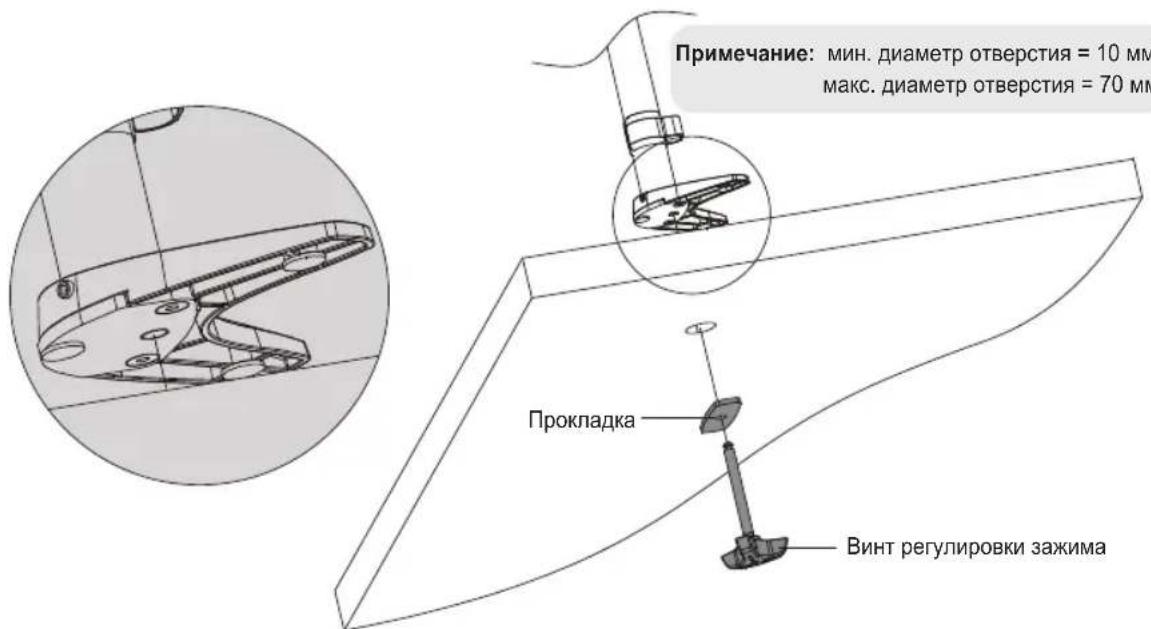
Bctabte ocTabuHc BHT perynipOBKn 3axmna no HanpaBneHIO n3-noCToJa BBePx Chepe3 npoknAky n OTBepCTne B cTone. NobopoTOM roJbKn BBePnTe BHT BOCHOBAHNE, noka He 3aTARNBaER oNlHOCTbO. BCTabTe kpoHtEIN DnHaTOJIbHorO MOHTaKa B C6ope nO CEHTpy OTBepCTnRA, a 3aTEM NIOTHO 3aTAHNTe BHT perynipOBKn 3axmna.
4. YctahOBHTe nepexoHbI KPOHHTeH B c6ope
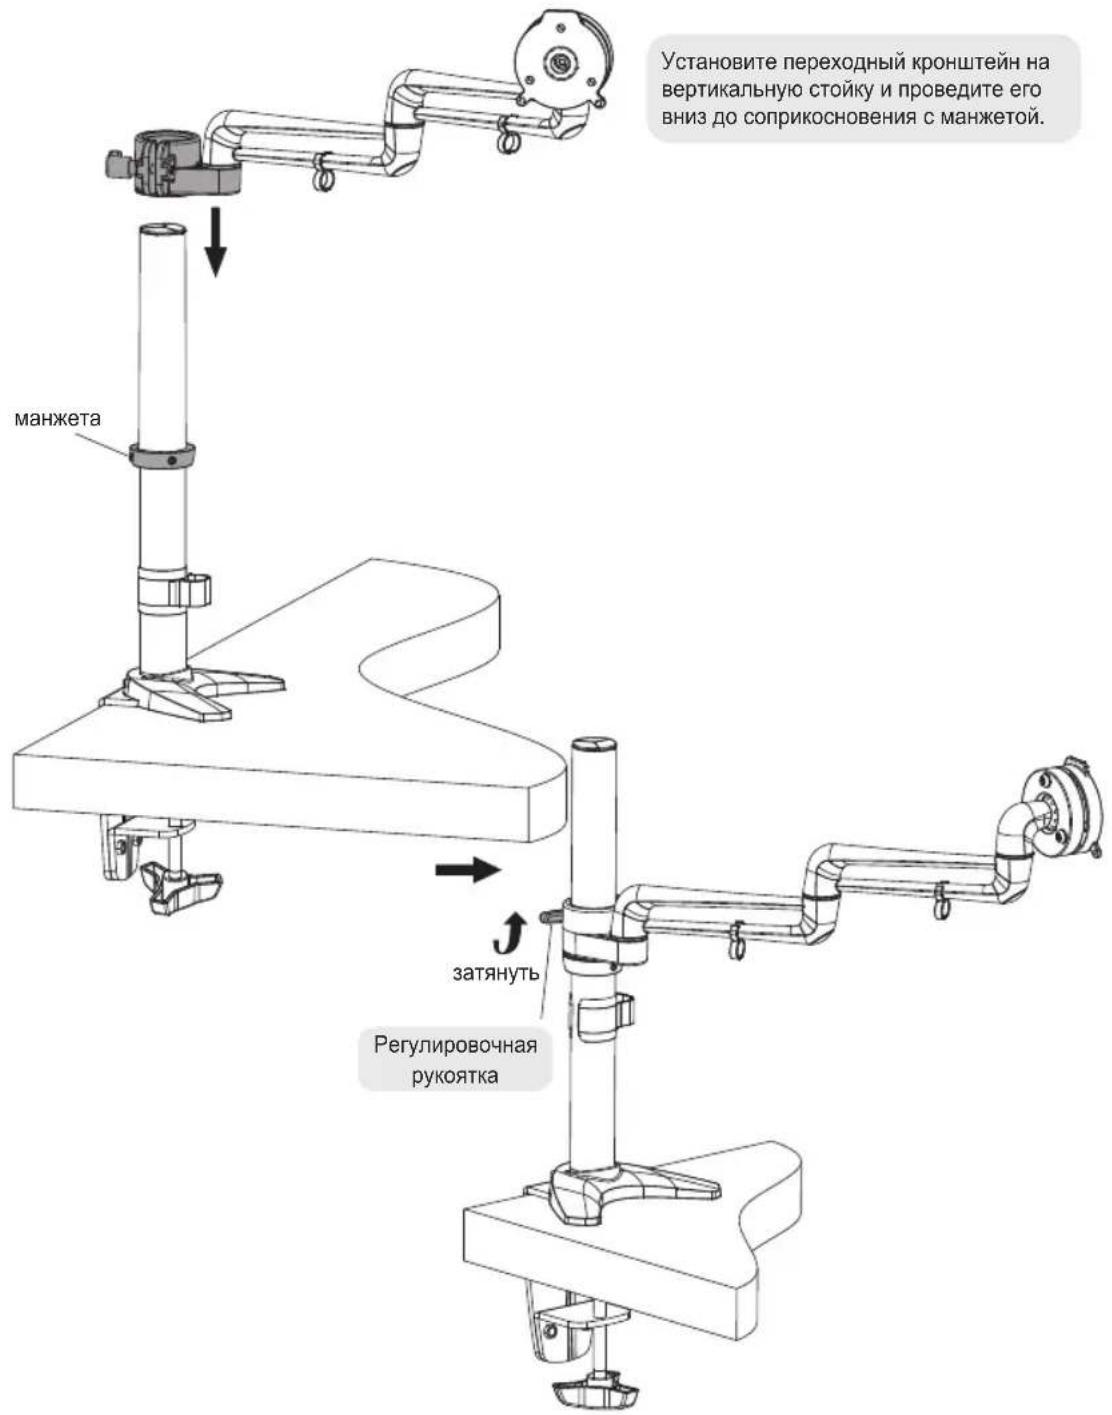
IЯЗкpenneHЯ nepexoHOrO kPOHHTeHa BdaBnTe PnactMaccBOyIO pyKoTky I NOBepHnTe ee NO HAnpaBHeHIO BBePx Do ynpa. 3aTeM BbITAHte PnactMaccBOyIO pyKoTky O6pAHO nnEe paCuenHeHc I WeCTNrpAHHo IOnOBKO 60NTa I NOBepHnTe B HnXHee nNoXeHne. Nocne 3TOrO CHObA BdaBnTe PnactMaccBOyIO pyKoTky I NOBepHnTe ee No HAnpaBHeHIO BBePx Do ynpa. PpOdoJIkaTe DaHHb II pOuecc, Noka KPOHHTeH He 6ydet npOHO 3aФнICnPobAH.
PpmeaHne. Ira ocnabneHn KPOHHTeHa NOBTOPe TOT JKe IpOeCC, TOIbKO B 3TOM CNYae PnactMaccOByIO pyKoRTky cNeDyET nepMeMaTaB BnH3 N3 BEPxHrO NNOKeHn.
5. YctaHOBInTe Ha MecTo nlaCTnHy VESA
IOnHIMNTe DnCnne N COBmecTnTe HIXHHe MOHTaXHbE OTBepCTn C nlaCTnHO VESA, RbJIauOuSeiCzIeMeHToM KPOHtTeHa.
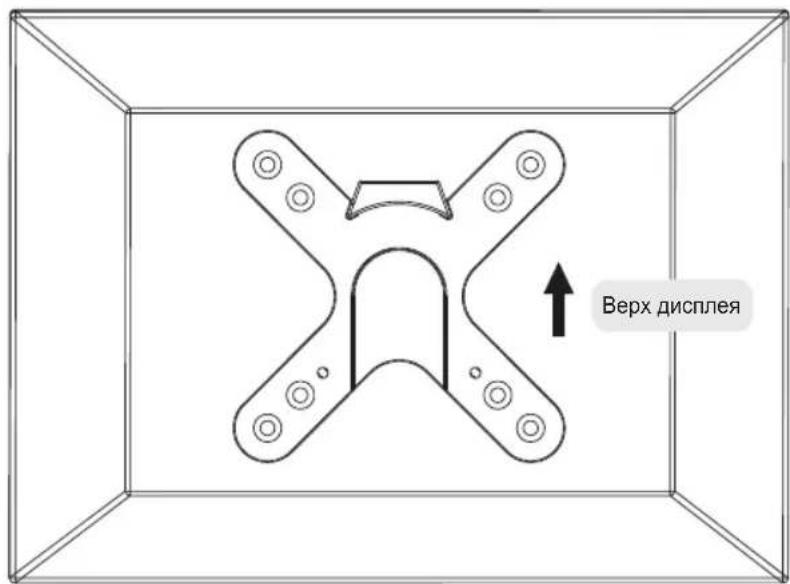
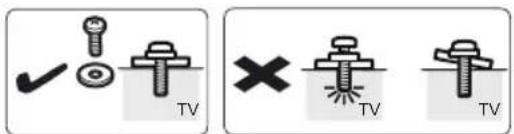
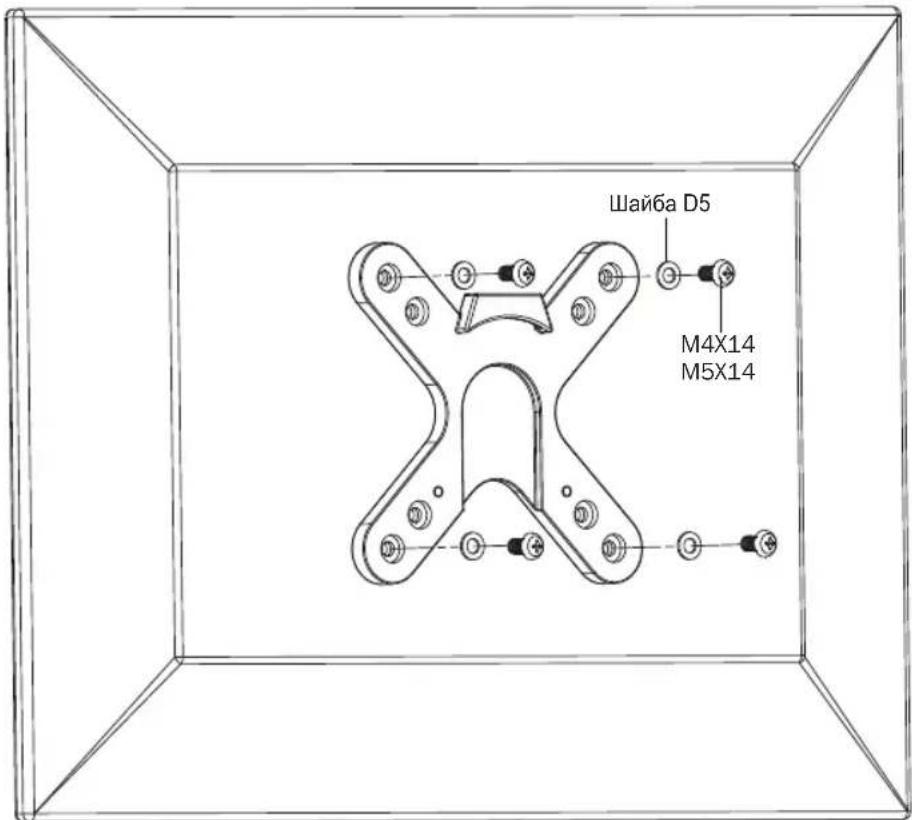

PnPKeINTE DnCnne K nactHe VESA C nCnoB3OBaHem COOTBeTCTByIOx BNHTOB, NOCTABnREbIX B KOMNNEKTe
IIOtHO 3aTHHte BCE BnHTbI. He nepetraBauTe.
6. YctaHOBNTe dncnne
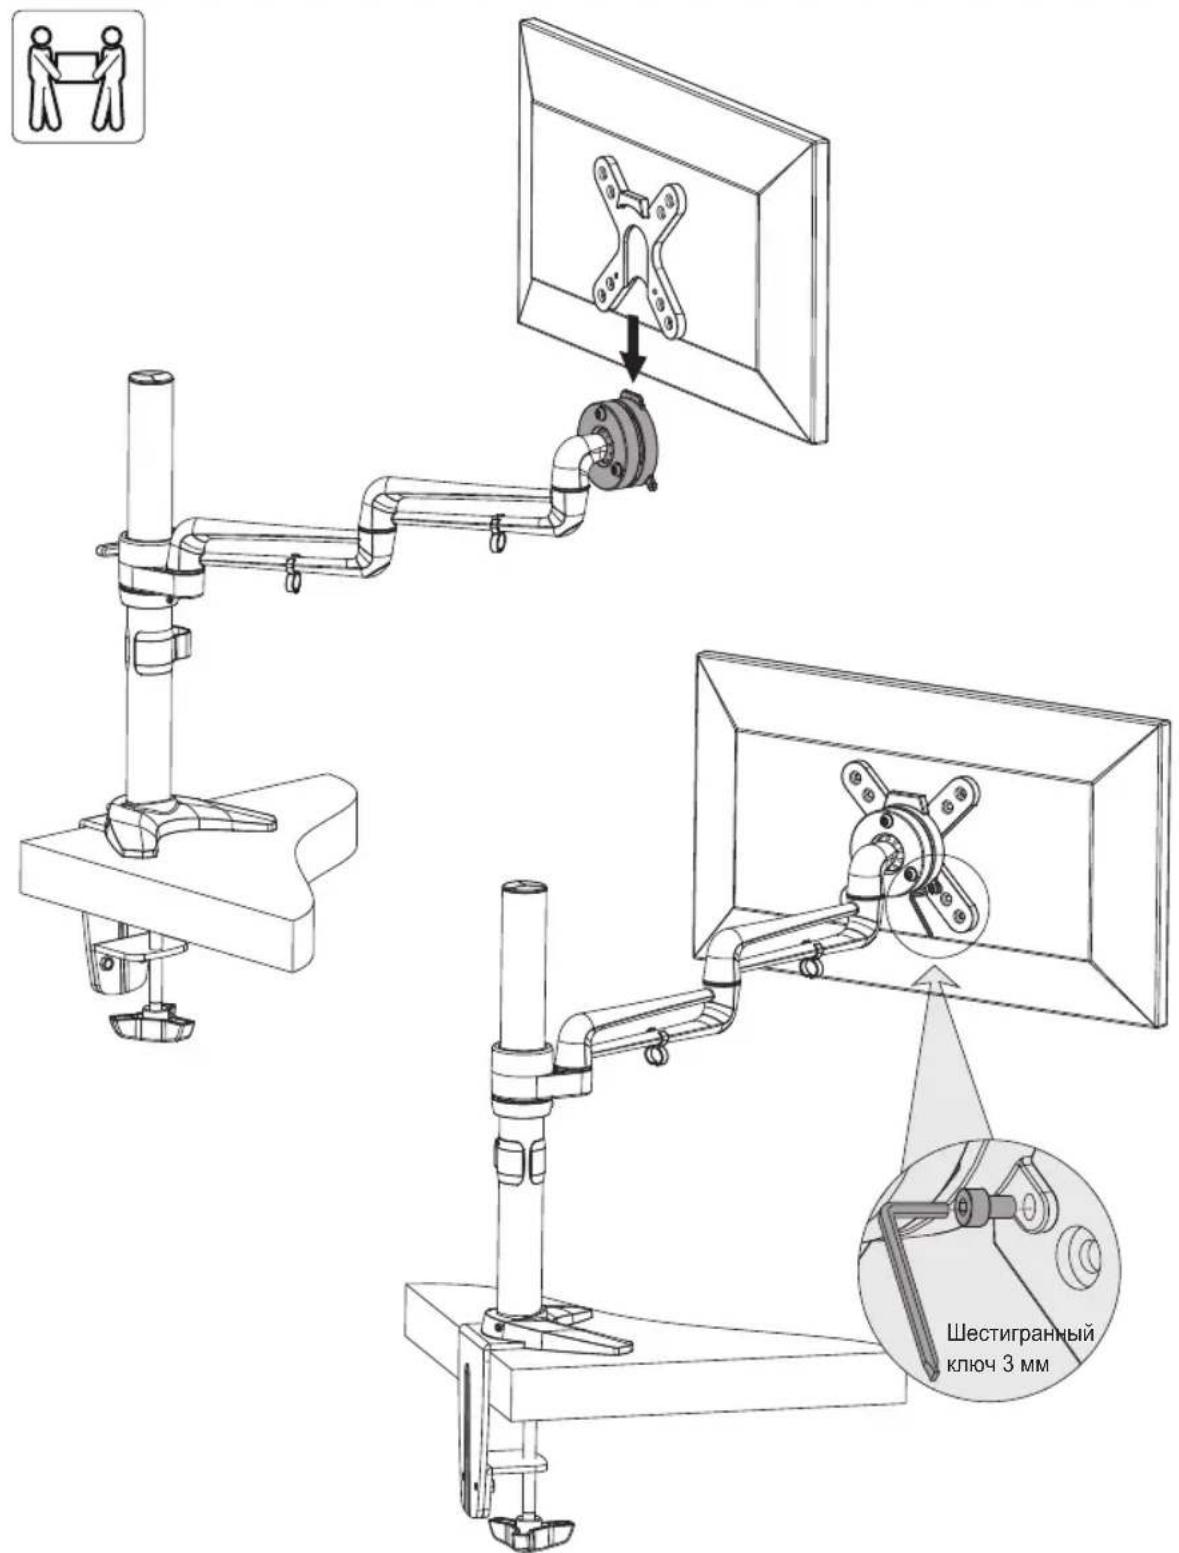
O6paTbBwncb 3a NOMOuHIO INI BOCNOJb3OBABWNCb MEXAHuecknIM NOJBemHBIM O6pyoBaHNEM, NOHMITE DNCLTIe C npKpePENHno K HEmy PnactInHO VESA nHaedeHte ero Ha BepxHIO uACTb NepexoHoro KPOHHTeHa B c6ope. PpIKpeNTe pNactInHy VESA nDcNneK NepexoHOMy KPOHHTeHy B c6ope npN NOMOu BNHTOB, BBIBepHyTBix Ha ware 1. PpeXJe Yem OTNyCTNb DcNcNe, y6eUTeCB TOM, YTO OH NaExHo 3akpenJIeH.
7.Оптимиазаця ka6eьных coeинн

IcnoIb3yIte 3aXIMblI JnI npoknaKn Ka6enei.
PpmeaHne. nOeocneeyHn BO3MOXHOCTn BpaueHn KPOHtHeHa KaebI dONKeH IMeTb HEKOTOpoe npOBuCAHne
8. PerúnlípoBka
TexHnueckoe o6cIyXnBaHne
PerynepHO (he pexe, yem pa3 B Tpr Meca) npOBepaTe HndexHoctb KpennHeHna KpOnuTeHa N 6e3onacOcTbe rnoCnOJIb3OBAHnI.
B Cnyae BO3HKnHOBeHn KaKx-Jn6o BOpocB nprrnaaem Bac nocetntb ctpaHuy www.triplite.com/support.


1111 W. 35th Street, Chicago, IL 60609 USA · www.triplite.com/support
Benutzerhandbuch
1111 W. 35th Street, Chicago, IL 60609 USA • www.triplite.com/support
1111 W. 35th Street, Chicago, IL 60609 USA • www.triplite.com/support