Victoria Plus Silent - Pump ASTRALPOOL - Free user manual and instructions
Find the device manual for free Victoria Plus Silent ASTRALPOOL in PDF.
User questions about Victoria Plus Silent ASTRALPOOL
0 question about this device. Answer the ones you know or ask your own.
Ask a new question about this device
Download the instructions for your Pump in PDF format for free! Find your manual Victoria Plus Silent - ASTRALPOOL and take your electronic device back in hand. On this page are published all the documents necessary for the use of your device. Victoria Plus Silent by ASTRALPOOL.
USER MANUAL Victoria Plus Silent ASTRALPOOL
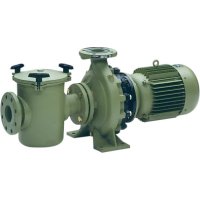
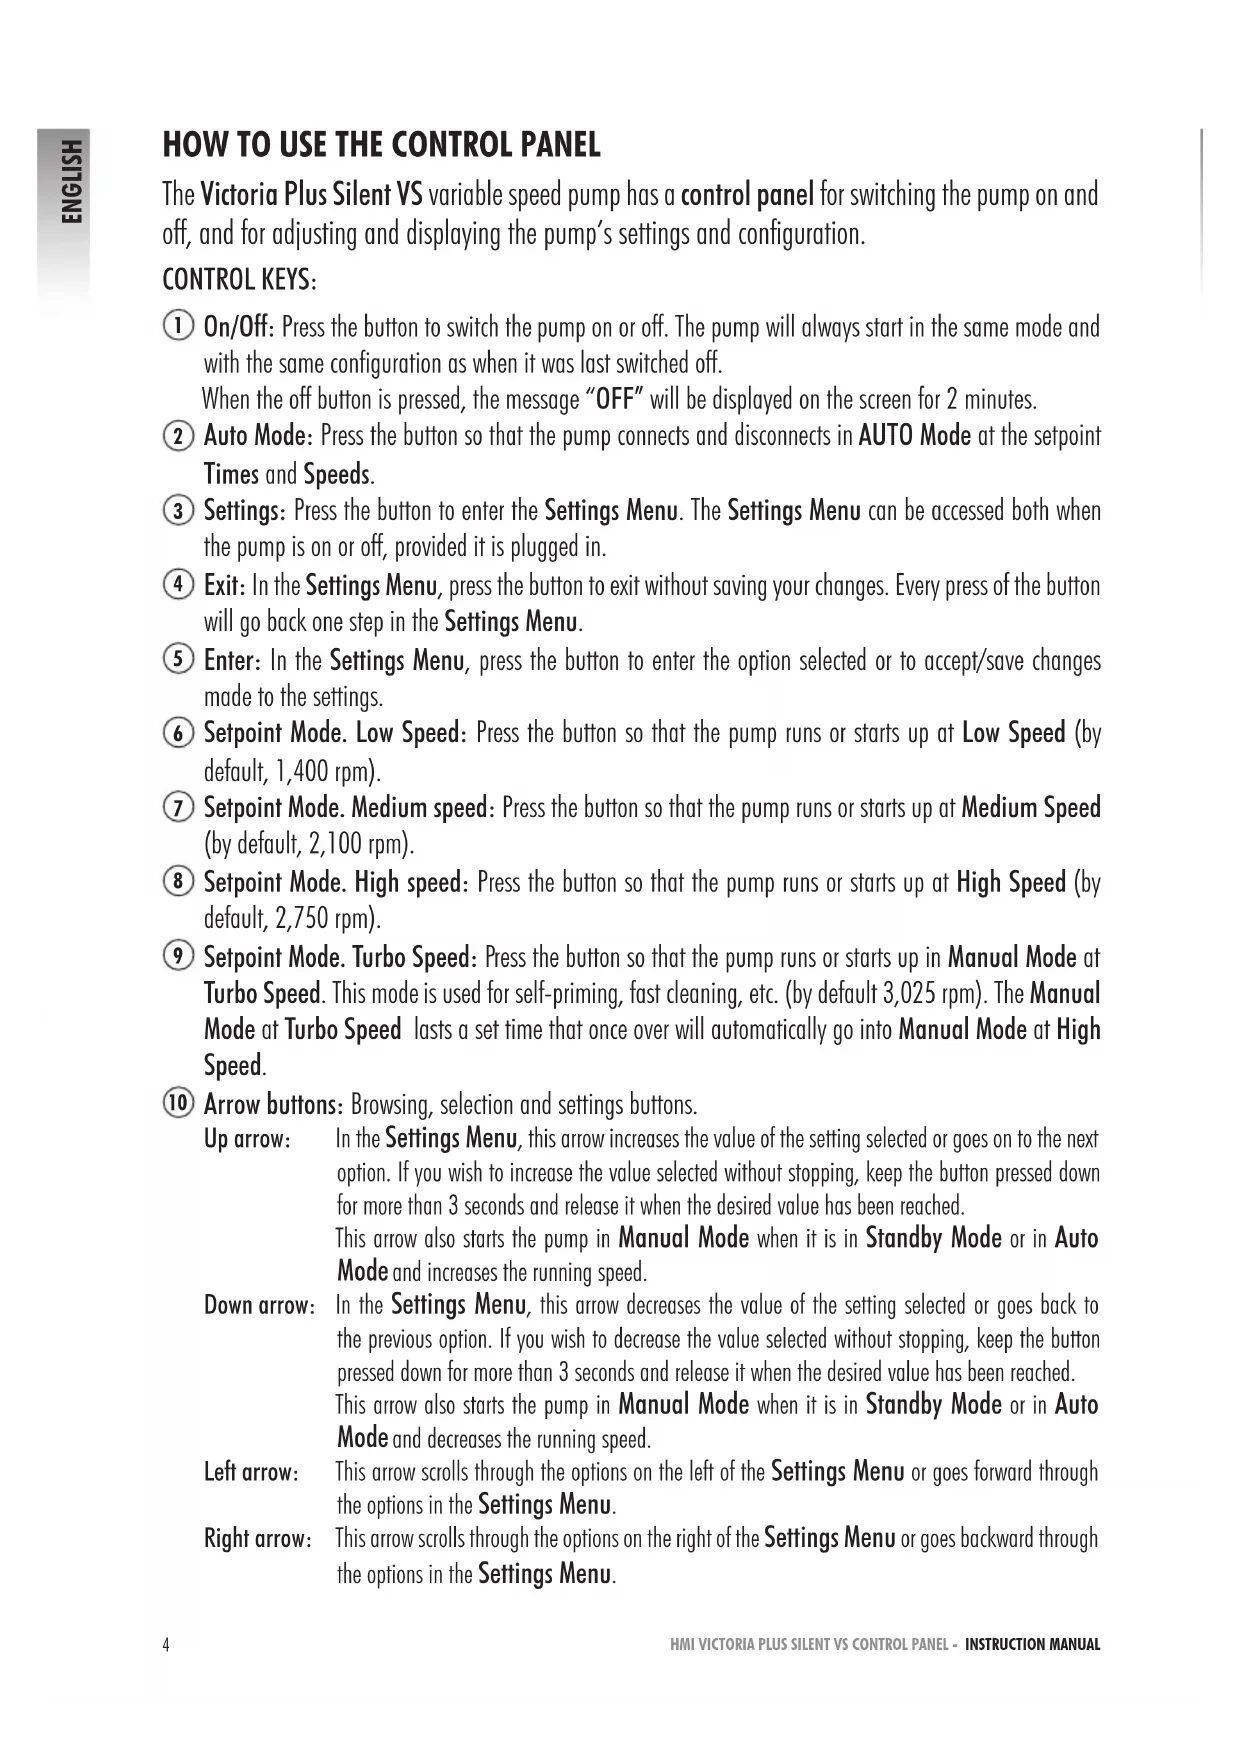
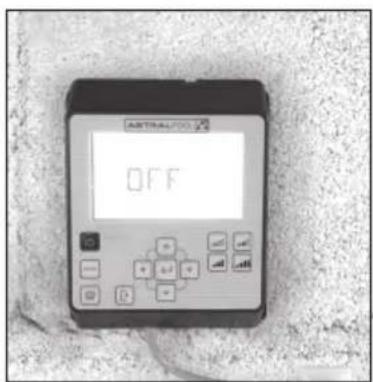
The Victoria Plus Silent VS variable speed pump has a control panel for switching the pump on and off, and for adjusting and displaying the pump's settings and configuration.
CONTROL KEYS:
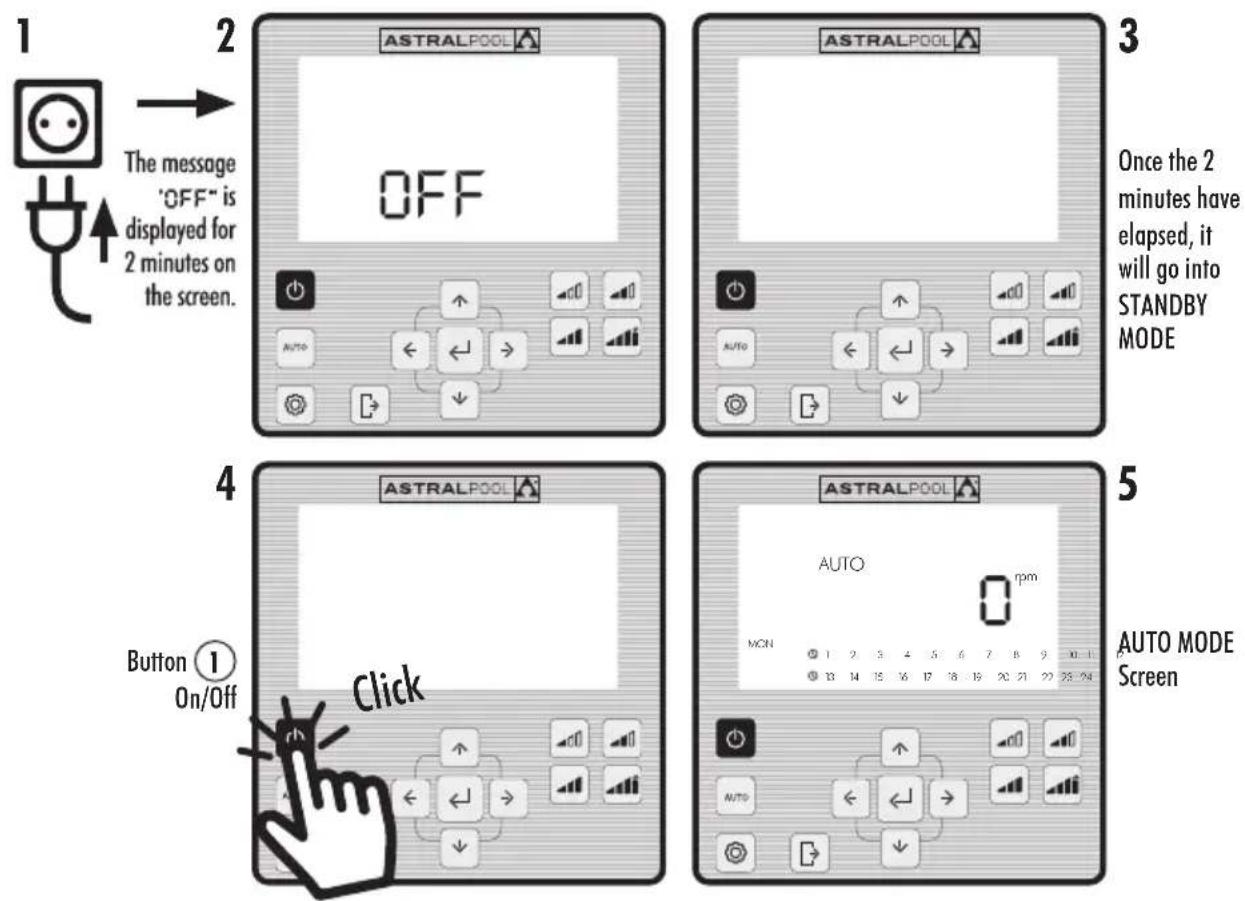
① On/Off: Press the button to switch the pump on or off. The pump will always start in the same mode and with the same configuration as when it was last switched off. When the off button is pressed, the message "OFF" will be displayed on the screen for 2 minutes.
② Auto Mode: Press the button so that the pump connects and disconnects in AUTO Mode at the setpoint Times and Speeds.
(3) Settings: Press the button to enter the Settings Menu. The Settings Menu can be accessed both when the pump is on or off, provided it is plugged in.
(4) Exit: In the Settings Menu, press the button to exit without saving your changes. Every press of the button will go back one step in the Settings Menu.
⑤ Enter: In the Settings Menu, press the button to enter the option selected or to accept save changes made to the settings.
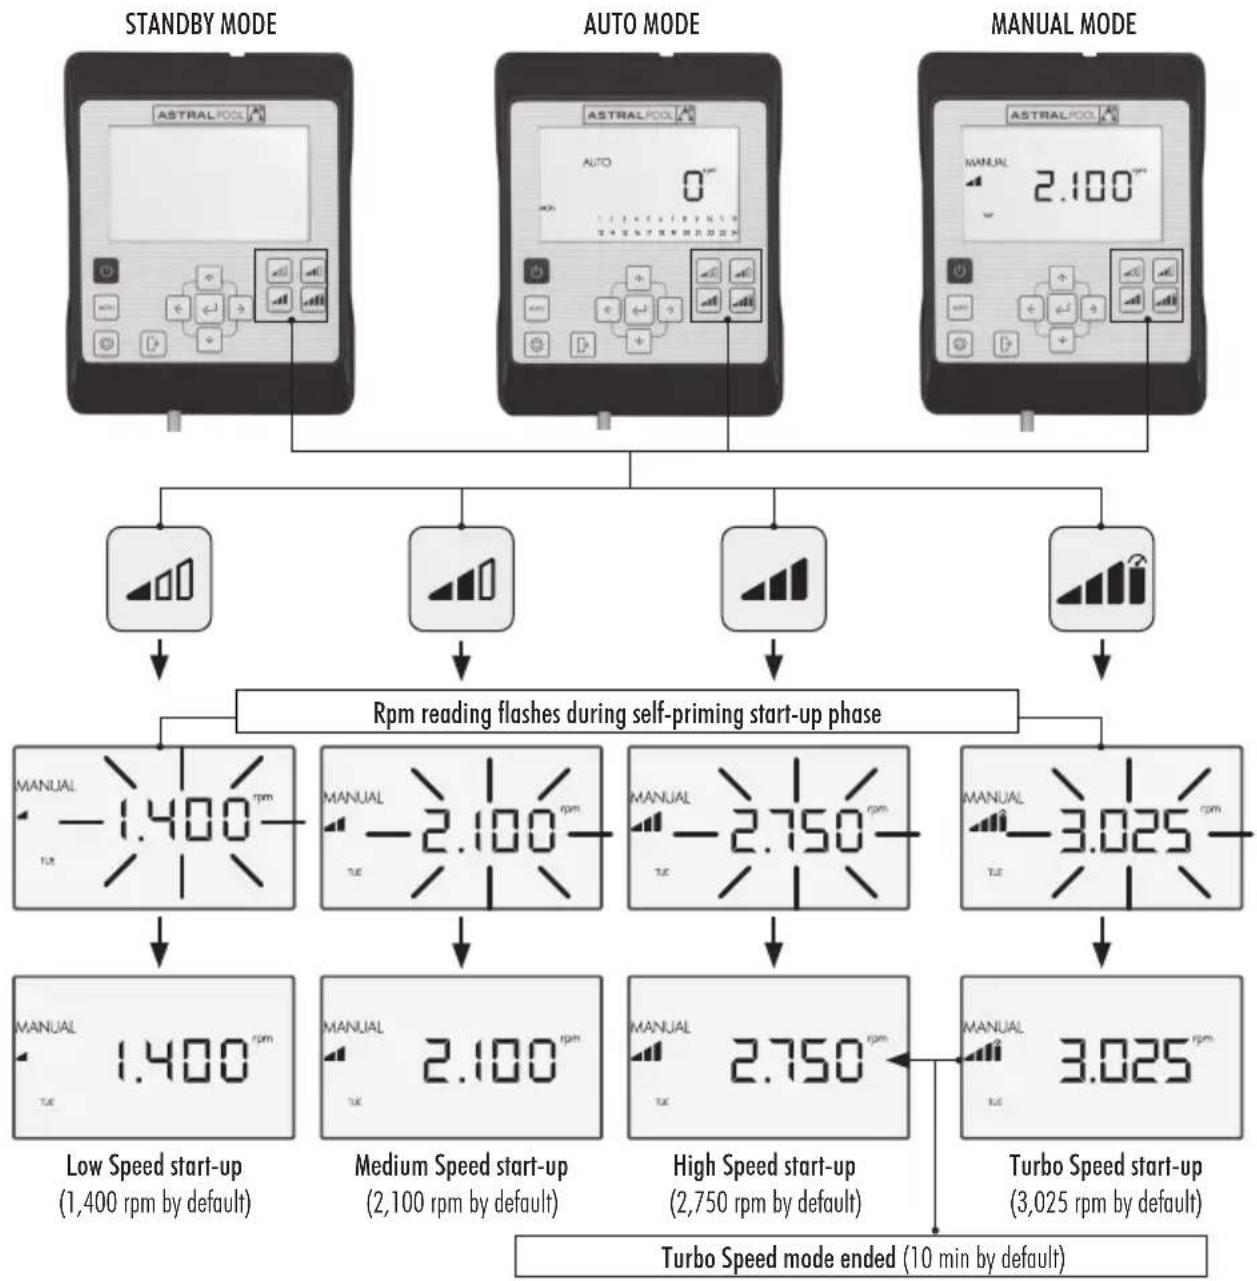
⑥ Setpoint Mode. Low Speed: Press the button so that the pump runs or starts up at Low Speed (by default, 1,400 rpm).
⑦ Setpoint Mode. Medium speed: Press the button so that the pump runs or starts up at Medium Speed (by default, 2,100 rpm).
⑧ Setpoint Mode. High speed: Press the button so that the pump runs or starts up at High Speed (by default, 2,750 rpm).
⑨ Setpoint Mode. Turbo Speed: Press the button so that the pump runs or starts up in Manual Mode at Turbo Speed. This mode is used for self-priming, fast cleaning, etc. (by default 3,025 rpm). The Manual Mode at Turbo Speed lasts a set time that once over will automatically go into Manual Mode at High Speed.
10 Arrow buttons: Browsing, selection and settings buttons.
Up arrow: In the Settings Menu, this arrow increases the value of the setting selected or goes on to the next option. If you wish to increase the value selected without stopping, keep the button pressed down for more than 3 seconds and release it when the desired value has been reached.
This arrow also starts the pump in Manual Mode when it is in Standby Mode or in Auto Mode and increases the running speed.
Down arrow: In the Settings Menu, this arrow decreases the value of the setting selected or goes back to the previous option. If you wish to decrease the value selected without stopping, keep the button pressed down for more than 3 seconds and release it when the desired value has been reached.
This arrow also starts the pump in Manual Mode when it is in Standby Mode or in Auto Mode and decreases the running speed.
Left arrow: This arrow scrolls through the options on the left of the Settings Menu or goes forward through the options in the Settings Menu.
Right arrow: This arrow scrolls through the options on the right of the Settings Menu or goes backward through the options in the Settings Menu.
1. PUMP START-UP
Ensure that the pump is plugged in. When plugged in for the first time, it goes into STANDBY Mode and the message "OFF" is displayed on the screen for 2 minutes.
Every time the pump is unplugged and then plugged back in, the pump will start in the same mode and with the same configuration as the last time before it was unplugged.
In STANDBY Mode, press button (On/off) to switch the pump on. The first time it is started up, AUTO Mode will be displayed on the screen. As there is no initial auto-configuration, the pump will not start until the AUTO Mode is configured or the MANUAL Mode used.
When the pump is on in any mode, pressing button (1) (On/off) will put the pump into STANDBY Mode. In STANDBY Mode, the pump will neither run nor will the auto-configuration in AUTO Mode be enabled.
If started up on successive occasions, the pump will switch on in the same mode (MANUAL or AUTO) and with the same configuration as the last time it was switch off, even if unplugged from the mains.

If there is a power cut or if the pump is unplugged while it is running, it will go back to the same operating mode once the power supply is back.
SEQUENCE OF THE FIRST START-UP
The pump can work in MANUAL Mode or AUTO Mode. To stop it from running in MANUAL or AUTO Mode, put it back in STANDBY Mode, by pressing button (1) (On/Off).
In STANDBY Mode, the pump will neither run nor will the auto-configuration in AUTO Mode be enabled.
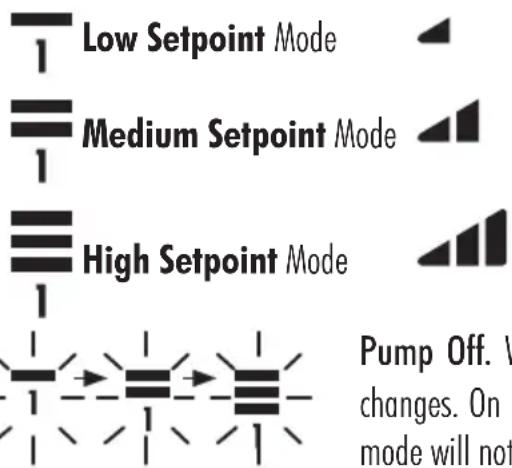
Whenever the pump is started up (in MANUAL or AUTO Mode) from the STANDBY Mode, it will self-prime for 30 seconds at a speed of 2,850 rpm by default before starting up again. The default self-priming time and speed can be adjusted, and can be disabled from the EXPERT settings menu (see Section 2.3.9). While it is self-priming, the speed reading of the mode selected will flash on and off until the process has been completed.
START-UP IN MANUAL MODE. SELF-PRIMING:

Flashes while self-priming
2.1 MANUAL MODE
In MANUAL Mode, the pump can be manually switch on or off and the operating speed adjusted to the desired setting.
To stop the pump from running in MANUAL Mode, press button (On/Off) so that it goes back into STANDBY Mode.
In MANUAL Mode, a Setpoint Speed can be selected (see Section 2.1.1) or the speed can be set manually (see Section 2.1.2).
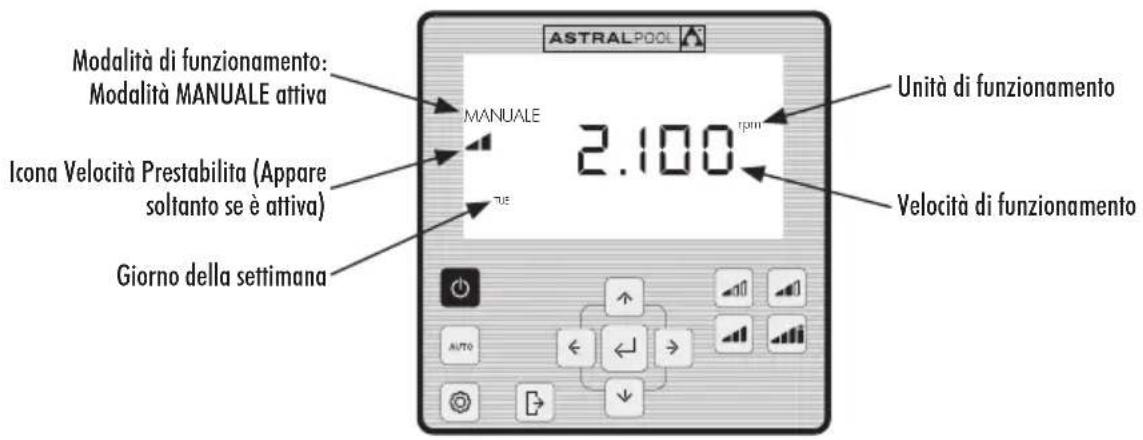
MANUAL MODE SCREEN:
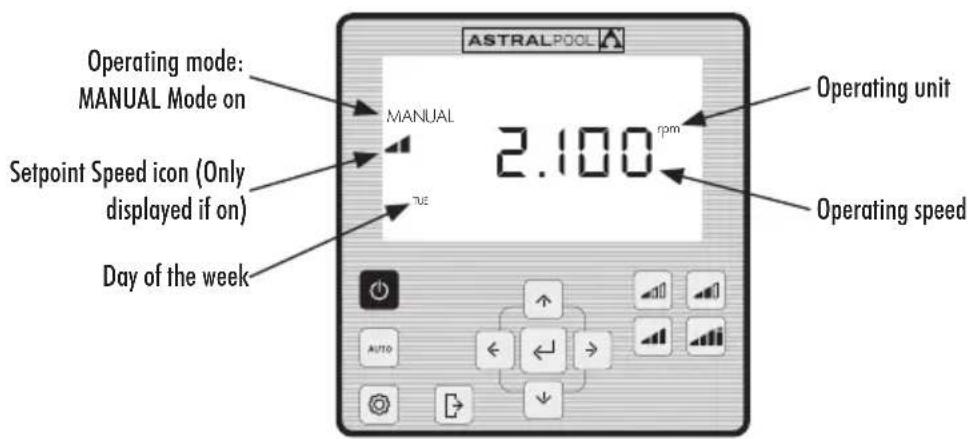
2.1.1 MANUAL MODE WITH SETPOINT SPEED
The pump has 4 Setpoint Speeds in MANUAL Mode: Low, Medium, High and Turbo.
Turbo Speed is normally used for fast cleaning and is pre-set by the manufacturer to last 10 minutes. Once this time is over, the pump will automatically run in MANUAL Mode at High Speed. The speed and duration of the Turbo Speed cannot be changed for safety reasons.
The Low, Medium and High setpoint operating speeds can be configured from the SETPOINT option on the Settings Menu (see Section 2.1.5) or from the EXPERT MODE option in the Settings Menu (see Section 2.1.9).
Use the following sequences for running the pump in MANUAL Mode with a Setpoint Speed:
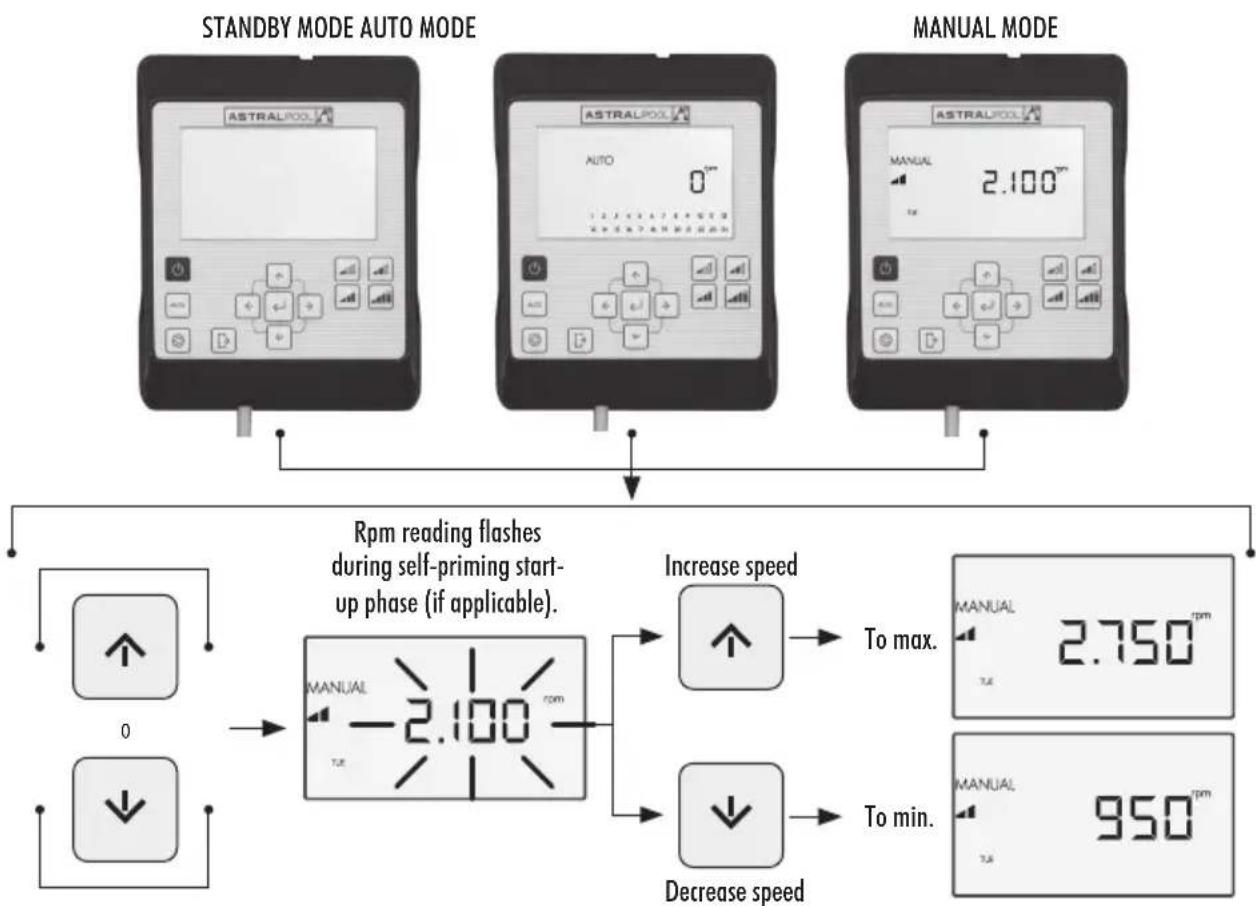
The Setpoint Speed can be changed by pressing the Up Arrow to increase it and the Down Arrow to decrease it. By pressing it for a short interval, it increases by 25 rpm and by pressing it for long intervals ( >3s ) it increases non-stop until the button is released.
When the Setpoint Speed is increased or decreased, the corresponding icon disappears and it goes into MANUAL Mode.
The speeds range from a minimum of 975 rpm to a maximum of 2,750 rpm. When the top or bottom rpm speed is reached in MANUAL Mode, the pump lets off a prolonged beeping sound.
EXAMPLE OF THE VARIATION IN THE MEDIUM SETPOINT SPEED IN MANUAL MODE:

2.1.2 OPERATING MODE WITH MANUAL SPEED SETTING
The pump's operating speed is started up and adjusted by the user manually.
USE THE FOLLOWING SEQUENCE FOR SETTING THE SPEED IN MANUAL MODE.
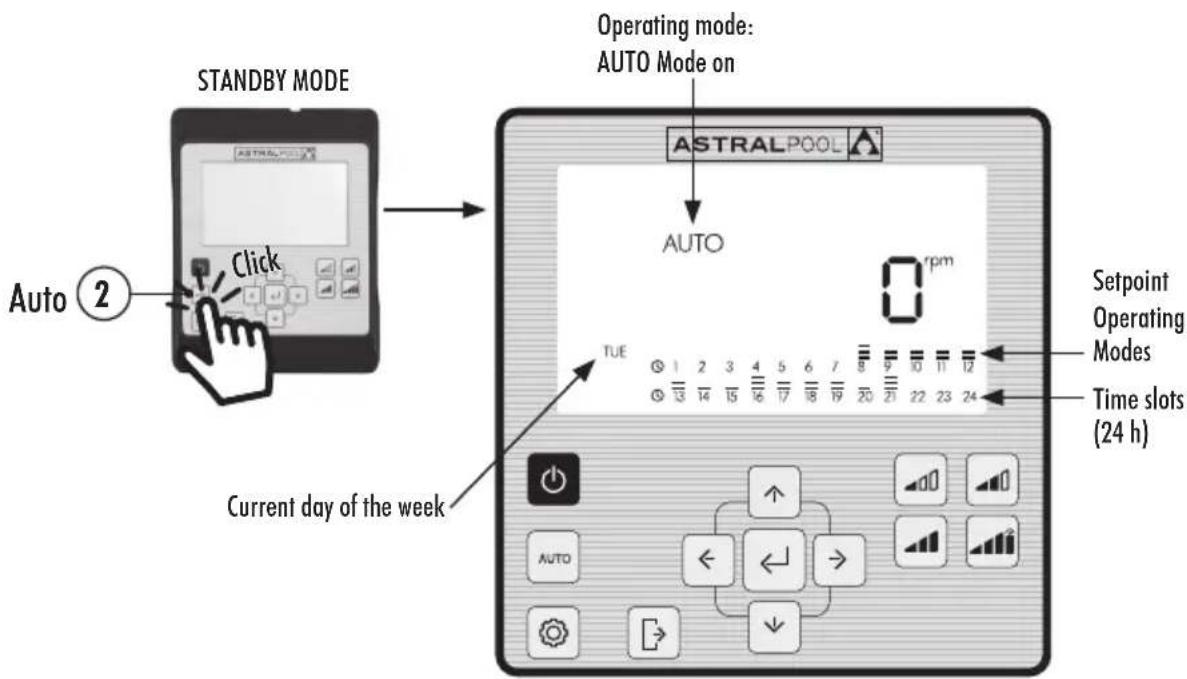
2.2 AUTO MODE
In AUTO Mode, the pump automatically runs a weekly programmable timer set by the user for which the desired Setpoint Speeds must be configured.

To run in AUTO Mode, it is essential to configure the Day and Time under the CLOCK and DAY options in the Settings Menu (see Sections 2.1.1 CLOCK and 2.1.2 DAY).
The timer will be programmed based on each pool (energy savings, total water volume, etc.) and the times it is normally used.
To run the pump in AUTO Mode, press button (AUTO). The screen will show the timer settings for the current day of the week.
To cancel the AUTO Mode, either press button (1) (On/Off) to enable the STANDBY Mode or to put the pump into Manual Mode.
Whenever the pump is started up in MANUAL Mode, it will self-prime for 30 seconds at a speed of 2,850 rpm by default. The default self-priming time and speed can be adjusted, and can also be disabled from the EXPERT Mode in the Settings Menu (see Section 2.3.9). While it is self-priming, the speed reading will flash on and off until the process has been completed.
If the pump is running in MANUAL Mode and the AUTO Mode is enabled, it will work according to the automatic timer settings.
To display and configure the timer for the whole week, go to the TIMER option in the Settings Menu (Section 2.3.8). If you wish to configure the Setpoint Speeds, go to the SETPOINT option in the Settings Menu (Section 2.3.5).
ENABLING AUTO MODE:
2.3 SETTINGS MENU
Press button 3 to access the Settings Menu. You can access the Settings Menu from any Operating Mode (STANDBY Mode, MANUAL Mode or AUTO Mode), both when the pump is on and off.
To browse through the Settings Menu options, use the Left and Right Arrow Buttons (10). The option on the Settings Menu selected will flash. Press button 5 (Enter) to configure the option selected in the Settings Menu. Once in the option under the Settings Menu, only the option selected will be displayed on the options bar.
ON ACCESSING THE CONFIGURATION OF THE OPTION SELECTED IN THE SETTINGS MENU:
Press the Left and Right Arrow Buttons (10) to browse through the settings and the Up and Down Arrow Buttons (10) to modify them.

Press button (Enter) to accept save the changes made and go on to the next setting or end the set-up by going back to the Settings Menu.

Under the configuration of the setting selected, press button 4 (Exit) to go back to the Settings Menu without saving the changes made. Press button 4 (Exit) again if you wish to exit the Settings Menu in order to go back to the Operating Modes.
EXAMPLE OF AN OPTION SELECTED IN THE SETTINGS MENU:


SETTINGSMENU
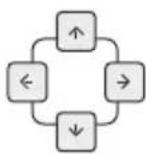
2.3.1 CLOCK. SETTING THE TIME
- Select the CLOCK option in the Settings Menu to display the time.
- Enter the CLOCK option in the Settings Menu to set the time. The digit selected will flash.
- Us the Left and Right 10 Arrow Buttons to move from one digit to another.
- Press the Up and Down 10 Arrow Buttons to increase or decrease the value of the digit selected.
- Press button (Enter) to confirm the time set. Once confirmed, it will go back to the options under the Settings Menu.

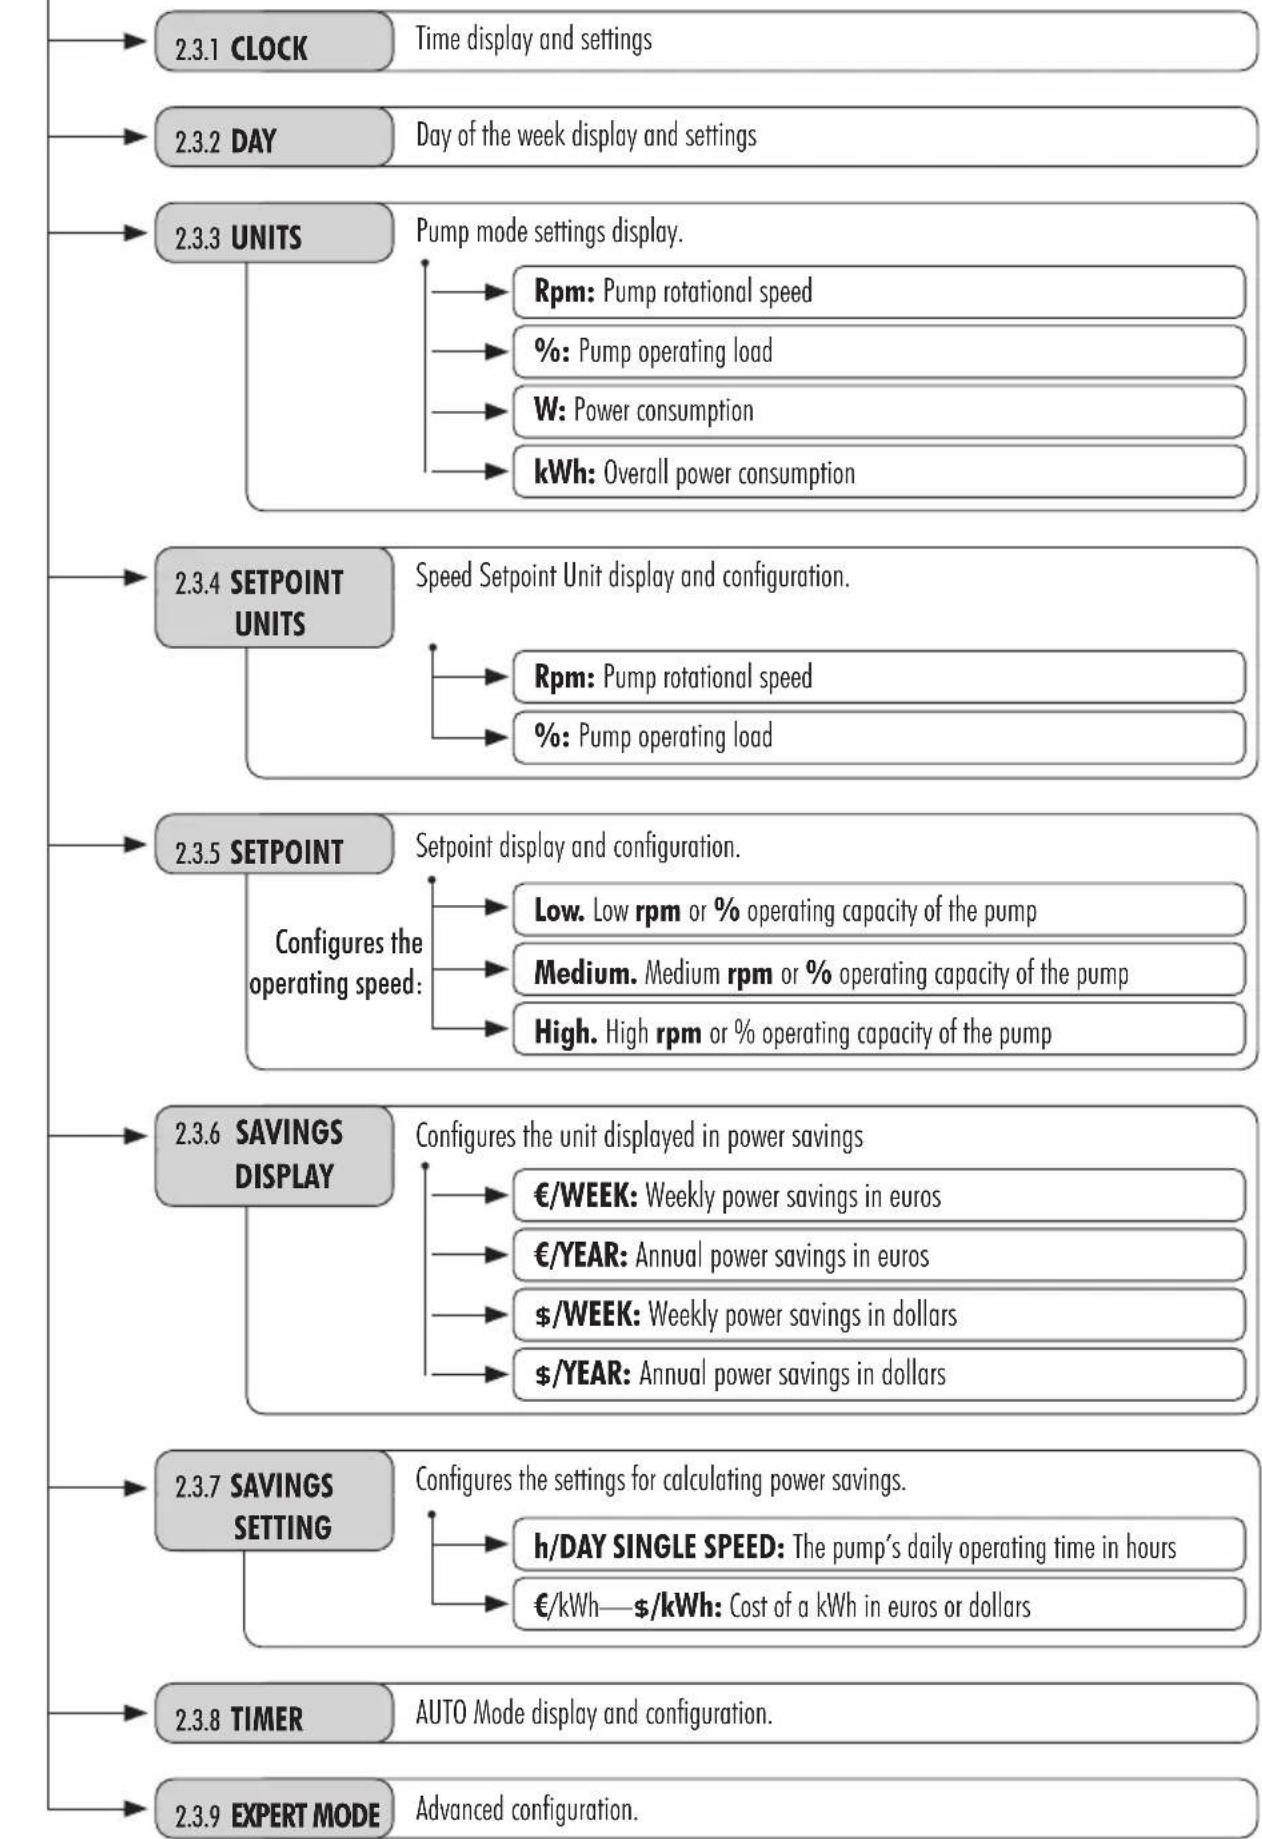
2.3.2 DAY. DAY OF THE WEEK
- Select the DAY option in the Settings Menu to display the day of the week.
- Enter the DAY option in the Settings Menu to set the day of the week.
- Use the Up and Down Arrow Buttons (10) to change the day of the week.
- Press button (Enter) to confirm the day of the week selected. Once confirmed, it will go back to the options in the Settings Menu.
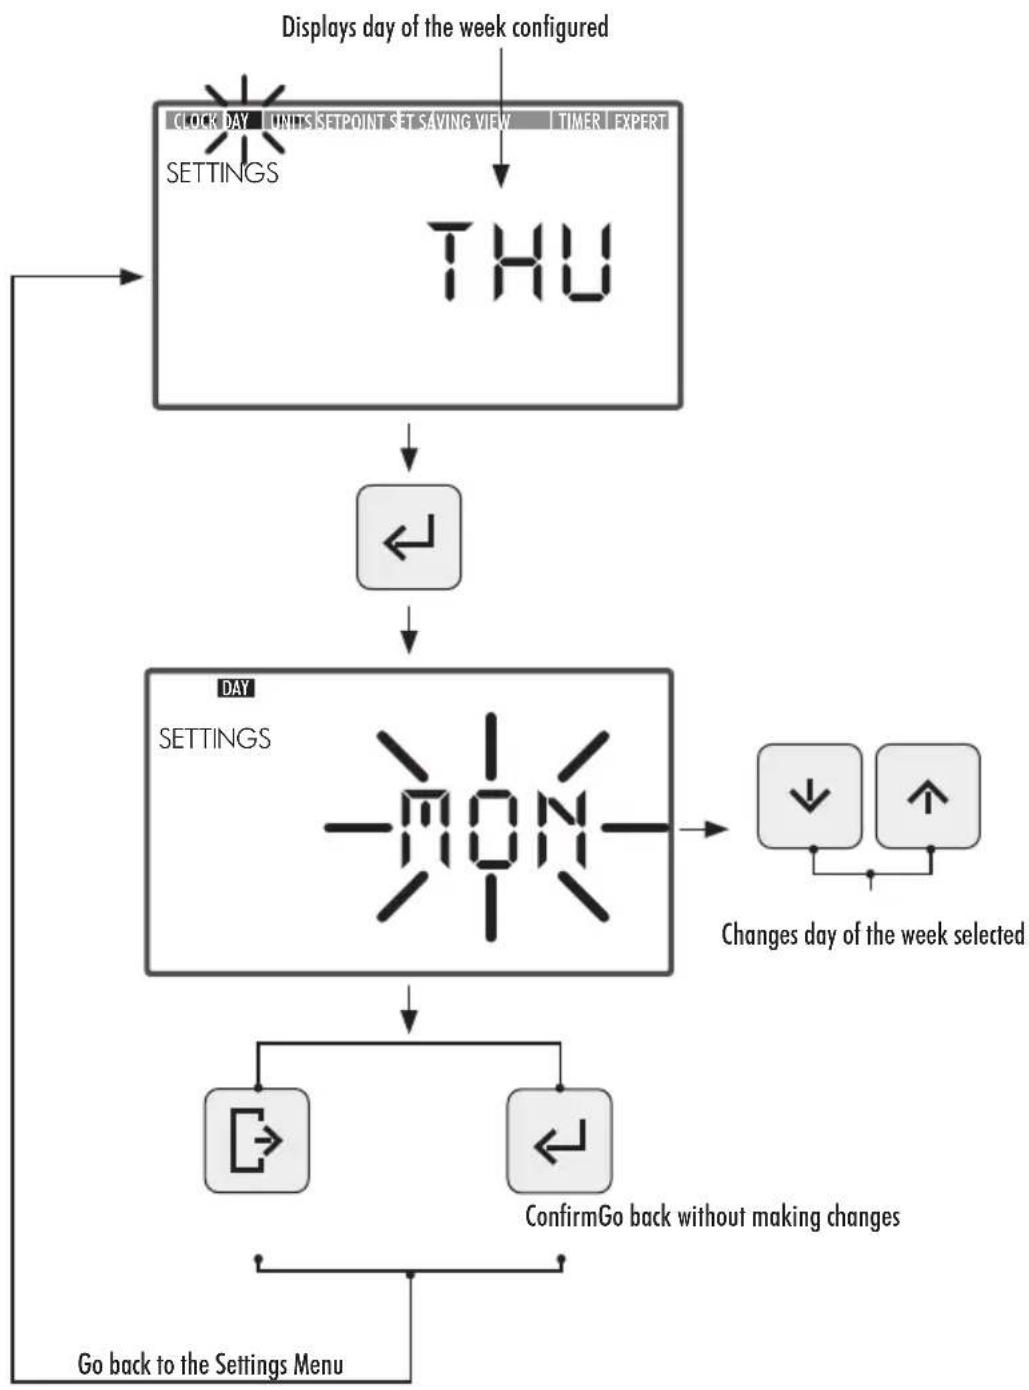
2.3.3 UNITS
- Select the UNITS option in the Settings Menu to display the reading of the unit selected.
- Enter UNITS in the Settings Menu to display the readings of the pump's operating settings. The setting selected will flash.
- Use the Up and Down Arrow Buttons (10) to display the various settings:
Rpm: Displays the motor's rotational speed in revolutions per minute.
- % : Displays the pump's operating capacity in % (35\% = minimum load — 100\% = maximum load).
W: Displays the motor's power consumption in watts.
- kWh: Displays the pump's overall power consumption in kilowatt hours. To reset the consumption meter, keep button (Enter) pressed down for more than 5 seconds.
- Hz: Displays the electrical frequency fed to the motor in hertz.
- Press button (Enter) to select the reading to be displayed. Once confirmed, it will go back to the options under the Settings Menu.
2.3.4 SETPOINT UNITS. CONFIGURATION OF SETPOINT UNITS
- Select the SETPOINT UNITS option in the Settings Menu to display one of them.
- Enter SETPOINT UNITS in the Settings Menu to modify the Setpoint Unit. The unit selected will flash.
- Use the Up and Down Arrow Buttons (10) to modify the unit. Select from among the the following units:
Rpm: Displays the motor's rotational speed in revolutions per minute.
- % : Displays the pump's operating capacity in % (100\% = full load) depending on the motor's rotational speed: (a full load is equal to the top working speed at 2,770 rpm).
- Press button (Enter) to confirm the unit's value for Setpoint Operations. Once confirmed, it will go back to the options under the Settings Menu.

2.3.5 SETPOINTS. CONFIGURATION OF SETPOINTS
- Enter the SETPOINT option in the Settings Menu to display/modify the values assigned to the Setpoint Units. The Setpoint Unit selected will flash.
-
Use the Up and Down Arrow Buttons (10) to increase or decrease the value assigned to the Setpoint Unit. There are 3 Setpoint Unit modes that can be configured:
-
Low Setpoint: Low rpm or % operating capacity of the pump (depending on the unit configured. See Section 2.3.4, SETPOINT UNITS). Minimum value.
- Medium Setpoint: Medium rpm or % operating capacity of the pump (depending on the unit configured. See Section 2.3.4, SETPOINT UNITS). Intermediate value.
- High Setpoint: High rpm or % operating capacity of the pump (depending on the unit configured. See Section 2.3.4, SETPOINT UNITS). Maximum value.
The operating mode speed will be incremental starting from the Low Setpoint up to the High Setpoint, in other words, the Medium Setpoint value cannot be higher than the High Setpoint value or lower than the Low Setpoint value. The following condition must therefore always be fulfilled:
High Setpoint Value ≥ Medium Setpoint Value ≥ Low Setpoint Value.
- Press button (Enter) to confirm the value assigned to the Setpoint Unit. Once confirmed, it will go on to the next Setpoint Unit. Once the last Setpoint Unit value has been entered, it will return to the option in the Settings Menu.


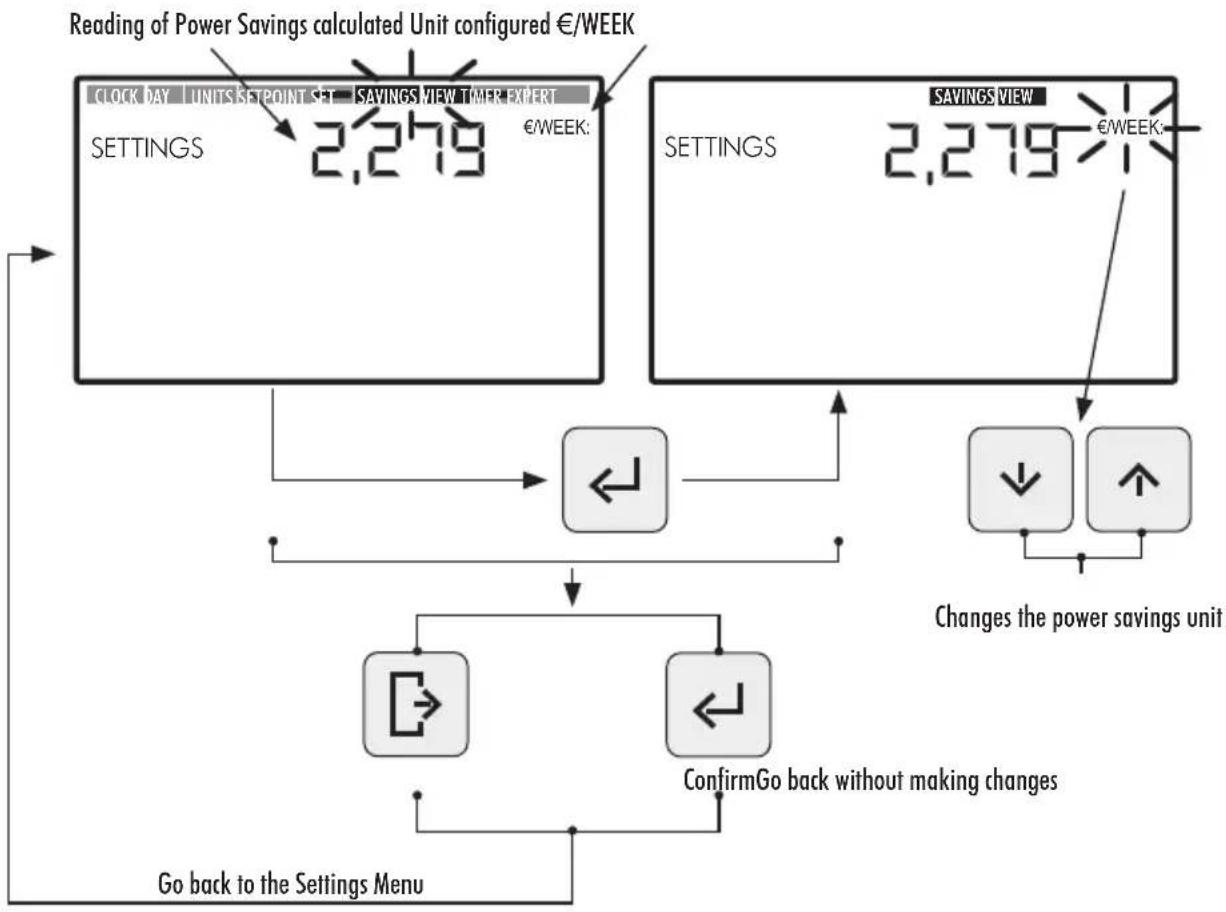
2.3.6 SAVINGS DISPLAY. DISPLAY OF POWER SAVINGS
- Select the SAVINGS DISPLAY option in the Settings Menu to display the power savings reading.
- Enter SAVINGS DISPLAY in the Settings Menu to modify the power savings unit displayed. The unit configured will flash.
- Use the Up and Down Arrow Buttons (10) to modify the unit displayed. Select from among the following units:
€/WEEK: Weekly power savings in euros.
€/YEAR: Annual power savings in euros.
- $/WEEK: Weekly power savings in dollars.
- $/YEAR: Annual power savings in dollars.
- Do not display Power Savings. The unit will not be displayed on the screen.
- Press button (Enter) to confirm the selection of the power savings unit to be displayed. Once confirmed, it will go back to the options under the Settings Menu.

In order to correctly display the power savings, first set the power savings under the SAVINGS SETTINGS option in the Settings Menu (see Section 2.3.7).
The reading of the Power Savings displayed under the SAVINGS DISPLAY option is calculated based on the setting entered under the option SAVINGS SETTING in the Settings Menu (see Section 2.3.7), and shows the savings made using a variable speed pump in comparison with a single speed pump.
2.3.7 SAVINGS SETTING. SETTING POWER SAVINGS
- Enter the SAVINGS SETTING option in the Settings Menu to adjust the settings for calculating power savings. The digit of the value of the first setting, h/DAY SINGLE SPEED, will flash.
The power savings reading displayed under the SAVINGS DISPLAY in the Settings Menu (see Section 2.3.6) is calculated based on the following settings:
-
h/DAY SINGLE SPEED: The pump's daily operating time in hours.
€/kWh—$/kWh: Cost of a kWh, in euros or dollars depending on the option selected under SAVINGS DISPLAY in the Settings Menu (see Section 2.1.6). -
To configure the pump's daily operating time in hours (h/DAY SINGLE SPEED) from the SAVINGS SETTING option, press the Left and Right Arrow Buttons (10) to move from one digit to another - the digit selected will flash - and press the Left and Right Arrow Buttons (10) to increase or decrease the digit selected. Once the value of the setting has been set, press button 5 (Enter) to confirm.
Once the first "h/DAY SINGLE SPEED" setting has been confirmed, it will go on to the second setting, i.e., €/kWh—/kWh. Configure the cost of a kWh (€/kWh—/kWh) by pressing the Left and Right Arrow Buttons (10) to move from one digit to another and the Left and Right Arrow Buttons (10) to increase or decrease the digit selected. Once the value of the setting has been set, press button 5 (Enter) to confirm. Once confirmed, it will go back to the options under the Settings Menu.


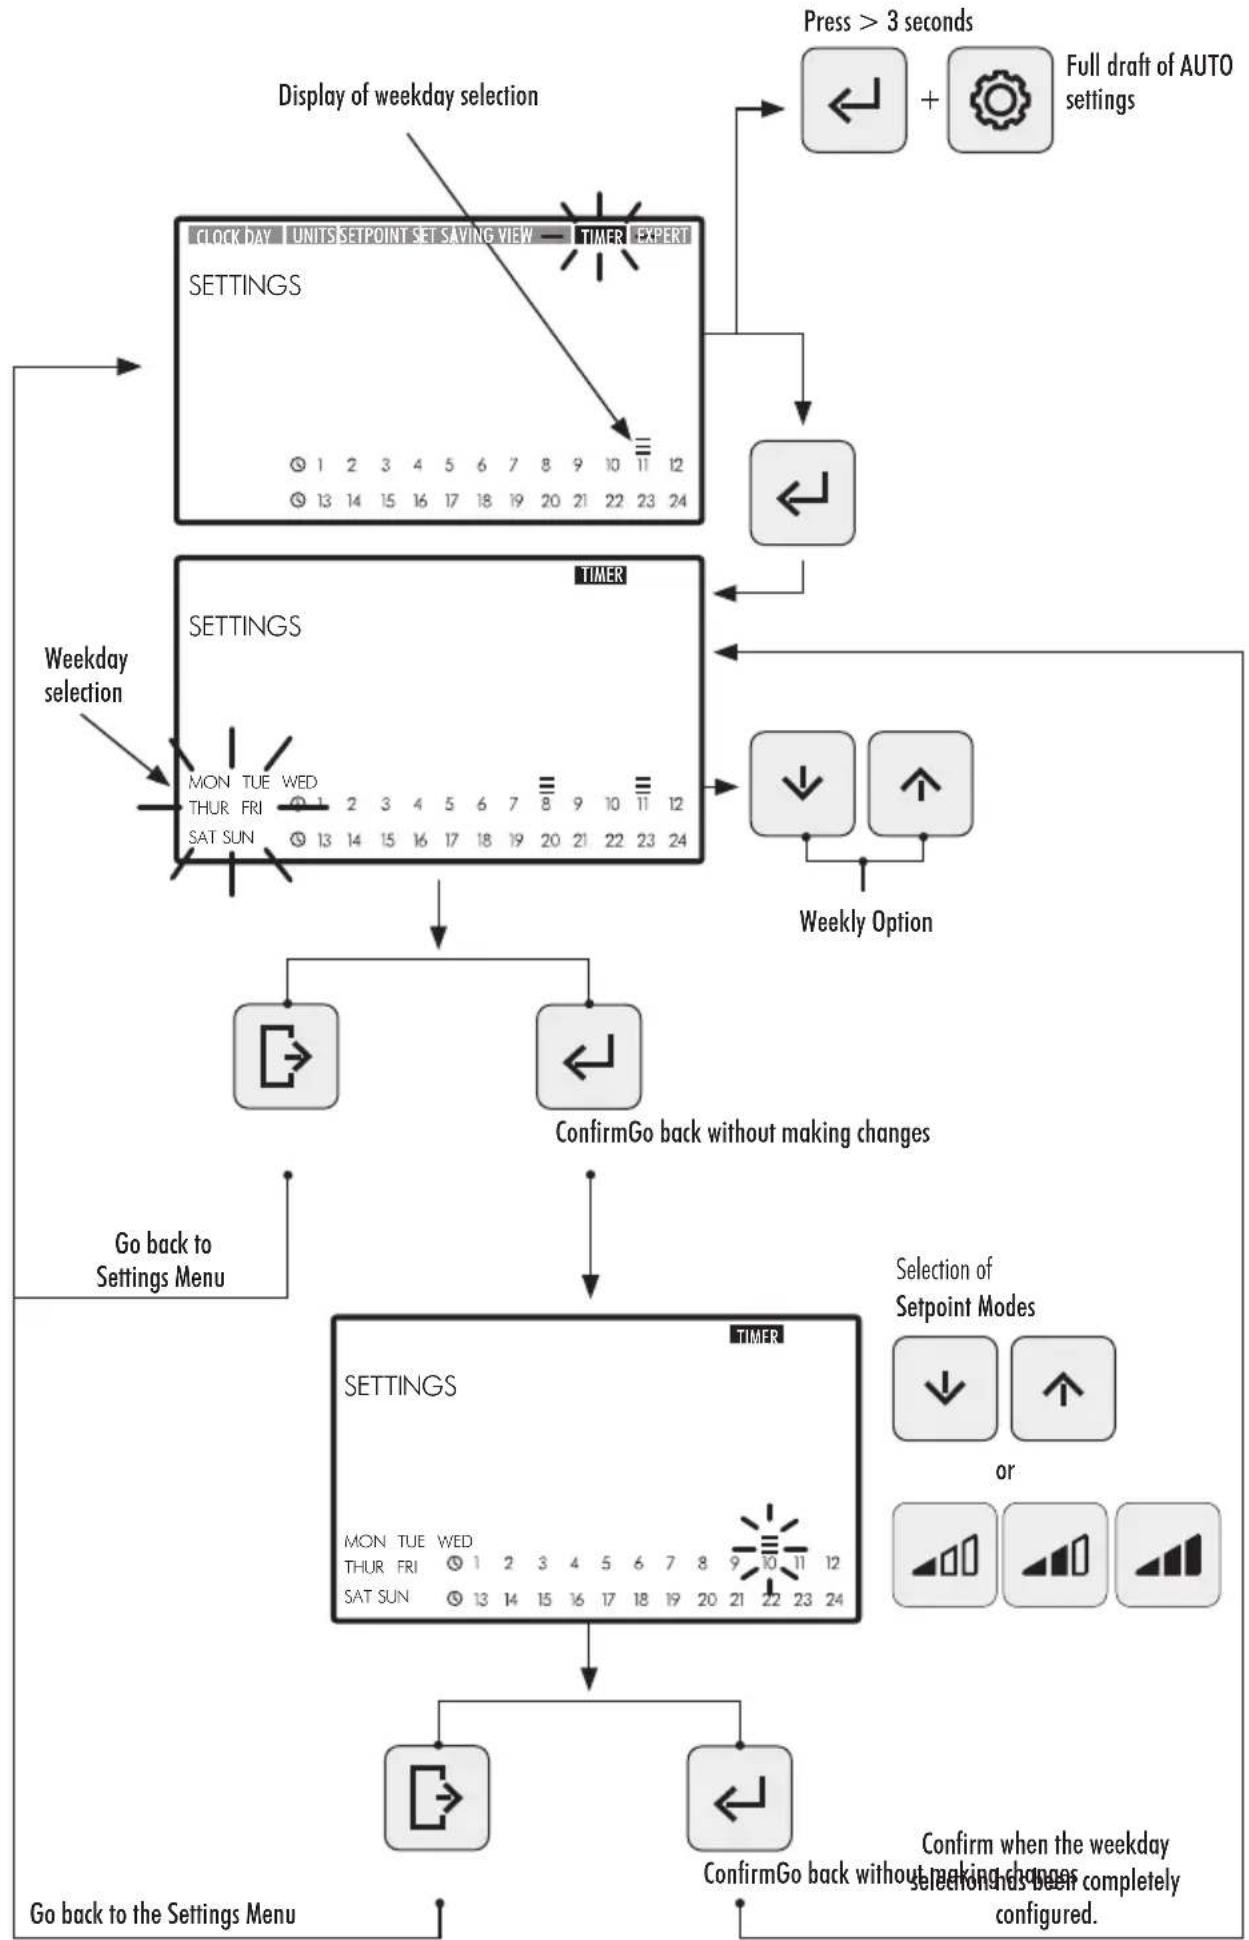
2.3.8 TIMER. SETTING AUTO MODE
- Select the TIMER option in the Settings Menu to display the AUTO Mode times set for the current day of the week.
- Enter the TIMER option in the Settings Menu to display or adjust the weekday times set for AUTO Mode. The day of the week selected will flash.
If you wish to delete all weekly times set in AUTO Mode, keep buttons (5) (Enter) and (3) (Settings) pressed down at the same time for at least 3 seconds when you enter the TIMER option.
To display the weekday times, use the Up and Down Arrow Buttons (10) to select the weekday option to be set. Use the following weekday options:
- MON: AUTO Mode for MONDAYS
TUE: AUTO Mode for TUESDAYS
WED: AUTO Mode for WEDNESDAYS
THUR: AUTO Mode for THURSDAYS
FRI: AUTO Mode for FRIDAYS
SAT: AUTO Mode for SATURDAYS
SUN: AUTO Mode for SUNDAYS
- MON TUE WED THUR FRI SAT SUN: AUTO Mode every day of the week from MONDAY TO SUNDAY.
SAT SUN: AUTO Mode for weekends (SATURDAYS AND SUNDAYS).
Press button ⑤ (Enter) to confirm the weekday selection you wish to configure.
- Press the Left and Right Arrow Buttons (10) to move from one time slot to another. The time slot selected will flash. In the time slot selected, press the Up and Down Arrow Buttons (10) as many times as necessary for the desired Setpoint Unit to be displayed or set the mode by directly pressing button 6 or 8 of the Low, Medium or High Setpoint Unit.
CONFIGURATION OPTIONS AVAILABLE FOR THE SELECTION OF THE TIME SLOT IN AUTO MODE.
- Press button (Enter) to confirm the weekday option selected. Once confirmed, it will go back to the weekday selection option. If required, the next day to be configured can be selected at this point or button (Exit) pressed to go back to the options in the Settings Menu.
Only press button (Enter) button when the weekday selection has been completely finished. The Low, Medium and High Setpoints can be configured from the SETPOINT option in the Settings Menu (see Section 2.3.5).
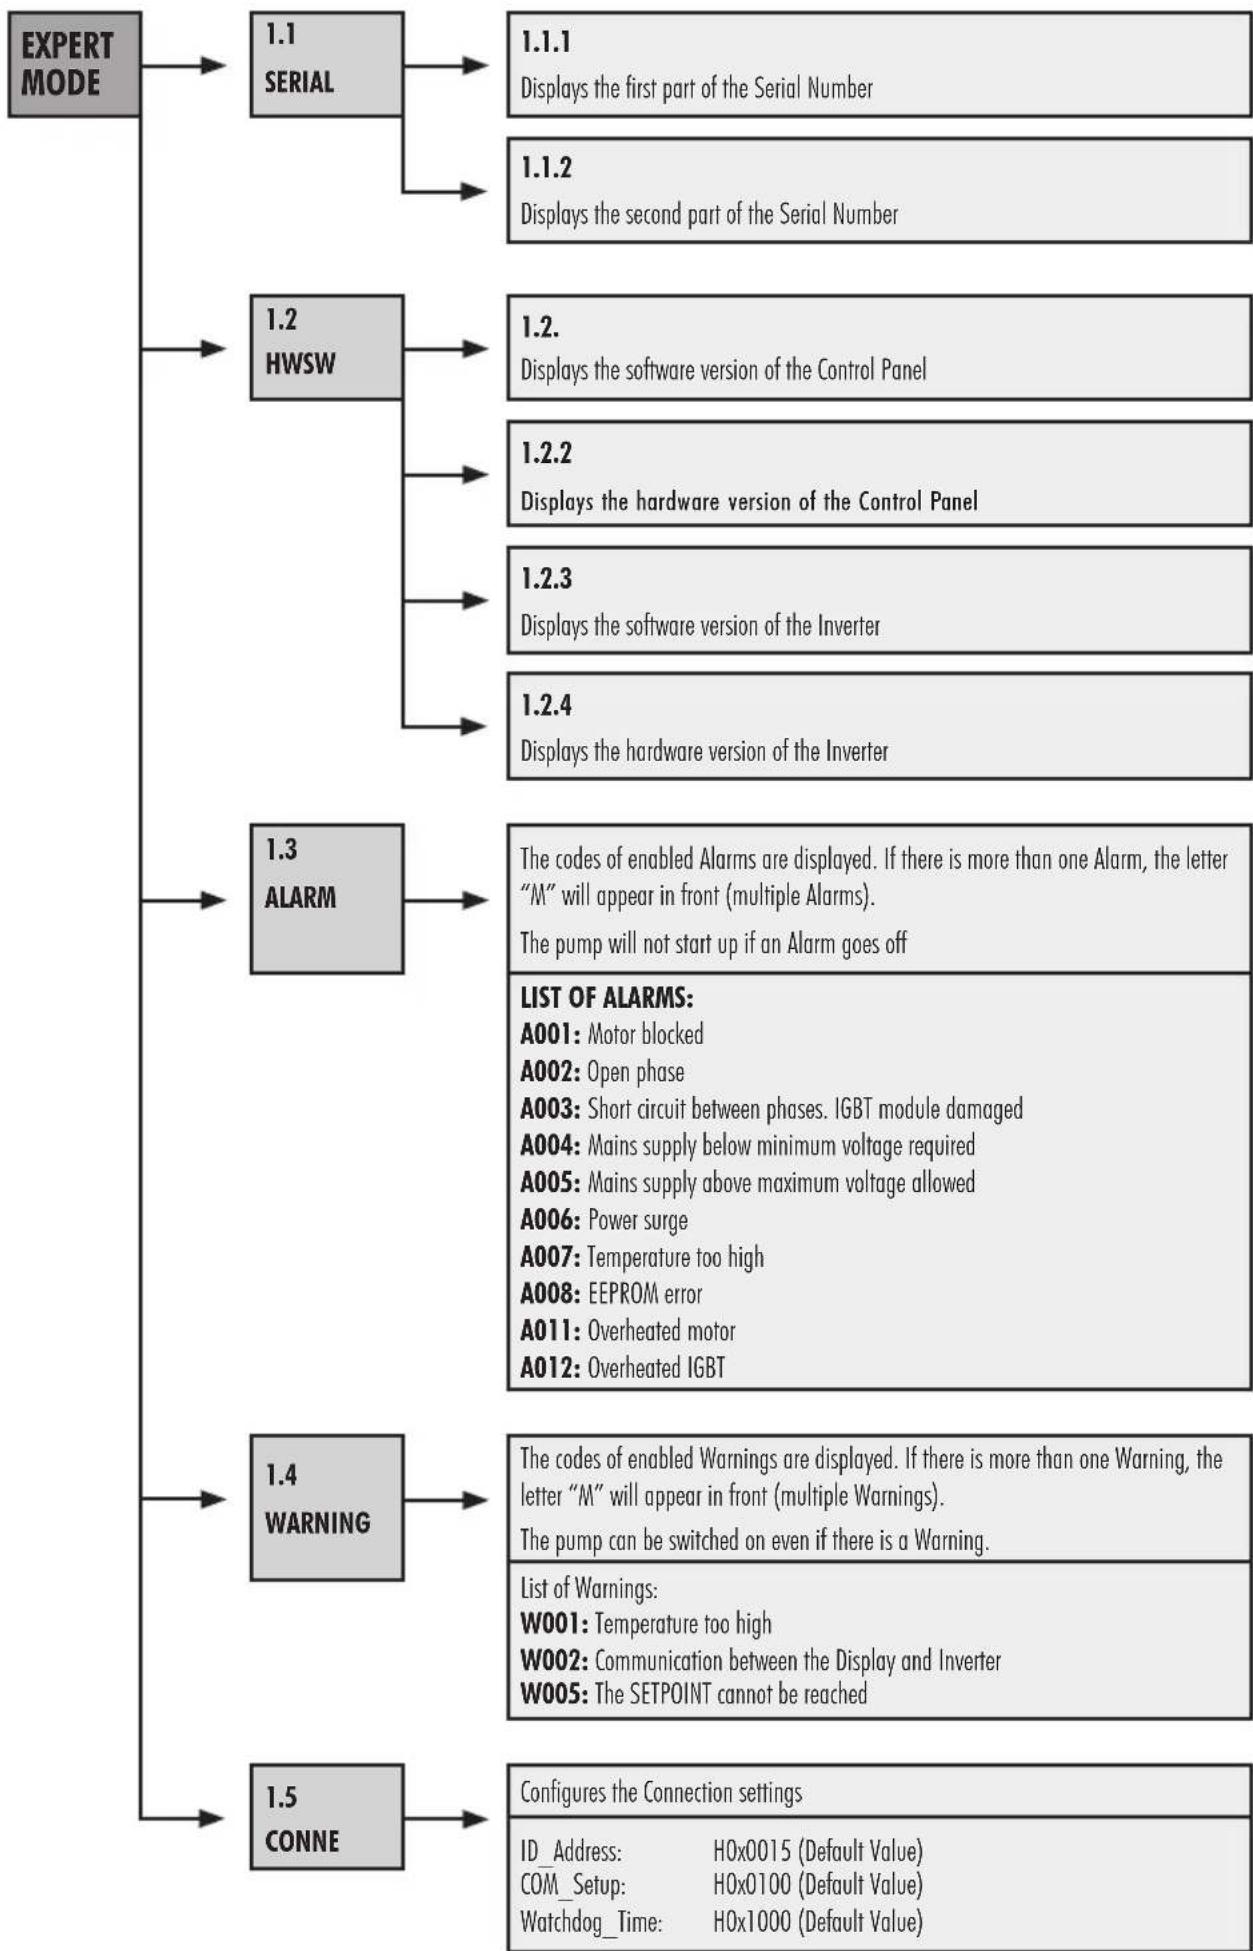
2.3.9 EXPERT MODE.ADVANCED MENU
- Enter the EXPERT Mode option in the Settings Menu to access the advanced menu settings..
- Browse, select and set the options and settings in the advanced menu by using the Arrow Buttons (10).
- Press button (Enter) button to confirm the setting made or press button (Exit) button to go back to the options in the Settings Menu.
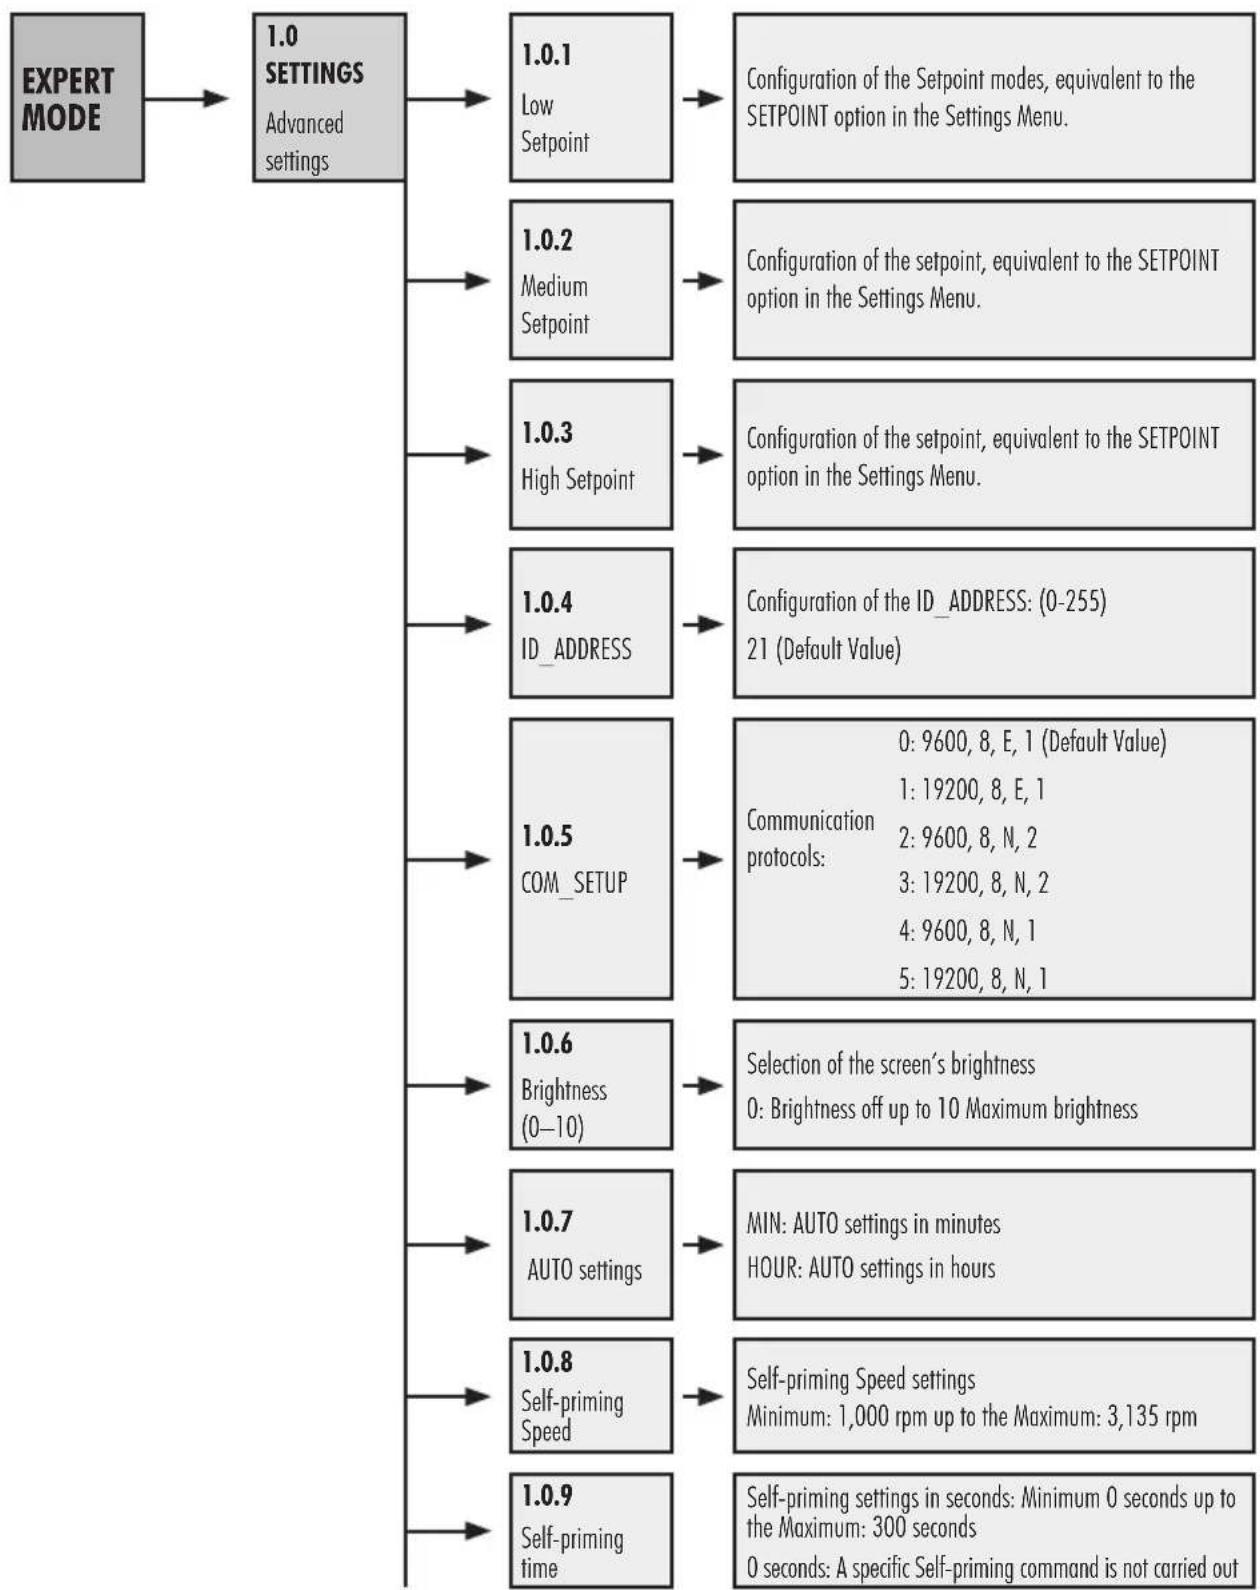
OPTIONS IN THE ADVANCED SETTINGS MENU:
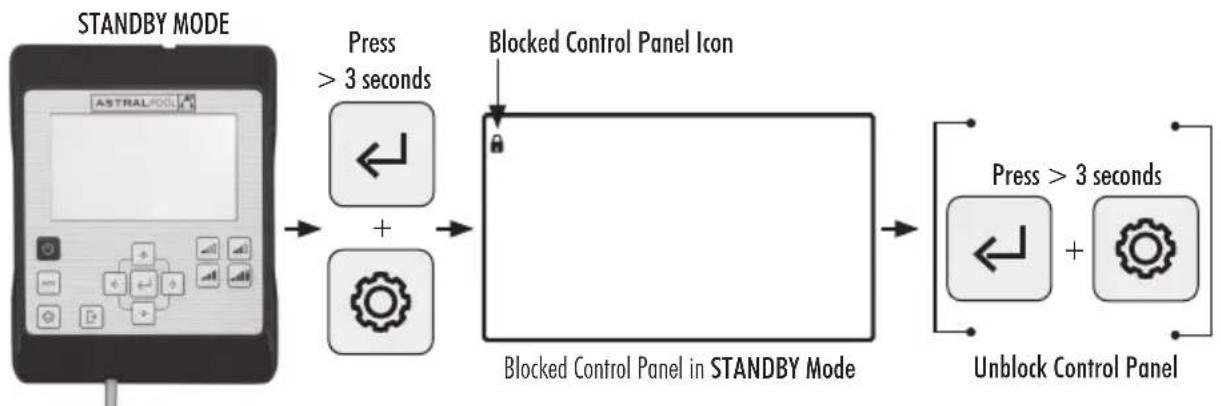
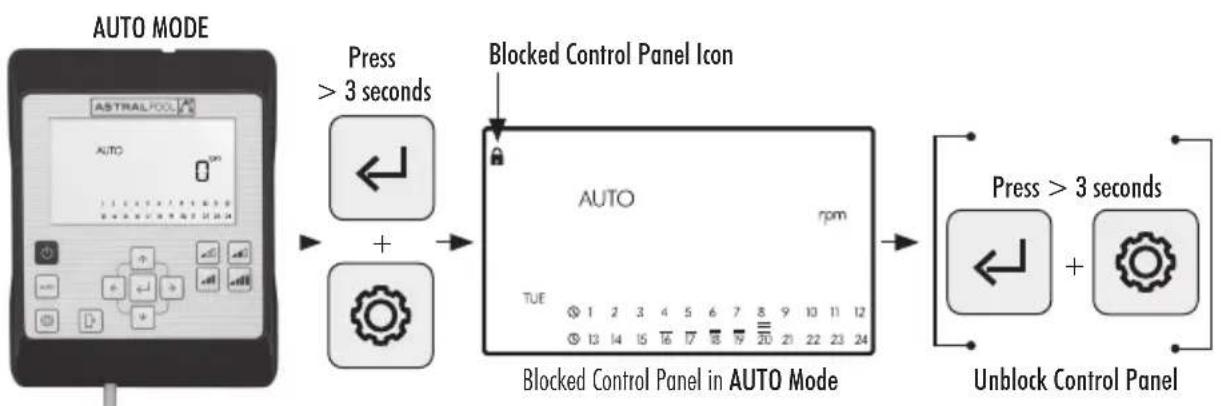
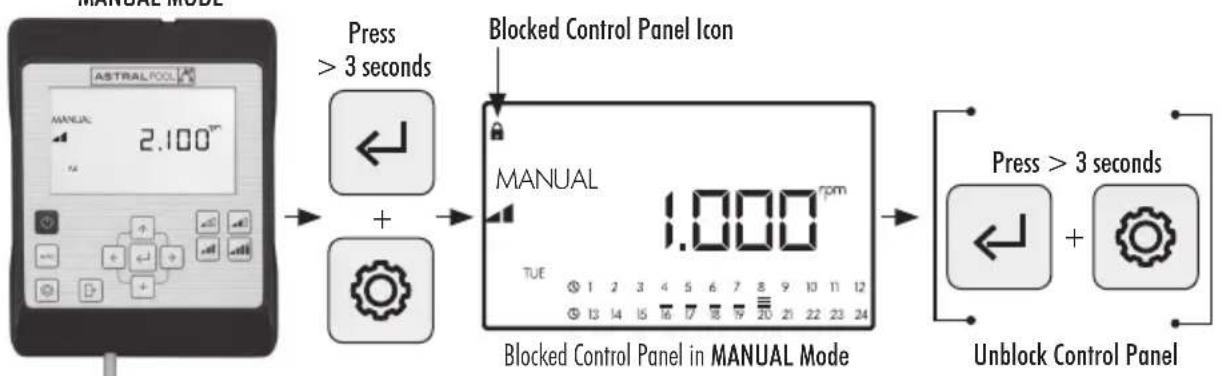
3. HOW TO BLOCK THE CONTROL PANEL
In STANDBY Mode, MANUAL Mode or AUTO Mode, press the ③ Settings and ⑤ Enter buttons at the same time for at least 3 seconds to block access to the control panel. Use the same sequence to unblock the control panel.
When the control panel is blocked, only the CLOCK and DAY options in the Settings Menu will be enabled for display and to change the settings.

Block the Control Panel in AUTO Mode so that the pump starts up the weekly cycle. When the Control Panel is blocked, the pump will only work in AUTO Mode if a cycle has been programmed. If the Control Panel is blocked in STANDBY Mode, the pump will not run until it has been unblocked.
CONTROL PANEL BLOCKING AND UNBLOCKING SEQUENCES
4. CONNECTIVITY PRIORITIES
Direct commands on the Control Panel take priority over commands from the remote control via Modbus. For safety, while direct commands are being entered in to the the Control Panel, the Modbus and digital input settings cannot be modified but may be displayed.
For pump control using Modbus or Fluidra Connect press the AUTO button for more than 3 seconds so that the pump goes into "REMOT" mode. In this mode, the pump will follow the commands sent by Fluidra Connect/Modbus and the HMI buttons will be disabled.
To quit "REMOT" mode and rerun the pump manually, press the AUTO button again for more than 3 seconds.
5. CONTROL PANEL ALARMS AND WARNINGS
The Control Panel will displayWarnings and Alarms as "W" or "A" followed by two digits corresponding to the failure detected. In the event that there are severalWarnings or Alarms, "M" (Multiple) will also be displayed.
Whenever an Alarm goes off, the pump will stop. However, if a Warning is displayed the pump can still be run.
To displayWarnings and Alarms, enter the EXPERT Mode option in the Settings Menu (see Section 2.3.9).
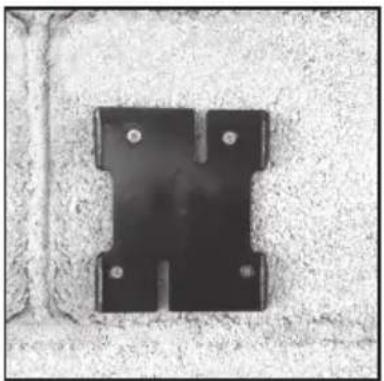
6. HOW TO MOUNT THE CONTROL PANEL ON A WALL
The Victoria Plus Silent VS variable speed pump has a removable Control Panel that has also been designed to be mounted on walls.
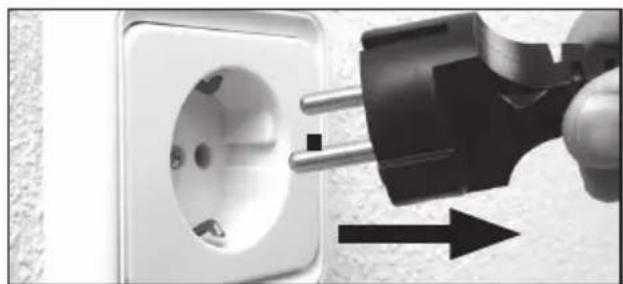
Before starting, ensure that the pump is unplugged.
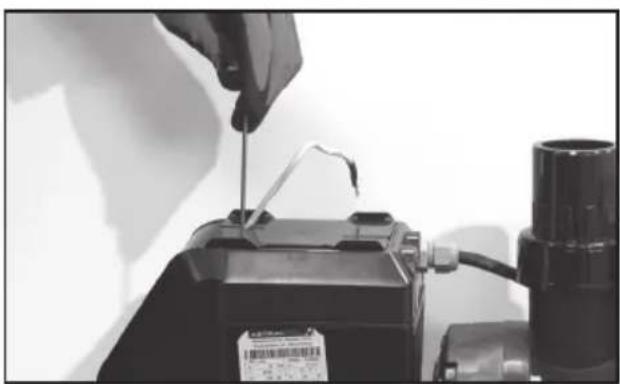
Unfasten the Control Panel from its base by exerting force sideways until it can be lifted upwards.
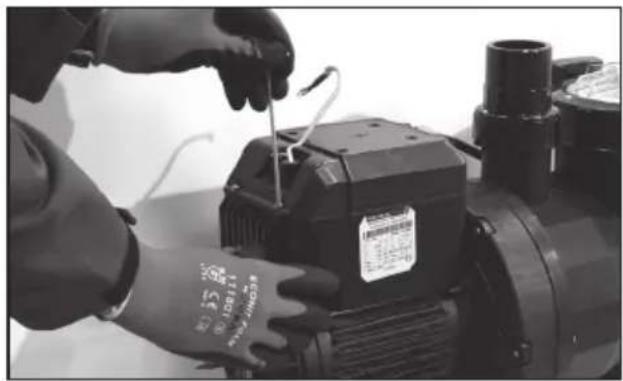
Disassemble the fastening base from the motor and mount it on a wall in the desired position.
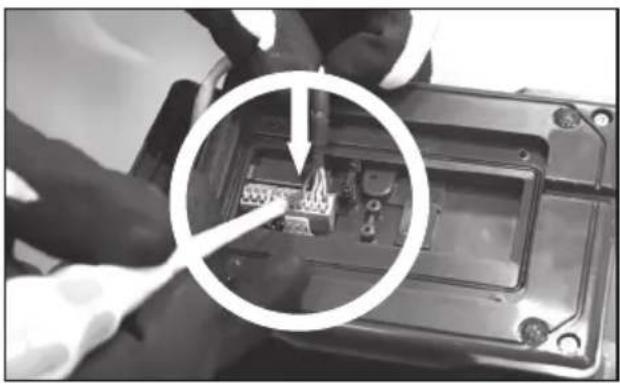
Wire the Control Panel to its pump connection.
Unplug the pump


7. DIAGRAM OF INVERTER WIRING
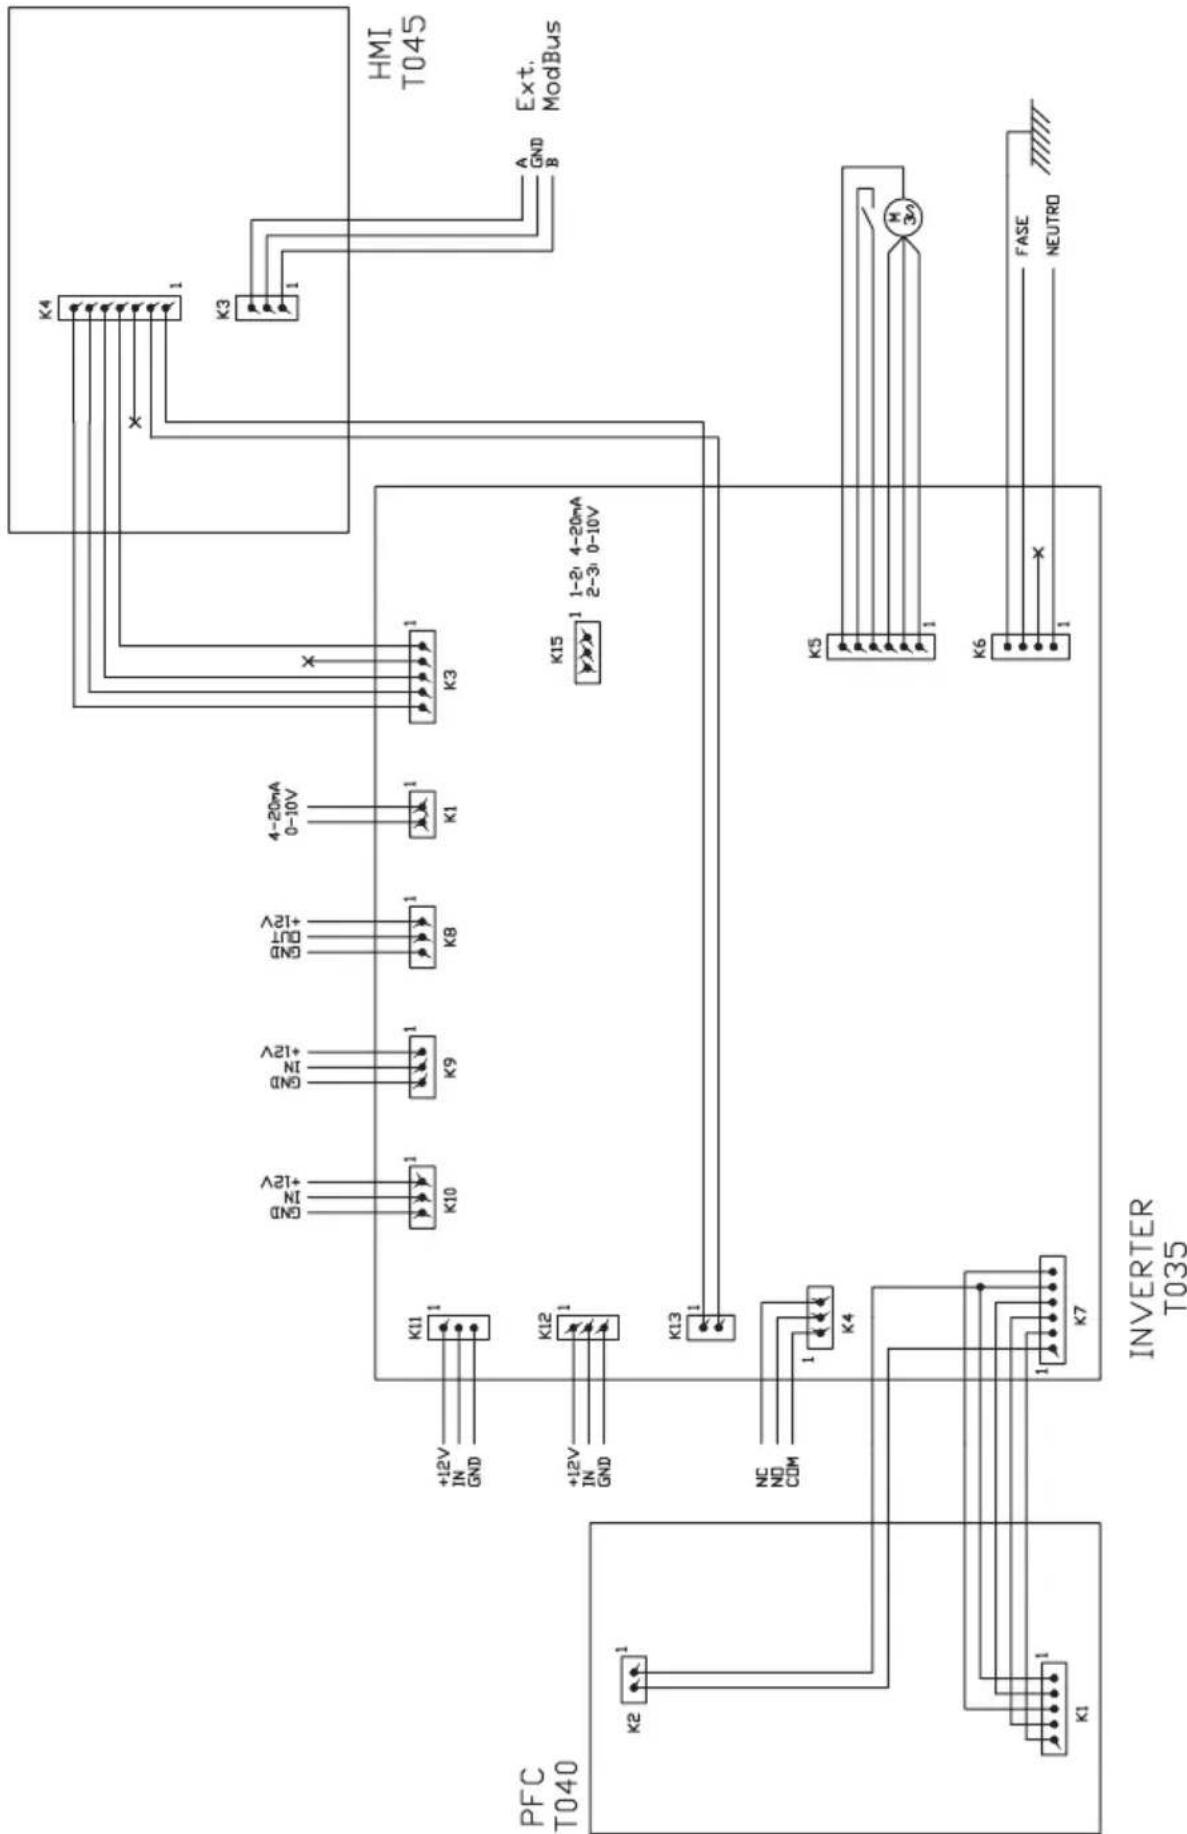
| DIGITAL INPUTS | |||||
| K10 K11 | K1 K12 Action | Mode | |||
| 0000 | Change of mode Before local | ||||
| 0001 | Pump off Local | ||||
| 0010 | Low speed Local | ||||
| 0011 | Pump off Local | ||||
| 0100 | Medium Speed Local | ||||
| 0101 | Pump off Local | ||||
| 0110 | Medium Speed Local | ||||
| 0111 | Pump off Local | ||||
| 1000 | High speed Local | ||||
| 1001 | Pump off Local | ||||
| 1010 | High speed Local | ||||
| 1011 | Pump off Local | ||||
| 1100 | High speed Local | ||||
| 1101 | Pump off Local | ||||
| 1110 | High speed Local | ||||
| 1111 | Pump off Local | ||||
K4 Dry contact relay. Shows the pump's operating mode.
COM/NC Shows the pump is on. COM/NO Shows the pump is off.

UTILISATION DU PANNEAU DE CONTROLLE
SCHERMO MODALITA MANUALE