
ProD Bluetooth PRODBTB - Hi-fi system HARVIA - Free user manual and instructions
Find the device manual for free ProD Bluetooth PRODBTB HARVIA in PDF.

| Product Type | Bluetooth hi-fi system with built-in amplifier and microphone |
| Brand | Harvia |
| Model | ProD Bluetooth PRODBTB |
| Dimensions (W x H x D) | 79 x 103 x 36.6 mm |
| Cutout dimensions | 65 x 70 x 35 mm |
| Weight | Approx. 200 g |
| Power supply | 230 V via plug-in power supply (1.5 m cable + 2 m extension) |
| Bluetooth version | 4.0 |
| Bluetooth range | Up to 30 m |
| Output power | 2 x 3 W (RMS), approx. 15 W (P.M.P.O.) |
| Speaker impedance | 2 x 8 Ω |
| Audio outputs | Speaker terminals (L/R) and Line Out (3.5 mm jack) |
| Main functions | Bluetooth music playback, hands-free, voice assistant (Siri, Google Now), 4 volume levels, touch control |
| Built-in microphone | Yes, for calls and voice recognition |
| Ambient temperature | 0 °C to +100 °C |
| Protection rating | IPX4 (protected against water splashes) |
| Mounting | Flush or wall mounting, max height 140 cm (sauna) or 170 cm (infrared) |
| Maintenance | Clean with a damp cloth and mild soap; never immerse |
| Package contents | ProD Bluetooth module, power supply, 2 m extension cable, mounting hardware (4 screws, opening tool) |
| Recommended accessories | WC4-BT-SPK or WC4-BT-EXC speakers |
| Compatible operating systems | Android ≥1.5, iOS ≥3.0, Nokia Symbian, Linux |
Frequently Asked Questions - ProD Bluetooth PRODBTB HARVIA
User questions about ProD Bluetooth PRODBTB HARVIA
0 question about this device. Answer the ones you know or ask your own.
Ask a new question about this device
Download the instructions for your Hi-fi system in PDF format for free! Find your manual ProD Bluetooth PRODBTB - HARVIA and take your electronic device back in hand. On this page are published all the documents necessary for the use of your device. ProD Bluetooth PRODBTB by HARVIA.
USER MANUAL ProD Bluetooth PRODBTB HARVIA
PROD-BT-B / PROD-BT-W
Inhaltsverzeichnis
natural_image
Technical line drawing of a mechanical assembly with a rod and bracket (no text or symbols)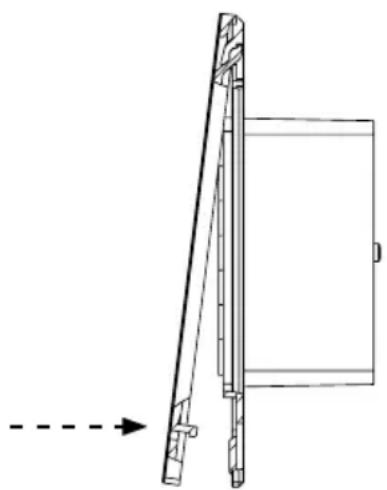
natural_image
Technical line drawing of a mechanical assembly with an arrow indicating direction (no text or symbols)Abb. 4: Montage Frontcover
5. Bedienung
5.1. Bedienelement

flowchart
graph TD
    A["1"] --> B["Speaker Icon"]
    C["2"] --> B
    D["3"] --> B
    E["4"] --> B
    F["5"] --> B
    G["6"] --> H["push & talk"]
① Kontroll-LED
② Mikrofon
③ Play/Pause-Taste
④ Lauter-Taste
⑤ Leiser-Taste
⑥ Vorwärts-Taste
PROD-BT-B / PROD-BT-W
INSTRUCTIONS FOR INSTALLATION AND USE English
EN
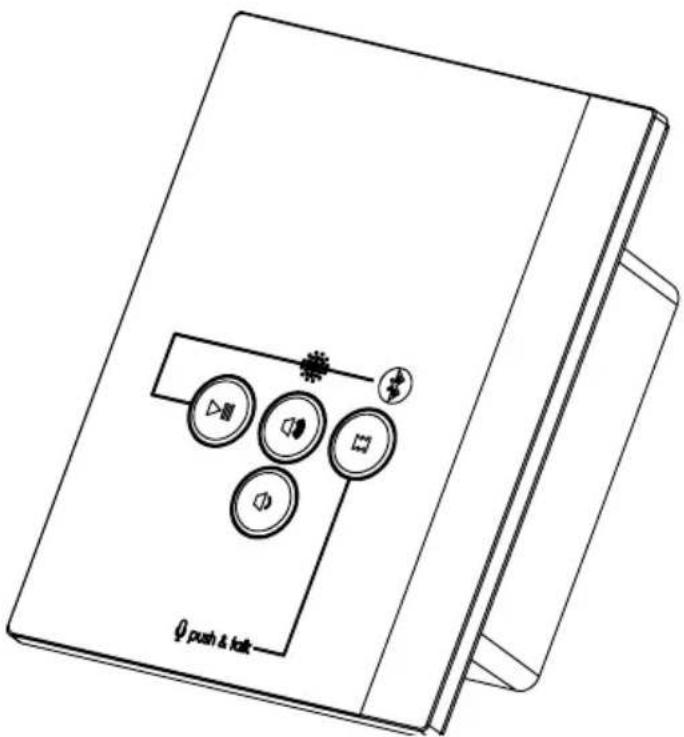
Table of Contents
1. About this instruction manual 3
2. Important information for your safety 4
2.1. Intended use 4
2.2. Safety information 4
3. Product description 5
3.1. Scope of delivery 5
3.2. Product features 5
4. Installation and connection 7
4.1. Preparing for installation 8
4.2. Connecting the device 9
4.3. Installing the device 9
5. Operation 10
5.1. Control 10
5.2. Establishing a connection for the first time (pairing)....11
5.3. Adjusting the volume 12
5.4. Pausing/resuming music playback 12
5.5. Selecting songs 12
5.6. Disconnecting....12
5.7. Re-establishing a connection 13
5.8. Switching audio sources 13
5.9. Answering a call while music is playing 14
5.10. Using voice recognition 14
6. Cleaning and maintenance 15
6.1. Cleaning 15
6.2. Maintenance 15
7. Disposal 15
8. Troubleshooting 16
9. Technical data 17
1. About this instruction manual
Read these instructions for installation and use carefully and keep them within reach of the device. This ensures that you can refer to information on safety and operation at any time.

These installation and operating instructions can also be found in the downloads section of our website: www.sentiotec.com.
Symbols
In these installation and operating instructions, symbols and signal words are used which have the following meanings:
ATTENTION!
This keyword is a warning that damage to property can occur.

This symbol indicates tips and useful information.
2. Important information for your safety
The Pro D Bluetooth module is built according to recognised safety rules. However, hazards may arise during use. Therefore adhere to the following safety information and the specific warning notices in the individual chapters.
2.1. Intended use
The ProD Bluetooth is an audio amplifier with a built-in microphone. It is designed for playing music from a Bluetooth-enabled device. The integrated microphone allows hands-free talking and access to a language assistant (e.g. Siri, Google Now etc.), provided the Bluetooth-enabled device supports this function. Bluetooth-enabled devices include most mobile phones, tablets or laptops.
Any use exceeding this scope is considered improper use. Improper use can result in damage to the product, severe injuries or death.
2.2. Safety information
- Installation and connection of the device may only be performed when the power supply is disconnected.
- Follow the instructions in this instruction manual during installation, as the product may otherwise be damaged or have its service life shortened.
- NEVER open the device.
- For your own safety, consult your supplier in the event of problems that are not described in sufficient detail in the installation and operating instructions.
3. Product description
3.1. Scope of delivery
- ProD Bluetooth
• Wall power supply with connection cable (1.5 m) - Extension cable for connecting cable to the wall power supply (2 m)
- Assembly material (4 wood screws (16 mm), bracket for opening the control unit)
3.2. Product features
The ProD Bluetooth allows you to play music in the sauna or infrared cabin. The music is transmitted via a Bluetooth connection from a Bluetooth-enabled device (= audio source) to the ProD Bluetooth module. All Bluetooth-enabled devices, such as most mobile phones, tablets, notebooks, etc., can be used as an audio source. The amplifier is already integrated in the Bluetooth module.
The integrated microphone enables voice control of the Bluetooth-enabled device, provided it supports this function (e.g. Siri, Google Now etc).
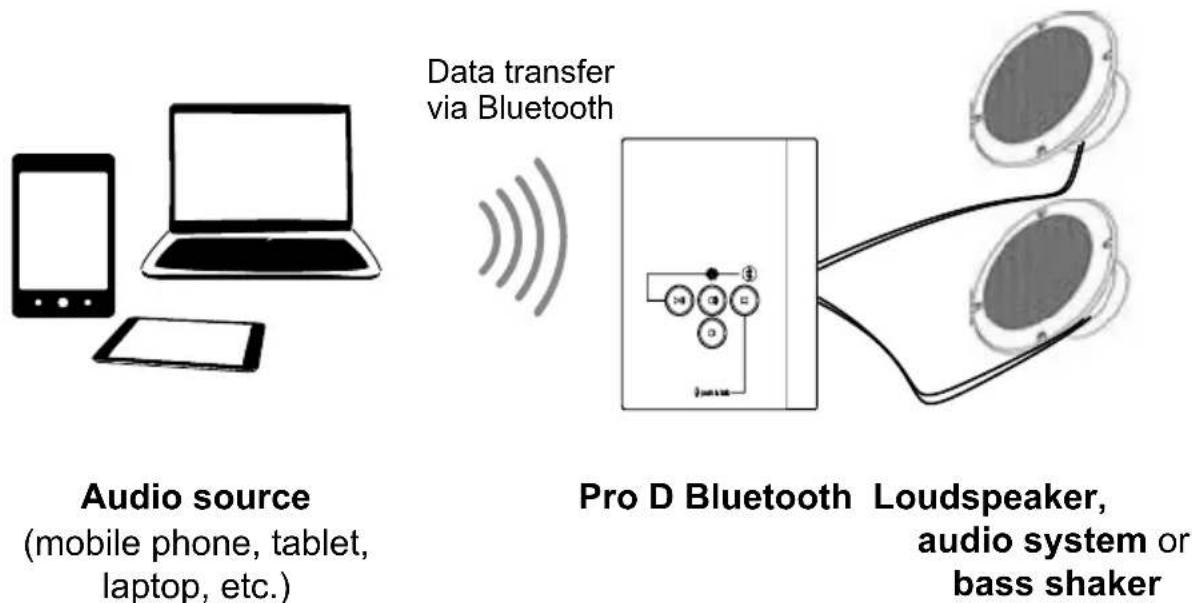
Figure 1: Product function
Installation location
The ProD Bluetooth module can be installed inside and outside the sauna, but the specifications of these installation instructions must be strictly observed (see 4. Installation and connection on page 7 and 9. Technical data on page 17).
Recommended accessories
Speakers are needed to play music. The manufacturer recommends you use the following products:
| Item number | Name Remarks | |
| WC4-BT-SPK | Loudspeaker set Suitable for installation in the sauna cabin | |
| WC4-BT-EXC | Electrodynamic exciter(Electromagnetic exciter) | To be mounted outside the sauna roomNot suitable for all sauna cabins (depending on the wall construction) |
If other speakers are used than those listed, disturbing noises may occur.
Caution: There will be no claim to the warranty in the case of problems regarding disturbing noises if using speakers other than WC4-BT-SPK and WC4-BT-EXC. You must observe the requirements under 9. Technical data on page 17.
Playback through an audio system
The ProD Bluetooth has a line-out output. This means you can also play music on an audio system such as the wave.com4 sound&light or a stereo system, if the stereo has a 3.5 mm line-in jack (aux-in jack).
Volume control
The volume can be adjusted in 4 levels on the ProD Bluetooth. Finer volume adjustments are made using the audio source (mobile phone, tablet etc.)
4. Installation and connection
- If you observe the following points, you can install the device inside the sauna:
- Install the device as far away from the sauna heater, infrared lamps or other heat sources as possible.
- Do NOT install the device on or right next to the sauna heater or other heat source.
- The maximum installation height in a sauna cabin is 140 cm.
- The maximum installation height in an infrared cabin is 170 cm.
- No insulating material (such as mineral wool) may be located behind the device.
- The ambient conditions (see 9. Technical data on page 17) must be observed.
- Only the supplied extension cord may be used to extend the mains cable.
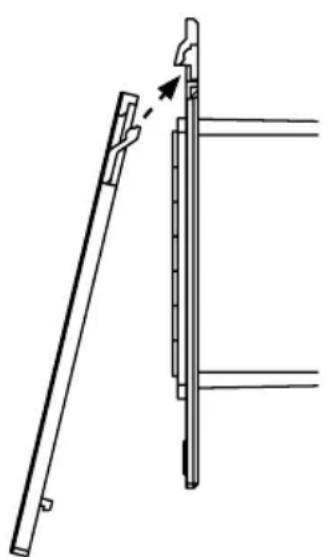
4.1. Preparing for installation
Note Figure 2.
ATTENTION!
Damage to the unit
- The ProD Bluetooth is splash-proof (protection class IPX4).
- Work on the ProD Bluetooth may only be carried out using an ordinary screwdriver. Using a cordless screwdriver may cause irreparable damage to the housing.
- Cut the mounting hole the cabin wall with a jigsaw.
- The minimum installation depth for a wall cut-out is 35 mm.
- Remove any insulation from the mounting hole.
- Lay the connecting cable in the wall of the sauna cabin to the mounting hole and fasten it with cable ties.

Figure 2: Installation in wall cut-out

Figure 3: Connecting the device (rear)
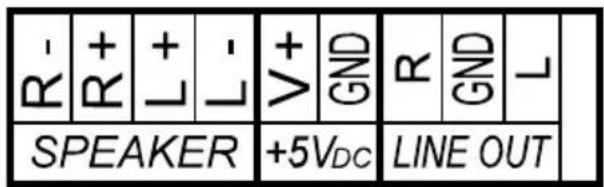
4.2. Connecting the device
Note Figure 3.
- Connect the 2-pin cable to the terminals marked "5V _DC ".
- Plug the black cable into the terminal marked "GND" and the red cable into the terminal marked "V+".
- Connect the cable to the jack plug of the power supply unit.
- Connect the loudspeaker cables (max. 3 m) to the terminals marked "SPEAKER": connect the cables of the right speaker to terminals "R" and the cables of the left speaker to terminals "L".
- Plug the black cable into the terminals marked “-” and the red cables into the terminals marked “+”.
- If you want to use an audio system for music playback, connect the "LINE OUT" output of the Bluetooth module to the line-in (aux-in jack) of the audio system. Use a cable resistant to temperatures up to 150 °C (NOT included).
4.3. Installing the device
- Insert the device into the mounting hole.
- Screw the unit through the holes to the cabin wall using the four wood screws provided.
- Gently press the front panel into the housing. Ensure that the lower catches engage noticeably.
natural_image
Technical line drawing of a mechanical assembly with a rod and bracket (no text or symbols)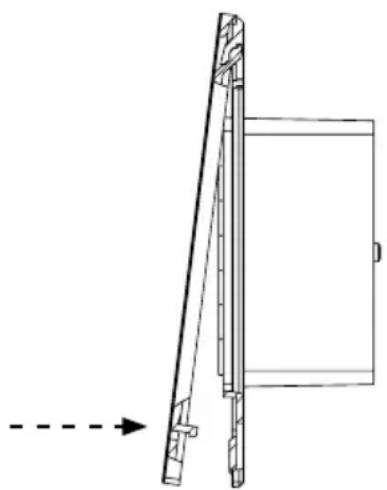
natural_image
Technical line drawing of a mechanical component with an arrow indicating direction (no text or symbols)Figure 4: Mounting the front cover
5. Operation
5.1. Control

flowchart
graph TD
    1["1"] --> A["Speaker"]
    2["2"] --> A
    3["3"] --> A
    4["4"] --> A
    5["5"] --> A
    6["6"] --> A
    A --> B["Output"]
    style A fill:#f9f,stroke:#333
    style B fill:#ccf,stroke:#333
① Indicator LED
② Microphone
③ Play/Pause button
④ Volume Up button
5 Volume Down button
6 Forward button
5.2. Establishing a connection for the first time (pairing)

Observe the operating instructions for your audio source (mobile phone, tablet, etc.)
- Plug the plug-in power supply of the ProD Bluetooth into an electrical socket (230 V).
The indicator LED 1 on the ProD Bluetooth flashes alternately red and blue for approx. 3 minutes (pairing mode).
▶ After pairing, the ProD Bluetooth switches to standby mode. The indicator LED ① on the ProD Bluetooth flashes blue slowly.
▶ Press the forward button for 3 seconds to return to pairing mode.
-
Turn on the audio source (mobile phone, tablet, etc).
-
Turn on the Bluetooth function of the audio source.
If your audio source does not automatically search for Bluetooth devices in the area, start the search manually by selecting "Search for devices" or a similarly named function.
▶ Most devices automatically search for and display other Bluetooth devices in the area.
The ProD Bluetooth is displayed on the audio source with the name "sentio.BT xxx".
- xxx is the device's own identification number (e.g. E2D)
- Select "sentio.BT xxx" from the device list shown on the audio source.
The Bluetooth connection between the audio source and the ProD Bluetooth is established for the first time (= pairing).
▶ The indicator LED 1 on the ProD Bluetooth lights up blue.
▶ The ProD Bluetooth is connected and ready to use.
- Play music with the audio player of your audio source.
The music is played from the speakers connected to the ProD Bluetooth.
5.3. Adjusting the volume
Use the Volume Up/Down buttons 4, 5 on the ProD Bluetooth module to adjust the volume.
The volume can be adjusted in 4 levels on the ProD Bluetooth. The maximum volume is reached after pressing the Volume Up button ④ when the indicator LED ① flashes three times. The minimum volume is reached after pressing the Volume Down button ⑤ when the indicator LED ① flashes three times.

If the maximum volume level of the ProD Bluetooth appears too quiet, increase the volume on the audio source. If the minimum volume level of the ProD Bluetooth appears too loud, reduce the volume on the audio source.
5.4. Pausing/resuming music playback
To pause or resume music playback after the interruption, you have the following options:
- Use the Play/Pause button ③ on the ProD Bluetooth.
- Use the Play/Pause button of the audio player of your audio source.
5.5. Selecting songs
You have the following options for selecting a song:
- Use the Forward button 6 on the Bluetooth module.
- Use the Forward/Back buttons on the audio player of your audio source.
5.6. Disconnecting
You have the following options for disconnecting the Bluetooth connection between your audio source (mobile phone, tablet, etc.) and the proD Bluetooth:
- Turn off the Bluetooth function of the audio source.
- Disconnect the connection manually on the audio source.
Follow the operating instructions for your device.
5.7. Re-establishing a connection
The Bluetooth connection between the audio source and the ProD Bluetooth is automatically re-established when
- the audio source was out of range of the ProD Bluetooth.
- The Bluetooth function of the audio source was turned off and you turn it back on again.
If you have manually disconnected the Bluetooth connection between the audio source and ProD Bluetooth at the audio source, you must manually re-establish the Bluetooth connection to the audio source (see 5.2 on page 11).
5.8. Switching audio sources
Switch to a new (not previously paired) audio source
This is how to pair the ProD Bluetooth with a new audio source:
- Disconnect the Bluetooth connection between the previous audio source and the ProD Bluetooth. Follow the operating instructions for your device.
- Press the Play/Pause button ③ on the ProD Bluetooth for 3 seconds. The indicator LED ① flashes alternately red and blue (pairing mode)
The ProD Bluetooth can now establish a connection to a different audio source for the first time (pairing – see 5.2 on page 11).

Only one device can be actively connected to the ProD Bluetooth at a time.
Switching to an audio source that was previously paired
The Bluetooth module stores the pairing information of the last eight audio sources. To connect the Bluetooth module to a device it had previously been paired with, you only need to perform the following steps:
- Disconnect the Bluetooth connection between the previous audio source and the ProD Bluetooth. Follow the operating instructions for your device.
- Manually establish a Bluetooth connection between the new audio source and Bluetooth module:
- Select "sentio.BT xxx" from the list of paired devices.

Only one device can be actively connected to the ProD Bluetooth at a time.
5.9. Answering a call while music is playing
An incoming call on the connected device is forwarded to the ProD Bluetooth and signalled by a call tone. If you want to answer the call, briefly press the Forward button ⑥. The music is then automatically interrupted and resumed after the call.

If the indicator LED flashes purple, the microphone is activated.
5.10. Using voice recognition
Follow the operating instructions for your device. Depending on the activated functions, these can be selected using the built-in microphone of the ProD Bluetooth (e.g. call a contact, answer a call, play the next song on the playlist, create reminders etc.).
- Press the Forward button 6 for 3 seconds to activate the microphone (push to talk).
The indicator LED 1 on the ProD Bluetooth flashes purple and a signal tone sounds.
6. Cleaning and maintenance
6.1. Cleaning
ATTENTION!
Damage to the unit
The device is protected against splashing water, but direct contact with water could still damage the device.
- NEVER immerse the device in water.
- Never pour water over the unit.
- Do get the device too wet when cleaning it.
- NEVER clean the back of the device yourself. Have this done by a qualified electrician.
- NEVER remove the housing of the device.
- Immerse a cleaning cloth in a mild, soapy solution.
- Wring the cleaning cloth out well.
- Wipe off the front of the device carefully.
6.2. Maintenance
The ProD Bluetooth needs no maintenance.
7. Disposal

- Please dispose of packaging materials in accordance with the applicable disposal regulations.
- Used units contain reusable materials as well as hazardous substances. Therefore, do not dispose of your used unit with household waste, but rather do so in accordance with the locally applicable regulations.
8. Troubleshooting
| Error Cause Rectification | ||
| An audio source cannot be paired. | The audio source is out of range of the ProD Bluetooth. | Reduce the distance between the audio source and the ProD Bluetooth. |
| The ProD Bluetooth is not in pairing mode. | Press the Play/Pause button 3 for 3 seconds.► The indicator LED 1 on the Bluetooth module flashes alternately red and blue (pairing mode). | |
| The Bluetooth connection between an audio source and the ProD Bluetooth cannot be established. | The audio source is out of range of the ProD Bluetooth. | Reduce the distance between the audio source and the ProD Bluetooth. |
| The ProD Bluetooth is already connected to another audio source. | Disconnect the connection to this other audio source. | |
| The next track is not played. The Forward button does not work | The ProD Bluetooth sends the command but the audio source cannot process it | Use a different audio source |
| Microphone cannot be activated despite pressing the Forward button for 3 seconds | The ProD Bluetooth sends the command but the audio source cannot process it | Check the voice input settings on the audio source. |
9. Technical data
Ambient conditions
| Storage temperature: | -25 °C to +70 °C |
| Ambient temperature: | 0 °C to +100 °C |
| Relative humidity: | max. 99% |
non-condensing
Dimensions
| Dimensions: | 79 x 103 x 36.6 mm |
| Cut-out dimensions | 65 x 70 x 35 mm |
Cables (temperature resistance at least up to 150 °C)
| Connection cable and extension cable at least 2 x 0.4 mm ^2 |
| Speaker cables (max. 3 m): min. 2 x 0.4 mm ^2 |
Bluetooth
| Version: | 4.0 | |||
| Range | up | to | 30 | m |
Cables (temperature resistance at least up to 150 °C)
| Connection cable and extension cable at least 2 x 0.4 mm ^2 |
| Speaker cables (max. 3 m): min. 2 x 0.4 mm ^2 |
Connections
| Audio connection for two loudspeakers |
| Line-out connector |
| Plug-in power supply with adapter |
Loudspeakers
Impedance
2
X
8
RMS power: 2 x 3 W
P.M.P.O. value: \~ 15 W
Temperature resistance at least 120 °C
The use of WC4-BT-SPK or WC4-BT-EXC speakers is recommended, otherwise there may be disturbing noises.
Possible operating systems for the audio source
Android version 1.5 or higher
iPad/iPhone iOS 3.0 or higher
Nokia Symbian
Linux
NOTE: Windows 7 does NOT support full functionality. For example, it is not possible to set the volume using the Volume Up / Volume Down buttons on the Bluetooth module.
ProD Bluetooth
PROD-BT-B / PROD-BT-W
INSTRUCTIONS DE MONTAGE ET MODE D'EMPLOI Français

FR
Table des matières
1. Concernant ces instructions 3
natural_image
Technical line drawing of a mechanical assembly with a rod and bracket (no text or symbols)
natural_image
Technical line drawing of a mechanical component with an arrow indicating direction (no text or symbols)PROD-BT-B / PROD-BT-W
IT
Indice
natural_image
Technical line drawing of a mechanical assembly with a rod and bracket (no text or symbols)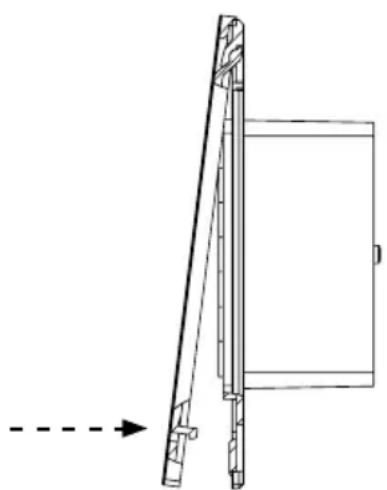
natural_image
Technical line drawing of a mechanical assembly with a dashed arrow indicating direction (no text or symbols)PROD-BT-B / PROD-BT-W
NL
Inhoudsopgave
Afb. 2: Montage in wanduitsnede
natural_image
Technical line drawing of a mechanical assembly with a rod and bracket (no text or symbols)
natural_image
Technical line drawing of a mechanical assembly with an arrow indicating direction (no text or symbols)Afb. 4: Montage frontcover
5. Bediening
5.1. Bedieningselement

flowchart
graph TD
    A["1"] --> B["2"]
    B --> C["3"]
    C --> D["4"]
    D --> E["5"]
    E --> F["6"]
    B --> G["播放器"]
    G --> H["声波"]
    H --> I["喇叭"]
    I --> J["push & talk"]
① Controle-led
② Microfoon
③ Play/Pause-toets
④ Luider-toets
⑤ Zachter-toets
⑥ Vooruit-toets
PROD-BT-B / PROD-BT-W
MONTERINGS- OCH BRUKSANVISNING Svenska

SV
natural_image
Technical line drawing of a mechanical assembly with a rod and bracket (no text or symbols)
natural_image
Technical line drawing of a mechanical assembly with an arrow indicating direction (no text or symbols)Bild 4: Montera frontkåpa
5. Användning
5.1. Manöverelement

flowchart
graph TD
    A["1"] --> B["2"]
    B --> C["3"]
    C --> D["4"]
    D --> E["5"]
    E --> F["6"]
    B --> G["播放器"]
    G --> H["声波"]
    H --> I["喇叭"]
    I --> J["push & talk"]
PROD-BT-B / PROD-BT-W
FI
Sisällys
natural_image
Technical line drawing of a mechanical assembly with a rod and bracket (no text or symbols)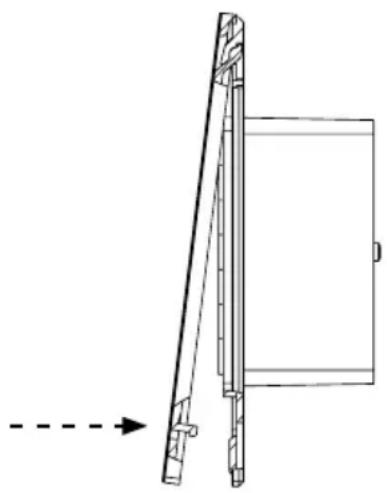
natural_image
Technical line drawing of a mechanical component with an arrow indicating direction (no text or symbols)PROD-BT-B / PROD-BT-W
NÁVOD K MONTÁŽI A POUŽITÍ Česky

CS
Obsah
1. O tomto návodu 3
natural_image
Technical line drawing of a mechanical assembly with a rod and bracket (no text or symbols)
natural_image
Technical line drawing of a mechanical assembly with a dashed arrow indicating direction (no text or symbols)PROD-BT-B / PROD-BT-W
PT
Índice
1. Sobre este manual 3
natural_image
Technical line drawing of a mechanical assembly with a rod and bracket (no text or symbols)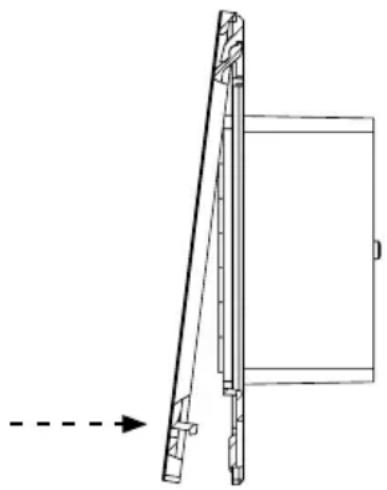
natural_image
Technical line drawing of a mechanical component with an arrow indicating direction (no text or symbols)

- Inhaltsverzeichnis
- Bedienung
- Bedienelement
- Table of Contents
- About this instruction manual 3
- Important information for your safety 4
- Product description 5
- Installation and connection 7
- Operation 10
- Cleaning and maintenance 15
- Disposal 15
- Troubleshooting 16
- Technical data 17
- About this instruction manual
- Symbols
- ATTENTION!
- Important information for your safety
- Intended use
- Safety information
- Product description
- Scope of delivery
- Product features
- Installation location
- Recommended accessories
- Playback through an audio system
- Volume control
- Installation and connection
- Preparing for installation
- Damage to the unit
- Connecting the device
- Note Figure 3.
- Installing the device
- Operation
- Control
- Establishing a connection for the first time (pairing)
- Adjusting the volume
- Pausing/resuming music playback
- Selecting songs
- Disconnecting
- Re-establishing a connection
- Switching audio sources
- Switch to a new (not previously paired) audio source
- Switching to an audio source that was previously paired
- Answering a call while music is playing
- Using voice recognition
- Cleaning and maintenance
- Cleaning
- Maintenance
- Disposal
- Troubleshooting
- Technical data
- Loudspeakers
- Possible operating systems for the audio source
- ProD Bluetooth
- Table des matières
- Concernant ces instructions 3
- Indice
- Inhoudsopgave
- Bediening
- Bedieningselement
- Användning
- Manöverelement
- Sisällys
- Obsah
- O tomto návodu 3
- Índice
- Sobre este manual 3
Brand : HARVIA
Model : ProD Bluetooth PRODBTB
Category : Hi-fi system