Smart HUB Module - Electronic module GYS - Free user manual and instructions
Find the device manual for free Smart HUB Module GYS in PDF.

| Product type | Electronic accessory module |
| Brand | GYS |
| Model | Smart HUB Module (SHM) |
| Mains power supply | Single-phase 230 V (50-60 Hz), 16 A, CEE7/7 plug |
| Dimensions (L x H) | 168 x 186 mm |
| Max number of connected modules | 4 (Gysflash CNT) |
| Main functions | Connect multiple modules to the same charger, parallel connection of identical Gysflash CNT chargers (up to 4) |
| Connection type | SMC cables, DB9 connection for communication |
| Operating temperature | Do not exceed 50°C |
| Maintenance | Disconnect plug before cleaning, use a dry cloth, no solvents |
| Safety | Indoor use only, do not expose to rain, do not use if cord damaged, grounded plug |
| Included accessories | SMC cable, 16 A CEE7/7 power cord |
| Warranty | 2 years (parts and labor) |
| Compliance | CE, EAC, UKCA, CMIM (Morocco) |
| Customer service | GYS France: +33 2 43 01 23 60, service.client@gys.fr |
Frequently Asked Questions - Smart HUB Module GYS
User questions about Smart HUB Module GYS
0 question about this device. Answer the ones you know or ask your own.
Ask a new question about this device
Download the instructions for your Electronic module in PDF format for free! Find your manual Smart HUB Module - GYS and take your electronic device back in hand. On this page are published all the documents necessary for the use of your device. Smart HUB Module by GYS.
USER MANUAL Smart HUB Module GYS
natural_image
Technical line drawing of a rectangular electronic device with four ports and mounting holes (no text or symbols)| FR | 02-09 / 52-56 |
| EN | 10-16 / 52-56 |
| DE | 17-23 / 52-56 |
| ES | 24-30 / 52-56 |
| RU | 31-37 / 52-56 |
| NL | 38-44 / 52-56 |
| IT | 45-51 / 52-56 |
SMART HUB MODULE
FIG I
text_image
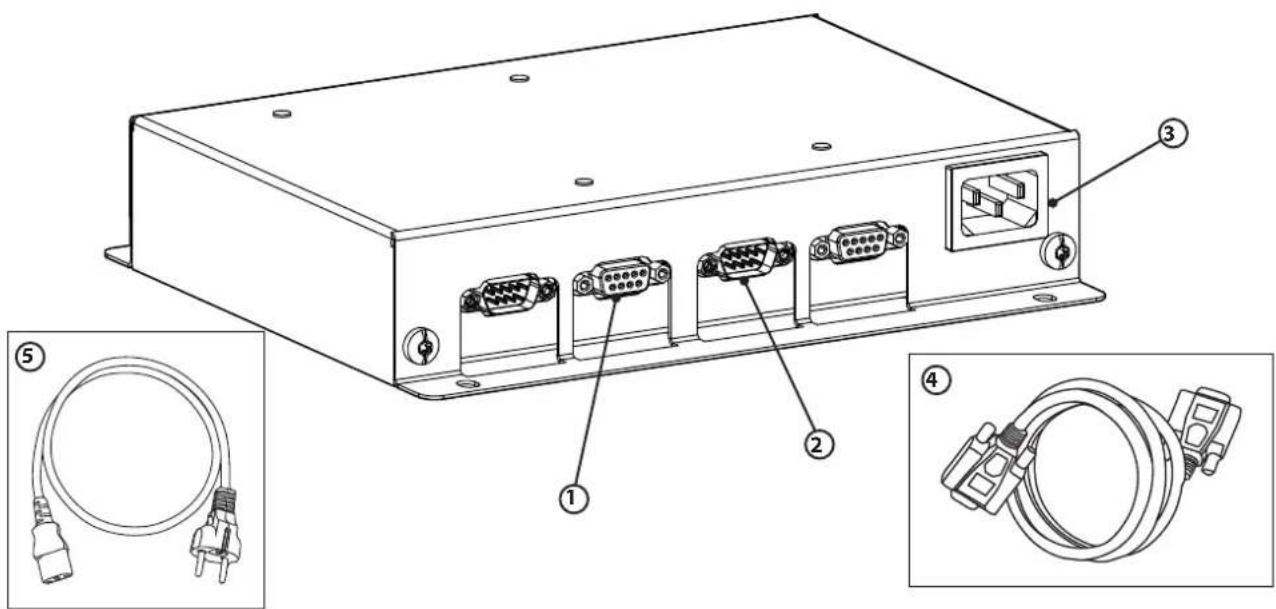
Technical diagram of an electronic device with labeled ports and cable connectors, including zoomed-in views for details.| 1 | Sortie SMC pour Module CNT (x4) / SMC output for CNT Module (x4) / SMC-Ausgang für Modul CNT (x4) / Salida SMC para módulo CNT (x4) / Выход SMC для Модуля CNT (x4) / Uitgang SMC voor Module CNT (x4) / Uscita SMC per Module CNT (x4) |
| 2 | Entrée SMC pour GYSFLASH CNT (x4) / SMC input for GYSFLASH CNT (x4) / SMC-Eingang für GYSFLASH CNT (x4) / Entrada SMC para GYSFLASH CNT (x4) / Входы SMC для GYSFLASH CNT (x4) / Ingang SMC voor GYS-FLASH CNT (x4) / Entrata SMC per GYSFLASH CNT (x4) |
| 3 | Prise câble secteur 230 Vac / 230 Vac power cable socket / Netzanschluss 230 VAC / Toma de cable de alimentación de 230 Vac / Сетевой шнур 230 Vac / Stekker netsnoer 230 Vac / Presa cavo di rete 230 Vac |
| 4 | Cordon SMC / SMC cord / SMC-Kabel / Cordón SMC / Шнур SMC / Kabel SMC / Cavo SMC |
| 5 | Cordon secteur / Power supply cable / Netzleitung / Cable de conexión eléctrica / Сетевой шнур / Kabel netspanning / Cavo corrente |
natural_image
Technical line drawings of a mechanical device with internal components and mounting holes (no text or symbols)GARANTIE
This manual contains safety and operating instructions, to be followed for your safety. Please read it carefully before using the device for the first time and keep it for future reference.
Read and understand the following safety instructions before use. Any modification or updates that are not specified in the instruction's manual should not be undertaken. The
manufacturer is not liable for any injury or damage due to non-compliance with the instructions featured in this manual. If there is any issue or uncertainty, please consult a qualified individual to operate the equipment correctly. This device may only be used for ticket printing and/or data transmission within the limits indicated on the device and manual. The operator must observe the safety precautions. In case of improper or unsafe use, the manufacturer cannot be held liable.

The device is destined to be used indoors. Must not be exposed to the rain.
Do not use the charger if the mains cable or plug is damaged.
Do not place the unit near a heat source/direct sunlight and durably high temperatures (above 50 °C )

This machine must be connected to an earthed socket.

Maintenance
- Maintenance should only be carried out by a qualified person.
- Warning! Always disconnect from the mains before performing maintenance on the device.
- Do not use solvents or any agressive cleaning products.
- Clean the device's surfaces with a dry cloth.
Regulations:
• Equipment complies with European directives
- The declaration of conformity is available on our website.
• EAEC Conformity marking (Eurasian Economic Community).
- Material complies with British requirements. The UK Declaration of Conformity is available on our website (see cover page).
• Device consistent with Moroccan standards.
- The C _o (CMIM) declaration of conformity is available on our website.
Waste management:
- This material is subject to selective collection. Do not throw away in a household bin.
GENERAL DESCRIPTION
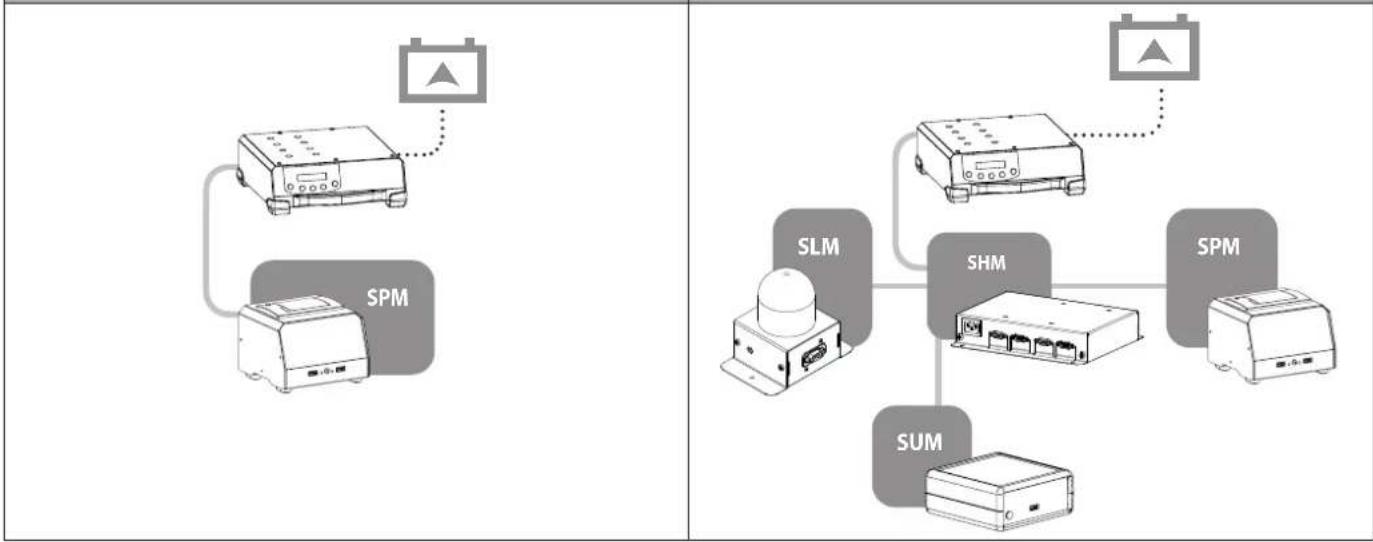
- The Smart Hub Module (SHM) is an accessory that allows several modules (maximum 4) to be connected to a single Gysflash CNT charger.
1 module Several modules
flowchart
graph TD
    A["SPM"] --> B["Router"]
    C["SLM"] --> D["ShM"]
    E["SUM"] --> F["ShM"]
    G["SPM"] --> H["Router"]
    I["SLM"] --> J["SHM"]
    K["SUM"] --> L["ShM"]
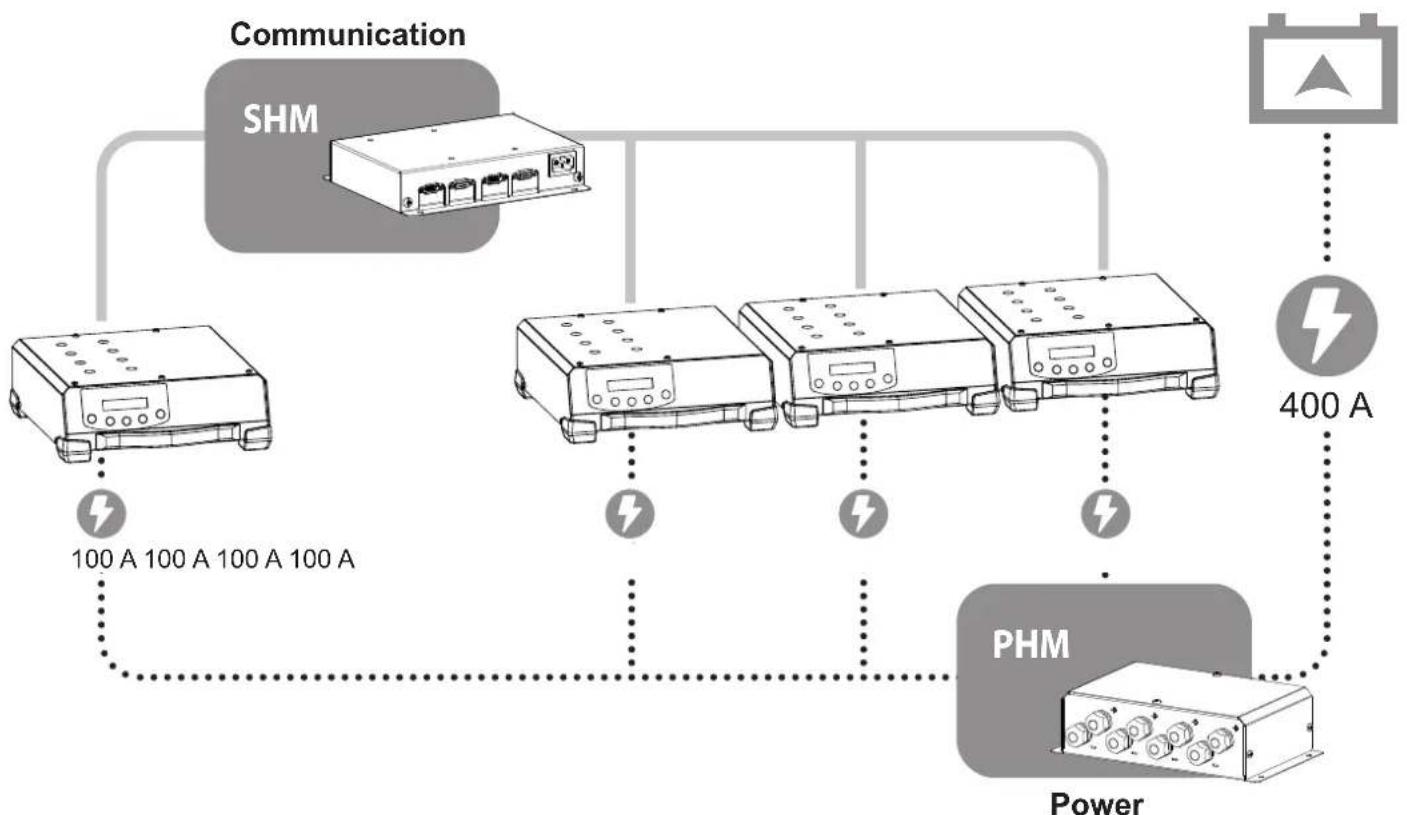
- The SHM manages communication when identical Gysflash CNT chargers are paralleled to create an ultra powerful charger.
Example: 4 GYSFLASH 101.12 CNT → 400 A
flowchart
graph TD
    A["Communication"] --> B["SHM"]
    B --> C["PHM Power Unit"]
    C --> D["400 A Battery"]
    style A fill:#f9f,stroke:#333
    style B fill:#ccf,stroke:#333
    style C fill:#cfc,stroke:#333
    style D fill:#fcc,stroke:#333

For this function, the SHM must be associated with a Power Hub Module (ref. 056589) which manages the power.
This machine is fitted with a 16A socket type CEE7/7 which must be connected to a single-phase 230V (50 - 60 Hz) power supply fitted with three wires and one earthed neutral.
CONNECTION OF SEVERAL MODULES

For the SHM device to work, a GYSFLASH CNT charger must be connected to channel 1 (FIG II) via the SMC cable supplied.
Using the power cord
- If there are as many chargers as there are modules connected to the SHM, the presence of the mains is not mandatory. Each GYSFLASH provides the necessary energy to the module connected to its channel.

To benefit from the energy supplied by the charger, a module must be connected to the same channel as a GYSFLASH.
- In general, connecting the SHM to the mains opens up all the channels without having to resort to the number of GYS-FLASH needed to power all the modules. It should be used when more modules than chargers are to be connected to the SHM.
| Need to use the power cord | |||||
| Number of connected modules | |||||
| 1 2 3 | 4 | ||||
| Number of connected GYSFLASH | 1 | Yes Yes | |||
| 2 | No No | Yes Yes | |||
| 3 | No No | No Yes | |||
| 4 | No No | No No | |||
Example:
A module can be connected to channel 3 (LED on) when:
- a GYSFLASH is connected to channel 3.
- the power cord is plugged in and a GYSFLASH is present on channel 1.

text_image
CONNECTED CNT 075FLASH MOBILE 3 075FLAConnecting a GYSFLASH with several modules:
① Connect the GYSFLASH to channel 1 via the SMC lead supplied with the SHM.
② Connect the modules (SMC cable supplied with the modules).
③ Connect the mains plug.
④ Connect the charger to the battery (refer to the GYSFLASH manual).
⑤ Switch on the charger.
PARALLELING GYSFLASH CNT

Paralleling can only be done with identical GYSFLASH CNT (maximum 4).
Master/Slave communication:
Parallel connection of GYSFLASH CNT chargers is done via a Master/Slave configuration.
→ One GYSFLASH (the Master) controls all the others (the Secondaries).
Setting the GYSFLASH as Master or Slave requires a manipulation on each of them.
| 1 | Uncap the GYSFLASH CNT.△ Unplug your GYSFLASH at least 10 minutes before disassembly. This operation should only be carried out by a qualified person | |
| 2 | Locate the micro-switches that allow you to change the Master/Slave position of the charger.When it leaves the factory, the GYSFLASH is always in the Master position.Depending on the desired configuration, set the position of the GYSFLASH as shown below:Master  Slave 1 Slave 1  Slave 2 Slave 2  Slave 3 Slave 3  Each GYSFLASH in parallel must be in a different position.It's not possible to have two Master products or two of Slave 1 for example. Each GYSFLASH in parallel must be in a different position.It's not possible to have two Master products or two of Slave 1 for example. | |
| 3 | Recap the GYSFLASH CNT. | |
| 4 | Switch on the Master Charger and perform the following operation to activate the "Multi-Charger" mode:- Press the MODE button for 3 seconds to access the "Configuration" MenuMODE- Use the arrow keys to navigate to "Multi-Chargemode".SELECTMulti-Charger modeOFF- Press Select again to activate the mode and use the arrows to select the configuration that suits your installation: «MASTER + 1 SLAVE» — «MASTER + 2 SLAVE» — «MASTER + 3 SLAVE». | CONFIGURATIONMulti-charger ModeMulti-Charger modeOFFMulti-Charger modeMASTER + X SLAVE |
| - Press Select one last time to confirm.The GYSFLASH restarts. |  | ||
| 5 | Switch on the Master Charger and perform the following operation to activate the “Multi-Charger” mode: | ||
| - Press the MODE button for 3 seconds to access the “Configuration” Menu | MODE | ||
| - Use the arrow keys to navigate to “Multi-Chargemode”. |  | CONFIGURATIONMulti-Charger mode | |
| - Press Select to enter the mode. |  | Multi-Charger modeOFF | |
| - Press Select again to activate the mode.The Gysflash indicates its position according to the chosen configuration: «SLAVE 1» — «SLAVE 2» — «SLAVE 3». |  | Multi-Charger modeSLAVE X | |
| - Press Select one last time to confirm.The GYSFLASH restarts. |  | SLAVE X | |

A GYSFLASH configured as Slave is locked. To return the charger to standard use, press the key for 3 seconds, switch the "Multi-charger" mode to OFF and confirm with the key. MODE SELECT
Connections and charge initiation:

For the SHM device to work, a GYSFLASH CNT charger must be connected to channel 1 (FIG II).
①Connect the GYSFLASH to the SHM (SMC cables not supplied) according to the desired configuration.
② Connect the power cables to the PHM (refer to the PHM manual).
③ Connect the battery to be charged to the output of the PHM.
④ Turn on all GYSFLASH.
⑤ Calibrate the cables.
⑥ Set up the charge cycle on the GYSFLASH Master.
⑦ Start the charge.
⑤CABLES CALIBRATION :
Procedure for calibrating the charging cables of the device, so that the charger optimally compensates for the voltage drop due to the cables. It is strongly recommended to perform this procedure at least once a year and each time the charging cables are replaced.
| Calibration procedure: | |
| 1 On the Master GYSFLASH, press SELECT to enter the CALIBRATION CABLES sub-menu. |  |
| 2 Short-circuit the two output clamps of the PHM. | 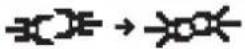 |
| 3 Press START/STOP to start the calibration |  |
4: The calibration was carried out correctly. Err19: Cable_NOK: A problem occurred during the cables calibration. Check the wiring, the good condition of the cables and the short-circuiting. Repeat the operation.
TROUBLESHOOTING
| Err27: Cable_NOK | Multi-charger mode :Parallel charging cables fail | Load cables to be replaced. |
| Poor connection, check assembly (PHM). | ||
| Err28: COM_NOK | Multi-charger mode :Communication failure between chargers | No communication, check SHM mounting and SLAVE X charger configuration. |
| DB9 cable(s) to be replaced. |
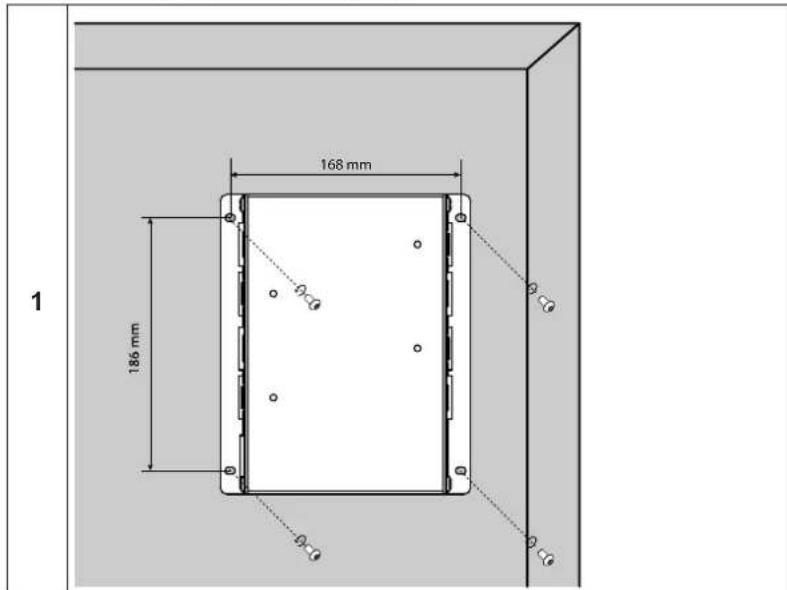
FIXING
There are two possibilities for fixing:
→ to the wall (screws not included)
text_image
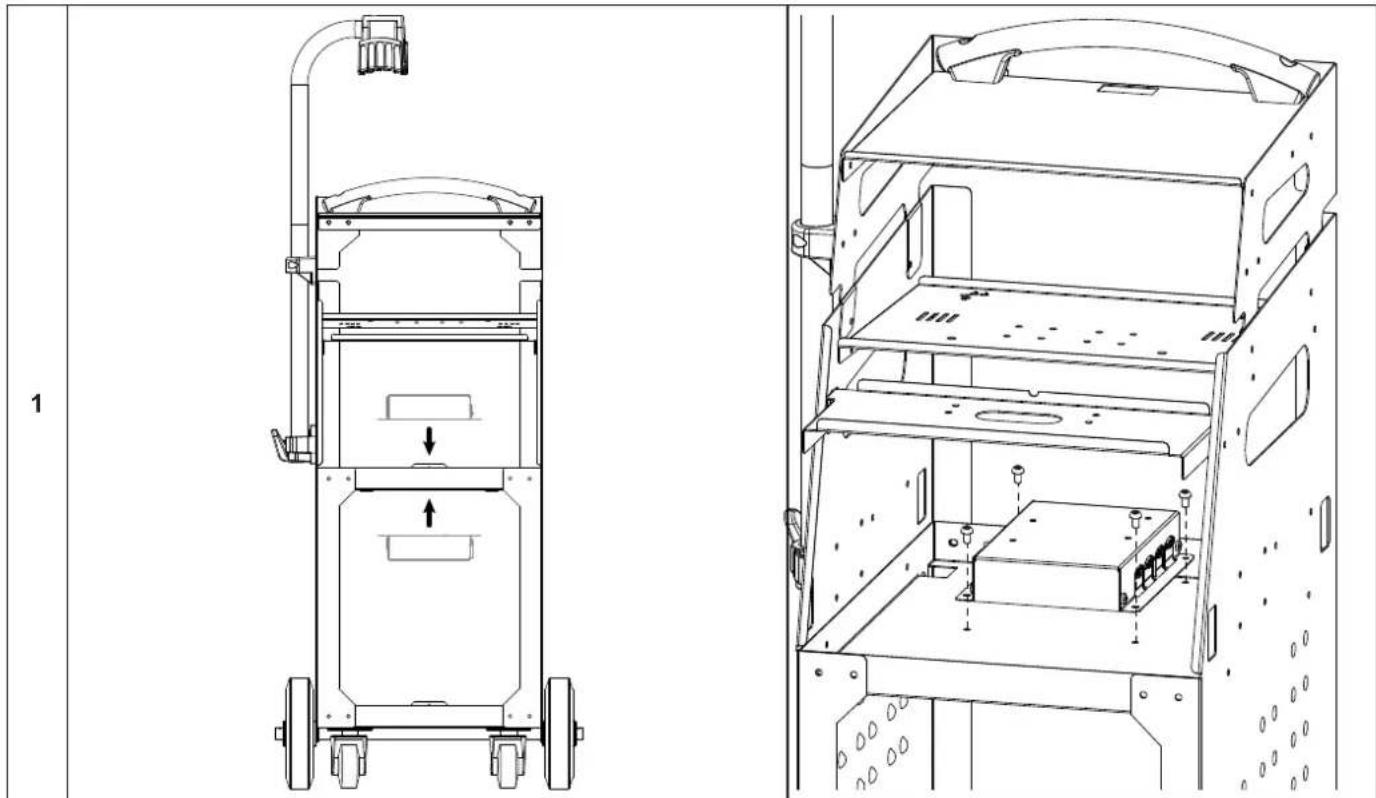
1 168 mm 186 mm 1→ on the Gysflash XL-ND trolley - ref. 028890 (use the screws supplied with the trolley).
natural_image
Technical line drawing of a mechanical device with internal components and mounting holes (no text or symbols)WARRANTY
The warranty covers defaults or manufacturing defects for 2 years from the date of purchase (parts and labour).
The warranty does not cover:
- Any other damage due to transport.
- Normal wear of parts (eg.: cables, clamps, etc..).
- Damages due to misuse (power supply error, dropping of the equipment, disassembling).
- Environment related failures (pollution, rust, dust).
In the event of a malfunction, return the unit to your dealer, enclosing:
- a dated proof of purchase (till receipt, invoice...)
- An explanatory note of the failure.
SICHERHEITSHINWEISE

text_image
Diagram showing two electronic devices connected via a cable, one labeled 'SPM' and the other with a triangular icon above.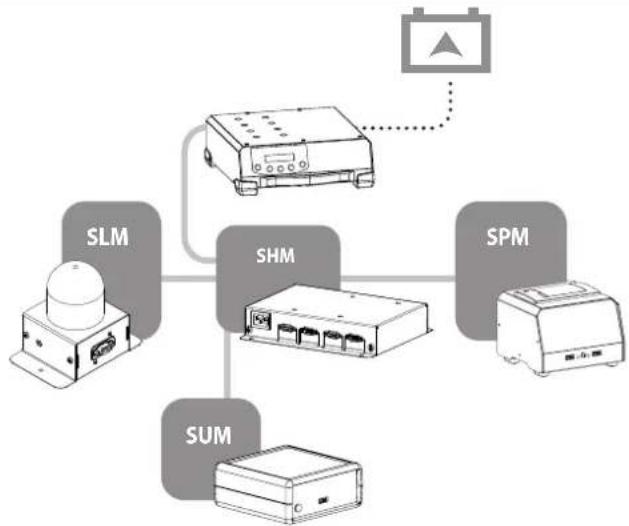
flowchart
graph TD
    A["SLM"] --> B["SHM"]
    B --> C["SPM"]
    C --> D["SUM"]
    D --> A
    B --> E["Device with indicator"]
text_image
DYFLASH MODULE CNT CONNECTED CNTnatural_image
Technical line drawing of a mechanical device with internal components and mounting holes (no text or symbols)GARANTIE
natural_image
Technical line drawing of a mechanical device with internal components and mounting holes (no text or symbols)GARANTÍA
text_image
CONNECTED CNTnatural_image
Technical line drawing of a mechanical device with internal components and mounting holes (no text or symbols)ГАРАНТИЯ
text_image
Diagram showing two electronic devices connected via a power supply, labeled 'SPM' with an icon pointing to the top device.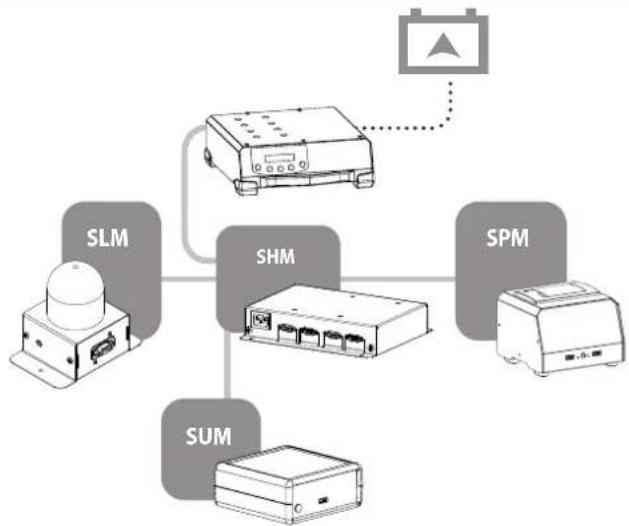
flowchart
graph TD
    A["Power Supply"] --> B["ShM"]
    B --> C["SUM"]
    C --> D["SLM"]
    D --> E["SHM"]
    E --> F["SPM"]
    F --> G["Output Connection"]
    style A fill:#f9f,stroke:#333
    style B fill:#ccf,stroke:#333
    style C fill:#cfc,stroke:#333
    style D fill:#fcc,stroke:#333
    style E fill:#cff,stroke:#333
    style F fill:#ffc,stroke:#333
    style G fill:#fcc,stroke:#333
natural_image
Technical line drawing of a mechanical device with wheels and a central component, no text or symbols present
natural_image
Technical line drawing of a multi-level electronic device with mounting brackets and internal components (no text or symbols)GARANTIE
text_image
CONNECTED CNTnatural_image
Technical line drawing of a mechanical device with internal components and mounting holes (no text or symbols)GARANZIA
text_image
Technical diagram of an electronic device with labeled components including a front panel, internal circuit boards, and cable connectors.| 1 | Bornier secteur / Mains terminal block / Netzanschluss / Borne conexión eléctrica / Сетевая клеммная колодка / Terminal netspanning / Morsettiera | 52431 |
| 2 | Carte électronique / Electronic board / Platine / Tarjeta electrónica / Электронная карточка / Elektrische circuit / Scheda elettrica | E0061C |
| 3 | Câble de liaison SMC / SMC connection cable / SMC-Verbindungskabel / Cable de unión SMC / соединительный кабель SMC / Verbindingskabel SMC / Cavo di collegamento SMC | 70988 |
| 4 | Cordon d'alimentation secteur IEC C13 / IEC C13 mains power cord / IEC C13 Netzversorgungskabel / Cable de suministro de corriente IEC C13 / шнур питания IEC C13 / Voedingskabel IEC C13 / Cordone d'alimentazione settore IEC C13 | 22314 |
TECHNICAL SPECIFICATIONS / TECHNISCHE DATEN / ESPECIFICACIONES TÉCNICAS / ТЕХНИЧЕСКИЕ СПЕЦИФИКАЦИИ / TECHNISCHE GEGEVENS / SPECIFICHE TECNICHE
| Modèle / Reference / Modell / Modelo / Modelle / Model / Modello SMART HUB MODULE | |
| Référence / Part number / Artikelnummer / Referencia / Артикул / Referentie / Riferimento | 025981 |
| Tension assignée d'isolement (Ui) / Rated insulation voltage (Ui) / Isolierungsspannung (Ui) / Tensión asignada de aislamiento (Ui) / Номинальное напряжение изоляции (Ui) / Nominale isolatiespanning (Ui) / Tensione nominale di isolamento (Ui) | 250 VRMS |
| Tension assignée de tenue aux chocs (Uimp) / Rated impulse withstand voltage (Uimp) / Bemessungs-Stoßspannungs-Festigkeit (Uimp) / Tensión asignada para los choques (Uimp) / Номинальное импульсное выдерживаемое напряжение (Uimp) / Stoo-thoudspanning (Uimp) / Tensione nominale di tenuta agli shock (Uimp) | 2.5 kV |
| Indice de protection / Protection rating / Schutzart / Índice de protección / Степень защиты / Beveiligingsindex / Indice di protezione | IP40 |
| Poids (câbles de charge non-compris) / Weight (load cables not included) / Gewicht (Ladekabel nicht inbegriffen) / Peso (cables de carga no incluidos) / Bec (зарядные кабели в комплект не входят) / Gewicht (exclusief laadkabels) / Peso (cavi di carica non compresi) | 1,07 kg |
| Dimensions (L x H x P) / Dimensions (L x H x D) / Abmessungen (B x H x T) / Dimensiones (L x A x A) / Размеры (Д x В x Ш) / Afmetingen (L x H x D) / Dimensioni (L x H x P) | 220 x 180 x 45 mm |
| Normes / Standards / Normen / Normas / Нормы / Normen / Norme EN 60335-1 | CEI EN 60529 (IP)EN 55014-1 (CEM)EN 55014-2 (CEM)EN 55058-1 (RoHS) |
SYMBOLS / ZEICHENERKLÄRUNG / ICONOS / СИМВОЛЫ / PICTOGRAMMEN / ICONE / ICONES / IKONY / IKONER / IKONER / IKONER / KUVAKKEET / IKONOK / VYSVĚTLENÍ SYMBOLŮ / アイコン / 図示 / EIKONIΔIA / ICOANE
 | FR Matériel conforme aux Directives européennes. La déclaration UE de conformité est disponible sur notre site (voir à la page de couverture). EN Device complies with europeans directives, The EU declaration of conformity is available on our website (see cover page). DE Gerät entspricht europäischen Richtlinien. Die Konformitätserklärung finden Sie auf unsere Webseite. ES Aparato conforme a las directivas europeas. La declaración de conformidad UE está disponible en nuestra página web (dirección en la portada). RU Устройство соответствует директивам Евросоюза. Декларация о соответствии доступна для просмотра на нашем сайте (ссылка на обложке). NL Apparaat in overeenstemming met de Europese richtlijnen. De verklaring van overeenstemming is te downloaden op onze website (adres vermeld op de omslag). IT Materiale in conformità alle Direttive europee. La dichiarazione di conformità è disponibile sul nostro sito (vedere sulla copertina). |
 | FR Matériel conforme aux exigences britanniques. La déclaration de conformité britannique est disponible sur notre site (voir à la page de couverture). EN Equipment in compliance with British requirements. The British Declaration of Conformity is available on our website (see home page). DE Das Gerät entspricht den britischen Richtlinien und Normen. Die Konformitätserklärung für Grossbritannien ist auf unserer Internetseite verfügbar (siehe Titelseite). ES Equipo conforme a los requisitos británicos. La Declaración de Conformidad Británica está disponible en nuestra página web (véase la portada). RU Материал соответствует требованиям Великобритании. Заявление о соответствии для Великобритании доступно на нашем веб-сайте (см. главную страницу) NL Materiaal conform aan de Britse eisen. De Britse verklaring van overeenkomt is beschikbaar op onze website (zie omslagpagina). IT Materiale conforme alla esigenze britanniche. La dichiarazione di conformità britannica è disponibile sul nostro sito (vedere pagina di copertina). |
 | FR Matériel conforme aux normes Marocaines. La déclaration C_P (CMIM) de conformité est disponible sur notre site (voir à la page de couverture). EN Equipment in conformity with Moroccan standards. The declaration C_P (CMIM) of conformity is available on our website (see cover page). DE Das Gerät entspricht die marokkanischen Standards. Die Konformitätserklärung C_P (CMIM) ist auf unserer Webseite verfügbar (siehe Titelseite). ES Equipamiento conforme a las normas marroquiles. La declaración de conformidad C_P (CMIM) está disponible en nuestra página web (ver página de portada). RU Товар соответствует нормам Марокко. Декларация C_P (CMIM) доступна для скачивания на нашем сайте (см на титульной странице). NL Dit materiaal voldoet aan de Marokkaanse normen. De verklaring C_P (CMIM) van overeenstemming is beschikbaar op onze internet site (vermeld op de omslag). IT Materiale conforme alle normative marocchine. La dichiarazione C_P (CMIM) di conformità è disponibile sul nostro sito (vedi scheda del prodotto). |
 | FR Ce matériel faisant l'objet d'une collecte sélective selon la directive européenne 2012/19/UE. Ne pas jeter dans une poubelle domestique ! EN This hardware is subject to waste collection according to the European directives 2012/19/EU. Do not throw out in a domestic bin ! DE Für die Entsorgung Ihres Gerätes gelten besondere Bestimmungen (sondermüll) gemäß europäische Bestimmung 2012/19/EU. Es darf nicht mit dem Hausmüll entsorgt werden! ES Este material requiere una recogida de basuras selectiva según la directiva europea 2012/19/UE. ¡No tirar este producto a la basura doméstica! RU Это оборудование подлежит переработке согласно директиве Евросоюза 2012/19/UE. Не выбрасывать в общий мусоросборник! NL Afzonderlijke inzameling vereist volgens de Europese richtlijn 2012/19/UE. Goci het apparaat niet bij het huishoudelijk afval ! IT Questo materiale è soggetto alla raccolta differenziata seguendo la direttiva europea 2012/19/UE. Non smaltire coni rifiuti domestici! |
 | FR Produit recyclable qui relève d'une consigne de tri. EN This product should be recycled appropriately DE Recyclingprodukt, das gesondert entsorgt werden muss. ES Producto reciclable que requiere una separación determinada. RU Этот аппарат подлежит утилизации. NL Product recyclebaar, niet bij het huishoudelijk afval gooien IT Prodotto riciclabile soggetto a raccolta differenziata. |
GYS France
Siège social / Headquarter