CLR2466N - Alarm clock radio ROADSTAR - Free user manual and instructions
Find the device manual for free CLR2466N ROADSTAR in PDF.
| Product type | Clock radio |
| Brand | Roadstar |
| Model | CLR2466N |
| Color | Black (current estimate) |
| Main power supply | AC 230 V ~ 50 Hz |
| Backup power supply | 9 V battery (not included) |
| Backup battery type | Alkaline recommended, duration 9-12 months |
| Radio reception | FM 87.5 - 108 MHz |
| Radio presets | Yes (memory for FM stations) |
| Number of alarms | 2 (Alarm 1 and Alarm 2) |
| Alarm mode | Buzzer or radio |
| Snooze function | Yes (9 minutes) |
| Sleep timer | Yes (15/30/45/60/90/120 minutes or off) |
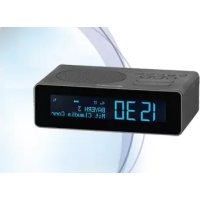
| Display | LED |
| Volume control | VOLUME +/- buttons |
| Antenna | Integrated adjustable antenna |
| Speaker | Built-in |
| Time format | 24 hours |
| Maintenance functions | Clean with soft damp cloth, no solvents |
| Protection | Do not expose to water, humidity, direct sunlight |
| Dimensions | Not specified in the manual |
| Weight | Not specified in the manual |
| Spare parts | No user-serviceable parts |
| Repairability | Contact a qualified technician |
Frequently Asked Questions - CLR2466N ROADSTAR
User questions about CLR2466N ROADSTAR
0 question about this device. Answer the ones you know or ask your own.
Ask a new question about this device
Download the instructions for your Alarm clock radio in PDF format for free! Find your manual CLR2466N - ROADSTAR and take your electronic device back in hand. On this page are published all the documents necessary for the use of your device. CLR2466N by ROADSTAR.
USER MANUAL CLR2466N ROADSTAR
Digital FM Clock Radio
User manual
Bedienungsanleitung
AC POWER: You can power your clock radio by plugging the AC power cord into a wall AC power outlet. Check that the rated voltage of your appliance matches your local voltage.
BATTERY BACK-UP POWER FAILURE PROTECTION
This radio has a battery back up circuit that will keep the correct time and alarm settings in the event of a temporary power interruption.
Install a 9-volt battery (not included), into the battery compartment located on the bottom of the unit.
Note: We recommend an alkaline battery for longer usable life.
Change the battery every 9 to 12 months for best result and avoid possible battery leakage.
If power is temporarily interrupted the display will blink and the radio will not play. However, the battery back-up circuit will continue to maintain the clock and alarm settings. When power is restored the clock will display the correct time and alarm settings, and no adjustment is necessary.
CLOCK SETTING
In stand-by mode:
- Press 2 seconds the [SET] button (9);
- Press the [TIME -/+] (3/4) buttons to adjust the hour;
- Press the [SET] button (9) again;
- Press the [TIME -/+] (3/4) buttons to adjust the minutes;
- Press the [SET] button (9) to complete the setting operation.
ALARM SETTING
In stand-by mode:
- Press 2 seconds the [ALARM 1 or 2] (5/6) button;
- Press the [TIME -/+] (3/4) buttons to select the alarm mode (Buzzer or Radio)
- Press the [ALARM 1 or 2] (5/6) button to confirm;
- Press the [TIME -/+] (3/4) buttons to set the hour;
- Press the [ALARM 1 or 2] (5/6) button to confirm;
- Press the [TIME -/+] (3/4) buttons to set the minutes;
- Press the [ALARM 1 or 2] (5/6) button to confirm;
Note: The alarm volume depends on the last setting. (If necessary, when the radio is ON, adjust the volume with the [VOLUME +/-] (5/6) to the desired level).
ALARM OFF: During Alarm on, press [POWER] button (2) to deactivate the alarm sound (the Alarm setting remains) or press [SNOOZE] button (1) to postpone the alarm for 9 min. To activate or deactivate the alarm, in stand-by mode, press the [ALARM 1 or 2] (5/6) button (When the alarm is ON, the “●” indicator will light up on the right or left side of the display).
TO USE THE RADIO
- Press the [POWER] button (2) to power ON the unit;
- Adjust radio frequency to your desired station by pressing the [TUNING +/-] buttons (3/4). (If you hold tuning button it will scan until it finds the next station);
- Adjust the volume with the [VOLUME +/-] (5/6);
- To switch off the radio, press the [POWER] button (2).
Note: For a better reception reorient the antenna.
PRESETS
- Tune the desired station as explained above;
- Press and hold [SET] button (9) until "P" will flash;
- Press the [TUNING +/-] buttons (3/4) to choose the number;
- Press the [SET] button (9) to save the radio station.
RECALL A PRESET STATION:
Press the [SET] button (9) and then choose the number of the preset by pressing the [TUNING +/-] buttons (3/4).
SLEEP TIMER
The sleep timer switches the radio off automatically after an adjustable time. When the radio is ON:
- Press [SLEEP] button (1) repeatedly to adjust the sleep shutdown time. You can choose between 120-90-60-45-30-15-OFF;
- Sleep time will be confirmed if no button is pressed within 5 seconds.
CANCEL SLEEP TIMER
Press [SLEEP] button (1) repeatedly to select "OFF".
CARE AND MAINTENANCE
To prevent fire or shock hazard, do not allow this clock radio to be exposed to rain or moisture.
This clock radio should not be exposed to direct sunlight, very high or low temperature, moisture, vibration, or placed in a dusty environment.
Do not use abrasives, benzine, thinners, or other solvents to clean the surfaces of the clock radio. To clean it, wipe with a mild non-abrasive defergent solution on a clean soft cloth.
Never attempt to insert wires, pins, or other objects into the ventilation holes or openings on the clock radio.
Note: When setting the Clock or Alarm times remember that this clock radio has a 24 Hour clock mode.
TECNICAL SPECIFICATIONS
Power Supply: AC 230V ~ 50Hz. Radio Frequency Coverage
FM:
87.5 - 108 MHz.
Speaker
Output Power: 1 × 0.8 Wrms.
Specifications and design are subject to possible modifications without notice due to improvement.
WARNING

The exclamation point within the triangle is a warning sign alerting the user of important instructions accompanying the product.

The lightening flash with arrowhead symbol within the triangle is a warning sign alerting the user of "dangerous voltage" inside the unit.
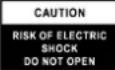
To reduce the risk of electric shock, do not remove the cover. No user serviceable parts inside the unit. Refer all servicing to qualified personnel.
This unit operates on 230V 50Hz . If the unit is not used for a long period of time, remove the plug from the AC mains.

Ensure all connections are properly made before operating the unit.

This unit must not be exposed to moisture or rain.

This unit should be positioned so that it is properly ventilated. Avoid placing it, for example, close to curtains, on the carpet or in a built-in installation such as a bookcase.
Do not expose this unit to direct sunlight or heat radiating sources.

CORRECT DISPOSAL OF THIS PRODUCT (Waste Electrical & Electronic Equipment)
This marking shown on the product or its literature, indicates that it should not be disposed with other household wastes at the end of its working life. To prevent possible harm to the environment or human health from uncontrolled waste disposal, please separate this from other types of wastes and recycle it responsibly to promote the sustainable reuse of material resources. Household users should contact the retailer where they purchased this product, or their local government office, for details of where and how they can take this item for environmentally safe recycling. Business users should contact their supplier and check the terms and conditions of the purchase contract. This product should not be mixed with other commercial wastes for disposal.
LAGE DER BEDIENUNGSELEMENTE
- SNOOZE / SLEEP BUTTON
- POWER ON - OFF / ALARM ON - OFF (RADIO EIN-AUS / ALARM AUS TASTE)
- TIME - / TUNING DOWN BUTTON (ZEIT - / ABSTIMMUNG -)
- TIME +/TUNING UP BUTTON (ZEIT +/ABSTIMMUNG +)
- VOLUME + / ALARM 2 (LAUTSTÄRKEREGLER + / ALARM 2)
- VOLUME - / ALARM 1 (LAUTSTÄRKEREGLER - / ALARM 1)
- LED DISPLAY (LED ANZEIGE)
- SPEAKER (LAUTSPRECHER)
- SET (TIME / PRESET RADIO-MEMORY) (UHR / RADIO SPEICHER)
STROMQUELLEN
Puisance: 1× 0.8 Wrms
Hereby, Roadstar Management SA declares that the radio equipment type CLR2466N is in compliance with Directive 2014/53/EU.
The full text of the EU declaration of conformity is available at the following internet address:
http://roadstar.com/images/ce/CLR-2466N.pdf
or by scanning the following QR Code.
http://roadstar.com/images/ce/CLR-2466N.pdf
http://roadstar.com/images/ce/CLR-2466N.pdf
http://roadstar.com/images/ce/CLR-2466N.pdf
http://roadstar.com/images/ce/CLR-2466N.pdf
http://roadstar.com/images/ce/CLR-2466N.pdf
http://roadstar.com/images/ce/CLR-2466N.pdf
http://roadstar.com/images/ce/CLR-2466N.pdf
http://roadstar.com/images/ce/CLR-2466N.pdf
Roadstar Management SA, via Passegiata 7 CH 6883 Novazzano (Switzerland)