CLR-2605 - Alarm clock radio ROADSTAR - Free user manual and instructions
Find the device manual for free CLR-2605 ROADSTAR in PDF.

User questions about CLR-2605 ROADSTAR
0 question about this device. Answer the ones you know or ask your own.
Ask a new question about this device
Download the instructions for your Alarm clock radio in PDF format for free! Find your manual CLR-2605 - ROADSTAR and take your electronic device back in hand. On this page are published all the documents necessary for the use of your device. CLR-2605 by ROADSTAR.
USER MANUAL CLR-2605 ROADSTAR
Roadstar. is a registered Trademark of Roadstar S.A. - Switzerland All rights reserved

INDEX
| English | Page | 1 |
| Deutsch | Seite | 9 |
| Français | Page | 17 |
| Italiano | Pagina | 25 |
| Español | Página | 33 |
| Portuguese | Página | 41 |
- Your new unit was manufactured and assembled under strict ROADSTAR quality control. Thank you for purchasing our product for your music enjoyment. Before operating the unit, please read this instruction manual carefully. Keep it also handy for further future references.
- Votre nouvel appareil a été fabriqué et monté en étant soumis aux nombreux tests ROADSTAR. Nous espérons que cet appareil vous donnera entière satisfaction. Avant de vous adonner à ces activités, veuillez lire attentivement ce manuel d'instructions. Conservez-le aportée de main à fin de référence ultérieure.
-
Vuestro nuevo sistema ha sido construido según las normas estrictas de control de calidad ROADSTAR. Le feleitamos y lo dema los gracias por su elección de este aperado. Por favor leer el manual antes de poner en funcionamiento el equipo y guardar esta documentación en case de que se necesita nuevamente.
-
Ihr neues Gerät wurde unter Beachtung der strengen ROADSTAR-Qualitätsvorschriften gefertigt. Wir danken Ihnen für den Kauf unseras Produktes und wünschen Ihnen optimalen Hörgenuss. Bitte lesen Sie diese Bedienungsanleitung durch, und lieben Sie sie auf: um jederzeit darin nachschlagen zu können.
Il vostro nuovo apparecchio è stato prodotto ed assemblato sotto lo stretto controllo di qualità ROADSTAR. Vi ringrazismo di aver acquistato un nostro prodotto per il vostro piacere d'ascolto. Prima di procedere alfutilizzo dell'apparecchio, leggete attentamente il manuale d'istruzioni e tenetelo sempre a portata di mano per fulun riferimenti.
(1) 2017年1月1日
[Non-Text]
[Non-Text]
[Non-Text]
[Non-Text]
[Non-Text]
CLR-2605K/SL
text_image
12 13 9 7 12:00 8 4 2 3 10 14 5 6 11English
1
WARNINGS

The exclamation point within the triangle is a warning sign alerting the user of important instructions accompanying the product.

The lightening flash with arrowhead symbol within the triangle is a warning sign alerting the user of 'dangerous voltage' inside the unit.

To reduce the risk of electric shock, do not remove the cover. No user serviceable parts inside the unit. Refer all servicing to qualified personnel.

This unit operates on 230V \~ 50Hz. If the unit is not used for a long period of time, remove the plug from the AC mains.

This unit must not be exposed to moisture or rain.

The power switch in this unit is mounted on the secondary circuit and does not disconnect the whole unit from the mains in OFF position.

Ensure all connections are properly made before operating the unit.

This unit should be positioned so that it is properly ventilated. Avoid placing it, for example, close to curtains, on the carpet or in a built-in installation such as a bookcase.

Do not expose this unit to direct sunlight or heat radiating sources.

Make sure the battery is inserted according to the proper polarity.

If the unit is not used for a long period of time (more than 1 month), remove the battery from its compartment to avoid possible leaking.
2
English
CLR-2605K/SL
AM/FM CLOCK RADIO WITH ALARM
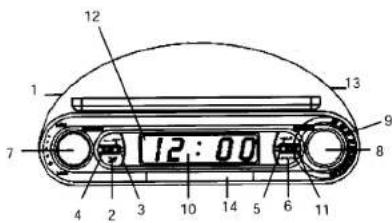
LOCATION OF CONTROLS
- RADIO ON/OFF/AL RADIO
- TIME SET Button
- ALARM SET Button
- TIMER ON/OFF Button
- HOUR SET Button
- MINUTE SET Button
- VOLUME Control
- TUNING Control
- DIAL SCALE
- LED Display (24 hours mode)
- AL./OFF Button
- ALARM ON INDICATOR
- BAND Selector AM/FM
- SNOOZE Button
POWERSUPPLY
This unit operates from a main supply of 230V \~ 50Hz. Connect the AC power cord to the AC household main outlet. Ensure that the voltage is as indicated on the rating plate on the rear of the unit.
Battery Back-up Power Failure Protection
This radio has a battery back up circuit that will keep the correct time and alarm settings in the event of a temporary power interruption.
English
3
Install a 9-volt battery (type 6F 22/006P), not included, into the battery compartment located on the bottom of the unit.
Note: We recommend an alkaline battery for longer usable life. Change the battery every 9 to 12 months for best result and avoid possible battery leakage.
If power is temporarily interrupted the display will blink and the radio will not play. However, the battery back-up circuit will continue to maintain the clock and alarm settings. When power is restored the clock will display the correct time and alarm settings, and no adjustment is necessary.
Note: If power is interrupted and there is no battery in the compartment or the battery is exhausted. The time and alarm settings will be lost. When power is restored the clock will begin to flash indicating that the time and alarm settings must be corrected.
4
English
MOUNTING
This radio can be mounted under the kitchen cupboard, shelves or similar. However do not fix it over the cooking plates or water basins. Check that there be a mains plug 230V nearby.
- Slide the fixing plate to the rear until it gets loose.
Note: the plate can be used as a trimmer to mark the holes for the screws (not included)1. - Drill 3 small holes on the marked points and fix the plate with 3 small screws.
Note: Should a lamp cover impede the mounting of the plate, distance it with a wooden plate or similar. - Lift the radio to the plate and slide it until it is firmly fixed.
- Connect the AC power cable to the mains 230V.
SETTING THE CORRECT TIME
- With the TIMER Function Off, press and hold the TIME SET button (2).
- Press the HOUR button (5) to advance hour, press MINUTE button (6) to increase minutes, until the correct time is displayed.
- Release the TIME SET Button.
SETTING THE WAKE UP TIME
- Press and hold the ALARM set button (3).
- Press the HOUR button (5) to advance hour, press MINUTE button
English
5
(6) to increase minutes, until the correct time is displayed.
- Release the ALARM SET Button.
- To check ALARM Time, press ALARM SET button (3)
WAKE TO ALARM
- Set the Alarm time as shown above.
- Set the RADIO ON/OFF/AL RADIO Switch (1) to the AL RADIO position.
- The ALARM ON Indicator (12) will light up.
- Lower VOLUME Knob (7) to minimum ("CLIC").
- When the set Alarm Time is reached, the unit will Beep:
- To stop Alarm sound press AL. OFF button (11).
- The Alarm will Beep the next day at the same time.
- To turn off completely the Alarm Function, select OFF with the RADIO ON/OFF/AL RADIO Switch (1).
Note: After 2 hours the alarm sound will stop automatically.
WAKE TO THE RADIO
- Set the Alarm time as shown above.
- Set the RADIO ON/OFF/AL RADIO Switch (1) to the AL RADIO position.
6
English
- At the Alarm Time the Radio will automatically switch on the tuned station, at the preset volume level.
SNOOZE FUNCTION
When the alarm sounds, pressing the SNOOZE Button (14) will temporarily stop for about 9 minutes then the alarm sounds again.
TIMERON/OFF
- Select TIMER (4). The display will show "0:59".
- Press the HOUR button (5) to advance one hour, press MINUTE button (6) to decrease minutes.
- As long as the Timer function is engaged, the Timer Time will be displayed.
- After the indicated time has elapsed, the Buzzer will sound.
- Select TIMER OFF (4) to cancel Timer or to reset Timer time.
- Set the RADIO ON/OFF/AL RADIO Switch (1) to the ON position.
- Turn the TUNING Knob (8) until the desired station is heard.
- Adjust the VOLUME Control (11) to a comfortable listening level end select desired BAND AM or FM (13).
- To turn off the radio, set the RADIO ON/OFF/AL RADIO Switch (1)
English
7
to the OFF position.
Note: The FM band uses a wire antenna. Extend it for the best reception.
CARE AND MAINTENANCE
To prevent fire or shock hazard, do not allow this clock radio to be exposed to rain or moisture.
This clock radio should not be exposed to direct sunlight, very high or low temperature, moisture, vibration, or placed in a dusty environment. Do not use abrasives, benzine, thinners, or other solvents to clean the surfaces of the clock radio. To clean it, wipe with a mild non-abrasive detergent solution on a clean soft cloth.
Never attempt to insert wires, pins, or other objects into the ventilation holes or openings on the clock radio.
Note: When setting the Clock or Alarm times remember that this clock radio has a 24 Hour clock mode
SPECIFICATIONS
FM Band: 88 to 108 MHz
AM Band: 530 to 1620 KHz
Power Supply: 230VCD, 50 Hz
DC Back-up: 9V DC 006P BATTERY
SICHERHEITSHINWEISE