CLR-2950DAB+ - Alarm clock radio ROADSTAR - Free user manual and instructions
Find the device manual for free CLR-2950DAB+ ROADSTAR in PDF.

| Product Type | Alarm Clock Radio |
| Brand | Roadstar |
| Model | CLR-2950DAB+ |
| Radio Bands | DAB+, FM |
| Display | LED with adjustable brightness |
| Alarm | Dual alarms with snooze function |
| Sleep Timer | Yes, adjustable |
| Power Supply | AC adapter (included) + backup battery (CR2032) |
| Dimensions (W x H x D) | 200 x 100 x 120 mm (approx.) |
| Weight | 0.5 kg (approx.) |
| Backup Battery Type | CR2032 (not included) |
| Speaker | Mono, 3W output |
| Presets | 10 DAB+ and 10 FM presets |
| Auto Scan | Yes for DAB+ and FM |
| Time Display | 12/24 hour format selectable |
| Alarm Sound Options | Buzzer, radio, or DAB+ |
| Snooze Duration | 9 minutes (default) |
| Volume Control | Rotary knob with mute function |
| Headphone Jack | 3.5mm stereo |
| Cleaning | Wipe with a soft, dry cloth; avoid liquids |
| Safety | Designed for indoor use only; keep away from water |
| Spare Parts / Repair | Contact authorized service center for genuine parts |
Frequently Asked Questions - CLR-2950DAB+ ROADSTAR
User questions about CLR-2950DAB+ ROADSTAR
0 question about this device. Answer the ones you know or ask your own.
Ask a new question about this device
Download the instructions for your Alarm clock radio in PDF format for free! Find your manual CLR-2950DAB+ - ROADSTAR and take your electronic device back in hand. On this page are published all the documents necessary for the use of your device. CLR-2950DAB+ by ROADSTAR.
USER MANUAL CLR-2950DAB+ ROADSTAR
Correct Disposal of This Product
(Waste Electrical & Electronic Equipment)
This marking shown on the product or its literature, indicates that it should not be disposed with other household wastes at the end of its working life. To prevent possible harm to the environment or human health from uncontrolled waste disposal, please separate this from other types of wastes and recycle it responsibly to promote the sustainable reuse of material resources. Household d users should contact either the retail or where they purchased this product, or their local government office, for details of where and how they can take this item for environmentally safe recycling. Business users should contact their supplier and check the terms and conditions of the purchase contract. This product should not be mixed with other commercial wastes for disposal.

text_image
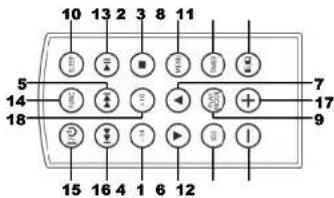
Technical diagram of a device with numbered components and labeled parts, including a top view and bottom view.CLR-2950DAB+ - REMOTE
text_image
10 13 2 3 8 11 5 7 14 17 18 9 15 16 4 1 6 12English
1
CLR-2950DAB+
LOCATION OF CONTROLS
-
OPEN / CLOSE BUTTON
-
PLAY / PAUSE / SCAN BUTTON
-
STOP/ENTER BUTTON
-
SKIP BACK/TUNING-BUTTON
-
SKIP UP / TUNING + BUTTON
-
FOLDER/MEMORY - BUTTON
-
FOLDER/MMEMORY·BUTTON
-
MEMORY/CLOCK ADJUST/MENU BUTTON
-
PLAY MODE / INFO BUTTON
-
SLEEP BUTTON
-
TIMER BUTTON
-
DISPLAY / ID3 BUTTON
-
PRESET EQUALIZER BUTTON
-
FUNCTION BUTTON
-
STANDBY BUTTON
-
VOLUME - BUTTON
-
VOLUME + BUTTON
-
AUX IN JACK
-
USB PORT
-
FRONT LOADING CD DOOR
-
POWER LED
-
REMOTE REC
-
REMOTE RECEIVER
-
LCD DISPLAY
-
EM/DAIRANT
-
FM/ DAB ANTENNA
-
AG-ROCKET DC
-
AC SOCKET DC
Battery Back-Up Memory
2
English
REMOTE
-
10 - BUTTON
-
PLAY / PAUSE / SCAN BUTTON
-
STOP / ENTER BUTTON
-
SKIP BACK/TUNING-BUTTON
-
SKIP UP / TUNING + BUTTON
-
FOLDER/M-BUTTON
-
FOLDER/M·BUTTON
-
MEMORY/CLOCK ADJUST/MENU BUTTON
-
PLAY MODE / INFO BUTTON
-
SLEEP BUTTON
-
TIMER BUTTON
-
DISPLAY/ID3 BUTTON
-
PRESET EQUALIZER BUTTON
-
FUNCTION BUTTON
-
STANDBY BUTTON
-
VOLUME - BUTTON
-
VOLUME * BUTTON
-
10 - BUTTON
-
10 * BUTTON
Note: Please pull battery protector before using.
To operate the unit with the remote control, point the remote handset at the remote sensor on the front panel and press the appropriate button on the remote handset. The remote works best within a range of 6 - 7 meters from the front panel and on an angle of 30 degrees. Bright sunlight or room light conditions can interfere with the remote control. If the remote operation is unsatisfactory or stops working entirely, first try replacing the remote batteries, then try reducing the room lighting conditions.
English
3
WARNINGS

The exclamation point within the triangle is a warning sign alerting the user of important instructions accompanying the product.

The lightening flash with arrowhead symbol within the triangle is a warning sign alerting the user of "dangerous voltage" inside the unit.

To reduce the risk of electric shock, do not remove the cover. No user serviceable parts inside the unit. Refer all servicing to qualified personnel.

This unit operates on 230V \~ 50Hz. If the unit is not used for a long period of time, remove the plug from the AC mains.

Ensure all connections are properly made before operating the unit.

This unit must not be exposed to moisture or rain.

This unit should be positioned so that it is properly ventilated. Avoid placing it, for example, close to curtains, on the carpet or in a built-in installation such as a bookcase.

Do not expose this unit to direct sunlight or heat radiating sources.
4
English
MOUNTING INSTRUCTIONS
- Drill a 6mm diameter holes through the underside of the cabinet bottom shelf using the three points marked on the template.
-
Select the spacer or combination of spacers that fit your preferences, from the mounting kit.
-
Fix the unit using the screws from the mounting kit.
Before switching on make sure that the voltage of your electricity supply is the same as that indicated on the rating plate.
For your own safety read the following instructions carefully before attempting to connect this unit to the mains.
This unit is designed to operate on AC 230V 50Hz / DC 12V current only. Connecting it to other power sources may damage the unit.
To prevent electric shock disconnected from the mains before removing cover. No user serviceable parts inside. Refer servicing to qualified service personnel.
SETTING THE TIME
Note: Please make sure that all connections have been ready.
1. In standby mode, press and hold MEM/CLK/MENU BUTTON (8), the Hour digits will flash. Press SKIP BACK/UP / TUNING /+ BUTTONS (4)(5) on unit or on remote repeatedly to set the dock to the correct Hour, press MEM/CLK/MENU BUTTON (8) to confirm.
2. Then the minute digits will flash, press SKIP BACK/UP / TUNING -/+ BUTTONS (4)(5) on unit or on remote repeatedly to set the dock to the correct Minutes, press MEM/CLK/MENU BUTTON (8) again to confirm.
3. The display will show the RTC 12 hours or the RTC 24 hours version. Press SKIP BACK/UP / TUNING -/+ BUTTONS (4)(5) on unit or on remote to choose for the 12 or 24 hour version. Press the MEM/CLOCK/MENU BUTTON (8) to confirm.
English
5
COOKING TIMER
- In standby mode, press and hold TIMER BUTTON (11), the minute digits will flash. Press VOLUME 4+ BUTTON (16)/(17) on unit or on remote repeatedly to set the timer to the desired time (the display will run up from 1 minute to 120 minutes maximum), press TIMER BUTTON (11) to confirm.
- Then the volume digits will flash, press VOLUME ← BUTTON (16)/(17) on unit or on remote repeatedly to set the desired volume, press TIMER BUTTON (11) again to confirm.
- The timer will start the countdown. Once countdown was arrived, bee lone sound will coming. You can stop it by pressing one more time TIMER BUTTON (11) on unit or remote.
TURNING ON THE UNIT
Press STANDBY BUTTON (15) on unit or remote control, then press FUNCTION BUTTON (14) on unit or on remote control to choose FM / CD / USB / AUX model.
VOLUME ADJUSTING
Press VOLUME -/+ BUTTON (16)/(17) on unit or on remote control to increase or decrease volume.
TUNING RADIO STATIONS
- Press FUNCTION BUTTON (14) on unit or remote control to select the desired wave band EM
- Press 3 seconds SKIP BACK/UP / TUNING → BUTTONS (4)(5) to start the Radio auto-tuning function (the unit will search automatically the strongest stations).
- To search manually a Radio station, when in radio-mode press SKIP BACK/UP / TUNING BUTTONS (4)(5) sequentially until the desired frequency is displayed.
- To turn off the radio, press FUNCTION BUTTON (14) to switch to other functions or press STANDBY BUTTON (15) to turn off the unit.
6
English
DAB AUTO SCAN
The auto scan will search for the entire DAB Band III channels. After the scan has finished, the first alphanumerically found station will be automatically selected.
1. To activate auto scan press PLAY/PAUSE/SCAN BUTTON (2), the display will show "Searching ..." and a processing slide bar.
2. All the stations that have been found will be stored automatically, to explore and select listening to the found stations, repeatedly press SKIP BACK/UP /TUNING -/- BUTTONS(4)(5).
DAB DISPLAY MODES
Every time you press P.MODE/INFO BUTTON (9), the display will cycle through the following display modes:
Programme type
This describes the style of the programme that is being broadcast. If the information is not available, the display will show "
EnsembleMultiplex (Group name)
The Ensemble/Multiplex is a collection of radio stations that are bundled and transmitted together in a single frequency. There are national and local multiplexes, local ones contain stations that are specific to that area.
Frequency
The frequency of the present station will be displayed.
Audio bit rate
The display will show the digital audio bit rate being received.
Signal strength
The display will show a side bar to indicate the signal strength, the stronger the signal, the longer the bar will be from left to right.
DLS
English
7
DLS stands for Dynamic Label Segment which is a scrolling message that the broadcaster may include in their transmissions. The message usually includes information such as programme details ...etc.
STORING AND RECALLING STORED STATIONS
In either DAB or FM mode, you can store up to 20 stations to the favourite pre-sets; this will enable you to get direct access to your favourite stations.
-
To store a preset, first tune to your desired station, then press and hold MEM/CLK/MENU BUTTON (8) until the display shows "W" and flash.
-
Repeatedly turn FOLDER/M -/+ BUTTON (6):(7) to select your desired station preset number then press MEM/CLK/MENU BUTTON (8) to confirm your selection, the display will show "Preset # saved".
-
To recall a preset station, first press MEM/CLK/MENU BUTTON (8) once, then repeatedly press FOLDER/M → BUTTON (6)(7) to scroll up or down the presets that you have stored. When the display shows your desired preset number, press MEM/CLK/MENU BUTTON (5). If the preset hasn't been allocated a station, the display will show "Empty preset #".
DISCS FOR PLAYBACK
This system can playback all digital audio CD/MP3, finalized digital audio CD-Recordable (CD-R) discs, finalized digital audio CD-Rewritable (CD-RW) discs and CD-DA format digital audio CD/CD-RCD-RW discs.
LOADING A DISC
-
Press FUNCTION BUTTON (14) on unit or remote control to select CD mode.
-
Press OPEN/CLOSE BUTTON (1) to open the CD door, "OPEN" will be shown on the display.
-
Place an audio CD/MP3 DISC into the tray with the front side fading up.
-
Close the CD door. The display will show a flashing "READING", then the total number of tracks would be shown and the playback will start from track.
-
To remove the CD, press OPEN/CLOSE BUTTON (1) to open CD door, the display will show "OPEN". Hold the CD by its edges, and take it out carefully.
8
English
Note:
• Make sure the disc is stopped before opening the CD DOOR.
- To ensure good system performance; wait until the unit completely reads the disc before proceeding.
- If no disc loaded into the tray, or the disc is unreadable, the display will show NO DISC.
PLAYING A DISC
-
The playback starts from track 1 automatically when reading the disc.
-
To pause playback, press PLAY/PAUSE/SCAN BUTTON (2) on unit or on remote.
-
To resume playback, press PLAY/PAUSE/SCAN BUTTON (2) on unit or on remote screen
-
To stop playback, press STOP/ENTER BUTTON (3) on unit or on remote.
SELECTING A DESIRED TRACK/PASSAGE
To select a desired track
Press SKIP BACK/UP / TUNING BUTTONS (4)(5) on unit or on remote respectively in stop mode or during playing until the desired track appears on the display. Press press PLAY/PAUSE/SCAN BUTTON (2) on unit or on remote to start play.
To search for a particular passage during playback
Press and hold SKIP BACK/UP / TUNING -/+ BUTTONS (4y(5) on unit or on remote to scan the current playing track at high speed until desired point (passage) appears, then release for normal playback mode. Playback will start again from this point.
REPEAT
You can play one track or all tracks on the disc repeatedly.
To Repeat a Single Track
- Press P.MODE/INFO BUTTON (9) on unit or on remote during play, the display will show a flashing "Rep1" and the current track will be played over an
English
9
over again till you press STOP/ENTER BUTTON (3) on unit or on remote. 2. To cancel repeat play, press P.MODE/INFO BUTTON (9) on unit or on remote until "Rept" disappears from the display.
To Repeat all the Tracks
-
Press P.MODE/INFO BUTTON (9) on unit or on remote until the "RepA" shows steady on the display, all tracks on the disc will be played over and over again till you press STOP/ENTER BUTTON (3) on unit or on remote.
-
To cancel repeat play, press P.MODE/INFO_BUTTON (9) on unit or on remote until "RepA" disappears from the display.
To Repeat Folder
- Press P.MODE/INFO BUTTON (9) on unit or on remote until the "RapF" shows steady on the display, all tracks of the folder will be played over and over again till you press STOP/ENTER BUTTON (3) on unit or on remote.
- To cancel repeat play, press P.MODE/INFO BUTTON (9) on unit or on remote until "RepF" disappears from the display.
RANDOM PLAY
Press P.MODE/INFO BUTTON (0) on unit or on remote in play mode till the "Rand" shows steady on the display, the random play will start from next track automatically, until all tracks are played over and then it will stop. Press P.MODE/INFO BUTTON (0) on unit or on remote again until the "Rand" disappears from the display.
SLEEP
During music playback, press SLEEP BUTTON (10). The clock display will show 90/80/70/60/50/40/30/20/10 minutes. The unit will turn off automatically after the selected sleep timer.
USB OPERATION
- Press FUNCTION BUTTON (14) on unit or on remote to select "USB" mode.
- Connect the USB to the USB INPUT. The playback stars from track 1 automatically after reading the USB.
10
English
- Press STOP/ENTER BUTTON (3) on unit or on remote to stop playing. The display will show total number of USB and STOP
- Proceed repeat play (repeat 1- repeat folder - repeat all) program play/skip up and back operation as the same described in above 'CDMP3 OPERATION'.
CAUTION: Do not use any USB extension cable for connecting the USB bar which may cause harmful interference.
AUX OPERATION
- Press FUNCTION BUTTON (14) to select 'AUX' mode.
- Insert the AUX line plug into the AUX IN jack (3.5mm) on the player, music from the device would be amplified and exported from the speakers.
- Adjust the volume of the main unit to your desired level.
- Press PLAY of the external audio source (eg. MP3 player) to start playback.
PRESET EQUALIZER
Every time you press PRESET EQ. BUTTON (13), the display will cycle through the following preset equalizer: classic, rock, pop, jazz, flat.
ID3 / DISPLAY FUNCTION
Since this system designed with dock/timer feature, thus, the LCD display will change to clock automatically after operation. To check your playing mode state (such as CD track number/radio frequency) press DISPLAY / ID3 BUTTON (12) on unit or remote to change the information for displaying few second.
SPECIFICATIONS
| FM Band: | 87.5 to 108 MHz |
| DAB: | Band III |
| Power Supply: | DC 12V (adapter) |
Design and specifications are subject to change without notice.
Deutsch
11
CLR-2950DAB+
ÜBERWACHUNG
-
TASTE ÖFFNEN / SCHUESSEN (CD)
-
TASTE PLAY / PAUSE / SCAN
-
TASTE STOP/ENTER
-
TASTE SKIP BACK / TUNING -
-
TASTE SKIP UP / TUNING +
-
TASTE MAPPE / SPEICHER -
-
TASTE MAPPE / SPEICHER *
-
TASTE SPEICHER / UHR ADJUSTE /
-
TASTE WIEDERGAREMODUS / INFO
-
TASTE WIEDERGABE/MODUS? INFO
-
TASTE SLEEP
-
TASTE TIMER
-
TASTE ANZEIGE (ID)
-
TASTE PRESET EQUALIZER
-
TASTE FUNKTION
-
TASTE STANDRY
-
TASTE VOLUME -
-
TASTE VOLUME
-
AUX IN-ANSCHLUSS
-
USB ANSCHLUSS
-
EINLEGEFACHCD
-
POWER LED
-
FERNBEDIENUNGSEMPFÄNGER
-
LCD DISPLAY
-
ANTENNE DAB / FM
-
DC-ANSCHLUSS