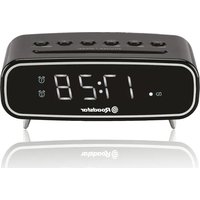
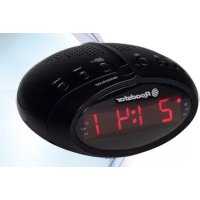
CLR290D+ - Alarm clock radio ROADSTAR - Free user manual and instructions
Find the device manual for free CLR290D+ ROADSTAR in PDF.

| Product type | Clock radio |
| Brand | ROADSTAR |
| Model | CLR290D+ |
| Power supply | AC/DC 5V 2A (mains adapter) |
| FM frequency | 87.5 – 108 MHz |
| DAB+ frequency | 174 – 240 MHz |
| Number of presets | 40 DAB+ stations and 40 FM stations |
| Alarms | Dual alarm with choice of buzzer or radio |
| Snooze function | Yes, press on top of the device |
| Display | Adjustable backlight (levels 1 to 5) and timeout |
| Headphone output | 3.5 mm jack socket |
| USB port | Charging only (5V 1A) |
| Speaker | Built-in |
| Dimensions (approx) | 200 x 120 x 100 mm |
| Weight (approx) | 0.5 kg |
| Maintenance | Clean with a soft, dry cloth, without liquid |
| Safety | Do not open, do not expose to moisture or heat sources |
| Repairability | Entrust to a qualified technician |
| Warranty | Complies with directive 99/44/EC |
Frequently Asked Questions - CLR290D+ ROADSTAR
User questions about CLR290D+ ROADSTAR
0 question about this device. Answer the ones you know or ask your own.
Ask a new question about this device
Download the instructions for your Alarm clock radio in PDF format for free! Find your manual CLR290D+ - ROADSTAR and take your electronic device back in hand. On this page are published all the documents necessary for the use of your device. CLR290D+ by ROADSTAR.
USER MANUAL CLR290D+ ROADSTAR
Digital FM Clock Radio
User manual
Bedienungsanleitung
- INSTRUCTIONS - All the safety and operating instructions should be read before the radio is operated. The manual should be retained for future reference.
- HEED WARNINGS - All warnings on the appliance and in the operating instructions should be adhered to.
- WATER AND MOISTURE - The appliance should not be used near liquids or in rooms with a high level of humidity.
- VENTILATION - The appliance should be situated so that its location or position does not interfere with its proper ventilation.
- HEAT - The appliance should be situated away from heat sources such as radiators, stoves or other appliances that produce heat.
- POWER SOURCE - The radio should be connected to power supply only of the type described in the operating instructions or as marked on the appliance.
- POWER CORD PROTECTION - Power supply cords should be routed so that they are not likely to be walked on or pinched by items placed upon/against them.
- OBJECT AND LIQUID ENTRY - Care should be taken so that objects do not fall and liquids are not spilled into the enclosure through openings.
- DAMAGE REQUIRING SERVICE
The appliance should be serviced by qualified service personnel when:
- The power supply cord or plug has been damaged;
Objects have fallen into or liquids has been spilled into the radio; - The appliance has been exposed to rain;
-
The appliance has been dropped or the enclosure damaged;
-
The appliance does not appear to operate normally.
- SERVICING - The user should not attempt to service the appliance beyond that descrive in the user operating instructions. All the servicing should be referred to qualified service personnel
Note: If the display does not function properly or no reaction to operation of any con
trol may due to the electrostatic discharge. Switch off and disconnect the AC cord and remove all the batteries, then turn the power back on after a few seconds.
POWER SOURCES
AC POWER: You can power your clock radio by plugging the AC/DC power adapter into a wall AC power outlet. Check that the rated voltage of your appliance matches your local voltage.
Power ON/OFF: press [POWER] (12) on back radio to turn on or off.
SETTINGS
Selecting Modes: Press [MODE/MENU] (5) to select DAB or FM modes.
Volume Adjustment: Adjusting Volume with [VOL + / - ] (6/10) to increase or decrease the volume.
Selecting Stations: in DAB mode, press [STAT+/-] (7/9) button to browse stations, Press [SEL] (8) to confirm. In FM mode, press and hold [STAT+/-] (7/9) to search stations. Or use [Preset] (4) button to access the saved preset stations.
Snoopze Function: to snooze the alarm, press the top of the radio. The alarm will sound again once the snoze time has elapsed.
CLOCK SETTING
The time will updated automatically. If you want set manually, see instructions below:
- Turn on in FM or DAB mode;
- Press and hold the [MODE] button (5) to access the system menu and select TIME>SET TIME with [STAT- or +] (9/7) and [SELECT] (8) button;
- Press the [STAT- or +] (7/9) buttons to set desired time (HH:MM) to adjust the hour and minutes and confirm with [SELECT] (8) button;
- Press the [STAT- or +] (7/9) buttons to set desired date (DD-MM-YY) to adjust the date and confirm with [SELECT] (8) button;
When complete, SAVED will appear on the display.
ALARM SETTING
In Radio mode:
- Press the [ALARM 1 or 2] (1/2) button, and press [SELECT] (8) to confirm. Display will start to flash "HH:MM";
- Press the [STAT- or +] (7/9) to set desired time then press [SELECT] (8) to confirm;
- Press the [STAT- or +] (7/9) to set desired select the alarm mode (Buzzer or Radio) then press [SELECT] (8) to confirm;
- If selected RADIO, press [STAT- or +] (7/9) to select a station to wake up to
- Press the [STAT- or +] (7/9) buttons to set desired Volume of the alarm, then press [SELECT] (8) to confirm;
- Press the [STAT- or +] (7/9) buttons to turn on or off the alarm. If done correctly, «SAVED » will appear on the display.
Repeat step 1 to 7 for alarm 2 if desired.
To turn off Alarm, press Alarm 1 or Alarm 2 to completely stop.
To cancel an alarm altogether, press Alarm 1 or 2, and press [STAT+/-] (7/9) to cancel.
FM OPERATION
FM auto tuning: press [Mode/menu] (5) button to select FM mode.
Press and hold [STAT- or +] (7/9) button to scan for FM stations.
Storing stations: you can save 40 DAB stations and 40 FM stations.
Select FM or DAB. Press and hold [PRESET] (4) button.
Press the [STAT- or +] (7/9) buttons to select a preset, then press [SELECT] (8) button to save the station. The display will show "STORED".
DAB+ OPERATION
Auto tuning: first time, the DAB+ radio will start searching for stations automatically. Or, while in DAB playing mode, press and hold the [Mode/menu] (5) button, select "FULL SCAN" and press [SELECT] (8) to confirm;
Manual tuning:
- Press and hold the [Mode/menu] (5) button to enter the system menu. Press [STAT +] buttons (7) to select "MANUAL", [SELECT] (8) to confirm;
- Press [STAT- or +] (7/9) buttons to browse between the range of frequencies. Press [SELECT] (8) button to select a station.
DAB+ MENU
- Press and hold the [Mode/menu] (5) to access the system menu;
- Adjust radio frequency to your desired station by pressing the [STAT +/-] buttons (7/9), then press [SELECT] (8) to confirm;
DRC (Dynamic Range Compression): This function reduces the differences between the loudes and quietest audio being broadcast. It makes quiet sounds comparatively louder, and loud sounds comparatively quieter (only if offered by the provider).
In Menu mode, press [STAT- or +] (7/9) to select DRC, then press [SELECT] (8) to confirm;
PRUNE: Removes all invalid stations indicated in the station list with a “?” in front of the station name.
In Menu mode, press [STAT- or +] (7/9) to select PRUNE>PRUNE Y, then press [SELECT] (8) to confirm;
SYSTEM
Press and hold [MODE/MENU] (5) button to go back in the menus at any time.
Backlight:
- Press [STAT- or +] (7/9) to navigate the setting options for Backlight; Ti-meout>Level
- Press the [STAT- or +] (7/9) button to choose brightness level from 1 to 5. Press [SELECT] (8) to confirm. You can press Dimmer +/- (15) at back of the radio.
Reset: reset the radio to factory settings.
Timeout: The radio display has a baklight with an adjustable timeout.
Press [STAT- or +] (7/9) to select duration, and [SELECT] (8) to confirm.
OFF/10/20/30/45/60/90/120/180
SW VER: Software version.
USB CHARGING
To charge a USB device, using a USB cable (not included), connect a USB device (e.g.
smartphone, mp3 player) via to the USB port (16) on the back of this product. The contents in the connected USB device cannot be accessed by this product.
TECNCAL SPECIFICATIONS
Power Supply: Power Adapter DC 5V 2A
Radio Frequency Coverage
FM: 87.5 - 108 MHz.
DAB+
174 - 240 MHz.
Speaker
Output Power: 1 × 1 Wrms.
General
Headphones Out: 3.5mm jack plug.
USB charging 5V 1A output
Specifications and design are subject to possible modifications without notice due to improvement.
-WARNING

The exclamation point within the triangle is a warning sign alerting the user of important instructions accompanying the product.

The lightening flash with arrowhead symbol within the triangle is a warning sign alerting the user of "dangerous voltage" inside the unit.
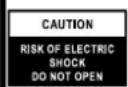
To reduce the risk of electric shock, do not remove the cover. No user serviceable parts inside the unit. Refer all servicing to qualified personnel.
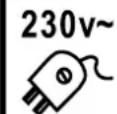
This unit operates on 230V 50Hz . If the unit is not used for a long period of time, remove the plug from the AC mains.

Ensure all connections are properly made before operating the unit.
This unit must not be exposed to moisture or rain.

This unit should be positioned so that it is properly ventilated. Avoid placing it, for example, close to curtains, on the carpet or in a built-in installation such as a bookcase.

Do not expose this unit to direct sunlight or heat radiating sources.

CORRECT DISPOSAL OF THIS PRODUCT (Waste Electrical & Electronic Equipment)
This marking shown on the product or its literature, indicates that it should not be disposed with other household wastes at the end of its working life. To prevent possible harm to the environment or human health from uncontrolled waste disposal, please separate this from other types of wastes and recycle it responsibly to promote the sustainable reuse of material resources. Household users should contact the retailer where they purchased this product, or their local government office, for details of where and how they can take this item for environmentally safe recycling. Business users should contact their supplier and check the terms and conditions of the purchase contract. This product should not be mixed with other commercial wastes for disposal.
ORT DER BEDIENELEMENTE
- ALARM 1
- ALARM 2
- SLEEP
- PRESET
- MOD/MENU
- VOL+
- STATION+
- SELECT
- STATION
- VOL-
- ANTENNE
- EIN/AUS
- KOPFHÖRERHÖRER JACK
- LEISTUNGSEINGANG
- DIMMER+/-
- USB OUTPUT 1A
- SNOOZE
SICHERHEITSHINWEISE
Puissance: 1 x 1 Wrms
Généralités
Hereby, Roadstar Management SA declares that the radio equipment type CLR-290D+ is in compliance with Directive 2014/53/EU. The full text of the EU declaration of conformity is available at the following internet address: http://roadstar.com/images/ce/CLR-290D.pdf or by scanning the following QR Code.
| TEST REPORT - Energy Efficiency Regulations Energy Efficiency of External Power Suppliers | |||
| Nameplate Information | Value and precision | Unit | Verdict (PASS/ FAIL) |
| Manufacturer's name or trade mark, commercial registration number and address | DongGuan Obelieve Electronic Co., Ltd/Address: Huazhaoxin industrial Park B-4/F, Golden Phoenix industrial Zone, Fenggan Town, Dongguan, guangdong Province, People's Republic of China. | -- -- | |
| Model identifier | OBL-0502000E | -- | -- |
| Input voltage | 100-240V V -- | ||
| Input AC frequency | 50/60Hz Hz -- | ||
| Output voltage | 5 | V | -- |
| Output current | 2 | A | -- |
| Output power | 10 | W | -- |
| Average active efficiency | 82.10 | % | -- |
| Efficiency at load 10% | -- | % | -- |
| No-load power consumption | 0.088 | W | -- |

INTERNATIONAL WARRANTY -INTERNATIONALE GARANTIE GARANTIE INTERNATIONALE -GARANZIA INTERNAZIONALE GARANTIA INTERNACIONAL - GARANTIA INTERNACIONAL IEONHE EITYHESH
is a registered Trademark of Roadstar S.A. - Switzerland. All rights reserved.
FRANÇAIS
Conditions Générales de Garantie Roadstar
Roadstar Warranty Terms and Conditions
Roadstar- by means of its sales organisation, representative or distributor- guarantees its products against manufacturing defects in material and/or workmanship throughout the per warranty.
Should the product fail to work or shows manufacturing defect within the warranty period,
Roadstar- by means of its sales organisation, representative or distributor - will take the necessary actions to restore the perfect functioning of the product. To repair or to replace is at discretion of Roadstar or it's representative or distributor.
The warranty period is in accordance with directive 99/44/CE of the European Union. For all non EU members, please refer to the local law of each country. This warranty does not cover normal wear and tear of the product and/or its parts, any damage, failure, or loss caused by accident, misuse, and any other failure not directly related to a defect of the product.
This warranty does not void consumer's rights in accordance with EU Directive99/44/CE. For further information please visit the website www roadstar.com, or write to
aftersales@roadstar.com. DEUTSCH
Allgemeine "Roadstar" Garantiebedingungen
Roadstar Management SA, via Passegiata 7 CH 6883 Novazzano (Switzerland)