Diamant 68895 - Oven UNOLD - Free user manual and instructions
Find the device manual for free Diamant 68895 UNOLD in PDF.
User questions about Diamant 68895 UNOLD
0 question about this device. Answer the ones you know or ask your own.
Ask a new question about this device
Download the instructions for your Oven in PDF format for free! Find your manual Diamant 68895 - UNOLD and take your electronic device back in hand. On this page are published all the documents necessary for the use of your device. Diamant 68895 by UNOLD.
USER MANUAL Diamant 68895 UNOLD
natural_image
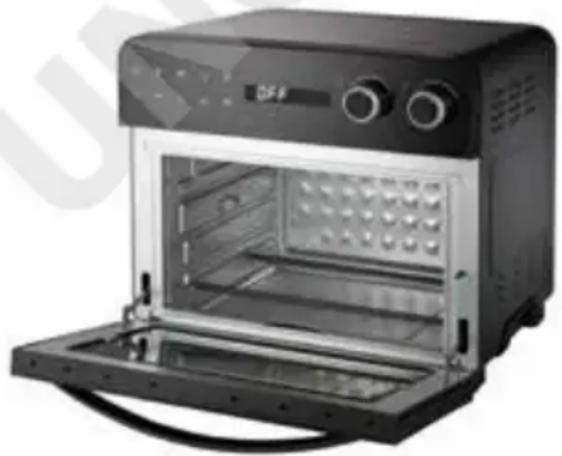
Black UNO! air fryer oven with digital display and control knobs (no visible text or symbols on main body)Bedienungsanleitung
Instructions for use | Notice d'utilisation Gebruiksaanwijzing | Istruzioni per l'uso Instrucciones de uso | Instrukcja obsługi
Modell 68895
Impressum:
Instructions for use Model 68895
Foreword....30
Technical data....30
Explanation of symbols....31
For your safety....31
Special safety instructions - Convection .....34
Cooking with Convection....35
Description of control panel....36
Before first use....37
Use of accessories....37
Safety switch....41
Oven operation 42
Programs 44
Cleaning and maintenance ....44
Troubleshooting....45
Guarantee Conditions....46
Waste Disposal/Environmental Protection ...46
Service 29
natural_image
Modern kitchen appliance with digital display and a bucket containing red liquid, no visible text or symbols
natural_image
Modern industrial machine with control panel and grain bowl, accompanied by small kitchen utensils (no visible text or symbols)UNOLD®
Care + Style
natural_image
Product photo of a red and black hairbrush with a curling tool, no visible text or symbols
natural_image
Close-up of a metallic stand with a cable, no visible text or symbolsUNOLD®
Fan + Heat
natural_image
Close-up of a desktop electric fan with visible blades and base (no text or symbols)
natural_image
Red portable electric fan with cooling fan and control panel (no visible text or symbols)EINZELTEILE

text_image
Exploded view diagram of a microwave oven with numbered parts for identificationD Ab Seite 8
1 Control panel
2 Door with handle
3 Deep fryer basket
4 Baking tray
5 Oven rack
6 Drip pan
7 Removal tool for rotisserie spit
8 Rotisserie spit with clamps
F Page 47
natural_image
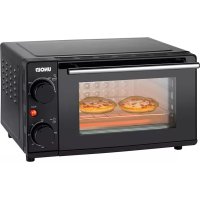
Exterior view of a black countertop oven with control knobs and open doors (no visible text or symbols)natural_image
Line drawings of three different kitchen appliances: a oven, an oven with open door, and a microwave oven (no text or symbols present)BACKBLECH
natural_image
Line drawings of three different kitchen appliances: a microwave oven, an open oven with a lid, and a closed oven with a tray (no text or symbols present)GRILLROST
natural_image
Line drawings of three different kitchen appliances: a microwave oven, an oven with open door, and a closed oven with grating (no text or symbols present)FRITTIERKORB
text_image
Diagram showing three steps of a toaster oven setup with labeled components and airflow directionENTNAHMEHILFE
natural_image
Pure electrical circuit lines without any symbolsDREHSPIESS
natural_image
Line drawing of a microwave oven with an open lid and control panel (no text or symbols)Thank you for having chosen a quality product from the Unold range. Please read the instruction manual carefully to make yourself familiar with the functions of your new oven (also referred to as „the appliance“).
Please make sure that all persons who use or clean the oven have read the instructions and adhere to them. When handing over the appliance to a new owner, always include the instruction manual.
If you have any queries that are not answered in this document, or if you encounter technical problems, please contact our customer service department or your dealer.
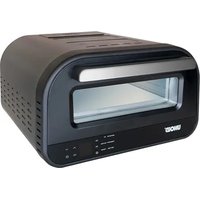
TECHNICAL DATA
Power: 1,700 W, 220–240 V\~, 50/60 Hz
Housing: Metal
Door: Heat-resistant glass
Volume: approx. 23 l
Dimensions: approx. 41.4 x 37.5 x 37.5 cm L/W/H outside,
approx. 33 x 30.5 x 19 cm inside
Weight: approx. 10.6 kg
Cord length: approx. 105 cm
Features: Touch screen control panel for time and temperature adjustment; 2 rotary controls; 8 program buttons for chips, pizza, bread, pizza and cake, etc.; oven light; temperature adjustable to 230 °C
Accessories: Rotisserie spit; clamps for rotisserie spit; removal tool for rotisserie spit; baking tray; oven rack; drip pan; instruction manual
CE
The oven described in this manual might differ slightly from your model with regard to features, technology, colour or design. Errors and omissions exempted.
EXPLANATION OF SYMBOLS

This symbol denotes a possible hazard which could cause injury or damage to the appliance.

This symbol indicates a potential burning hazard. Please be especially careful at all times here.
FOR YOUR SAFETY
Please read this instruction manual carefully and keep it for future reference.
General safety instructions
- This appliance can be used by children aged 8 years or more and persons with reduced physical, sensory or mental capabilities or lack of experience and knowledge, provided they are supervised or have been instructed in the safe use of the appliance and understand the hazards involved.
- Children must not play with the appliance.
- Children from the age of 8 may be permitted to clean or maintain the appliance, provided they are supervised.
- Keep the appliance and its power cord out of the reach of children under the age of 8.
- CAUTION - Certain parts of the appliance might become very hot when the oven is in use. There is thus a risk of injury from burns! Special caution is required, if the oven is being operated in the presence of children or other vulnerable persons.
- Only use the appliance for the purposes described in this instruction manual.
- Regularly check the appliance, the cable and the plug for wear and damage. If the power cord or other parts of the appliance is damaged, return the oven for inspection and repair to our customer service department. Improper repair can result in serious hazards to the user and shall void all warranty.
Installation and operation
-
Connect the appliance to an alternating current source as specified on the type plate.
-
Do not connect the appliance to an external timer or remotely controlled power system.
- Never immerse the appliance or the cable in water or another liquid.
- Do not clean the oven in the dishwasher.
- Never touch the appliance or the cable with wet hands.
- The oven is designed for domestic use and for use in similar facilities, e.g..
■ tea kitchens in offices, shops, on farms, etc.;
■ kitchenettes for guests in hotels, motels, hostels,
■ holiday homes, etc.
- Never place the appliance on a hot or wet surface or on a metal tray.
- Do not place the appliance or the cable close to naked flames.
- To operate the oven, place the appliance on a clean, level and heat-resistant surface.
- Keep a minimum distance of 10 cm to walls, curtains and other objects.
- Do not operate the oven under wall cabinets.
- Do not place any objects on the appliance.
- Never use the oven without accessories. as this might cause damage to the appliance.
- Ensure that the power cord does not hang from the worktop, as it might be pulled down by small children.
- Do not wrap the power cord around the appliance, as this might become damage.
- Make sure that the power cord is not in contact with hot parts of the appliance.
- Only use the appliance indoors.
- Never operate the appliance when not supervised.
- If you use an extension cable, ensure that it is in proper working order and suitable for the task, as there is otherwise a risk of overheating. Make sure that the extension cable does not pose a trip hazard.
-
Place the food you wish to cook on the accessories supplied with the appliance. Never place food directly on the inside bottom of the oven. Risk of fire!
-
When the oven is in use, the inside surfaces of the appliance become very hot. Therefore, only touch the appliance at the insulated handle and the control panel.
- Never operate the oven near flammable materials such as curtains, etc.
- Make sure that the ventilation slots are unobstructed when the oven is in use.
- Notice: While the oven is on, hot steam might escape from the ventilation slots – risk of injury from scaling!
- Never operate the oven near flammable liquids or close to a heat source such as a cooking hob.
- The appliance is a convection oven. Therefore, do not place oil or fat in the oven – risk of fire!
- Should the appliance catch fire, immediately pull the plug from the power socket. Do not extinguish the fire with water, but place damp cloth over the flames.
- If there are dark fumes escaping from the appliance, immediately pull the power cord from the socket.
- Do not use the door of the oven as a self or support. Never place cooking implements or baking dishes on the door, as this might cause damage.
- If you use containers made from a material other than glass or metal in the oven, proceed with extra caution. Never place objects made from cardboard, plastic or similar material in the oven.
- Do not cover the drip tray or other parts of the oven with aluminium foil, as this might lead to overheating.
- Do not place containers covered with aluminium foil in the oven. Make sure that the containers you use are not too large for the appliance. There is otherwise a risk of fire or injury from electric shock.
- Do not displace the appliance as long as it is hot, as this poses a risk of injury.
- To disconnect the appliance the plug from the power socket, hold the plug and do not pull it by the power cord.
-
Do not operate the appliance with accessories from another manufacturer or brand, as this might cause damage to the oven.
-
After use and before cleaning the appliance, switch it off with the ON/OFF button and disconnect the plug from the power socket. Never leave the appliance unsupervised while it is connected to the power socket.
- Clean the appliance after every use.
- Before reinserting the accessories such as the dry tray, make sure that they are completely dry.

Never open the appliance housing. Risk of injury from electric shock! Never place oil or fat in the appliance, as this might cause damage to the oven.
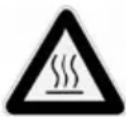
Caution! During and after use, the appliance and its component parts are very hot! Keep children away from the appliance!
The manufacturer will not be liable in the event of incorrect assembly, improper or incorrect use or if repairs are carried out by unauthorized third parties.
SPECIAL SAFETY INSTRUCTIONS - CONVECTION


-
During use, the appliance becomes very hot. As soon as the food is ready and the appliance is no longer used, switch it off and disconnect the plug from the power socket.
-
Only use the oven to cook food as described in this instruction manual. Only cook food that is suitable for oven cooking.
- Ensure that the food is as dry as possible before placing it in the oven.
- Never add water to the food in the oven.
- When food is being cooked, steam might be produced. Therefore, open the oven door carefully and keep a safe distance.
- During cooking, make sure that the room in which the oven is operated is properly ventilated.
- Never cover the appliance when it is in use, as it might overheat.
COOKING WITH CONVECTION
- Cooking with convection is a time- and energy-saving method suitable for many different dishes. The convection oven can be used for grilling, roasting, defrosting, stewing, re-heating, and baking. The hot air circulating in the oven makes sure that pores are closed quickly and juices are sealed in. As the hot air acts on all sides of the food, the cooking time is reduced.
- To ensure proper circulation in the oven, place the food so that there is a distance of minimum 1.5 cm between the individual items.
- The oven is also suitable for the cooking of complete dishes. In this case, take into account that different foods have different cooking times.
- First place the food with the longest cooking time in the oven, and then add the other food as appropriate. Calculate the cooking times of the individual foodstuffs and adjust the temperature, if necessary. While this method requires some experience, it save a lot of time and energy and is particularly suitable for small households.
- As the circulating hot air makes sure that juices are sealed in, there is no transfer of flavours, so that you can for instance cook meat and fish at the same time in the oven.
natural_image
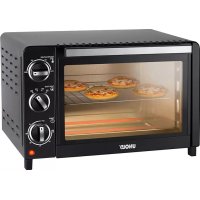
Exterior view of a black multiflorant oven with control knobs and open lid (no visible text or symbols)DESCRIPTION OF CONTROL PANEL
text_image
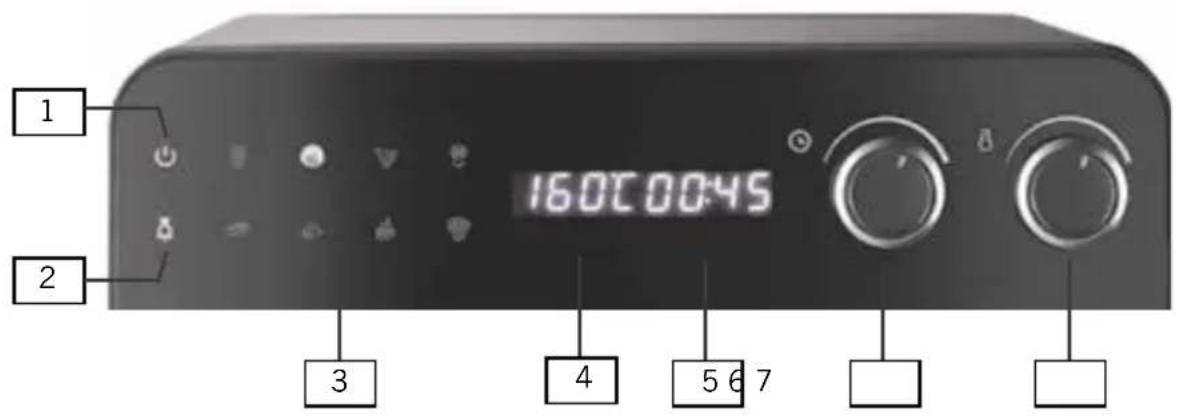
1 160C0045 2 3 4 5 6 71 ON/OFF button
Switching oven on/off.
Press button 1x: Oven is switched on, display shows „OFF“. Select the program you want to run. Press the program button again to start the program.
2 Oven light
Switching oven light on/off. Press button 1x to switch on light. Press button again to switch off light. The light is switched off after one minute.
3 Program buttons
Press one of the 8 function button to select the respective oven program. The time and temperature are displayed. The time and temperature can be adjusted manually for each program.
4 Temperature display
Indicates the set temperature.
5 Time display
Indicates the time of the program.
6 Time control
Use this rotary control to change the time of the program (0 to 300 minutes - 5 hous). Turn the control clockwise to increase the time; turn the control anticlockwise to reduce the time.
7 Temperature control
Use this rotary control to change the temperature (40 to 230 °C). Turn the control clockwise to increase the temperature; turn the control anticlockwise to reduce the temperature.
BEFORE FIRST USE
- Remove all packaging and transport safety devices. Keep the packaging material away from children. Choke hazard! Dispose of the packaging material according to the applicable statutory waste disposal regulations.
- Inspect the appliance for damage. If there is visible damage, to not start the appliance but contact our customer service department.
- Check whether all accessories listed in this manual have been shipped with your appliance.
- Clean all detachable appliance with warm soapy water and dry them.
- Clean the inside of the oven with a damp cloth.
- Place the appliance on a level, sturdy and heat-resistance surface.
- Notice: During the first use, there might be some harmless fumes.
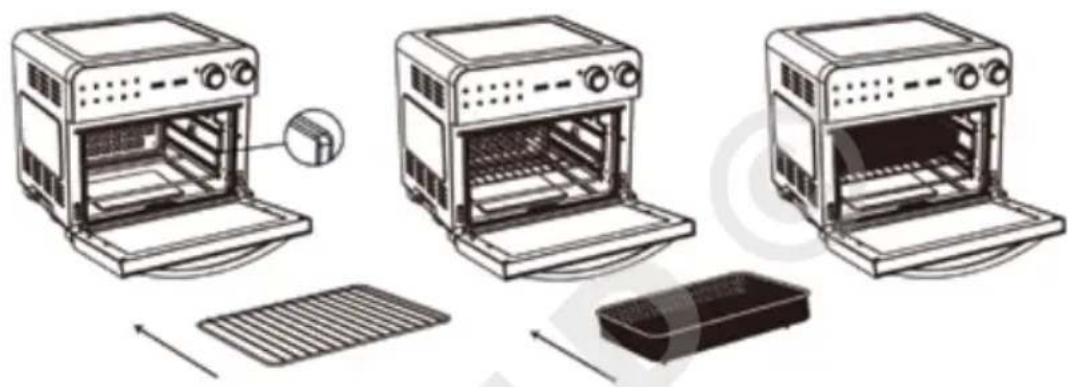
USE OF ACCESSORIES
DRIP PAN
- Never operate the appliance without the drip pan.
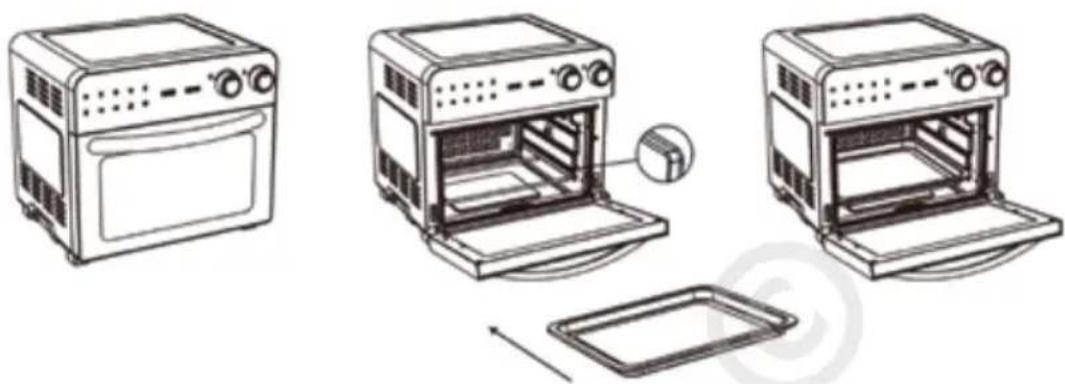
- To place the drip pan in the oven, open the door,
- and slide the drip pan into the oven at the very bottom, as shown in the illustration.

natural_image
Line drawings of three different kitchen appliances: oven, microwave oven, and oven (no text or symbols)BAKING TRAY
- Before using the baking tray, treat it with a little cooking oil to prevent food sticking to the tray.
- Then place your food directly on the baking tray.
- The oven features three rails for the baking tray. Insert the baking tray at the correct height in the oven. Ensure that the baking tray is level.
natural_image
Line drawings of three different kitchen appliances: a oven, an oven with a door, and a microwave oven with a tray (no text or symbols present)OVEN RACK
- Before using the oven rack, treat it with a little cooking oil to prevent food sticking to the rack.
- Then place your food directly on the oven rack.
- The oven features three rails for the oven rack. Insert the rack at the correct height in the oven. Ensure that the oven rack is level.

natural_image
Line drawings of three different kitchen appliances: a microwave oven, an open oven with a lid, and a closed oven with a grater (no text or symbols present)DEEP FRYER BASKET
- The deep fryer basket is ideal for the preparation of oven chips, chicken or fish.
- Place the food in basket, making sure it is evenly distributed. Ensure that there is sufficient distance between the food items so that the air can circulated properly through the basket. Do not stack food items one on top of the other.
- Slide the oven rack into the rail at the required height, and then place the basket on it.
text_image
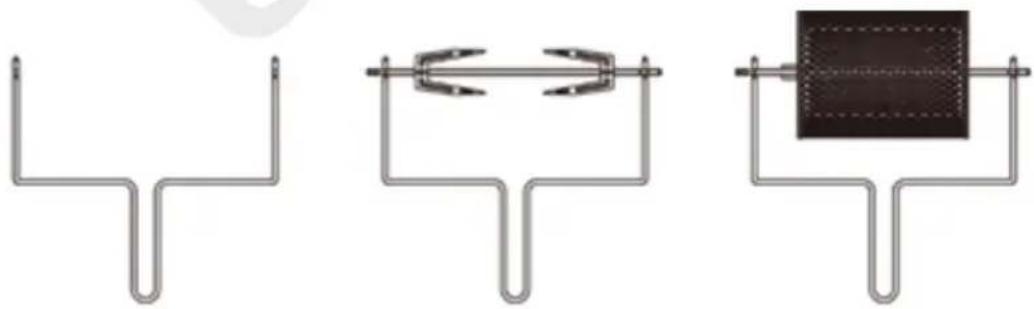
Diagram showing three stages of a toaster oven with labeled components and airflow directionREMOVAL TOOL FOR ROTISSERIE SPIT
- The removal tool allows you to place the assembled rotisserie spit with food safely and easily in the oven and to remove them once the food is cooked.
- Before removing the rotisserie spit with the food from the oven, switch off the appliance with the ON/OFF button.
natural_image
Three schematic diagrams of U-shaped pipe fittings with internal components, no text or symbols presentInserting rotisserie spit
- Using the removal tool, carefully lift the spit with food. Place the right end of the spit in the drive cylinder provided in the right side panel of the oven, and place the left end of the spit in the holder.
Removing rotisserie spit
- Open the oven door.
- Place the removal tool under the rotisserie spit.
- First lift the left end of the spit and then move the spit slightly towards the left and forward until the right end disengages from the drive cylinder.
- Remove the rotisserie spit carefully from the oven and place it on a heat-resistant surface.
ROTISSERIE SPIT
- The rotisserie spit is designed for food of maximum 1,200 g in weight. Ensure that the food can rotate freely inside the oven. The rotisserie spit can only be used in conjunction with the „Poultry“ program.
- If necessary, to move the clamps (2) loosen the screws (1). Slide one holder onto the rotisserie spit so that the pointed tips face towards the centre of the spit.
- Place the prepared and seasoned food on the spit, making sure that it is placed in the centre of the spit.
- Mount the second holder with the tips pointing towards the centre of the spit.
- Position both holders so that the food is secured at the centre of the spit. It is important that the food is placed exactly at the centre of the spit, as it can otherwise not be rotated and evenly roasted. If required, tie down protruding parts such as chicken wings with cooking twine.
- Secure the holder by tightening the screws.
- One end of the rotisserie spit features one single groove. Place this end in the recess provided inside the oven to the right. Place the other end of the rotisserie spit featuring two groves in the holder provided to the left so that the outer groove is placed in the holder. The rotisserie spit cannot be rotated by hand. To align it correctly, you might need to remove it and reposition its ends until both ends engage properly.
- To remove the rotisserie spit, always use the removal tool provided.

text_image
1 2
Caution! During and after use, the appliance and its component parts are very hot!
Do not touch the appliance or accessories with your bare hands, but use an oven glove. Risk of injury from burns!
Do not use metal kitchen utensils on the baking tray, as they might cause damage to the anti-stick coat.
Never use the oven without the drip pan. The drip pan protects the base of the oven from food crumbs and fat, and must be inserted at the very bottom of the oven chamber.
SAFETY SWITCH

natural_image
Line drawing of a microwave oven with open door and lid, showing internal components and a close-up view of the lid (no text or symbols)The safety switch to the right of the door makes sure that the appliance can only be switched on when the door is properly closed. If the door is not closed, the oven cannot be switched on. In this case, all icons on the control panel flash, indicating that the door is not properly closed.
OVEN OPERATION
Notice: For health reasons, we recommend roasting or frying food to a golden-brown colour, avoiding dark crusts. This keeps the formation of potentially harmful acrylamide low.
Notice: The appliance is a convection oven. Therefore, do not place oil or fat in the oven – risk of fire!
During operation, the oven accessories become very hot. Only touch them with oven gloves! Otherwise, there is a risk of injury from burns.
Never place any plastic packaging in the oven.
- Before starting the oven, prepare it as described in chapter „Before first use“.
- Make sure that the oven is placed on a level and heat-resistant surface.
- Position the oven so that it is at a distance of at least 10 cm from walls, curtains and other objects. Do not operate the oven below wall cabinets.
- Place the plug in a power socket (220–240 V\~, 50/60 Hz).
- The display shows „OFF“. The ON/OFF button flashes. The appliance is in standby mode.
- Open the door of the oven. Make sure that the drip pan is properly placed at the bottom of the oven.
- Place the food you wish to cook on the accessory.
- Place the accessory with the food in the oven, following the instructions for the accessory in this manual.
- Carefully close the door of the oven.
- At the control panel, press the ON/OFF button in the top left corner to switch on the appliance.
- On the display, the default settings 230 °C and 20 minutes for program „Oven chips“ is displayed.
- Select the program you wish to run by pressing the respective function button.
- If necessary, adjust the temperature with the temperature control.
-
If necessary, adjust the cooking time with the time control.
-
Tip: If you have changed the time or temperature manually, but wish to return to the default settings of the selected program, simply press the program button again. The default values are displayed again.
- Important: Press the ON/OFF button again. This is necessary to start the cooking program.
- The temperature and time can be readjusted at any time while the program is running.
- If you do not start a cooking program for 30 seconds, the appliance is automatically set to standby mode, and you need to press the ON/OFF button again to select a program and adjust the time and/or temperature.
- While the oven is heating up, the temperature field of the display flashes until the set temperature is reached. Also displayed is the remaining cooking time.
- To check the food in the oven, press the oven light button to light the oven chamber. The light remains on for 1 minute and is then automatically switched off. To switch off the light manually, press the oven light button again.
- Notice: If you open the oven door while the appliance is in operation, it is automatically shut down and all symbols on the control panel flash. As soon as the door is closed, the oven resumes operation.
- After the set time has elapsed, the appliance is automatically switched off with a repeated audible signal. You can stop the cooking program at any time by pressing the ON/OFF button. Notice: After the program has been completed, the fan of the oven continue to rotate.
- Open the oven door and carefully remove the cooked food. To remove the rotisserie spit, always use the removal tool provided.
- Disconnect the plug from the power socket.
- Before cleaning and stowing away the appliance, allow it to cool down.

Caution: After the oven has been switched off, the accessories remain very hot for some time. There is thus a risk of injury from burns. Handle the appliance and its accessories with great caution. Protect your hands with oven gloves and do not place hot items on surfaces that cannot withstand the heat.
PROGRAMS
The default cooking times set in the various programs are only guide values and might need to be adjusted, depending on the size and nature of the food you wish to cook. If you place the food in the oven without preheating, add 2 to 3 minutes to the cooking time. When cooking poultry or fish, make sure that the food is cooked through, as uncooked food might pose a health risk.
The rotisserie spit must be used exclusively in conjunction with the „Poultry“ program!
| Symbol Program | Preset temp in °C | Adjustable Temp °C | Preset time in minutes | Adjustable Time | |
 | Oven chips 230 80–230 20 0–60 | ||||
 | Cake 160 80–230 45 0–60 | ||||
 | Pizza 230 80–230 7 0–60 | ||||
 | Defrost 60 40–80 30 0–300 | ||||
 | Bread 190 80–230 60 0–60 | ||||
 | Poultry 170 80–230 45 0–60 | ||||
 | Steak | 230 80–230 12 0–60 | |||
 | Dry | 40 40–80 300 (5 h) | 0–300 | ||
CLEANING AND MAINTENANCE


After use and before cleaning, switch off the appliance and disconnect the power plug from the socket.
Allow the appliance to cool. Never use abrasive sponges, scours or metal implements to clean the appliance. There is a risk of electric shock.
- Wipe the inside and the outside of the oven with a damp cloth an little washing-up liquid. If necessary, use a grease cleaner and then wipe the surfaces clean, using a damp cloth and clean water. Never clean the appliance
with an aggressive or abrasive cleaning product. Ensure that there is no water ingress. After cleaning, carefully dry the appliance.
- The accessories can be cleaned in warm water with a mild washing-up liquid. To remove persistent dirt, soak the parts for approx. 10 minutes in warm water. Rinse with water and then clean as described above.
- The accessories can also be cleaned in a dish washer on the top tray.
- Always dry the accessories thoroughly before putting them away.
- Regular and proper cleaning prolongs the service life of your appliance.
- When not in use, store the appliance in a dry place and protected against dust.
TROUBLESHOOTING
| Problem Remedy | |
| The appliance cannot be switched on. | Connect the plug correctly to the power socket. Close the door properly. |
| The food is not fully cooked. | Increase the cooking time and/or temperature. |
| The food is burnt. | Reduce the cooking time and/or temperature. Make sure that the food fits properly into the oven without coming too close to the heating elements. |
| The food is not evenly cooked. | Preheat the oven. When placing the food on the baking tray or rack, make sure that the items are evenly distributed. |
| There is white smoke coming from the oven. | If you use the appliance for the first time, this is normal. Otherwise, the smoke might result from dripping fat. Allows the appliance to cool down and then thoroughly clean the oven chamber. |
| There is black smoke coming from the oven. | Immediately switch off the oven and disconnect the power plug from the socket. Allow the appliance to cool down. When there is no longer smoke coming from the oven, remove all accessories and contact our customer service department. |
GUARANTEE CONDITIONS
We grant a 24 months guarantee, and in case of commercial use a 12 months guarantee, starting from the date of purchase for any damage demonstrably due to manufacturing defects and when the appliance has been used according to its intended use. Within the warranty period we will remedy defective materials or workmanship through repair or replacement, at our option. Our warranty terms apply only to appliances sold in Germany and Austria. For other countries, please contact the responsible importer. In the event of a claim for remedy of defects, please send the appliance to our after sales service, properly packaged, together with a copy of the automatically generated sales receipt, which must show the date of purchase, and a description of the defect. You can print out a return receipt on our website www.unold.de/ruecksendung. (only for entries from Germany and Austria). The warranty does not cover damage from normal wear, improper handling and failure to comply with the maintenance and care instructions. The warranty is void if repairs or modifications are made to the appliance by third parties. Any claims of the end consumer vis-à-vis the retailer are not limited by this warranty.
WASTE DISPOSAL / ENVIRONMENTAL PROTECTION
Our appliances are produced on a high quality level for a long lifetime. Regular maintenance and expert repairs by our after-sales service can extend the useful life of the appliance. If an appliance is defective and repair is not possible we ask you to follow the following instructions for disposal. Do not dispose this appliance together with your standard household waste. Please bring this product to an approved collection point for recycling of electric and electronic products. By separate collection and disposal of waste products you help to protect natural resources and ensure, that the product is disposed in an adequate way to protect health and environment.

The instruction booklet is also available for download: www.unold.de
NOTICE D'UTILISATION MODÈLE 68895
AVANT-PROPOS
natural_image
Line drawings of three different kitchen appliances: a oven, an oven with open door, and an oven with closed lid (no text or symbols)PLAQUE DE CUISSON
natural_image
Line drawings of three different kitchen appliances: a microwave oven, an open oven with a lid, and a closed oven with a tray (no text or symbols present)GRILLE DE CUISSON
natural_image
Line drawings of three different kitchen appliances: a microwave oven, an oven with open door, and a closed oven with grating (no text or symbols present)PANIER À FRITURE
text_image
Diagram showing three steps of a toaster oven setup with labeled components and airflow directionUSTENSILE DE RETRAIT
natural_image
Pure electrical circuit lines without any symbolsTOURNE-BROCHE
natural_image
Line drawing of a microwave oven with an open lid and a close-up inset showing a camera (no text or symbols)CONDITIONS DE GARANTIE
natural_image
Line drawings of three different kitchen appliances: a oven, an oven with open door, and a microwave oven with open lid (no text or symbols)BAKPLAAT
natural_image
Line drawings of three different kitchen appliances: a oven, a microwave oven with open lid, and a tray (no text or symbols)GRILROOSTER
natural_image
Line drawings of three different kitchen appliances: a microwave oven, an oven with open door, and a closed oven with grating (no text or symbols present)FRITUURMAND
text_image
Diagram showing three steps of a toaster oven setup with labeled components and airflow directionDRAAISPITGREEP
natural_image
Pure electrical circuit lines without any symbolsDRAAISPIT
natural_image
Line drawing of a microwave oven with an open lid and a close-up inset showing a camera (no text or symbols)Volume: circa 23 litri