Allround 68875 - Oven UNOLD - Free user manual and instructions
Find the device manual for free Allround 68875 UNOLD in PDF.

| Brand | UNOLD |
| Model | Allround 68875 |
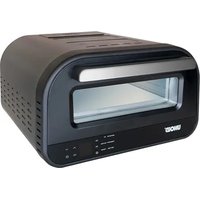
| Product type | Countertop oven |
| External dimensions | Approx. 42.8 x 31.0 x 28.7 cm |
| Cooking space | 30.0 x 25.0 x 20.0 cm |
| Capacity | 18 litres |
| Weight | Approx. 7.5 kg (with accessories) |
| Power supply | 220-240 V~, 50/60 Hz |
| Heating functions | Top heat, bottom heat, or both |
| Maximum temperature | 220 °C |
| Timer | 0 to 60 minutes, with continuous operation possible |
| Included accessories | 1 wire rack, 1 baking tray, 1 rack lifter |
| Door material | Heat-resistant glass |
| Cord length | Approx. 90 cm |
| Safety | Automatic shut-off after timer, hot exterior walls |
| Cleaning | Removable parts dishwasher-safe, wipe housing with damp cloth |
| Warranty | 24 months (domestic use), 12 months (professional use) |
Frequently Asked Questions - Allround 68875 UNOLD
User questions about Allround 68875 UNOLD
0 question about this device. Answer the ones you know or ask your own.
Ask a new question about this device
Download the instructions for your Oven in PDF format for free! Find your manual Allround 68875 - UNOLD and take your electronic device back in hand. On this page are published all the documents necessary for the use of your device. Allround 68875 by UNOLD.
USER MANUAL Allround 68875 UNOLD
Technical Specifications 27
Explanation of symbols. 27
Important Safeguards. 27
General information 30
Before using the appliance the first time....31
Operation. 32
Cleaning and Care 32
Functions. 33
Recipes 34
Browning 34
Roasting and cooking 35
Baking 37
Guarantee Conditions 38
Waste Disposal/Environmental Protection...38
Service 25
1 Temp. switch for temperature selection
2 Function indicator
3 Timer
4 Oven rack
5 Baking tray
6 Grade and sheet lifter (for safe removal of grate and sheet)
FR Page 39
Door: Heat-proof glass
Dimensions: Approx. 42.8 x 31.0 x 28.7 cm, Baking compartment 30,0 x 25,0 x 20,0 cm
Weight: Approx. 6.5 kg (including accessories)
Power cord length: Approx. 90 cm, permanently attached
Features: Baking compartment 18 litre, top/bottom heat, timer (0-60 minutes) controlled or continuous operation
Accessories: Operating instructions, 1 baking tray, 1 oven rack
Equipment features, technology, colours and design are subject to change without notice. Errors and omissions excepted
EXPLANATION OF SYMBOLS

This symbol denotes a possible hazard which could cause injury or damage to the appliance.
This symbol indicates a potential burning hazard. Please be especially careful at all times here.
IMPORTANT SAFEGuards
Please read the following instructions and keep them on hand for later reference.
-
This appliance can be used by children 8 years and older, as well as by persons with reduced physical, sensory or mental abilities or with lack of experience and/or knowledge, if they are supervised or if they have been instructed with regard to safe use of the appliance and have understood the dangers that can result from use of the appliance.
-
Children must not play with the appliance.
-
Children are not allowed to perform cleaning and user maintenance, unless they are 8 years of age or older and are supervised.
- Keep the appliance and the power cord out of the reach of children under 8 years of age.
- CAUTION - Some parts of this product can become very hot and cause burns. Particular attention has to be given where children and vulnerable people are present.
- Children should be supervised to ensure that they do not play with the appliance.
- Connect the appliance only to an AC power source of the voltage specified on the rating plate.
- Do not operate this appliance with an external timer or remote control system.
- Do not operate the appliance on or near a hot surface.
- The appliance is designed for indoor use only. Place the appliance on a suitable dry and level surface.
- Leave sufficient space between the appliance and walls, furniture and flammable objects such as curtains. There should be at least 10~cm of space on the sides and at least 30~cm above the appliance.
- Place the appliance with its back against the wall but with sufficient space to other objects.
- Never leave the appliance unattended when in operation.
- Keep a distance of minimum 2 ~cm between the food in the oven and the upper and lower heating rods, as the food might otherwise catch fire!
- Cook or bake your food only in containers and crockery suitable for this purpose.
- Only use accessories recommended by the oven manufacturer. The use of other accessories might cause damage to the appliance or lead to accidents.
- Do not pull the appliance by the power cord. Do not place the power cord across the edge of the worktop.
Do not wrap the power cord around the appliance and avoid kinking of the cable.
- Ensure that the power cord does not come into contact with hot components of the appliance. Do not touch hot parts. Always use oven gloves.
- The appliance becomes hot during operation. Use oven gloves. Never cover the appliance while it is in operation.
- While the oven is on, ensure that the room is properly ventilated.
- The appliance does not shut off automatically. You must therefore switch it off manually by setting the temperature switch to MIN and the timer switch to O and disconnecting the power cord from the socket.
- Do not immerse the appliance and power cord in water or other liquids.
- Before assembling the appliance, ensure that all parts are dry.
- Before moving, cleaning or putting away the appliance, allow it to cool down to room temperature. Before moving, cleaning or otherwise interfering with the appliance, disconnect the power cord from the socket.
- The appliance is intended for household use only, or for similar areas of use, such as
- kitchenettes in businesses, offices or other workplaces,
agricultural enterprises,
for use by guests in hotels, motels or other lodgings,
in private guesthouses or holiday homes. - Check the plug and the power cord regularly for wear and damage. In case of damage to the power cord or other parts, please send the appliance for inspection and/or repair to our after sales service.
- Unauthorized repairs can result in serious risks to the user and will void the warranty.
Caution! During and after operation, the appliance is very hot! Temperature of accessible surfaces may be high when the appliance is operating

Never open the housing of the appliance. This can result in electric shock.
The manufacturer will not be liable in the event of incorrect assembly, improper or incorrect use or if repairs are carried out by unauthorized third parties.
GENERAL INFORMATION
CAUTION!
The appliance becomes very hot during operation, also on the outer surfaces. Therefore, be sure to maintain sufficient clearance between the appliance and all flammable objects; also, provide for sufficient ventilation. Always use pot holders whenever the appliance is in operation or as long as it is still hot.
- Your oven is the ideal appliance for the daily preparation of a wide range of dishes. As cooking times and temperatures might vary slightly from those given in the recipes, we recommend monitoring the cooking process closely. Regularly check whether the food is cooked through.
- For certain recipes, we recommend pre-heating the oven. To do this, switch on the appliance at the desired temperature approx. 5-10 minutes before placing the food in it.
- When using bottom heat, it is recommended to place the food on the lower rack level. When using top heat, place it on the upper rack level.
- Never use metal implements to clean the housing or the baking tray. The baking tray is not cut-proof. Never cut cakes, pizzas, etc. on the baking tray.
- As the ap pliancebecomes hot during operation, always wear oven gloves.
- Do place any objects such as pans and dishes on the open glass door as the glass panel might otherwise be damaged.
- Always open the glass door carefully as escaping hot air can cause injury.
- When keeping cooked food warm, only leave it in the oven for a short time, as food tends to dry out quickly.
- After use, make sure that all switches are set to 0.
-
When not in use, disconnect the power cord from the socket.
-
To grill food, use only top heat! Grease could otherwise drip onto the heating rods, causing unpleasant fumes.
BEFORE USING THE APPLIANCE THE FIRST TIME
- Remove all packaging (outside and inside). Keep packaging materials away from children - danger of suffocation! Ensure that all parts are in place and undamaged.
- Clean all removable parts with warm water and a mild washing-up liquid. Do not use abrasive agents, steel wool or aggressive detergents. Rinse the parts with clean water. Dry all parts thoroughly.
- Wipe off the oven with a damp cloth.
- If necessary, clean the heating rods with a damp cloth. Make sure that no water enters the housing.
- Do not immerse the appliance in water or other liquids.
- When using the appliance for the first time, there might be some light smoke. This is normal and should not cause you concern. We recommend however to pre-heat the appliance before placing any food in it in order to eliminate all residue.
- Place the appliance on a temperature-resistance, stable and level surface.
- Ensure that there is proper ventilation around the appliance and keep it at a safe distance from walls and flammable objects such as curtains.
- Ensure that the timer switch is in position 0.
- Connect the plug of the appliance to the power socket (220-240 V~ AC).
- Using the temperature switch, set the appliance to 220^ and select top and bottom heat.
- Switch on the appliance by setting the timer switch to the desired baking time. Before using the oven for the first time, we recommend heating the appliance for 30 minutes at maximum temperature until there is no more smoke.
- After the set baking time has lapsed, the oven beeps and is automatically switched off. If you wish to prepare a dish that takes longer than 60 minutes in the oven, you must set the timer again.
- To shut down the appliance, set the temperature and the timer switch to 0 and allow the oven to cool down.
- Your oven is now ready for operation.
OPERATION
- Prepare your dish.
- Set the temperature switch to the desired temperature.
- Using the function switch, select the desired function. Available options: top heat, top/bottom heat and bottom heat.
- Timer
Depending on the necessary cooling time, set the timer switch to a time between 0 and 60 minutes. Turn the timer once to the maximum possible time and then back to the desired minutes. This ensures safe switching of the timer. After this time has lapsed, the oven beeps and is automatically switched off. If you wish to prepare a dish that takes longer than 60 minutes in the oven, you must set the timer again. You can readjust the timer settings at any time while the oven is in operation.
- Place the food in the oven.
- If the oven is controlled by the timer, it is automatically switched off when the set time has lapsed.
- To switch off the oven, also set the temperature switch to 0.
- To fully shut down the appliance, disconnect the power cord from the socket.
Caution! During and after operation, the appliance is very hot! Temperature of accessible surfaces may be high when the appliance is operating
CLEANING AND CARE

Before cleaning the oven, switch it off (function switch to AUS/ OFF) and disconnect the power cord from the socket.
Allow the appliance to cool down to room temperature.
- Do not immerse the appliance and power cord in water or other liquids.
- All removable parts and accessories such as the baking tray and oven rack can be cleaned with warm water and a mild washing-up liquid. Rinse the
cleaned parts with clear water and dry them. The above parts and accessories can also be cleaned in the dishwasher.
- Should there be burn-on food on the trays, etc., soak them for a short time in hot water and a mild detergent to remove the food residue.
- If necessary, clean the heating rods with a damp cloth. Make sure that no water enters the oven housing.
- Wipe the inside and outside of the appliance with a damp cloth. Make sure that no water enters the housing.
- The inside of the oven is covered in an easy-clean surface that can be cleaned with a damp cloth. Immediately wipe off the food residue and splashes with a damp cloth.
- Do not use aggressive of abrasive cleaning agents or steel wool, etc.
FUNCTIONS

Top heat
- Position the food on the oven rack at the centre of the oven.
- Select the desired function using the function switch.
- Set the temperature switch to the desired temperature.
- Set the time to the desired healing time.

Top/bottom heat
The oven is the ideal appliance for the preparation of bakes, roasts and other oven-cooked dishes.
- Place your casserole, souffle dish or roaster on the oven rack, or use the baking tray.
- Always place the bakeware/souffle dishes at the centre of the oven on the rack.
- Select the desired function using the function switch.
- Set the temperature switch to the desired temperature and select top and bottom heat or top heat only, depending on the recipe.
- Set the timer to the desired cooking time.

Bottom heat
- Place your casserole, souffle dish or roaster on the oven rack, or use the baking tray.
- Always place the bakeware dishes at the centre of the oven on the rack.
- Select the desired function using the function switch.
- Set the temperature switch to the desired temperature.
- Set the timer to the desired cooking time.
RECIPES
BROWNING
Hawaii toast
Ingredients: 4 slices bread for toasting, 4 slices cooked ham, 4 slices pineapple, 4 slices Edam cheese
Preparation: Place the bread slices on the grate, insert the grate at the third level from the bottom and toast the bread briefly at 220^ top and bottom heat until the top side is slightly brown; then turn and toast the other side. Place one slice of cooked ham, one slice of pineapple and one slice of cheese on each slice of bread. Place the prepared bread slices on the greased baking sheet, insert in the oven at the third level from the bottom and brown at 220^ for about 5 minutes.
Mozzarella toast
Ingredients: 4 slices bread for toasting, 1 tomato, several basil leaves, 2 balls of mozzarella, freshly ground black pepper
Preparation: Place the bread slices on the grate, insert the grate at the third level from the bottom and toast the bread briefly at 220^ top and bottom heat until the top side is slightly brown; then turn and toast the other side. Slice the tomatoes and place on the bread slices. Sprinkle several basil leaves on top. Slice the mozzarella and place on the bread slices; season with pepper. Place the bread slices on the greased baking sheet, insert in the oven at the third level from the bottom and brown at 220^ with top and bottom heat for about 5 minutes.
ROASTING AND COOKING
Meat loaf
Preparation time: 75 minutes
Ingredients: 500 g ground beef and pork, 150 g chopped pork liver, 1 day-old roll, 1 onion, 2 cloves garlic, 1 egg, 1 tsp salt, 3 pinches nutmeg, 3 pinches pepper, 150 g lean bacon, thinly sliced, 1 tsp paprika powder, 1 tsp mustard, 1 TBSP fine bread crumbs
Preparation: Soak the roll in water. Peel the onions and garlic and chop very fine. Knead together the squeezed out roll, the onions, ground meat, chopped liver, egg, salt, mustard and spices with the bread crumbs. Form the mass into a long loaf and place in an ovenproof dish and cover with the sliced bacon. Place the dish with the meat loaf on the grate at the second level from the bottom and bake at 180^ with top and bottom heat for about 50 minutes; it may be necessary to reduce the heat to 160^ after about 30 minutes.
Leg of lamb
Marinating time: 6 hours
Preparation time: 60-80 minutes
Ingredients: 1.5 kg leg of lamb with bones, 3 cloves garlic, 3 onions, 1/4 I hot meat broth, 1/8 I dry white wine, 1 tsp corn starch
For the marinade: 70 g tomato paste, 1 TBSP flour, 1 tsp salt, 2 TBSP lemon juice, 1 tsp dried rosemary, 14 tsp caraway seed, 14 tsp pepper
Preparation: Cut a shallow cross shape into the leg of lamb and use a sharp knife to make small incisions for spiking with the peeled and sliced garlic. Combine the tomato paste with the flour, salt, lemon juice, rosemary, caraway seed and pepper. Spread this mixture on the leg of lamb and marinate in the refrigerator for 6 hours. Place the leg of lamb in an ovenproof dish at the bottom level in the oven. Cover the roast with onion rings. Roast about 150-180 minutes at 180^ with top and bottom heat. When the onions are brown, move them to the bottom of the pan and add some meat broth. Gradually pour the remaining meat broth and the wine over the leg of lamb and turn it after about 2/3 of the cooking time. When it has finished cooking, switch off the oven and leave the leg of lamb in the oven for about 10 minutes. Loosen the pan juices with a little water, thicken with corn starch and season to taste. Leg of lamb is complemented very well by green beans and au gratin potatoes.
Pork steaks
Ingredients: 4 pork steaks (200 g each), 1 tsp salt, a few dashes of Tabasco, 2 tsp paprika, 3 TBSP oil
Preparation: Prepare a marinade from the Tabasco, paprika and oil and marinated the steaks about 2 hours. Place the seasoned steaks on the grate, insert
in oven at third level from the bottom and grill the steaks at 220^ with top and bottom heat about 10 minutes on each side. TIP: To save time you can use ready-to-grill steaks.
Lasagna
Preparation time: 90 minutes
Ingredients: 250 g lasagna noodles, 500 g ground beef and port, 2 TBSP oil, 2 onions, 12 tsp oregano, 1 tsp paprika powder, 1 tsp salt, 70 g, tomato paste, 2 TBSP butter, 2 TBSP flour, 12 I milk, 14 I dry white wine, 12 tsp salt, 2 pinches pepper, 100 g grated Swiss cheese, 50 g grated Parmesan cheese, 3 TBSP sweet cream, butter for the pan
Preparation: Cook the noodles according to the instructions on the package and then place in cold water. Chop the onions and brown in the oil in a pan on the stove. Add the ground meat and fry, stirring occasionally. Add oregano, paprika and 1/2 tsp salt and set the mixture aside. In a pot, prepare a roux from the butter and flour, and then add the milk and wine. Cook 5 minutes, stirring constantly, then season with salt and pepper. Grease a casserole form and cover the bottom with lasagna noodles.
In layers, add some the meat mixture and then sauce. Repeat in thin layers; the top layer should be lasagna noodles. Pour the rest of the sauce over the lasagna and top with cheese and cream. Cover the form with aluminum foil and place on the grate at the bottom level of the oven; bake at 200^ with top and bottom heat for about 45 minutes. After 2/3 of the baking time remove the foil.
Mixed vegetables
Ingredients: 1000 g esason al mixed vegetables, prepared, 1-2 TBSP mixed herbs, 1 tsp spices for vegetables
Preparation: Cut larger vegetables into fine strips. Mix the vegetables with the spices and distribute on 10 pieces of aluminum foil. Add butter in flakes, if desired. Take the foil by the corners and twist together to form small packages. Place the wrapped vegetables on the baking sheet and cook in the oven at 180^ with top and bottom heat for about 30 minutes. The cooking time can vary depending on the type of vegetables. After cooking, sprinkle the vegetables with fresh chopped herbs.
BAKING
Spicy crown cake
Ingredients for a ring mould with a diameter of 24~cm
5 eggs, 200 g sugar, 12 jar cherry jam, 12 tsp cinnamon, 1 heaped TBSP cocoa, 100 g ground nuts, 350 g flour, 1 envelope baking powder, milk
Preparation: Beat eggs, butter, sugar, jam and cinnamon until foamy. Combine cocoa, nuts, flour and baking powder and stir in. The batter must be thick. Add a little milk if necessary. Fill the batter into a greased ring mould. Place the pan on the grate at the bottom level in the oven. Bake about 50 minutes at 180^ with top and bottom heat.
Cheesecake
Ingredients for the crust: 65g butter, 75g sugar, 1 egg, 200g flour, 12 envelope baking powder
Ingredients for the filling: 500 g low-fat curd cheese, 150 g sugar, 1 envelope vanilla sugar, 1 envelope vanilla pudding powder, 3 eggs, 375 ml milk, 50 g melted butter
Preparation: Make a kneaded dough from the butter, sugar, egg, flour and baking powder. Roll out the dough and cover the bottom and edge of a springform pan (24 cm diameter) greased only on the bottom, pushing the dough up on the edge about 3 cm. Mix the ingredients for the filling and pour onto the dough. CAUTION: Make sure to use a
pan which will not leak, since the filling is runny at first. Place the pan on the grate and insert into the oven at the bottom level. Bake about 80-90 minutes at 180^ with top and bottom heat.
Basic dough for yeast-risen cake
Preparation time: 120 minutes, 25 cm loaf pan
Basic dough: 500 g flour, 75 g sugar, 80 g soft butter, 330 ml lukewarm milk, 12 tsp salt, 1 cake yeast
For spreading on top: 1 egg yolk, 1 TBSP cream
Preparation: Knead the ingredients for the basic dough until the dough forms a ball which pulls away from the bottom of the bowl. Let the dough rise in a warm place until it doubles in volume. Punch down the dough and knead thoroughly, then put the dough in a greased loaf pan. Mix the egg yolk with the cream and brush over the dough; use a sharp knife to slice the dough lengthways. Let the dough rise again for 30 minutes. Place the loaf pan on the grate at the bottom level in the oven and bake at 180^ with top and bottom heat for about 45 minutes. You can also prepare yeast dough in a UNOLD® Backmeister breadmaker.
GUARANTEE CONDITIONS
We grant a 24 months guarantee, and in case of commercial use a 12 months guarantee, starting from the date of purchase for any damage demonstrably due to manufacturing defects and when the appliance has been used according to its intended use. Within the warranty period we will remedy defective materials or workmanship through repair or replacement, at our option. Our warranty terms apply only to appliances sold in Germany and Austria. For other countries, please contact the responsible importer. In the event of a claim for remedy of defects, please send the appliance to our after sales service, properly packaged, together with a copy of the automatically generated sales receipt, which must show the date of purchase, and a description of the defect. You can print out a return receipt on our website www.unold.de/ruecksendingung. (only for entries from Germany and Austria). The warranty does not cover damage from normal wear, improper handling and failure to comply with the maintenance and care instructions. The warranty is void if repairs or modifications are made to the appliance by third parties. Any claims of the end consumer vis-à-vis the retailer are not limited by this warranty.
WASTE DISPOSAL / ENVIRONMENTAL PROTECTION
Our appliances are produced on a high quality level for a long lifetime. Regular maintenance and expert repairs by our after-sales service can extend the useful life of the appliance. If an appliance is defective and repair is not possible we ask you to follow the following instructions for disposal. Do not dispose this appliance together with your standard household waste. Please bring this product to an approved collection point for recycling of electric and electronic products. By separate collection and disposal of waste products you help to protect natural resources and ensure, that the product is disposed in an adequate way to protect health and environment.

The instruction booklet is also available for download: www.unold.de
The authors have thoroughly considered and tested the recipes included in these operating instructions. Nevertheless, a guarantee cannot be accepted. The authors, respectively UNOLD AG and their assignees shall not be liable for personal injuries, material damages and financial loss.
NOTICE D'UTILISATION MODELE 68875
SPÉCIFICATION TECHNIQUE
Puissance:1.200Watt,220-240V\~,50Hz