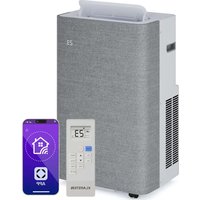
IceWind Max - Air Conditioning Klarstein - Free user manual and instructions
Find the device manual for free IceWind Max Klarstein in PDF.
User questions about IceWind Max Klarstein
0 question about this device. Answer the ones you know or ask your own.
Ask a new question about this device
Download the instructions for your Air Conditioning in PDF format for free! Find your manual IceWind Max - Klarstein and take your electronic device back in hand. On this page are published all the documents necessary for the use of your device. IceWind Max by Klarstein.
USER MANUAL IceWind Max Klarstein
bar
| Category | Value | |---|---| | Category 1 | 100 | | Category 2 | 100 | | Category 3 | 100 | | Category 4 | 100 | | Category 5 | 100 | | Category 6 | 100 | | Category 7 | 100 | | Category 8 | 100 | | Category 9 | 100 | | Category 10 | 100 | | Category 11 | 100 | | Category 12 | 100 | | Category 13 | 100 | | Category 14 | 100 | | Category 15 | 100 | | Category 16 | 100 | | Category 17 | 100 | | Category 18 | 100 | | Category 19 | 100 | | Category 20 | 100 | | Category 21 | 100 | | Category 22 | 100 | | Category 23 | 100 | | Category 24 | 100 | | Category 25 | 100 | | Category 26 | 100 | | Category 27 | 100 | | Category 28 | 100 | | Category 29 | 100 | | Category 30 | 100 | | Category 31 | 100 | | Category 32 | 100 | | Category 33 | 100 | | Category 34 | 100 | | Category 35 | 100 | | Category 36 | 100 | | Category 37 | 100 | | Category 38 | 100 | | Category 39 | 100 | | Category 40 | 100 | | Category 41 | 100 | | Category 42 | 100 | | Category 43 | 100 | | Category 44 | 100 | | Category 45 | 100 | | Category 46 | 100 | | Category 47 | 100 | | Category 48 | 100 | | Category 49 | 100 | | Category 50 | 100 | | Category 51 | 100 | | Category 52 | 100 | | Category 53 | 100 | | Category 54 | 100 | | Category 55 | 100 | | Category 56 | 100 | | Category 57 | 100 | | Category 58 | 100 | | Category 59 | 100 | | Category 60 | 100 | | Category 61 | 100 | | Category 62 | 100 | | Category 63 | 100 | | Category 64 | 100 | | Category 65 | 100 | | Category 66 | 100 | | Category 67 | 100 | | Category 68 | 100 | | Category 69 | 100 | | Category 70 | 100 | | Category 71 | 100 | | Category 72 | 100 | | Category 73 | 100 | | Category 74 | 100 | | Category 75 | 100 | | Category 76 | 100 | | Category 77 | 100 | | Category 78 | 100 | | Category 79 | 100 | | Category 80 | 100 | | Category 81 | 100 | | Category 82 | 100 | | Category 83 | 100 | | Category 84 | 100 | | Category 85 | 100 | | Category 86 | 100 | | Category 87 | 100 | | Category 88 | 100 | | Category 89 | 100 | | Category 90 | 100 | | Category 91 | 100 | | Category 92 | 100 | | Category 93 | 100 | | Category 94 | 100 | | Category 95 | 100 | | Category 96 | 100 | | Category 97 | 100 | | Category 98 | 100 | | Category 99 | 100 | | Total (Total) = [sum of bars] / [values] * (sum of bars + bars) * (sum of bars + bars) * (sum of bars + bars) * (sum of bars + bars) * (sum of bars + bars) * (sum of bars + bars) * (sum of bars + bars) * (sum of bars + bars) * (sum of bars + bars) * (sum of bars + bars) * (sum of bars + bars) * (sum of bars + bars) * (sum of bars + bars) * (sum in brackets) * (sum in brackets) * (sum in brackets) * (sum in brackets) * (sum in brackets) * (sum in brackets) * (sum in brackets) * (sum in brackets) * (sum in brackets) * (sum in brackets) * (sum in brackets) * (sum in brackets) * (sum in brackets) * (sum in brackets) * (sum in brackets) * (sum in brackets) * (sum in brackets) * (total).* (sum in brackets) * (sum in brackets) * (sum in brackets) * (sum in brackets) * (sum in brackets) * (sum in brackets) * (sum in brackets) * (sum in brackets) * (sum in brackets) * (sum in brackets) * (sum in brackets) * (sum in brackets) * (total).* (sum in brackets) * (sum in brackets) * (sum in brackets) * (sum in brackets)text_image
QR code image containing encoded data, no visible human-readable textINHALTSVERZEICHNIS
text_image
Diagram of a remote control unit with numbered parts for identification and assembly reference.Member of Berlin Brands Group
Handwerkerstr. 11
15366 Dahlwitz-Hoppegarten
Deutschland
natural_image
Symbol of a trash bin crossed with a diagonal line, no text or numbers presentBerlin Brands Group UK Ltd
PO Box 1145
Oxford, OX1 9UW
United Kingdom
Dear customer,
Congratulations on the purchase of your appliance. Please read the following instructions carefully and follow them to prevent potential damage. We accept no liability for damage caused by disregarding the instructions and improper use. Please scan the QR code to access the latest operating instructions and further information about the product.

text_image
QR code image containing encoded data, no visible human-readable textCONTENTS
Safety Instructions 22
Device Overview and Remote Control 26
Control panel 27
Getting Started 27
Operation 28
Cleaning and Care 32
Troubleshooting 35
Disposal Considerations 36
Manufacturer & Importer (UK) 36
TECHNICAL INFORMATION
| Article number 10036067, 10036068 | |
| Power supply 220-240 V ~ 50 Hz | |
| Nominal power 62 W | |
| Nominal air flow rate 330 m | ^3/h |
| Nominal evaporation capacity (1) 900 l/h | |
| Noise level ≤ 61 dB(A) | |
| Battery type (remote control) | LR03 (AAA). Not included in the scope of delivery. |
(1) The water consumption increases or decreases depending on the ambient humidity.
SAFETY INSTRUCTIONS
- Check the voltage on the rating plate before use. Only connect the appliance to sockets which correspond to the voltage of the appliance.
- Keep the appliance and cable away from sources of heat, sharp objects or anything that may cause damage.
- Do not place the cord under carpets. Do not cover the cord with small clothes, shirts or other similar elements. Place the cord away from traffic areas in order to avoid any risk of tripping over.
- Do not operate the appliance if the cable or plug is damaged.
- If the supply cord or plug is damaged, it must be replaced by the manufacturer, its service agent or similarly qualified persons in order to avoid a hazard.
- Indoor use only.
- Do not cover the machine during using.
- Place the appliance on a stable flat horizontal surface. Make sure the appliance is in an upright position during use.
- Ensure the appliance is switched off before connecting to the mains power supply.
-
Always ensure that hands are dry before operating or adjusting any switch on the product or touching the plug and mains supply connections.
-
Do not leave this appliance unattended when it's in use. Turn off and disconnect the appliance when you leave the room for an extended period.
- Switch off the appliance and unplug from the mains socket when not in use, before filling, cleaning or other maintain.
- To disconnect the appliance, switch it "OFF", and then remove the plug from outlet. Do not pull the cord to disconnect the plug.
- Use the appliance only as described in this manual.
- Do not insert your fingers in the openings of the guard.
- Do not leave hair, tissue, tablecloths, clothes or curtains near all openings of the fan, they could be sucked into the fan and be taken within the internal moving parts that could cause injury or damage.
- Do not use the appliance in wet or damp locations such as bathrooms.
- Do not operate the appliance when it's not mounted on its wheels or if it's lying on the side.
- Make sure the cord is completely extended before use.
-
When in operation, evaporative coolers moisturize the ambient air. Over-humidification of residential rooms should be avoided. Recommendation: 40-50 % relative humidity. Excessive humidity of the air can damage the home and cause health problems.
-
The appliance may only be set up on water-and moisture-proof flooring materials (spilling some drops of water is unavoidable when the content of the tank is changed).
- With each and every change of tank content, completely remove residual water from the equipment. To prevent nucleation, remove residual water from the equipment and water tank every time after three days of use.
- This device can be used by children over 8 years of age and persons with limited physical, sensory or mental abilities or lack of experience and knowledge, if they have been supervised or instructed in the safe use of the device and understand the dangers involved. Children must not play with the device.
Cleaning and maintenance of the air cooler must not be performed by children without supervision.
- Keep new and used batteries away from children.
- If the battery compartment does not close securely, stop using the product.
- The batteries contain environmentally hazardous substances. They must be removed from the product before it is scrapped and disposed of safely.

WARNING
Danger of injury! Make sure that children do not swallow the battery. If the button cell battery is swallowed, it can cause severe internal burns in only 2 hours and lead to death. If you think that batteries may have been swallowed, consult a doctor immediately.
Special notes on use
- Be aware that high humidity levels may encourage the growth of biological organisms in the environment.
- Do not permit the area around the humidifi er to become damp or wet. If dampness occurs, turn the output of the humidifi er down. If the humidifi er output volume cannot be turned down, use the humidifi er intermittently. Do not allow absorbent materials, such as carpeting, curtains, drapes, or tablecloths, to become damp.
- Unplug the appliance during fi lling and cleaning.
- Never leave water in the reservoir when the appliance is not in use.
- Empty and clean the humidifi er before storage. Clean the humidifi er before next use.
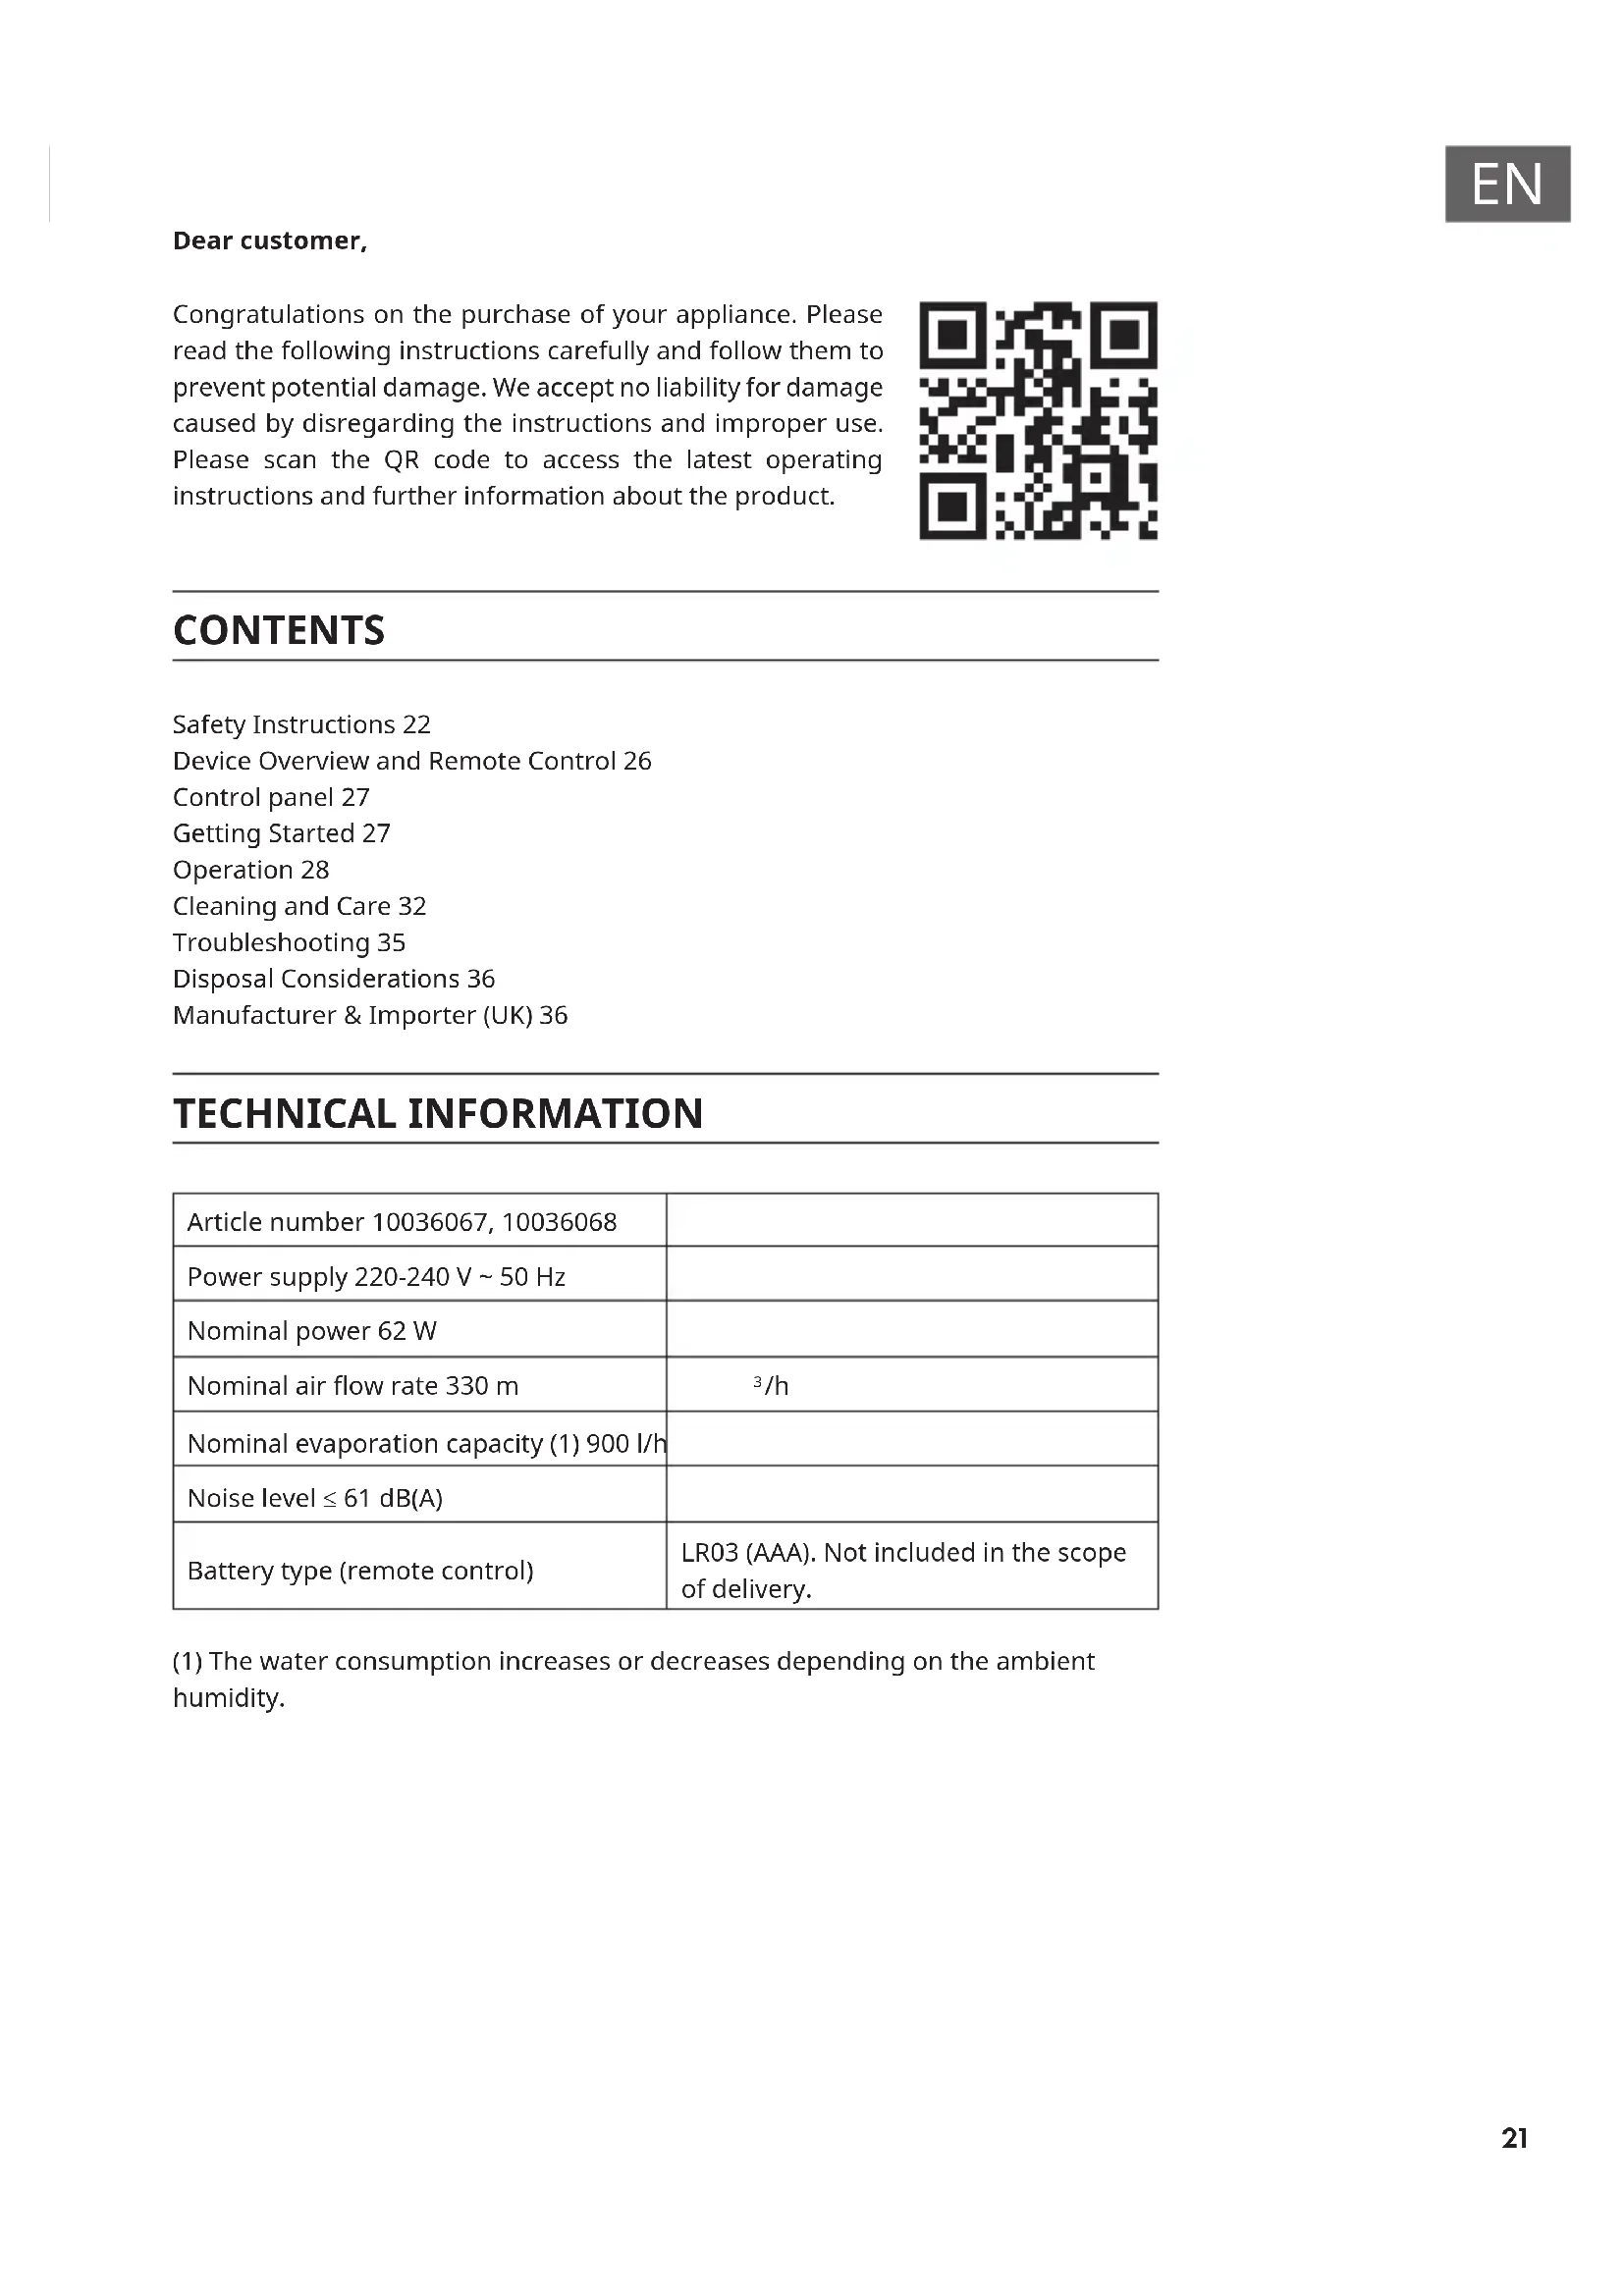
DEVICE OVERVIEW AND REMOTE CONTROL
text_image
Diagram of a remote control unit with numbered parts for identification and assembly reference.| 1 Control panel 4 Evaporation filter | ||
| 2 Buttons 5 Water tank | ||
| 3 Air outlet with ventilation flaps 6 Rollers |
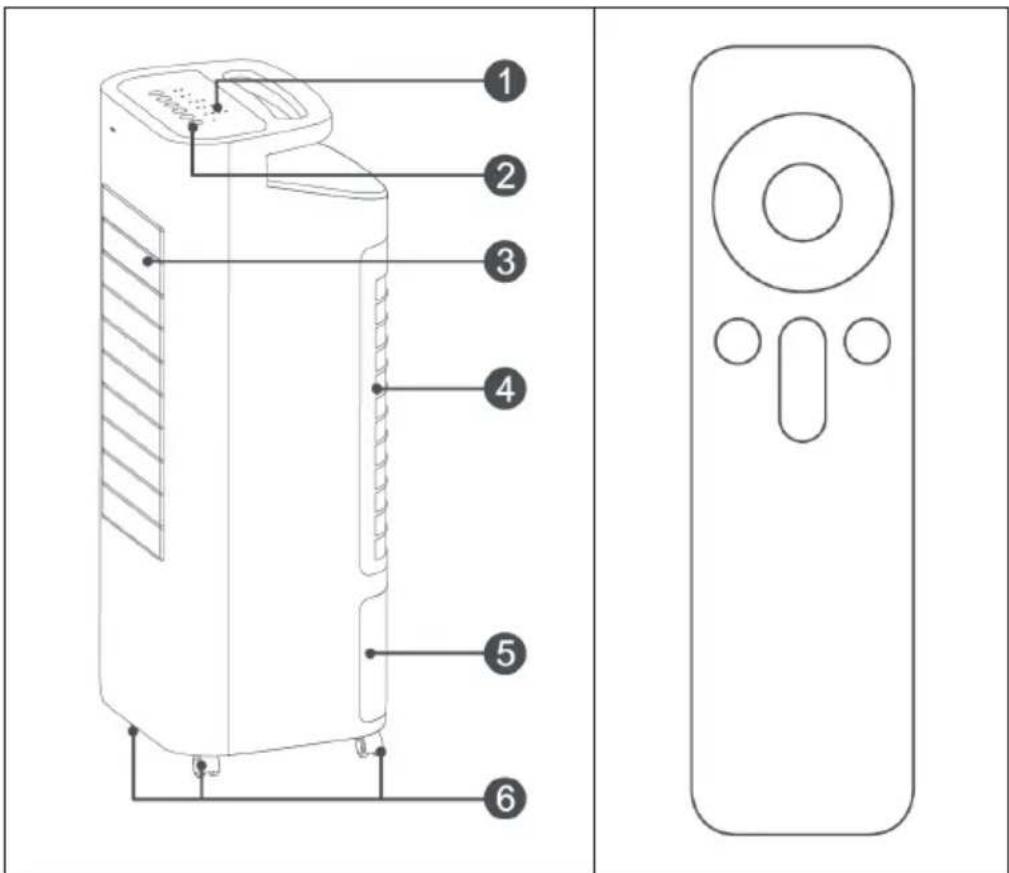
CONTROL PANEL
text_image
Display ○ 8h ○ 4 ○ Sleep ○ 4h ○ 3 ○ Low Water ○ U&D Swing ○ Natural ○ 2h ○ 2 ○ Humidify ○ L&R Swing ○ General ○ 1h ○ 1 ○ Humidify Swing Mode Timer/ Preset Speed DisplayGETTING STARTED
- Open the packaging and remove the device. Make sure that all items included in the scope of delivery are complete.
- Place the device horizontally on a stable surface. Do not tilt the unit before use. Before starting the device, make sure that the voltage of the socket used corresponds to the voltage specified on the type plate of the device.
Adding water
- First remove the water tank from the machine. Before removing the water tank, make sure that all the residual water from the pump system has already flowed back into the water tank to prevent the water from flowing out of the appliance.
- Observe the minimum and maximum markings in the water tank.
Note: Make sure that the water level is always between the two marks and never exceeds the maximum mark, otherwise the water could overflow. Before filling with water, remove the cardboard attached to the left side of the water tank.
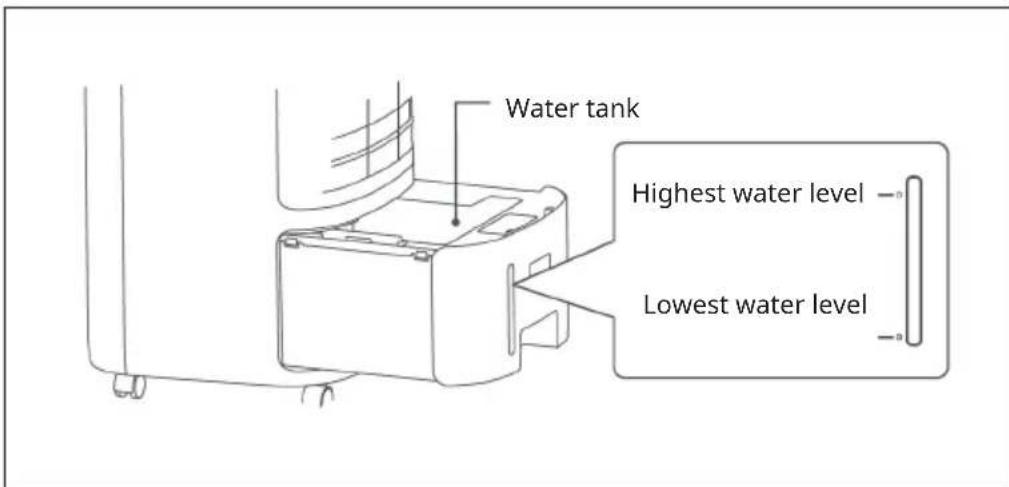
text_image
Water tank Highest water level Lowest water levelOPERATION
Switching on
-
After plugging the power cord into the wall outlet, press the button ⏻ to switch the device from standby mode to operating mode.
-
The factory default setting is fan speed 1 in normal mode.
Fan speed
- The unit has 4 different speed settings. - While the unit is on, press the SPEED button to adjust the fan speed. Each time the SPEED button is pressed, the fan speed is increased by one step. If you press the button again after the highest speed is reached, the device will start again at the lowest speed level, etc.
Timer
(1) Automatic switch-off
- While the unit is on, press the TIMER/PRESET button to enter the timer standby setting. If you press this key several times, you can set the time until the unit automatically switches to standby mode in the following sequence: 1h > 2h > 3h > ... > 15h > Cancel timer setting. The corresponding indicator lamp lights up.
- As soon as the time you have set in the timer has expired, the device automatically switches to standby mode.
- If you keep the TIMER/PRESET button pressed, the time can be set faster.
(2) Automatic switch-on
- If you press the TIMER/PRESET button in standby mode, you can set the time until the unit switches on automatically. If you press this key several times, you can set the time until the unit automatically switches on in the following sequence: 1h > 2h > 3h > > 15h > Cancel timer setting. The corresponding indicator lamp lights up.
- As soon as the time you have set in the timer has elapsed, the device will switch on automatically.
- If you keep the TIMER/PRESET button pressed, the time can be set faster.
Mode
After switching on the unit, press the MODE button. By pressing several times, the unit switches between the modes: General (normal) - Natural (natural) - Sleep (snooze mode). The corresponding indicator lamp lights up.
- General: The wind is continuously emitted from the device at the same speed.
- Natural: In this mode, depending on the programme set, the wind occurring in nature is simulated. The wind speed alternates back and forth between strong and weak.
- Sleep: The fan speed is automatically reduced to low after some time, depending on the set programme.
Swing function
In operating mode, press this button to switch on the oscillation function. Each time you press it once, the functions are called up in the following order: Swing Up and Down > Swing Left and Right > Swing OFF > Swing Left and Right > Swing Up and Down > Swing OFF.
Humidification
When this button is pressed in the operating mode of the unit, the humidification function can be activated or deactivated. The corresponding indicator lamp lights up.
Note: Check the water level in the water tank before activating the humidification function. If the water level is below the minimum mark, the water must be topped up.
Lower water level
If there is not enough water in the water tank, the unit automatically stops operating in humidification mode. The humidification indicator or the "Low water level" indicator flashes. Fill the water tank. Then restart the humidification function.
Screen illumination
If no button is pressed within 40 seconds, the screen illumination is dimmed by 50 %. Press any button to make the screen fully lit again.
Memory function
This unit has a memory function. When the unit is put into standby mode, the previously set function is saved. When you switch the unit on again, it will then automatically start in the previously saved function.
Automatic standby mode
If no button is pressed within 15 hours, the unit is automatically set to standby mode.
Remote control
The buttons on the remote control correspond to the buttons on the unit. When using the remote control, make sure that the infrared transmitter of the remote control is pointed at the infrared receiver of the unit. There must be no obstacles between the remote control and the device. Remove the batteries from the remote control if it will not be in use for a long period of time.
Note: There is no heating function.
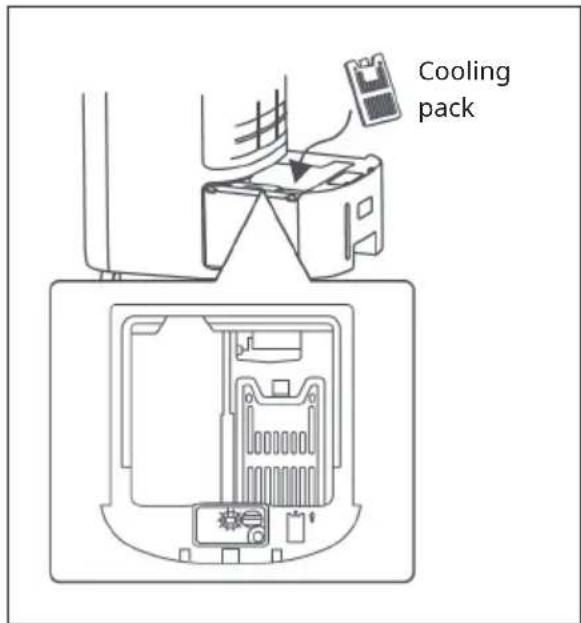
Cooling pack
Do not open the ice container under any circumstances. The contents of the ice container are not suitable for consumption. Place the ice containers in the freezer compartment of your refrigerator or in a freezer for at least four hours before use (see picture).
text_image
Cooling packPlace the ice container in the water tank of the appliance. To do this, first pull the mains plug out of the socket. Then pull out the water tank at the back of the machine. Place the ice container in the marked side of the water tank to ensure that it can be pulled out properly.
Make sure that the water level does not exceed the maximum mark even after inserting the ice container. To remove the ice container, pull out the water tank and remove the ice container. There are 2 ice containers included in the delivery, which can be used on a rotating basis.
CLEANING AND CARE
Storage
Empty the water from the water tank if you will not be using the device for a long period of time. Then let the unit run in "General" mode for a while to dry the wet curtain completely. Then cover the unit or store it in its original packaging.
Cleaning
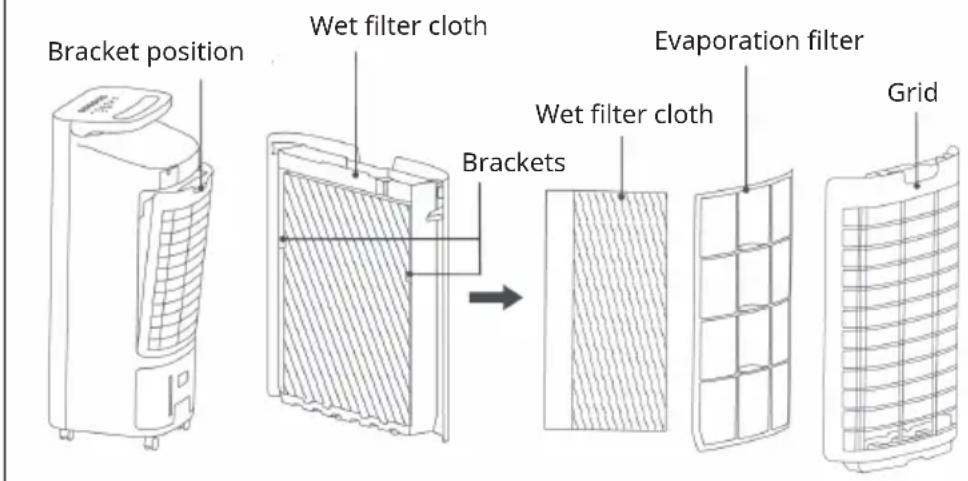
If you have already been using the appliance for a long period of time, the water tank, the water tank filter, the wet curtain or the wet curtain filter may become blocked by dust, limescale or other residues. This can negatively affect the air volume or the cooling effect. It is recommended to clean the appliance at least once every 2 weeks. Before cleaning, the mains plug must be disconnected from the socket.
- First remove the wet curtain from its holder. To do this, pull the clips on both sides of the wet curtain holder slightly outwards. The wet curtain and its filter can then be removed. Clean the wet curtain with clean water and then dry it completely before putting it back in place (see figure 1).
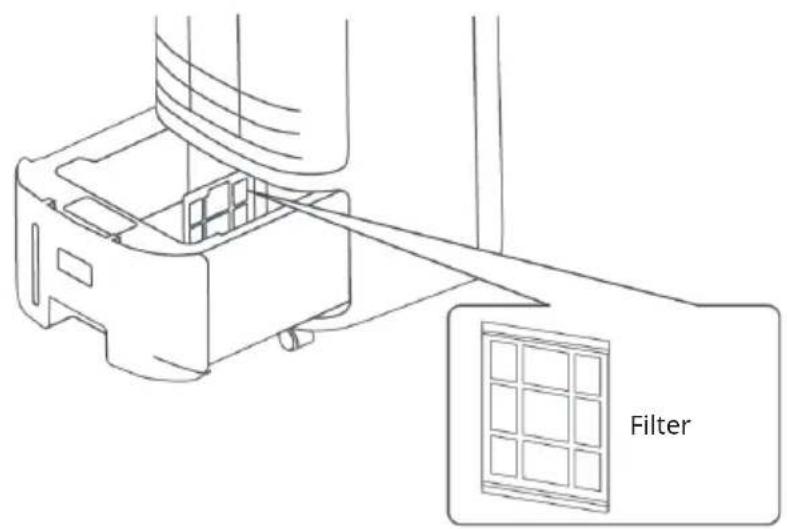
- To remove the filter, first pull out the water tank. You can then pull out the filter (see figure 2).
- Clean the filter with a soft brush or cloth. Then rinse the filter with clean water.
1
text_image
Bracket position Wet filter cloth Evaporation filter Brackets Grid2
text_image
FilterWater tank cleaning
Pull out the water tank directly for cleaning.
Water channel cleaning
Once the water tank has been pulled out, you can check whether there is any residual water in the water channel. If this is the case, absorb the water with a dry cloth.
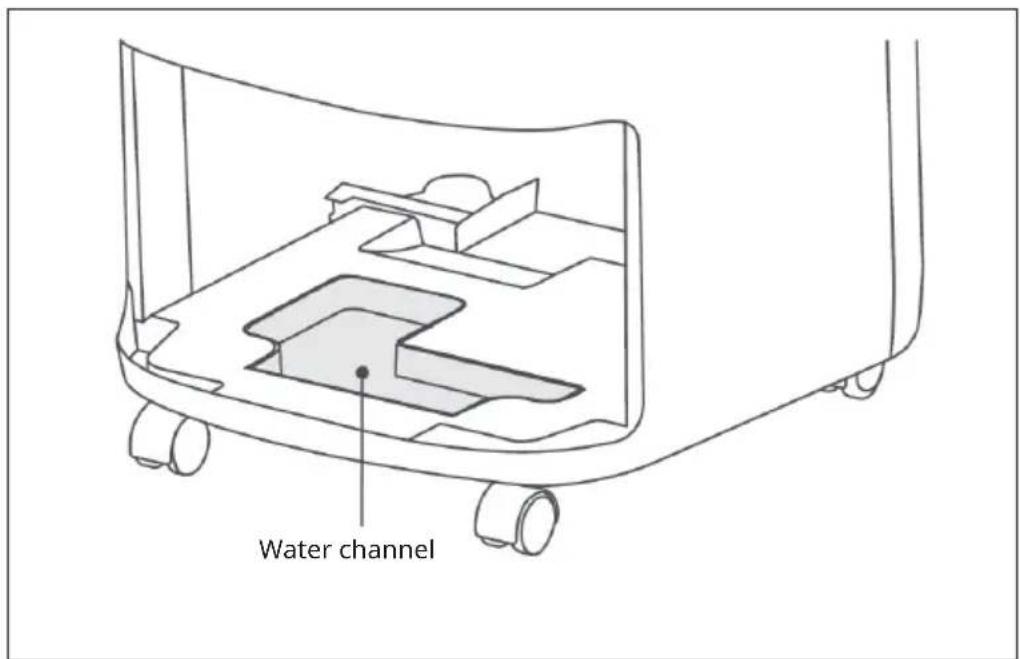
text_image
Water channelHousing cleaning
- Wipe the housing with a damp cloth. Do not rinse the housing directly with water.
- Do not clean the housing with an aggressive cleaning agent.
- After cleaning, put all the accessories back into the appliance in reverse order.
Note: To replace the wet curtain, press its bottom into the opening provided (see figure 3). Then press down the brackets of the holder with your hand. Do not put the wet curtain back into the unit unless the filter has been installed. Failure to do so may result in damage to the unit.
3

text_image
Bottom flaps Clamp ClampTROUBLESHOOTING
| Problem Possible cause | Solution approach | |
| The appliance is not working. | The plug has not been inserted correctly. | Plug the power plug securely into the wall socket. |
| The nebuliser unit has not been installed correctly. | Install the nebuliser unit correctly. | |
| The unit is switched off. Switch the device on. | ||
| The wiring in the unit has come loose. | Contact a specialist company for repairs. | |
| The humidifier does not work / The pump makes strange noises. | No water in the water tank or the water level is below the MIN mark. | Switch off the device and fill water into the water tank. |
| The filter screen of the submersible pump is clogged. | Clean the filter screen. | |
| The water outlet hole of the nebuliser unit is blocked. | Clean the nebuliser unit. | |
| The pump or the wiring in the unit has come loose. | Contact a specialist company for repairs. | |
| Abnormal noises. Deposits | in the nebuliser unit. | Remove the nebuliser unit and clean the components. |
| Loose fan blades or motor damage. | Contact a specialist company for repairs. | |
DISPOSAL CONSIDERATIONS
natural_image
Symbol of a trash bin crossed with a diagonal line, no text or numbers presentIf there is a legal regulation in your country regarding the disposal of electrical and electronic equipment, this symbol on the product or on the packaging indicates that this product must not be disposed of with household waste. Instead, it must be taken to a collection point for the recycling of electrical and electronic equipment. By disposing of this product in accordance with the regulations, you protect the environment and the health of those around you from negative consequences. For information on recycling and disposal of this product, contact your local government or household waste disposal service.
This product contains batteries. If there is a legal regulation in your country regarding the disposal of batteries, the batteries must not be disposed of in household waste. Consult your local regulations for the disposal of batteries. By disposing of this product in accordance with the regulations, you protect the environment and the health of those around you from negative consequences.
MANUFACTURER & IMPORTER (UK)
Manufacturer:
Chal-Tec GmbH, Wallstraße 16, 10179 Berlin, Germany.
Importer for Great Britain:
Berlin Brands Group UK Ltd
PO Box 1145
Oxford, OX1 9UW
United Kingdom
Cher client, chère cliente,
text_image
QR code image containing encoded data, no visible human-readable textSOMMAIRE
text_image
Diagram of a remote control unit with numbered parts for identification and assembly reference.natural_image
Symbol of a trash bin crossed with a diagonal line, no text or numbers presentBerlin Brands Group UK Ltd
PO Box 1145
Oxford, OX1 9UW
United Kingdom
Estimado cliente:
text_image
QR code image containing encoded data, no visible human-readable textÍNDICE
text_image
Technical diagram of a remote control unit with numbered parts for identificationnatural_image
Symbol of a trash bin crossed with a diagonal line, no text or numbers presentBerlin Brands Group UK Ltd
PO Box 1145
Oxford, OX1 9UW
United Kingdom
Gentile cliente,
text_image
QR code image containing encoded data, no visible human-readable textINDICE
text_image
Diagram of a remote control device with numbered parts for identification and assembly reference.natural_image
Symbol of a trash bin crossed with a diagonal line, no text or numbers presentPRODUTTORE E IMPORTATORE (UK)
Produttore:
Chal-Tec GmbH, Wallstraße 16, 10179 Berlino, Germania.
Berlin Brands Group UK Ltd
PO Box 1145
Oxford, OX1 9UW
United Kingdom
Geachte klant,
text_image
QR code image containing encoded data, no visible human-readable textINHOUDSOPGAVE
text_image
Diagram of a remote control unit with numbered parts for identification and assembly reference.INSTRUCTIES VOOR AFVOER

natural_image
Symbol of a trash bin crossed with a diagonal line, no text or numbers presentBerlin Brands Group UK Ltd
PO Box 1145
Oxford, OX1 9UW
United Kingdom

bar
| Category | Value | |---|---| | Category 1 | 100 | | Category 2 | 100 | | Category 3 | 100 | | Category 4 | 100 | | Category 5 | 100 | | Category 6 | 100 | | Category 7 | 100 | | Category 8 | 100 | | Category 9 | 100 | | Category 10 | 100 | | Category 11 | 100 | | Category 12 | 100 | | Category 13 | 100 | | Category 14 | 100 | | Category 15 | 100 | | Category 16 | 100 | | Category 17 | 100 | | Category 18 | 100 | | Category 19 | 100 | | Category 20 | 100 | | Category 21 | 100 | | Category 22 | 100 | | Category 23 | 100 | | Category 24 | 100 | | Category 25 | 100 | | Category 26 | 100 | | Category 27 | 100 | | Category 28 | 100 | | Category 29 | 100 | | Category 30 | 100 | | Category 31 | 100 | | Category 32 | 100 | | Category 33 | 100 | | Category 34 | 100 | | Category 35 | 100 | | Category 36 | 100 | | Category 37 | 100 | | Category 38 | 100 | | Category 39 | 100 | | Category 40 | 100 | | Category 41 | 100 | | Category 42 | 100 | | Category 43 | 100 | | Category 44 | 100 | | Category 45 | 100 | | Category 46 | 100 | | Category 47 | 100 | | Category 48 | 100 | | Category 49 | 100 | | Category 50 | 100 | | Category 51 | 100 | | Category 52 | 100 | | Category 53 | 100 | | Category 54 | 100 | | Category 55 | 100 | | Category 56 | 100 | | Category 57 | 100 | | Category 58 | 100 | | Category 59 | 100 | | Category 60 | 100 | | Category 61 | 100 | | Category 62 | 100 | | Category 63 | 100 | | Category 64 | 100 | | Category 65 | 100 | | Category 66 | 100 | | Category 67 | 100 | | Category 68 | 100 | | Category 69 | 100 | | Category 70 | 100 | | Category 71 | 100 | | Category 72 | 100 | | Category 73 | 100 | | Category 74 | 100 | | Category 75 | 100 | | Category 76 | 100 | | Category 77 | 100 | | Category 78 | 100 | | Category 79 | 100 | | Category 80 | 100 | | Category 81 | 100 | | Category 82 | 100 | | Category 83 | 100 | | Category 84 | 100 | | Category 85 | 100 | | Category 86 | 100 | | Category 87 | 100 | | Category 88 | 100 | | Category 89 | 100 | | Category 90 | 100 | | Category 91 | 100 | | Category 92 | 100 | | Category 93 | 100 | | Category 94 | 100 | | Category 95 | 100 | | Category 96 | 100 | | Category 97 | 100 | | Category 98 | 100 | | Category 99 | 100 | | Total (Total) = [sum of bars] / [values] * (sum of bars + bars) * (sum of bars + bars) * (sum of bars + bars). The values in the table represent the sum of the bars and the corresponding sum of the bars. There is no additional data series or categories specified in the code.