
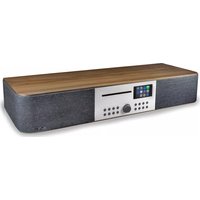
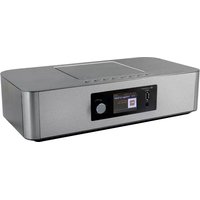
ICD3030 - Hi-fi system Soundmaster - Free user manual and instructions
Find the device manual for free ICD3030 Soundmaster in PDF.
| Product type | Hi-Fi system |
| Brand | Soundmaster |
| Model | ICD3030 |
| Power supply | AC adapter 100-240V~50/60Hz, DC 18V output |
| Audio output power | 2 x 15 W |
| Wireless connectivity | Dual-band Wi-Fi 2.4 GHz and 5 GHz, Bluetooth 2.1+EDR |
| DAB+ digital radio | Band III 174.928 – 239.200 MHz |
| FM radio | 87.5 – 108 MHz |
| CD player | Yes |
| Auxiliary input | 3.5 mm jack socket |
| USB port | Yes |
| Headphone jack | Yes, 3.5 mm |
| Remote control | Yes, with AAA batteries included |
| Display | Digital display |
| Equalizer | Presets: Normal, Jazz, Rock, Classic, Pop, Custom |
| Sleep timer | 15/30/45/60 min or off |
| Alarm | 2 independent alarms, modes: Buzzer, Internet Radio, CD, DAB, FM |
| Network functions | Internet Radio, Spotify Connect, DLNA, UPnP, UNDOK app |
| Standby power consumption (network maintained) | 1.5 W |
| Package contents | Main unit, remote control, AC adapter, antenna, instruction manual |
| Maintenance | Clean with a dry cloth only; do not use detergents |
| Safety | Do not open (risk of electric shock); avoid exposure to laser radiation (class 1) |
| Recycling | Do not dispose of with household waste; take to a recycling center or collection point |
Frequently Asked Questions - ICD3030 Soundmaster
User questions about ICD3030 Soundmaster
0 question about this device. Answer the ones you know or ask your own.
Ask a new question about this device
Download the instructions for your Hi-fi system in PDF format for free! Find your manual ICD3030 - Soundmaster and take your electronic device back in hand. On this page are published all the documents necessary for the use of your device. ICD3030 by Soundmaster.
USER MANUAL ICD3030 Soundmaster
DAB+ (DIGITALRADIO)....14
UKW (FM)....15
BLUETOOTH ^® 16
AUX-IN....16
CD BETRIEB....17
EINSCHLAFTIMER - SLEEP 18
WECKER - ALARM....18
UNDOK....18
KOPFHÖRERBETRIEB 19
WERKSEINSTELLUNG 19
STÖRUNGSBEHEBUNG 19
TECHNISCHE DATEN 21
BEDIENELEMENTE
FRONTANSICHT
![Windows Media Player Library > Playlists > test Organize > Screen > Create Playlist Title Length Rating 1 All Out of Love 1.06 Play all Play next Play to Add to Edit Rate Find album info Remove from last Move down Properties... Find in library Open file location Library Playlists Text NAP TEST Music Turner193 Artot Album Genre Videos Pictures Recorded TV Other media Other Libraries Mediashare [Samsung] Quartet15-16:00:45](/content/2026/03/573302/images/0a0510350836bf702dffa5b5913313397bd01a6c8971ef13c745ff80da6e7e7a.jpg)
![Play To - [MPT207] Clear List Air Out of Line Contacting media server.](/content/2026/03/573302/images/dd9cc0711bcc75edbf3f23cbb825a676a122f980940b89296471ec8ce8440cf9.jpg)
Do not dispose of this product with the normal household waste at the end of its life cycle. Return it to a collection point for the recycling of electrical and electronic devices. This is indicated by the symbol on the product, user manual or packaging
The materials are reusable according to their markings. By reusing, recycling or other forms of utilization of old devices you make an important contribution to the protection of our environment.
Please contact your local authorities for details about collection points.
| WARNING | ! | |
| Risk of electric shockDo not open! |
Caution: To reduce the risk of electric shock, do not remove the cover (or back). There are no user serviceable parts inside. Refer servicing to qualified service personnel.

This symbol indicates the presence of dangerous voltage inside the enclosure, sufficient enough to cause electric shock.

This symbol indicates the presence of important operating and maintenance instructions for the device

Used batteries are hazardous waste and NOT to be disposed of with the household waste! As a consumer you are legally obligated to return all batteries for environmentally responsible recycling – no matter whether or not the batteries contain harmful substances*)
Return batteries free of charge to public collection points in your community or shops selling batteries of the respective kind.
Only return fully discharged batteries
*) marked Cd = cadmium, Hg = mercury, Pb = lead
- Only use mercury and cadmium-free batteries.
- Used batteries are hazardous waste and NOT to be disposed of with the household waste!!!
- Keep batteries away from children. Children might swallow batteries.
- Contact a physician immediately if a battery was swallowed.
- Check your batteries regularly to avoid battery leakage.
- Batteries shall not be exposed to excessive heat such as sunshine, fire or the like.
- CAUTION: Danger of explosion if battery is incorrectly replaced
- Replace only with the same or equivalent type
CAUTION - INVISIBLE LASER RADIATION WHEN OPENING THE COVER OR PRESSING THE SAFETY INTERLOCK. AVOID EXPOSURE TO THE LASER BEAM.

To prevent possible hearing damage, do not listen at high volume levels for long periods
- Use the device in dry indoor environments only.
- Protect the device from humidity.
- This apparatus is for moderate climates areas use, not suitable for use in tropical climates countries.
Safety, Environmental and Setup Instructions
- No objects filled with liquids, such as vases, shall be placed on the apparatus.
- The mains plug or an appliance coupler is used as the disconnect device, the disconnect devices shall remain readily operable.
- Connect this device to a properly installed and earthed wall outlet only. Make sure the mains voltage corresponds with the specifications on the rating plate.
- Make sure the mains cable stays dry during operation. Do not pinch or damage the mains cable in any way.
- A damaged mains cable or plug must immediately be replaced by an authorized service center.
- In case of lightning, immediately disconnect the device from the mains supply.
- Children should be supervised by parents when using the device.
- Clean the device with a dry cloth only.
- Do NOT use CLEANING AGENTS or ABRASIVE CLOTHS!
- Do not expose the device to direct sunlight or other heat sources.
- Install the device at a location with sufficient ventilation in order to prevent heat accumulation.
- Do not cover the ventilation openings!
- Install the device at a safe and vibration-free location.
- Install the device as far away as possible from computers and microwave units; otherwise radio reception may be disturbed.
- Do not open or repair the enclosure. It is not safe to do so and will void your warranty. Repairs only by authorized service/ customer center.
- No naked flame sources, such as lighted candles, should be placed on the unit.
- When you are necessary to ship the unit store it in its original package. Save the package for this purpose.
- In case of malfunction due to electrostatic discharge or fast transient (burst), remove and reconnect the power supply.
- If the unit is not using for a long period of time, disconnect it from the power supply by unplugging the power plug. This is to avoid the risk of fire.
TABLE OF CONTENT
LOCATIONS OF CONTROLS ....2
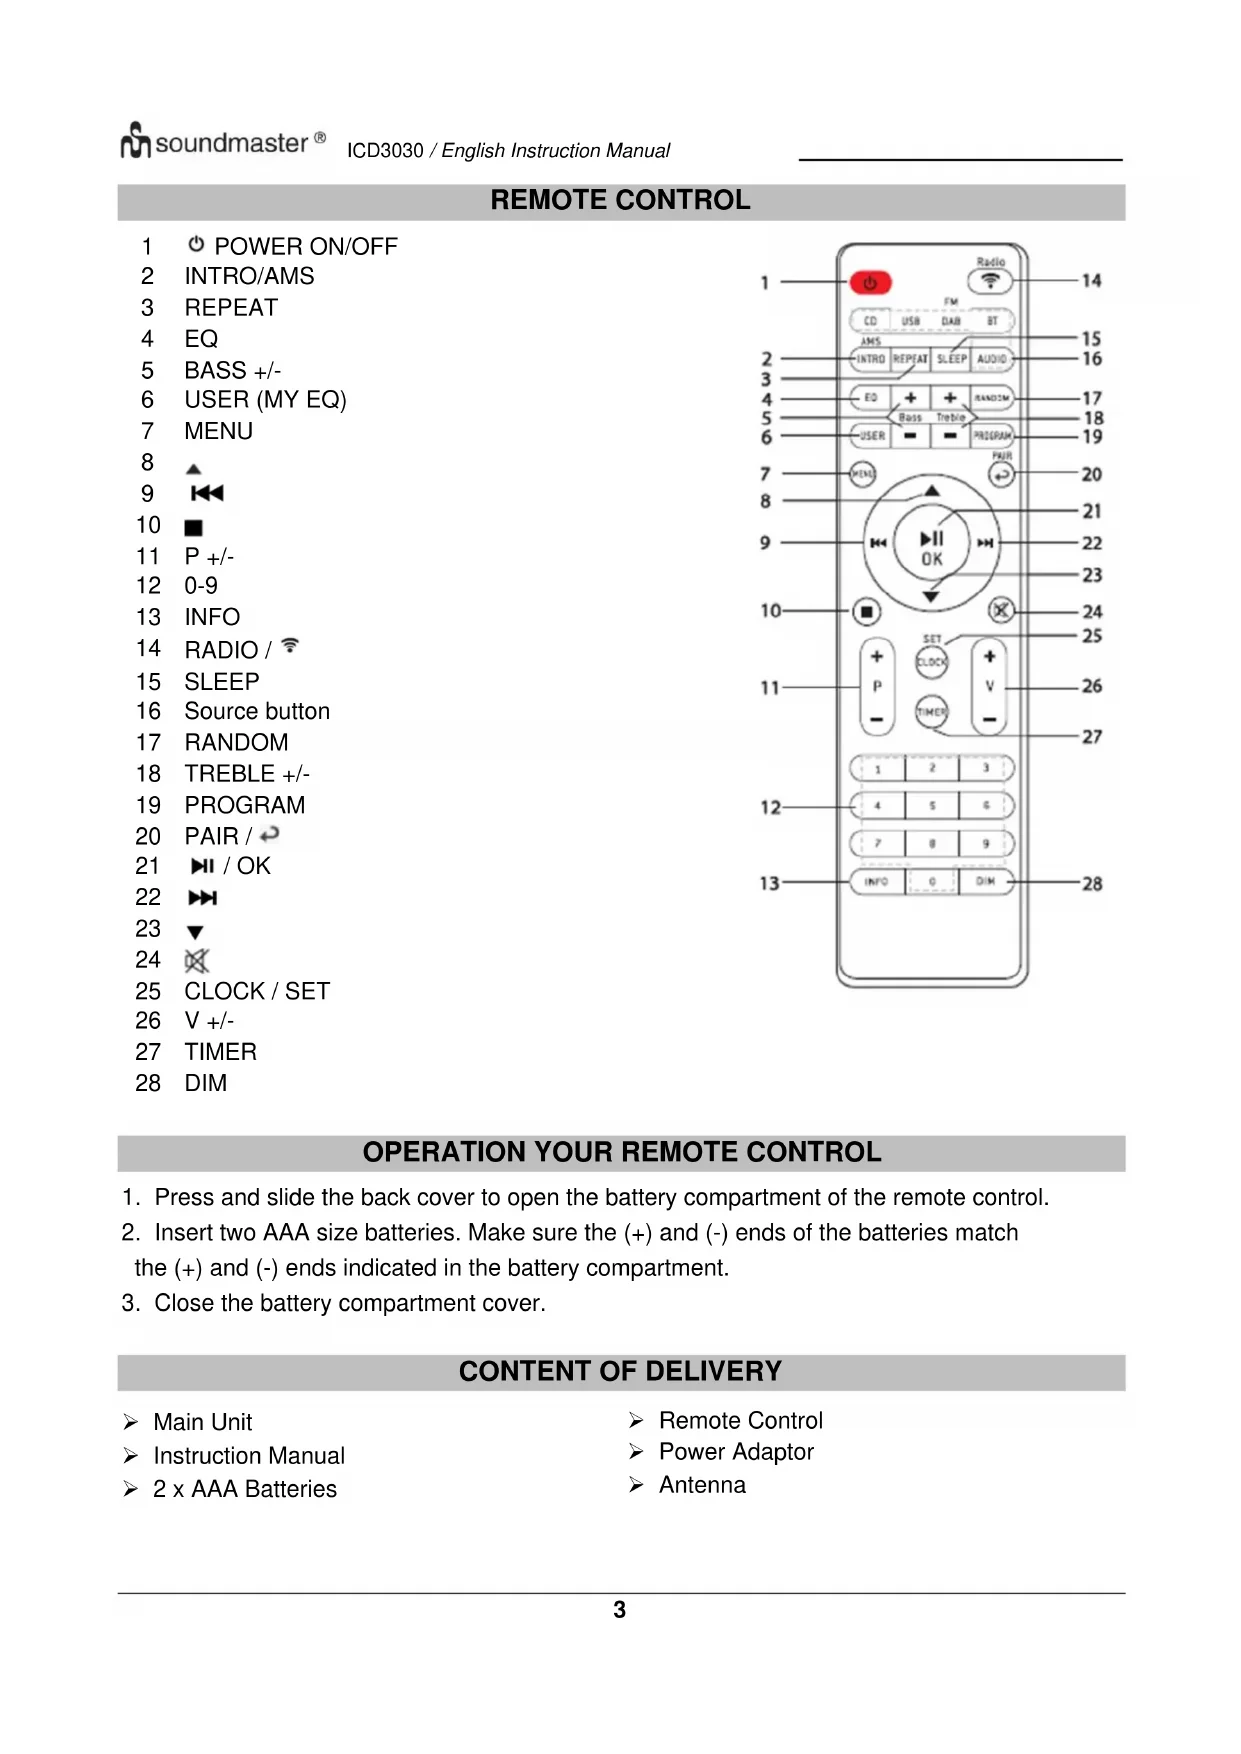
REMOTE CONTROL ....3
TROUBLESHOOTING....19
TECHNICAL SPECIFICATIONS....20
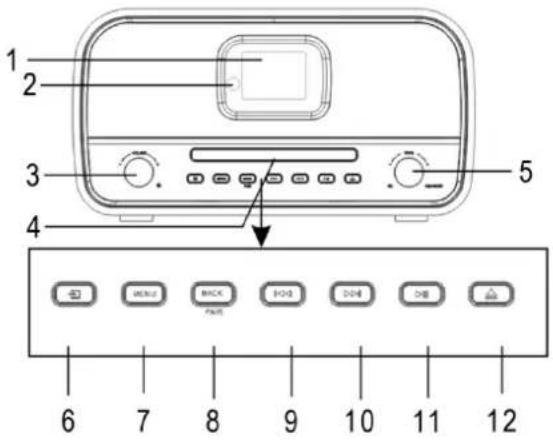
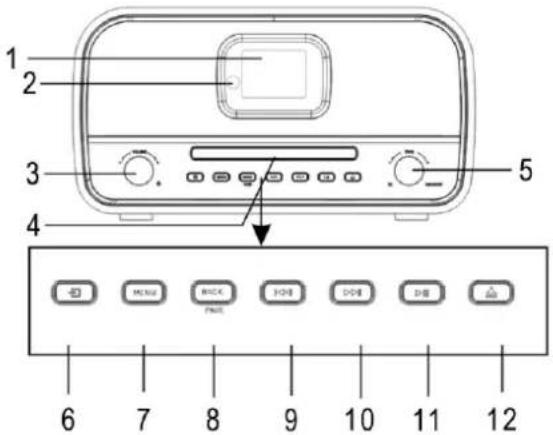
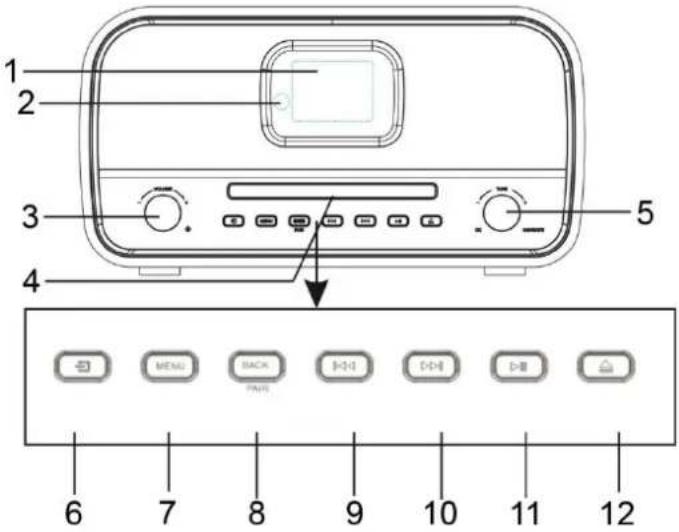
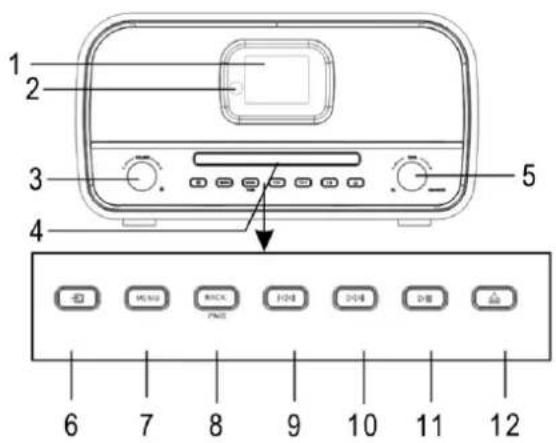
LOCATIONS OF CONTROLS
FRONT VIEW
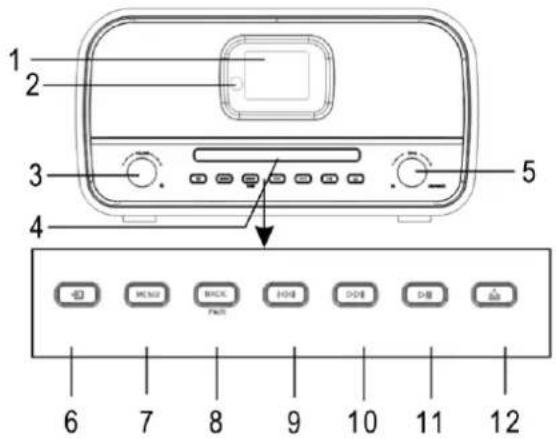
1 Display 7 Menu
2 Remote sensor 8 PAIR/BACK
3 On/Off, VOL+/VOL- 9
4 Disc Tray 10
5 NAVIGATE, OK, TUNE+/TUNE- 11
6 Main menu (Source) 12
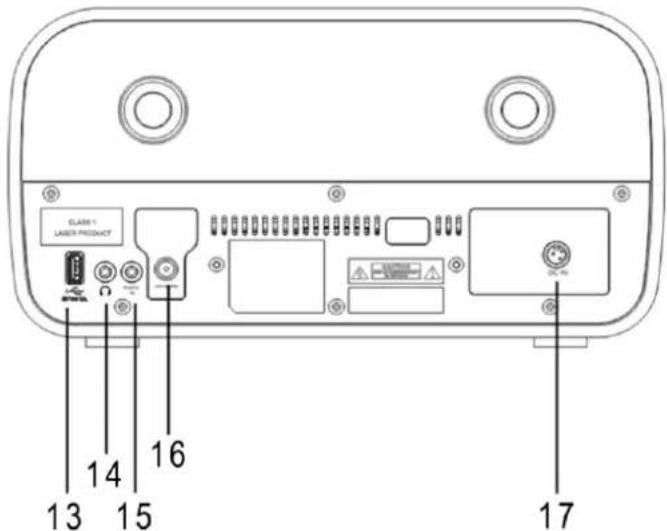
BACK VIEW
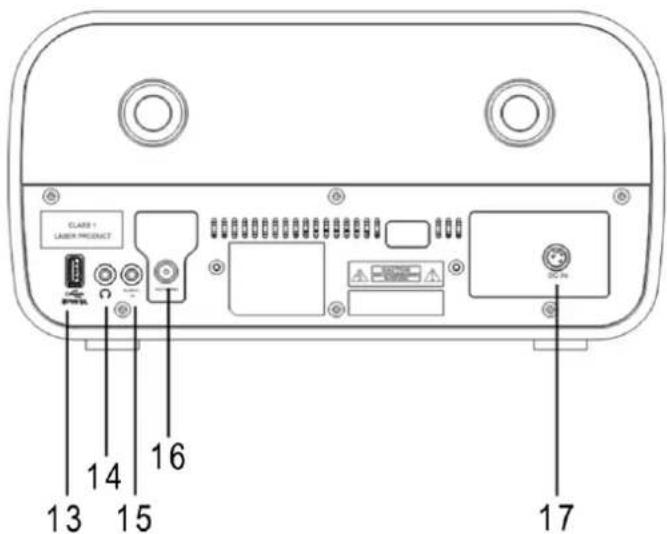
13 USB jack 16 Antenna socket
14 Headphone jack 17 DC IN
15 AUDIO IN
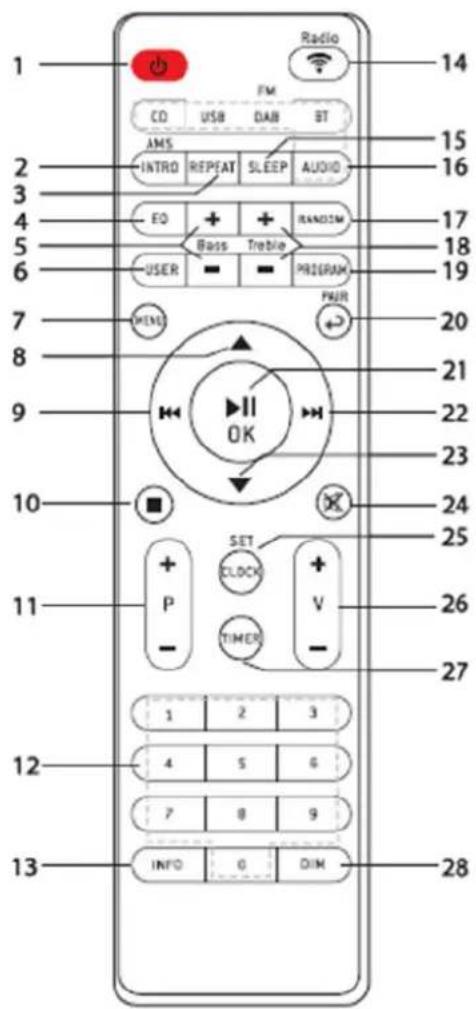
REMOTE CONTROL
1 POWER ON/OFF
2 INTRO/AMS
3 REPEAT
4 EQ
5 BASS +/-
6 USER (MY EQ)
7 MENU
8
9
10
11 P +/-
12 0-9
13 INFO
14 RADIO /
15 SLEEP
16 Source button
17 RANDOM
18 TREBLE +/-
19 PROGRAM
20 PAIR /
21 ▶ / OK
22
23 ▼
24
25 CLOCK / SET
26 V +/-
27 TIMER
28 DIM

- Press and slide the back cover to open the battery compartment of the remote control.
- Insert two AAA size batteries. Make sure the (+) and (-) ends of the batteries match the (+) and (-) ends indicated in the battery compartment.
- Close the battery compartment cover.
CONTENT OF DELIVERY
Main Unit
Instruction Manual
2 x AAA Batteries
Remote Control
Power Adaptor
Antenna
GETTING STARTED / SET UP
Connect the unit to a suitable power source using the power supply provided. After showing a starting screen, it will enter the last used listening mode. When the unit is started for the first time, the setup wizard will be launched automatically.
GET THE NETWORK ENVIRONMENT READY
Make sure you have setup the wireless network and you have the WEP, WPA or WPA2 security password to activate the connection.
You may also use the WPS (WiFi Protected Setup) function for easy pairing between the network device and ICD3030. Check if the light indicators on the network device are in appropriate status.
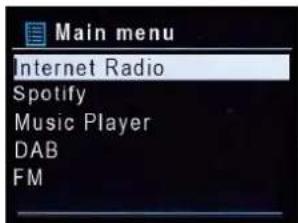
MAIN MENU
Under the main menu, you can select the following modes:
Internet Radio, Spotify, Media player (USB), DAB, FM, Bluetooth ^® , CD, AUX-In, Sleep and Alarm.
SYSTEM SETTINGS
At the beginning of the first installation or after making a factory reset, the product privacy policy will first appear on the display. To continue the installation, please confirm with the "NAVIGATE/OK" button.
Further information are available under www.frontiersmart.com/privacy
Now the system asks if you want to start the Setup Wizard. The Setup wizard guides you through the basic setup parameters for Time/Date and Network connection. To change any settings later, all setting functions are accessible from the Settings Menu.

SETUP WIZARD
1. Language
Select the menu language
2. Time/Date Display format
Select 12 or 24 as the time format.
3. Auto update
The time and date can be updated manually or automatically from DAB, FM or network.
Auto update works with data sent over DAB, FM or the Internet. The clock is only updated when it is in a corresponding mode, so it is suggested to select a mode you use regularly.
DAB and FM use time signals broadcast with radio transmissions. Network uses a time signal sent from the Internet radio portal when in any network connected mode.
4. Time zone/daylight
Set your time zone. If your country uses daylight saving and it is in effect, turn on the Daylight saving option. (only available when Auto update from Internet is selected).
5. Manual update
If you set No update, the wizard prompts you to set the time and date manually. The date and time are displayed as dd-mm-yyyy and hh:mm.
The active value appears as flashing. Adjust each value with the "NAVIGATE" knob. Once the value is set, press the knob to continue setting with next value.
6. Network
Keep Network connected
Select this option when the unit should the network connection in standby keep, when the function is confirmed, the unit wills faster connecting the internet and it is possible to switch on the unit with the "UNDOK" app.
Note: The standby power consumption is slightly increased with this function.
WLAN region
Select the WLAN region to obtain the optimal WLAN connectivity: Europe.
Scanning for the network
ICD3030 is compatible with all common network protocols and encryption methods. It searches for the available networks and list them out for you.
There will be hints for the type of network – if your network devices support WPS function, it will be [WPS] before the SSID (the name of the network device). Select the one you want to connect.
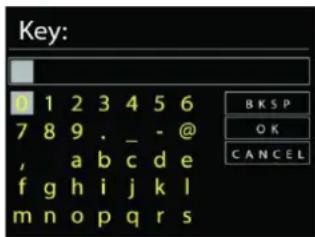
For the wireless connection, you will be asked for input the encryption in the next step. To enter the network's key, use the "NAVIGATE" knob to move the cursor through the characters and press "OK" to confirm. As each character is selected, the key is built up near the top of the display.
There are three options accessible by tuning the navigate reel back before the first characters – Backspace, OK and Cancel.
WPS encrypted network
WPS encrypted networks are identified by WPS at the start of the network name when the
ICD3030 searches the available AP. Use one of the following methods of connection: There is the shortcut WPS key on the unit.
Push button
ICD3030 prompts you to press the connect button on the router. It then scans for a ready Push Button Connect network and connects.
WPS Setup

Push WPS button at the other end
Press SELECT to continue
Pin
ICD3030 generates an 8-digit code number which you enter into the wireless router, access point, or an external registrar.
WPS Setup

Enter PIN 98467583 at the other end
Press SELECT to continue
Skip WPS
Enter key as for a standard encrypted network.
For more information on setting up a WPS encrypted network, see your WPS router's instructions.
Completion
ICD3030 attempts to connect to the selected network.
Network settings
Please wait Connecting .. \
It will show connected if the setup is successful. If connecting fails,
ICD3030 returns to a previous screen to try again.
Press "OK" to quit the setup wizard.
Setup wizard

Setup wizard completed
Press SELECT to exit
EQUALISER
Several preset EQ modes are available: Normal, Jazz, Rock, Classic, Pop and My EQ.
In the My EQ settings, you can create your own EQ with custom bass and treble settings.
Equaliser
Normal
Jazz
Rock
Classic
Pop
NETWORK
- Network wizard
Enter to search AP SSID, then input the WEP / WPA key or choose Push Button/Pin/Skip WPS to connect to the wireless network.
- PBC Wlan setup
Push Button Configuration, it is to connect the AP that supports WPS (Wi-Fi Protected Setup).
- View settings
View the information of current connected network: Active connection, MAC address, Wlan region, DHCP, SSID, IP address, Subnet mask, Gateway address, Primary DNS and Secondary DNS.
- WLAN region
Select the WLAN region to obtain the optimal WLAN connectivity: Europe or Australia.
- Manual settings
Choose wireless network connection and enable or disable DHCP (Dynamic Host Configuration Protocol).
- Network profile
ICD3030 remembers the last four wireless networks it has connected to, and automatically tries to connect to whichever one of them it can find. From here you can see the list of registered networks. You can delete unwanted networks by turning and pressing then choosing YES to confirm delete.
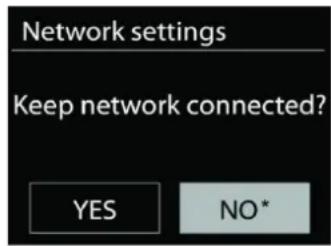
- Keep network connected
If you choose to keep network connected, the WiFi will not disconnect even you are in standby mode. Otherwise, the connection will only available in internet radio and music player modes. This option allows ICD3030 to be ready for DLNA streaming in any operating modes.
When Keep network connected is selected the standby power consumption is raised.
TIME/DATE
Set the time manually or automatically update, time format, time zone and daylight.
BRIGHTNESS
You may change the backlight of each environment (Normal or standby) to High, Medium High, Medium, Medium Low, Low or Off.
LANGUAGE
Change it as your preference.
SOFTWARE UPDATE
From time to time, software upgrades may be created with bug fixes and/or additional features. You can either check manually or set ICD3030 to check periodically automatically (this is the default). If newer available software is detected, you will be asked if you want to go ahead with an update. If you agree, the new software is then downloaded and installed. After a software upgrade, all user settings are maintained.
NOTE: Before starting a software upgrade, ensure that ICD3030 is plugged into a stable main power connection. Disconnecting power during an upgrade may permanently damage the unit.
INFO
View the firmware version and the radio ID.
INTERNET RADIO
ICD3030 can play thousands of radio stations and podcasts from around the world though a broadband Internet connection.
When you select Internet radio, ICD3030 directly contacts the Frontier Silicon Internet radio portal (which is supported by Airable) to get a list of stations.
The portal also enables multiple lists of favorite stations that you can personalize.
If you are already listening to an Internet radio station, you can press "BACK" button to quickly return to the last visited branch of the menu tree, rather than "MENU" to go to the first menu of Internet radio mode.
- Last listened
When Internet radio mode restarts, the last-listened station is selected. To select another recently used station, enter here to select the listed station. Most recent stations appear at the top of the list.
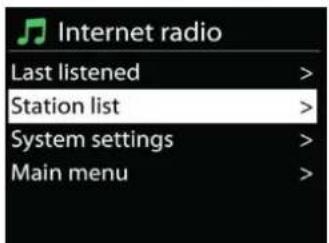
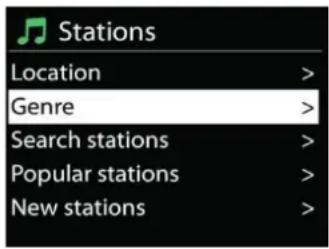
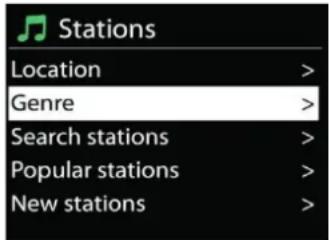
- Station list
Browse Internet broadcasts that organized into different categories, Location, Genre, Popular and New. You can also find the station with Search by keyword.
- Presets
To store an Internet radio preset, press and hold the "PROGRAM" key on Remote Control until the display shows the "Save preset" screen. Select one of the 40 presets to save the current station and press "OK" to confirm.
To select a preset station, press the "PROGRAM" on Remote Control, then select one of the listed preset stations and press "OK" to confirm. Or press 0 to 9 on the Remote Control to directly recall the presets.
You can store / recall up to 40 of your favourite stations to the memory. This will enable you to access your favourite stations by using the numbers of the Remote Control or the list of preset stations in UNDOK app.
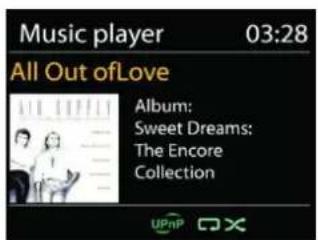
• Now playing information
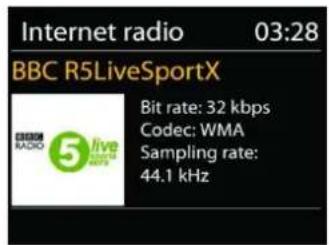
While the stream is playing, the screen shows its name and description. To view further information, press "INFO" button on the radio or Remote Control. Each time you press "INFO" button, another set of information is displayed, cycle through name/description, genre/location, reliability, codec/sampling rate, playback buffer and today's date.
SPOTIFY
The ICD3030 is compatible with Spotify Connect, so the ICD3030 device can act as a wireless speaker controlled by the Spotify App, which is available for iOS, Android smart devices and a desktop client for PCs.
Use your phone, tablet or computer as a remote control for Spotify. Go to spotify.com/connect to learn how.
The Spotify Software is subject to third party licenses found here: https://www.spotify.com/connect/third-party-licenses
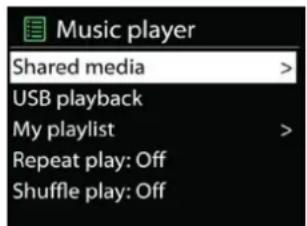
MEDIA PLAYER
Music player mode plays audio files in MP3, WMA, WAV, AAC, FLAC or ALAC format from a computer on the local network. If you are already playing a music file, you can press "BACK" button on the radio to quickly return to the last visited branch of the menu tree.
You can use “▶▶” button or “◀◀” button to play the previous or the next track.
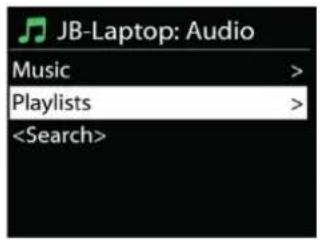
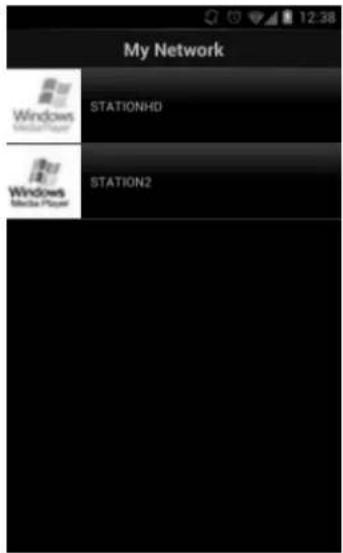
- Shared media
If you have set up shared media, you should see an entry consisting of
From this point on, the menus are generated from the shared media server. The first menu shows a list of media types, for example Music, Video, Pictures and Playlists. ICD3030 can only play music and playlists.
There is also a search function which finds tracks in a similar way to Internet radio search.
From Music, there are numerous ways of selecting tracks including Genre, Artist, Album, Composer and Rating. Once you have found a track you want to play, press the "NAVIGATE" knob.
A short press plays the track immediately.
- Prune Server
From time to time, it is maybe necessary to remove server displaying question marks in front of the server name from the server list. For example, if the device is moved to a new network or if a Wake-on-line is removed from your current network.
To perform this function: go to menu by using the Menu button > Prune servers > and select Yes.
- USB playback
From this point on, menus are generated from the folders on the USB device. Browse folders with the "NAVIGATE" knob and "BACK" button, the "▼ / ▲" buttons on the remote control or by using the UNDOK app. The display shows folder and file names (not necessarily track names).
Once you have found a track you want to play, press the "NAVIGATE" knob on the device or click on the song title in UNDOK app.
- Repeat / Shuffle
Allow you to repeat tracks or play them in random order.
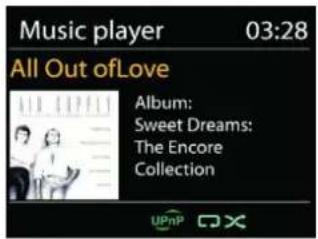
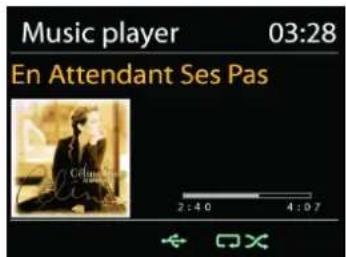
• Now playing information
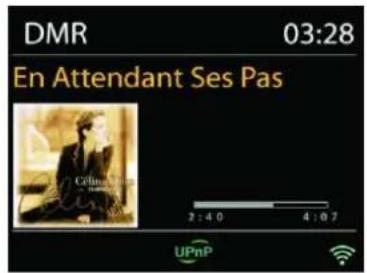
While a track is playing, the screen shows its track and artist (UPnP). There is also a progress bar with figures for elapsed and total track time. At the bottom of the screen, an icon indicates UPnP depending on the source. To view further information, press "INFO" button.
Each time you press "INFO" button, another set of information is displayed, cycling through the information: track/artist/progress bar/track times, album, codec/sampling rate, playback buffer and today's date.
• DMR (DLNA Streaming)
Shared music is a way of music streaming which you look for the music list and control playback from ICD3030. This topic will introduce another way to do the music
streaming which is not necessary to control playback on ICD3030.
You can share the music files from PC, Android mobile or tablet, and directly use your PC,
Android mobile, tablet or iPhone / iPad to control music playback on the ICD3030. It is simple called DLNA streaming.
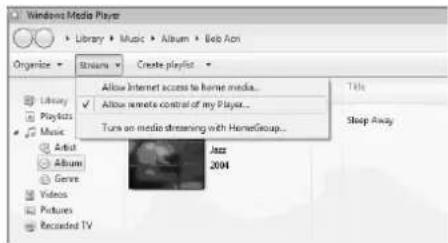
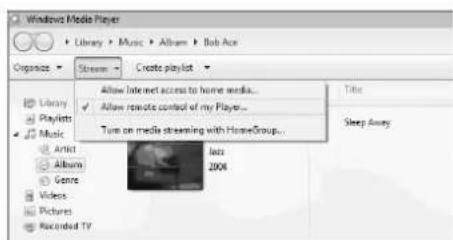
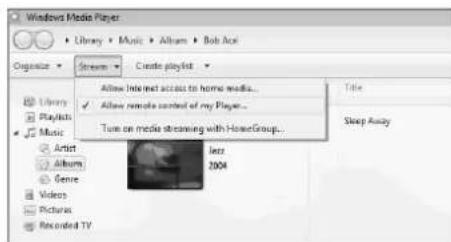
- Control on PC
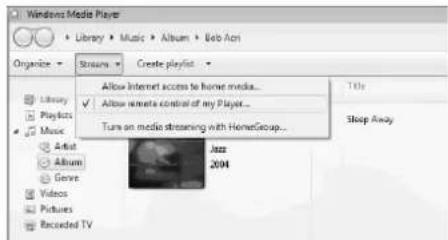
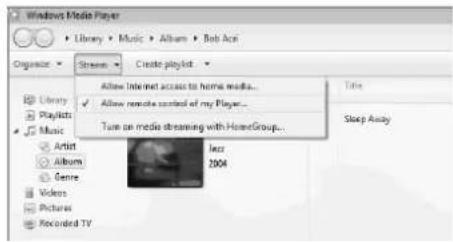
The PC system requirements for DLNA are Windows 7 or above, together with Windows Media Player 12. Setup as below:
Firstly, share the media on your PC to ICD3030.
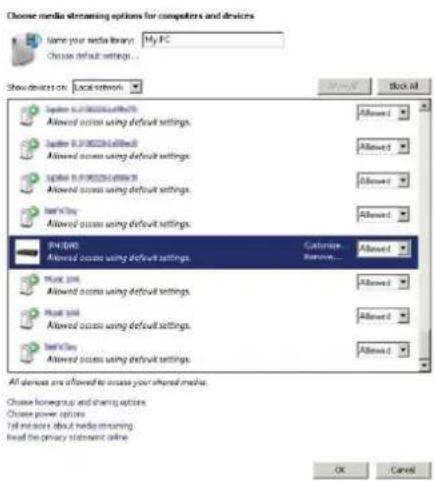
Control Panel > Network and Internet > Network and Sharing Center > Media streaming options
Open Windows Media Player to enable Allow remote control of my Player.
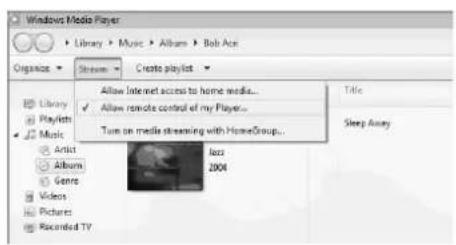
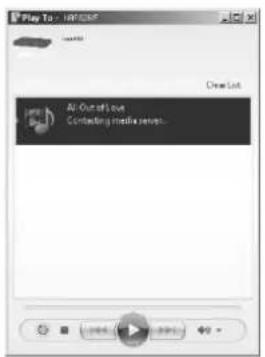
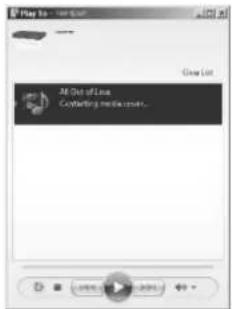
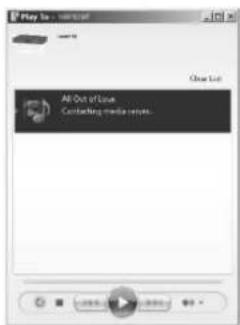
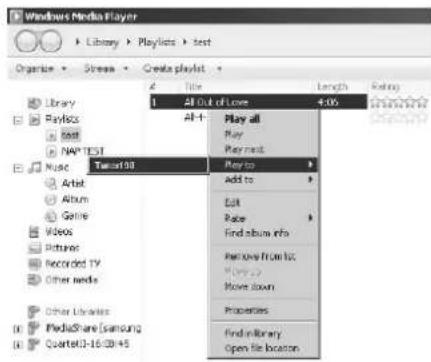
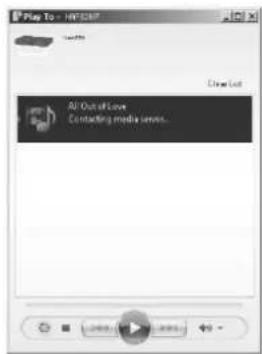
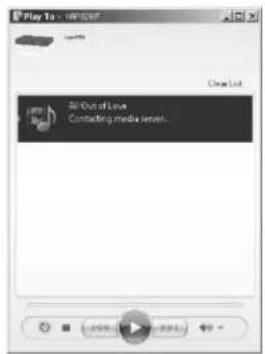
Right click any music in the library and choose Play to ICD3030. Then a box of music playback pops up for the streaming.
![Windows Media Player Library > Playlists > test Organize > Stress > Create playlist Library Playlists NAP TEST Music Artist Album Gohle Videos Pictures Recorded TV Other media Other Libraries MediaShare [Samsung] Quartet3.1-16:08:45 All out of Love All- Play all Play next Play to Add to Edit Race Find album info Remove from list Move down Properties Find library Open file location](/content/2026/03/573302/images/a43f116467ef547f6b2aaaff79a513d8091830d84f83de186eff2bda5f9a25d4.jpg)
Then a box of music playback pops up for the streaming.
• Control on Smartphone / Tablet
You may search (with keyword: DLNA) and install any free or commercial DLNA Apps from Google Play or Apple Store if you are using Android mobile, tablet or iPhone / iPad.
It is suggested to use iMediaShare on Android mobile, tablet or iPhone/iPad.
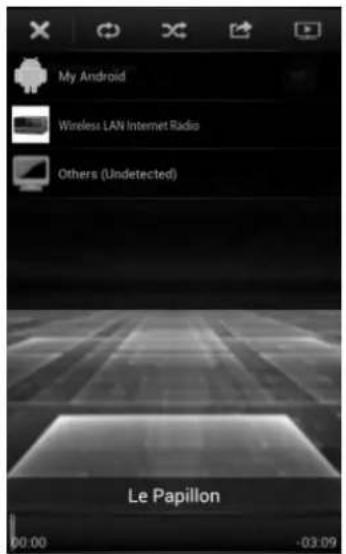
Procedures for playing shared music on the app are as follows:
- Select ICD3030 as the player.
- Select music server and choose the music.
NOTE: Some Apps may not support streaming music from iPhone/iPod but iPhone/iPod could still be used to control streaming music from other servers.
Some Apps may allow to play the music to multi players at the same time.
Some Apps can create a playlist if you choose several music.
Study the own instruction of the software or Apps you use to enjoy DLNA streaming if necessary.
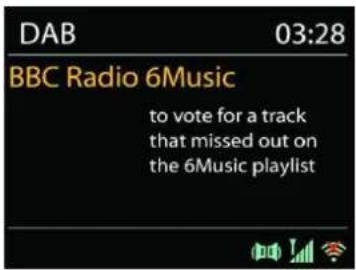
DAB
DAB mode receives DAB or DAB plus digital radio signal and displays information about the station, streaming audio and the program details.
- Scanning for stations
The first time you select DAB radio mode, or if the station list is empty, ICD3030 automatically performs a full scan to see what stations are available. You may also need to start a scan manually to update the list of stations for one of the following reasons:

• Available stations change from time to time.
- If reception was not good for the original scan, this may result in an empty or incomplete list of available stations.
- If you have poor reception of some stations (burbling), you may wish to list only stations with good signal strength.
To start a scan manually, choose Full scan. To scan only stations with good signal strength, select Local scan.
Once the scan is complete, the radio shows a list of available stations.
To remove stations that are listed but not unavailable, choose Prune invalid.
Press the "BACK" button to view a list of stations and press "OK" to select. Once selected, the station plays and the screen shows information about station, track or show as broadcast.
- Presets
To store an DAB radio preset, press and hold the "PROGRAM" on Remote Control until the display shows the "Save preset" screen. Select one of the 40 presets to save the current station and press "OK" to confirm.
To select a preset, press the "PROGRAM" on Remote Control, then select one of the listed preset stations and press "OK" to confirm. Or press 0 to 9 on the Remote Control to directly recall the presets.
Now playing information
While the stream is playing, the screen shows its name and DLS (Dynamic Label Segment) information broadcast by the station giving real-time information such as program name, track title and contact details. Stereo broadcasts are indicated with an icon at the bottom of the screen. To view further information, press "INFO" button.
Each time you press "INFO" button on the radio, another set of information is displayed, cycling through DLS text, program type, ensemble name/frequency, signal strength/error rate, bite rate/codec/channels and today's date.
SETTINGS
• Dynamic range compression (DRC)
If you are listening to music with a high dynamic range in a noisy environment, you may wish to compress the audio dynamic range. This makes quiet sounds louder, and loud sounds quieter. You can change DRC as off, low or high.
- Station order
You can choose the order of the DAB station list to be either Alphanumeric, Ensemble or Valid.
Ensemble lists groups of stations that are broadcast together on the same ensemble. Valid lists valid stations first, alphanumerically, then off-air stations.
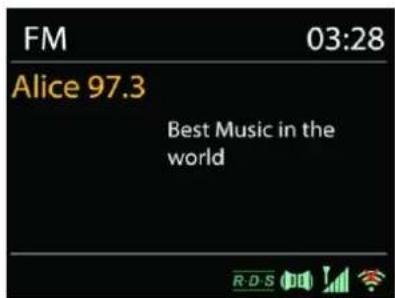
FM
FM radio mode receives analogue radio from the FM band and displays RDS (Radio Data System) information about the station and where broadcast.
To full scan, press "INTRO/AMS" remote key. The frequency display starts to run and scans the FM full band.
To manual scan, press and hold " nor " " button. The frequency display starts to run and scans the FM band and stops at the next station.
To fine tune press the "◀ or " " button on the Remote Control.
The unit search in 0.05 MHz steps.
- Preset
To store an FM radio preset, press and hold the "PROGRAM" button on Remote Control until the display shows the "Save preset" screen. Select one of the 40 presets to save the current station and press "OK" to confirm.
To select a preset, press the "PROGRAM" button on Remote Control, then select one of the listed preset stations and press "OK" to confirm. Or press 0 to 9 on the Remote Control to directly recall the presets.
• Now playing information
While the stream is playing, the screen shows its frequency, or if RDS signal is available, station name and any further RDS information such as program name, title and other details. Stereo broadcasts are indicated with an icon at the bottom of the screen. To view further information, press Info button on the radio.
Each time you press "INFO" button on the radio, another set of information is displayed, cycling through Radio text, program type, frequency and today's date.
SETTINGS
- Scan settings
Choose FM at first, it will go to a specific station playing. Then press "MENU" on the radio to get above table.
By default, FM scans stop at any available station. This may result in a poor signal-to-noise ratio (hiss) from weak stations. To change the scan settings to stop only at stations with good signal strength, select "Yes" after choosing Strong station only.
- Audio settings
All stereo stations are reproduced in stereo. For weak stations, this may result in a poor signal-to-noise ratio (hiss). To play weak stations in mono, select FM weak reception: Listen in mono only and then YES.
BLUETOOTH
When you select the Bluetooth mode, the device is entering to pairing and the BT icon at the bottom of the screen will flash.
Turn on your smartphone, tablet or other Bluetooth devices to search for the device.
The Bluetooth pairing name is "ICD3030".
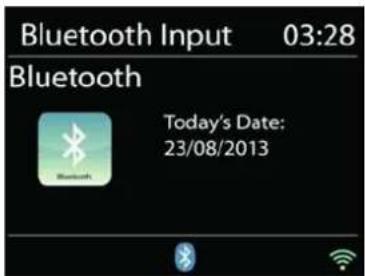
When pairing is successful, the Bluetooth indicator will light up and stop flashing.
To release BT pairing, turn off or unpair your smartphone, table or other Bluetooth devices.
Press “▶II” on the radio or Remote Control to start or pause the playback. You can press “◀◀” or “▶◀” on the radio or Remote Control to play the previous or next track.
AUX IN
Connecting DVD player / Set-Top Box / TV outputs to analogue inputs from the sound board.
Use a RCA audio cable to connect the DVD player/TV outputs with the AUX (L/R) input socket from the sound board.
CD MODE
Notice!
Improper operation can result in material damages!
Do not insert any recording media that deviate from the standard CD format (eg: mini-discs) into the CD player. These may not be played and ejected correctly. Insert only one disc at a time into the CD player.
- Press → button on the unit and press “▶▶” till “CD” displayed, then press “OK” on the knob or press the “CD” button on remote control to choose CD.
-
Put a disc (with printing side facing up) inside. The display will say "Loading" and the disc functions will not work while the disc is loading. After Reading the display shows the following information in CD mode:
-
CD mode
- Time
- Elapsed playback time in minutes
- Track number
- Playback status (playing/pause)
The Playback will begin automatically once the table of contents is read. The display will show "No Disc" when the unit is set to CD mode and there is no CD inside.
- To pause/resume playback of the CD, press the " " button
- To switch to the next track, press the " " button once
- To fast forward through a track, press and hold the “▶▶” button.
- To switch to the previous track, press the “” button twice
- To fast backward through a track, press and hold "◀◀" button.
- To stop CD playback, press the “” button on the remote control.
- To eject the disc press in stop mode the “” button on the unit.
CD Program
- Set the unit in Stop mode
- Press the "PROGRAM" button on the Remote Control. The display will show "T01 P01" and "T01" flash.
- Choose with “◀◀” or “▶◀” or 0 to 9 on the Remote Control, the track which should be programmed and confirm the track by pressing the “PROGRAM” button on the Remote Control. The display changes to “P02”.
- To choose more tracks do step 3 again.
- If all tracks are programmed press the “▶II” button on the unit or Remote Control to start the programmed playback.
Shuffle mode
Press the "RANDOM" button on the Remote Control. The display will show the Shuffle indicator.
Repeat one track
During playback press the "REPEAT" button on the Remote Control once to repeat playback of the song you are listening to.
Repeat all tracks
During playback press the “REPEAT” button on the Remote Control twice to repeat all songs from the CD. To cancel the Repeat mode press the “REPEAT” button on the Remote Control until all symbols in the display disappear.
SLEEP
To set the sleep timer, press "SLEEP" on the unit or Remote Control. Choose from Sleep OFF, 15mins, 30mins, 45mins or 60mins.
Once you select a sleep period, the system returns to the "Now playing" screen.
If you go under Main Menu to Sleep press "MENU" on the unit or Remote Control to return to the "Now playing" screen.
ALARM
There are two versatile wake-up alarms with snooze facility, and a sleep function to turn the system off after a set period. Each alarm can be set to start in a particular mode.
Press "TIMER" button on the Remote Control or select Alarm under Main menu to set or change an alarm.
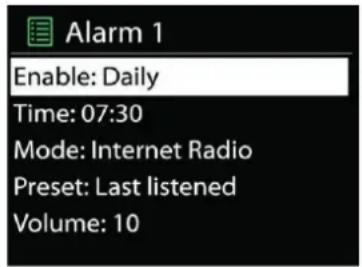
Select the alarm number (1 or 2) then configure the following parameters:
- Enable: on/off, Frequency: Daily, Once, Weekends or Weekdays,
- Time
• Mode: Buzzer, Internet Radio, CD, DAB or FM, - Preset: Last listened, 1 - 40,
• Volume: 0 - 32
To activate the new settings, scroll down and select Save.
The screen shows active alarms with an icon at the bottom left.
UNDOK
The ICD3030 supports remote control from Apple iPhone, iPad and Android using the UNDOK app. The apps are available in Apple's app store and Google's android play.
The UNDOK app allows you to:
- Create a group
- Rename a group
- Edit a group - add or remove one or more products
- Delete a group
• Control a group - choose operating mode and browse for content - Adjust volume for an entire group or for individual products within a group
• Control products which have not been assigned to any group - Control all the modes of the ICD3030, including Internet Radio, Media Player, USB playback, DAB, FM, Bluetooth, CD and AUX-In
- Adjust the volume level of current playback
- Setting EQ for various audio presets
- Setting Sleep timer
- Editing the displayed name of the radio.
HEADPHONE
To listen to music privately, use headphones with a 3.5 stereo jack plug and connect it to the headphones socket. The speakers will then be muted.

To prevent possible hearing damage, do not listen at high volume levels for long periods.
FACTORY RESET
A factory reset resets all user settings to default values, so that time and date, network configuration and presets are lost. However, the ICD3030 's current software version is maintained.
TROUBLESHOOTING
| Error | Remedy |
| The device does not switch on. | Check it the power adaptor is connected properly. |
| Switch automatically off | Due to ErP2 requirements and environmental protection, the unit automatically switches to standby mode when no music is played for more than 15 minutes. |
| No sound. | 1. Turn on the sound as it may be muted2. Increase the volume.3. Pull any connected headphone or speaker from the connector jack. |
| No network connection can be established. | 1. Check the LAN cable or the WLAN function.2. Try to set an IP address at the device.3. Activate the DHCP function on the router and make the connection again at the device.4. A firewall is activated on the network – set the respective program in such a way that access is possible.5. Reboot the router |
| WiFi connection cannot be established. | 1. Check the availability of WLAN network on the router.2. Place the device closer to the router.3. Make sure the password is correct. |
| Wired connection cannot be established. | 1. Check the availability of LAN network on the access point.2. Reconnect or even replace the LAN cable. |
| No station is found. | 1. Check the network as well as the access point and firewall.2. The station may not be available currently, try it again later or select another station.3. The link of the station is changed or the station no longer transmits – ask the provider for information.4. The link of manual added station is not correct, make sure it is correct and re-enter. |
| Hiss in FM mode | Check/move the FM antenna or move the radio |
| No stations available / burbling / intermittent in DAB mode. | 1. Move the radio.2. Rescan local stations only (high-strength).3. Check the local DAB coverage. |
| Alarm does not work. | 1. Switch on the alarm.2. Due to the volume setting, refer to the solutions of “No sound”.3. The source of alarm was set to be station but there is no network connection. Change the source of alarm or reconfigure the connection. |
| USB driver or MP3 player is not detected. | 1. Check if the USB driver or MP3 player is plugged properly.2. Some USB hard disks need external power supply, make sure it is connected to the power.3. Not all MP3 players can be read directly on the device – use an USB drive instead. |
| NetRemote does not show or connect to ICD3030 | 1. Reopen the App.2. If you have several streaming from several devices at the same time, it may cause crash, reboot ICD3030 and/or your device. |
| All other undetermined cases. | ICD3030 may process large amount of data after a period of operation, no matter in which mode, it will cause the system freeze or malfunction. Reboot ICD3030 if necessary. |
| The normal function of the product may be disturbed by strong Electro-MagneticInterference. If so, simply reset the product to resume normal operation by following the instruction manual. In case the function could not resume, please use the product in other location. | |
| The device may malfunction when used in areas with strong radio interference. The device will work properly again once there is no more interference. | |
| Under the environment with Conducted Immunity disturbance, the sample may malfunction. It will automatically recover to normal when the Conducted Immunity disturbance stopped. |
TECHNICAL SPECIFICATIONS
| Power supply | : Use only the supplied adapter |
| Power input | : 100-240V~50/60Hz |
| Power output | : DC 18V 12A |
| DAB+ range | : Band III 174 - 240 MHz |
| FM range | : 87.5 – 108MHz |
| Bluetooth® Version | : Version 2.1 + EDR |
| Connectivity | : WiFi Dual modes to support 2.4GHz and 5GHz WiFi system |
| Audio power output | : 2×15 W |
| Standby consumption with setting "Keep network in standby" | : 1.5W |
Technical changes and misprints reserved
Copyright by Woerlein GmbH, 90556 Cadolzburg, www.soundmaster.de
Duplication only with the permission of Woerlein GmbH


PROTECTION DE L'ENVIRONNEMENT

DÉMARRAGE DU SYSTÈME
LEVERINGSOMVANG....3
APPARAAT START
Setup wizard voltooid
Open Windows Media Player om Allow remote control of my Player in te schakelen.
All services are offered to access your shared media.
Change between 0 and shares in terms
Chassis server offers
fall now about media streaming
Read the privacy statement online


• Bediening via Smartphone/Tablet
13 Presa USB
14 Jack cuffie
15 Ingresso AUX
INIZIO DISPOSITIVO
All derivats are allowed to choose your shared media.
Change from group and share options
Chosen power options
Tall we must about media streaming
Read the privacy statement online


![Windows Media Player Library > Playlists > test Organize > Screen > Create playlist A Title Length Rating 1 All Out of Love 4.06 Play all Play Play next Play to Add to Edit Rate Find album info Remove from list Playlist Move down Properties Find in library Open file location Library Playlists test NAP TEST Music Tune193 Artet Album Genre Videos Returns Recorded TV Other media Other Libraries MediaShare [Samsung] Quartells-16:00:45](/content/2026/03/573302/images/77049a460c331ca3ce59c05c0951984f915804764227444b131d7a45eb27754c.jpg)
• Controllo su Smartphone/Tablet
AJUSTES DEL SISTEMA
Push WPS button at the other end
Press SELECT to continue
Código pin
Enter PIN 98467583 at the other end
Press SELECT to continue
Omitir una red WPS
Please wait Connecting .. \
Setup wizard completed
Press SELECT to exit
HORA/FECHA
- Servidor Prune
Control Panel > Network and Internet > Network and Sharing Center > Media streaming options
Abra Windows Media Player y active Allow remote control of my Player.
All devices are allowed to access your shared media. Choose homegroup and sharing options Choose power options Tell memory about media streaming Read the privacy statement online

13 USB-terminal
14 Stik til hovedtelefoner
15 AUX IN-terminal
16 Antennestik
17 Jævnstrømsinput
FJERNBETJENING
1 Knappen Standby/tænd
2 INTRO/AMS
3 REPEAT
4 EQ
5 BASS +/-
6 USER (MY EQ)
7 MENU
8
9
10
11 P +/-
12 0-9 numeriske knapper
13 INFO
14 RADIO /
15 SLEEP
16 Funktionsknapper
17 RANDOM
18 TREBLE +/-
19 PROGRAM
20 PAIR / ←(BACK)
21 / OK
22
23 ▼
24
25 CLOCK / SET
26 V +/-
27 TIMER
28 DIM

BETJENING DIN FJERNKONTROL
SYSTEMINDSTILLINGER
OPSÄETNINGSGUIDE
Sprog 1.
Vælg menusproget
Tids-/datoformat 2.
Pin
Enter PIN 98467583 at the other end
Press SELECT to continue
Brug ikke WPS
Please wait Connecting .. \
Setup wizard completed
Press SELECT to exit
EQUALISER
TID/DATO
- Stationsliste
- Faste stationer
Then a box of music playback pops up for the streaming.
DAB
Mode: Internet Radio
Preset: Last listened
Volume: 10
LEVERANSEN INNEHOLDER ....3
SLIK KOMMER DU I GANG / KONFIGURERING......4
GJ∅RE KLAR NETTVERKSMILJ∅ET 4
HOVEDMENY 4
SYSTEMINNSTILLINGER ....4
OPPSTARTSVEIVISER 4
EQUALISER....6
NETTVERK....7
TID/DATO....7
LYSSTYRKE....7
SPRÅK....7
PROGRAMVAREOPDATERING....8
INFO....8
INTERNETTRADIO......8
SPOTIFY 9
MEDIEAVSPILLER....9
DAB....13
FM 14
BLUETOOTH....16
AUX-INNGANG....16
CD-MODUS....16
SOVE-FUNKSJON....17
ALARM....18
UNDOK 18
HODETELEFONER ....19
NULLSTILLING....19
FEILS∅KING....19
TEKNISKE SPESIFIKASJONER....21
PLASSERING AV KONTROLLENE
SETT FORFRA
1 Skjerm 7 Menu
2 Fjernkontrollsensor 8 PAIR/BACK
3 ⏻ På/Av, VOL+/VOL- 9
4 CD-skuff 10
5 NAVIGATE, OK, S∅KE+/S∅KE- 11 ▶II
6 Hovedmeny (Kilde) 12
SETT BAKFRA
13 USB-kontakt 16 Antennekontakt
14 Kontaktinngang for hodetelefoner 17 DC IN
15 Audio-inngang
FJERNKONTROLL
1 ⏻ STR∅M PÅ/AV
2 INTRO/AMS
3 REPEAT
4 EQ
5 BASS +/-
6 USER (MY EQ)
7 MENU
8
9
10
11 P +/-
12 0-9
13 INFO
14 RADIO/
15 SLEEP
16 Kildeknapp
17 RANDOM
18 TREBLE +/-
19 PROGRAM
20 PAIR/
21 ▶/OK
22
23 ▼
24
25 CLOCK/SET
26 V +/-
27 TIMER
28 DIM
KLARGJ∅RE FJERNKONTROLLEN
SYSTEMINNSTILLINGER
OPPSTARTSVEIVISER
1. Språk
Velg menyspråket.
Push WPS button at the other end
Press SELECT to continue
Pin
ICD3030 genererer et 8-sifret kodenummer som du legger inn i den trådløse ruteren, aksesspunktet eller en ekstern registrator.
WPS Setup

Enter PIN 98467583 at the other end
Press SELECT to continue
Hopp over WPS
Please wait Connecting..\
Setup wizard completed
Press SELECT to exit
TID/DATO
- Kanalliste
- Delte medier
Control Panel > Network and Internet > Network and Sharing Center > Media streaming options
Åpne Windows Media Player og aktiver Allow remote control of my Player.

- Kontroller på smarttelefon/nettbrett
• Dynamic range compression (DRC)
Velg alarmnummer (1 eller 2) og konfigurer følgende parametre:
*) markerade Cd = kadmium, Hg = kvicksilver, Pb = bly
VARNING - OSYNLIG LASERSTRÅLNING NÄR DU ÖPPNAR LOCKET ELLER TRYCKER PÅ SÄKERHETSSPÄRREN. UNDVIK EXPONERING FÖR LASERSTRÅLEN.

INNEHÅLLSFÖRTECKNING
REGLAGENS PLACERING ....2
FJÄRRKONTROLL 3
HÄMTA STARTADE/KONFIGURATION ....4
FÖRBERED NÄTVERKSMILJÖN......4
HUVUDMENY 4
INSTALLATIONSGUIDE 4
EQUALIZER 6
NÄTVERK....6
TID/DATUM 7
BAKGRUNDSLJUS....7
SPRÅK 7
PROGRAMUPPDATERING 7
INFO 7
INTERNETRADIO....8
SPOTIFY....9
MEDIESPELARE....9
DAB 12
FM....13
BLUETOOTH^ 14
AUX-IN....14
CD....15
INSOMNINGSFUNKTION 16
LARM....16
UNDOK....16
HÖRLUR....17
FABRIKSÄTERSTÄLLNING....17
FELSÖKNING 17
TEKNISKA SPECIFIKATIONER 18
REGLAGENS PLACERING
BILD PÅ FRAMSIDA
SYSTEMINSTÄLLNINGAR
INSTALLATIONSGUIDE
1. Språk
Välj menyspråket
2. Tid/datumvisningsformat
Pin
Enter PIN 98467583 at the other end
Press SELECT to continue
Skippa WPS
EQUALIZER
https://www.spotify.com/connect/third-party-licenses
MEDIESPELARE
![Windows Media Player Library > Playlist > test Organize > Stream > Create playlist Title Length Rating 1 All out of Love 4.0% Library Reprint Text NAP TEST Music Artist Album Genre Videos Returns Recorded TV Other media Other Libraries MediaShare [salesung] Quarter2L-Lo36-RS All-4 Play all Play next Play to Add to Edit Runo Find album info... Remove from list Move down Properties Find in library Open file location](/content/2026/03/573302/images/a5063dceb499afe01ba418595e8ac6e022a1bcd02154824d7d333093461de077.jpg)
- Kontroll på Smartphone/Tablet
TEKNISET TIEDOT....21
OHJAINTEN SIJAINNIT
KUVA EDESTÄ
JÄRJESTELMÄASETUKSET
Push WPS button at the other end
Press SELECT to continue
PIN
Enter PIN 98467583 at the other end
Press SELECT to continue
Ohita WPS
Please wait Connecting..\
Setup wizard completed
Press SELECT to exit
TAAJUUSKORJAIN
KELLONAIKA/PÄIVÄMÄÄRÄ
- Asemaluettelo
| Stations | |
| Location | > |
| Genre | > |
| Search stations | > |
| Popular stations | > |
| New stations | > |
- Esiasetukset
| Music player | |
| Shared media | > |
| USB playback | |
| My playlist | > |
| Repeat play: Off | |
| Shuffle play: Off | |
Control Panel > Network and Internet > Network and Sharing Center > Media streaming options
Avaa Windows Media Player ja salli Allow remote control of my Player.
• Asemien hakeminen
- Esiasetus
D 90556 Cadolzburg, Germany
Tel: +49 9103 71 67 0
Fax: +49 9103 71 67 12
Hereby, Wörlein GmbH declares that this device is in compliance with the essenal requirements and other relevant provisions of Direcve 2014/53/EU.
A copy of the declaraon of conformity can be obtained from the above address.
- BEDIENELEMENTE
- FRONTANSICHT
- TABLE OF CONTENT
- LOCATIONS OF CONTROLS
- FRONT VIEW
- BACK VIEW
- REMOTE CONTROL
- CONTENT OF DELIVERY
- GETTING STARTED / SET UP
- GET THE NETWORK ENVIRONMENT READY
- MAIN MENU
- SYSTEM SETTINGS
- SETUP WIZARD
- Language
- Time/Date Display format
- Auto update
- Time zone/daylight
- Manual update
- Network
- Keep Network connected
- WLAN region
- Scanning for the network
- WPS encrypted network
- Push button
- Pin
- Skip WPS
- Completion
- EQUALISER
- NETWORK
- - Network wizard
- - PBC Wlan setup
- - View settings
- - WLAN region
- - Manual settings
- - Network profile
- - Keep network connected
- TIME/DATE
- BRIGHTNESS
- LANGUAGE
- SOFTWARE UPDATE
- INFO
- INTERNET RADIO
- - Last listened
- - Station list
- - Presets
- • Now playing information
- SPOTIFY
- MEDIA PLAYER
- - Shared media
- - Prune Server
- - USB playback
- - Repeat / Shuffle
- • DMR (DLNA Streaming)
- - Control on PC
- • Control on Smartphone / Tablet
- DAB
- - Scanning for stations
- Now playing information
- SETTINGS
- • Dynamic range compression (DRC)
- - Station order
- FM
- - Preset
- - Scan settings
- - Audio settings
- BLUETOOTH
- AUX IN
- CD MODE
- Notice!
- CD Program
- Shuffle mode
- Repeat one track
- Repeat all tracks
- SLEEP
- ALARM
- UNDOK
- HEADPHONE
- FACTORY RESET
- TECHNICAL SPECIFICATIONS
- PROTECTION DE L'ENVIRONNEMENT
- DÉMARRAGE DU SYSTÈME
- APPARAAT START
- • Bediening via Smartphone/Tablet
- INIZIO DISPOSITIVO
- • Controllo su Smartphone/Tablet
- AJUSTES DEL SISTEMA
- Código pin
- Omitir una red WPS
- HORA/FECHA
- - Servidor Prune
- FJERNBETJENING
- BETJENING DIN FJERNKONTROL
- SYSTEMINDSTILLINGER
- OPSÄETNINGSGUIDE
- Sprog 1.
- Tids-/datoformat 2.
- Brug ikke WPS
- TID/DATO
- - Stationsliste
- - Faste stationer
- PLASSERING AV KONTROLLENE
- SETT FORFRA
- SETT BAKFRA
- FJERNKONTROLL
- KLARGJ∅RE FJERNKONTROLLEN
- SYSTEMINNSTILLINGER
- OPPSTARTSVEIVISER
- Språk
- WPS Setup
- Hopp over WPS
- - Kanalliste
- - Delte medier
- - Kontroller på smarttelefon/nettbrett
- VARNING - OSYNLIG LASERSTRÅLNING NÄR DU ÖPPNAR LOCKET ELLER TRYCKER PÅ SÄKERHETSSPÄRREN. UNDVIK EXPONERING FÖR LASERSTRÅLEN.
- INNEHÅLLSFÖRTECKNING
- REGLAGENS PLACERING
- BILD PÅ FRAMSIDA
- SYSTEMINSTÄLLNINGAR
- INSTALLATIONSGUIDE
- Tid/datumvisningsformat
- Skippa WPS
- EQUALIZER
- MEDIESPELARE
- - Kontroll på Smartphone/Tablet
- OHJAINTEN SIJAINNIT
- KUVA EDESTÄ
- JÄRJESTELMÄASETUKSET
- Ohita WPS
- TAAJUUSKORJAIN
- KELLONAIKA/PÄIVÄMÄÄRÄ
- - Asemaluettelo
- - Esiasetukset
- • Asemien hakeminen
- - Esiasetus
Brand : Soundmaster
Model : ICD3030
Category : Hi-fi system