
BHFEV36B2DW - Hand vacuum cleaner BLACK & DECKER - Free user manual and instructions
Find the device manual for free BHFEV36B2DW BLACK & DECKER in PDF.



| Product Type | 4-in-1 Cordless Hand Vacuum |
| Brand | Black & Decker |
| Model | BHFEV36B2DW |
| Weight | 3.58 kg |
| Power Source | Lithium-Ion 36V, 90Wh Battery |
| Charger | SSC-360040 (mains voltage, double insulation) |
| Charging Time | Approximately 5 hours |
| Run Time | Not specified in the manual, estimated ~20-30 minutes |
| Speeds | 3 variable speeds (variable power switch) |
| Motorized Brush | Beater bar with activation button (2a) |
| Lighting | LED on the floor head, turns on with the beater bar |
| Dustbin Capacity | Removable dustbin, approximately 0.5 L (estimated) |
| Filtration | Washable filter + pre-filter, mechanical filter agitator |
| Included Accessories | 2-in-1 accessory, crevice tool, pet hair brush, large dusting brush |
| Tube Length | Removable extension tube (approximately 60 cm estimated) |
| Use | Floor, furniture, crevices, car (4 configurations) |
| Floor Type | Hard floors, carpets (beater bar) |
| Storage | Wall storage mount with hook (included in this model) |
| Maintenance | Filters washable with soapy water, 24h drying, replacement every 6 to 9 months |
| Safety | Double insulation, brush overload protection, indoor use only |
| Warranty | 24 months |
Frequently Asked Questions - BHFEV36B2DW BLACK & DECKER
User questions about BHFEV36B2DW BLACK & DECKER
0 question about this device. Answer the ones you know or ask your own.
Ask a new question about this device
Download the instructions for your Hand vacuum cleaner in PDF format for free! Find your manual BHFEV36B2DW - BLACK & DECKER and take your electronic device back in hand. On this page are published all the documents necessary for the use of your device. BHFEV36B2DW by BLACK & DECKER.
USER MANUAL BHFEV36B2DW BLACK & DECKER
natural_image
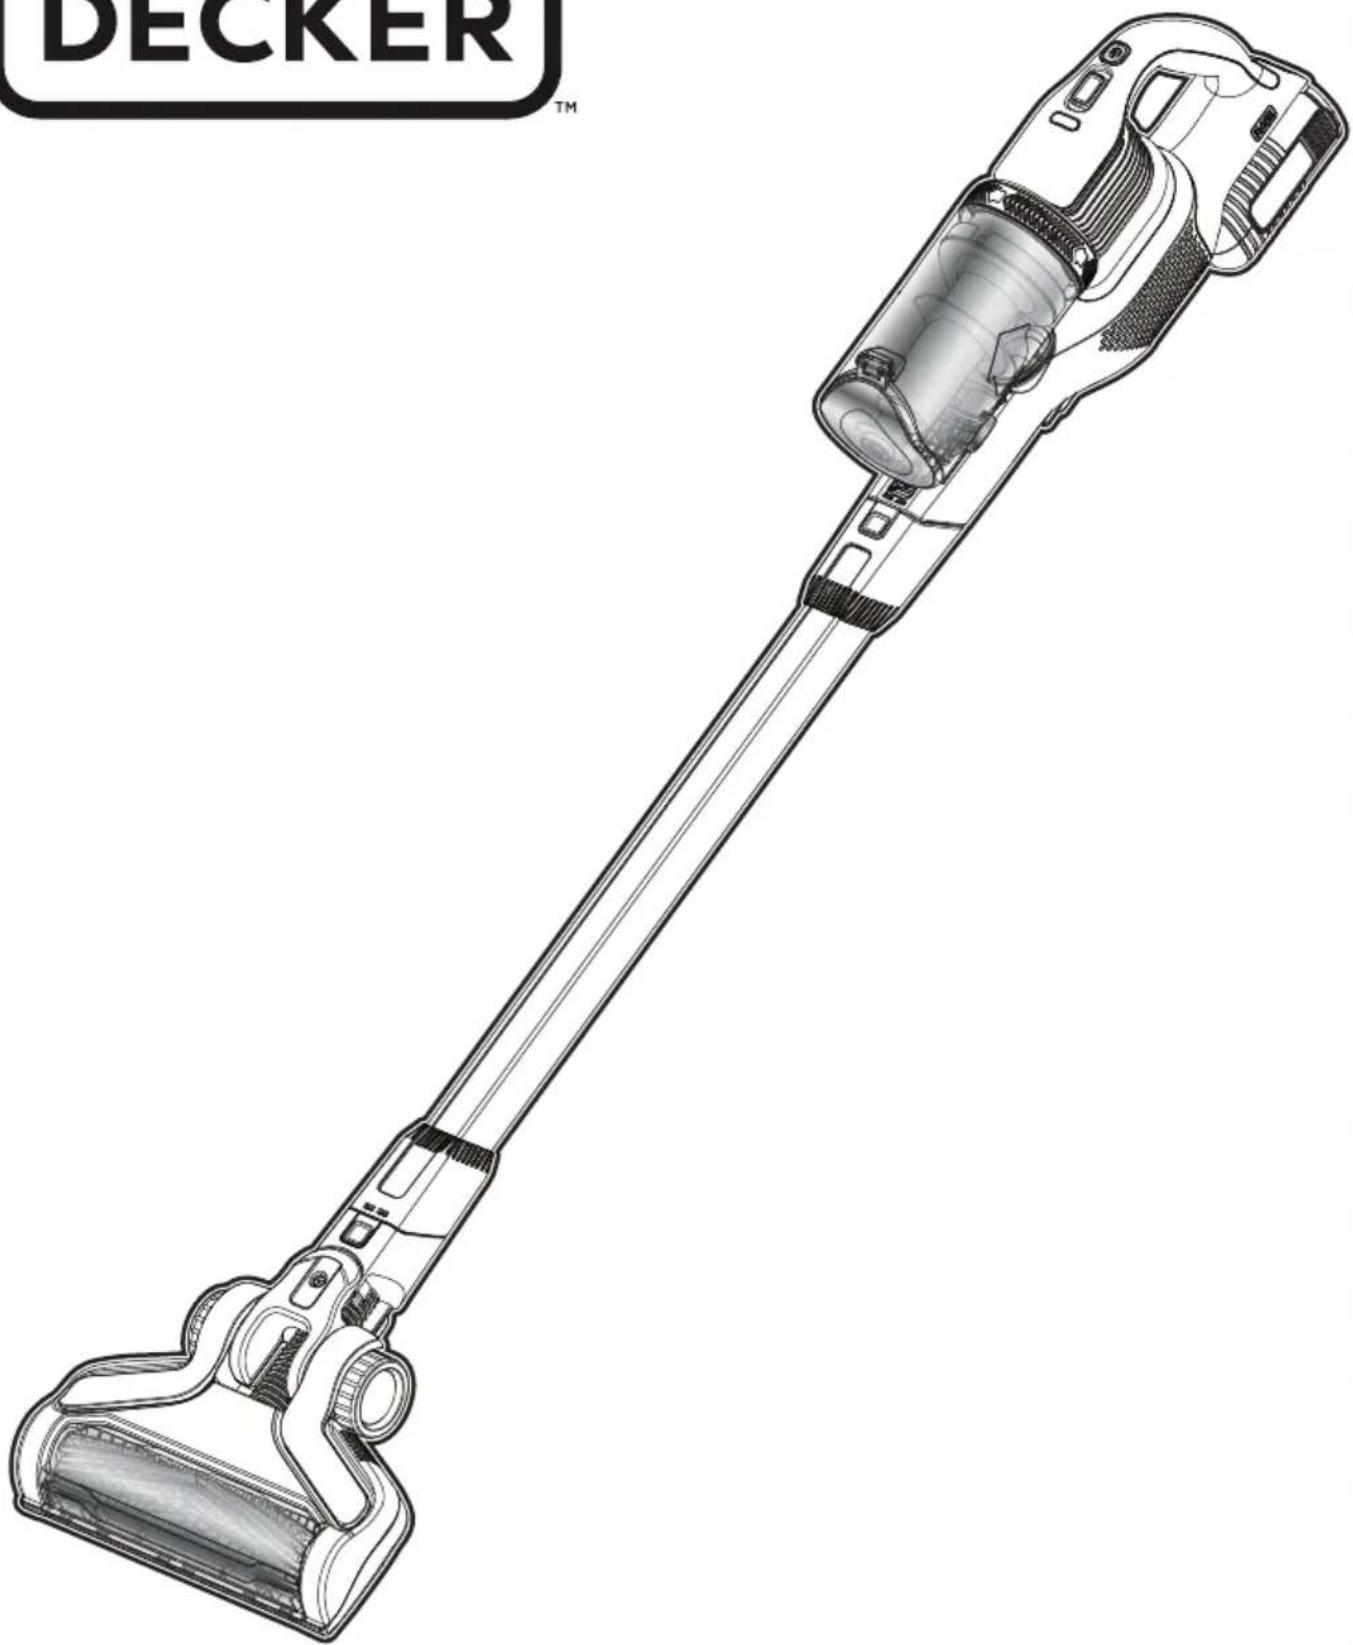
Line drawing of a DECKER-branded vacuum cleaner with transparent internal structure (no text or symbols on the device itself)www.blackanddecker.eu
BHFEV36B2D BHFEV36B2DW


Failure to follow the warnings and instructions listed below may result in electric shock, fire and/or serious injury.
- The intended use is described in this manual. The use of any accessory or attachment or the performance of any operation with this appliance other than those recommended in this instruction manual may present a risk of personal injury.
- Retain this manual for future reference.
Using your appliance
- Do not use the appliance to pick up liquids or any materials that could catch fire.
- Do not use the appliance near water.
- Do not immerse the appliance in water.
- Never pull the charger lead to disconnect the charger from the socket. Keep the charger lead away from heat, oil and sharp edges.
Intended use
Your BLACK+DECKER BHFEV36B2D, BHFEV36B2DW 4 in 1 cordless vacuum cleaners have been designed for vacuum cleaning purposes. These appliances are intended for household use only.

Read all of this manual carefully before operating the appliance.
Safety instructions

Warning! Read all safety warnings and all instructions.
- This appliance can be used by children aged from 8 years and above and persons with reduced physical, sensory or mental capabilities or lack of experience and knowledge if they have been given supervision or instruction concerning use of the appliance in a safe way and understand the hazards involved. Children shall not play with the appliance.
Cleaning and user maintenance shall not be made by children without supervision.
Inspection and repairs
Before use, check the appliance for damaged or defective parts. Check for breakage of parts, damage to switches and any other conditions that may affect its operation.
- Do not use the appliance if any part is damaged or defective.
- Have any damaged or defective parts repaired or replaced by an authorized repair agent.
- Regularly check the charger lead for damage. Replace the charger if the lead is damaged or defective.
- Never attempt to remove or replace any parts other than those specified in this manual.
Additional safety instructions
After use
- Unplug the charger before cleaning the charger or charging base.
- When not in use, the appliance should be stored in a dry place.
- Children should not have access to stored appliances.
Residual risks
Additional residual risks may arise when using the tool which may not be included in the enclosed safety warnings. These risks can arise from misuse, prolonged use etc.
Even with the application of the relevant safety regulations and the implementation of safety devices, certain residual risks can not be avoided. These include:
- Injuries caused by touching any rotating/moving parts.
- Injuries caused when changing any parts, blades or accessories.
- Injuries caused by prolonged use of a tool. When using any tool for prolonged periods ensure you take regular breaks.
◆ Impairment of hearing. - Health hazards caused by breathing dust developed when using your tool (example:- working with wood, especially oak, beech and MDF.)
Chargers
Your charger has been designed for a specific voltage. Always check that the mains voltage corresponds to the voltage on the rating plate.
Warning! Never attempt to replace the charger unit with a regular mains plug.
- Use your BLACK+DECKER charger only to charge the battery in the appliance with which it was supplied.
Other batteries could burst, causing personal injury and damage.
- Never attempt to charge non-rechargeable batteries.
- If the supply cord is damaged, it must be replaced by the manufacturer or an authorised BLACK+DECKER Service Centre in order to avoid a hazard.
- Do not expose the charger to water.
- Do not open the charger.
- Do not probe the charger.
- The appliance/battery must be placed in a well ventilated area when charging.
Electrical safety
Symbols on the charger

Read all of this manual carefully before using the appliance.

his tool is double insulated; therefore no earth wire is required. Always check that the power supply corresponds to the voltage on the rating plate.

The charging base is intended for indoor use only.
Labels on appliance
The following symbols appear on this appliance along with the date code

Read all of this manual carefully before using the appliance

90616337-**
SSC-360040**
BHFEV36B2D use charger 90616337-**
BHFEV36B2DW use charger
SSC-360040**
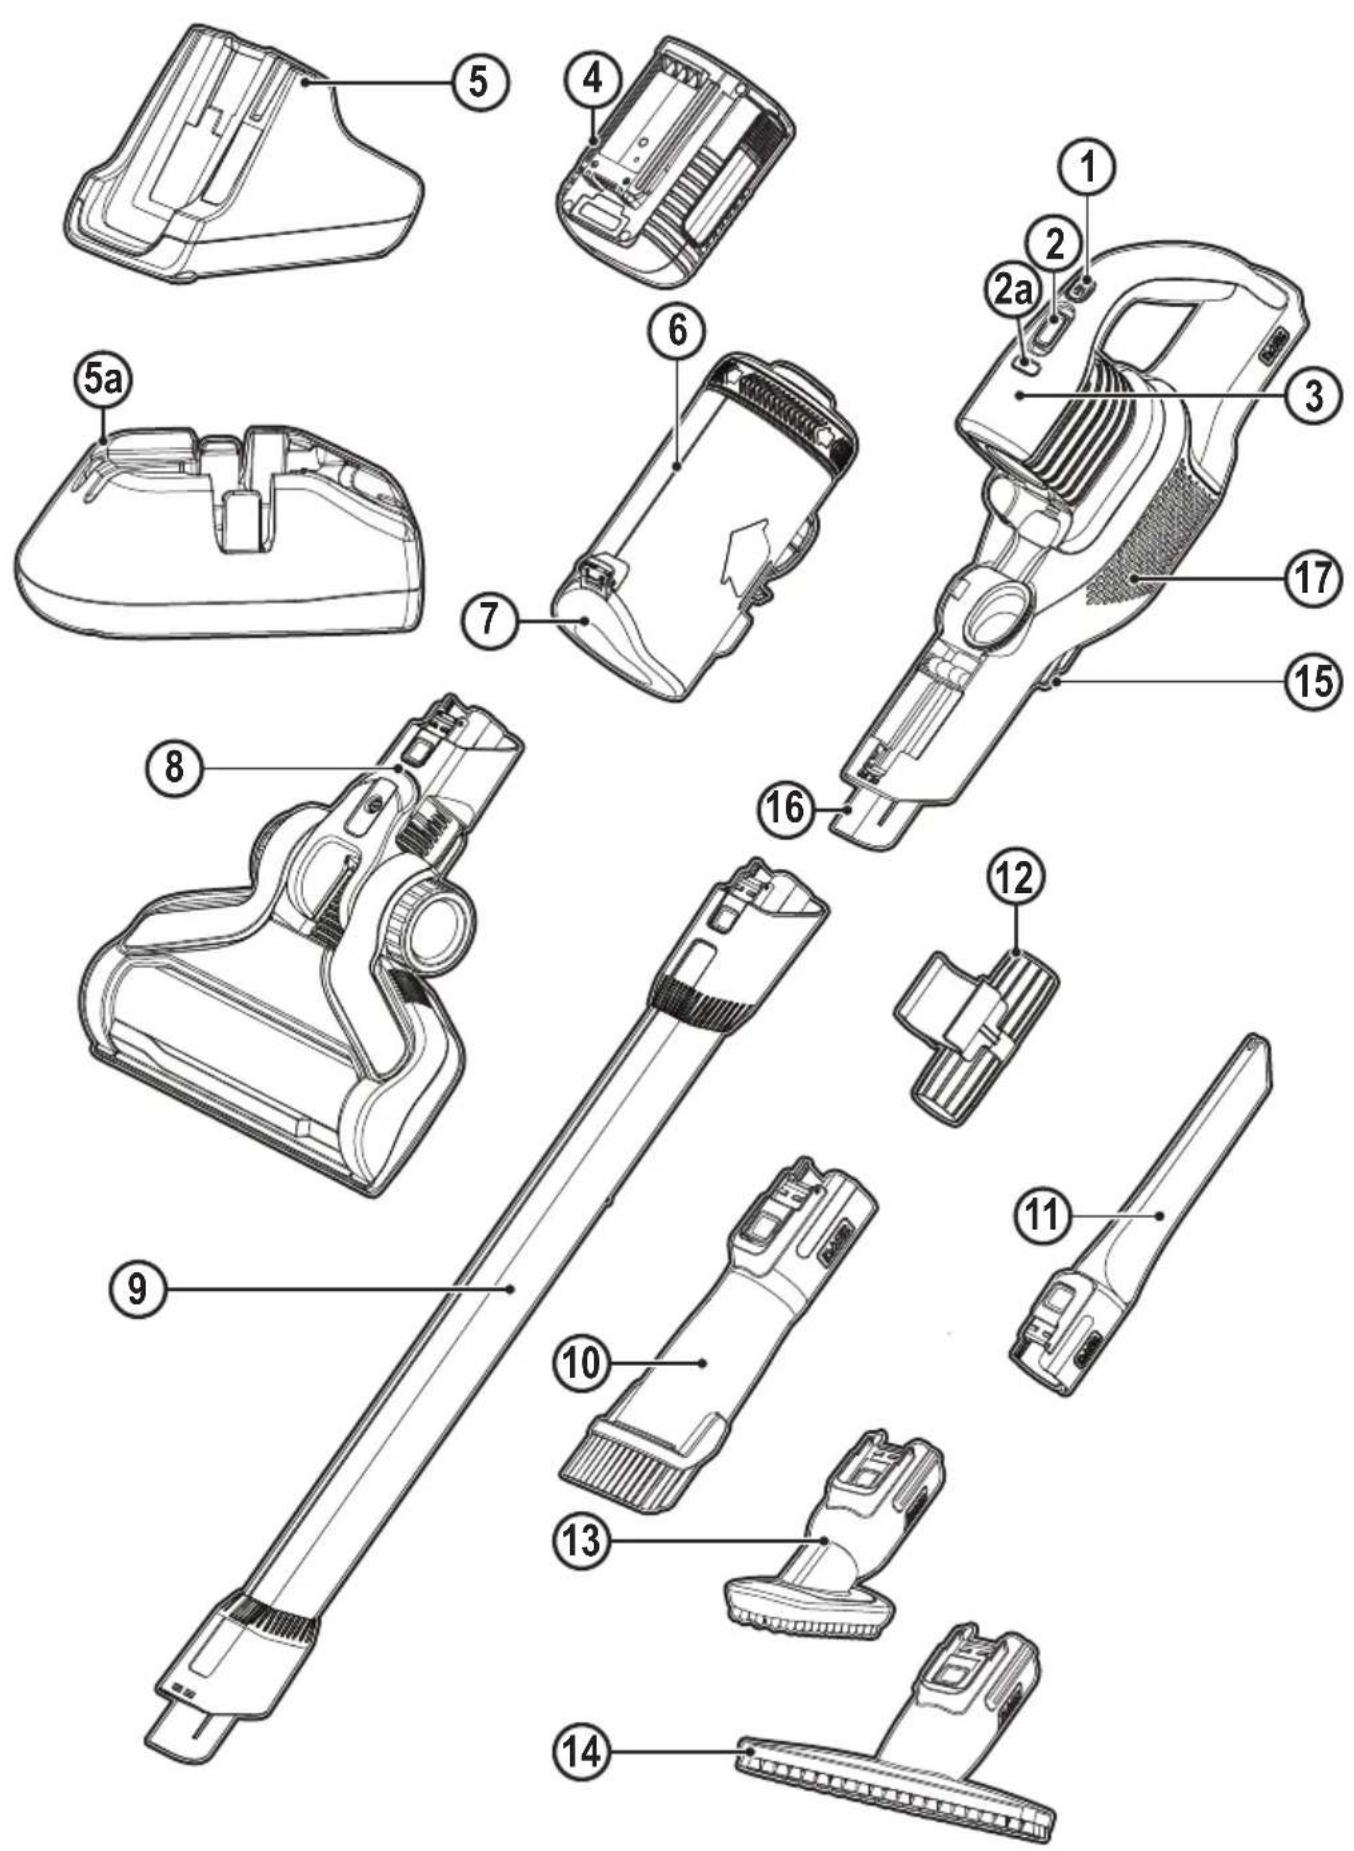
Features
This tool includes some or all of the following features.
- On/Off button
2.3 speed power switch
2a. Beater bar activation button
-
State of charge indicator
-
36V Battery
-
36V charger
5a. Wall storage bracket (available for BHFEV36B2DW)
- Lift away dust canister with filter agitator
- Dust canister door
- Floor head
- Extension tube
- 2 in 1 Accessory tool
- Crevice tool (available to order through service department)
- Accessory storage clip
- Pet hair tool (available to order through your service department)
- Wide mouth dust brush
- Hang hook for use with wall storage bracket (5a)
Charging a Battery
BLACK+DECKER chargers are designed to charge BLACK+DECKER battery packs.
Note: To ensure maximum performance and life of lithium ion battery packs:
◆ Charge the battery pack fully before first use.
◆ Recharge discharged batteries as soon as possible after every use.
◆ Do not discharge batteries fully.
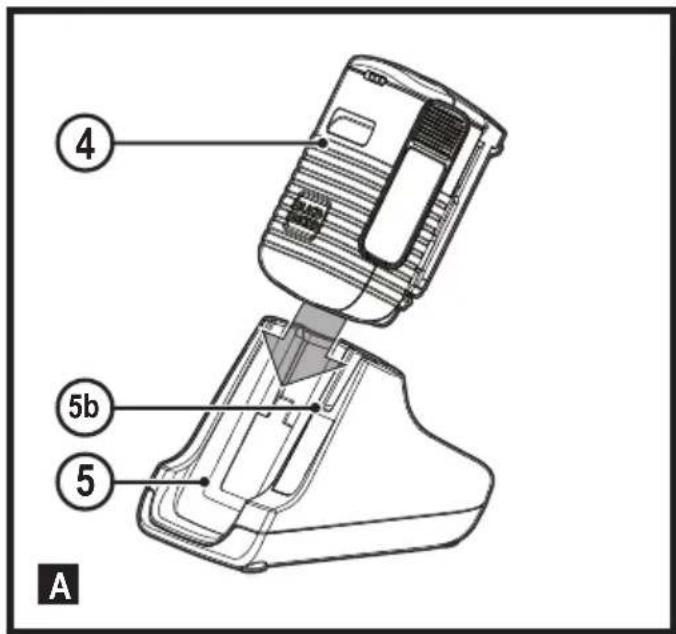
Charging (Fig. A)
◆ Plug the charger (5) into an appropriate outlet before inserting the battery pack (4).
◆ Insert the battery pack into the desk charger (5).
- When using the desk charger a green LED (5b) will flash indicating that the battery is being charged.
- The completion of charge is indicated by the green LED (5b) remaining on continuously. The pack is fully charged and may be used at this time or left on the charger.
Note: The battery includes a state of charge indicator to quickly determine the extent of battery life. By pressing the state of charge button (4a) you can easily view the charge remaining in the battery.
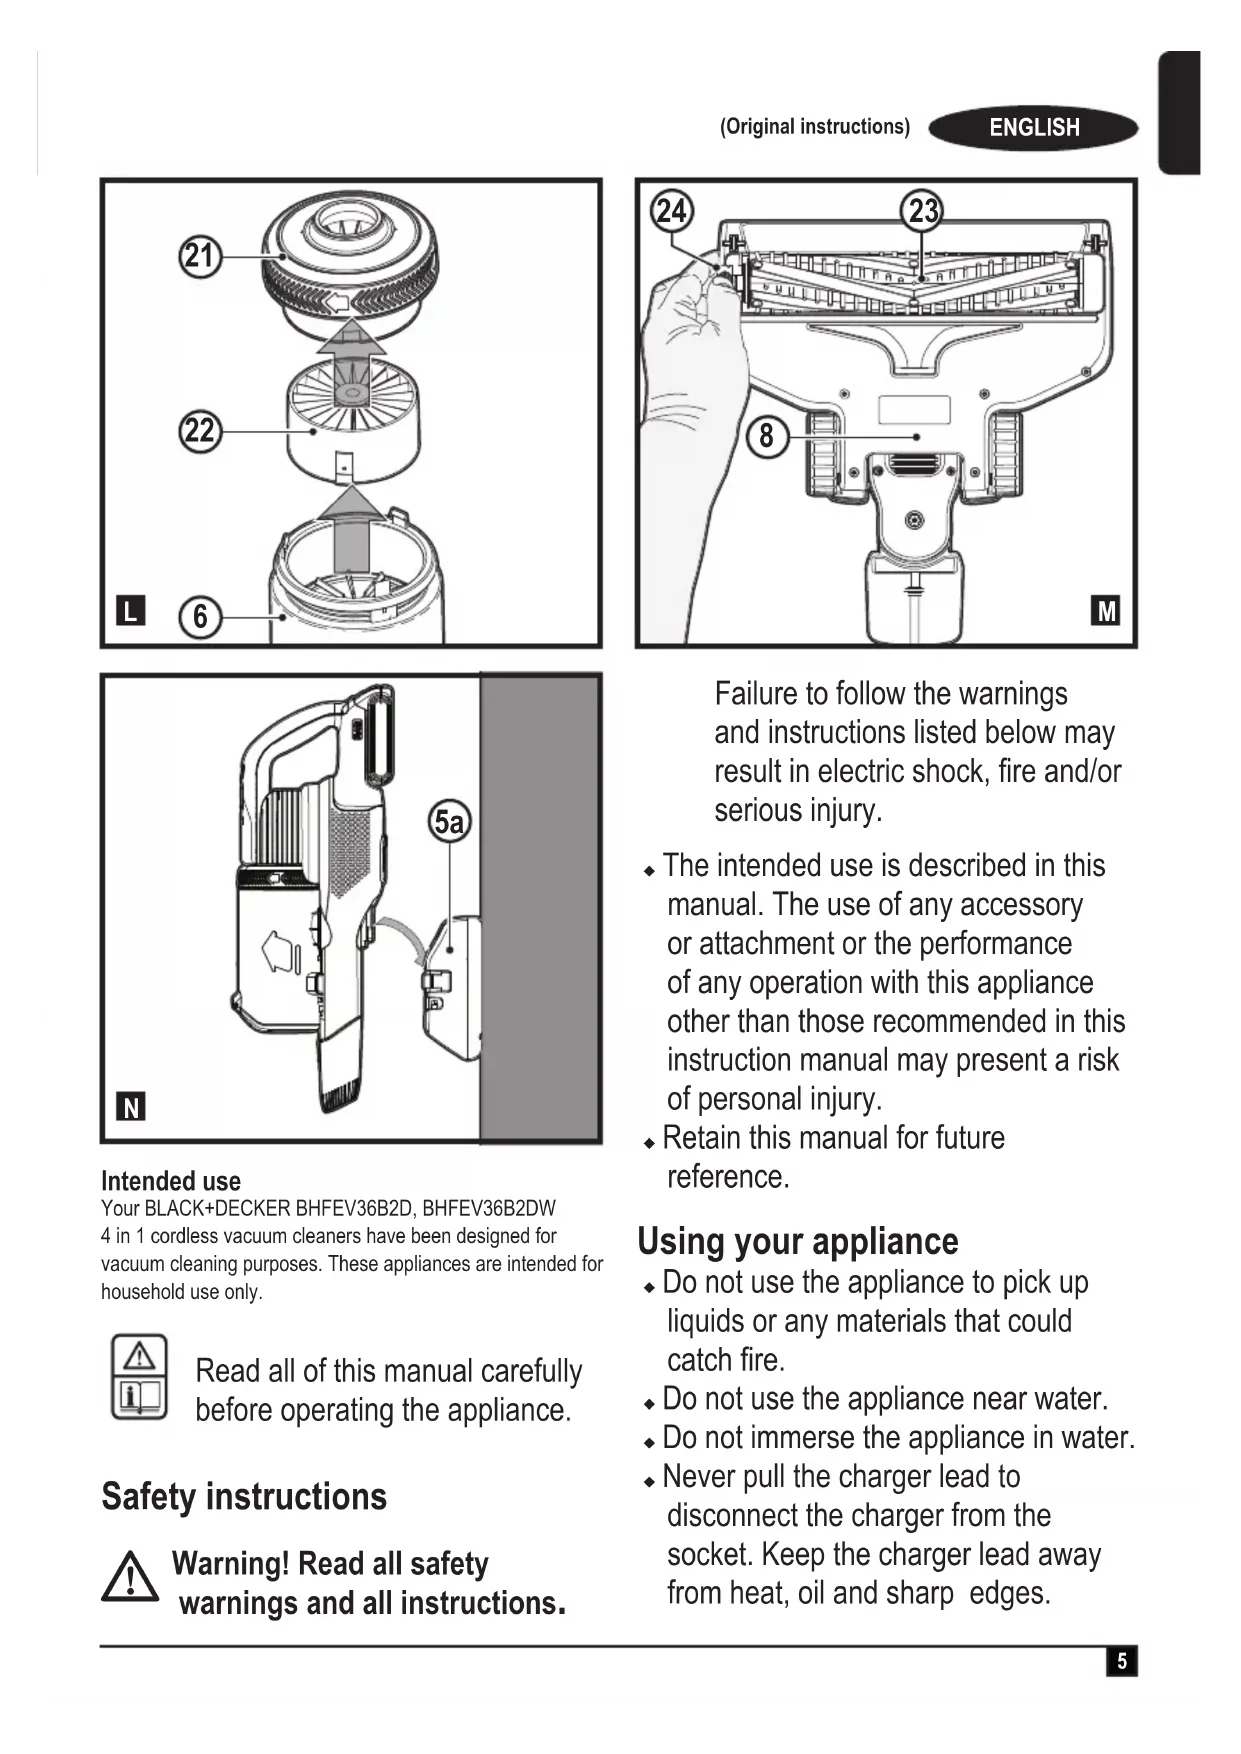
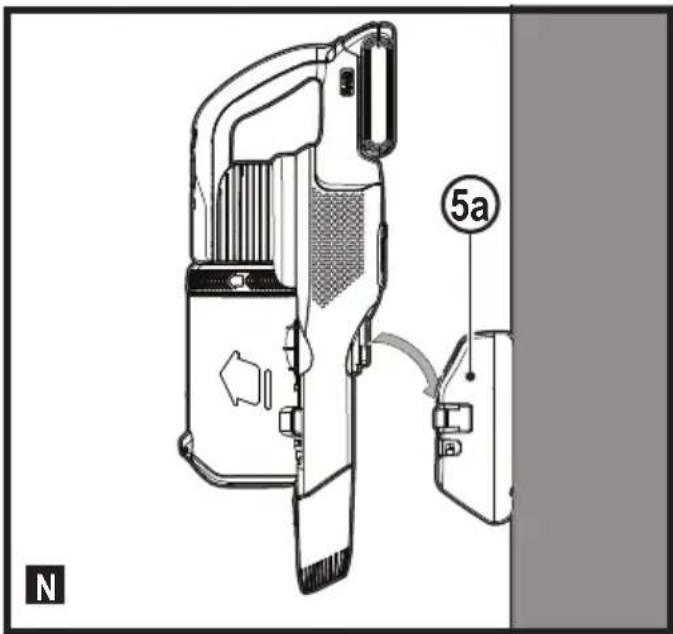
Wall mounted vacuum storage (available through your service department) (Fig. N)
The product can be attached to a wall to provide convenient storage for the appliance.
When mounting to a wall, make sure the mounting method is suitable for the wall type and is appropriate to the weight of the appliance.
◆ Mark the location of the storage bracket screw holes on the wall.
- Fix the wall storage bracket to the wall using appropriate screws and plugs for the type of wall, and weight of the appliance.
To install battery pack (fig. B)
◆ Insert battery (4) into tool until an audible click is heard as shown in figure B.
ENGLISH
(Original instructions)
- Ensure battery pack is fully seated and fully latched into position.
To remove battery pack
◆ Depress the battery release button and pull battery pack (4) out of the tool.
Assembly (Fig. C)
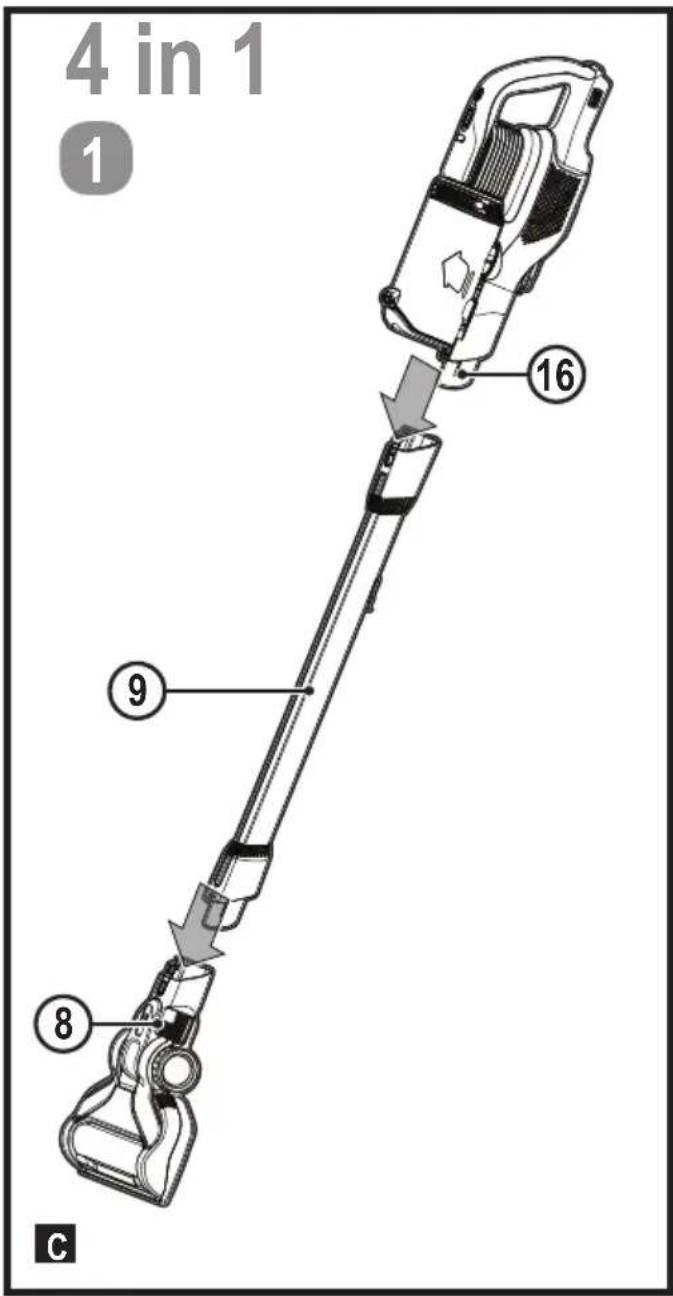
◆ Align the top of the extension tube (9) with the vacuum inlet (16) as shown in figure C.
◆ Push the extension tube (9) onto the vacuum inlet (16) so it locks into position.
♦ Align the bottom of the extension tube (9) with the floor head (8) as shown in figure C.
◆ Push the bottom of the extension tube (9) onto the floor head (8) so it locks into position.
◆ To remove an accessory, press the accessory release latch located on the accessory and pull it off.
USE
This vacuum cleaner can be used in one of four ways.
- With the extension tube (9) and the floor brush (8) as shown in figure C.
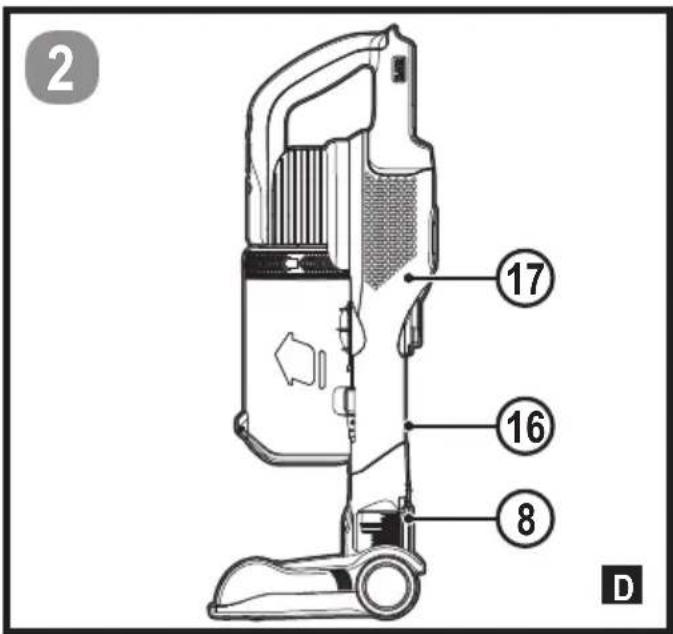
- With the floor brush (8) and the vacuum inlet (16) as shown in figure D.
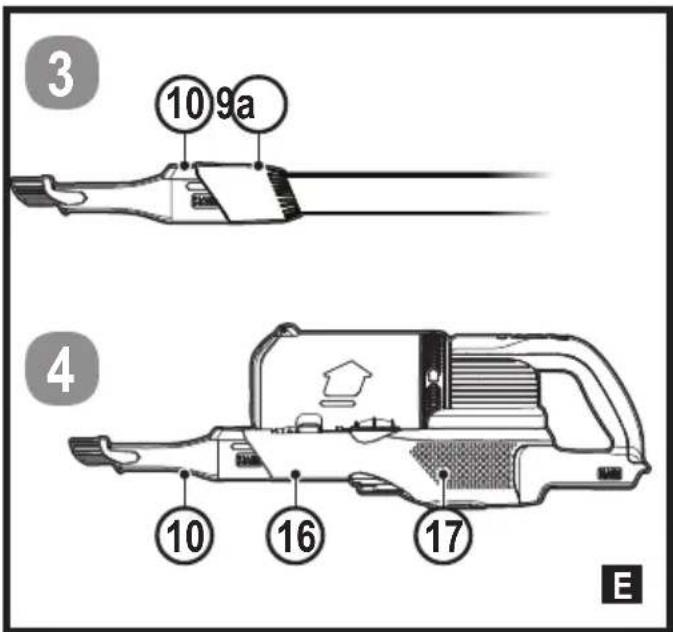
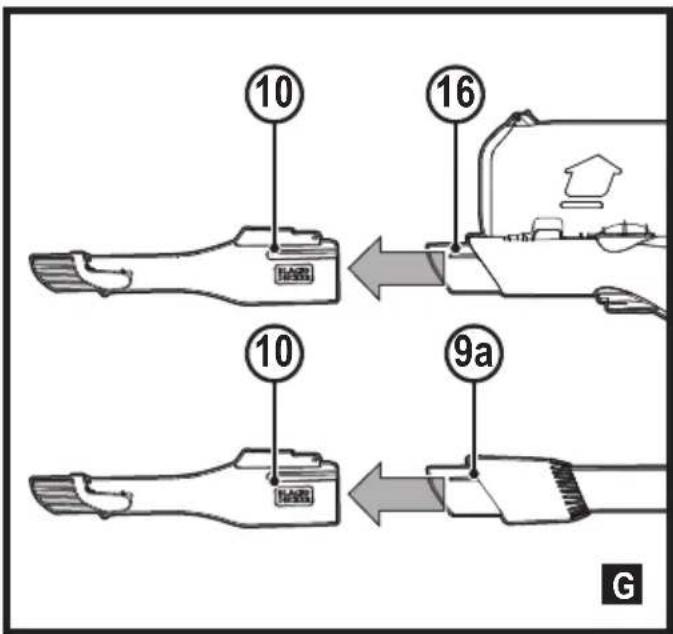
With the extension tube (9) and an accessory tool (10), (11), (13) or (14) as shown in figure E. - With an accessory tool (10), (11), (13) or (14) and the vacuum inlet (16) as shown in figure E.
◆ Accessories not supplied with your unit can be ordered through service department.
Switching ON and OFF (Fig. F)
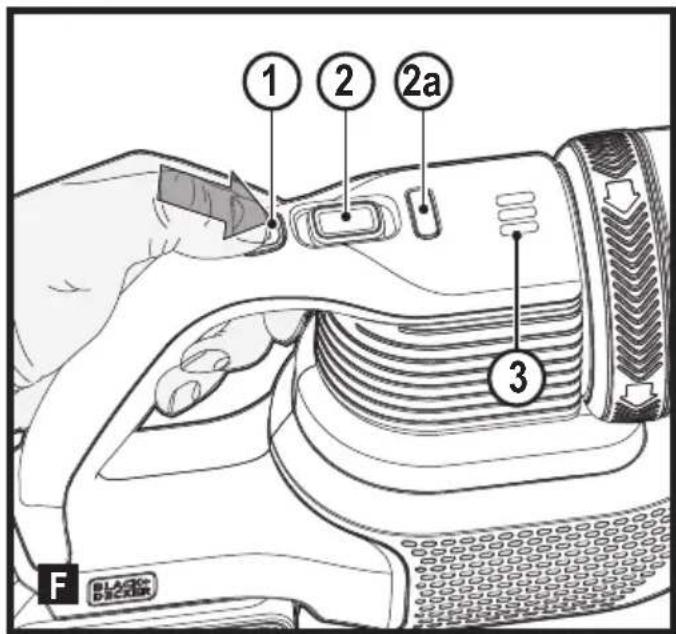
◆ To switch ON, press the On/Off button (1).
- For increased power, slide the variable power switch (2) forward.
Note: The floor brush (8) will power on when it is attached to the vacuum or extension tube (it can be switched off by pressing the button 2a on the display). The LED worklights on the front of the floor head will illuminate whenever the beater bar activation button (2a) is switched ON (they can be switched off by pressing the button again).
Note: The state of charge indicator LEDs (3) will illuminate while the vacuum is ON.
◆ To switch OFF, press the On/Off button (1).
- Return the battery to the charger immediately after use so that it will be ready and fully charged for the next use.
Using an Accessory tool (Fig. G)
Your vacuum may come with some of the following tools.
◆ 2 in 1 Accessory tool (10)
◆ Crevice tool (11).
◆ Pet hair tool (13).
◆ Wide mouth dust brush (14).
- The accessory tool (10), (11), (13) or (14) can be fitted either directly to the extension tube (6) or to the vacuum inlet (5) as shown in Fig. G.
- Align the top of the accessory tool (10), (11), (13) or (14) with the vacuum inlet (16) or extension tube connection (9a) and push into place so it locks into position as shown in figure G.
Cleaning and emptying the vacuum
Filter agitator (Fig. H)
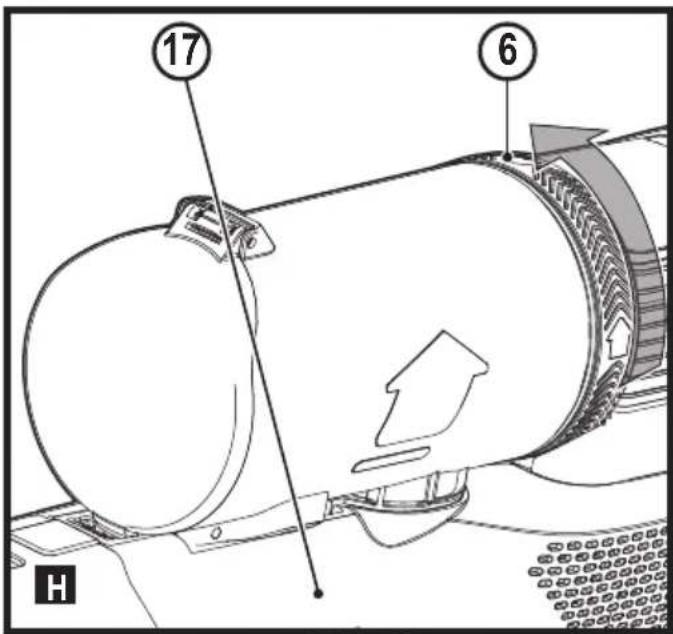
With the lift away dust canister (6) off the chassis (17), rotate the filter agitator wheel 5 - 10 times to remove excessive dust from the filter thus increasing its performance.
Note: It is recommended that you agitate when the unit is emptied and the prefilter removed.
Note: Maximum dust collection will only be obtained with clean filters and an empty dust canister.
If dust begins to fall back out of the product after it is switched off, this indicates that the dust canister is full and requires emptying.
To empty the dust canister (Fig. I, J)
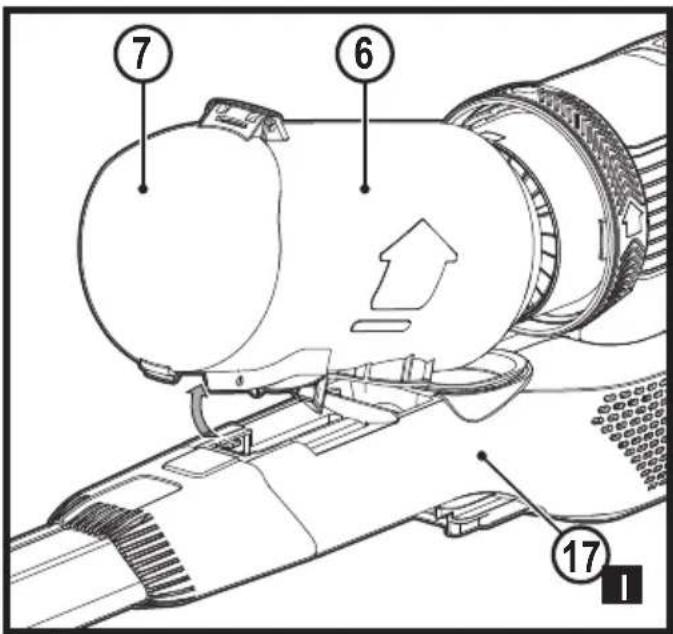
◆ Lift and remove the lift away dust canister (6) from the chassis (17) as shown in figure I.
◆ Place the dust canister over a dust bin and press the dust canister lid release button (6a) to empty the dust canister as shown in figure J.
◆ Close the dust canister lid (7), until it “clicks” firmly into position.
◆ Install the lift away dust canister (6) back onto the chassis (17).
Removing pre-filter (Fig. K)
◆ Lift and remove the lift away dust canister (6) from the chassis (17) as shown in figure I.
◆ Place the dust canister over a trash bin and press the dust canister lid release button (6a) to empty the dust canister as shown in figure J.
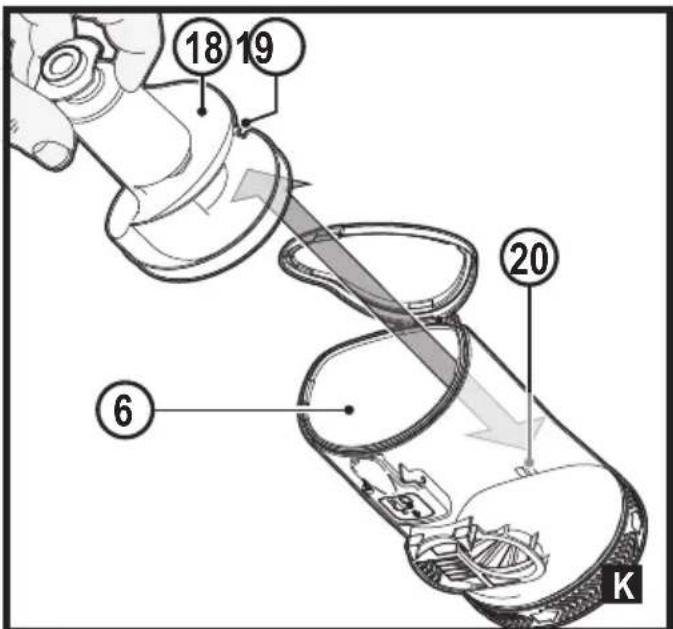
◆ Use your index finger and thumb to pinch the pre-filter (18), pull the pre-filter (18) from the dust canister (6) as shown in figure K.
Note: The filter housing fits snuggly in the dust canister and may be difficult to remove at first.
◆ Empty the dust canister.
◆ Install the pre-filter (18) into the dust canister (6) ensuring the dust canister tab (20) aligns with the prefilter slot (19) as shown in figure K.
◆ Install the dust canister onto the vacuum, until it "clicks" firmly into position.
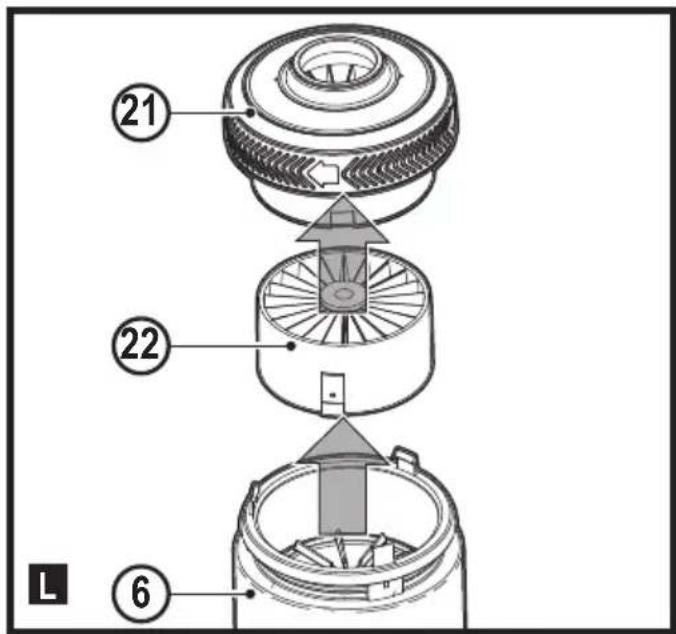
Removing filter (Fig. L)
◆ Lift and remove the lift away dust canister (6) from the chassis (17) as shown in figure I.
◆ Place the dust canister over a trash bin and press the dust canister lid release button (6a) to empty the dust canister as shown in figure J.
◆ Grasp the agitator wheel housing (21) and pull up to remove.
◆ Remove the filter (22), from the agitator wheel housing (21) as shown in figure L.
◆ Shake off or lightly brush any loose dust from the filter.
◆ Install the the filter (22), into the agitator wheel housing (21).
◆ Install the agitator wheel housing (21) onto the dust canister, until it "clicks" firmly into position.
Cleaning the filters
◆ Once the filter and pre-filter are removed from the dust canister shake off or lightly brush any loose dust from the pre-filter and filter.
◆ Rinse out the dust canister (6) with warm soapy water.
◆ Wash the filters with warm soapy water.
- Ensure the filters are completely dry before refitting (24hrs).
◆ Follow instructions in the "Removing pre-filter and Removing filter" sections for assembly instructions.
Note: Maximum dust collection will only be obtained with clean filters and an empty dust canister.
If dust begins to fall back out of the product after it is switched off, this indicates that the dust canister is full and requires emptying or that there is a blockage somewhere.
- Wash the filters regularly using warm, soapy water and ensure that they are completely dry before using again. The cleaner the filter is, the better the product will perform.
- It is very important that the filters are completely dry and correctly in position before use.
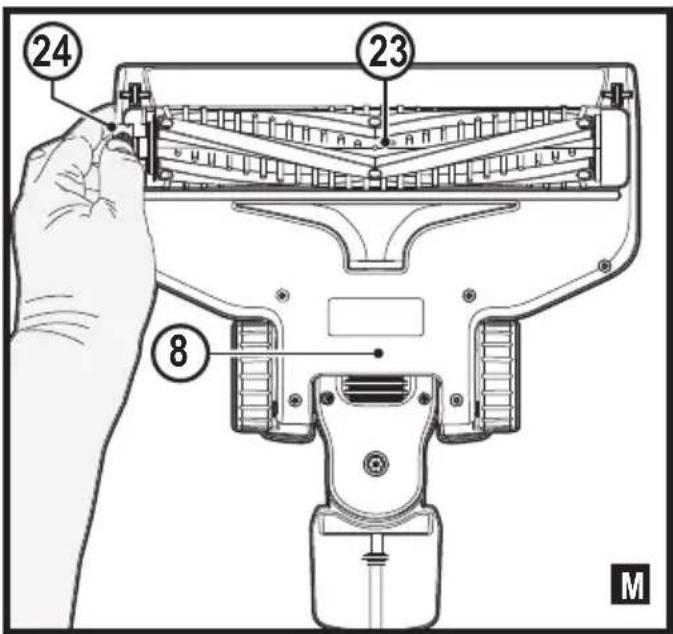
Removing and clearing the rotary brushes (Fig. M)
Warning! To reduce the risk of injury from moving parts, disconnect battery before cleaning or servicing.
◆ To remove the rotary brush (23) from the floor head (8) depress the release button (24) as shown in figure M.
◆ Lift the rotary brush from its locked position.
◆ The rotary brush (23) can now be removed.
- Clean the rotary brush, and reinstall. Ensure it is secured in its locked position before operating.
Storage
The unit can be safely stored using the wall storage bracket (5a) available through your service department. as shown in figure N.
Maintenance
Your BLACK+DECKER cordless appliance has been designed to operate over a long period of time with a minimum of maintenance. Continuous satisfactory operation depends upon proper tool care and regular cleaning.
Warning! Before performing any maintenance on cordless appliances:
◆ Remove the battery.
◆ Unplug the charger before cleaning it. Your charger does not require any maintenance apart from regular cleaning.
◆ Regularly clean the ventilation slots in your appliance/charger using a soft brush or dry cloth.
◆ Regularly clean the motor housing using a damp cloth. Do not use any abrasive or solvent-based cleaner.
Replacing the filters
The filters should be replaced every 6 to 9 months and whenever worn or damaged. Replacement filters are available from your BLACK+DECKER dealer.
◆ Remove the old filters as described above.
◆ Fit the new filters as described above.
Trouble shooting
| Problem Possible | Cause Possible solution | |
| Unit will not start. | Battery pack not charged. | Check battery pack charging requirements. |
| Blockage. | Check floorhead tube. | |
| Check extension tube. | ||
| Check between extension tube and bowl | ||
| Beater bar stops working. | Obstruction. | The unit is equipped with a beater bar overload protection feature. Remove and clean the beater bar of all debris and obstructions |
| Battery pack will not charge. | Charger not plugged in. | Plug charger into a working outlet. Refer to Important Charging Notes for more details. |
| Surrounding air temperature too hot or too cold | Move charger and battery pack to a 4 °C or below +40 °C. |
Protecting the environment

Separate collection. Products and batteries marked with this symbol must not be disposed of with normal household waste.
Products and batteries contain materials that can be recovered or recycled reducing the demand for raw materials. Please recycle electrical products and batteries according to local provisions. Further information is available at www.2helpU.com
Technical Data
| BHFEV36B2D | BHFEV36B2DW | |
| Voltage 36 36 | ||
| Watt Hours 90 90 | ||
| Weight 3.58 3.58 | ||
| Battery BL2536 BL2536 | ||
| Charger 90616337-** SSO | -360040** | |
| Approx charge time 2 Hrs | 5 Hrs |
Guarantee
Black & Decker is confident of the quality of its products and offers consumers a 24 month guarantee from the date of purchase. This guarantee is in addition to and in no way prejudices your statutory rights. The guarantee is valid within the territories of the Member States of the European Union and the European Free Trade Area.
To claim on the guarantee, the claim must be in accordance with Black&Decker Terms and Conditions and you will need to submit proof of purchase to the seller or an authorised repair agent.
Terms and conditions of the Black&Decker 2 year guarantee and the location of your nearest authorised repair agent can be obtained on the Internet at www.2helpU.com, or by contacting your local Black & Decker office at the address indicated in this manual.
Please visit our website www.blackanddecker.co.uk to register your new Black & Decker product and receive updates on new products and special offers.

- Using your appliance
- Intended use
- Safety instructions
- Inspection and repairs
- Additional safety instructions
- After use
- Residual risks
- Chargers
- Electrical safety
- Symbols on the charger
- Labels on appliance
- Features
- Charging a Battery
- Charging (Fig. A)
- Wall mounted vacuum storage (available through your service department) (Fig. N)
- To install battery pack (fig. B)
- ENGLISH
- (Original instructions)
- To remove battery pack
- Assembly (Fig. C)
- USE
- Switching ON and OFF (Fig. F)
- Using an Accessory tool (Fig. G)
- Cleaning and emptying the vacuum
- Filter agitator (Fig. H)
- To empty the dust canister (Fig. I, J)
- Removing pre-filter (Fig. K)
- Removing filter (Fig. L)
- Cleaning the filters
- Removing and clearing the rotary brushes (Fig. M)
- Storage
- Maintenance
- Replacing the filters
- Protecting the environment
- Guarantee
Brand : BLACK & DECKER
Model : BHFEV36B2DW
Category : Hand vacuum cleaner