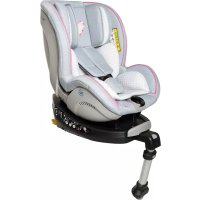
Jet - High chair Osann - Free user manual and instructions
Find the device manual for free Jet Osann in PDF.


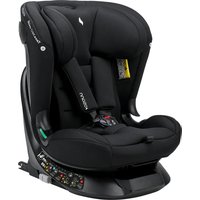
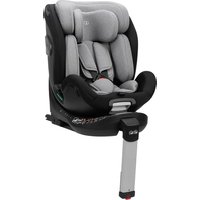
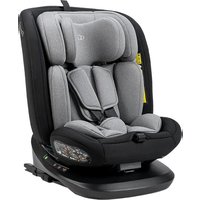
| Product type | Child car seat group 0+/1 (0-18 kg) |
| Brand | Osann |
| Model | Jet |
| Standard | ECE R44/04, semi-universal ISOFIX system |
| Child weight | 0 to 18 kg |
| Orientation | Rear-facing (0-9 kg) and forward-facing (9-18 kg) |
| Installation | ISOFIX base + support leg |
| Recline positions | 4 adjustable positions |
| Headrest adjustment | Height adjustable with red handle |
| Harness | 5-point, adjustable in height with headrest |
| Emergency release | Red button on harness buckle |
| Cover material | Hand-washable fabric |
| Care | Hand wash at 30°C, mild soap, no bleach or ironing |
| Safety | Do not use on seat with airbag, never leave unattended |
| Included accessories | ISOFIX base, support leg, ISOFIX insertion aids |
| Manual storage | Dedicated compartment on the seat |
Frequently Asked Questions - Jet Osann
User questions about Jet Osann
0 question about this device. Answer the ones you know or ask your own.
Ask a new question about this device
Download the instructions for your High chair in PDF format for free! Find your manual Jet - Osann and take your electronic device back in hand. On this page are published all the documents necessary for the use of your device. Jet by Osann.
USER MANUAL Jet Osann
natural_image
Line drawing of a baby car seat with red and green buttons, set against a geometric background (no text or symbols)flowchart
graph TD
    A["Step 1: Seatbelt opening"] --> B["Step 2: Click point on upper torso"]
    B --> C["Step 3: Child wearing seatbelt"]
    C --> D["Step 4: Seatbelt insertion"]
    D --> E["Step 5: Seatbelt insertion"]
FALSCH - ZU NIEDRIG FALSCH - ZU HOCH RICHTIG
natural_image
Line drawing of a hand adjusting a red belt buckle (no text or symbols)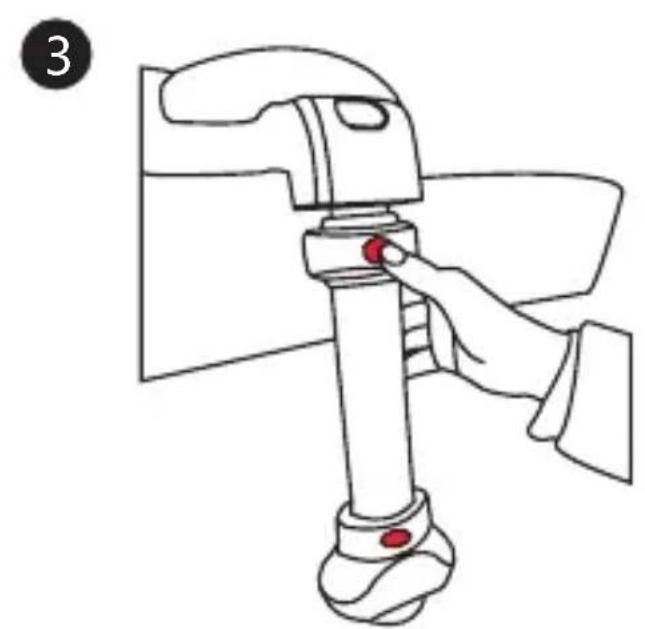
natural_image
Line drawing of a hand operating a mechanical lever with a red knob, no text or symbols present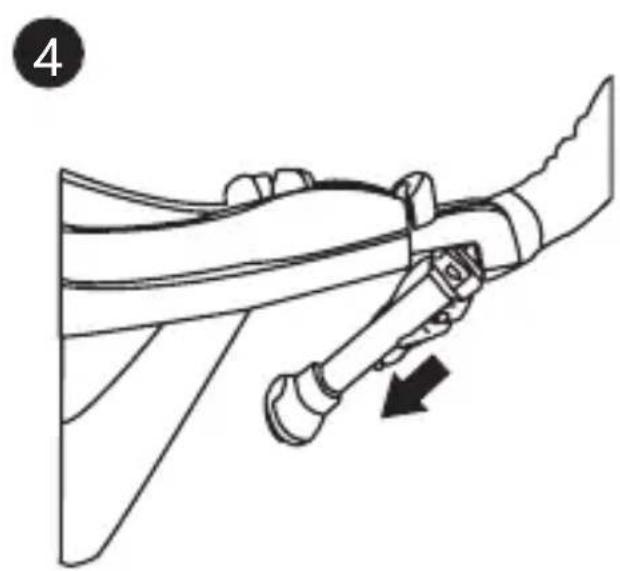
natural_image
Diagram of a mechanical assembly with a lever and curved component, no text or symbols presentWe would like to congratulate you on your purchase of a group 0+/1 car seat. If you would like to obtain any help regarding this product, you can contact our customer service.
Notice
- This is a “semi-universal” child restraint. It is approved to Regulation 44.04 for general use in vehicles fitted with ISOFIX anchorages systems.
- It will fit vehicles with positions approved as Isofix positions (please see details the vehicle handbook), depending on the category of the child seat and of the fixture.
- The mass group and the Isofix size for this device is D,B1. This seat can be used for children of 0-18KG in weight.
Extreme Hazard
Do not use in passenger seats equipped with airbags (SRS).
The instruction for use should be stored in the storage bin on the seat. These instructions are important. Please read carefully and retain for future use.
The correct use and maintenance of your car seat will ensure it gives long and trouble free use. When somebody else is using your car seat, ensure they also know how to use it. The safety of your child is your responsibility.
Please read thoroughly before commencing installation as an incorrect installation could be dangerous. This seat can be used for children of 0-18KG in weight.
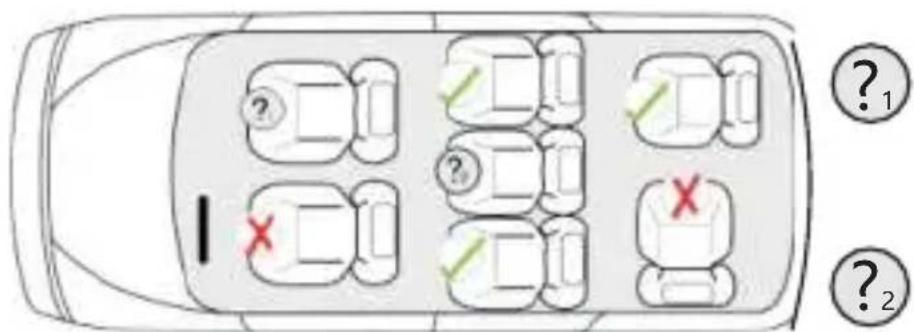
If there is a safety air bag in front of the car seat, you can not be installed in this location.


Only equipped with a three point type of car seat belts, can be insta in this location.
Mounting position of seat in vehicle

proper installation

Incorrect installation
Safety Warnings
- Please read thoroughly before commencing installation as an incorrect installation could be dangerous.
- Do not use in passenger seats equipped with airbags.
- This is a "Semi-Universal" child restraint. It is approved to regulation 44.04 for general use in vehicles fitted with Isofix anchorages systems.
- Never use the child seat without fastening the child's harness correctly, and never attempt use it without fastening it into the car as described in these fitting instructions, if the shoulder height is not ok, please re-install the seat again.
- Never use this product if it has been in an accident, or if it has become badly worn.
- Please using mild soap and hand wash in warm water for the seat covers. Can not using any chemical cleaner or decolorizes and let it dry naturally.
- It is important that the seat belt is correctly routed and the child seat tightened down on the upholstery as firmly as possible.
- Car interiors can become very hot when left standing in direct sunlight. It is therefore recommended that the seat child seat, when not in use, is covered by a towel etc.
- Do not leave a child in the seat unattended at any time.
- Luggage and other heavy objectives should be secured in the car. Loose objects are liable to cause injury in the event of an accident.
- The child seat must not be used with without the cover.
- In an emergency your child can be released quickly by pressing the red button on the harness buckle.
- When the child seat is not in use, it is recommended that it is fastened into the car with a seat belt to avoid cause injury in the event of an accident.
- Store this child seat in a safe place when it is not being used. Avoid placing heavy objects on top of it.
- Do not allow your child seat to come into contact with corrosive substances e.g.battery acid.
- Do not use this child seat in the home. It has not been designed for home use and should only be used in your car.
- The manufacturer can only guarantee the safety of the car seat if it is used by the original owner.
- We strongly advise against using a second-hand product, as you can never be sure of its history.
- Always check to make sure the seat fits in your car properly before purchasing it.
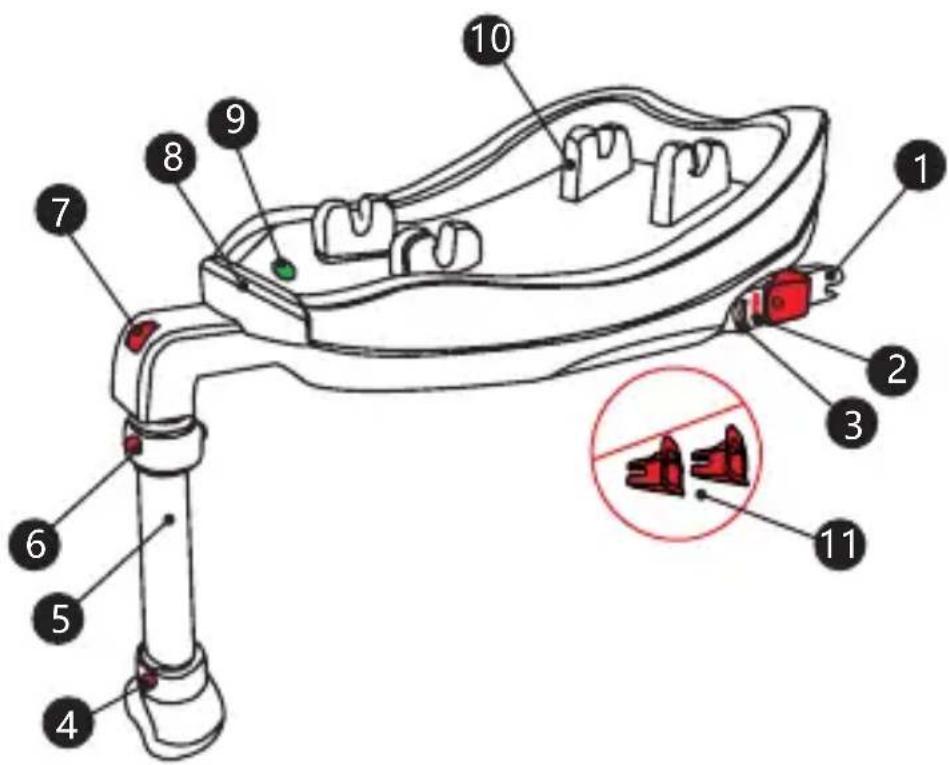
- Isofix attachments
- Isofix latching indication
- Isofix release button
- Supporting leg indication
- Supporting leg
- Supporting leg adjuster button
- Isofix elastic button
- Seat release button from isofix base
- Seat latching indication
- Seat anchor points
- Isofix insertion aid
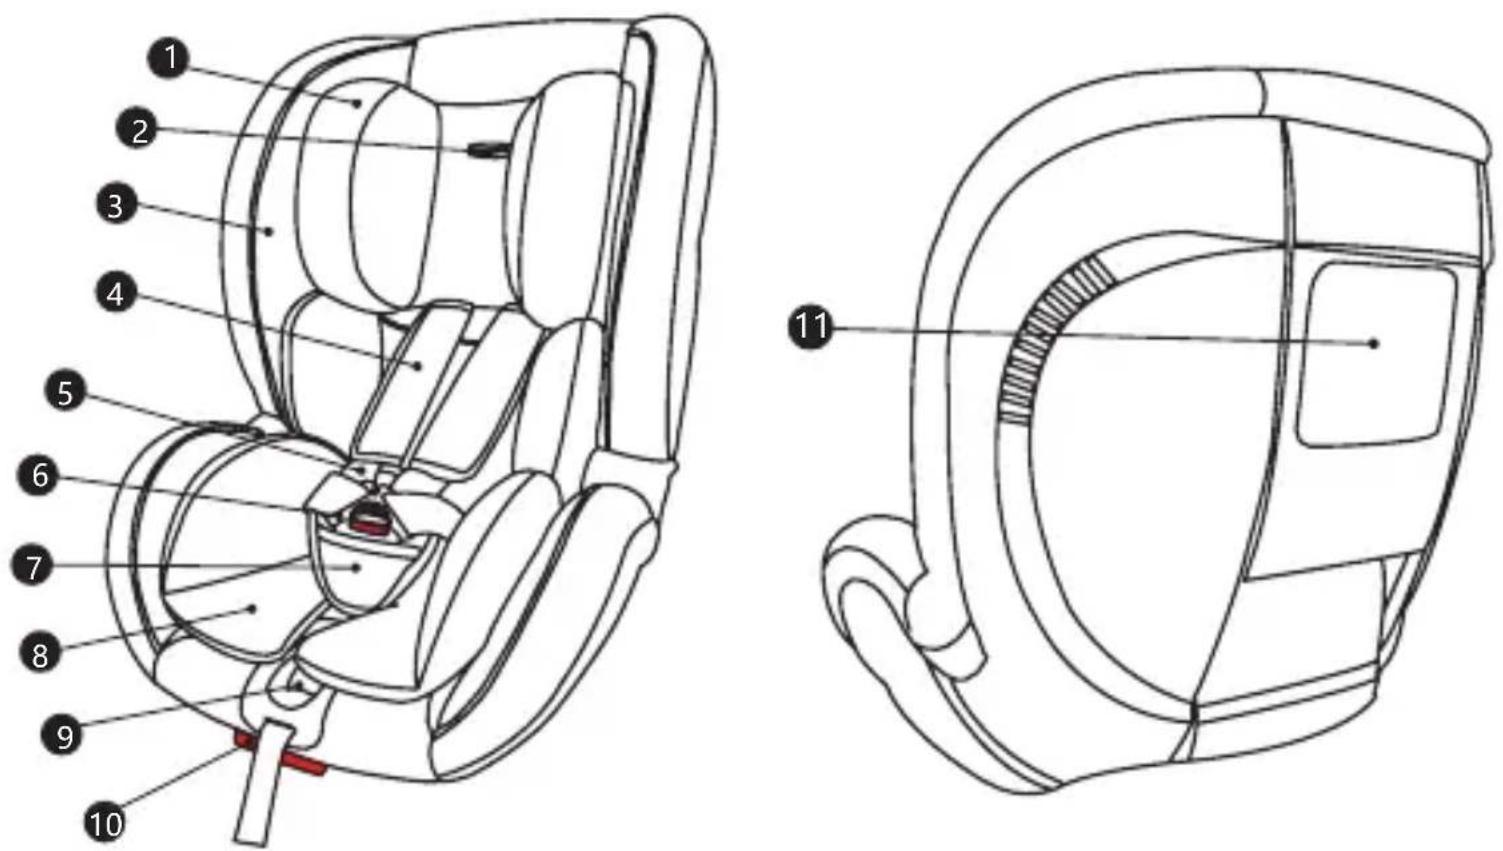
- Headrest
- Headrest height adjuster bu on
- Backrest
- Shoulder pad
- Shoulder pads
- Buckle
- Buckle pad
- Cushion
- Harness adjuster
- Seat posi on adjuster
- Manual storage
Adjustment of belt and straps
flowchart
graph TD
    A["Step 1: Foot Position"] --> B["Step 2: Click Action"]
    B --> C["Step 3: Patient Care"]
    C --> D["Step 4: Body Care"]
    D --> E["Step 5: Support/Resistance"]
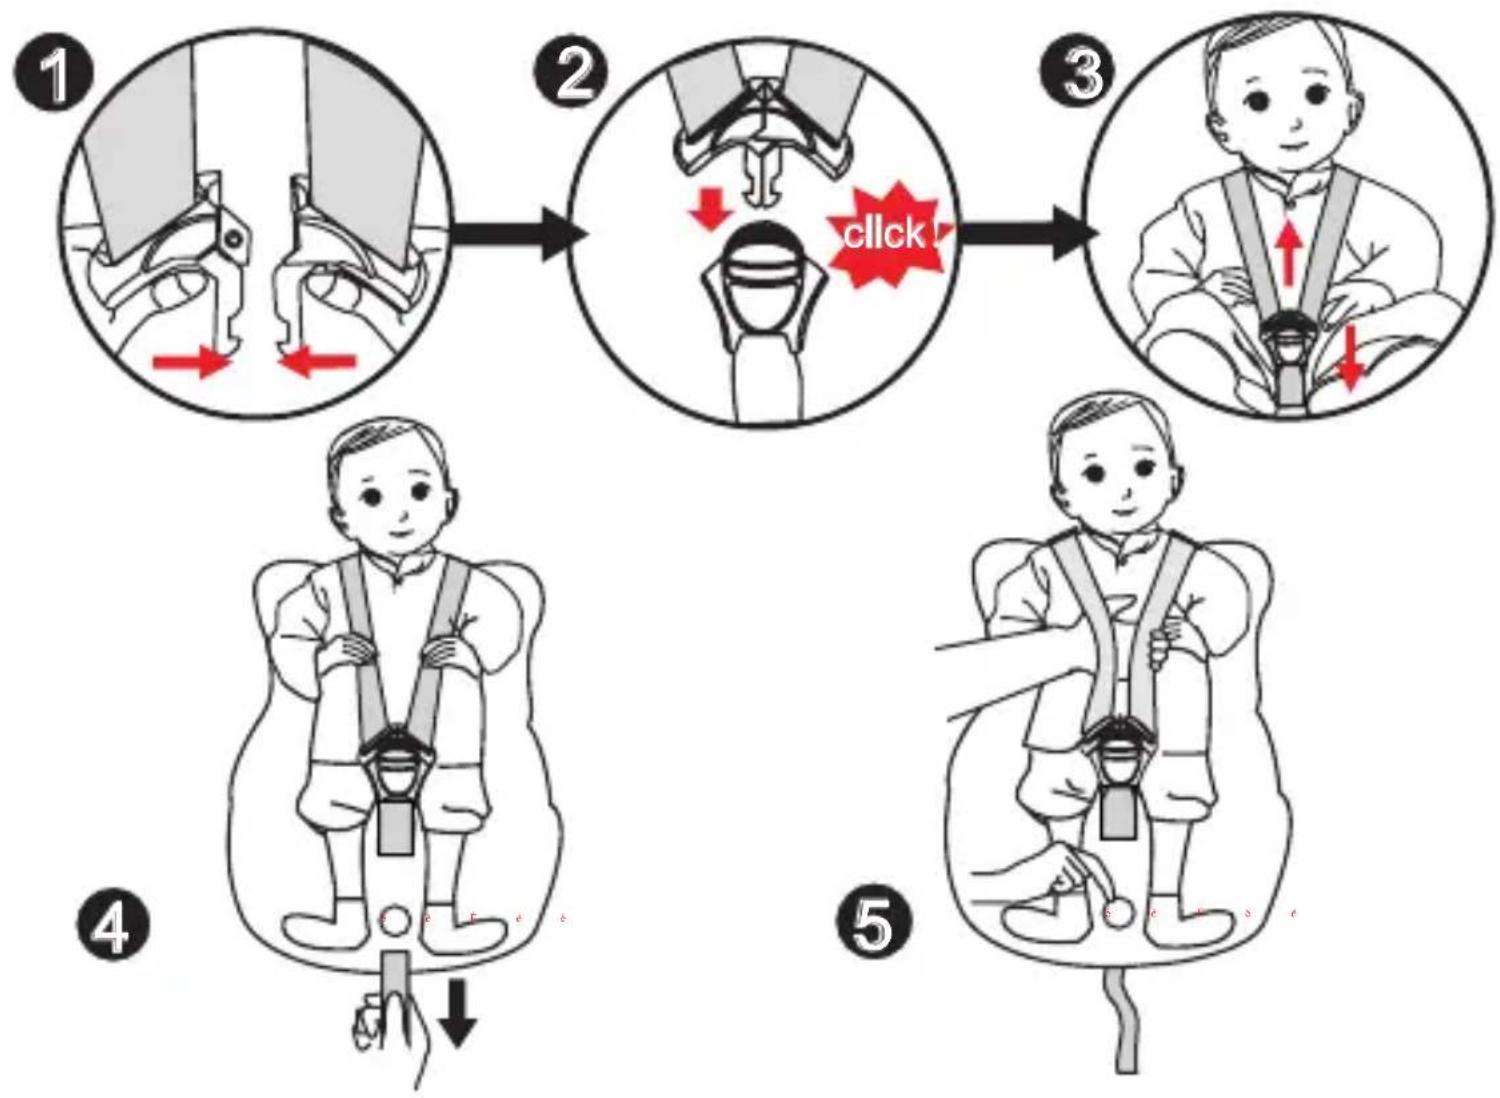
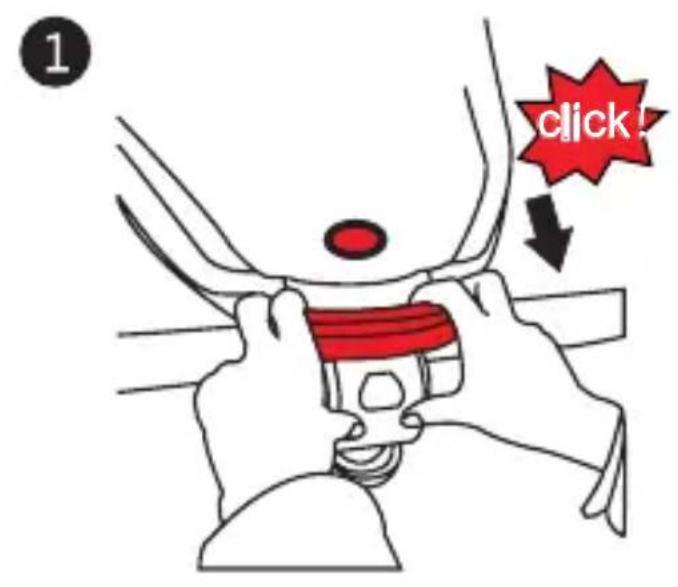
Step 1: Put the two metal section of the buckle connectors together. see picture1
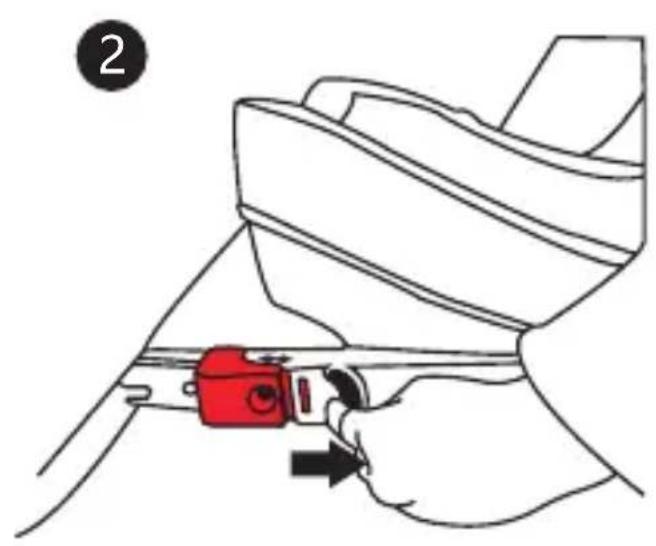
Step 2: Insert two buckle connectors to the slot in the buckle until hear "click". see picture2
Step 3: Check the harness is correctly locked by pulling the shoulder straps upwards. see picture3
Step 4: The harness should be adjusted as tightly as possible without causing discomfort to your child. A loose harness can be dangerous. Check the harness adjuster and tighten each time when child is placed in the seat. see picture4
Caution: When insert the two buckle connectors to the slot in the buckle, please make sure you always hear a "click".
Caution: To make sure the staps are suitable for your child, please ensure that you can put one hand in between your child and the straps. Please adjust the straps if too loose or too fasten for your child.
Adjustment the seat to different incline postions
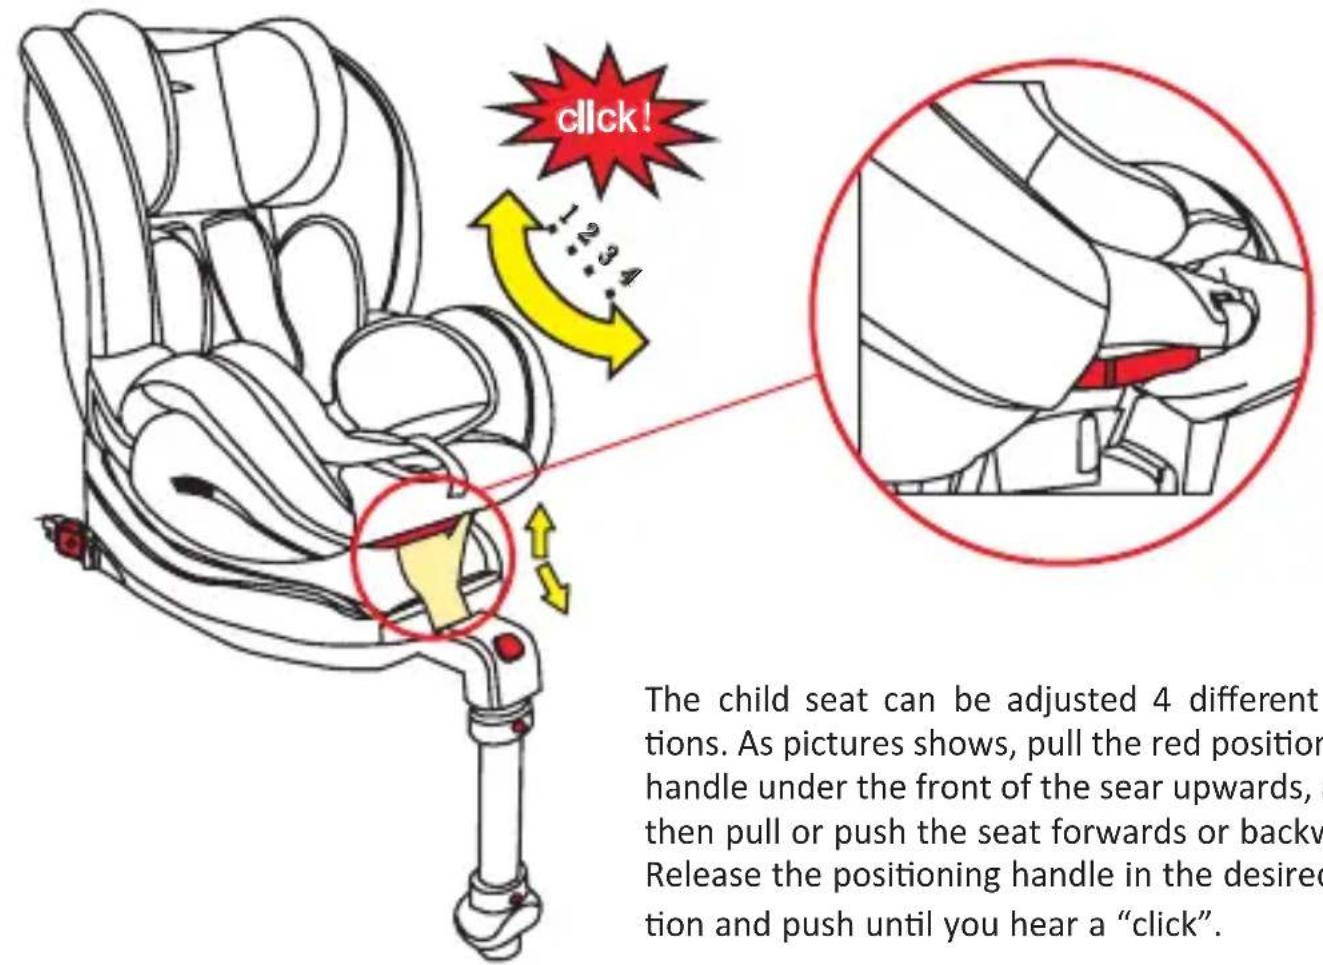
The child seat can be adjusted 4 different positions. As pictures shows, pull the red positioning handle under the front of the sear upwards, and then pull or push the seat forwards or backwards. Release the positioning handle in the desired position and push until you hear a “click”.
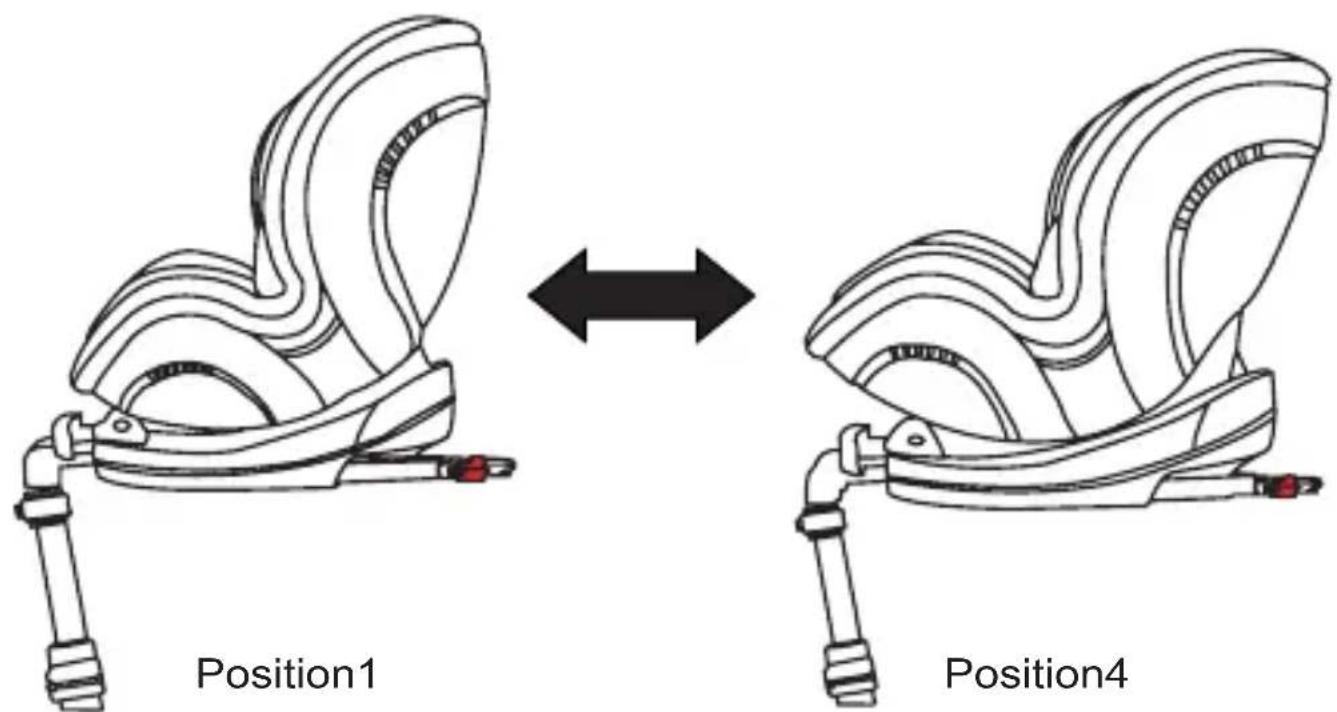
If child weight below 9KG, the seat must installed as rearward-facing position and only can adjust to the position 4.
If child weight exceed 9KG, the seat can be installed as front-facing position and can adjust to any positions.
Loosen the shoulder straps and adjust the height of headrest
To release the harness, you can press the red button of the buckle downwards, the two metal sections will pop up. When you release your harness, make sure the two buckle connectors do not stumble your child clothes. The height of shoulder straps can adjust with the height of headrest. o The correct position of using shoulder straps is that the belt is coming out on the same height as the child's shoulder. See below picture.
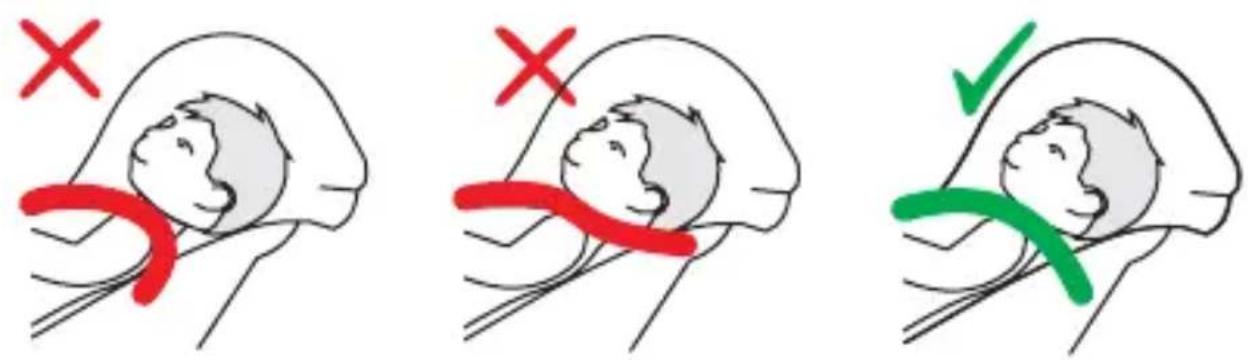
INCORRECT - TOO LOW INCORRECT - TOO HIGH CORRECT
The headrest can be adjusted for different height of children. See below picture. There is a red handle on the headrest. Meanwhile adjust the headrest up and down to change the height, the height of the shoulder harness will change as well.
Important: Check to make sure the headrest is securely locked in the desired position by pulling or pressing it.
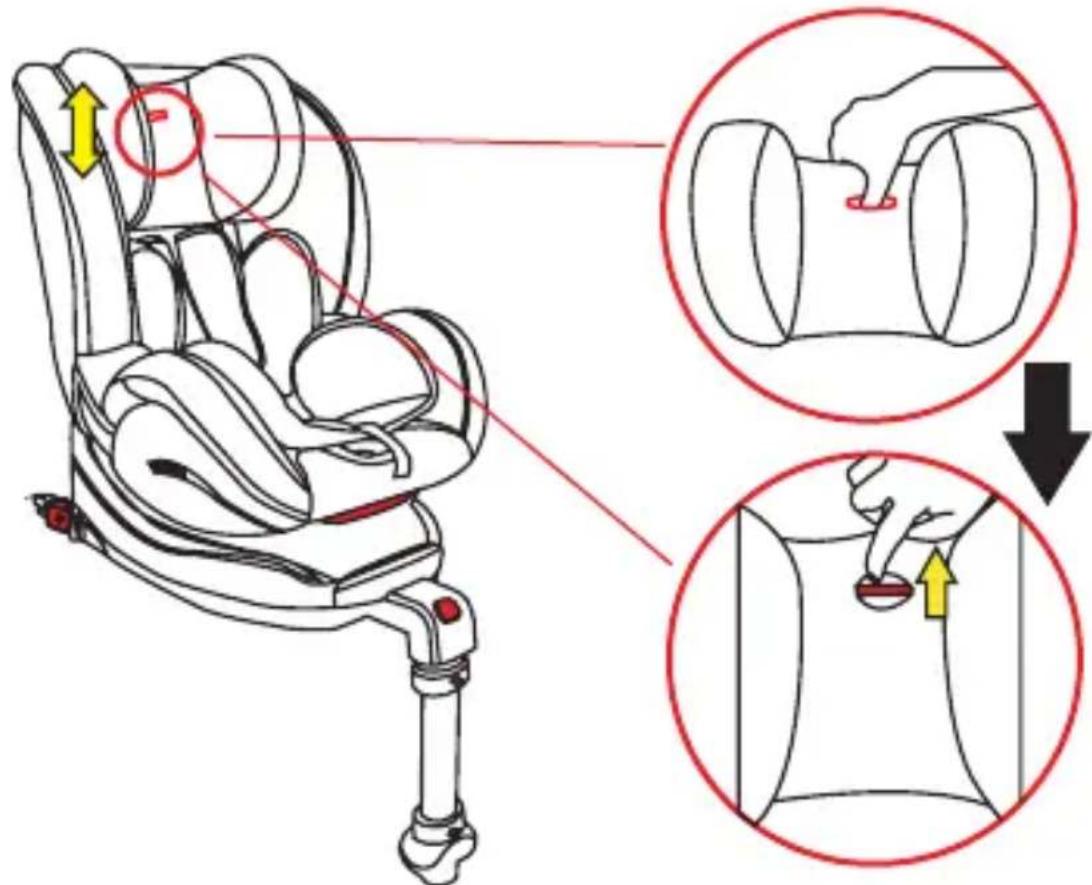
The preparation for installation
Warning: Please read thoroughly before commencing installation as an incorrect installation could be dangerous.
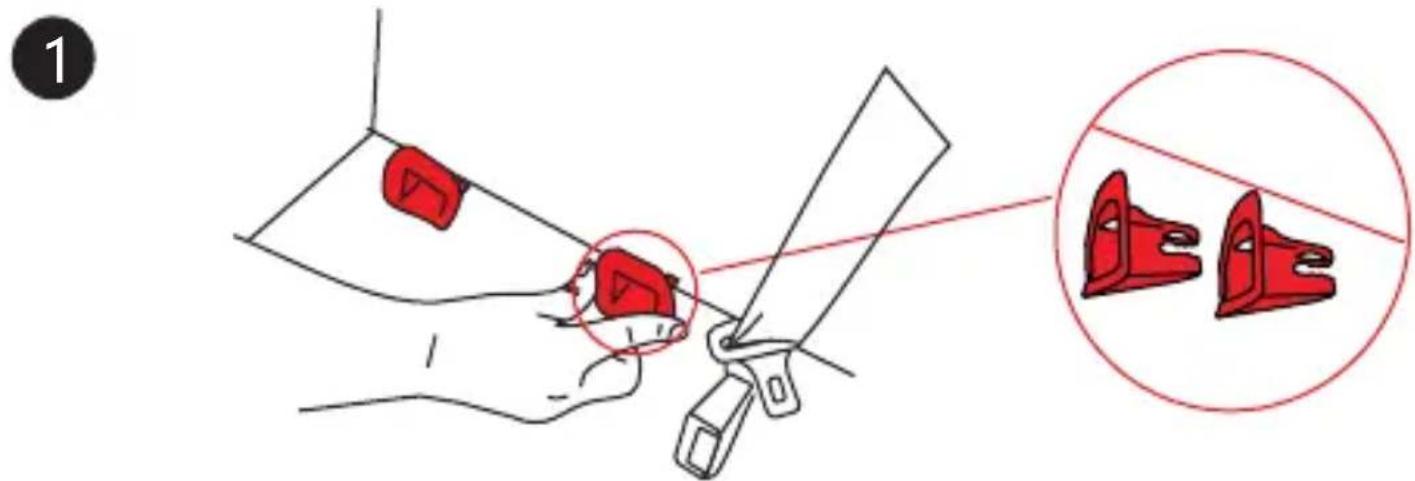
Step 1: Fix the two red Isofix insertion aids in your cars isofix anchorage. This step is only necessary in your car, if your car doesnt have already fixed insertion aids.
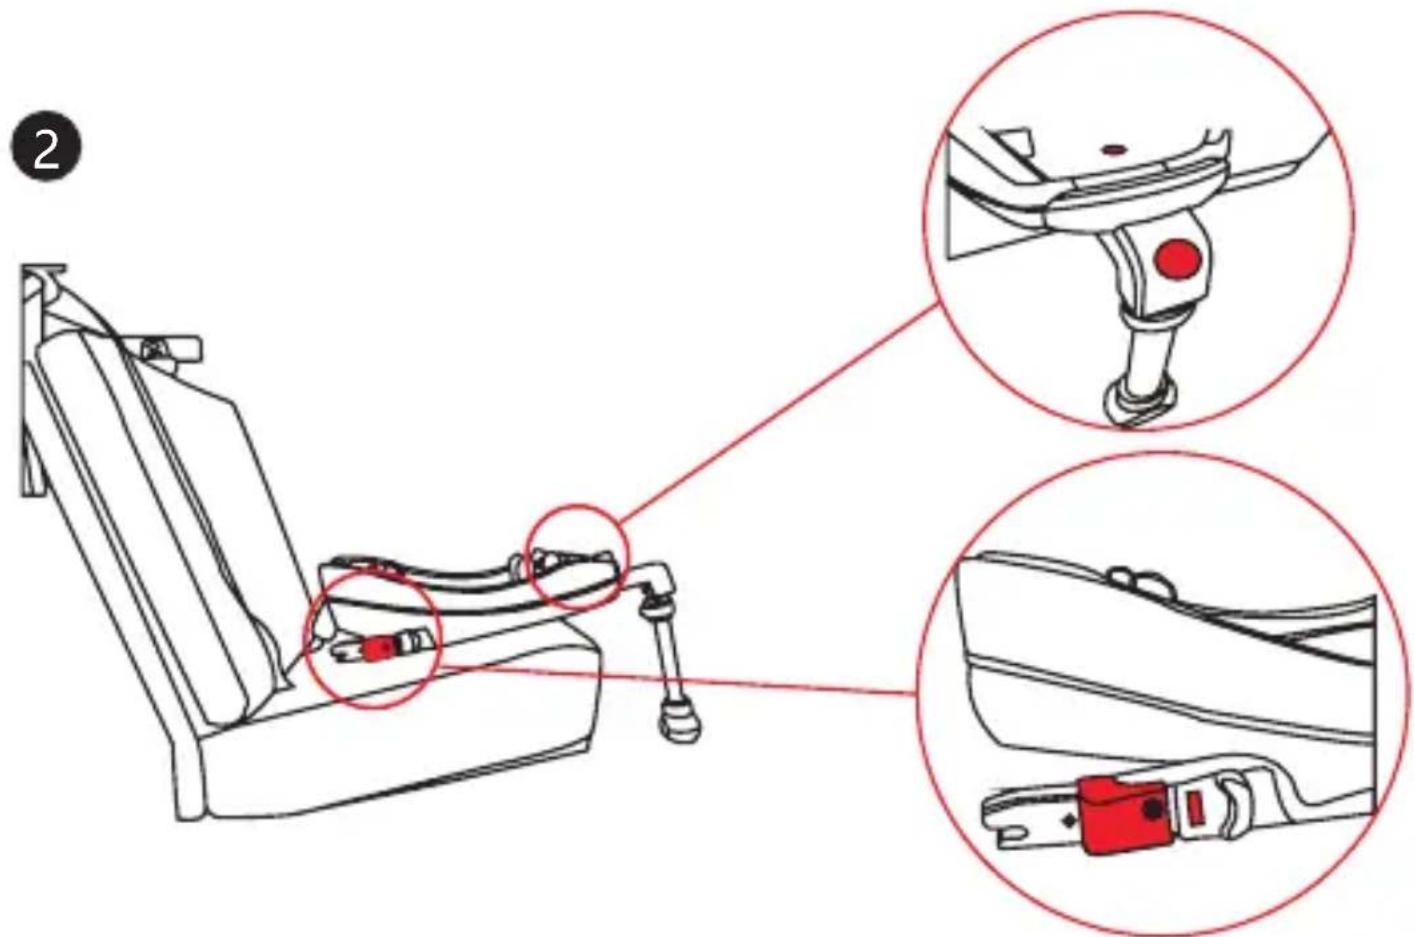
Step2: Pull out the supporting leg from bottom of the Isofix base. And check the Child seat latching indication and Isofix latching indication are both showing red. If it shows green, please refer to steps 1 and 2 of page 14 Remove the Isofix base child restraint system. And make sure the indication shows red.
Installation of the Isofix Base Child restraint system
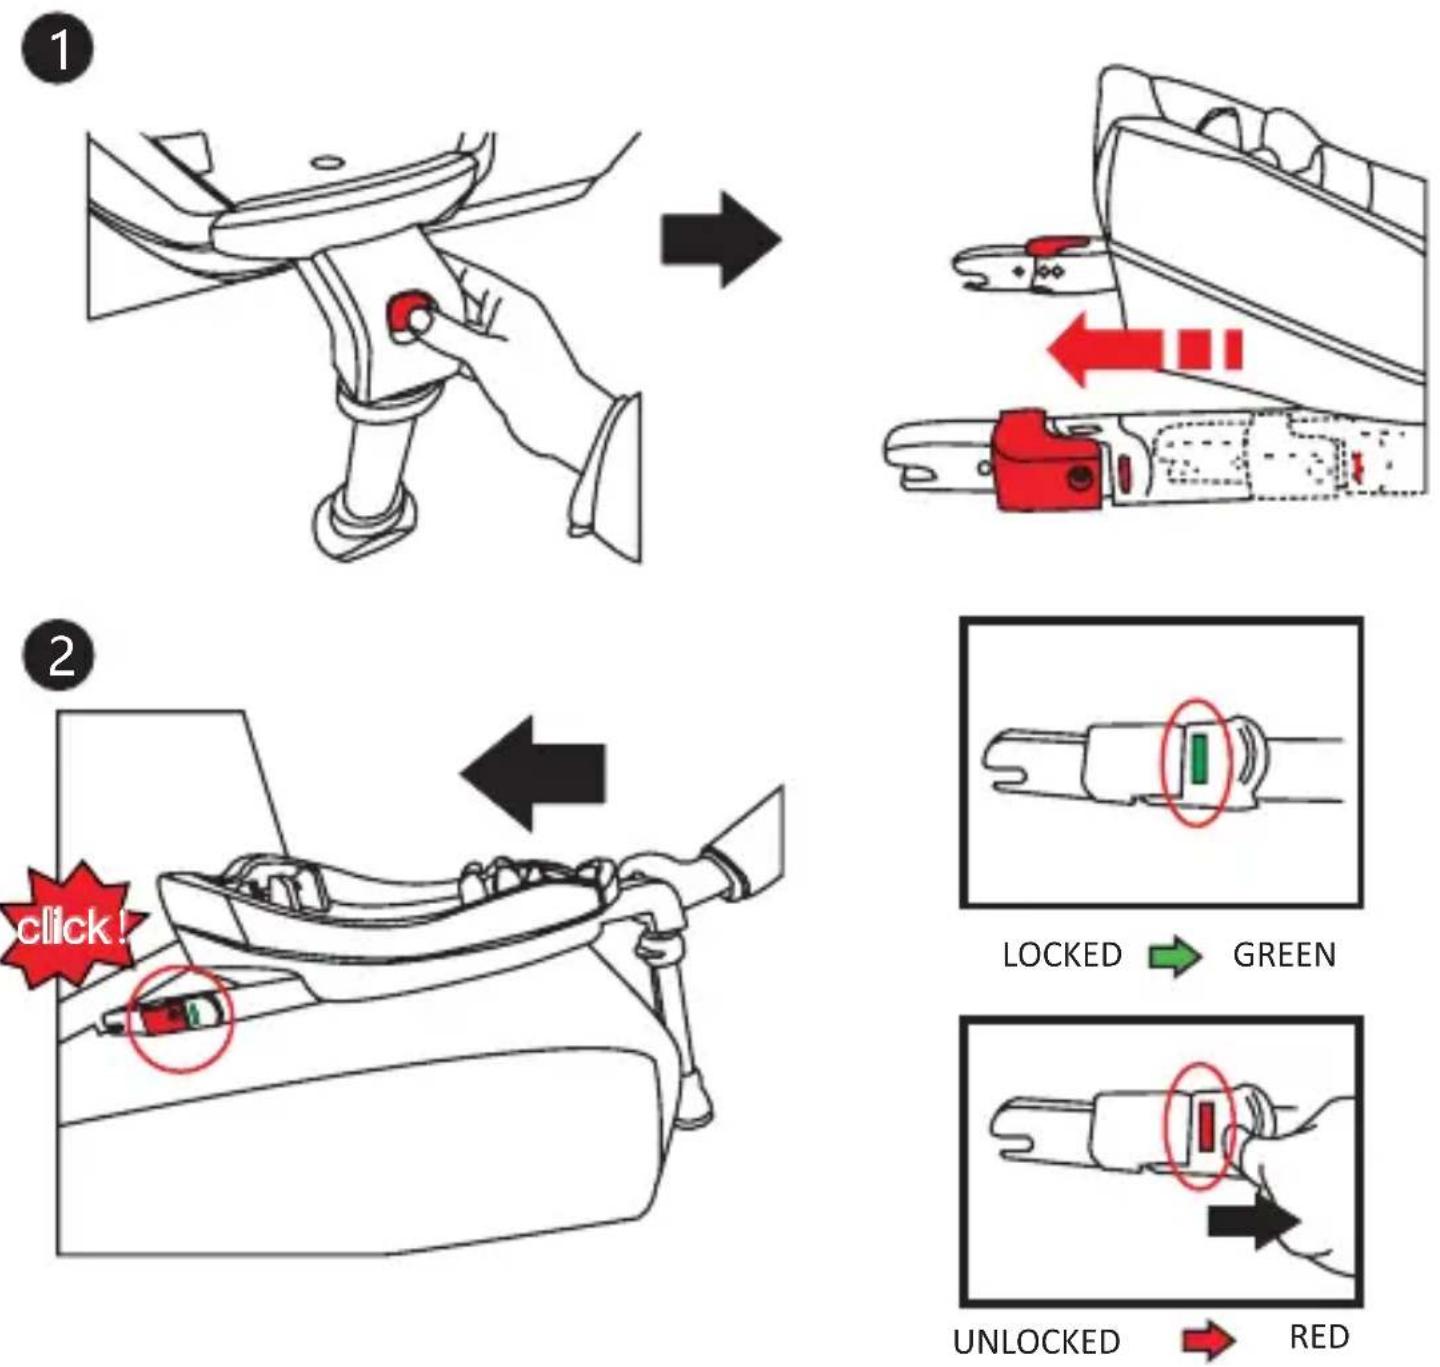
Step 1: Press the two isofix elastic button, and let the Isofix attachments pop up.
Step 2: Place the isofix base on the correct position on the car, make sure that the isofix connectors can get into these protectors. As picture shows, once hearing a “click”, this means the isofix attachments already locked to the car. And make sure the isofix connector is in green window.
To release the Isofix attachments, pull the Isofix release button towards to you.
Installation rearward-facing for 0-18 KG
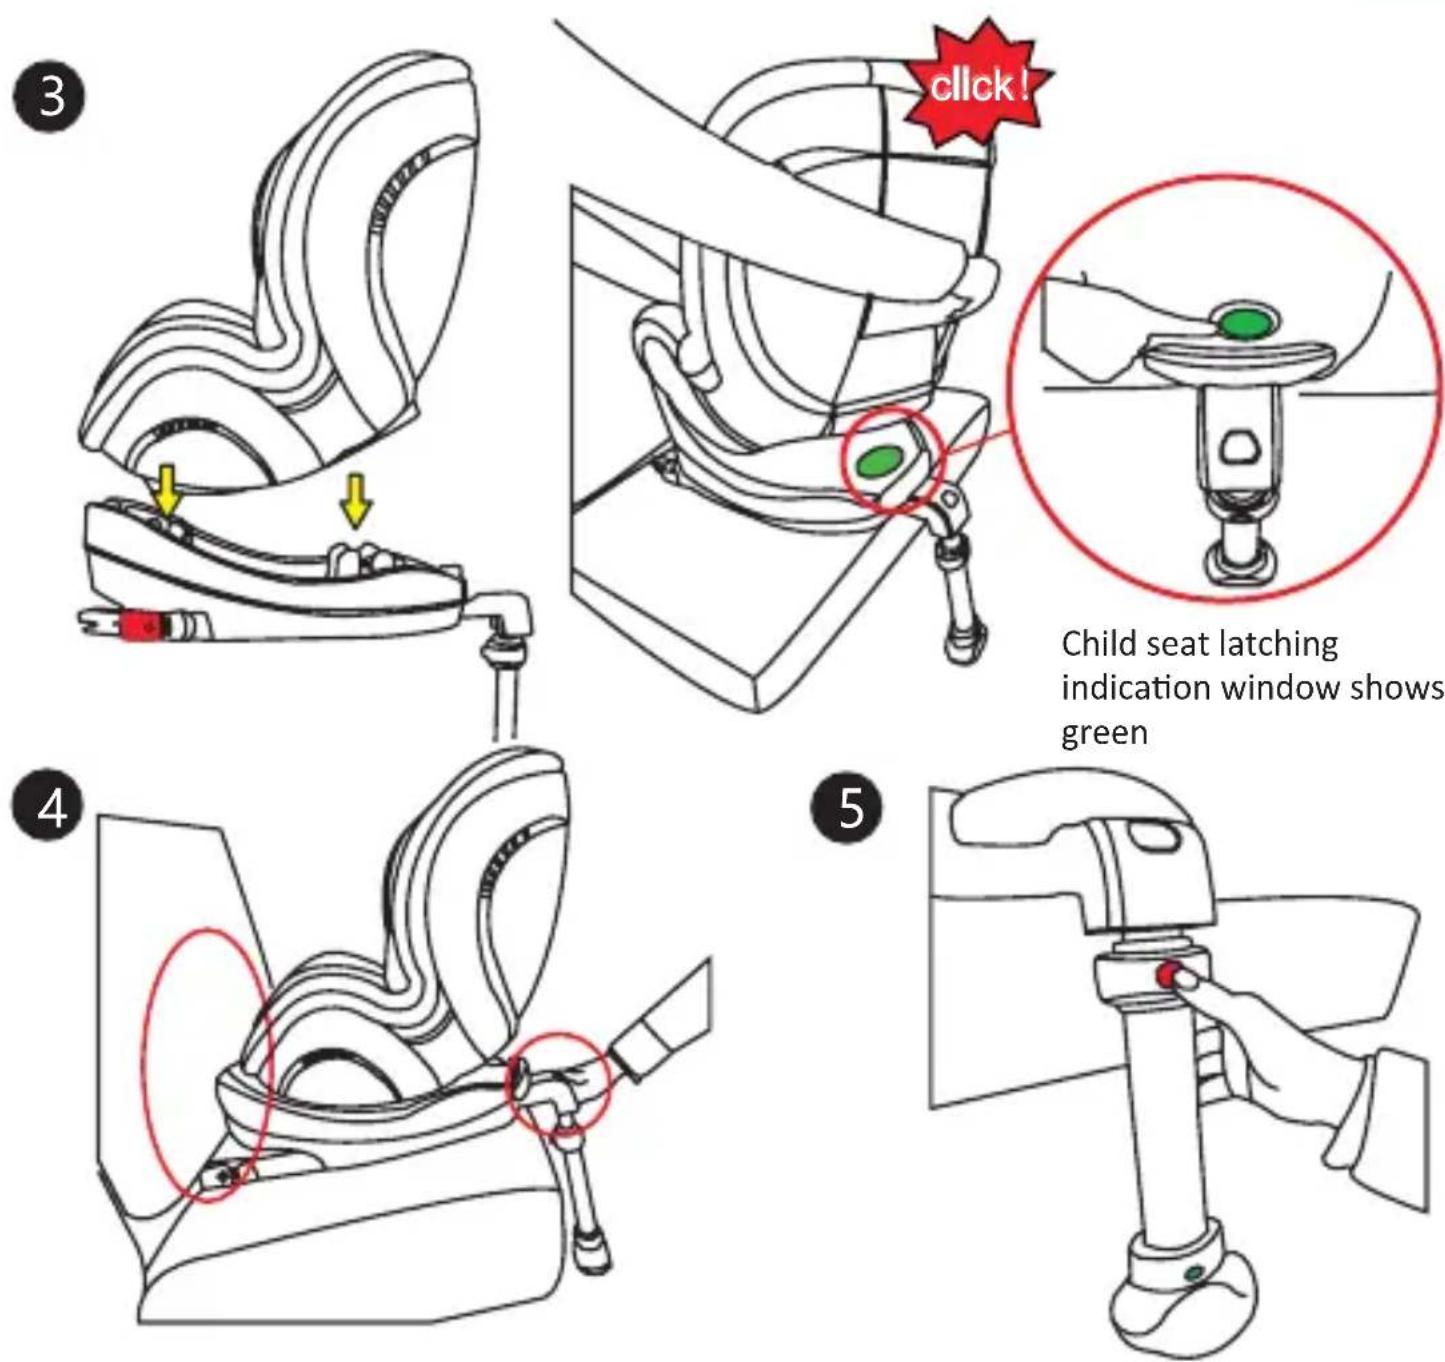
Child seat latching
indication window shows
green
This child seat can be used with the harness for children less than 18KG in weight, installed rear-ward-facing using Isofix anchorage.
For child weight less than 9KG, only can installed rearward-facing position.
Step 3: Secure the backrest on the Isofix base rearward-facing and adjust the child seat to position 4, which is the most reclining position (See picture3). Meanwhile check to make sure the backrest is securely latched with the ISOFIX base and the child seat latching indication shows Green.
Step 4: Press the Isofix pushbutton and push the isofix base towards the car seat backrest until it is firmly pressed against the car seat backrest.
Step 5: Press the supporting leg adjuster button, and adjust the length of support leg to suitable for different height of car seat. Important: Make sure the bottom of the support leg touch the ground completely.
Installation forward-facing for 9-18 KG
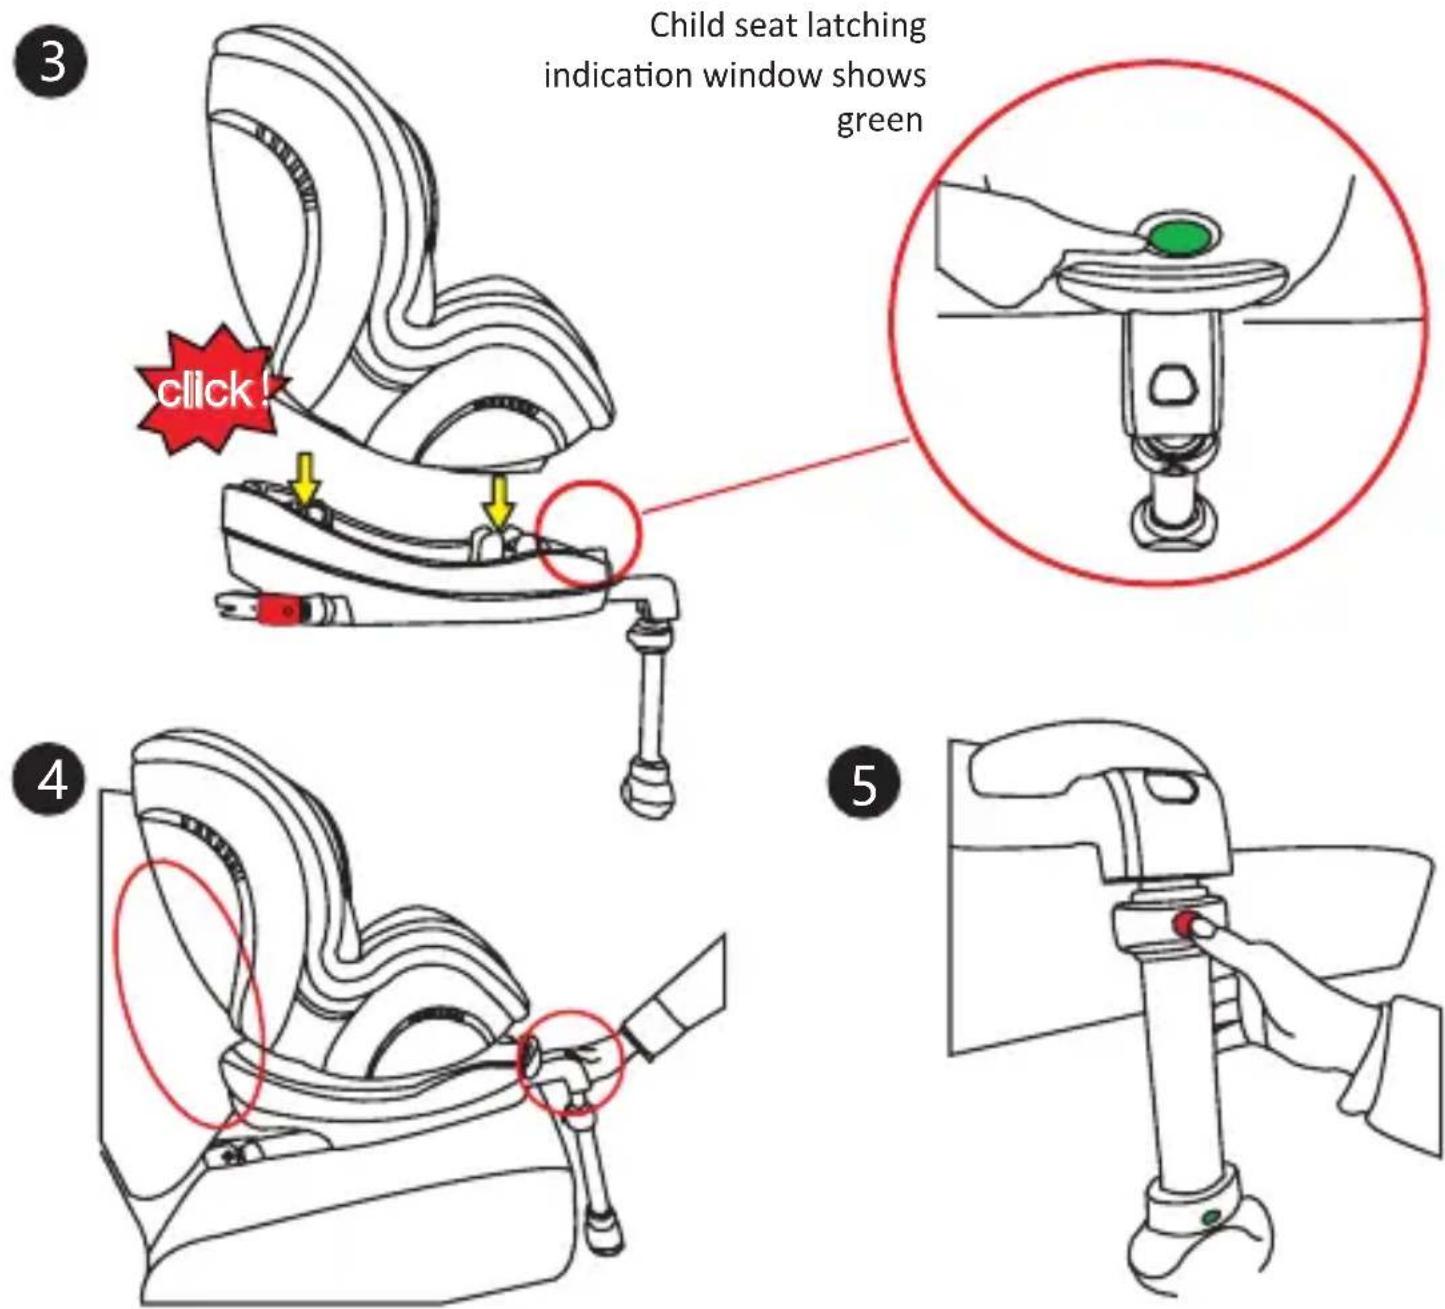
If child weight exceed 9KG, you can also use the forward-facing position. Please install the isofix base first, more details please refer to page 11.
Step 3: Secure the backrest on the Isofix base forward-facing and adjust the child seat to desired position, Meanwhile check to make sure the backrest is securely latched with the Isofix base and the child seat latching indication shows Green. For this backrest, there are 4 positions, please adjust suitable position for your child.
Step 4: Press the isofix elastic button and push the Isofix base towards the car seat backrest until it is firmly pressed against the car seat backrest.
Step 5: Press the supporting leg adjuster button, and adjust the length of support leg to suitable for different height of car seat.
Important: Make sure the bottom of the support leg touch the ground completely.
Remove the Isofix base child restraint system
natural_image
Line drawing of a hand adjusting a red belt buckle (no text or symbols)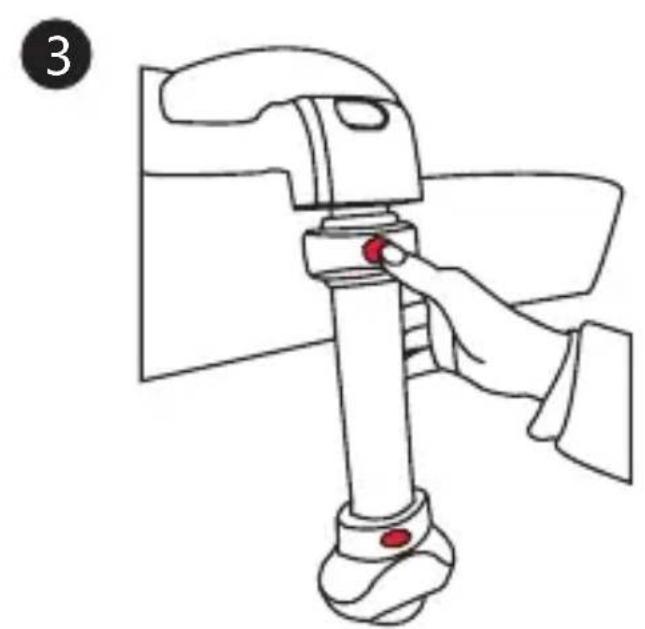
natural_image
Line drawing of a hand operating a mechanical device with a red knob (no text or symbols)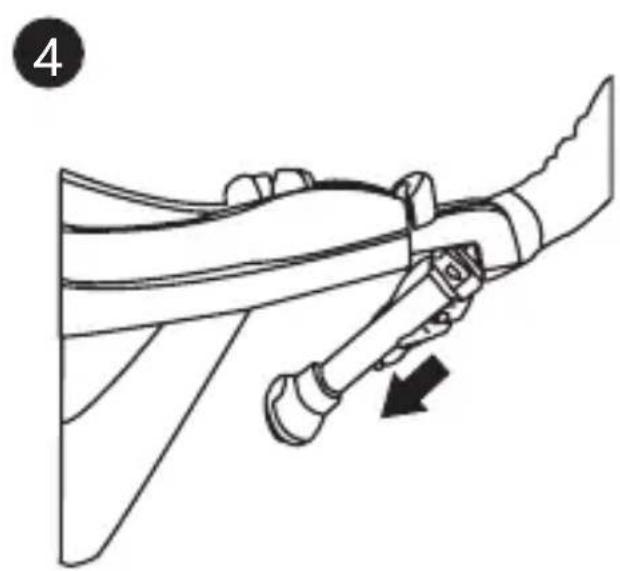
natural_image
Diagram of a mechanical assembly with a lever and directional arrow (no text or symbols)Step 1: Pull the backrest released button until the child seat latching indication window shows red. Then take the seat unit away from the base.
Step 2: As picture 2 shows, pull the Isofix release button towards to you until see the Isofix latching indication window shows red.
Step 3: Press the supporting leg adjuster button and let it become the shortest position.
Step 4: Rotate the supporting let and put it to the bottom of the Isofix base.
Care and maintenance
1. Removing the cover
Backrest cover removal: First, release the elasti c strap at the bottom of the backrest cover, then slide the cover off.
Headrest and booster seat cover removal: Slide the cover off .
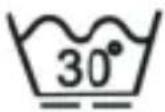
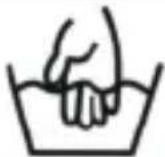 | Hand Wash No dry-cleans | 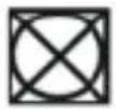 | |
 | Temperature below 30 degree | 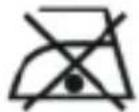 | Do not iron |
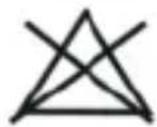 |  | Use mild soapNo decolorizer |
2. Cleaning the seat cover:
All the material parts can be removed. Slight stains can be removed using a damp sponge soaked in soapy water or it can be washed by hand at 30^ in soapy water. Do not use bleach, do not iron, do not machine wash, and do not tumble dry.
3.Cleaning the seat:
The harness and plastic parts can be sponged with very mild detergent and warm water. Do not use chemical cleansers, bleach or corrosives on any part of the seat.
flowchart
graph TD
    A["Step 1: Seatbelt opening"] --> B["Step 2: Click point on upper torso"]
    B --> C["Step 3: Child wearing seatbelt"]
    C --> D["Step 4: Seatbelt insertion"]
    D --> E["Step 5: Seatbelt insertion"]
INCORRECT - TROP BAS INCORRECT - TROP HAUT CORRECT
natural_image
Line drawing of a hand adjusting a red belt buckle (no text or symbols)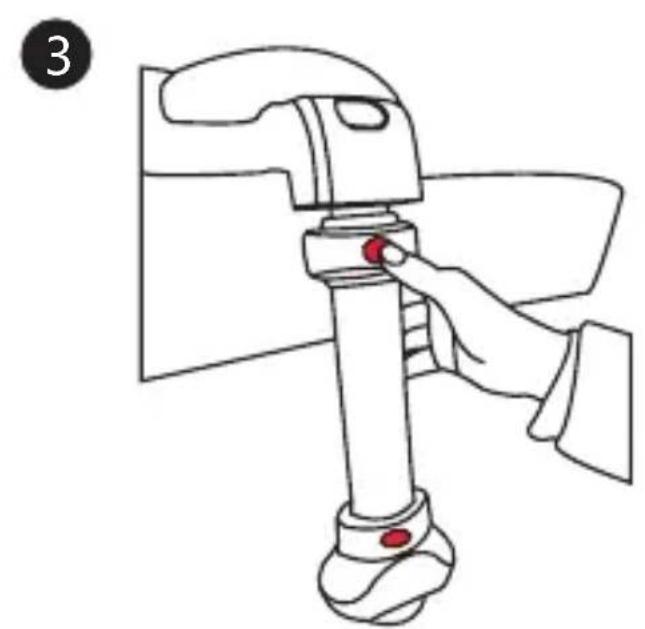
natural_image
Line drawing of a hand operating a mechanical lever with a red knob, no text or symbols present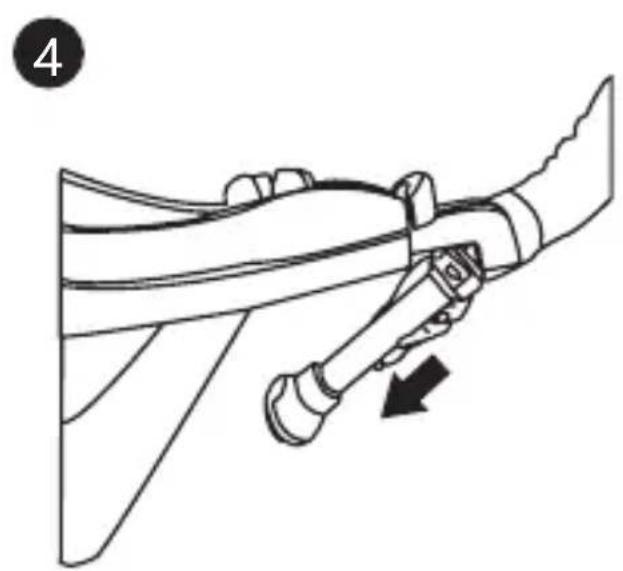
natural_image
Diagram of a mechanical assembly with a lever and curved component, no text or symbols presentnatural_image
Line drawing of a hand adjusting a red belt buckle (no text or symbols)
natural_image
Line drawing of a hand operating a mechanical device with a red knob (no text or symbols)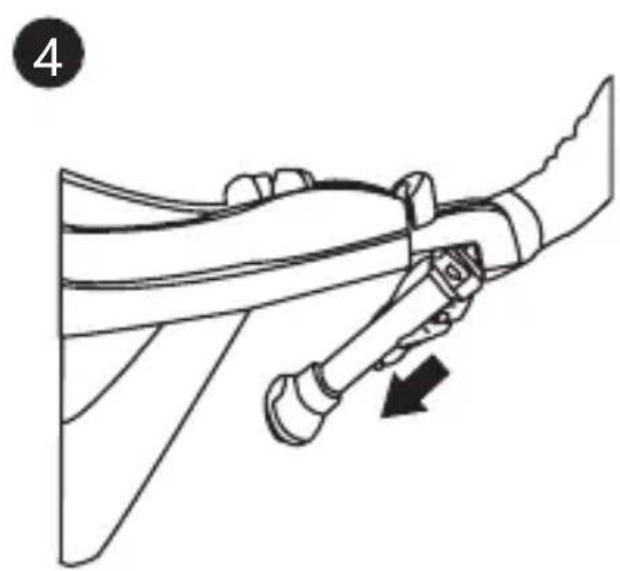
natural_image
Diagram of a mechanical assembly with a lever and pin, showing motion direction (no text or symbols)?1
flowchart
graph TD
    A["Step 1: Seatbelt opening"] --> B["Step 2: Click point on upper torso"]
    B --> C["Step 3: Child wearing seatbelt"]
    C --> D["Step 4: Seatbelt insertion"]
    D --> E["Step 5: Seatbelt insertion"]
FOUT - TE LAAG FOUT - TE HOOG CORRECT
natural_image
Line drawing of a hand adjusting a red belt buckle (no text or symbols)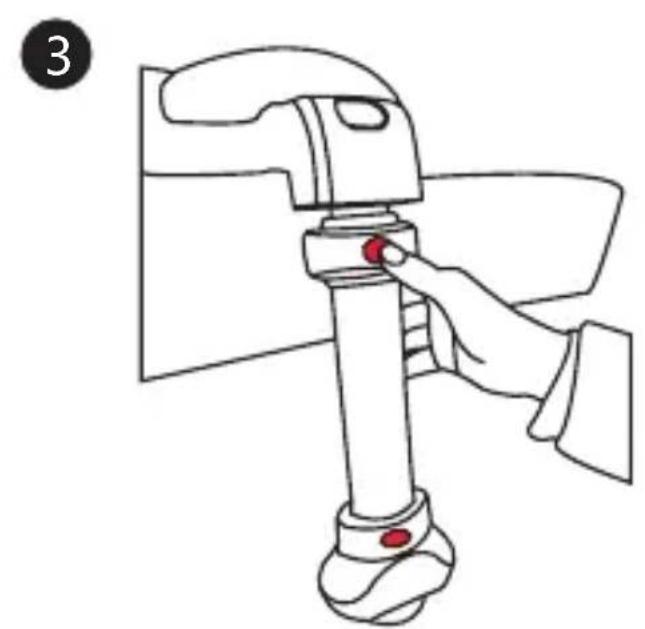
natural_image
Line drawing of a hand operating a mechanical lever with a red knob (no text or symbols)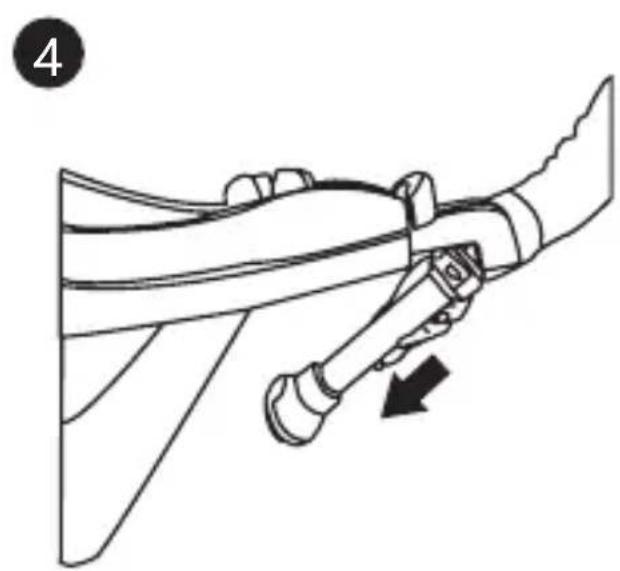
natural_image
Diagram of a mechanical assembly with a lever and curved component, no text or symbols presentnatural_image
Facebook logo icon (no text or symbols present)
Find us on Facebook!
www.facebook.com/Osann.de

osann
Osann GmbH
Gewerbestr. 22
D-78244 Gottmadingen

- Notice
- Extreme Hazard
- Safety Warnings
- Adjustment of belt and straps
- Adjustment the seat to different incline postions
- Loosen the shoulder straps and adjust the height of headrest
- The preparation for installation
- Installation of the Isofix Base Child restraint system
- Installation rearward-facing for 0-18 KG
- Installation forward-facing for 9-18 KG
- Remove the Isofix base child restraint system
- Care and maintenance
- Removing the cover
- Cleaning the seat cover:
- 3.Cleaning the seat:
- osann
Brand : Osann
Model : Jet
Category : High chair