
EPA150EF - Heating Toyotomi - Free user manual and instructions
Find the device manual for free EPA150EF Toyotomi in PDF.

| Product type | Electric radiant panel heater / convector |
| Brand | Toyotomi |
| Model | EPA150EF |
| Power supply | 220-240 V, 50 Hz |
| Power | 1500 W (adjustable: low/high) |
| Dimensions (W × H × D) | 640 × 413 × 113 mm |
| Weight | 4.4 kg |
| Temperature range | 5 °C to 35 °C |
| Timer | 0-24 hours |
| Operating modes | Low power, high power, anti-freeze, timer |
| Child safety | Yes (key lock) |
| Memory function | Yes (memorizes last setting after power off) |
| Display | LED screen |
| Mounting | Wall-mounted (bracket included) or on casters with feet |
| Safety distance | 0.9 m minimum from combustible materials at front and above |
| Cleaning | Dry cloth; do not use abrasive detergents |
| Warranty | 24 months (limited) |
Frequently Asked Questions - EPA150EF Toyotomi
User questions about EPA150EF Toyotomi
0 question about this device. Answer the ones you know or ask your own.
Ask a new question about this device
Download the instructions for your Heating in PDF format for free! Find your manual EPA150EF - Toyotomi and take your electronic device back in hand. On this page are published all the documents necessary for the use of your device. EPA150EF by Toyotomi.
USER MANUAL EPA150EF Toyotomi
Electric convector heater
MANUAL DE INSTRUÇões PORTUGUES P.37
BETJENINGSVEJLEDNING
DANSK
P.43
IMPORTANT SAFEGUARDS
PLEASE READ ALL INSTRUCTIONS BEFORE USING THIS HEATER
WHEN USING ELECTRICAL APPLIANCES, BASIC PRECAUTIONS SHOULD ALWAYS BE FOLLOWED TO REDUCE RISK OF FIRE, ELECTRICAL SHOCK AND INJURY TO PERSONS OR PROPERTY, INCLUDING THE FOLLOWING
When switching on the appliance for the first time, allow it to run at full power for about two hours to get rid of the unpleasant smell. Make sure that the room in which the appliance is located is well ventilated during this operation. It is normal for the appliance to emit small cracking sounds when you turn it on if the first time.
- Read all instructions before using this heater.
- This heater is hot when in use. To avoid burns, DO NOT let bare skin touch hot surfaces. Use handle when moving the unit. Keep combustible materials, such as furniture, pillows, bedding, papers, clothes and curtains at least 3 feet (0.9 meters) from the front and top of the radiator and keep them away from the sides and rear. Keep the rear grille away from walls or drapes so as not to block the air intake.
- Extreme caution and supervision is necessary when any heater is used near children or pets and whenever the heater is left operating and unattended.
- ALWAYS unplug heater when not in use.
- DO NOT operate any heater with a damaged cord or plug or after the heater malfunctions, has been dropped or damaged in any manner. Return the heater to an authorized service facility for examination, electrical or mechanical adjustment or repair.
- DO NOT use outdoors.
- This heater is not intended for use in any area where there is standing water. NEVER locate heater where it may fall into a bathtub or other water container.
- DO NOT run cord under carpeting. DO NOT cover cord with throw rugs, runners or the like. Arrange cord away from traffic area where it will not be tripped over.
- To disconnect the heater, turn controls to OFF, then remove the plug from the outlet. 10. Connect to properly polarized outlets only.
- DO NOT insert or allow foreign objects to enter any ventilation or exhaust opening as this may cause electric shock, fire or damage to the heater.
- To prevent possible fire, DO NOT block air intakes or exhaust in any manner. DO NOT use on soft surfaces, like a bed, where openings may become blocked.
- A heater has hot or arcing or sparking pads inside. DO NOT use it in areas where gasoline, paint or flammable liquids are used or stored.
- Use this heater only as described in this manual. Any other use not recommended by the manufacturer may cause fire, electric shock, injury to persons or other damage to property.
- To prevent overload and blown fuses, be sure that no other appliance is plugged into the same outlet (receptacle) or into another outlet (receptacle) wired into the same circuit.
- It is normal for the heater's plug and cord to feel warm to the touch. A plug or cord which becomes hot to the touch or becomes distorted in shape may be a result of a worn electrical outlet. Worn outlets or receptacles should be replaced prior to further use of the heater. Plugging heater into a worn outlet/receptacle may result in overheating of the power cord or fire.
- Ensure the heater is on a stable, secure surface to eliminate the potential of tipping it over.
ENGUSHENGU
- We DO NOT recommend use of an extension cord as it may overheat and cause a risk of fire. However, if you have to use an extension cord, the cord should be No. 14 AWG minimum size and rated not less than 1875 watts, and has to be used only for supplying power to this heater.
- Be sure that the plug is fully inserted into appropriate receptacle. Please remember that receptacles also deteriorate due to aging and continuous use: check periodically for signs of overheating or deformations evidenced by the plug. DO NOT use the receptacle and CALL your electrician.
- Check that neither the appliance nor the power cable has been damaged in any way during transportation.
- Make sure that no pieces of polystyrene or other packaging material have been left between elements of the appliance. It may be necessary to pass over the appliance with a vacuum cleaner.
- The appliance is not to be used by persons (including children) with reduced physical, sensory or mental capabilities, or lack of experience and knowledge, unless they have been given supervision or instruction.
- Children being supervised not to play with the appliance.
- In order to avoid overheating, DO NOT cover the heater. Heater is not located immediately below a socket-outlet. The heater is to be installed so that switches and other controls cannot be touched by a person in the bath or shower.
- Children of less than 3 years should be kept away unless continuously supervised. Children aged from 3 years and less than 8 years shall only switch on/off the appliance provided that it has been placed or installed in its intended normal operating position and they have been given supervision or instruction concerning use of the appliance in a safe way and understand the hazards involved. Children aged from 3 years and less than 8 years shall not plug in, regulate and clean the appliance or perform user maintenance.
- CAUTION — Some parts of this product can become very hot and cause burns. Particular attention has to be given where children and vulnerable people are present.
CAUTION: TO PREVENT ELECTRIC SHOCK, MATCH WIDE BLADE OF PLUG TO WIDE SLOT, FULLY INSERT.
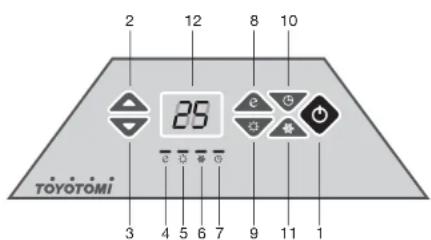
Control function
Check the household voltage to ensure it matches the appliance's rated specification.
Be sure to plug into a 220-240V, 50Hz outlet.
Key Operating Instructions
- On/Off switch
- Upper key
- Down key
- Low power indicator light
- High power indicator light
- Anti-frost indicator light
- Timer indicator light
- Low power key
- High power key
- Timer key
- Anti-frost key
- LED display
ENGUSHENGLISH
1. Function Introduction
(1) ON/OFF: Power on, inset the plug, the heater enters into standby mode. Press and the heater start to work under the previous mode, LED display show the set temperature. Power off, press again, the heater stop to work and enter into standby mode, display show
(2) Power setting: When user uses the heater for the first time, it works in default mode-high power. Press enter into low power mode, the indicator light will on; press , after into high power mode, the indicator light will off. indicator light will on.
(3) Temperature setting: Under working mode, press to increase or decrease the temperature degree. The temperature range is 5^ - 35^ . Press the key over 2s, the degree can set quickly. When finish setting, it confirm automatically, the dot stop if ashing and off, the LED display shows setting temperature. Note: If under Anti-frost mode, the temperature cannot be setting.
(4) Timer off setting: When the heater is working, press , the timer indicator light will flash, the display shows timer, press to set the hours, range is 0-24 hours. Press the over 2s, can set the hour quickly. After 5s finish setting timer, the indicator light on. Display shows the set temperature.
(5) Anti-frost mode: Under working mode, press the indicator light on. Press again, the anti-frost mode cancelled and indicator light off.
(6) Child lock function: Press together for 3s, the display shows [ ] symbol, after 5s. display shows the previous status, the keys cannot work. If press the keys, display is fl ashing [ ] symbol. Press together for 3s again, the keys unlock.
(7)Memory function: If suddenly power off, after power on again, the heater will enter into previous working mode.
Installation the panel heater
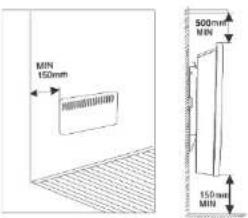
Recommended Installation The convector shall be installed so that produced heat will mix maximum volume of air. The convector should be attached in accordance with applicable requirements. The switch and other mechanisms should be away from a person who takes bath or shower. The device should not be exposed to water splashes. If the device is covered there is a risk of overheating. It is strictly forbidden to cover or plug inlets and outlets (air grids) as it can cause an accident or damage the device. DO NOT place the convector behind curtains, doors, under wall opening or ventilation hole. Keep minimum distance required for installation on floor, surface, near furniture, etc. (Figure 1).
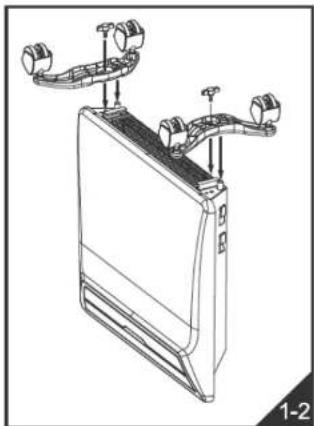
Wall Mounting:
DO NOT fit the castors to the base of the heater. Make sure the heater is unplugged from the mains power and the wall is suitable for mounting the panel heater and there are the correct clearances. Make sure the panel heater is within 1 meter of a power socket.
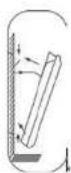
Detach the mounting bracket from the rear of the heater by compressing the 2 bracket clips, pulling the clips out of the heater rear & removing the bracket hooks from the heater.
Position the bracket on the wall in the desired position & drill holes for two mounting screws. Once the holes are drilled, use two screws (appropriate for the type of wall to fix the bracket firmly in place. Check for strength.
Carefully place the heater (slightly tilted forward) onto the hooks at the bottom of the bracket & rotate back so the clips fix back into their original holes. Check that they are fixed correctly. If possible, have a second person help to check for alignment as the heater is attached. The heater is now ready to connect to the mains power.
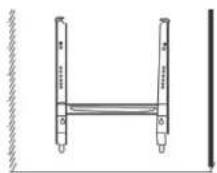

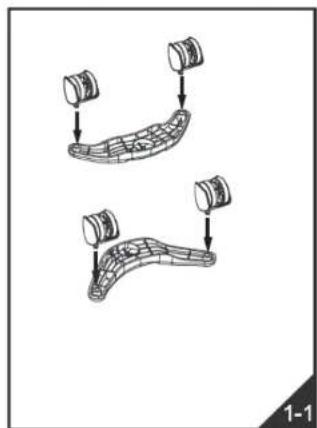
Floor Mounting:
The device can be mounted on special legs enabling to move it in the room.
Support foots are attached as follows:
Tum the convector upside down;
Take one of support foots with rollers;
Place the plate of the support foot to the attaching point on the convector so that the dome-shaped part of the plate will be tightly attached to the convector close to its rear panel the screw holes should match;
Tighten the support foos with the screws in parts kitting.
ENGLISH
MAINTENANCE

This product contains recyclable materials. DO NOT dispose this product as unsorted municipal waste. Please contact your local municipality for the nearest collection point.
The heater requires regular cleaning to ensure trouble free operation.
Unplug the heater from the mains supply before cleaning.
Ensure that the heater has been allowed to cool down completely before cleaning.
Unplug the heater from the mains supply before cleaning.
Ensure that the heater has been allowed to cool down completely before cleaning.
Periodically, clean the appliance with a dry cloth to remove the dust. DO NOT use detergents or abrasive products.
Using a vacuum cleaner, clean the dust from the intake grill and the air output openings.
To clean behind the heater (when mounted on a wall), unfasten the two locking screws located on the top of the mounting bracket, press down on the two release catches on the mounting bracket to tilt the heater forward. When the heater is tilted forward, it is easier to clean behind it.
Ensure the heater is dry before plugging back into the mains supply.
If the appliance is not to be used for any length of time, we recommend returning it to its original package and storing it in a dry, dust-free place.
TROUBLESHOOTING
| Problem | Cause | Solution |
| The appliance does not heat. 1) The power cord is not properly connected.2) The corvector is in timer mode and the timer is up.3) The room temperature exceeds the temperature set by the thermostat. | 1) Connect the cable correctly.2) Press the power switch again and operate in normal operation.3) Set a new operating temperature. | |
| Dust burning smell when using the convector for the first time. | It is not a defect. The smell disappears | as the convector is used for several minutes. |
If the problems persist after trying the solutions, contact authorized service center.
SPECIFICATIONS
| MODEL EPA-100EF EPA-150EF EPA-200EF | |||
| POWER SOURCE 220-240V, 50Hz | |||
| POWER CONSUMPTION 1000 W 1500 W 2000 W | |||
| WEIGHT | 3.5kg | 4.4kg | 4.9kg |
| DIMENSIONS (W×H×D) | 460×413×113 | 640×413×113 | 800×413×113 |
LIMITED WARRANTY
TOYOTOMI CO., LTD. (TOYOTOMI) warrants each product and any parts thereof sold by it to be free from defects in materials or workmanship under normal use and service for TWENTY FOUR (24) MONTHS from the date of delivery to the original purchaser at retail subject to the following terms and conditions:
WHAT IS COVERED: Product or any parts thereof which are defective in materials or workmanship.
WHAT IS NOT COVERED:
This warranty does not extend to any defect due to the negligence of others: failure to install, operate or maintain until in accordance with instructions (operating and maintenance instructions are furnished with each new unit; unreasonable use, accidents, alteration, use of unauthorized or non-standardized equipment, excessive power, excessive losses, electrical malfunction, etc., as resulting from large power surges, short circuit, etc.; incorrect installation; or repair by anyone other than a service facility specified by TOYOTOMI).
WHOIS COVERED:The original purchaser at retail.
WHAT WE WILL DO: TOYOTOMI will either repair or replace, at its opinion, all defective parts free of charge that are covered by this limited warranty on a carry-in basis, to your nearest authorized dealer or distributor of TOYOTOMI.
WHAT YOU MUST DO FOR WARRANTY SERVICE: You must return the defective product or part to any authorized dealer or distributor of TOYOMI with the LIMITED WARRANTY. If possible, you may also please contact our CUSTOMER RELATIONS DEPARTMENT 60.
TOYOTOMI EUROPE SALES B.V. 10000000000000000000
ENINET: http://www.26.com/8
THE FOREIGNING EXPRESS ALL OF TOYOTOM'S OBLIGATIONS AND LIABILITIES WITH RESPECT TO THE QUALITY OF PRODUCT FURNISHED BY IT. ALL OTHER WARRANTYES, EXpressed OR IMplied, INCLUDING THE WARRANTY OF MERCHANTIABILITY OF FIFTNESS FOR A USE OF THE PRODUCT, AND THE INTOLERANCE OF THE USE OF ANYTHING NOT BE ENABLED FOR THE LOSS OF USE OF THE PRODUCT, INCONVENIENCE, LOSS OR ANY OTHER DAMAGE, DIRECT OR CONSEQUENTIAL, ASRISING OUT OF, THE USE OF, OR INABILITY TO USE, THE PRODUCT OR DAMAGES RESULTING FROM OR ATTRIBUTABLE TO DEFEFFS IN THE PRODUCT.
No other than TOYOTOMI has authority to extend or modify the terms of this Limited Warranty in any manner whatsoever.
Some states do not allow the exclusion or limitation of incidental or consequential damages or limitations on how long an implied warranty lasts, so these limitations or exclusions may not apply to you. This Limited Warranty gives you specific legal rights and you may also have other rights which vary from state to state.
PRECAUTIONS IMPORTANTES
VEUILLEZ LIRE TOUTE LES INSTRUCTIONS AVANT D'UTILISER CE RADIATEUR
LORS DE L'UTILISATION D'APPEARIS ÉLECTRIQUES, DES PRECAUTIONS DE BASE DOIVENT TOUJOURS ÉTRE PRISES POUR RÉDIRE L RISQUE D'INCENDIE, DE CHOC ÉLECTRIQUE ET DE BLESSURES AUX PERSONNES OU AUX BIENS. PAR EXAMPLE:
Installation recommende
EINGESCHBÄNKTE GARANTIE
E-MAIL:info@163.com.cn
INTERNE:www.towotom.com
DAS WETER OBOEN GESAGTE BEINHALTET ALLE VERPFlichtungen und DIE GESAMTE HAFTUNG VON TOYOTOMI IN BEZUG AUF. DUE QUALITAT DER VON TOYOTOMI GELIEFERENTEN PRODUkte, ALLE AnderEN DE PERSPECTIVE PRODUkte, ALLE AnderEN DE PERSPECTIVE PRODUkte, EINCHSILESSD. GREBAUBSTGAUCHlichkeit ODER DER EIGNGINF FOR EUNEN BESTIMMTEN ZWECK, SIND NICH ANMENDBAR. TOYOTOMI HAHET NÜCH FÜR DEN VERLUST DER EINSAUSZAFFHIGKEIT DES PRODUKTUS, DIE UNANGEMESSEINH-VERLUST ODRAND AnderERE SCHADEN, DIE DIREKT ORIENTEK FROM DEM GRAUBAIB ZW., DFM ORIENTEK FROM DEM GRAUBAIB ZW., DFM ORIENTEK FROM DEM PRODUKTUS RISULTIERTER ODRER SCHADEN BASIERFEND AO UBER ZUKROCKFHRABUOR REFDEKEM IM PRODUKT.
Installation of panelvarmer
Anbefalet installation: Konvektoren skal monteres, sa den afgivne varme blandes med maksimal luftvolumen. Konvektoren skal fastgore i overensstemmelse med gaelnde krav. Kontakten og andre mekanismer skal vare vaek fra personer, der tager et bad aller brusebad. Apparatet ma参加会议 for Vandsprt. Hvis apparatet daekkes til, er der risiko for overhehning. Det er strengt forbudt at tildekke eri tilstoppe luftindtag og-udtag (luftgitre), da det kan medfare en ukykke er leskadige apparatet. Konvektoren ma IKKE placeres bag gardiner, dore, under en vegabning eri et ventilationshul. Overhold den minimumsafstanden, der kraves til installation pa gulvet, overfl ade, nar mober osv. (fi gur 1).