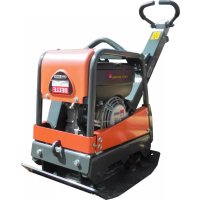
BELLE PCLX 1645E - Vibratory plate Lescha - Free user manual and instructions
Find the device manual for free BELLE PCLX 1645E Lescha in PDF.
User questions about BELLE PCLX 1645E Lescha
0 question about this device. Answer the ones you know or ask your own.
Ask a new question about this device
Download the instructions for your Vibratory plate in PDF format for free! Find your manual BELLE PCLX 1645E - Lescha and take your electronic device back in hand. On this page are published all the documents necessary for the use of your device. BELLE PCLX 1645E by Lescha.
USER MANUAL BELLE PCLX 1645E Lescha
natural_image
Line drawing of a manual lawn mower (no text or symbols)- Spare Parts Book
- Pièces Détachées
- Onderdelen Boekje
- Reservedele Skrift
- Ersatzteilhandbuch
- Manuale dei Ricambi
- Bruksanvisning
- Varaosaluettelo
- Lista Części Zamiennych
• Запасные Части Книга - Varuosade Nimekiri
- Rezerves Dalu Saraksts
- Atsarginiu Daliu Sarašas
GB Operators Manual
F Manuel De L'Opérateur
NL Handleiding
DK Betjeningsvejledning
D Bedienungshandbuch
① Manuale Dell'Operatore
s Bruksanvisning
SF Käyttöohje
PL Instrukcja Obstugi
RUS Руководство для оператора
EST Kasutusjuhend
LV Lietotāja rokasgrāmata
LT Naudojimo Instrukcija
EC DECLARATION OF CONFORMITY / DECLARATION CE DE CONFORMITE / DECLARACIÓN DE CONFORMIDAD CE / DECLARAÇÃO CE DE CONFORMIDADE / EG-VERKLARING VAN OVEREENSTEMMING / EF OVERENSSTEMMELSESERKLAERING

We, Belle Group Sheen UK, Sheen, Nr. Buxton, Derbyshire, SK17 0EU, GB, hereby certify that if the product described within this certificate is bought from an authorised Belle Group dealer within the EEC, it conforms to the following EEC directives: 2006/42/CE (This directive replaces directive 98/37/EC), Electromagnetic Compatibility Directive 2004/108/CE (as amended by 89/336/EEC, 92/31/EEC & 93/68 EEC). The Waste Electrical and Electronic Equipment (WEEE) 2002/96/CE, the low voltage directive 2006/95/CE, BS EN ISO 12100-1:2003 Safety of machinery and associated harmonised standards, where applicable. Noise emissions conform to directives 2000/14/EC Annex VI & 2005/88/EC, for machines under article 12 the notified body is AVT Reliability, Unit 2 Easter Court, Europa Boulevard, Warrington, Cheshire, WA5 7ZB, GB. Noise Technical files are held by Ray Neilson at the Belle group Head Office address which is stated above.

PRODUCT TYPE ...... TYPE DE PRODUIT...... TIPO DE PRODUCTO......
MODEL...... MODELE...... MODELO......
SERIAL No..... N° DE SERIE..... N° DE SERIE.....
natural_image
Empty white rectangle with dashed border (no text or symbols)Signed by:
Signature:
Medido por:
Assinado por:
Getekend door:
Uunderskrevetaf:

text_image
O.NahRay Neilson
Managing Director - On behalf of BELLE GROUP (SHEEN) UK.
Place of Declaration - Sheen, Nr. Buxton, Derbyshire, SK17 0EU, UK
Lieu de déclaration - Sheen, Nr. Buxton, Derbyshire, SK17 0EU, UK
Sted i erklæring - Sheen, Nr. Buxton, Derbyshire, SK17 0EU, UK
Date of Declaration - 2016....
natural_image
Empty white rectangle with dashed border (no text or symbols)Unterzeichnet vo:
Firmato da:
Undertecknat:
Signatur:
Allekirjoitus:
Podpisat:

text_image
O. Nath Ray Neilsonnatural_image
Empty rectangular frame with dashed border (no text or symbols)text_image
O. Nath Ray Neilsonnatural_image
Empty white rectangle with dashed border (no text or symbols)Podepsal:
Semnat de:
Aláírás:
Potpisao:
Imzalayan:
Podpísal:

text_image
O.NahRay Neilson
Director General - in numele BELLE GROUP (SHEEN), UK
This manual has been written to help you operate and service the 'PCLX 16/45E' Plate compactor safely. This manual is intended for dealers and operators of the 'PCLX 16/45E' Plate compactor.
Foreword
The ‘Machine Description’ section helps you to familiarise yourself with the machine's layout and controls.
The ‘Environment’ section gives instructions on how to handle the recycling of discarded apparatus in an environmentally friendly way.
The ‘General Safety’ and ‘Health and Safety’ sections explain how to use the machine to ensure your safety and the safety of the general public.
The ‘Operating Instructions’ section helps you with the setting up and use of the machine.
The ‘Trouble Shooting Guide’ helps you if you have a problem with your machine.
The ‘Service & Maintenance’ section is to help you with the general maintenance and servicing of your machine.
The ‘Warranty’ Section details the nature of the warranty cover and the claims procedure.
Directives with regard to the notations.
Text in this manual to which special attention must be paid are shown in the following way:

CAUTION
The product can be at risk. The machine or yourself can be damaged or injured if procedures are not carried out in the correct way.

WARNING
The life of the operator can be at risk.

WARNING

WARNING
Before you operate or carry out any maintenance on this machine YOU MUST READ and STUDY this manual.
KNOW how to safely use the unit's controls and what you must do for safe maintenance. (NB Be sure that you know how to switch the machine off before you switch on, in case you get into difficulty.)
ALWAYS wear or use the proper safety items required for your personal protection. If you have ANY QUESTIONS about the safe use or maintenance of this unit, ASK YOUR SUPERVISOR OR CONTACT: Altrad Belle (UK): +44 (0) 1298 84606

Contents
How To Use This Manual....6
Warning 6
Machine Description....7
Environment 7
Technical Data....8
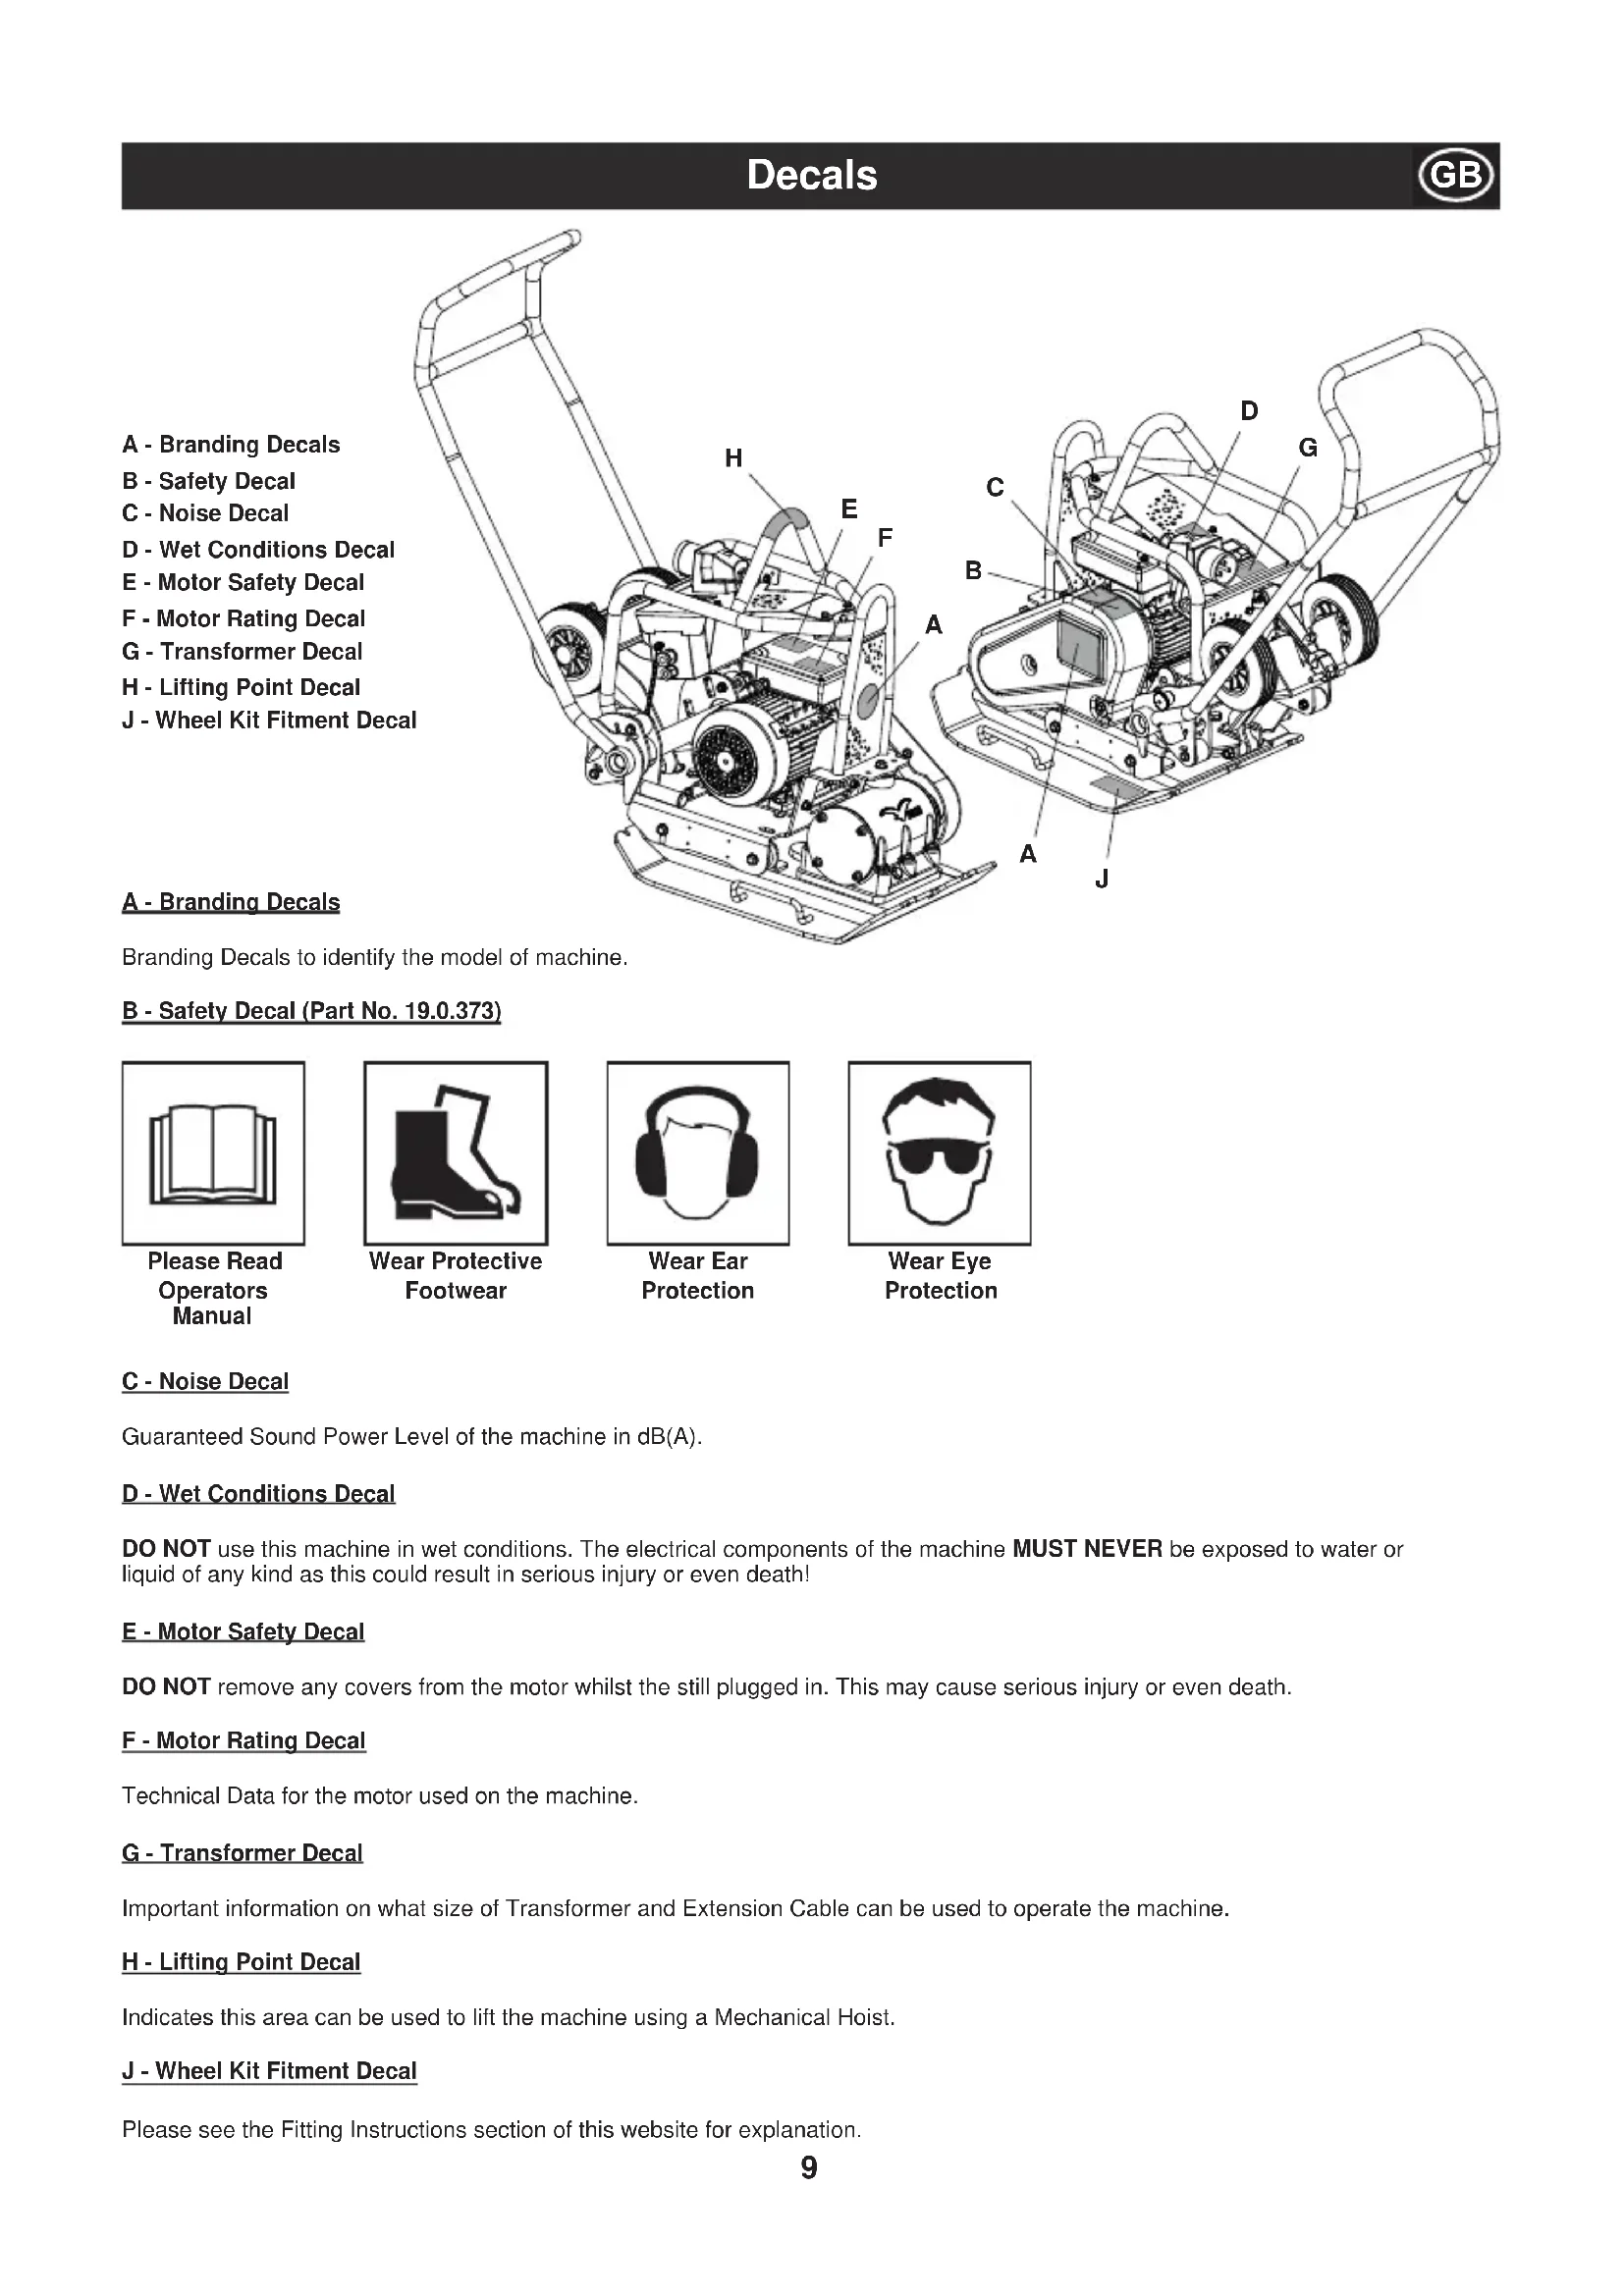
Decals....9
Safety Instructions....10
Health And Safety....11
Reasons For Compaction....11
Compaction Specification....11
Applications....11
Pre-Start Checks 11
Operating Instructions....12
Trouble Shooting Guide .... 13
Service & Maintenance .... 14
Fitting Instructions....15
Warranty 16
Declaration Of Conformity....2
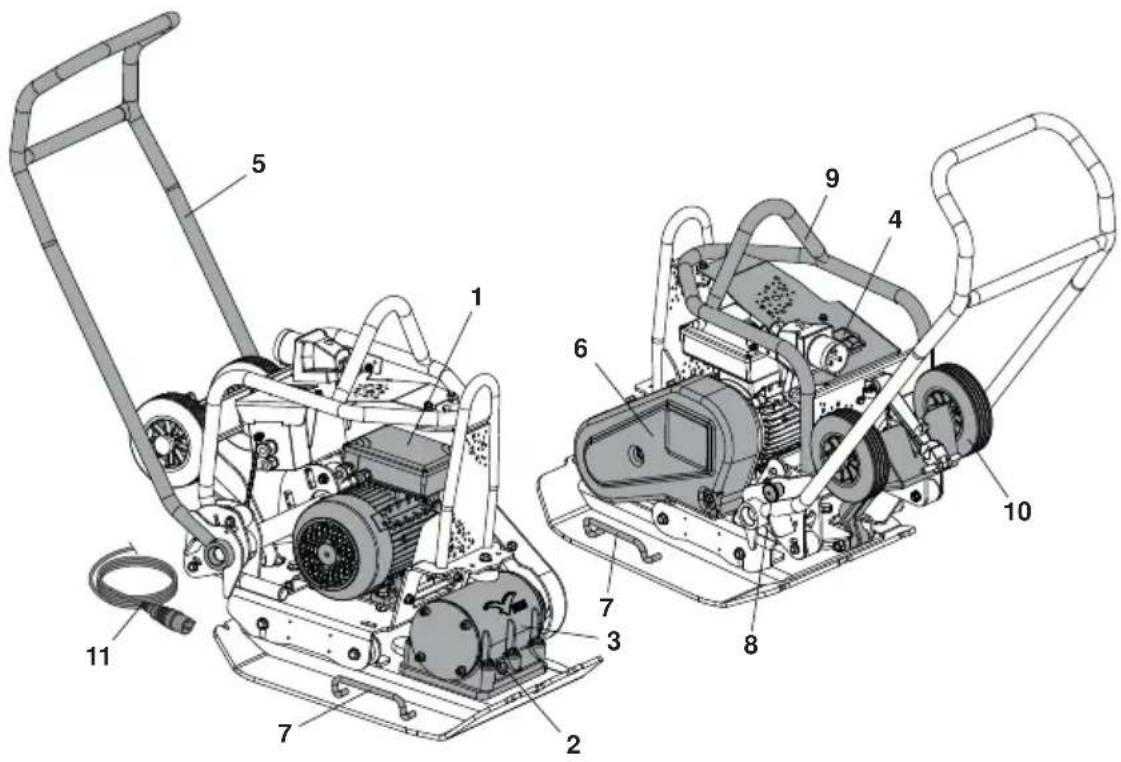
Machine type:
Single Direction
Plate Compactor
- Electric Motor
- Vibrator Unit Oil Plug.
- Vibrator Unit
- On / Off Switch
- Operating Handle,
- Belt Guard,
- Hand Lifting Point
- Handle Latch
- Motor Guard
- Wheel Kit
- Power Cable
DO NOT use a Mechanical Hoist on the Hand Lifting Point (No. 7)
text_image
Technical diagram of a lawn mower system with numbered components for identificationEnvironment

Safe Disposal.

Instructions for the protection of the environment. The machine contains valuable materials. Take the discarded apparatus and accessories to the relevant recycling facilities.
| Component Material | |
| Operator Handle Steel | |
| Hand Grip Steel | |
| Base Plate Steel | |
| Eccentric Weights Steel | |
| Electric Motor Steel & Various Parts Steel | Aluminium & Copper& Aluminium |
text_image
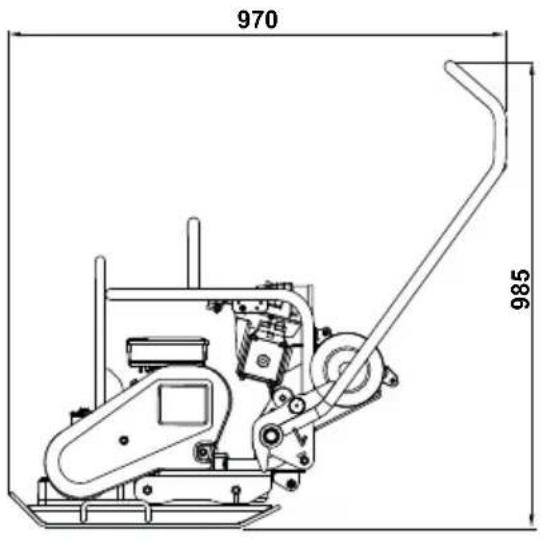
970 985
natural_image
Technical line drawing of a mechanical device with internal components and dimension label (450), no readable text or symbols beyond the dimension marker.
text_image
960 705 420 583| Model 110v 50Hz 230v 50Hz | ||
| Weight (kg) 97 97 | ||
| Motor Power (Hp / kW) 3.0 / 2.2 3.0 / 2.2 | ||
| Motor RPM 2880 2880 | ||
| Nominal Voltage (v) 110230 | ||
| Full Load Current (A) 27.2 13.6 | ||
| Motor Protection Rating IP44 | IP44 | |
| Power Consumption (kW) | 2.21 2.21 | |
| Vibrator Force (kN) | 14 14 | |
| Frequency (Hz) | 50 50 | |
| Minimum Transformer Size (kVA) | 5 | N/A |
| Maximum Travel Speed (m/min) | 25 25 | |
| Max. Gradient (°) | 20 20 | |
| Compaction Force (kg/m2) | 517 | 517 |
| 3 Axis Vibration* (m/sec2) | 3.04 3.04 | |
| Usage Time (Mins) 323.6 | 323.6 | |
| Sound Power Level (dB(A)) | 105 | 105 |
* Minimum level to EN500 Part 4
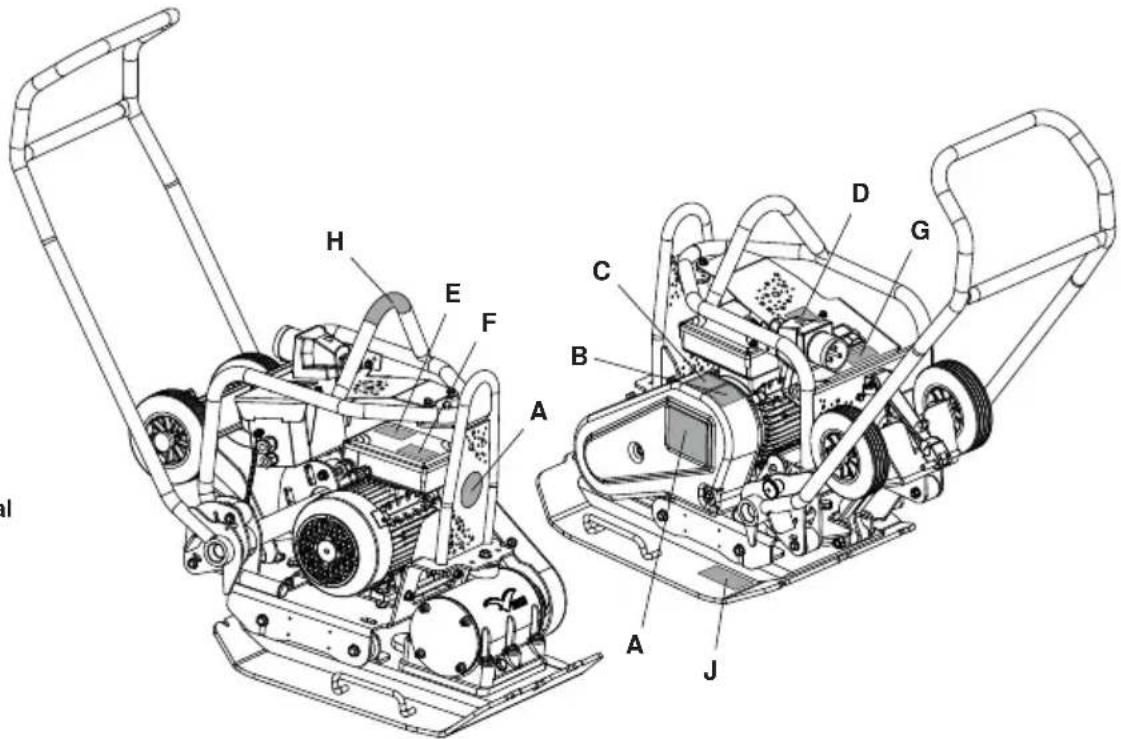
A - Branding Decals
B - Safety Decal
C - Noise Decal
D - Wet Conditions Decal
E - Motor Safety Decal
F - Motor Rating Decal
G - Transformer Decal
H - Lifting Point Decal
J - Wheel Kit Fitment Decal
text_image
Technical diagram of a mechanical lawn mower with labeled components from A to JA - Branding Decals
Branding Decals to identify the model of machine.
B - Safety Decal (Part No. 19.0.373)

Please Read
Operators
Manual

Wear Protective
Footwear

Wear Ear
Protection

Wear Eye
Protection
C - Noise Decal
Guaranteed Sound Power Level of the machine in dB(A).
D - Wet Conditions Decal
DO NOT use this machine in wet conditions. The electrical components of the machine MUST NEVER be exposed to water or liquid of any kind as this could result in serious injury or even death!
E - Motor Safety Decal
DO NOT remove any covers from the motor whilst the still plugged in. This may cause serious injury or even death.
F - Motor Rating Decal
Technical Data for the motor used on the machine.
G - Transformer Decal
Important information on what size of Transformer and Extension Cable can be used to operate the machine.
H - Lifting Point Decal
Indicates this area can be used to lift the machine using a Mechanical Hoist.
J - Wheel Kit Fitment Decal
Please see the Fitting Instructions section of this website for explanation.
For your own personal protection and for the safety of those around you, please read and ensure you fully understand the following safety information. It is the responsibility of the operator to ensure that he/she fully understands how to operate this equipment safely. If you are unsure about the safe and correct use of the 'PCLX 16/45E' Plate compactor, consult your supervisor or Altrad Belle.

CAUTION
Improper maintenance can be hazardous. Read and Understand this section before you perform any maintenance, service or repairs.
• This equipment is heavy and must not be lifted single-handedly, either GET HELP or use suitable lifting equipment.
• Cordon off the work area and keep members of the public and unauthorized personnel at a safe distance.
• Personal Protective Equipment (PPE) must be worn by the operator whenever this equipment is being used (see Health & Safety).
• Make sure you know how to safely switch this machine OFF before you switch it ON in case you get into difficulty.
• Always switch OFF and un-plug the motor before transporting, moving it around the site or servicing it.
- During use the motor becomes very hot, allow the motor to cool before touching it. Never leave the motor running and unattended.
- Never remove or tamper with any guards fitted, they are there for your protection. Always check guards for condition and security, if any are damaged or missing, DO NOT USE THE MACHINE until the guard has been replaced or repaired.
- Never pull or guide the machine using the cable and never pull on the cable to disconnect the plug.
• DO NOT operate the MACHINE when you are ill, feeling tired, or when under the influence of alcohol or drugs.
- Ensure that any trailing cable is protected against damage and not liable to be tripped over or trapped underneath the machine.
• DO NOT use the Motor Guard as a Lifting Point.
• DO NOT Jet Wash the machine as this could result in serious injury or even death!
- DO NOT use this machine in wet conditions. The electrical components of the machine MUST NEVER be exposed to water or liquid of any kind as this could result in serious injury or even death!
- Belle strongly recommends the use of a Residual Current Device on 220/240v electrics.
Fire Fighting
If your machine catches fire, turn off the electric supply. Using a dry powder or C02 fire extinguisher put out the fire. If the fire can not be put out, keep away and call the fire brigade. If you are in any doubt about the safety condition of your machine, please consult your nearest Altrad Belle dealer or Altrad Belle direct.
Electric Motors
All portable electric appliances are dangerous if abused. This machine will only operate on one voltage. Check the power supply to ensure it corresponds to the voltage as stamped on the motor. Make sure that the motor is switched off before you plug it into the power supply.
220/240v - Always use a Residual Current Device ("RCD"), (earth leakage trip), plugged directly into the 220/240v socket.
If using an extension cable, plug it directly into the RCD.
110v - When using a portable transformer it must have a minimum output of 4.0kW and be continuously rated.
The symbols on the ON/OFF switch are 0=OFF and I=ON in accordance with international standards.

WARNING
DO NOT use an extension cable between the transformer and the power supply. Always ensure that the cable between the 110v machine and transformer is a minimum length of 3 metres. Ensure cable is fitted with cable clip to the operating handle at all times.
Plugs
The PCLX 16/45E Plate Compactor is intended for DIY or site usage, the following plug types are supplied fitted to the product:-
110v Motor - 32 amp rated BS4343 plug type. or 3-pin CEE7/7 Euro plug type.
230v Motor - 16 amp rated 3-pin BS1363 plug type
Fitting a plug - WARNING THIS PRODUCT MUST BE EARTHED
IMPORTANT: The wires in the mains lead are coloured in accordance with the following code:
GREEN / YELLOW = EARTH, BLUE = NEUTRAL, BROWN = LIVE
The wire which is coloured Green and Yellow must be connected to the terminal in the plug marked E or coloured Green and Yellow. The wire which is coloured Brown must be connected to the terminal in the plug marked L or coloured Red. The wire which is coloured Blue must be connected to the terminal in the plug marked N or coloured Black. Always ensure before connecting to the supply that the supply voltage is the same as the rated voltage marked on the motor
Extension Cables
If you need to use an extension cable it must be no longer than 25 metres (82 feet) in length. The wire section must be 2.5mm^2 on 230v and 2.5mm^2 on 110v. Ensure that the extension cable is carefully laid out avoiding liquids, sharp edges and places where vehicles might run over it. Avoid allowing the extension cable to be trapped underneath the plate compactor. Unroll it fully or it will overheat and could catch fire. Make sure that any extension cable connections are dry and safe.
NVR - No Volt Release
The motors which are fitted to the machine are fitted with a NVR (No Volt Release) Switch. This mean that if the power fails, the motor will not automatically restart when the power is restored. The machine will need to be manually restarted.
Health & Safety
Vibration
Some vibration from the compacting operation is transmitted through the handle to the operator's hands. Refer to specifications & technical data for vibration levels and usage times (recommended maximum daily exposure time). DO NOT exceed the maximum usage times.
PPE (Personal Protective Equipment).
Suitable PPE must be worn when using this equipment i.e. Safety Goggles, Gloves, Ear Defenders, Dust Mask and Steel Toe capped footwear (with anti-slip soles for added protection). Wear clothing suitable for the work you are doing. Always protect skin from contact with concrete.
Dust.
The compaction process can produce dust, which may be hazardous to your health. Always wear a mask that is suited to the type of dust being produced.
Reasons For Compaction

Soil, which has been disturbed or new infill, subbase and blacktop, will have small voids or air pockets which, if not compacted, will lead to one or more problems occurring.
- As traffic crosses the surface of an uncompacted area, the material is compressed. This leads to subsidence of the top surface as the material fills the voids.
- A similar situation occurs with static loads on uncompacted ground. The load (e.g. a building) will sink.
- Materials with voids are more susceptible to water seepage, leading to erosion. Water ingress may also cause the soil to expand during freezing temperatures and contract during dry spells. Expansion and contraction is a major cause of damage to building foundations and normally leads to the structure requiring underpinning.
Compaction increases the density of the material and therefore increases its load bearing capacity. Reduces air voids and therefore reduces the risk of subsidence, expansion and contraction, due to ingress of water.
Compaction Specification

Various methods have been employed in the past to specify the compaction required for various applications. The factors to consider are, material properties, layer thickness, pressure applied, vibration and number of passess. Greater understanding of how compaction works has lead to new compaction specifications being introduced. The most up to date specification is part of the U.K.'s NRSWA (New Roads & Street Works Act). Civil Engineers are now adopting these specifications to ensure good compaction for all site work.
Applications

Applications/materials fall into three categories:
- Cohesive materials (less than 20% granular) e.g clay, silt & heavy soils.
- Granular materials (more than 20% granular) e.g hard core, sand & light soils.
- Bituminous materials e.g asphalt (tarmac), cold lay (bitumin emulsion products).
Pre-start Checks

Pre start-up inspection.
The following Pre-start-up inspection must be performed before the start of each work session or after every four hours of use, whichever is first. Please refer to the service section for detailed guidance. If any fault is discovered, the 'PCLX 16/45E' must not be used until the fault is rectified.
- Thoroughly inspect the 'PCLX 16/45E' and all cables for signs of damage. Make sure that the belt guard is secure before using the machine.
- Check hoses, filler openings, drain plugs and any other areas for signs of leakage. Fix any leaks before operating.

WARNING
Before you operate or carry out any maintenance on this machine YOU MUST READ and STUDY this manual.

WARNING
NEVER pass over the electric cable with the compactor during operation.
• Take the compactor to where it is required.
DO NOT use a Mechanical Hoist on the Hand Lifting Points (See Machine Description section).
Transporting the PCLX 16/45E is a 2 person operation. Use the provided Hand Lifting Points (See Machine Description section)
- NEVER leave the motor running whilst transporting or moving the PCLX 16/45E, even if it is only a short distance.
- Having carried out the checks listed in the 'Pre-Start' section, you may start the motor.
- Switch the machine on and use the control handle to steer or turn the PCLX 16/45E.
The vibrator will not only cause the baseplate to vibrate but will also cause it to travel forward. During normal operation you should not have to push the PCLX 16/45E but allow it to travel at its own pace. The speed of travel will be determined by the condition of the surface being compacted. If the surface to be compacted is on a slope, great care must be taken when controlling the PCLX 16/45E's direction of travel. If necessary, use a suitable rope attached to the PCLX 16/45E at a low point on the chassis, to allow a helper to take part of the PCLX 16/45E's weight. Work up and down a slope not across.
• Work the PCLX 16/45E over the surface in an organized pattern until the required compaction has been achieved.
Where there are a number of different layers to be compacted on top of each other, compact each layer individually.
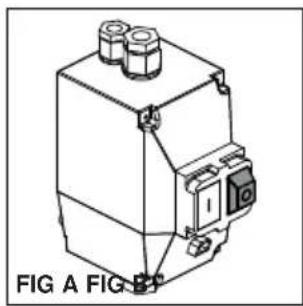
Stopping the Motor
- Depress the RED Button (O) to stop the machine (Fig A).
Starting the Motor
- Plug into power supply.
- Depress the GREEN Button (I) to start the machine (Fig B).
natural_image
Technical line drawing of a mechanical device with no visible text or symbols
natural_image
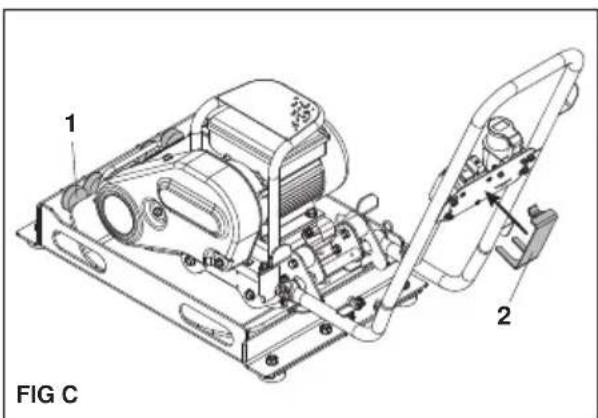
Technical line drawing of a mechanical device with two cylindrical components and mounting brackets (no text or symbols)Guide to using optional PCLX 16/45E Portable Appliance Test (PAT) Rig

WARNING
Make sure that the plate is unplugged from the power source prior to carrying out first steps or the visual inspection!
Prior to the PAT a Formal Visual Inspection must be carried out by a competent person to check the electrical safety of the equipment following correct procedure. For guidelines on PAT and definitions involved please visit government website:
http://www.hse.gov.uk/electricity/faq-portable-appliance-testing.htm.
- Place the PCLX 16/45E plate compactor into the test rig / fixture (Part No. 968/01200) with the front of the plate facing the anti-vibration mounts (Item 1), resting on the matting and with the handle swung back (Fig C). The Test rig must be located on a level floor, in dry ambient conditions with only the rubber feet touching the ground for appropriate vibration damping (NOTE: rubber feet are NOT designed to isolate the product from the ground).
- Fit the Z-Bracket (Item 2) (Part No. 968/01205) to the switch by sliding it until it securely clicks into place and presses the green ON button of the switch.
- Connect an approved PAT tester, configuring it according to your PCLX 16/45E specifications (e.g. Voltage; Appliance Insulation Class; Correct type of test etc.).
- Make sure that PCEL-E plate compactor and PAT test fixture are not touched by a human, animal or any other object and are not at risk of doing so during the test. Conduct the test when and if you are happy that it is safe to do so.
text_image
1 2 FIG CTroubleshooting Guide
| Problem Cause Problem | ||
| Motor fails to start. | Fuse or Circuit Breaker tripped. Replace Fuse or reset the Breaker. | |
| Stator is shorted or went to ground. Motor will make a humming noise and the circuit breaker or fuse will trip. | Contact Agent or Altrad Belle. | |
| Motor overloaded or load jammed. | Inspect to see that the load is free. If free, Contact Agent or Altrad Belle. | |
| Capacitor (on single phase motor) may have failed. | Contact Agent or Altrad Belle. | |
| Starting switch has failed. Contact Agent or | Altrad Belle. | |
| Motor runs but dies down. | Voltage drop. | If voltage is less than 10% of the motor's rating contact power company or check if some other equipment is taking power away from the motor or Contact Agent or Altrad Belle. |
| Load increased. | Verify the load has not changed. Verify equipment hasn't got tighter. If fan application verify the air flow hasn't changed or Contact Agent or Altrad Belle. | |
| Motor takes too long to accelerate. | Defective capacitor Contact Agent or Altrad Belle. | |
| Faulty stationary switch. Contact Agent or Altrad Belle. | ||
| Bad bearings. Contact Agent or Altrad Belle. | ||
| Voltage too low. | Make sure that the voltage is within 10% of the motor's nameplate rating. If not, contact power company or check if some other equipment is taking power away from the motor or contact Belle. | |
| Motor overload protector continually trips. | Load too high. | Verify that the load is not jammed. If motor is a replacement, verify that the rating is the same as the old motor. If previous motor was a special design, a stock motor may not be able to duplicate the performance. Remove the load from the motor and check motor doesn't trip. |
| Ambient temperature too high. | Verify that the motor is getting enough air for proper cooling. Most motors are designed to run in an ambient temperature of less than 40°C. (Note: A properly operating motor may be hot to the touch.) | |
| Protector may be defective. Contact Agent or Altrad Belle. | ||
| Winding shorted or grounded. Contact Agent or Altrad Belle. | ||
| The motor makes a loud rubbing or grinding noise. | Damage to internal workings. Contact Agent or Altrad Belle. | |
| Unit will not vibrate. | Drive belt tension loose. Adjust belt tension. | |
| Drive failure. Contact Agent or Altrad Belle. | ||
| Vibrator failure. | Contact Agent or Altrad Belle. | |
| Asphalt adhering to plate. Bituminous surface flaking (laminating). | Lack of lubrication. | Use water. |
| Over compaction. | Remove and relay. | |
| Low travel speed (plate sinking). | Layer thickness too deep. | Remove some of the material. |
| Moisture content too high or too low. | Remove material and adjust. | |
Maintenance
The Altrad Belle 'PCLX 16/45E' is designed to give many years of trouble free operation. It is recommended that an approved Altrad Belle dealer carries out all major maintenance and repairs. Always use genuine Altrad Belle replacement parts, the use of spurious parts may void your warranty. Before any maintenance is carried out on the machine, switch off the motor and disconnect the power supply.
Always set the ‘PCLX 16/45E’ on level ground to ensure any fluid levels will be correctly read. Only use recommended oils (see chart below).
Running In Period
The vibrator shaft case oil must be replaced after the first 100 hours use, then after every 500 working hours. For detail on vibrator shaft case oil replacement, see 'Vibrator unit'. The belt tension should be checked after 4 hours use.
Cleaning
This is an electrical appliance. During cleaning, the electrical components of this machine MUST NEVER be exposed to water or liquid of any kind as this could result in serious injury or even death!
| Routine Maintenance | Before Each Use | First 4 Hours | First Month / | 3 Months / 50 Hours | |
| Cables | Check | √ | |||
| Replace when necessary | |||||
| Drive Belt Tension | √ √ | √ | |||
Oil / Fuel Type & Quantity
| Oil Type | Quantity (Litre) | Fuel Type | Capacity (Litre) | Spark Plug Type | Electrode Gap (mm) | |
| Vibrator SAE 10w40 0.3 N/A N/A | A N/A N/A |
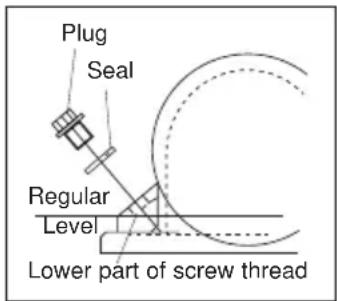
text_image
Plug Seal Regular Level Lower part of screw threadVibrator Unit.
Remove the plug complete with seal, check that the oil level reaches the bottom thread on the oil plug hole. Top up as necessary with the correct oil (see chart).
Paving Pad
The Paving Pad has been designed to be used when tamping down Paving Slabs and Block Pavers. However, it should not be used for normal compaction work. Before fitting, make sure the Paving Pad you have is the correct size and the correct type.
To fit the Paving Pad (1), place the pad under the plate ensuring the securing holes line up with the holes on the front of the baseplate. The securing coach bolts (2) should be passed through the clamp strip (3) then the paving pad (1) and finally through the baseplate. They are in turn secured in place with the nut (5) and washer (4). Tighten to 50Nm.
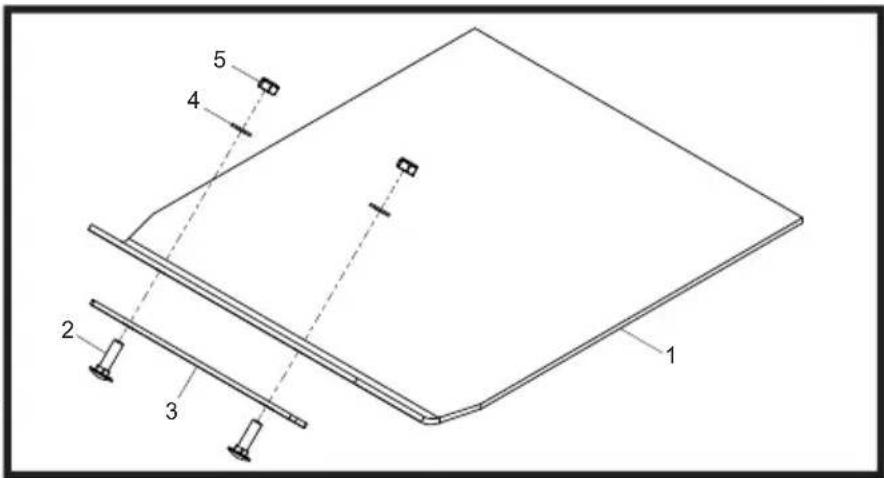
text_image
1 2 3 4 5Transporter Attachment
The transporter attachment enables the operator to move the compactor to the work place with the minimum of effort.
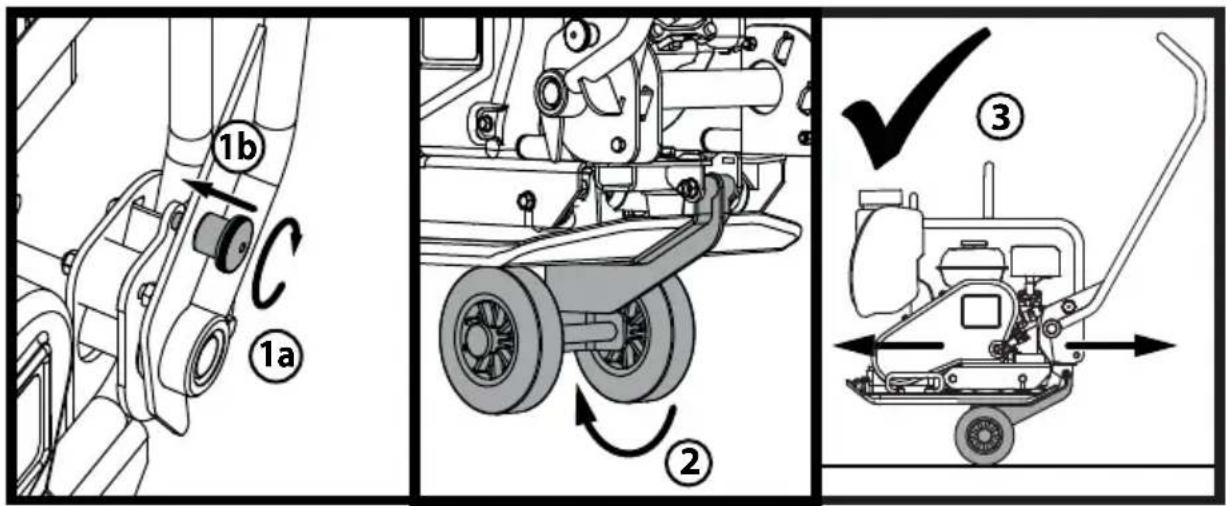
text_image
Technical diagram showing three mechanical assembly steps with labeled components and directional arrows indicating motion or movement.- Twist the Handle Latch Knob to engage the Handle Latch and lock the Handle.
- Once the Handle is locked into place, release the Wheel Kit and slide underneath the Baseplate.
- With the Handle still locked into place, the machine is now ready to be transported using the Wheel kit.
Your new Altrad Belle 'PCLX 16/45E' single direction plate compactor is warranted to the original purchaser for a period of one-year (12 months) from the original date of purchase. The Altrad Belle warranty is against defects in design, materials and workmanship.
The following are not covered under the Altrad Belle warranty:
- Damage caused by abuse, misuse, dropping or other similar damage caused by or as a result of failure to follow assembly, operation or user maintenance instructions.
- Alterations, additions or repairs carried out by persons other than Altrad Belle or their recognised agents.
- Transportation or shipment costs to and from Altrad Belle or their recognised agents, for repair or assessment against a warranty claim, on any machine.
- Materials and/or labour costs to renew, repair or replace components due to fair wear and tear.
The following components are not covered by warranty.
- Drivebelt/s
Altrad Belle and/or their recognised agents, directors, employees or insurers will not be held liable for consequential or other damages, losses or expenses in connection with or by reason of or the inability to use the machine for any purpose.
Warranty Claims
All warranty claims should firstly be directed to Altrad Belle, either by telephone, by Fax, by Email, or in writing.
For warranty claims:
Tel: +44 (0)1298 84606 Fax: +44 (0)1298 84073 Email : Warranty@belle-group.co.uk
Write to:
Altrad Belle Warranty Department,
Sheen, Nr. Buxton,
Derbyshire,
SK17 0EU
England.
Warranty Registration:
In the bid for ALTRAD Belle to become greener and more eco friendly, we have now introduced online Warranty registration. To access the registration page of our website, please use the following address:-
http://www.bellegroup.com/index.php?p=warranty_registration
Alternatively, please scan the adjacent QR Code (Quick Response Code) using your smartphone to access the registration page.

text_image
QR code image containing encoded data, no visible human-readable textnatural_image
Technical line drawing of a mechanical device with internal components and dimension label (450), no readable text or symbols beyond the dimension marker.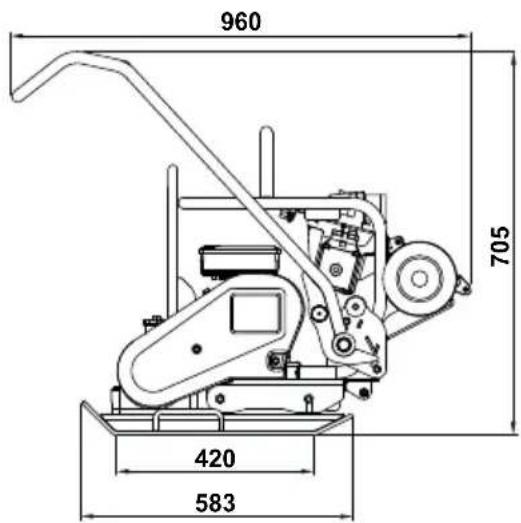
text_image
960 705 420 583Compaction Specification
natural_image
Technical line drawing of a mechanical device with no visible text or symbols
natural_image
Technical line drawing of a mechanical device with no visible text or symbolshttp://www.hse.gov.uk/electricity/faq-portable-appliance-testing.htm.
text_image
Technical diagram of a mechanical device with labeled parts 1 and 2FIG C
text_image
Technical diagram showing three mechanical assembly steps with labeled components and directional arrows indicating motion or movement.Altrad Belle Warranty Department,
Sheen, Nr. Buxton
Derbyshire
SK17 0EU
England.
Angleterre
text_image
QR code image containing encoded data, no visible human-readable texttext_image
Heid me, otillen Hoist 11 5 1 6 7 3 2 8 9 4 10Milieu
NL
natural_image
Technical line drawing of a mechanical device with internal components and dimension label (450), no readable text or symbols beyond the dimension marker.
text_image
960 705 420 583| Model 110v 50Hz 230v 50Hz | ||
| Gewicht (kg) 97 97 | ||
| Motorvermogen (Hp / kW) 3.0 / 2.2 3.0 / 2.2 | ||
| Motortoerental 2880 2880 | ||
| Nominale spanning (v) 110 230 | ||
| Nominale stroom (A) 27.2 13.6 | ||
| Beschermingsklasse IP44 IP44 | ||
| Energieverbruik (Kwh) | 2.21 2.21 | |
| Trilvermogen (kN) | 14 14 | |
| Frequentie (Hz) | 50 50 | |
| Minimum Transformator Grootte (kVA) | 5 | N/A |
| Maximale verplaatsingssnelheid (m/min) | 25 25 | |
| Maximale Hellingshoek (°) | 20 20 | |
| Verdichtingsvermogen (kg/m2) | 517 | 517 |
| 3-Assige Trilling* (m/sec2) | 3.04 3.04 | |
| Gebruikstijd (Mins) | 323.6 | 323.6 |
| Geluidsvermogensniveau (dB(A)) | 105 | 105 |
* Minimum niveau EN500 Deel 4
A - Merkstickers
B - Veiligheidssticker
C - Geluidssticker
D - Natte Omstandigheden
Sticker
E - Motor Veiligheid Sticker
F - Motor Cijfer Sticker
G - Transformer Sticker
H - Hefpunt Sticker.
J - Wielkit Montage Sticker

text_image
Technical diagram of a mechanical lawn mower with labeled components from A to HA - Merkstickers
G - Transformer Sticker
GEEL / GROEN = AARDE, BLAUW = NUL, BRUIN = FASE
natural_image
Technical line drawing of a mechanical component with no visible text or symbols
natural_image
Technical line drawing of a mechanical device with three bolts and mounting brackets (no text or symbols)http://www.hse.gov.uk/electricity/faq-portable-appliance-testing.htm.
text_image
Technical diagram showing three mechanical assembly steps with labeled components and directional arrows indicating motion or movement.Altrad Belle Warranty Department,
Sheen, Nr. Buxton
Derbyshire
SK17 0EU
England
text_image
QR code image containing encoded data, no visible human-readable texttext_image
Technical diagram of a lawn mower with numbered components and labels
Etikette
natural_image
Technical line drawing of a mechanical device with internal components and dimension label (450), no readable text or symbols beyond the dimension marker.
text_image
960 705 420 583| Model 110v 50Hz 230v 50Hz | ||
| Vægt (kg) 97 97 | ||
| Motoreffekt (Hp / kW) 3.0 / 2.2 3.0 / 2.2 | ||
| Motor RPM 2880 2880 | ||
| Nominel spænding (v) 110 230 | ||
| Nominel strøm (A) 27.2 13.6 | ||
| Beskyttelsessystem IP44 IP44 | ||
| Strømforbrug (Kwh) | 2.21 2.21 | |
| Vibrationskraft (kN) | 14 14 | |
| Frekvens (Hz) | 50 50 | |
| Minimum Transformer Størrelse (kVA) | 5 | N/A |
| Maksimal kørehastighed (m/min) | 25 25 | |
| Maksimal Gradient (°) | 20 20 | |
| Força de Compactação (kg/m2) | 517 | 517 |
| 3-akset vibration* (m/sec ^2 ) | 3.04 3.04 | |
| Anvendelsestid (Mins) | 323.6 | 323.6 |
| Lydeffekt (dB(A)) | 105 | 105 |
* Minimalt niveau i henhold til EN500, 4. del
G - Transformer Decal
GR∅N / GUL = JORD, BLÅ = NEUTRAL, BRUN = LEVENDE
natural_image
Technical line drawing of a mechanical device with two cylindrical components and a base, labeled 'FIG A FIG B' (no other text or symbols)
natural_image
Isometric line drawing of a mechanical device with no visible text or symbolstext_image
Technical diagram showing three mechanical assembly steps with labeled components and directional arrows indicating motion or movement.Altrad Belle Warranty Department
Sheen, Nr. Buxton
Derbyshire
SK17 0EU
England
Garantiregistrering:
text_image
QR code image containing encoded data, no visible human-readable texttext_image
Technical diagram of a lawn mower with numbered components and German text labelsUmwelt
D
Sichere Entsorgung.

natural_image
Technical line drawing of a mechanical device with internal components and dimension label (450), no readable text or symbols beyond the dimension marker.
text_image
960 705 420 583text_image
H E F A C B D G J A JA - Markenaufkleber
natural_image
Technical line drawing of a mechanical device with three bolts and mounting bracket (no text or symbols)http://www.hse.gov.uk/electricity/faq-portable-appliance-testing.htm.
text_image
Technical diagram showing three mechanical assembly steps with labeled components and directional arrows indicating motion or movement.Altrad Belle Warranty Department,
Sheen, Nr. Buxton
Derbyshire
SK17 0EU
England
text_image
QR code image containing encoded data, no visible human-readable texttext_image
Technical diagram of a lawn mower with numbered components for identification
Ambiente
Smaltimento sicuro.

natural_image
Technical line drawing of a mechanical device with internal components and dimension label (450), no readable text or symbols beyond the dimension marker.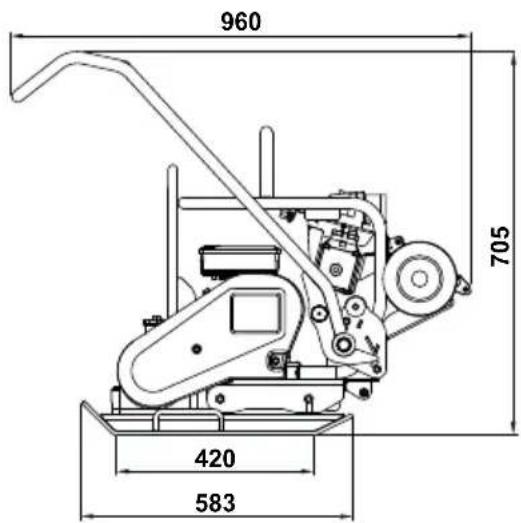
text_image
960 705 420 583natural_image
Technical line drawing of a mechanical device with no visible text or symbols
natural_image
Technical line drawing of a mechanical device with three cylindrical components and mounting brackets (no text or symbols)text_image
Technical diagram showing three mechanical assembly steps with labeled components and directional arrows indicating motion or movement.Altrad Belle Warranty Department,
Sheen, Nr. Buxton
Derbyshire
SK17 0EU
Inghilterra
text_image
QR code image containing encoded data, no visible human-readable texttext_image
Technical diagram of a lawn mower with numbered components for identificationMiljö
s
Säkert bortskaffande.

natural_image
Technical line drawing of a mechanical device with internal components and dimension label (450), no readable text or symbols beyond the dimension marker.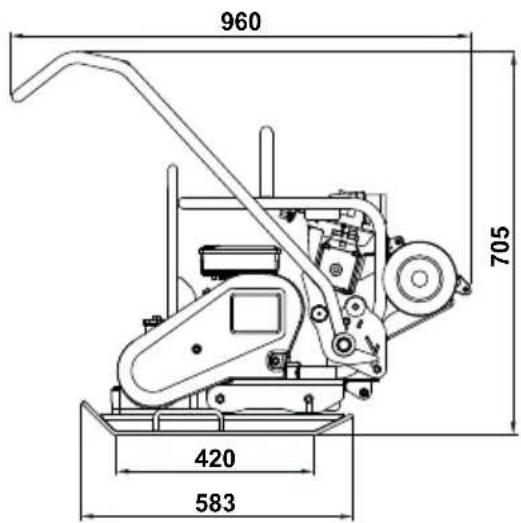
text_image
960 705 420 583| Modell 110v 50Hz 230v 50Hz | ||
| Vikt (kg) 97 97 | ||
| Motoreffekt (Hp / kW) 3.0 / 2.2 3.0 / 2.2 | ||
| Motorvarvtal 2880 2880 | ||
| Märkspänning (v) 110230 | ||
| Märkström (A) 27.2 13.6 | ||
| Skyddssystem IP44 IP44 | ||
| Strömförbrukning (Kwh) | 2.21 2.21 | |
| Vibrationskraft (kN) | 14 14 | |
| Frekvens (Hz) 50 50 | ||
| Minsta Transformatorstorlek (kVA) | 5 | N/A |
| Förflyttningshastighet (m/min) | 25 | 25 |
| Maximalt Gradantal (°) | 20 20 | |
| Packningskraft (kg/m2) | 517 | 517 |
| 3 Axelvibration* (m/sec2) | 3.04 3.04 | |
| Användningstid (Mins) | 323.6 | 323.6 |
| Ljudeffektsnivå (dB(A)) | 105 | 105 |
text_image
al H E F A C B D G A JA - Varumärkesdekal
GRÖN/GUL = JORD, BLÅ = NEUTRAL, BRUN = SPÄNNING
natural_image
Technical line drawing of a mechanical component with no visible text or symbols
natural_image
Technical line drawing of a mechanical component with no visible text or symbolstext_image
Technical diagram showing three mechanical assembly steps with labeled components and directional arrows indicating motion or movement.Altrad Belle Warranty Department,
Sheen, Nr. Buxton
Derbyshire
SK17 0EU
England
Garantiregistrering:
text_image
QR code image containing encoded data, no visible human-readable textnatural_image
Technical line drawing of a mechanical device with internal components and dimension label (450), no readable text or symbols beyond the dimension marker.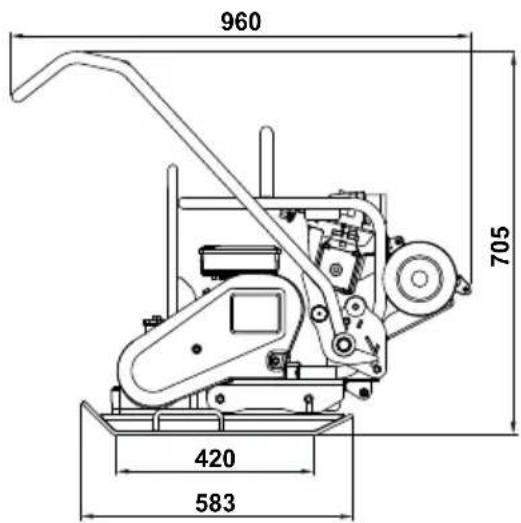
text_image
960 705 420 583natural_image
Technical line drawing of a mechanical device with three bolts and mounting brackets (no text or symbols)http://www.hse.gov.uk/electricity/faq-portable-appliance-testing.htm.
text_image
Technical diagram showing three mechanical assembly steps with labeled components and directional arrows indicating motion or movement.text_image
QR code image containing encoded data, no visible human-readable texttext_image
Technical diagram of a lawn mower with numbered components for identificationŚrodowisko

natural_image
Technical line drawing of a mechanical device with two cylindrical components and mounting brackets (no text or symbols)text_image
Technical diagram showing three mechanical assembly steps with labeled components and directional arrows indicating motion or movement.Altrad Belle Warranty Department
Sheen, Nr. Buxton,
Derbyshire,
SK17 0EU
England.
text_image
QR code image containing encoded data, no visible human-readable texttext_image
Technical diagram of a manual lawn mower with numbered parts labeled for engineering reference.RUS
Окружающая среда
natural_image
Technical line drawing of a mechanical device with internal components and dimension label (450), no readable text or symbols beyond the dimension marker.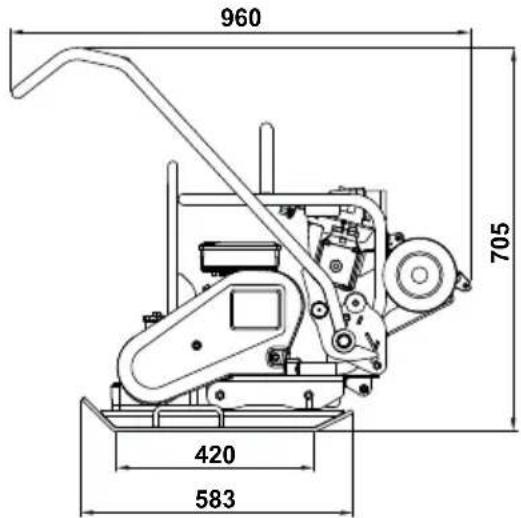
text_image
960 705 420 583natural_image
Technical line drawing of a mechanical device with three ports and mounting bracket (no text or symbols)text_image
Technical diagram showing three mechanical assembly steps with labeled components and directional arrows indicating motion or movement.Altrad Belle Warranty Department
Sheen, Nr. Buxton
Derbyshire
SK17 0EU
England
text_image
QR code image containing encoded data, no visible human-readable textnatural_image
Technical line drawing of a mechanical device with internal components and dimension label (450), no readable text or symbols beyond the dimension marker.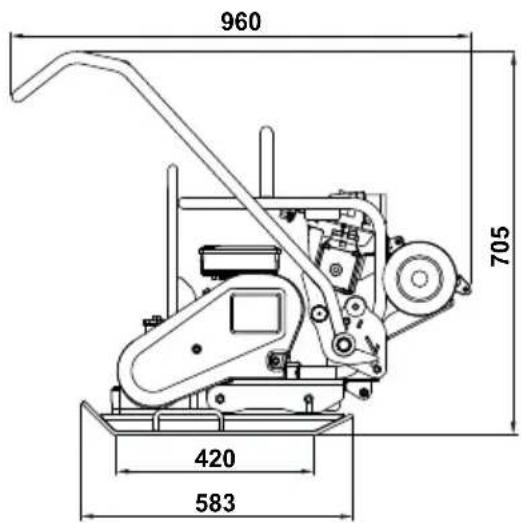
text_image
960 705 420 583natural_image
Technical line drawing of a mechanical device with three ports and mounting brackets (no text or symbols)text_image
Technical diagram showing three mechanical assembly steps with labeled components and directional arrows indicating motion or movement.Altrad Belle Warranty Department,
Sheen, Nr. Buxton
Derbyshire
SK17 0EU
England
Garantii Registreerimine
text_image
QR code image containing encoded data, no visible human-readable texttext_image
Technical diagram of a grass lawn mower with numbered components and descriptive text on the left side.
Vide
Droša iznīcināšana

natural_image
Technical line drawing of a mechanical device with internal components and dimension label (450), no readable text or symbols beyond the dimension marker.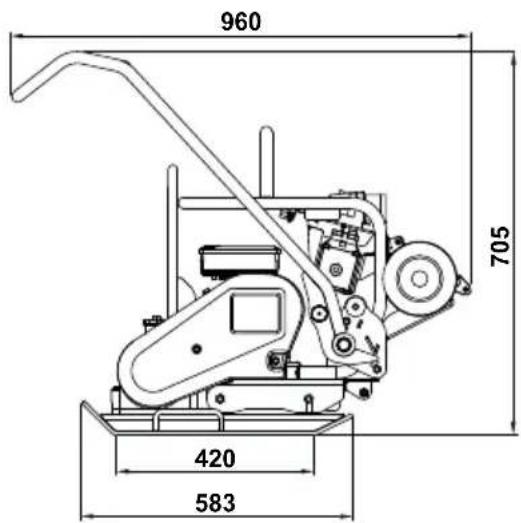
text_image
960 705 420 583| Modelis 110v 50Hz 230v 50Hz | ||
| Masa (kg) 97 97 | ||
| Dzinēja jauda (Hp / kW) | 3.0 / 2.2 | 3.0 / 2.2 |
| Motor RPM 2880 2880 | ||
| Nominal Voltage (v) 110230 | ||
| Nominal Current (A) 27.2 13.6 | ||
| Motor Protection IP44 IP44 | ||
| Power Consumption (Kwh) | 2.21 2.21 | |
| Vibratoras spēks (kN) | 14 | 14 |
| Frekvence (Hz) | 50 50 | |
| Minimālais Transformers lzmērs (kVA) | 5 | N/A |
| Maksimālais kustības ātrums (m/min) | 25 | 25 |
| Maksimālais Slīpums (°) | 20 | 20 |
| Blietešanas spēks (kg/m2) | 517 | 517 |
| 3 asu vibrācija* (m/sec ^2 ) | 3.04 3.04 | |
| Lietošanas laiks (Mins) | 323.6 | 323.6 |
| Trokšņu limenis (dB(A)) | 105 | 105 |
natural_image
Technical line drawing of a mechanical device with three ports and mounting brackets (no text or symbols)text_image
Technical diagram showing three mechanical assembly steps with labeled components and directional arrows indicating motion or movement.E-pasts: Warranty@belle-group.co.uk
Rakstiski
Altrad Belle Warranty Department,
Sheen, Nr. Buxton
Derbyshire
SK17 0EU
England
text_image
QR code image containing encoded data, no visible human-readable textnatural_image
Technical line drawing of a mechanical device with no visible text or symbolsPCEL-E portatyvinio prietaiso bandymo (PAT) stendo vadovas

WARNING
Make sure that the plate is unplugged from the power source prior to carrying out first steps or the visual inspection!
http://www.hse.gov.uk/electricity/faq-portable-appliance-testing.htm.
text_image
Technical diagram showing three mechanical assembly steps with labeled components and directional arrows indicating motion or movement.el. paštas: Warranty@belle-group.co.uk
Rašykite:
Altrad Belle Warranty Department,
Sheen, Nr. Buxton
Derbyshire
SK17 0EU
England.
text_image
QR code image containing encoded data, no visible human-readable text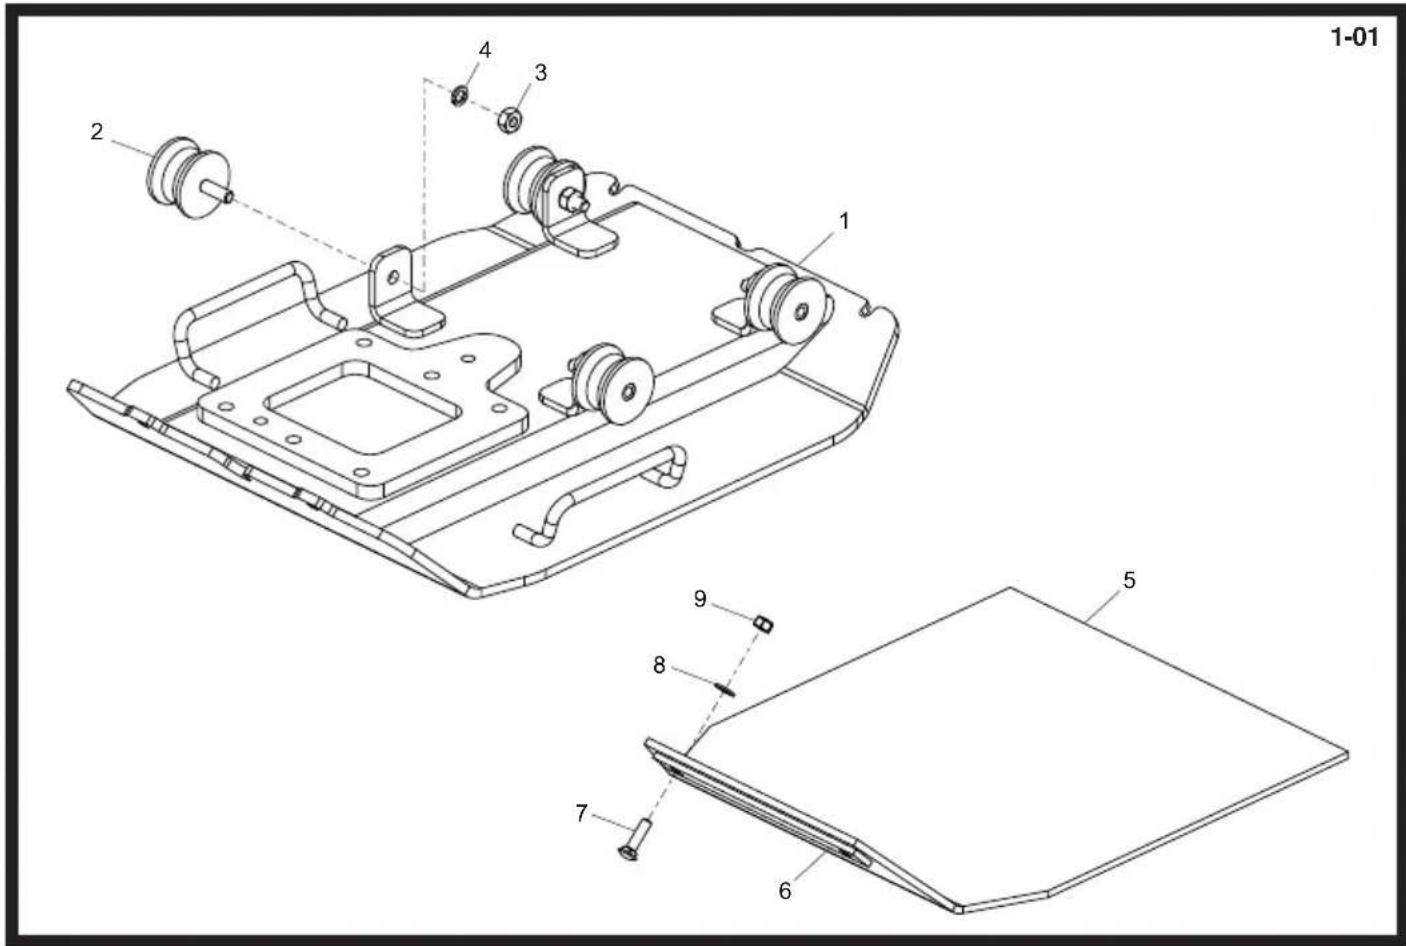
text_image
1-01 1 2 3 4 1 5 6 7 8 9Baseplate Assembly, Plaque d'embase, Cto. Placa de Base, Conj. Place de Base
| 1 | 968/01000 | Baseplate | Plaque d'embase | Placa de base | Placa de Base | 1 |
| 2 | 21.0.292 | Anti-Vibration Mount | Tampon antivibratoire | Montura antivibratoria | Bloco Anti-vibração | 4 |
| 3 | 8/10003 | Nut | Ecrou | Tuerca | Porca | M10 |
| 4 | 4/1003 | Washer | Rondelle | Arandela | Anilha | M10 |
| 5 | 968/99909 | Paving Pad | Tampon de Pavage | Tampón de Pavimentación | Bloco de Pavimentação | 1 |
| 6 | 943/99907 | Clamp Strip | Barrette de blocage | Barra de fijación | Tira de Grampeamento | 1 |
| 7 | 00.0.860 | Bolt | Boulon | Perno | Perno | M8 x 30 |
| 8 | 4/8006 | Washer | Rondelle | Arandela | Anilha | M8 |
| 9 | 8/8008 | Nut | Ecrou | Tuerca | Porca | M8 |

text_image
1-01 2 3 4 1 5 6 7 8 9Vloerplaat, Ruttelplatten -Zsb., Bundplade, Gruppo Piastra di Base
| 1 | 968/01000 | Vloerplaat | Rüttelplatten | Bundplade | Piastra di Base | 1 |
| 2 | 21.0.292 | Anti-trilbevestiging | Schwingungsdämpfer | Antivibrationsophæng | Supporto antivibrazioni | 4 |
| 3 | 8/10003 | Moer | Mutter | Møtrik | Dado | M10 |
| 4 | 4/1003 | Afdichtring | Scheibe | Spændeskive | Rondella | M10 |
| 5 | 968/99909 | Kunststof Onderplaat | Blockpflasterrüttler | Belægningsklodsudstyr | Attacco per la pavimentazione a blocchi | 1 |
| 6 | 943/99907 | Klemstrook | Sicherungsleiste | Klemmestrimmel | Fascetta di bloccaggio | 1 |
| 7 | 00.0.860 | Bouten | Bolzen | Skruebolt | Bullone | M8 x 30 |
| 8 | 4/8006 | Afdichtring | Scheibe | Spændeskive | Rondella | M8 |
| 9 | 8/8008 | Moer | Mutter | Møtrik | Dado | M8 |
text_image
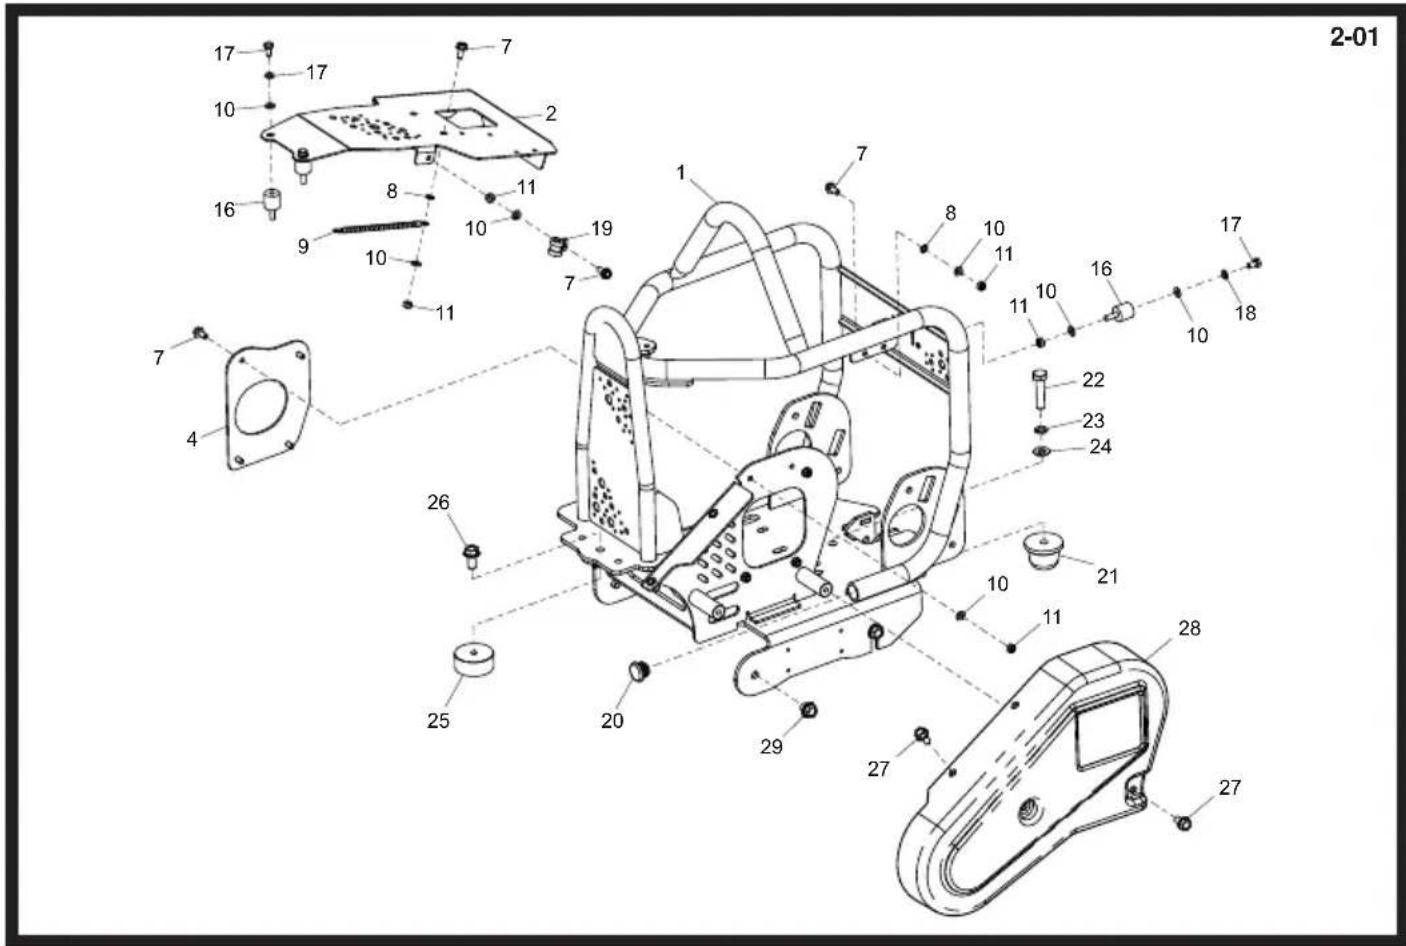
2-01 17 17 7 10 2 16 8 9 10 11 19 7 1 7 8 10 11 10 16 17 4 26 25 20 29 27 28 27 23 24 10 11 21 10 22 18Bedplate Assembly, Ensemble Socle, Conjunto de Bancada, Conjunto da Placa de Apoio
| 1 | 960/01900 | Bedplate | Plaque d'assise | Bancada | Placa de Apoio | 1 |
| 2 | 943/99968 | Plate | Plaque | Placa | Placa | 1 |
| 4 | 943/99967 | Plate | Plaque | Placa | Placa | 1 |
| 6 | 7/5020 | Screw | Vis | Tornillo | Parafuse | M5 x 10. |
| 7 | 7/6034 | Screw | Vis | Tornillo | Parafuse | M6 x 16. |
| 8 | 4/6004 | Washer | Rondelle | Arandela | Anilha | M6 |
| 9 | 71/0312 | Earth Cable | Cable - de Terre | Cable - Positivo | Cable - Terra | 1 |
| 10 | 4/6001 | Washer | Rondelle | Arandela | Anilha | M6 |
| 11 | 8/6007 | Nut | Ecrou | Tuerca | Porca | M6 |
| 16 | 21/0425 | Anti-Vibration Mount | Tampon antivibratoire | Montura antivibratoria | Bloco Anti-vibração | 4 |
| 17 | 7/6001 | Screw | Vis | Tornillo | Parafuse | M6 x 12. |
| 18 | 4/6005 | Washer | Rondelle | Arandela | Anilha | M6 |
| 19 | 900/10200 | P-Clip | Collier en "P" | Abrazadera "P" | Gancho "P" | 1 |
| 20 | 21.0.259 | Bung | Obturateur | Tapón | Tampão | 2 |
| 21 | 21.0.333 | Rubber Stop | Butée en caoutchouc | Tope de caucho | Batente de Borracha | 1 |
| 22 | 9/10005 | Bolt | Boulon | Perno | Perno | M10 x 45. |
| 23 | 4/1003 | Washer | Rondelle | Arandela | Anilha | M10 |
| 24 | 4/1005 | Washer | Rondelle | Arandela | Anilha | M10 |
| 25 | 21/0415 | Buffer | Butoir | Parachoques | Amortecedor | 1 |
| 26 | 7/10039 | Screw | Vis | Tornillo | Parafuse | M10 x 20. |
| 27 | 7/8053 | Screw | Vis | Tornillo | Parafuse | M8 x 16. |
| 28 | 960/99918S | Belt Guard - Orange | Capot de courroie - Orange | Protector de la correa - Naranja | Guarda da Cinta - Laranja | 1 |
| 28 | 960/99918B | Belt Guard - Blue | Capot de courroie - Bleu | Protector de la correa - Azúl | Guarda da Cinta - Azul | 1 |
| 28 | 960/99918G | Belt Guard - Green | Capot de courroie - Vert | Protector de la correa - Verde | Guarda da Cinta - Verde | 1 |
| 28 | 960/99918R | Belt Guard - Red | Capot de courroie - Rouge | Protector de la correa - Roja | Guarda da Cinta - Vermelho | 1 |
| 28 | 960/99918Y | Belt Guard - Yellow | Capot de courroie - Jaune | Protector de la correa - Amarillo | Guarda da Cinta - Amarelo | 1 |
| 28 | 960/99918W | Belt Guard - White | Capot de courroie - Blanc | Protector de la correa - Blanco | Guarda da Cinta - Branco | 1 |
| 29 | 7/10025 | Screw | Vis | Tornillo | Parafuse | M10 x 12. |
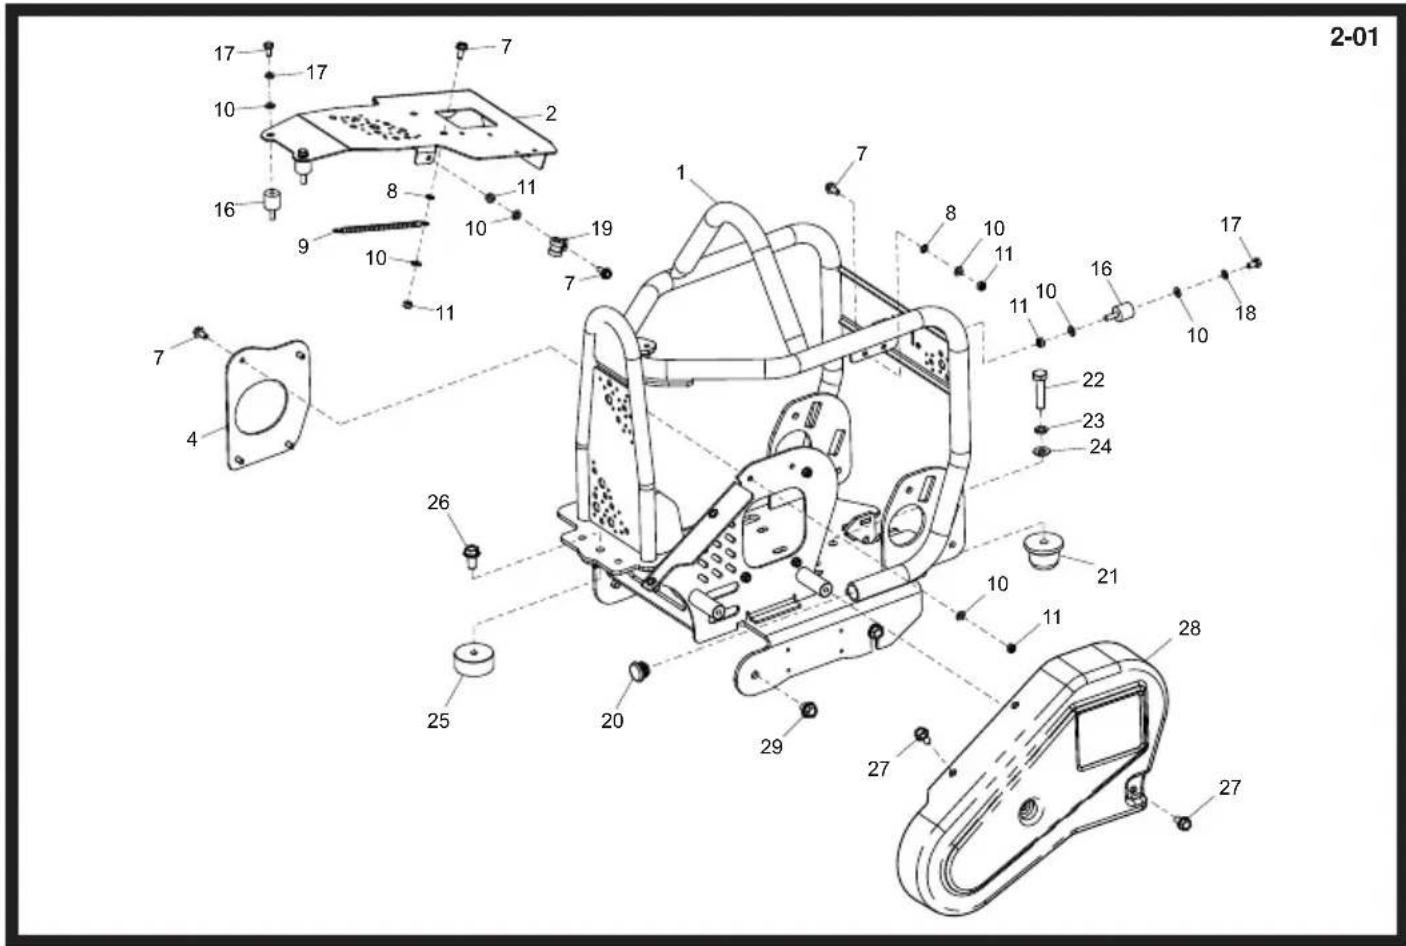
text_image
2-01 17 17 7 10 2 16 8 9 10 11 10 19 7 11 7 4 7 26 25 20 29 27 28 27 10 11 10 11 10 16 17 18 22 23 24 10 11 21 21 27Grondplaat, Sohlplatten-Zsb., Fundamentplademontage, Gruppo Piastra di Base
| 1 | 960/01900 | Grondplaat | Sohlplatte | Fundamentplade | Piastra di Base | 1 |
| 2 | 943/99968 | Plaat | Platte | Plade | Piastra | 1 |
| 4 | 943/99967 | Plaat | Platte | Plade | Piastra | 1 |
| 6 | 7/5020 | Schroef | Schraube | Skrue | Vite | M5 x 10 |
| 7 | 7/6034 | Schroef | Schraube | Skrue | Vite | M6 x 16 |
| 8 | 4/6004 | Afdichtring | Scheibe | Spændeskive | Rondella | M6 |
| 9 | 71/0312 | Aardkabel | Erdungskabel | Jordkabel | Cavo di Terra | 1 |
| 10 | 4/6001 | Afdichtring | Scheibe | Spændeskive | Rondella | M6 |
| 11 | 8/6007 | Moer | Mutter | Motrik | Dado | M6 |
| 16 | 21/0425 | Anti-trilbevestiging | Schwingungsdämpfer | Antivibrationsophæng | Supporto antivibrazioni | 4 |
| 17 | 7/6001 | Schroef | Schraube | Skrue | Vite | M6 x 12 |
| 18 | 4/6005 | Afdichtring | Scheibe | Spændeskive | Rondella | M6 |
| 19 | 900/10200 | P-klemmen | 'P'-Schellen | 'P'-klemmer | Fermagli a "P" | 1 |
| 20 | 21.0.259 | Plug | Spund | Spuns | Tappo | 2 |
| 21 | 21.0.333 | Aanslagrubber | Gummianschlag | Gummistop | Arresto in gomma | 1 |
| 22 | 9/10005 | Bouten | Bolzen | Skruebolt | Bullone | M10 x 45 |
| 23 | 4/1003 | Afdichtring | Scheibe | Spændeskive | Rondella | M10 |
| 24 | 4/1005 | Afdichtring | Scheibe | Spændeskive | Rondella | M10 |
| 25 | 21/0415 | Buffer | Puffer | Kofanger | Respingente | 1 |
| 26 | 7/10039 | Schroef | Schraube | Skrue | Vite | M10 x 20 |
| 27 | 7/8053 | Schroef | Schraube | Skrue | Vite | M8 x 16 |
| 28 | 960/99918S | Riembeschermkap - Oranje | Riemenabdeckung - Orange | Remskærm - Orange | Protezione Cinghia - Arancione | 1 |
| 28 | 960/99918B | Riembeschermkap - Blauw | Riemenabdeckung - Blau | Remskærm - Blå | Protezione Cinghia - Blu | 1 |
| 28 | 960/99918G | Riembeschermkap - Groen | Riemenabdeckung - Grün | Remskærm - Gron | Protezione Cinghia - verde | 1 |
| 28 | 960/99918R | Riembeschermkap - Rood | Riemenabdeckung - Rot | Remskærm - Rod | Protezione Cinghia - Rosso | 1 |
| 28 | 960/99918Y | Riembeschermkap - Geel | Riemenabdeckung - Gelb | Remskærm - Gul | Protezione Cinghia - Giallo | 1 |
| 28 | 960/99918W | Riembeschermkap - Wit | Riemenabdeckung - Weiß | Remskærm - Hvid | Protezione Cinghia - Blanco | 1 |
| 29 | 7/10025 | Schroef | Schraube | Skrue | Vite | M10 x 12 |
text_image
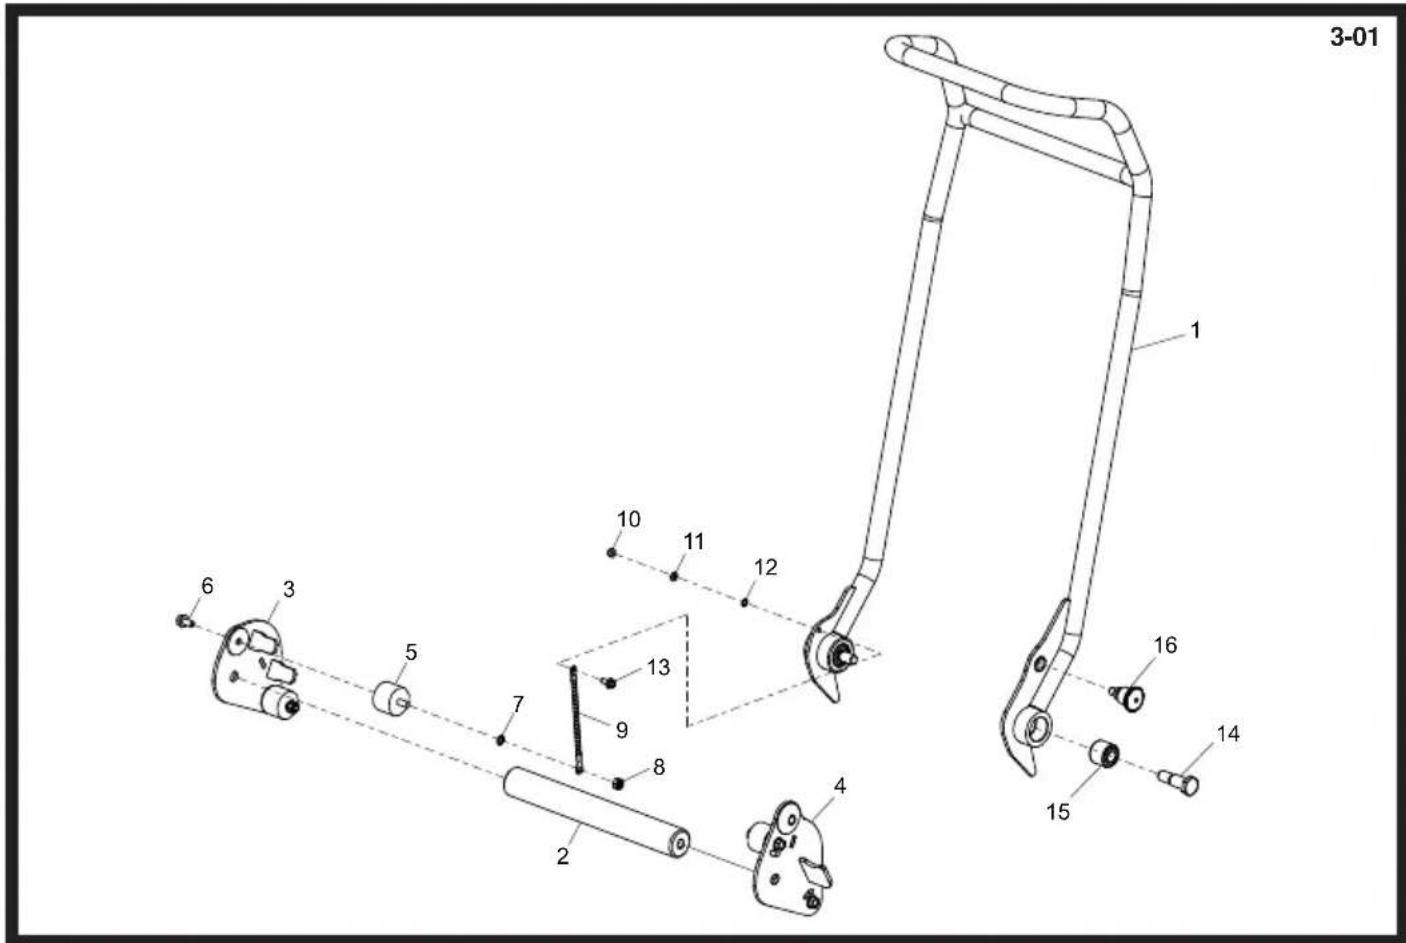
3-01 1 10 11 12 6 3 5 7 9 13 8 2 4 16 14 15Handle Assembly, Ensemble Poignée, Conjunto de Manillar, Conjunto do Punho
| 1 | 960/02300S | Handle - Orange | Guidon - Orange | Manillar - Naranja | Punho - Laranja | 1 |
| 1 | 960/02300B | Handle - Blue | Guidon - Bleu | Manillar - Azul | Punho - Azul | 1 |
| 1 | 960/02300G | Handle - Green | Guidon - Vert | Manillar - Verde | Punho - Verde | 1 |
| 1 | 960/02300R | Handle - Red | Guidon - Rouge | Manillar - Roja | Punho - Vermelho | 1 |
| 1 | 960/02300Y | Handle - Yellow | Guidon - Jaune | Manillar - Amarillo | Punho - Amarelo | 1 |
| 1 | 960/02300W | Handle - White | Guidon - Blanc | Manillar - Blanco | Punho - Branco | 1 |
| 2 | 960/99922 | Strut | Béquille | Puntal | Apoio | 1 |
| 3 | 960/02200 | Bracket | Patte de montage | Escuadra | Suporte | 1 |
| 4 | 960/02100 | Bracket | Patte de montage | Escuadra | Suporte | 1 |
| 5 | 21/0157 | Anti-Vibration Mount | Tampon antivibratoire | Montura antivibratoria | Bloco Anti-vibração | 4 |
| 6 | 7/8053 | Screw | Vis | Tornillo | Parafuse | M8 x 16 |
| 7 | 4/8002 | Washer | Rondelle | Arandela | Anilha | M8 |
| 8 | 8/8008 | Nut | Ecrou | Tuerca | Porca | M8 |
| 9 | 71/0310 | Earth Cable | Cable - de Terre | Cable - Positivo | Cable - Terra | 1 |
| 10 | 8/6007 | Nut | Ecrou | Tuerca | Porca | M6 |
| 11 | 4/6001 | Washer | Rondelle | Arandela | Anilha | M6 |
| 12 | 4/6004 | Washer | Rondelle | Arandela | Anilha | M6 |
| 13 | 7/6034 | Screw | Vis | Tornillo | Parafuse | M6 x 16 |
| 14 | 151.0.019 | Bolt | Boulon | Perno | Perno | 2 |
| 15 | 21.0.187 | Bush | Douille | Buje | Bucha | 2 |
| 16 | 3/0085 | Plunger | Plongeur | Émbolo | Émbolo | M6 |
text_image
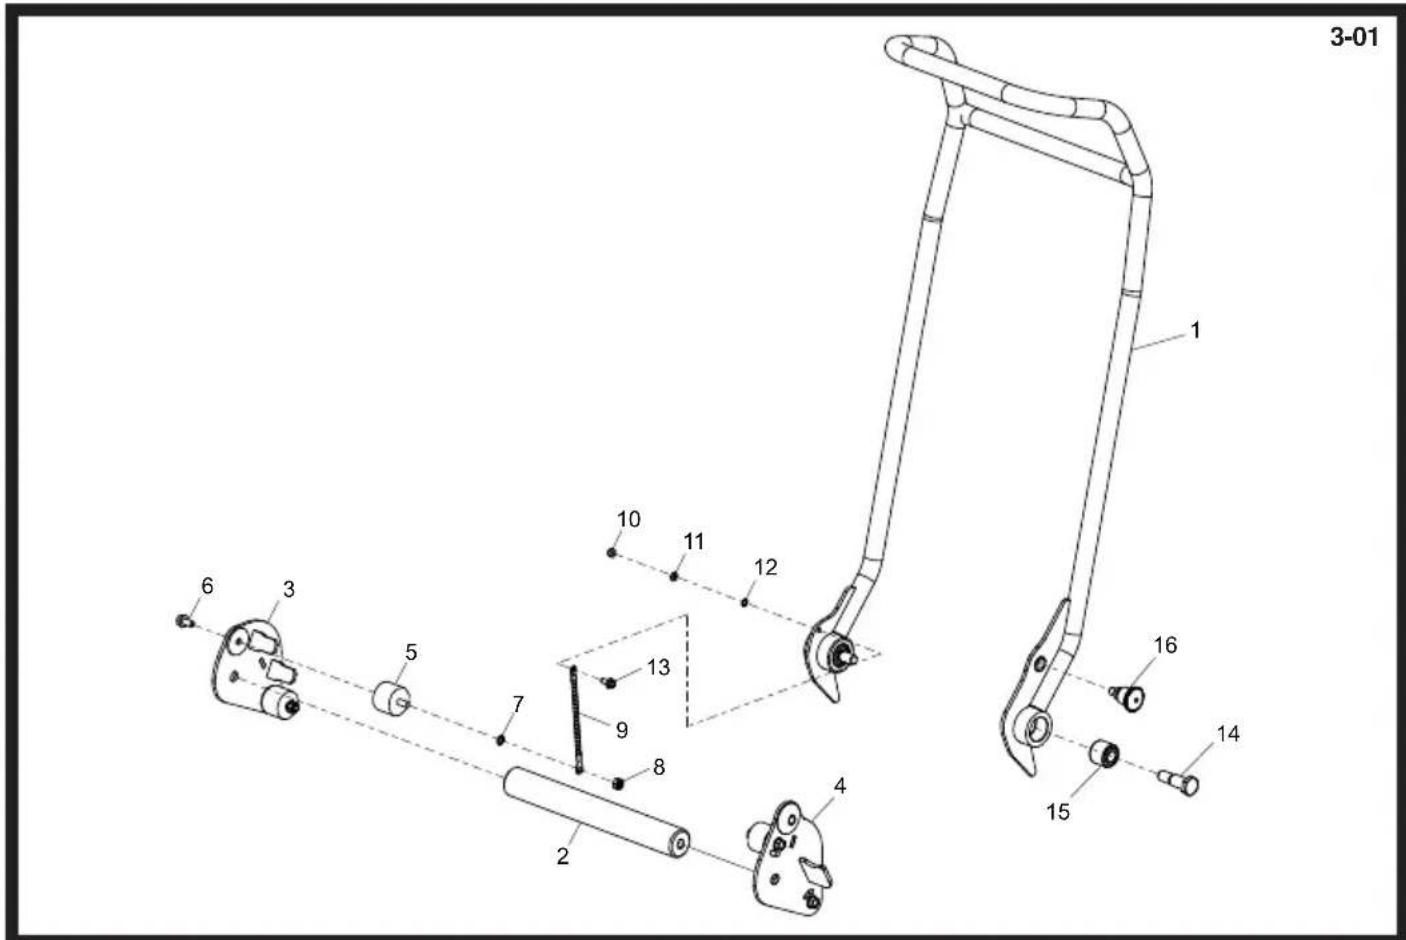
3-01 1 10 11 12 6 3 5 7 13 9 8 2 4 15 14 16Complete Hendel, Griff-zsb., Händtagsenhed, Gruppo Impugnatura
| 1 | 960/02300S....Hendel - Oranje....Griff - Orange....Händtag - Orange....Impugnatura - Arancione....1 |
| 1 | 960/02300B....Hendel - Blauw....Griff - Blau....Händtag - Blå....Impugnatura - Blu....1 |
| 1 | 960/02300G....Hendel - Groen....Griff - Grün....Händtag - Grøn....Impugnatura - Verde....1 |
| 1 | 960/02300R....Hendel - Rood....Griff - Rot....Händtag - Rød....Impugnatura - Rosso....1 |
| 1 | 960/02300Y....Hendel - Geel....Griff - Gelb....Händtag - Gul....Impugnatura - Giallo....1 |
| 1 | 960/02300W....Hendel - Wit....Griff - Weiß....Händtag - Hvid....Impugnatura - Blanco....1 |
| 2 | 960/99922....Strut....Béquille....Puntal....Apoio....1 |
| 3 | 960/02200....Steun....Halterung....Beslag....Staffa....1 |
| 4 | 960/02100....Steun....Halterung....Beslag....Staffa....1 |
| 5 | 21/0157....Anti-trilbevestiging....Schwingungsdämpfer....Antivibrationsophaeng....Supporto antivibrazioni....4 |
| 6 | 7/8053....Schroef....Schraube....Skrue....Vite....M8 x 16....8 |
| 7 | 4/8002....Afdichtring....Scheibe....Spændeskive....Rondella....M8....1 |
| 8 | 8/8008....Moer....Mutter....Møtrik....Dado....M8....9 |
| 9 | 71/0310....Aardkabel....Erdungskabel....Jordkabel....Cavo di Terra....1 |
| 10 | 8/6007....Moer....Mutter....Møtrik....Dado....M6....13 |
| 11 | 4/6001....Afdichtring....Scheibe....Spændeskive....Rondella....M6....17 |
| 12 | 4/6004....Afdichtring....Scheibe....Spændeskive....Rondella....M6....3 |
| 13 | 7/6034....Schroef....Schraube....Skrue....Vite....M6 x 16....9 |
| 14 | 151.0.019....Bouten....Bolzen....Skruebolt....Bullone....2 |
| 15 | 21.0.187....Bus....Buchse....Bøsning....Boccola....2 |
| 16 | 3/0085....Dompelaar....Taucher....Stempel....Pistone....M6....1 |
4-01
text_image
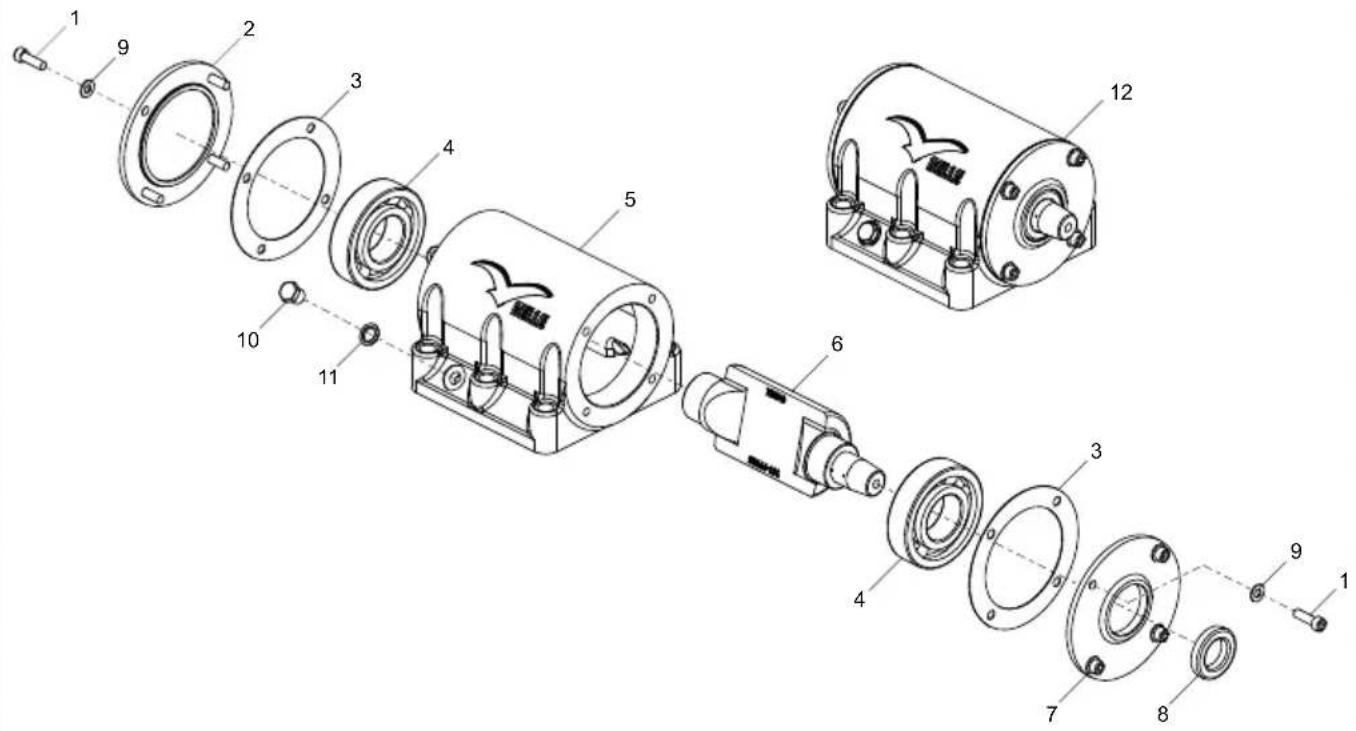
Exploded view diagram of a mechanical assembly with numbered parts for identificationVibrator Unit, Unité de Vibration, Unidade Vibradora, Unidade do Vibrador
| 1 | 7/8010 | Screw | Vis | Tornillo | Parafuse | M8 | 8 |
| 2 | 151/99986 | End Cover | Carter d'extrémité | Tapa de fondo | Tampa de extremidade | 1 | |
| 3 | 5/0069 | Gasket | Joint | Junta | Gaxeta | 2 | |
| 4 | 53/0072 | Bearing | Roulement | Cojinete | Rolamanto | 2 | |
| 5 | 960/99919 | Housing | Carter | Alojamiento | Carter | 1 | |
| 6 | 960/99920 | Vibrator Shaft | Axe | Eje | Veio | 1 | |
| 7 | 151/99987 | End Cover | Carter d'extrémité | Tapa de fondo | Tampa de extremidade | 1 | |
| 8 | 15.0.196 | Oil Seal | Joint d'étanchéité à l'huile | Obturador aceite | Vedação de Óleo | 1 | |
| 9 | 4/8006 | Washer | Rondelle | Arandela | Anilha | M8 | 8 |
| 10 | MS12 | Bung | Obturateur | Tapón | Tampão | 1 | |
| 11 | 5/0011 | Seal | Joint d'étanchéité | Obturador | Vedação | 1 | |
| 12 | PCX/VIB-06SP | Vibrator Unit | Unité de Vibration | Unidade Vibradora | Unidade do Vibrador | 1 |
4-01

text_image
Exploded view diagram of a mechanical assembly with numbered parts for identificationTrilelement, Rüttlerteil, Vibratorenhed, Gruppo Vibratore
| 1 | 7/8010 | Schroef | Schraube | Skrue | Vite | M8 | 8 |
| 2 | 151/99986 | Einddeksel | Endschild | Endedæksel | Coperchio Estremità | 1 | |
| 3 | 5/0069 | Taetningsring | Flachdichtung | Pakking | Gaurnizione | 2 | |
| 4 | 53/0072 | Lager | Lager | Leje | Rolamanto | 2 | |
| 5 | 960/99919 | Huis | Gehäuse | Hus | Alloggiamento | 1 | |
| 6 | 960/99920 | As | Welle | Aksel | Albero | 1 | |
| 7 | 151/99987 | Einddeksel | Endschild | Endedæksel | Coperchio Estremità | 1 | |
| 8 | 15.0.196 | Olieafdichtring | Oldichtung | Oliepakning | Paraolio | 1 | |
| 9 | 4/8006 | Afdichtring | Scheibe | Spændeskive | Cuscinetto | M8 | 8 |
| 10 | MS12 | Plug | Verschlusschraube | Prop | Candela | 1 | |
| 11 | 5/0011 | Afdichtring | Dichtung | Tætning | Tenuta | 1 | |
| 12 | PCX/VIB-06SP | Trilelement | Rüttlertiel | Vibratorenhed | Gruppo Vibratore | 1 | |
text_image
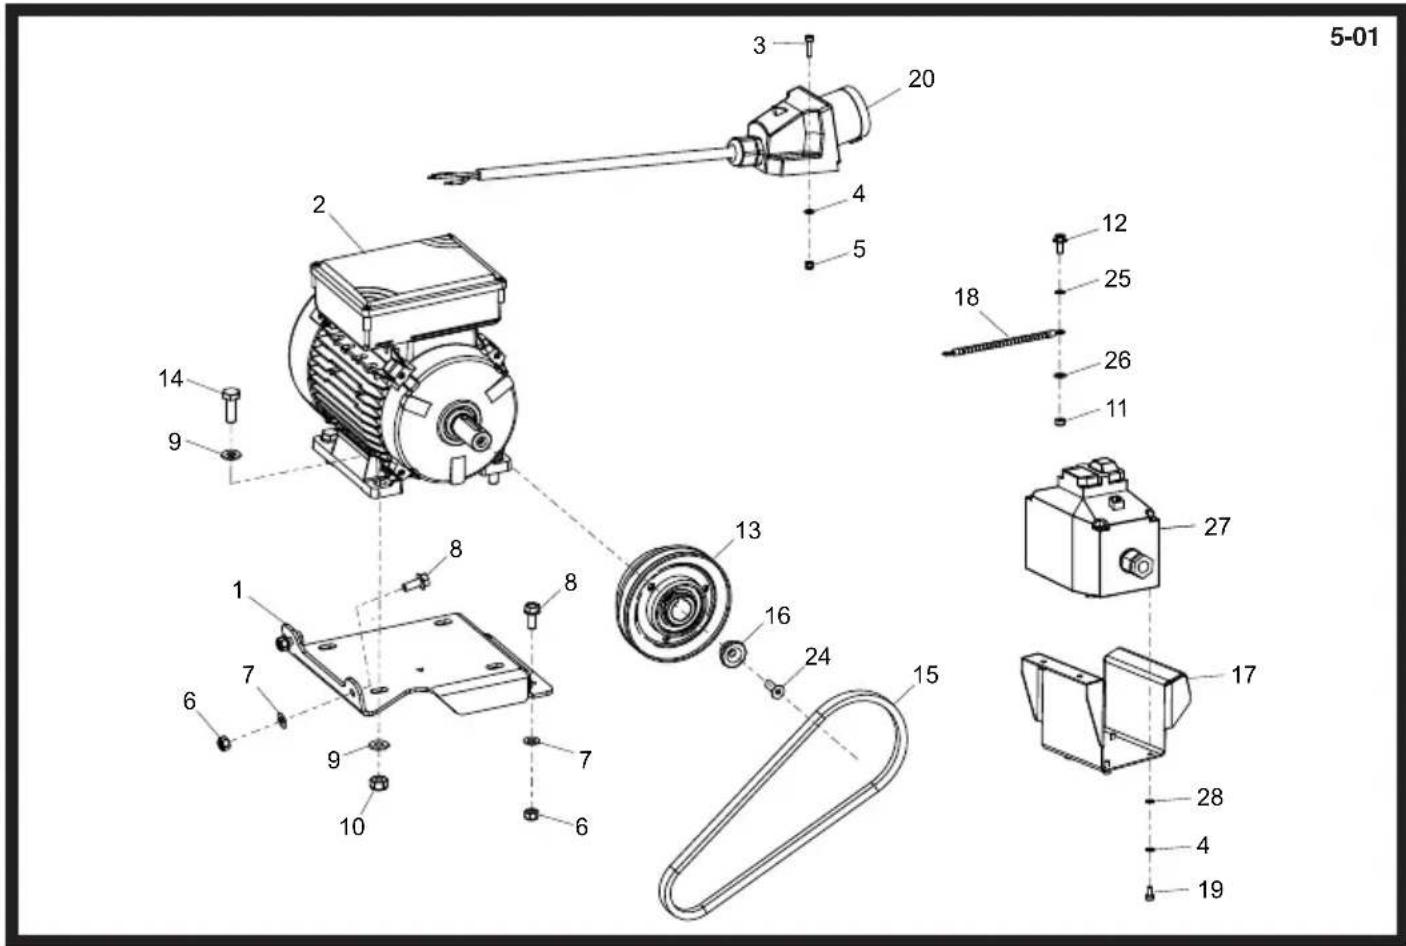
5-01 20 3 4 5 2 18 12 25 26 11 13 16 24 15 27 17 28 4 19 14 9 8 1 7 6 9 7 10 6Motor and Drive Kit, Moteur et Kit d'Entraînement, Motor y Kit Transmision, Motor e Kit de Transmissão
| 1 | 943/99966 | Motor Deck | Plate-Forme De Moteur | Cubierta Motor | Plataforma motor | 1 |
| 2 | 20/0101 | Motor | Moteur | Motor | Motor | 110v. |
| 2 | 20/0102 | Motor | Moteur | Motor | Motor | 230v. |
| 3 | 7/5025 | Screw | Vis | Tornillo | Parafuso | M5 x 10. |
| 4 | 4/5002 | Washer | Rondelle | Arandela | Anilha | M5. |
| 5 | 8/5009 | Nut | Ecrou | Tuerca | Porca | M5. |
| 6 | 8/8008 | Nut | Ecrou | Tuerca | Porca | M8. |
| 7 | 4/8006 | Washer | Rondelle | Arandela | Anilha | M8. |
| 8 | 7/8037 | Screw | Vis | Tornillo | Parafuso | M8 x 20. |
| 9 | 4/1005 | Washer | Rondelle | Arandela | Anilha | M10. |
| 10 | 8/10006 | Nut | Ecrou | Tuerca | Porca | M10. |
| 11 | 8/6007 | Nut | Ecrou | Tuerca | Porca | M6. |
| 12 | 7/6034 | Screw | Vis | Tornillo | Parafuso | M6 x 16. |
| 13 | 21/0421 | Clutch | Embrayage | Embrague | Embraiagem | 1 |
| 14 | 7/10003 | Screw | Vis | Tornillo | Parafuso | M10 x 35. |
| 15 | 21/0418 | Belt | Courroie | Correa | Cinta | 1 |
| 16 | 21/0422 | Bush | Douille | Buje | Bucha | 1 |
| 17 | 943/99969 | Starter Mounting | Support de montage | Palomilla para arrancador | Suporte da Ignição | 1 |
| Bracket | de démarreur | |||||
| 18 | 71/0310 | Earth Cable | Cable - de Terre | Cable - Positivo | Cable - Terra | 1 |
| 19 | 7/5020 | Screw | Vis | Tornillo | Parafuso | M5 x 10. |
| 20 | 70/0308 | Socket | Prise | Enchufe | Tomado | 110v. |
| 24 | 157.0.470 | Screw | Vis | Tornillo | Parafuso | M8 x 25. |
| 25 | 4/6004 | Washer | Rondelle | Arandela | Anilha | M6. |
| 26 | 4/6001 | Washer | Rondelle | Arandela | Anilha | M6. |
| 27 | 70/0306 | Starter | Démarreur | Arrancador | Arrancador | 110v. |
| 27 | 70/0262 | Starter | Démarreur | Arrancador | Arrancador | 230v. |
| 28 | 4/5003 | Washer | Rondelle | Arandela | Anilha | M5. |

text_image
Exploded view diagram of an electric motor assembly with numbered parts for identificationMotor en Aandrijfset, Motor und Antriebsbausatz, Motor og Gearkit, Motore e Kit Trasmissione
| 1 | 943/99966 | Motor Dek | Motordeck | Motor Dæk | Deck Motore | 1 |
| 2 | 20/0101 | Motor | Motor | Motor | Motore | 110v |
| 2 | 20/0102 | Motor | Motor | Motor | Motore | 230v |
| 3 | 7/5025 | Schroef | Schraube | Skrue | Vite | M5 x 10 |
| 4 | 4/5002 | Afdichtring | Scheibe | Spændeskive | Cuscinetto | M5 |
| 5 | 8/5009 | Moer | Mutter | Møtrik | Dado | M5 |
| 6 | 8/8008 | Moer | Mutter | Møtrik | Dado | M8 |
| 7 | 4/8006 | Afdichtring | Scheibe | Spændeskive | Cuscinetto | M8 |
| 8 | 7/8037 | Schroef | Schraube | Skrue | Vite | M8 x 20 |
| 9 | 4/1005 | Afdichtring | Scheibe | Spændeskive | Cuscinetto | M10 |
| 10 | 8/10006 | Moer | Mutter | Møtrik | Dado | M10 |
| 11 | 8/6007 | Moer | Mutter | Møtrik | Dado | M6 |
| 12 | 7/6034 | Schroef | Schraube | Skrue | Vite | M6 x 16 |
| 13 | 21/0421 | Koppeling | Kupplung | Kobling | Frizione | |
| 14 | 7/10003 | Schroef | Schraube | Skrue | Vite | M10 x 35 |
| 15 | 21/0418 | Riem | Riemen | Remmen | Cinghia | |
| 16 | 21/0422 | Bus | Buchse | Bøsning | Boccola | |
| 17 | 943/99969 | Starterbeugel | Halterung für Anlasser | Starterbeslag | Staffa del dispositivo di avviamento | |
| 18 | 71/0310 | Aardkabel | Erdungskabel | Jordkabel | Cavo di Terra | |
| 19 | 7/5020 | Schroef | Schraube | Skrue | Vite | M5 x 10 |
| 20 | 70/0308 | Mof | Buchsenausführung | Stikdåse | Presa | 110v |
| 24 | 157.0.470 | Schroef | Schraube | Skrue | Vite | M8 x 25 |
| 25 | 4/6004 | Afdichtring | Scheibe | Spændeskive | Cuscinetto | M6 |
| 26 | 4/6001 | Afdichtring | Scheibe | Spændeskive | Cuscinetto | M6 |
| 27 | 70/0306 | Starter | Anlasser | Starter | Avviatore | 110v |
| 27 | 70/0262 | Starter | Anlasser | Starter | Avviatore | 230v |
| 28 | 4/5003 | Afdichtring | Scheibe | Spændeskive | Cuscinetto | M5 |

text_image
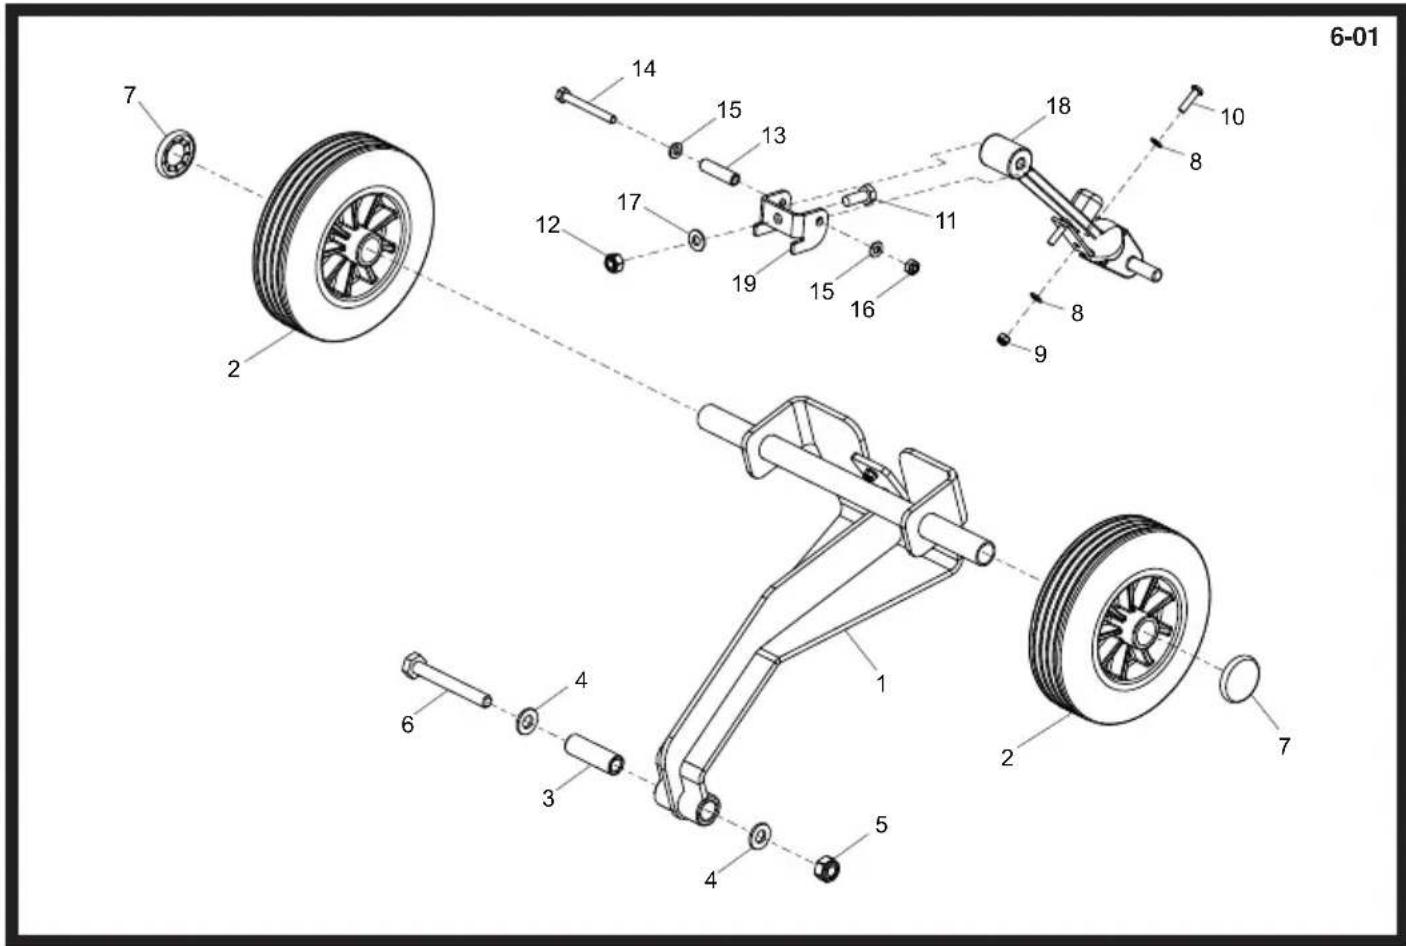
6-01 7 2 14 15 13 12 17 19 15 16 18 10 8 11 8 9 6 4 3 5 4 2 7Transporter Attachment, Fixation de transporteur, Conexión para transportador, Acessório do Transportado
| 1 | 960/02400 | Transporter Weldment | Assemblage soudé | Cjto. Transportador soldado | Soldadura do Transportador | |
| de transporteur | 1 | |||||
| 2 | 19.0.603 | Wheel | Roue | Rueda | Roda | 2 |
| 3 | 960/99924 | Boss | Bossage | Resalte | Cubo | 1 |
| 4 | 4/1005 | Washer | Rondelle | Arandela | Anilha | M10 |
| 5 | 8/10006 | Nut | Ecrou | Tuerca | Porca | M10 |
| 6 | 9/10011 | Bolt | Boulon | Perno | Perno | M10 x 80 |
| 7 | 00011 | Cap | Capuchon | Casquete | Tampa | 2 |
| 8 | 4/5002 | Washer | Rondelle | Arandela | Anilha | M5 |
| 9 | 8/5003 | Nut | Ecrou | Tuerca | Porca | M5 |
| 10 | 7/5027 | Screw | Vis | Tornillo | Parafuso | M5 x 20 |
| 11 | 7/8011 | Screw | Vis | Tornillo | Parafuso | M8 x 20 |
| 12 | 8/8008 | Nut | Ecrou | Tuerca | Porca | M8 |
| 13 | 988/99914 | Boss | Bossage | Resalte | Cubo | 1 |
| 14 | 9/6031 | Bolt | Boulon | Perno | Perno | M6 x 60 |
| 15 | 4/6001 | Washer | Rondelle | Arandela | Anilha | M6 |
| 16 | 8/6007 | Nut | Ecrou | Tuerca | Porca | M6 |
| 17 | 4/8006 | Washer | Rondelle | Arandela | Anilha | M8 |
| 18 | 960/99926 | Latch | Verrou | Cerrojo | Trinco | 1 |
| 19 | 960/99923 | Bracket | Patte de Montage | Escuadra | Suporte | 1 |
text_image
6-01 7 2 14 15 13 12 17 19 15 16 18 10 8 11 8 9 6 4 3 5 4 2 7Transporthulpstuk, Transportvorrichtung, Transportørudstyr, Trasportatore
| 1 | 960/02400 | Transportframe | Transportvorrichtung | Transportørsvejsning | Saldatura del Trasportatore | 1 |
| 2 | 19.0.603 | Wiel | Rad | Hjul | Ruota | 2 |
| 3 | 960/99924 | Naaf | Knauf | Studs | Borchia | 1 |
| 4 | 4/1005 | Afdichtring | Scheibe | Spændeskive | Cuscinetto | M10 |
| 5 | 8/10006 | Moer | Mutter | Møtrik | Dado | M10 |
| 6 | 9/10011 | Bouten | Bolzen | Skruebolt | Bullone | M10 x 80 |
| 7 | 00011 | Kap | Kappe | Hætte | Cappuccio | 2 |
| 8 | 4/5002 | Afdichtring | Scheibe | Spændeskive | Cuscinetto | M5 |
| 9 | 8/5003 | Moer | Mutter | Møtrik | Dado | M5 |
| 10 | 7/5027 | Schroef | Schraube | Skrue | Vite | M5 x 20 |
| 11 | 7/8011 | Schroef | Schraube | Skrue | Vite | M8 x 20 |
| 12 | 8/8008 | Moer | Mutter | Møtrik | Dado | M8 |
| 13 | 988/99914 | Naaf | Knauf | Studs | Borchia | 1 |
| 14 | 9/6031 | Bouten | Bolzen | Skruebolt | Bullone | M6 x 60 |
| 15 | 4/6001 | Afdichtring | Scheibe | Spændeskive | Cuscinetto | M6 |
| 16 | 8/6007 | Moer | Mutter | Møtrik | Dado | M6 |
| 17 | 4/8006 | Afdichtring | Scheibe | Spændeskive | Cuscinetto | M8 |
| 18 | 960/99926 | Grendel | Riegel | Grendel | Dispositivo di bloccaggio | 1 |
| 19 | 960/99923 | Steun | Halterung | Beslag | Staffa | 1 |
text_image
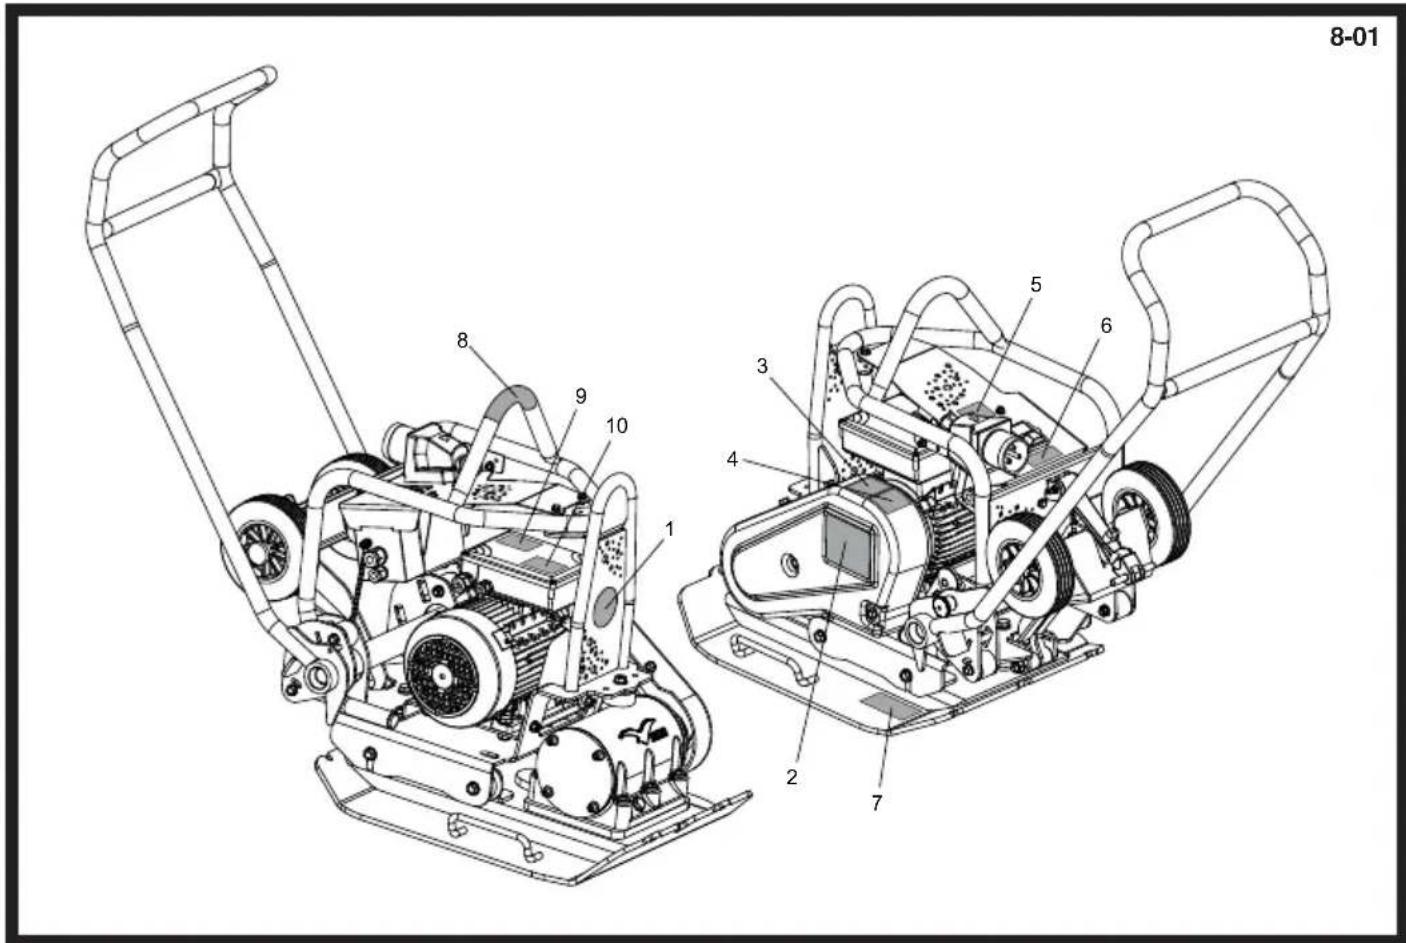
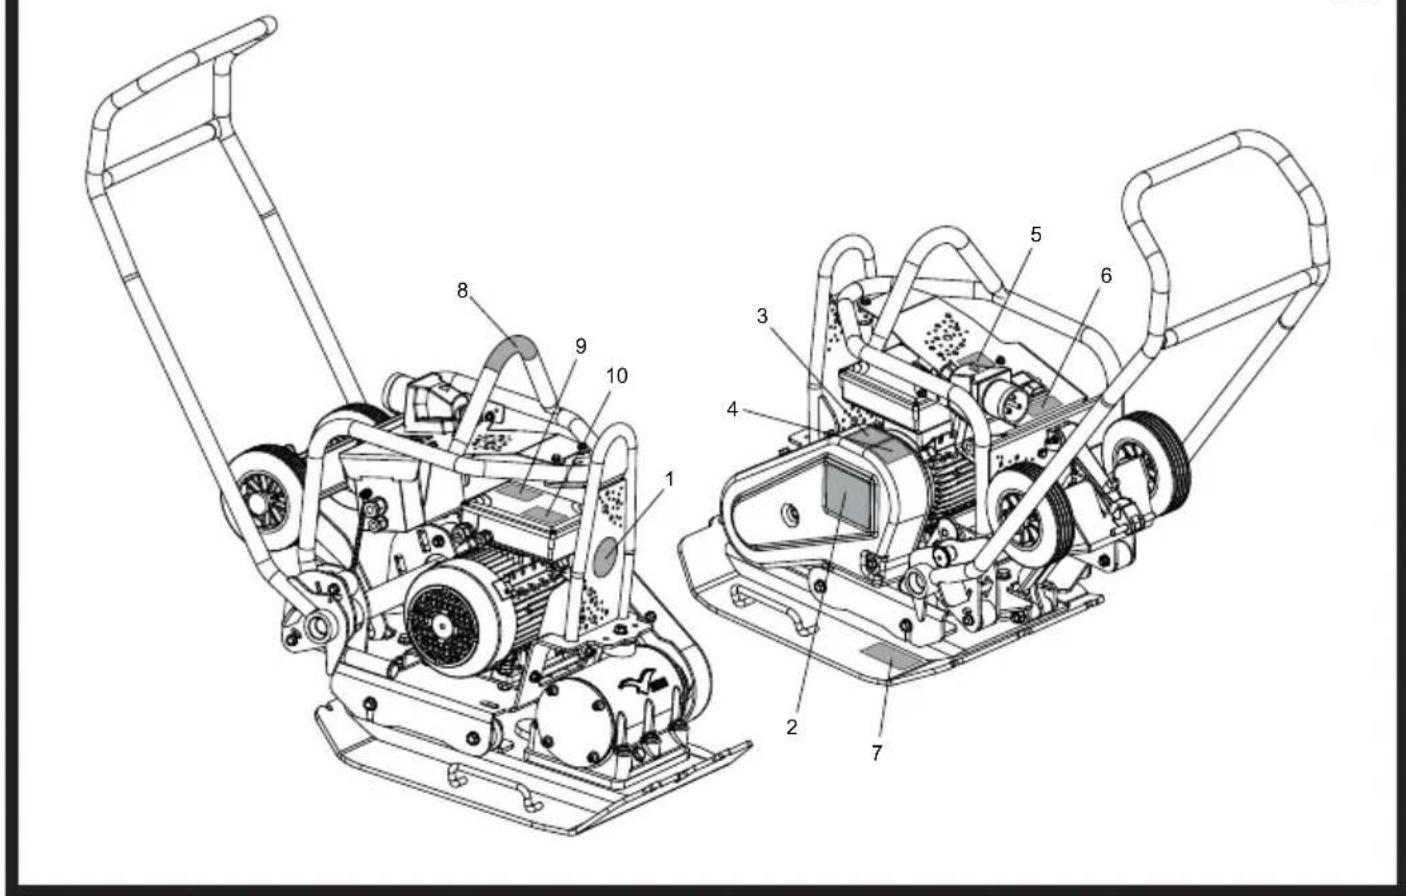
8-01 1 2 3 4 5 6 7 8 9 10Decals, Autocollant, Rótulo, Decalque
| 1 | 800/00300 | Decal | Autocollant | Rótulo | Decalque | Belle | 1 |
| 2 | 800/99447 | Decal | Autocollant | Rótulo | Decalque | PCLX 16/45E | 1 |
| 3 | 800/99951 | Decal | Autocollant | Rótulo | Decalque | 105dB(A) | 1 |
| 4 | 19.0.373 | Decal | Autocollant | Rótulo | Decalque | 1 | |
| 5 | 800/99532 | Decal | Autocollant | Rótulo | Decalque | Wet Conditions | 1 |
| 6 | 800/99306 | Decal | Autocollant | Rótulo | Decalque | Transformer Size | 1 |
| 7 | 800/99420 | Decal | Autocollant | Rótulo | Decalque | Wheel Kit | 1 |
| 8 | 800/99986 | Decal | Autocollant | Rótulo | Decalque | Lifting Point | 1 |
| 9 | 800/99531 | Decal | Autocollant | Rótulo | Decalque | Motor Safety | 1 |
| 10 | 800/99304 | Decal | Autocollant | Rótulo | Decalque | Motor Rating 110v | 1 |
| 10 | 800/99305 | Decal | Autocollant | Rótulo | Decalque | Motor Rating 230v | 1 |
8-01
text_image
Technical diagram of a manual lawn mower with numbered components for identificationLabel, Abziehbild, Skilt, Decalcomania
| 1 | 800/00300 | Label | Abziehbild | Skilt | Decalcomania | Belle | 1 |
| 2 | 800/99447 | Label | Abziehbild | Skilt | Decalcomania | PCLX 16/45E | 1 |
| 3 | 800/99951 | Label | Abziehbild | Skilt | Decalcomania | 105dB(A) | 1 |
| 4 | 19.0.373 | Label | Abziehbild | Skilt | Decalcomania | 1 | |
| 5 | 800/99532 | Label | Abziehbild | Skilt | Decalcomania | Wet Conditions | 1 |
| 6 | 800/99306 | Label | Abziehbild | Skilt | Decalcomania | Transformer Size | 1 |
| 7 | 800/99420 | Label | Abziehbild | Skilt | Decalcomania | Wheel Kit | 1 |
| 8 | 800/99986 | Label | Abziehbild | Skilt | Decalcomania | Lifting Point | 1 |
| 9 | 800/99531 | Label | Abziehbild | Skilt | Decalcomania | Motor Safety | 1 |
| 10 | 800/99304 | Label | Abziehbild | Skilt | Decalcomania | Motor Rating 110v | 1 |
| 10 | 800/99305 | Label | Abziehbild | Skilt | Decalcomania | Motor Rating 230v | 1 |