
OSA1000 - Multitools EGO - Free user manual and instructions
Find the device manual for free OSA1000 EGO in PDF.

| Product type | Olive vibrating rake accessory |
| Brand | EGO |
| Model | OSA1000 |
| Use | For EGO 56V PH1400E/PH1420E power head |
| Vibration frequency | 1780 / 2120 beats per minute (BPM) |
| Rod length (rake stroke) | 350 mm - 600 mm |
| Weight | 2.1 kg |
| Guaranteed sound power level | 94 dB(A) |
| Sound pressure level (operator) | 81 dB(A) (PH1400E) / 81.3 dB(A) (PH1420E) |
| Vibration at workstation (front handle) | 1.8 m/s² (PH1400E) / 7.47 m/s² (PH1420E) |
| Vibration at workstation (rear handle) | 4.3 m/s² (PH1400E) / 4.63 m/s² (PH1420E) |
| Package contents | Rake assembly, 10 carbon rods, 2 dampers, 10 bolts/nuts, Allen key, manual |
| Rod material | Carbon |
| Power supply | Via power head (56V battery, not included) |
| Main functions | Harvesting olives and other nuts by shaking branches |
| Daily maintenance | Check rod tightness, clean after use, grease piston 3 times a day |
| Cleaning | Clean the rake after each use |
| Safety instructions | Wear safety glasses, gloves, safety shoes; keep people away; do not modify the tool |
| Available spare parts | Carbon rods, dampers, rake teeth |
| Repairability | Repairs by authorized service center; do not open the upper casing (lifetime grease) |
| Warranty | See egopowerplus.eu for conditions |
Frequently Asked Questions - OSA1000 EGO
User questions about OSA1000 EGO
0 question about this device. Answer the ones you know or ask your own.
Ask a new question about this device
Download the instructions for your Multitools in PDF format for free! Find your manual OSA1000 - EGO and take your electronic device back in hand. On this page are published all the documents necessary for the use of your device. OSA1000 by EGO.
USER MANUAL OSA1000 EGO
natural_image
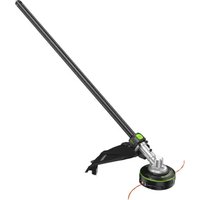
Technical line drawing of a mechanical lever assembly with multiple blades radiating from a central shaft (no text or symbols)OPERATOR'S MANUAL
OLIVE SHAKER ATTACHMENT
MODEL NUMBER OSA1000
FOR USE ONLY WITH THE 56V LITHIUM-ION POWER HEAD PH1400E/PH1420E
EN Olive shaker attachment
natural_image
Illustration of hands holding chopsticks (no text or symbols)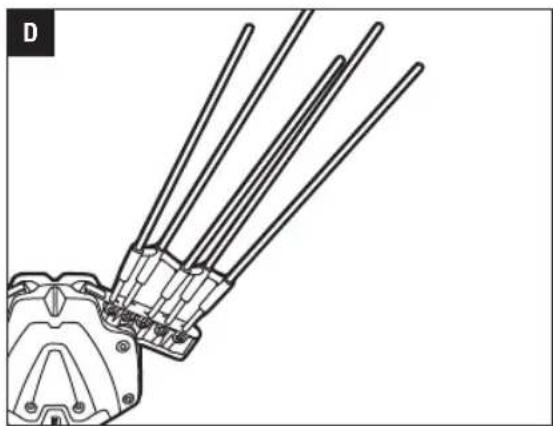
natural_image
Technical line drawing of a robotic arm joint with multiple articulated blades (no text or symbols)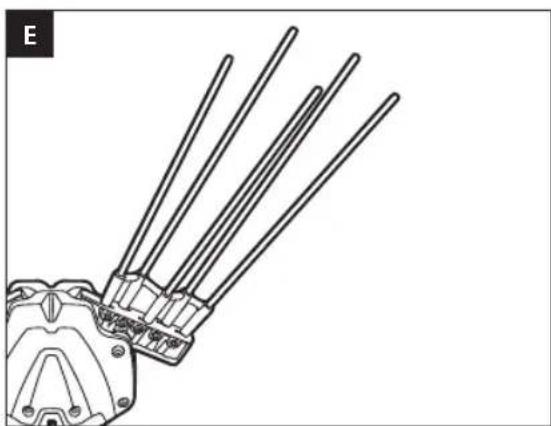
natural_image
Line drawing of a robotic arm with multiple blades extending outward (no text or symbols)EN READ ALL INSTRUCTIONS!
WARNING: Be sure to read and understand all safety instructions in this Operator's Manual, including all safety alert symbols such as "WARNING," and "CAUTION" before using this tool. Failure to follow all instructions listed below may result in electric shock, fire, and/or serious personal injury.
WARNING: The operation of any power tools can result in foreign objects being thrown into your eyes, which can result in severe eye damage. Before beginning power tool operation, always wear safety goggles or safety glasses with side shields and a full face shield when needed. We recommend a Wide Vision Safety Mask for use over eyeglasses or standard safety glasses with side shields.
SAFETY SYMBOLS

Safety Alert

WEEE, Waste electrical products should not be disposed of with household waste

To reduce the risk of injury, user must read instruction manual

Guaranteed sound power level according to the European community's Directive

Keep bystanders away V Volt

Wear snug-fitting clothing. Do not wear a scarf, necktie or jewelry

Direct Current

Wear non-slip safety footwear BPM Beats per Minute

Wear close-fitting safety glasses, earplugs or ear muffs and a safety hard hat with chin strap

This product is in accordance with applicable EC directives

Wear heavy-duty work gloves made of durable material
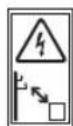
Keep sufficient distance away from electrical power lines

Do not expose to moisture
SPECIFICATIONS
| Olive shaker BPM 1780/2120 bpm | ||
| Forkhead stroke 350mm-600mm | ||
| Weight 2.1 kg | ||
| Measured sound power level L_WA | 90.1 dB(A)K=1.97 dB(A)(PH1400E) | |
| 92.08 dB(A)K=1.64 dB(A)(PH1420E) | ||
| Sound pressure level at operator's ear L_PA | 81 dB(A)K=3 dB(A)(PH1400E) | |
| 81.3 dB(A)K=3 dB(A)(PH1420E) | ||
| Guaranteed sound power level L_WA (according to 2000/14/EC) | 94 dB(A) | |
| Vibration a_h | Front-assist Handle | 1.8 m/s2K=1.5 m/s2(PH1400E) |
| 7.47 m/s2K=1.5 m/s2(PH1420E) | ||
| Rear Handle | 4.3 m/s2K=1.5 m/s2(PH1400E) | |
| 4.63 m/s2K=1.5 m/s2(PH1420E) | ||
PACKING LIST
| PART NAME QUANTITY | |
| Olive shaker assembly 1 | |
| Carbon rod 10 | |
| Shock absorber 2 | |
| Bolt & Nut 10 | |
| Allen Key 1 | |
| Operator's Manual 1 |
DESCRIPTION
KNOW YOUR OLIVE SHAKER ATTACHMENT (Fig. A)
- Carbon Rod
- Shock Absorber
- Comb
- Upper Piston Guard
- Tube
ASSEMBLY
WARNING: If any parts are damaged or missing, do not operate this product until the parts are replaced.
WARNING: Do not attempt to modify this product or create accessories not recommended for use with this olive shaker. Any such alteration or modification is misuse and could result in a hazardous condition leading to possibly serious personal injury.
CONNECTING THE OLIVE SHAKER ATTACHMENT TO THE POWER HEAD
This olive shaker attachment is designed for use with EGO 56V LITHIUM-ION Power Head PH1400E/PH1420E.
See "INSTALLING AN ATTACHMENT TO THE POWER HEAD" section in the power head PH1400E/PH1420E operator's manual.
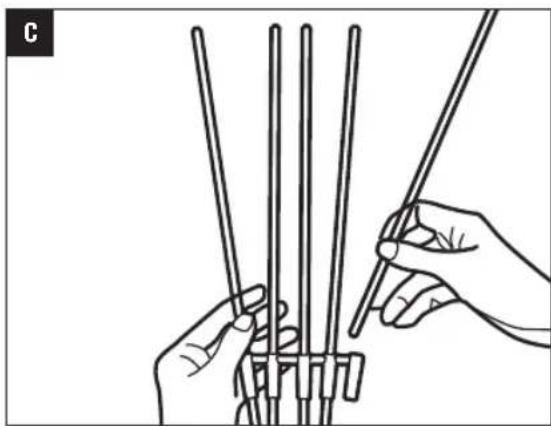
INSTALLING CARBON ROD
- Loosen the 5 fixing bolts on the comb with Allen key respectively.
- Pass the 5 carbon rods through the 5 corresponding holes in the black shock absorber one by one. (Fig. C). Insert the carbon rods into each of the fixed holes corresponding to the comb and then press it to the bottom. (Fig. D)
- Tighten the 5 fixing bolts on the comb with Allen key respectively.
- The other five carbon rods are installed the same way.
WARNING: Never attach or adjust any attachment while the power head is running or with the battery installed.
EN OPERATION
WARNING: Do not allow familiarity with this product to make you careless.
CAUTION: Before each use, make sure you have pressed 10 carbon rods down to the very end. Inspect the entire product for damaged, missing, or loose parts such as screws, carbon rods, etc. Tighten securely all screws and do not operate this product until all missing or damaged parts are replaced.
APPLICATIONS
Intended use: You may use this product for the purpose of harvesting nuts and fruits. You may use EGO POWER HEAD to drive the 10 carbon rods of Olive Shaker's working head to swing back and forth at high frequency, knocking the Olive fruit from the branches to the ground.
NOTICE: The tool is to be used only for its prescribed purpose. Any other use is deemed to be a case of misuse.
NOTICE: Keep children and bystanders away while operating a power tool.
PREPARATION FOR START
Notice: Wear non-slip gloves for maximum grip and protection. Never stand directly under the branch you are shaking. Make sure that you have a secure and balanced footing. Watch out for obstacles such as tree stumps, roots and ditches, which could cause you to trip or stumble.
Notice: Maintain a proper grip on the unit whenever the motor is running. Hold the unit firmly with both hands.
Notice: Pay attention to the tree's limb structure during operation. Do not be too close to the olive tree when you operate. It's easy to get hurt if you get too close.
TO START/STOP THE TOOL
See "STARTING/STOPPING THE POWER HEAD" section in the power head PH1400E/PH1420E operator's manual.
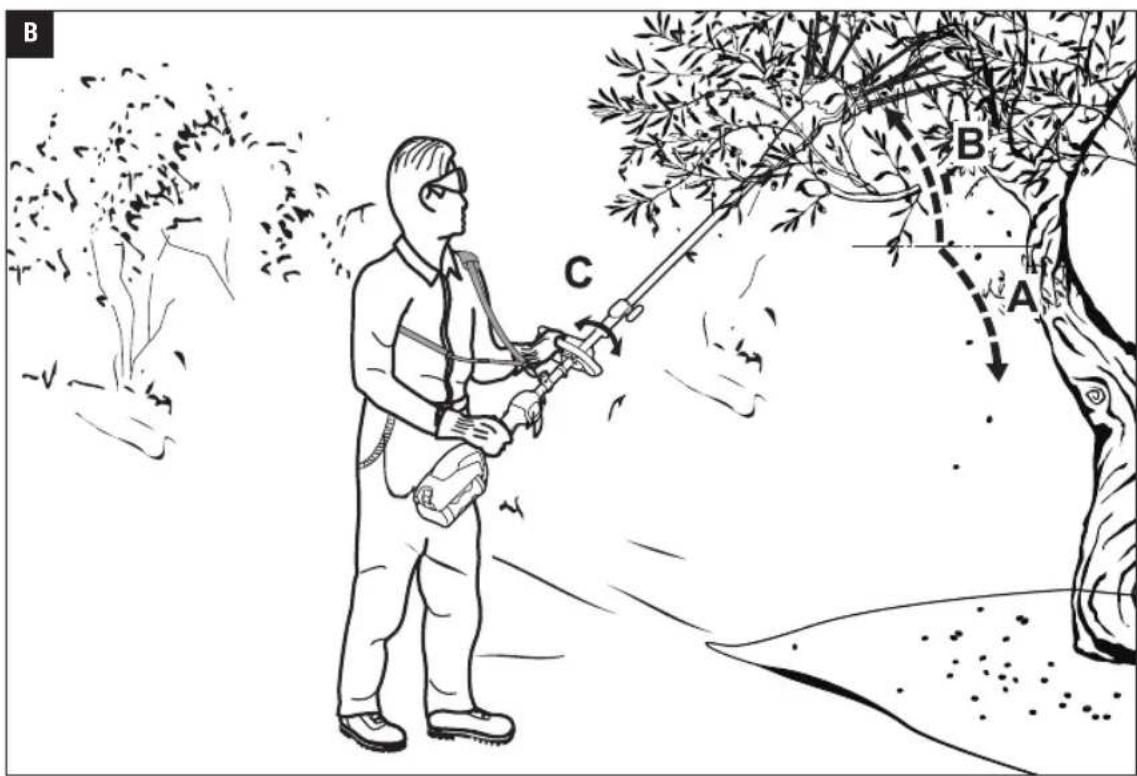
BASIC HARVESTING PROCEDURE (Fig. B)
- Pay attention to the tree's limb structure during operation:
■ Comb the lower section (A) from the top downwards, this also applies to the outer branches of the tree that hang down.
■ Comb the top part (B) upwards from the bottom.
■ Comb from the inside of the tree to the top of the branch.
- While combing the branches, rotate the tube back and forth on axis (C) if necessary.
- Shake the whole tree even if there is very little fruit left on it.
4 Do not fix the machine in one place for too long to avoid damaging unnecessary leaves and branches. - Always switch off the machine when no one is on duty.
MAINTENANCE
WARNING: To prevent serious personal injury, remove the battery pack from the tool before servicing, cleaning, changing attachments or removing material from the unit.
WARNING: When servicing, use only identical replacement parts. Use of any other parts can create a hazard or cause product damage. To ensure safety and reliability, all repairs, other than the items listed in these maintenance instructions, should be performed by a qualified service technician.
To assure a high performance for a long-time, operator has to make a simple maintenance work as mentioned in the following table.
| POS. COMPONENT ACTION FREQUENCY | |||
| 1 Carbon rods Check if assembled correctly | Daily | ||
| 2 Piston Grease through the proper opening | 3 times a day | ||
| 3 Olive Shaker Cleaning after use Daily | |||
NOTE: The inside mechanisms of olive shaker are protected for a lifetime with a special grease. DO NOT OPEN THE MACHINE UPPER PART. Any tampering will invalidate the manufacturer warranty.
REPLACEMENT
- Loosen the 10 fixing bolts on the comb with Allen key respectively.
-
Hold the black shock absorber and pull the tine out outward, then 10 carbon rods be pulled out together. Replace the new tine or shock absorber directly, then insert it into the fixing hole on the comb and tighten the retaining bolt.
-
If only one tine is damaged, simply loosen the retaining bolt at the root of the tine. Hold the black shock absorber with your hand, draw the damaged tine separately and pull it out.
Pass the new tine through the black shock absorber, then insert into the fixed hole corresponding to the comb. Press it to the bottom and simply re-tighten the retaining bolts. (Fig. E)
Protecting the environment

WEEE (Waste Electrical and Electronic Equipment)
Do not dispose of electrical equipment, used battery and charger into household waste! Take this product to an authorized recycler and make it available for separate collection. Electric tools must be returned to an environmentally compatible recycling facility.
EN
EN TROUBLESHOOTING
| PROBLEM | CAUSE SOLUTION | |
| Olive shaker fails to start. | ■ The battery pack is depleted.■ Battery pack breakdown■ The battery pack is not properly attached to the power head■ Beyond above-mentioned reason still do not start. | ■ Charge the battery pack with a designated charger■ Replace the battery pack with a new one■ Check whether the battery pack is fully fastened■ Do not disassemble and inspect the machine by yourself. Deliver it to the designated service point for repair |
| Sudden stop at work | ■ The battery pack flashes red■ The battery pack flashes yellow■ Olive shaker overload | ■ The electric quantity of battery pack is too low. Please replace it with a new battery pack or recharge and use it again.■ If the battery pack is too warm, cool it in a ventilated place for a while and then use it again. Please adjust the working mode to avoid continuous high intensity use■ Try tapping the olive fruit with the tip of the tine. Do not insert the tine completely into the tree cluster. |
| ■ Beyond above-mentioned reason still do not start. | ■ Do not disassemble and inspect the machine by yourself. Deliver it to the designated service point for repair | |
| Olive shaker is loud in vibration or noise | ■ Piston lack of lubrication■ Tine break off■ Drive link is abnormal■ Gear is damaged■ Drive shaft spline broken | ■ Grease through the proper opening in the lower part of the head■ Replace a new tine■ Open the upper piston guard to check whether the drive link and related bearing connectors are damaged■ If all other parts are normal, then only the gear is damaged. Replace the gearbox component with a new one■ Replace the tube components with a new one. |
WARRANTY
EN
EGO WARRANTY POLICY
Please visit the website egopowerplus.eu for full terms and conditions of the EGO Warranty policy.
LISEZ TOUTES LES INSTRUCTIONS !
FR


- EN READ ALL INSTRUCTIONS!
- SAFETY SYMBOLS
- DESCRIPTION
- KNOW YOUR OLIVE SHAKER ATTACHMENT (Fig. A)
- ASSEMBLY
- CONNECTING THE OLIVE SHAKER ATTACHMENT TO THE POWER HEAD
- INSTALLING CARBON ROD
- EN OPERATION
- APPLICATIONS
- PREPARATION FOR START
- TO START/STOP THE TOOL
- BASIC HARVESTING PROCEDURE (Fig. B)
- MAINTENANCE
- REPLACEMENT
- Protecting the environment
- WARRANTY
- LISEZ TOUTES LES INSTRUCTIONS !
- FR
Brand : EGO
Model : OSA1000
Category : Multitools