Mistral - Air Conditioning Klarstein - Free user manual and instructions
Find the device manual for free Mistral Klarstein in PDF.
| Brand | Klarstein |
| Model | Mistral |
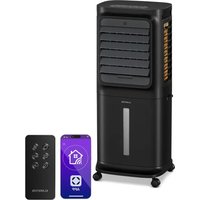
| Product type | Evaporative air cooler |
| Power supply | 220-240 V ~ 50 Hz |
| Power | 36 W |
| Water tank capacity | 3.6 L |
| Air volume | 365 m³/h |
| Evaporation volume | 500 ml/h |
| Maximum noise level | ≤ 53 dB (high speed) |
| Dimensions (W x D x H) | 300.5 x 300.5 x 1003 mm |
| Net weight | 5.2 ± 0.5 kg |
| Package weight | 7.3 ± 0.5 kg (with cooling blocks) |
| Number of speeds | 8 |
| Ventilation modes | Normal, Natural, Night |
| Timer | 1 to 9 hours |
| Main functions | Cooling, humidification, oscillation, plasma, WiFi, remote control |
| Cooling blocks included | 2 ice blocks |
| WiFi | 802.11 b/g/n, 2.4 GHz |
| Remote control battery | CR2032 (included) |
| Cleaning | Wipe the exterior; clean the water tank regularly |
| Safety | Water shortage protection, automatic shutdown |
Frequently Asked Questions - Mistral Klarstein
User questions about Mistral Klarstein
0 question about this device. Answer the ones you know or ask your own.
Ask a new question about this device
Download the instructions for your Air Conditioning in PDF format for free! Find your manual Mistral - Klarstein and take your electronic device back in hand. On this page are published all the documents necessary for the use of your device. Mistral by Klarstein.
USER MANUAL Mistral Klarstein
text_image
QR code image containing encoded data, no visible human-readable textINHALT
text_image
Technical diagram of a two-tiered air conditioner unit with numbered components and airflow indicatorsnatural_image
Technical line drawing of a rectangular electronic component with internal gear-like cutouts (no text or symbols)Kühlakku x 2
natural_image
Technical line drawing of a mechanical component assembly (no text or symbols)natural_image
Technical line drawing of a mechanical component with concentric rings and a diagonal line (no text or symbols)natural_image
Illustration of a traditional Chinese compass with a circular dial and pointer (no text or symbols)Fernbedienung
natural_image
Technical line drawing of a rectangular electronic component with a small circular component below (no text or symbols)BEDIENUNG
text_image
Diagram illustrating a multi-step setup for heating a heater, showing cooling and heat transfer process with labeled components.natural_image
Line drawing of a vertical shelf or vent with a lid and base, no text or symbols present
text_image
Rotate 90 degrees clockwisenatural_image
Technical line drawing of a mechanical assembly (no text or symbols)
natural_image
Technical line drawing of a mechanical component with no visible text or symbols
natural_image
Symbol of a trash bin with crossed lines indicating no waste or discharge (no text or labels)Congratulations on the purchase of your appliance. Please read the following instructions carefully and follow them to prevent potential damage. We accept no liability for damage caused by disregarding the instructions and improper use. Please scan the QR code to access the latest operating instructions and further information about the product.

text_image
QR code image containing encoded data, no visible human-readable textCONTENTS
Safety Instructions 26
Device overview 28
Control panel 29
Installation 30
Operation 32
Wind modes 34
Filling the Water Tank with Water 37
Device Control by Smartphone 40
Cleaning and Care 42
Troubleshooting 43
Disposal Considerations 44
Declaration of Conformity 44
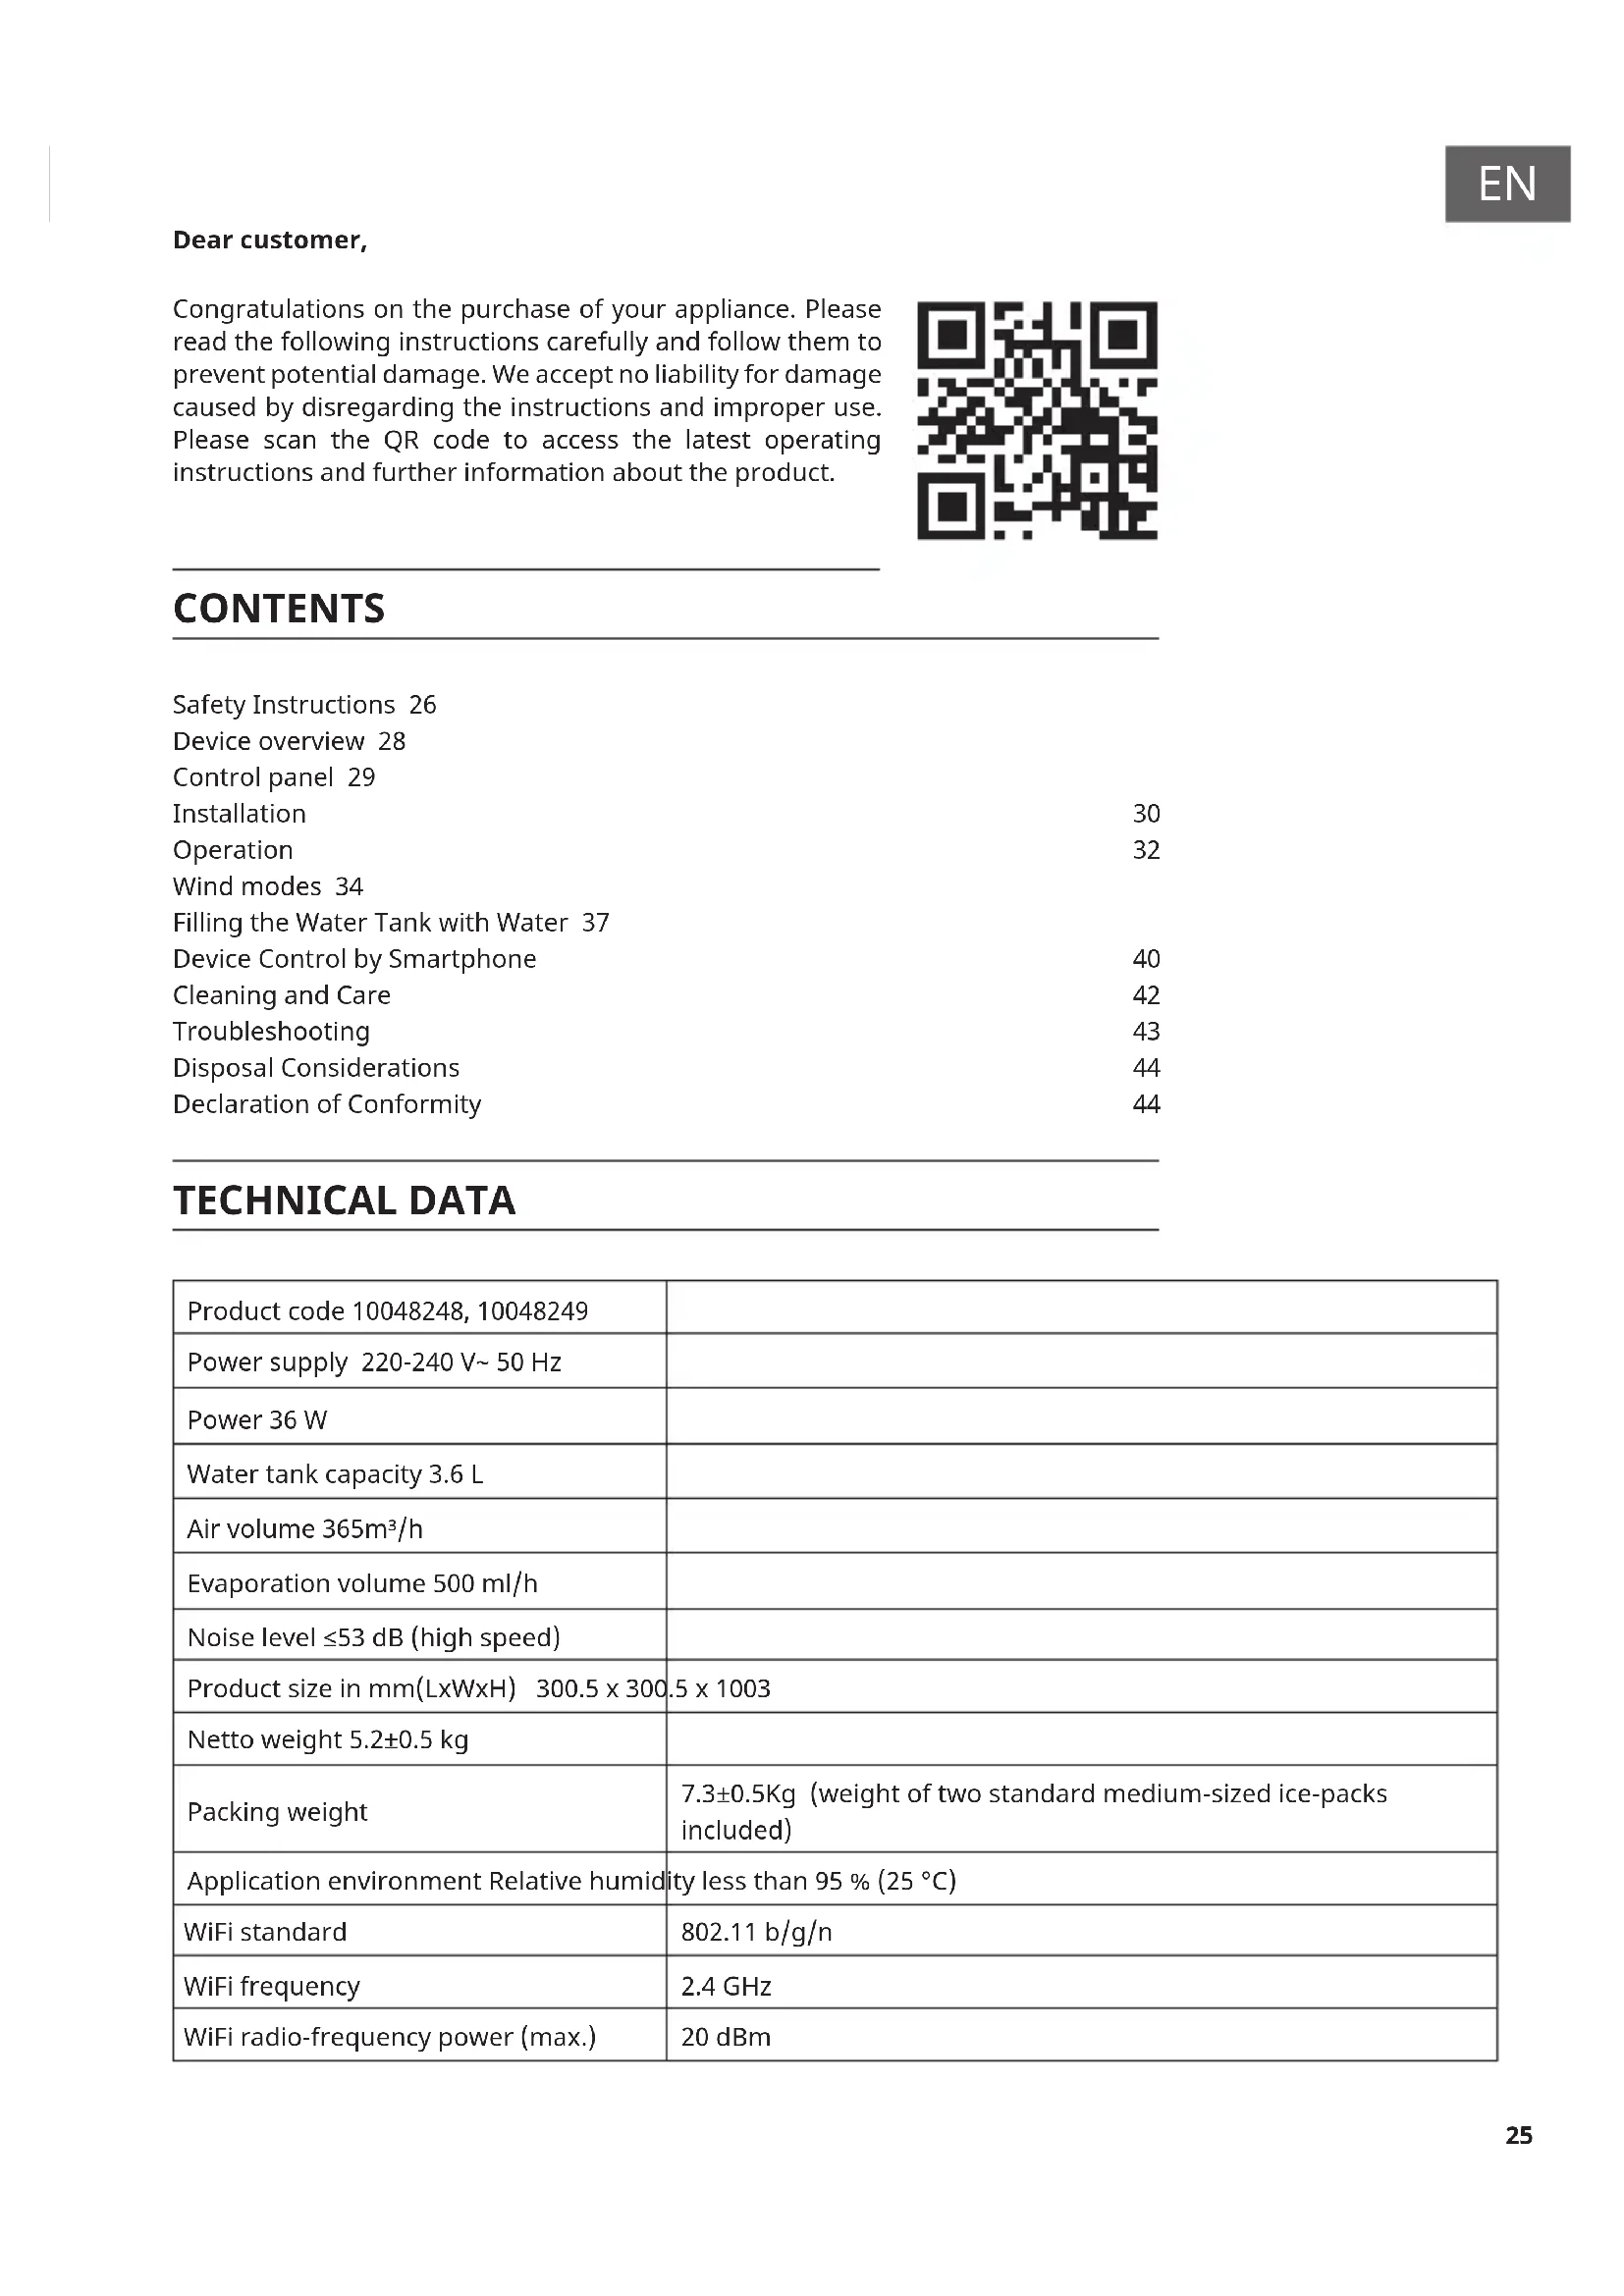
TECHNICAL DATA
| Product code 10048248, 10048249 | |
| Power supply 220-240 V~ 50 Hz | |
| Power 36 W | |
| Water tank capacity 3.6 L | |
| Air volume 365m^3/h | |
| Evaporation volume 500 ml/h | |
| Noise level ≤53 dB (high speed) | |
| Product size in mm(LxWxH) 300.5 x 300.5 x 1003 | |
| Netto weight 5.2±0.5 kg | |
| Packing weight | 7.3±0.5Kg (weight of two standard medium-sized ice-packs included) |
| Application environment Relative humidity less than 95 % (25 °C) | |
| WiFi standard | 802.11 b/g/n |
| WiFi frequency | 2.4 GHz |
| WiFi radio-frequency power (max.) | 20 dBm |
SAFETY INSTRUCTIONS
- Before use, check the voltage on the rating plate. Only connect the appliance to sockets that correspond to its voltage.
- Keep the appliance and its cable away from sources of heat or sharp objects that could cause damage.
- Do not place the cord under carpets. Do not cover the cord with small items of clothing or similar. Keep the cord away from areas with heavy foot traffic to avoid tripping hazards.
- Do not operate the appliance if the cable or plug is damaged.
- If the supply cord or plug is damaged, it must be replaced by the manufacturer, its service agent, or a similarly qualified person to avoid a hazard.
- For indoor use only.
- Do not cover the machine while in use. Place the appliance on a stable, flat, horizontal surface. Make sure that the appliance is kept in an upright position during use.
- Ensure that the appliance is switched off before connecting it to the mains power supply.
- Always make sure your hands are dry before operating or adjusting any switches on the product, or before touching the plug and mains supply connections.
- Never leave this appliance unattended while it is in use. Turn off and unplug the appliance when leaving the room for an extended period.
- Switch off and unplug the appliance from the mains socket when not in use, before filling, cleaning or carrying out any other maintenance.
- To disconnect the appliance, switch it off and then remove the plug from the socket. Do not pull the cord to disconnect the plug.
- Only use the appliance as described in this manual.
- Do not insert your fingers into the openings of the guard.
- Keep hair, tissues, tablecloths, clothes and curtains away from all openings of the fan. They could be sucked into the fan and caught in the internal moving parts, which could cause injury or damage.
- Do not use the appliance in wet or damp areas, such as bathrooms.
- Do not operate the appliance if it is not mounted on its wheels or is lying on its side.
- Ensure the cord is fully extended before use.
-
Evaporative coolers moisturise the ambient air when in operation. Over-humidification of residential rooms should be avoided. Recommendation: Maintain a relative humidity of 40–50%. Excessive humidity can damage the home and cause health problems.
-
The appliance must only be set up on waterproof and moisture-proof flooring (it is unavoidable that some water will be spilled when the tank is emptied).
• Each time the tank is emptied, completely remove any residual water from the equipment. To prevent nucleation, remove residual water from the appliance and water tank every three days. - This device can be used by children over eight years of age, as well as by persons with limited physical, sensory or mental abilities, or a lack of experience or knowledge, provided they have been supervised or instructed in the safe use of the device, and understand the dangers involved. Children must not play with the device. Children must not clean or maintain the air cooler without supervision.
- Keep new and used batteries away from children.
- If the battery compartment does not close securely, stop using the product. The batteries contain environmentally hazardous substances. They must be removed from the product before it is scrapped, and disposed of safely.
Special notes on use
- Be aware that high humidity levels may encourage biological organisms to grow in the environment.
- Make sure that the area around the humidifier does not become damp or wet. If dampness occurs, reduce the humidifier's output. If you cannot turn the humidifier output down, use it intermittently. Do not allow absorbent materials, such as carpets, curtains, drapes or tablecloths, to become damp. Always unplug the appliance when filling or cleaning it.
- Never leave water in the reservoir when the appliance is not in use.
- Empty and clean the humidifier before storing it away. Clean the humidifier before next use.

WARNING
Danger of injury! Ensure that children do not swallow the battery. If swallowed, the button cell battery can cause severe internal burns within 2 hours, which can lead to death. If you think a battery may have been swallowed, consult a doctor immediately.
DEVICE OVERVIEW
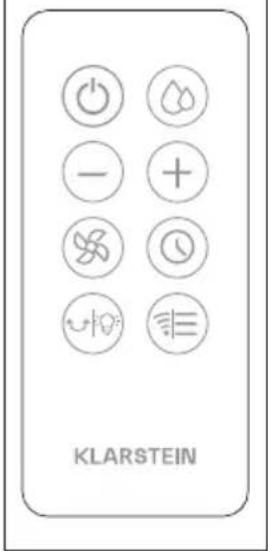
Remote control
text_image
KLARSTEIN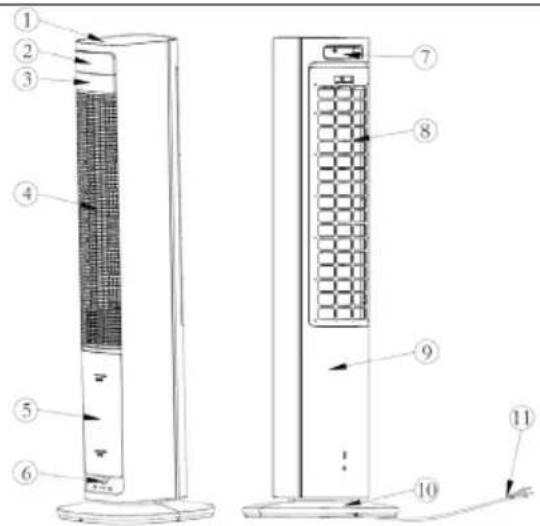
text_image
Technical diagram of a two-tiered air conditioner unit with numbered components and airflow indicators| 1 Top cover 5 Water tank | 9 Rear shell | ||
| 2 Display panel 6 Knob 10 | Base | ||
| 3 Front shell 7 Remote control | location | 11 Power cord | |
| 4 Air grille 8 Rear grille | |||
natural_image
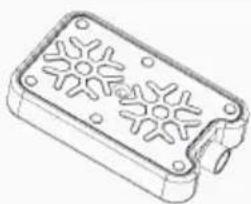
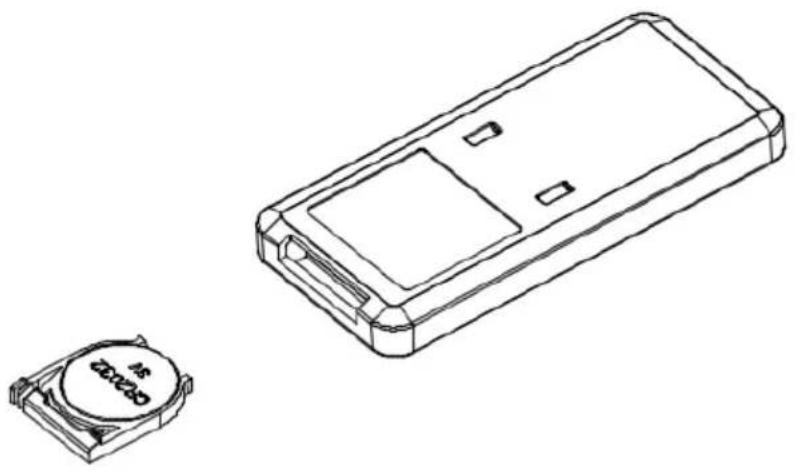
Technical line drawing of a rectangular electronic component with internal gear-like slots and mounting holes (no text or symbols)Ice pack x 2
Usage of ice-pack
The ice pack has cold storage and heat preservation features. It slowly absorbs heat from the water, keeping the water temperature in the tank lower than the ambient temperature for several hours. The air blown out is cooler under the effect of the ice pack.
- Place the ice pack in the freezer until it is completely frozen.
- Place the frozen ice pack in the water tank. After 10 minutes, the water tank temperature will be lower than the ambient temperature.
- Two ice packs are contained in the scope of delivery and can be used continuously.
- Do not open the ice pack or swallow its contents.
CONTROL PANEL
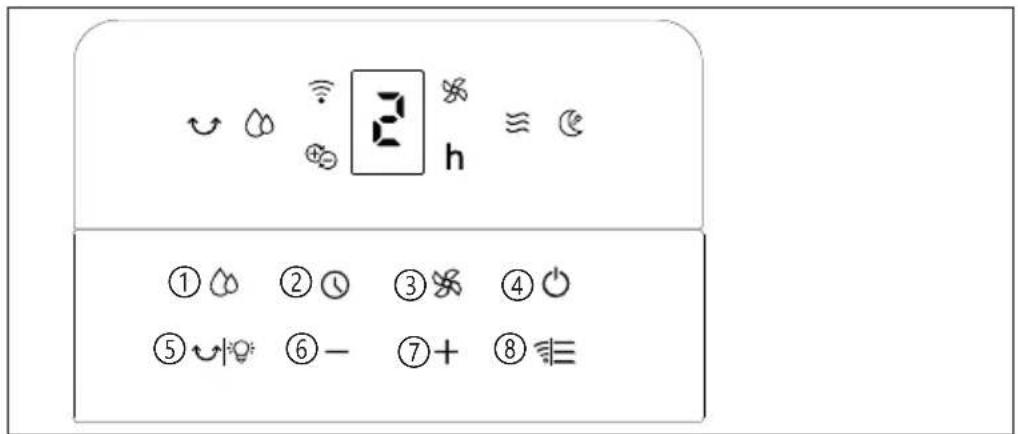
text_image
① ⏻ ② ⏻ ③ ⚗ ④ ⏻ ⑤ ⏻ ⑥ - ⑦ + ⑧ ≈ ⏻| Buttons | |
| 1 | Cooler/ Humidifier |
| 2 | Timer |
| 3 | Speed |
| 4 | On/ off |
| 5 | Swing/ Screen off |
| 6 | Decrease wind speed/ time |
| 7 | Increase wind speed/ time |
| 8 | Mode |
INSTALLATION
-
Unpack the product and take it out. Check that the appliance is undamaged and that all the accessories are included.
-
Once unpacked, the product can be used as soon as the upper part of the appliance and the water tank are installed..
Installation steps
Base assembly
Step 1

natural_image
Technical line drawing of a mechanical component assembly (no text or symbols)The base looks as shown in the figure. Tilt it up and down and press firmly on both ends to assemble it.
Step 2
natural_image
Technical line drawing of a mechanical assembly with a shaft and circular component (no text or symbols)Align the U-shaped opening of the base with the anti-stuck fixation of the appliance (as shown in the figure above). Press the lower side of the base firmly in order to make sure that the buckles are attached correctly to the base (see figure above).
Step 3
After assembling the base, the power cord of the appliance body should be assembled into the base buckle, a total of four position (see figure below).
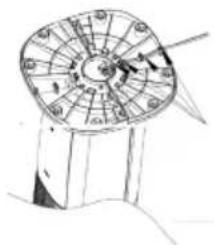
natural_image
Illustration of a circular mechanical device with radial arms and central hub (no text or symbols)Remote control
The function of some buttons on the remote control corresponds to the function of the buttons on the control panel. Point the infrared transmitter of the remote control at the receiver of the unit during use. Make sure that there are no obstacles between the remote control and the unit. Remove the batteries from the remote control if you will not be using it for a long period of time.
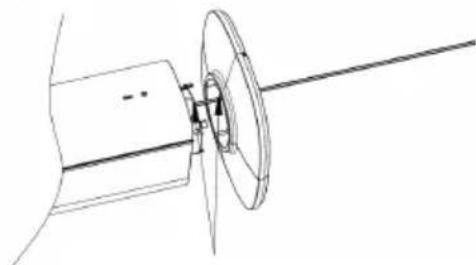
Using the remote control
First, open the battery cover on the remote control and insert a 3V CR2032 battery. To open the battery cover, press in the direction of arrow 1 to release the top part of the battery cover, then pull it out in the direction of arrow 2.
Please ensure that the remote control is aimed at the receiver when in use. If the battery runs out of charge, simply pull out the cover in the direction indicated and replace it with a new CR2032 battery. Please note the positive and negative poles of the battery. Then, replace the battery cover.
natural_image
Technical line drawing of a rectangular electronic component with a small circular component labeled 'ZC2023' (no text or symbols on the device itself)OPERATION
The following table provides an explanation of the touch button functions. To start using the corresponding functions, touch the buttons on the control panel or the remote control. After switching on, the buzzer will beep twice to indicate that the system has entered standby mode. All the function indicator lights are off. Except for the on/off key, pressing any other keys will have no effect.
On/ Off button:
After plugging in the power, all function indicators will light up for one second, then turn off and enter standby mode with all functions turned off.
To turn on the machine for the first time in standby mode, press the on/off button. The default setting is 4-speed normal wind operation. The plasma is turned on, the plasma indicator light is on, the wind speed indicator light is on, and the digital tube displays "4."
To enter standby mode in working mode, press the On/ Off button again.
Wind Speed button
While in the power-on state, press the Wind Speed button to adjust the speed level from 1 to 8. The digital tube will display the selected speed.
While in the power-on state, press and hold the wind speed button for three seconds to activate the auto-drying function for the cooling pad. The default setting is eight-speed normal wind, which runs continuously for 20 minutes before entering the standby state. The wind speed indicator light will flash as a prompt and the other displays will turn off.
During operation of the auto-drying function for the cooling pad, all function buttons except the On/Off button are invalid.
In this mode, press and hold the wind speed button for three seconds to exit the function.
Timer button
When you power on the machine, press the timer button to enter timer mode. Set the timer to shut down after 0 to 9 hours.
The timer indicator lights up, and the digital tube displays the set timer.
The digital tube alternately displays the timer time and the current wind speed at 10-second intervals.
Mode button
When you turn it on for the first time, it runs on normal wind. Press the "Wind Mode" button to switch to the "Natural Wind" mode. The sequence of modes is normal wind, natural wind, sleep wind, normal wind, and so on. The corresponding indicator lights show the current mode.
Wifi-function
Press and hold the Mode button for five seconds. The Wi-Fi indicator light will flash, indicating that you have entered Wi-Fi pairing mode. For further information see section "Device control by smartphone"
Cooler/ Humidifier button
While in the power-on state, press the Cooler/Humidifier button to turn the cooling/humidification function on or off.
After turning on the cooling/humidification function, it will run at the second wind speed for 90 seconds. During this time, the wind speed and mode buttons cannot be adjusted. It will return to normal after 90 seconds.
Note that the honeycomb filter cannot be moved during humidification; otherwise, water droplets will spray out of the air outlet.
Swing button
In the power-on state, press the swing button to turn the swing function on or off.
Swing on: The swing works and the indicator light is on.
Swing off: Swing stops working and the indicator light turns off.
WIND MODES
Normal mode:
The appliance operates according to the user-selected wind speed level. There are three levels: high, medium, and low. It runs at a fixed speed.
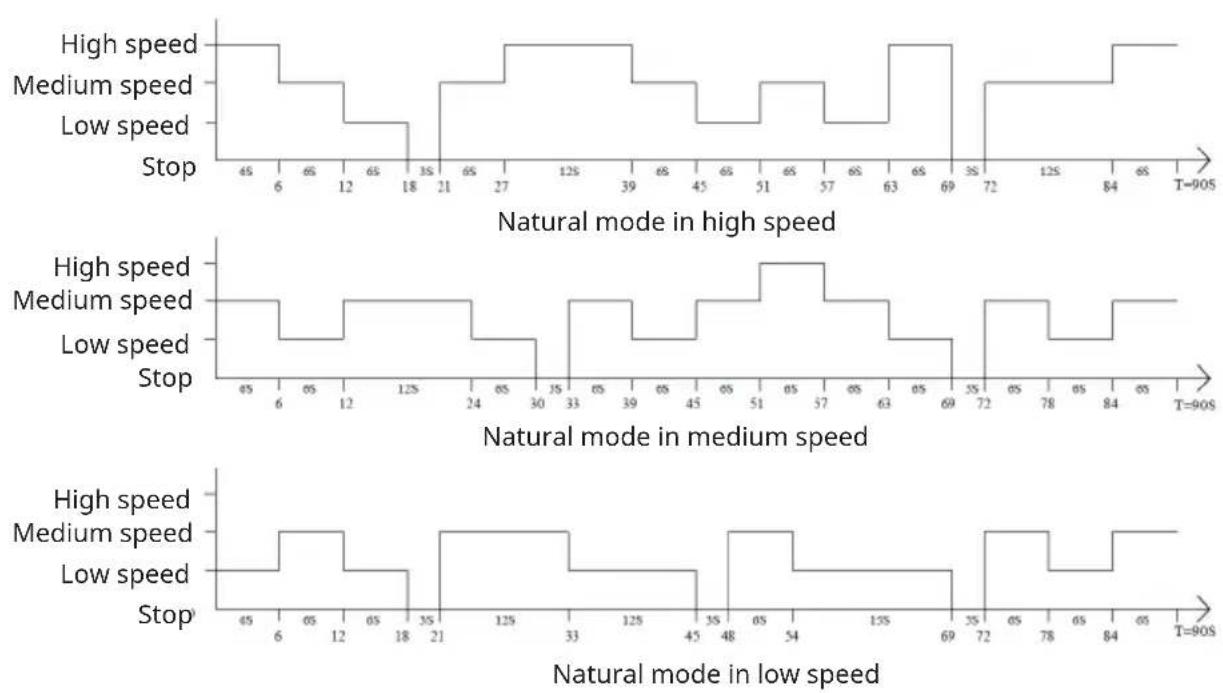
Natural mode
The Natural Wind mode allows the product to operate according to the user-set wind speed and the preset program rules. This mode automatically switches between high, medium, and low speeds, according to the preset program or the requirements set by the user. This mode imitates nature's blowing effects, making the wind softer and more comfortable.
The wind speed operating law is shown below:
Sleep wind mode
The default setting is wind speed 3 and the wind speed can be adjusted from speed 3-8. The digital tube will flash for five seconds before the screen turns off. Pressing any button lights up the screen. The first button press only illuminates the screen and does not execute any function. A second button press will execute the corresponding command.
In sleep mode, if the water tank is empty, the water shortage indicator will flash for five seconds before turning off; there will be no alarm. After the screen is turned on, the water shortage indicator will continue to flash until the cooling/humidification function is turned off.
Appliance Features
(1) Touch control
(2) Eight wind speed levels
(3) Wind mode: normal, natural, or sleep
(4) Timing: 1-9 hour timer
(5) Cooling/humidification function
(6) Auto-drying function for cooling pad before storage
(7) Infrared remote control function
(8) Water shortage protection
(9) Power memory function with plug-in
(10) Dimming function after one minute without operation
(11) Screen-off function
(12) Detachable water tank for easy refilling and cleaning
(13) Wi-Fi function
(14) Plasma function
Other functions
Water shortage protection function
When the cooling function is turned on and the water pump has been running for 45 seconds, if the water tank is detected as being low on water for more than 5 seconds, the protection switch will disconnect (due to water shortage). The water pump will stop working, the indicator light will flash on for 0.5 seconds and off for 0.5 seconds, the buzzer will emit a water shortage alarm sound 10 times, and the humidification function will turn off. Press the cooling/humidification button again to turn off the indicator light. In sleep mode, if the water tank runs low, only the indicator light will flash, and no alarm will sound.
Dimming Mode
If any indicator light is on and the button is not pressed within 1 minute, the indicator light will dim. Pressing the button again will brighten the indicator light.
Non-stop power-off memory function
If the machine is not powered on, press the power button in standby mode. The machine will then maintain the state it was in before it was powered off, except for the timer, sleep wind, and dry wind functions.
Screen Off Function
Press and hold the swing button on the remote control or the control panel for three seconds to put the entire device in screen-off mode.
FILLING THE WATER TANK WITH WATER
Before using the cooler/humidifier function, please fill the water tank with water. There are two ways to add water.
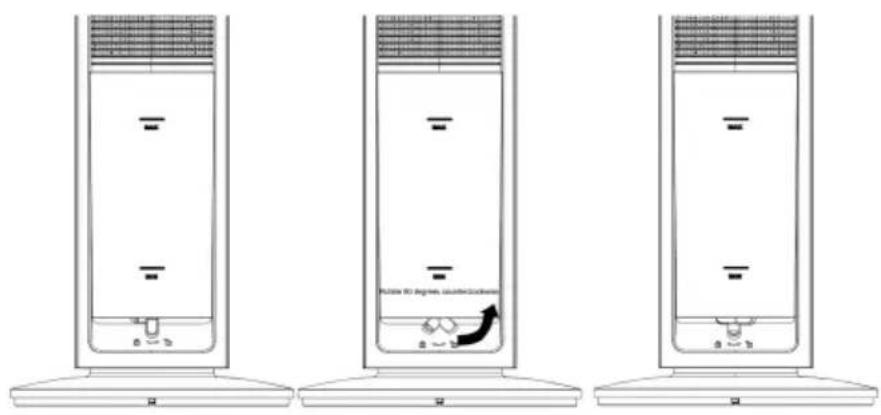
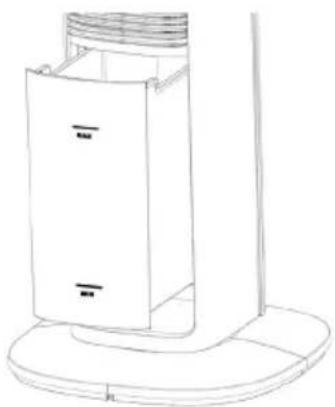
Water Filling Method 1
- First, turn the knob under the water tank counterclockwise 90°.
- Then, slowly pull out the water tank and slowly fill it with water (figures below).
- After adding water, turn the knob clockwise 90°.
text_image
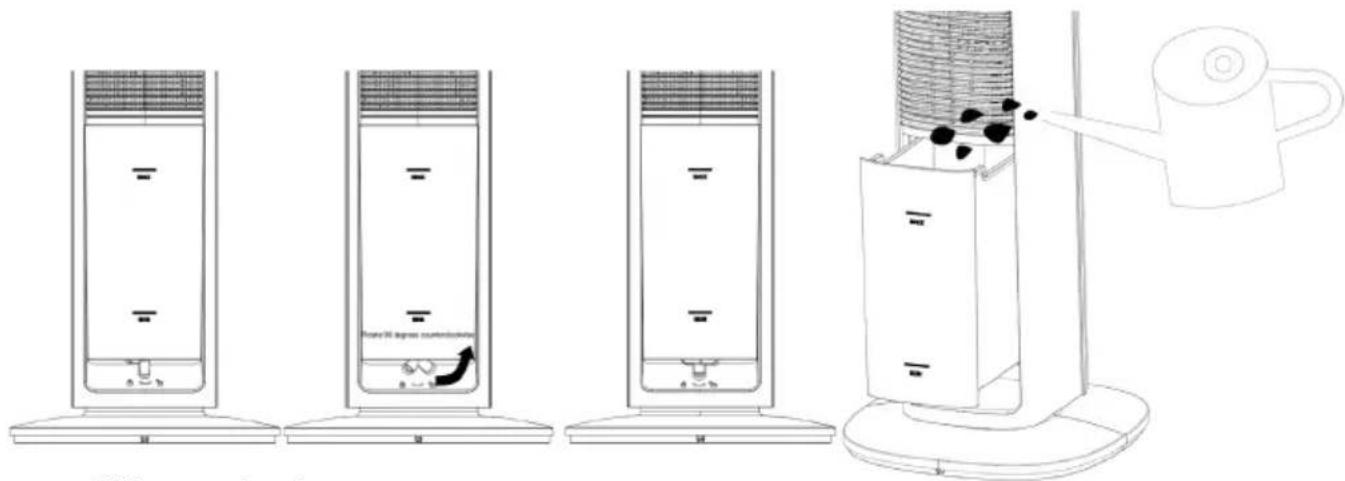
Diagram illustrating a multi-step setup for heating a water heater, showing cooling and heat transfer process with labeled components.Water filling method 2
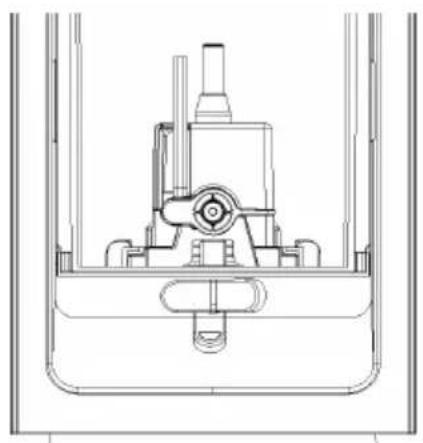
- First, rotate the knob under the water tank counterclockwise 90^ (see figure below).
text_image
FLOOR 30 degrees, counter/counterThen, slowly pull out the water tank. Next, rotate the water pump bracket knob clockwise 90° and pull out the water pump bracket.
natural_image
Line drawing of a vertical shelf or vent with a lid and base, no text or symbols present
text_image
Rotate 90 degrees clockwiseFinally, take the water tank alone to collect water.
natural_image
Technical line drawing of a mechanical assembly or valve mechanism (no text or symbols)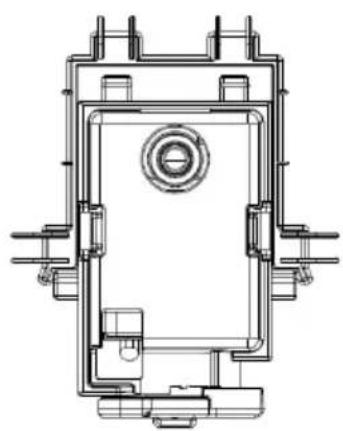
natural_image
Technical line drawing of a mechanical component with no visible text or symbols
Adding water manually
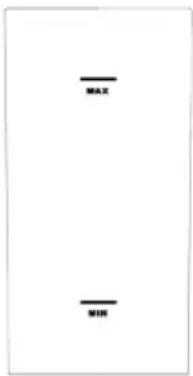
When adding water manually, please pay attention to the water level display on the front of the water tank (see figure below).
text_image
MAX MIN- Before adding water to the water tank, you should turn off the power and unplug the appliance. Be careful not to exceed the maximum water level line.
- Use clean tap water only, and clean the water tank if it is dirty.
- Do not pull out the water tank when turning on the humidification function. Turn off the appliance and leave it to stand for one minute before pulling out the water tank.
- After filling the water tank, move the entire machine steadily or do not move it to prevent overflowing when the tank is full.
- Warm reminder: When using the machine for the first time, a slight odor and slight discoloration of the water in the tank are normal and harmless.
- When pushing the water tank in, ensure that you place the blue drain pipe and water pump bracket inside the tank. Keep the blue drain pipe in a downward position and push it into place slowly, ensuring that it does not bend.
DEVICE CONTROL BY SMARTPHONE
If you integrate the device into your home WiFi, you can conveniently operate it via the associated Klarstein app. The app not only allows you to remotely control the device via your smartphone, but also gives you access to recipes and additional information.
Follow these steps to connect your smartphone to your Klarstein device:
1 Download the Klarstein app first by scanning the QR code with your smartphone (see below), or download it directly from App Store or Google Play.
2 Make sure your smartphone is connected to the same WiFi network that your Klarstein device is to be connected to.
3 Open the Klarstein app.
4 Sign in to your account. If you do not have an account, sign up in the Klarstein app.
5 Follow the instructions from the app.
App Download
Use the scan function of your smartphone to scan the QR code and save the app on your smartphone.
Note: The app provides further information on how to use the app and help on how to connect to your device as soon as you open it for the first time.
| iOS Android | |
 |  |
Troubleshooting connection problems
If your Klarstein device cannot be found in the WiFi, check the following:
1 The device is not plugged in. Make sure that your device is plugged into an electric socket.
2 The device is not in pairing mode. Make sure that the WiFi indicator (LED) on the smart device control panel is blinking as described in the 'Reset WiFi settings' instruction of your smart device (instructions are usually available on device connection process).
3 The WiFi access point does not operate on 5 GHz. Make sure that your access point operates on 2.4 GHz band and you have a separate SSID on 2.4 GHz band. If you are not sure about the operating band of your access point, please contact your internet provider company.
Important: please note that if your WiFi router is dual band - operating on both 2.4 GHz and 5 GHz band - you need to separate the SSIDs for each band and use the 2.4 GHz SSID for connection.
4 Firewall settings of your WiFi network; the firewall setting of your WiFi network may not allow the Klarstein app to configure the WiFi settings on your smart device. Please make sure that you are not using a public WiFi network, e.g. airports, dormitories, companies, etc.
5 Different credentials used in smartphone and the app. Make sure that the WiFi credentials entered in the Klarstein app are the same as the ones that your smartphone is connected to.
Following the above mentioned points, if your smart device still fails to connect to the app, please contact us via email for support: appsupport@klarstein.com
Activation of pairing mode on the appliance
Press and hold the mode button for 5 seconds until the Wifi-indicator light flashes, indicating that you are entering WiFi pairing mode.
CLEANING AND CARE
Note: Be sure to unplug the mains plug before cleaning or servicing the equipment.
Outer surfaces
- If dust has accumulated on the exterior, wipe it off with a soft cloth. If the surface is particularly dirty, mix water below 50^ with a neutral detergent, wipe it off with a soft cloth, then leave it to dry naturally.
- During cleaning, do not use gasoline, banana oil or any other substances that may easily damage the outer surface.
Cleaning the water tank
- Unplug the power supply and pull out the water tank. Clean the tank separately.
- Use a towel and a little detergent to wipe away any scale buildup inside the tank. Then, rinse the tank with water and empty the sewage.
Machine body cleaning
- To clean the surface of the body, wipe it with a wet cloth. Do not rinse it directly with water.
- Do not use corrosive detergents or solvents to clean it.
- Be sure to unplug the power cord before cleaning the body; otherwise, there is a risk of electric shock.
Installation and use After Cleaning
- To ensure correct installation, assemble the water tank.
- Connect the power supply and confirm that the product is working properly.
Maintenance
- When not in use for an extended period of time, unplug the power cord, pack the product, and prevent dust from entering the body.
- Before packaging it up, make sure the honeycomb filter, filter, etc., are dry, and that there is no water in the water tank.
TROUBLESHOOTING
| Problem Potential cause | Possible solution | |
| The appliance is not working. | The plug has not been inserted correctly. | Plug the power plug securely into the wall socket. |
| The unit is switched off. Switch the device on. | ||
| The wiring in the unit has come loose. | Contact a specialist company for repairs. | |
| The humidifier is not working / The pump is making strange noises. | No water in the water tank or the water level is below the MIN mark. | Switch off the machine and fill water into the water tank. Make sure that the water level is above the MIN mark. |
| The submersible pump is not drawing water. | Press the "Humidification" button several times until the submersible pump draws water normally. | |
| The filter screen of the submersible pump is clogged. | Clean the filter screen. | |
| The water outlet hole of the nebuliser unit is blocked. | Contact a specialist company for repairs. | |
| The pump or the wiring in the unit has come loose. | Contact a specialist company for repairs. | |
| Abnormal noises. Deposits | in the nebuliser unit. Contact a specialist company for repairs. | |
| Loose fan blades or engine damage. | Contact a specialist company for repairs. | |
DISPOSAL CONSIDERATIONS
natural_image
Symbol of a trash bin with crossed lines indicating no waste or discharge (no text or labels)If there is a legal regulation for the disposal of electrical and electronic devices in your country, this symbol on the product or on the packaging indicates that this product must not be disposed of with household waste. Instead, it must be taken to a collection point for the recycling of electrical and electronic equipment. By disposing of it in accordance with the rules, you are protecting the environment and the health of your fellow human beings from negative consequences. For information about the recycling and disposal of this product, please contact your local authority or your household waste disposal service.
This product contains batteries. If there is a legal regulation for the disposal of batteries in your country, the batteries must not be disposed of with household waste. Find out about local regulations for disposing of batteries. By disposing of them in accordance with the rules, you are protecting the environment and the health of your fellow human beings from negative consequences.
DECLARATION OF CONFORMITY

Manufacturer & Importer for Great Britain:
Chal-Tec GmbH, Mühlenstraße 25, 10243 Berlin, Germany.
Contact: info@klarstein.com
Hereby, Chal-Tec GmbH declares that the radio equipment type Mistral Smart is in compliance with Directive 2014/53/EU. The full text of the EU declaration of conformity is available at the following internet address: use.berlin/10048248
For Great Britain: Hereby, Chal-Tec GmbH declares that the radio equipment type Mistral Smart is in compliance with the relevant statutory requirements. The full text of the declaration of conformity is available at the following internet address: use.berlin/10048248
Estimado cliente:
text_image
QR code image containing encoded data, no visible human-readable textÍNDICE
natural_image
Technical line drawing of a rectangular electronic component with internal gear-like slots and mounting holes (no text or symbols)Parches de frío x 2
natural_image
Technical line drawing of a mechanical component assembly (no text or symbols)natural_image
Technical line drawing of a mechanical assembly with a shaft and circular component (no text or symbols)natural_image
Illustration of a traditional Chinese compass with hour and minute hands (no text or symbols)Mando a distancia
natural_image
Technical line drawing of a remote control module and its small cylindrical component (no text or symbols)line
| Time (T=90S) | Stop | Baja velocidad | Velocidad media | Velocidad alta | |---|---|---|---|---| | 65 | 0 | 0 | 0 | 0 | | 6 | 6 | 0 | 0 | 0 | | 12 | 0 | 0 | 0 | 0 | | 18 | 0 | 0 | 0 | 0 | | 21 | 35 | 0 | 0 | 0 | | 33 | 35 | 0 | 0 | 0 | | 45 | 35 | 0 | 0 | 0 | | 48 | 35 | 0 | 0 | 0 | | 54 | 35 | 0 | 0 | 0 | | 69 | 35 | 0 | 0 | 0 | | 72 | 35 | 0 | 0 | 0 | | 78 | 35 | 0 | 0 | 0 | | 84 | 35 | 0 | 0 | 0 | T = 90Stext_image
Diagram illustrating a multi-step setup for heating a water heater, showing cooling and heat transfer process with labeled components.text_image
0 ~ 3 Future 80 degrees calculated for water 2 ~ 1 3 ~ 1natural_image
Line drawing of a vertical shelf or vent with a lid and base, no text or symbols present
text_image
Rotate 90 degrees clockwisenatural_image
Technical line drawing of a mechanical assembly or valve mechanism (no text or symbols)
natural_image
Technical line drawing of a mechanical component with no visible text or symbols
natural_image
Symbol of a trash bin with crossed lines and a horizontal bar below (no text or labels)text_image
Technical diagram of a two-tiered air conditioner unit with numbered components and directional arrows indicating airflow or movement.natural_image
Technical line drawing of a rectangular electronic component with internal gear-like cutouts (no text or symbols)natural_image
Technical line drawing of a mechanical component assembly (no text or symbols)natural_image
Technical line drawing of a mechanical assembly with a shaft and circular component (no text or symbols)natural_image
Illustration of a traditional Chinese compass with dual dials and a pointer (no text or symbols)Télécommande
natural_image
Technical line drawing of a remote control module and its small cylindrical component (no text or symbols)FONCTIONNEMENT
text_image
Diagram illustrating a multi-step setup for a portable air conditioner, showing cooling and drying stages with labeled components.natural_image
Line drawing of a vertical shelf or vent with a lid and base, no text or symbols present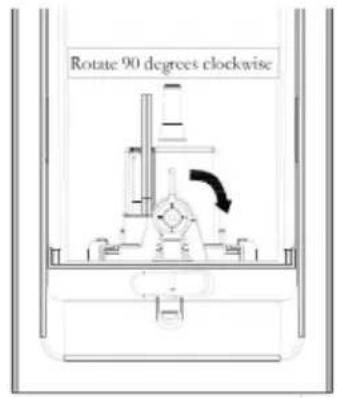
text_image
Rotate 90 degrees clockwisenatural_image
Technical line drawing of a mechanical assembly or valve mechanism (no text or symbols)
natural_image
Technical line drawing of a mechanical component with no visible text or symbols
natural_image
Symbol of a trash bin with crossed lines indicating no waste or discharge, and a solid black rectangle below (no text or labels)DÉCLARATION DE CONFORMITÉ

Fabricant :
text_image
QR code image containing encoded data, no visible human-readable textINDICE
text_image
Technical diagram of a two-tiered air conditioner tower with numbered components and directional arrows indicating airflow or movement.natural_image
Technical line drawing of a mechanical component with symmetrical slots and mounting holes (no text or symbols)Elemento refrigerante x 2
natural_image
Technical line drawing of a mechanical component assembly (no text or symbols)natural_image
Technical line drawing of a mechanical assembly with a shaft and circular component (no text or symbols)natural_image
Illustration of a traditional Chinese compass with dual dials and a pointer (no text or symbols)Telecomando
natural_image
Technical line drawing of a remote control module and a small cylindrical component (no text or symbols)UTILIZZO
text_image
Diagram illustrating a multi-step setup for heating a water heater, showing step-by-step cooling and drying process.text_image
FLOOR 30 degrees, counter/counternatural_image
Line drawing of a vertical shelf or vent with a lid and base, no text or symbols present
text_image
Rotate 90 degrees clockwisenatural_image
Technical line drawing of a mechanical assembly or valve mechanism (no text or symbols)
natural_image
Technical line drawing of a mechanical component with no visible text or symbols
Riempimento manuale
natural_image
Symbol of a trash bin with crossed x and y axes, no text or labels presentbar
| Category | Value | |---|---| | Category 1 | 100 | | Category 2 | 100 | | Category 3 | 100 | | Category 4 | 100 | | Category 5 | 100 | | Category 6 | 100 | | Category 7 | 100 | | Category 8 | 100 | | Category 9 | 100 | | Category 10 | 100 | | Category 11 | 100 | | Category 12 | 100 | | Category 13 | 100 | | Category 14 | 100 | | Category 15 | 100 | | Category 16 | 100 | | Category 17 | 100 | | Category 18 | 100 | | Category 19 | 100 | | Category 20 | 100 | | Category 21 | 100 | | Category 22 | 100 | | Category 23 | 100 | | Category 24 | 100 | | Category 25 | 100 | | Category 26 | 100 | | Category 27 | 100 | | Category 28 | 100 | | Category 29 | 100 | | Category 30 | 100 | | Category 31 | 100 | | Category 32 | 100 | | Category 33 | 100 | | Category 34 | 100 | | Category 35 | 100 | | Category 36 | 100 | | Category 37 | 100 | | Category 38 | 100 | | Category 39 | 100 | | Category 40 | 100 | | Category 41 | 100 | | Category 42 | 100 | | Category 43 | 100 | | Category 44 | 100 | | Category 45 | 100 | | Category 46 | 100 | | Category 47 | 100 | | Category 48 | 100 | | Category 49 | 100 | | Category 50 | 100 | | Category 51 | 100 | | Category 52 | 100 | | Category 53 | 100 | | Category 54 | 100 | | Category 55 | 100 | | Category 56 | 100 | | Category 57 | 100 | | Category 58 | 100 | | Category 59 | 100 | | Category 60 | 100 | | Category 61 | 100 | | Category 62 | 100 | | Category 63 | 100 | | Category 64 | 100 | | Category 65 | 100 | | Category 66 | 100 | | Category 67 | 100 | | Category 68 | 100 | | Category 69 | 100 | | Category 70 | 100 | | Category 71 | 100 | | Category 72 | 100 | | Category 73 | 100 | | Category 74 | 100 | | Category 75 | 100 | | Category 76 | 100 | | Category 77 | 100 | | Category 78 | 100 | | Category 79 | 100 | | Category 80 | 100 | | Category 81 | 100 | | Category 82 | 100 | | Category 83 | 100 | | Category 84 | 100 | | Category 85 | 100 | | Category 86 | 100 | | Category 87 | 100 | | Category 88 | 100 | | Category 89 | 100 | | Category 90 | 100 | | Category 91 | 100 | | Category 92 | 100 | | Category 93 | 100 | | Category 94 | 100 | | Category 95 | 100 | | Category 96 | 100 | | Category 97 | 100 | | Category 98 | 100 | | Category 99 | 100 | | Total (Total) = [sum of bars] / [values] * (sum of bars + bars) * (sum of bars + bars) * (sum of bars + bars) * (sum of bars + bars) * (sum of bars + bars) * (sum of bars + bars) * (sum of bars + bars) * (sum of bars + bars) * (sum of bars + bars) * (sum of bars + bars) * (sum of bars + bars) * (sum of bars + bars) * (sum of bars + bars) * (sum in brackets) * (sum in brackets) * (sum in brackets) * (sum in brackets) * (sum in brackets) * (sum in brackets) * (sum in brackets) * (sum in brackets) * (sum in brackets) * (sum in brackets) * (sum in brackets) * (sum in brackets) * (sum in brackets) * (sum in brackets) * (sum in brackets) * (sum in brackets) * (sum in brackets) * (total).* (sum in brackets) * (sum in brackets) * (sum in brackets) * (sum in brackets) * (sum in brackets) * (sum in brackets) * (sum in brackets) * (sum in brackets) * (sum in brackets) * (sum in brackets) * (sum in brackets) * (sum in brackets) * (total).* (sum in brackets) * (sum in brackets) * (sum in brackets) * (sum in brackets)