DAB80 - Radio Soundmaster - Free user manual and instructions
Find the device manual for free DAB80 Soundmaster in PDF.
Questions des utilisateurs sur DAB80 Soundmaster
0 question sur cet appareil. Repondez a celles que vous connaissez ou posez la votre.
Poser une nouvelle question sur cet appareil
Download the instructions for your Radio in PDF format for free! Find your manual DAB80 - Soundmaster and take your electronic device back in hand. On this page are published all the documents necessary for the use of your device. DAB80 by Soundmaster.
USER MANUAL DAB80 Soundmaster
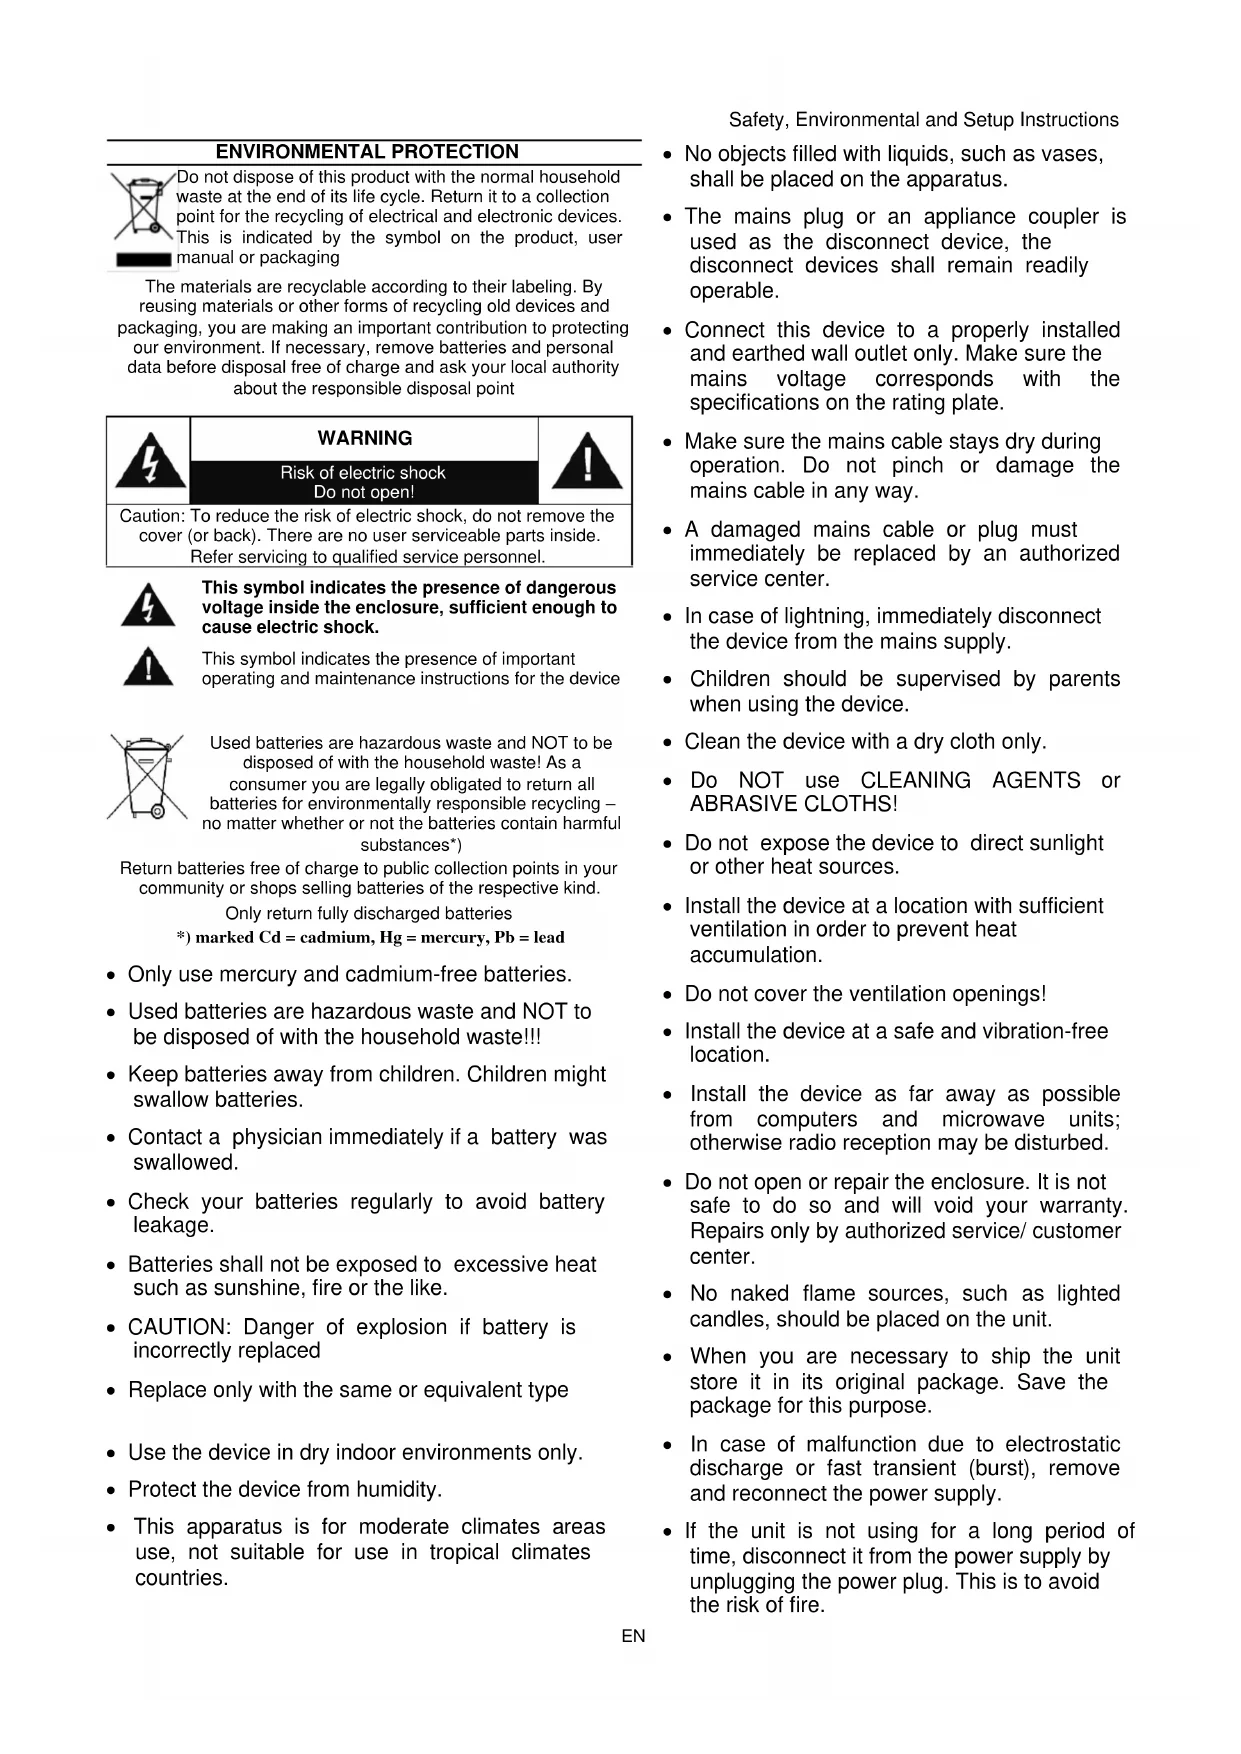
Do not dispose of this product with the normal household waste at the end of its life cycle. Return it to a collection point for the recycling of electrical and electronic devices. This is indicated by the symbol on the product, user manual or packaging The materials are recyclable according to their labeling. By reusing materials or other forms of recycling old devices and packaging, you are making an important contribution to protecting our environment. If necessary, remove batteries and personal data before disposal free of charge and ask your local authority about the responsible disposal point
Risk of electric shock Do not open! Caution: To reduce the risk of electric shock, do not remove the cover (or back). There are no user serviceable parts inside. Refer servicing to qualified service personnel.
This symbol indicates the presence of dangerous voltage inside the enclosure, sufficient enough to cause electric shock.
This symbol indicates the presence of important operating and maintenance instructions for the device
Used batteries are hazardous waste and NOT to be disposed of with the household waste! As a consumer you are legally obligated to return all batteries for environmentally responsible recycling – no matter whether or not the batteries contain harmful substances*)
Return batteries free of charge to public collection points in your community or shops selling batteries of the respective kind. Only return fully discharged batteries *) marked Cd = cadmium, Hg = mercury, Pb = lead
- Only use mercury and cadmium-free batteries.
- Used batteries are hazardous waste and NOT to be disposed of with the household waste!!!
- Keep batteries away from children. Children might swallow batteries.
- Contact a physician immediately if a battery was swallowed.
- Check your batteries regularly to avoid battery leakage.
- Batteries shall not be exposed to excessive heat such as sunshine, fire or the like.
- CAUTION: Danger of explosion if battery is incorrectly replaced
- Replace only with the same or equivalent type
- Use the device in dry indoor environments only.
- Protect the device from humidity.
- This apparatus is for moderate climates areas use, not suitable for use in tropical climates countries.
- No objects filled with liquids, such as vases, shall be placed on the apparatus.
- The mains plug or an appliance coupler is used as the disconnect device, the disconnect devices shall remain readily operable.
- Connect this device to a properly installed and earthed wall outlet only. Make sure the mains voltage corresponds with the specifications on the rating plate.
- Make sure the mains cable stays dry during operation. Do not pinch or damage the mains cable in any way.
- A damaged mains cable or plug must immediately be replaced by an authorized service center.
- In case of lightning, immediately disconnect the device from the mains supply.
- Children should be supervised by parents when using the device.
- Clean the device with a dry cloth only.
- Do NOT use CLEANING AGENTS or ABRASIVE CLOTHS!
- Do not expose the device to direct sunlight or other heat sources.
- Install the device at a location with sufficient ventilation in order to prevent heat accumulation.
- Do not cover the ventilation openings!
- Install the device at a safe and vibration-free location.
- Install the device as far away as possible from computers and microwave units; otherwise radio reception may be disturbed.
- Do not open or repair the enclosure. It is not safe to do so and will void your warranty. Repairs only by authorized service/ customer center.
- No naked flame sources, such as lighted candles, should be placed on the unit.
- When you are necessary to ship the unit store it in its original package. Save the package for this purpose.
- In case of malfunction due to electrostatic discharge or fast transient (burst), remove and reconnect the power supply.
- If the unit is not using for a long period of time, disconnect it from the power supply by unplugging the power plug. This is to avoid the risk of fire.DAB80 / English Instruction Manual
Power On/Off | Mode select
Automatic station search, NAP Timer and
Information and manual
Select lower station preset | search down
Select higher station preset | search up
Screw lock of phone compartment door
Phone compartment door
Fast lock of phone compartment door
If necessary, stick the supplied adhesive tapes on the underside of the frame for better slip and stability. POWER SUPPLY Use only the supplied power adapter! ➢ Ensure that the voltage is the same as that indicated on the ac adapter identification plate. ➢ Connect the supplied AC adapter to a properly installed safety power socket and the plug of the cable into the DC IN jack at the back side of the unit. ➢ Charge the built-in battery completely before using it for the first time!
BATTERY POWER INDICATOR
While the device is playing in battery mode, press the “INFO” button repeatedly until the display show “Battery xx” (xx = Battery level). When the battery power is low and need to re-fill, the battery icon in the right corner of the display is flashing and the display show “Battery Low”.DAB80 / English Instruction Manual
ERP power management The unit will turn off automatically after about 15 minutes in standby mode if there is no audio signal. To turn on the unit again press the “ST/BY / MODE” button. BASIC OPERATIONS
Press the “ / MODE” button to turn the unit in standby. The display show “Welcome to Digital Radio” and then the time and date is shown. In standby, press the “ / MODE” button to turn on the unit. In on mode, press and hold the “ / MODE” button to turn the unit in standby. The time and date are shown in the display. In standby, press and hold the “ / MODE” button to turn the unit in power saving mode. Note: In standby mode, if you don´t press any button, the unit will automatically turn off into power saving mode after about 15 seconds. SELECTING MODES During playing mode, press the “ / MODE” button repeatedly to switch between the modes. ADJUSTING VOLUME To increase or decrease the volume, rotate the “Volume Control” knob.
1. Select the mode “DAB”.
2. If you start the radio the first time, the unit will start an automatic scan and store all
receivable radio stations.
3. Press the “ / “ button to select a radio station from the station list and press “Enter”
to confirm the selection. Automatic Search Press and hold the “AMS” button to start the automatic scan. All found stations will be stored in the station list. Store preset station You can store up to 30 DAB radio stations
1. Select the desired radio station.
2. Press and hold the “MEM” button until “Preset store <X: (Empty) > (X = preset station
number) is shown in the display.
3. Select with the “ / “ button the station number and press “Enter” to confirm.
Recall preset station
1. Press the “MEM” button. The display show “Preset recall <X: (Empty) > (X = preset station
number) in the display.
2. Select with the “ / “ button the station number and press “Enter” to confirm.DAB80 / English Instruction Manual
Information (Info) When the radio station is playing, press the “Info | Menu” button repeatedly to cycle through the information broadcasted by the radio as follow: ➢ DLS (Dynamic Label Segmenting) ➢ Audio Bit Rate ➢ Signal strength ➢ Mains Power/Battery ➢ PTY (Program Type) ➢ Time ➢ Channel/Frequency ➢ Date ➢ Signal Error
1. Press and hold the “Info | Menu” button until the display show “DAB <Full scan>.
2. Select with the “ / “ button the following settings:
- Full scan Start an automatic scan.
- Manual tune Select the desired channel and search only the selected channel.
- DRC (Dynamic range compression) If you are listening to music with a high dynamic range in a noisy environment, you may wish to compress the audio dynamic range. This makes quiet sounds louder, and loud sounds quieter. You can change DRC as off, low or high.
- Prune Delete all radio stations which are not receivable anymore.
- TA When “On” is selected, the radio will receive traffic announcement on some area if the radio station will provide this service.
- System Find the system settings.
1. Select the mode “FM”.
2. Press the “AMS” button to start an automatic scan. The radio store all local radio stations.
Automatic tune Press and hold the “ / “ button to start the automatic tune. The radio stops at the next receivable radio station. Manual tune To manual tune, use the “ “ or “ “ button. And it will fine tune the frequency in a step of 50kHz. Store preset station You can store up to 30 FM radio stations. Is the same as in DAB mode.DAB80 / English Instruction Manual
Recall preset station is the same as in DAB mode. Information (Info) When the radio station is playing, press the “Info | Menu” button repeatedly to cycle through the information broadcasted by the radio as follow: ➢ Radio Text ➢ Mains Power/Battery ➢ PTY (program Type) ➢ Time ➢ Name ➢ Date
1. Press and hold the “Info | Menu” button until the display show “FM <Scan setting>.
2. Select with the “ / “ button the following settings:
- Scan setting By default, FM scans stop at any available station. This may result in a poor signal-to-noise ratio (hiss) from weak stations. To change the scan settings to stop only at stations with good signal strength, select “Strong station only”.
- System Find the system settings. BLUETOOTH
If you are using a Bluetooth audio device, make sure the working distance is within 10 meters. Different environment may have effect on the working distance.
1. Select the mode “Bluetooth” (“Bluetooth pairing” is shown in the display).
2. Activate the Bluetooth function on your Bluetooth device and select “DAB80”. When the
connection was successful the display show “Bluetooth Connected”.
3. Press the “ “ button to start or pause the playback.
4. Press the “ / “ to skip to the previous or next track.
This unit contains also a hands-free function. This function is only available in Bluetooth
mode. If you have connected a mobile phone by Bluetooth and you get a call, press the “Enter” button to pick-up the call. To hang-up the call, press long the “Enter” button. To reject the call, press and hold the “Enter” button during ringing. AUX
1. Select the mode “Aux” (“AUX IN” is shown in the display).
2. Connect your external device with an Aux cable with Aux jack at the backside of the unit
(Therefore you have to open the phone compartment door).
3. Start the playback on your external device.DAB80 / English Instruction Manual
EQUALIZER Press in on mode the “AMS | NAP | EQ” button and select with “ / “ one of the installed sound settings: Flat, Rock, Pop, Jazz, Classic. With the setting "My EQ" there is the possibility of a personal sound setting (treble, bass). NAP When stay on standby mode, press “AMS | EQ | NAP”, the display show NAP Timer < Off>. Press the button repeatedly to select the desired time 10, 15, 30, 45, 60, 90, 120, Off and press “Enter” to confirm. DISPLAY DIMMER In on mode, press repeatedly the “Light | Dimmer” button to adjust the display backlight. LED LIGHT Press and hold in standby or on mode the “Light | Dimmer” button to switch on or off the LED light. NOTE: To avoid eye damage you will not see directly into the light while the LED is on. SYSTEM SETTINGS In standby mode, press and hold the “Info | Menu” button until the display show “Standby <System>” and press “Enter” to confirm. Select with “ / “ the desired function.
- Sleep Select the function “Sleep” in the main menu. Choose from Sleep OFF, 15 mins, 30 mins, 45 mins, 60 mins or 90 mins. NOTE: This function is only adjustable in on mode!
- Time Select the function “Set Time/Date”, “Auto update”, “Set 12/24 hour”, “Set date format” to adjust the time and date settings.
- SW Version Show the installed software version
Lecture/Pause | Entrer
(Empty) > (X = preset station number)“.