Janis - Sewing machine VERITAS - Free user manual and instructions
Find the device manual for free Janis VERITAS in PDF.

| Product type | Mechanical sewing machine |
| Brand | Veritas |
| Model | Janis |
| Approximate dimensions | 40 x 18 x 30 cm |
| Approximate weight | 7 kg |
| Power supply | 110-240 V, 50/60 Hz (depending on model) |
| Foot pedal | Models KD-1902, FC-1902 (110-120V) / KD-2902, FC-2902A, FC-2902C, FC-2902D (220-240V) / 4C-316B (110-125V) / 4C-326C (127V) / 4C-326C (220V) / 4C-326G (230V) / 4C-336C (240V) / 4C-336G (220-240V) |
| Lighting | Integrated LED lamp |
| Number of stitches | 22 stitch programs (straight, zigzag, buttonhole, etc.) |
| Main functions | Straight stitch, zigzag stitch, 4-step buttonhole, blind hem, zipper sewing, button sewing, monograms and embroidery, darning, reverse sewing, two-step presser foot lifter |
| Bobbin | Drop-in bobbin, automatic winding with auto stop |
| Thread tension | Manual adjustment by knob (default value: 4) |
| Stitch length and width | Adjustable length, adjustable width for zigzag |
| Feed dogs | Removable (with cover plate for embroidery) |
| Accessories included | Multi-purpose foot, zipper foot, buttonhole foot, seam ripper/brush, needle pack (3), bobbins (3x), L-screwdriver, darning plate, felt pads (2x) |
| Usage | Household use only |
| Safety | Unplug before maintenance, do not use in humid environment, supervise children, do not block ventilation |
| Maintenance and cleaning | Clean feed dogs and hook regularly, lubricate with sewing machine oil, remove lint |
| Spare parts and repairability | Standard needles (HAx115x1, 15x1/705H, 130 PCL), bobbins, optional accessory feet available from retailer |
| Customer service | Toll-free number: 00800 333 00 777, email: service-fr@veritas-sewing.com |
Frequently Asked Questions - Janis VERITAS
User questions about Janis VERITAS
0 question about this device. Answer the ones you know or ask your own.
Ask a new question about this device
Download the instructions for your Sewing machine in PDF format for free! Find your manual Janis - VERITAS and take your electronic device back in hand. On this page are published all the documents necessary for the use of your device. Janis by VERITAS.
USER MANUAL Janis VERITAS
natural_image
White sewing machine with black handle and control panel against red background (no visible text or symbols)
natural_image
Black-and-white photo of a person in a fur-lined hood and high-collared outfit, posing with one hand raised (no visible text or symbols)Veritas Service Center
c/o Teknihall GmbH
Breitefeld 15
DE-64839 Münster
GERMANY
Veritas Service Center
c/o Teknihall GmbH
Breitefeld 15
DE-64839 Münster
GERMANY
FR INSTRUCTIONS DE SÉCURITÉ IMPORTANTES
We congratulate you on your purchase of your sewing machiner. You have bought a quality product which has been made with great care and, if serviced right, will serve you well for many years.
Before using it for the first time, we ask you to read the manual at hand carefully, paying special attention to the safety instructions. Persons who are not familiar with this manual must not use the appliance.
In this manual, you will find everything there is to know about possible applications of your sewing machine. Should any questions remain unanswered, we kindly ask you to turn to your dealer.
We wish you much pleasure and great sewing successes!
Questions concerning machine, service and customer care
Toll-free
customer service number: 00800 333 00 777
service-uk@veritas-sewing.com
Service address:
Veritas Service Center
c/o Teknihall GmbH
Breitefeld 15
DE-64839 Münster
GERMANY
EN
IMPORTANT SAFETY INSTRUCTIONS
When using an electrical appliance, basic safety should always be followed, including the following: Read all instructions before using this sewing machine and keep these instructions for future reference.
DANGER - To reduce the risk of electric shock:
- An appliance should never be left unattended when plugged in.
- Always unplug this appliance from the electric outlet immediately after using and before cleaning.
WARNING - To reduce the risk of burns, fire, electric shock, or injury to persons:
- Read the instruction carefully before you use the machine.
- Keep the instructions at a suitable place close to the machine and hand it over if you give the machine to a third party.
- Use the machine only in dry locations.
- Never leave the machine unattended with children or elderly people due to they may not be able to estimate the risk.
- This appliance can be used by children aged from 8 years and above and persons with reduced physical, sensory or mental capabilities or lack of experience and knowledge if they have been given supervision or instruction concerning use of the appliance in a safe way and understand the hazards involved.
- Children shall not play with the appliance.
- Cleaning and user maintenance shall not be made by children without supervision.
- Always switch off the machine if you carry out preparation for work (change the needle, feed the yarn thru the machine, change the footer, etc.).
- Always unplug the machine if you carry out maintenance (oiling, cleaning).
- Always unplug the machine if you leave it unattended, to avoid injury by inadvertently switch on the machine.
-
Don't use the machine if it's wet or in humid environment.
-
Never pull at the cord, always unplug the machine by gripping the plug.
- If the LED lamp is damaged or broken, it must be replaced by the manufacturer or its service agent or a similarly qualified person, in order to avoid a hazard.
- Never place anything on the pedal.
- Never use the machine if the air vents are blocked keep the air vents of the machine and the foot controls free from dust, fusel and leftovers.
- The machine may only be used with foot pedal type-1902, FC-1902 (110-120V) / KD-2902, FC-2902A, FC-2902C, FC-2902D (220-240V) / 4C-316B (110-125V) / 4C-326C (127V) / 4C-326C (220V) / 4C-326G (230V) / 4C-336G (240V) / 4C-336G (220-240V).
- The power cord of the foot controller can not be replaced. If the power cord is damaged the foot controller must be disposed.
- The sound pressure level at normal operation is smaller than 75dB(A).
- Do not dispose of electrical appliances as unsorted municipal waste, use separate collection facilities.
- Contact your local government for information regarding the collection systems available.
- If electrical appliances are disposed of in landfills or dumps, hazardous substances can leak into the groundwater and get into the food chain, damaging your health and well-being.
- When replacing old appliances with new ones, the retailer is legally obligated to take back your old appliance for disposal at least for free of charge.
- The appliance is not to be used by persons (including children) with reduced physical, sensory or mental capabilities, or lack of experience and knowledge, unless they have been given supervision or instruction. (For outside Europe)
- Children being supervised not to play with the appliance. (For outside Europe)
SAVE THESE INSTRUCTIONS
This sewing machine is intended for household use only.
DE Inhaltsliste
Details of the machine....15/18
Fitting the snap-in sewing table....19/20
Connecting machine to power source....21/22
Two-step presser foot lifter....23/34
Accessories....25/26
Threading the Machine
Winding the bobbin....27/28
Inserting the bobbin....29/30
Thread tension....31/32
Threading the upper thread....33/34
Raising the bobbin thread....35/36
Sewing
Straight stitching....37/38
Reverse sewing....39/40
Zig zag stitching in 3 steps 41/42
Blind hem....43/44
Sewing with the hemmer foot....45/46
Applique....47/48
Monogramming....49/50
Sew 4-steps buttonholes....51/52
Sewing on buttons....53/54
Zippers 55/56
Darning....57/58
General Information
Changing the presser foot....59/60
Needle/Fabric/Thread Chart....61/64
Maintenance and Troubleshooting
Inserting the needle....65/66
Maintenance....67/68
Troubleshooting Guide....69/72

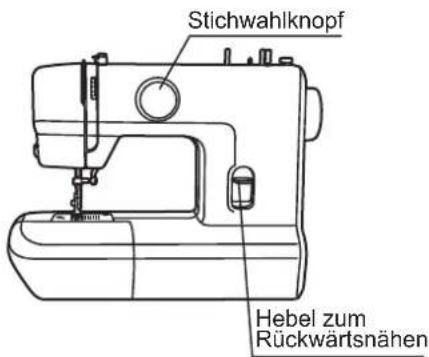
text_image
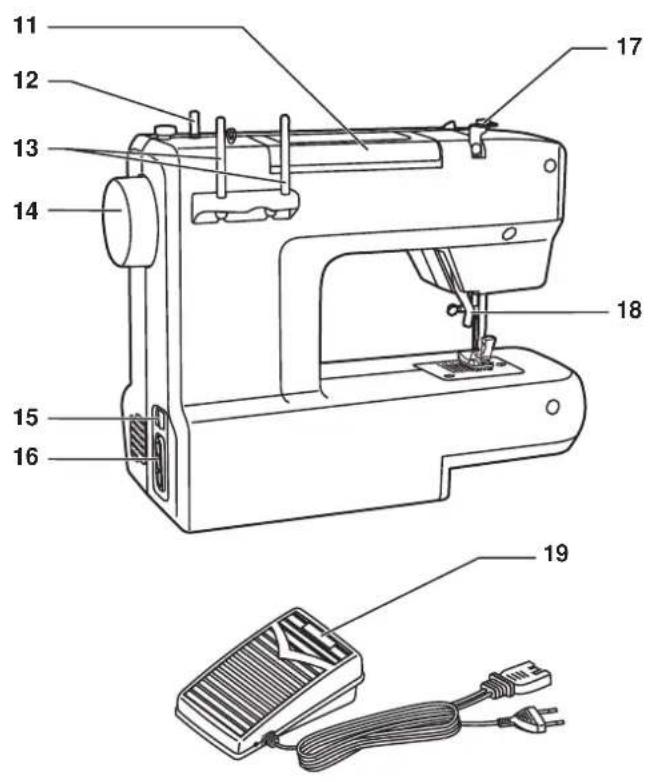
Technical diagram of a sewing machine with numbered parts for identificationEN Details of the machine
- Thread tension dial
2.Thread take-up level - Thread cutter
- Presser foot
- Needle plate
- Sewing table and accesory box
- Pattern selector dial
- Thread guide
- Bobbin stopper
- Reverse sewing lever
text_image
Technical diagram of a sewing machine with numbered parts and an electrical plug, labeled 19.EN Details of the machine
- Handle
- Spool pin
- Bobbin winder spindle
- Hand wheel
- Power switch
- Main plug socket
- Bobbin thread guide
- Upper thread guide
- Foot control and power cord
natural_image
Technical line drawing of a mechanical housing or enclosure with internal compartments and a rotation arrow (no text or symbols)2

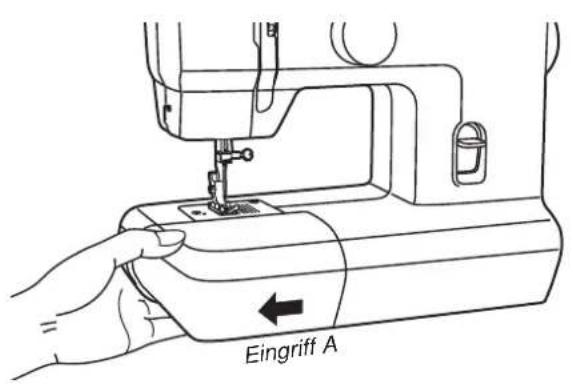
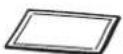
Der Anschiebetisch
Hold the removable extension table horizontal, and push it in the direction of the arrow. (1)
The inside of the removable extension table can be utilized as an accessory box.
To open, flip cover down as shown. (2).
text_image
Diagram showing connections between a power plug, switch, and power strip with labeled components
natural_image
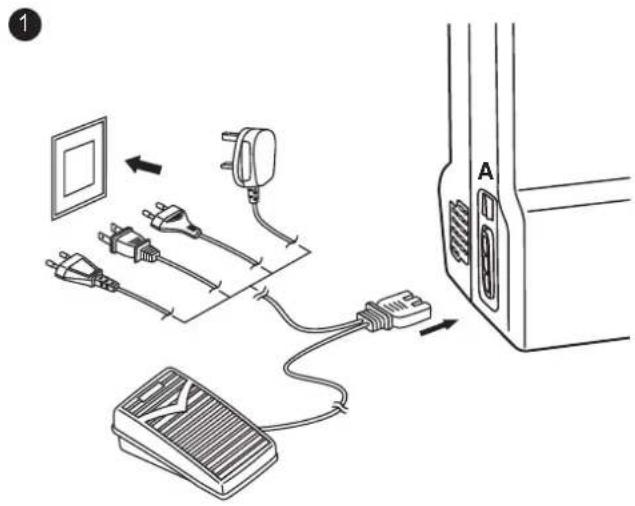
Simple line drawing of a shoe being adjusted with a curved arrow indicating motion (no text or symbols)EN Connecting machine to power source
Connect the machine to a power source as illustrated. (1)
Sewing light
Press main switch (A) to "I" for power and light.
Foot control
The foot control pedal regulates the sewing speed. (2)

Attention:
Unplug power cord when machine is not in use.
Consult a qualified electrician if in doubt of how to connect machine to power source.
text_image
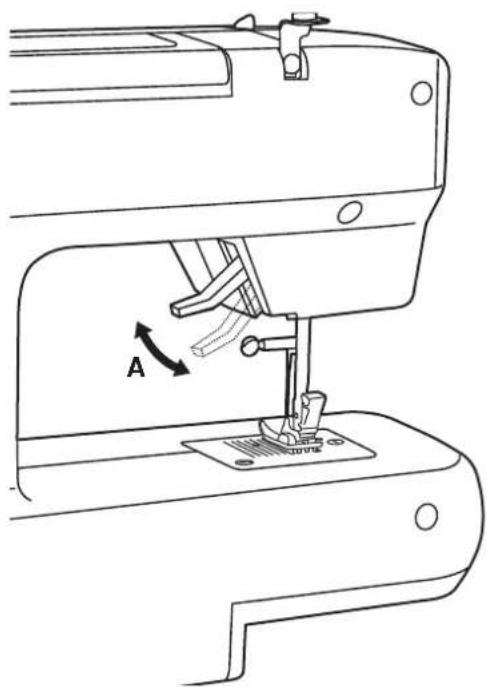
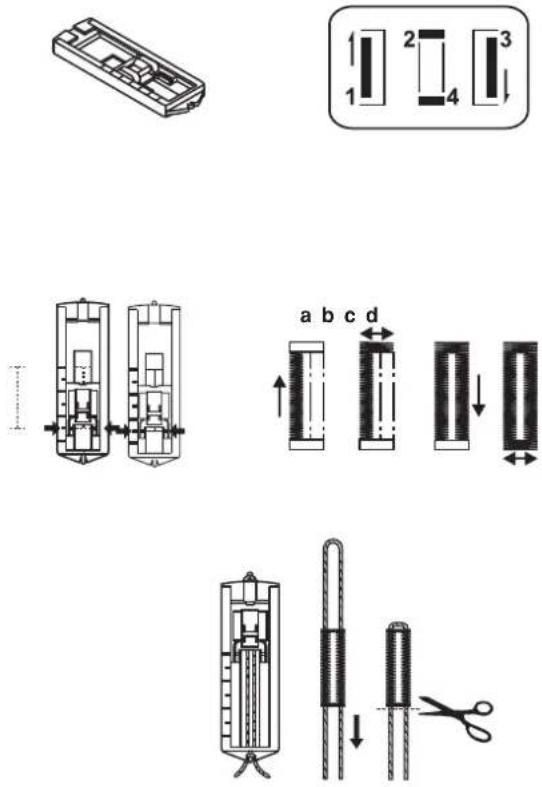
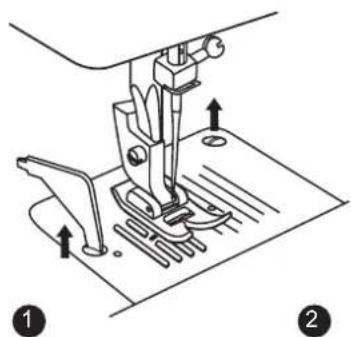
AEN Two-step presser foot lifter
When sewing several layers or thick fabrics, the presser foot can be raised a second stage for easy positioning of the work (A).
1
a

b

C
d
006806008 006905008
e
f

g

h
i

2
j

006B04008
k
a

006812008
0

006914008
1
006016008
p
DE
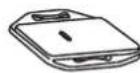
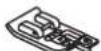
Zubehör
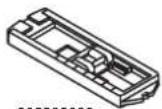
Accessories are stored inside the accessory storage.
Standard accessories (1)
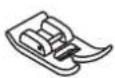
a. All purpose foot
b. Zipper foot
c. Buttonhole foot
d. Seam ripper/ brush
e. Pack of needle
f. Bobbin (3x)
g. L-screwdriver
h. Darnig plate
i. Spool pin felt (2x)
Accessoires facultatifs (2)
Optional accessories (2)
(Optional accessories are not supplied with this machine; they are however available as special accessories from your local dealer.)
j. Quilting foot
k. Overcasting foot
1. Hemmer foot
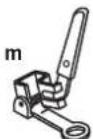
m. Darning/ embroidery foot
n. Blind hem foot
o. Button sewing foot
p. Edge/ quilting guide
text_image
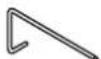
Technical diagram illustrating a mechanical assembly process with numbered steps and component illustrationsPlace the thread and spool holder onto the spool pin. (1, 2)
- Snap thread into thread guide.
- Wind thread clockwise around bobbin winder tension discs. (3)
- Thread bobbin as illustrated and place on spindle.
- Push bobbin spindle to right.
- Hold thread end.
- Step on foot control pedal.(4)
- Release the pedal after a few turns. Release the thread and cut as close as possible to the spool. Press the pedal again. Once the spool is full, it rotates slowly. Release the pedal and cut thread.
- Push bobbin spindle to left and remove.(5)

Please Note:
When the bobbin winder spindle is in "bobbin winding" position, the machine will not sew and the hand wheel will not turn.
To start sewing, push the bobbin winder spindle to the left (sewing position).


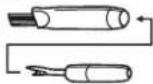
Einsetzen der Spule

Achtung:
Turn power switch to off ("O").
When inserting or removing the bobbin, the needle must be fully raised.
- Open the hinged cover.
- Hold the bobbin case with one hand. Insert the bobbin so that the thread runs in a clockwise direction (arrow).
- Put the thread under the tension spring.
- Hold the bobbin case by the hinged latch.
- Insert it into the shuttle.
text_image
4 3 2 6 5 A ①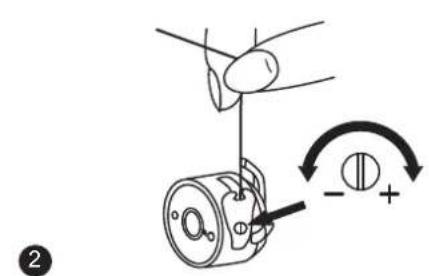
text_image
Diagram showing mechanical assembly with labeled components and directional arrows indicating rotation or movement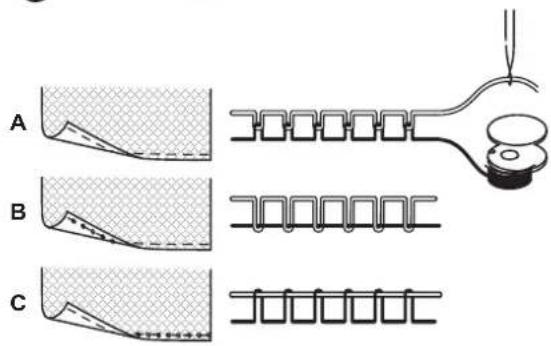
text_image
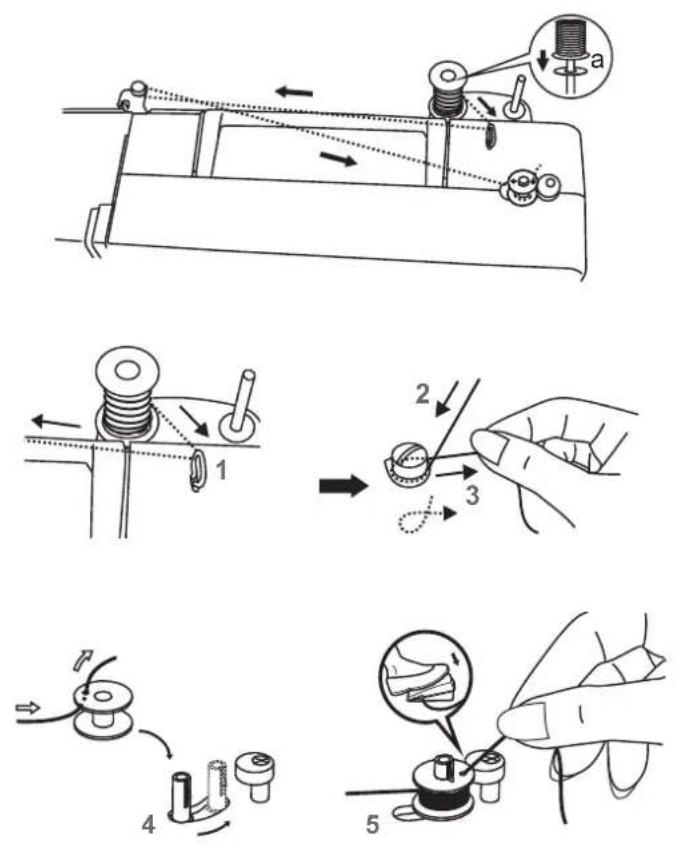
A B CDE Fadenspannung
Upper thread tension (1)
Basic upper thread tension setting: "4". To increase the tension, turn the dial to the next higher number. To reduce the tension, turn the dial to the next lower number.
A. Normal thread tension
B. Upper thread tension too loose
C. Upper thread tension too tight
Lower thread tension (2)
To test the bobbin thread tension, the full bobbin is placed in the bobbin case. The bobbin case and gripper are then suspended by the end of the thread.
If the tension is correct, the thread will unwind by about 5 to 10cm, when gently swung and will then remain suspended.
If the full bobbin case unwinds, the tension is too slack. If the tension is too tight, it hardly unwinds or does not unwind at all. To adjust, use the screwdriver.
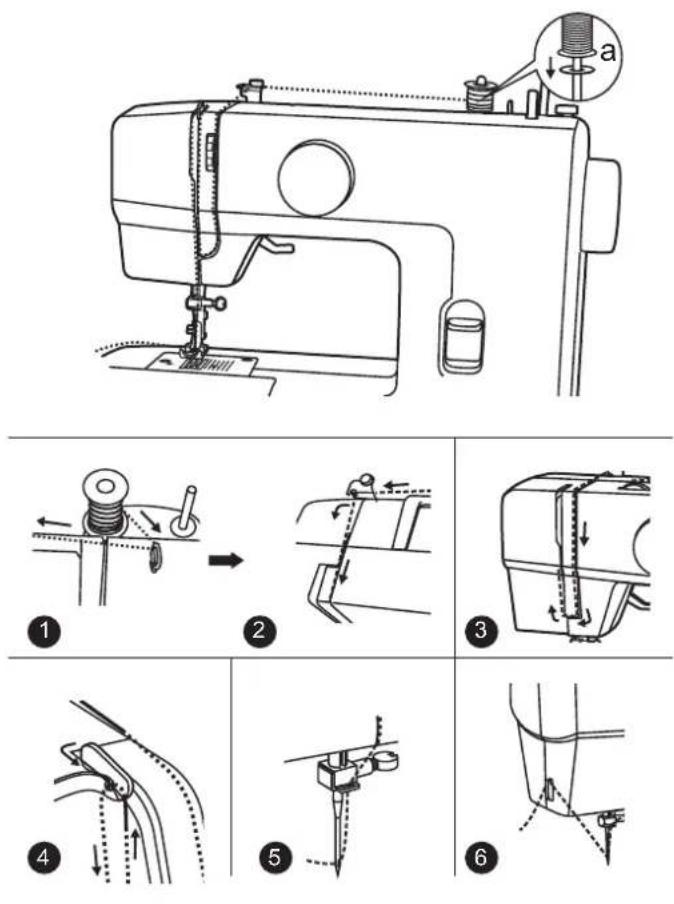

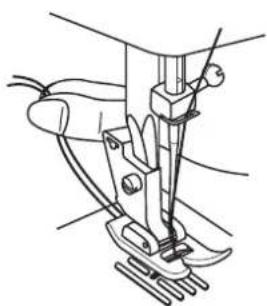
Threading the upper thread

Note: For safety, it is strongly suggested you turn off the power before threading
a. Spool pin holder
- Start by raising the needle to its highest point, and continue turning the handwheel counterclockwise until the needle just slightly begins to descend. Raise the presser foot to release the tension discs.
Place the thread and spool pin felt (a) onto the spool pin. - Draw thread from spool through the thread guide to the upper thread guide.
- Thread tension module by leading thread down right channel and up left channel. During this process it is helpful to hold the thread between the spool and thread guide.
- At the top of this movement pass thread from right to left through the slotted eye of the take-up lever and then downwards again.
- Now pass thread behind the thin wire needle clamp guide and then down to the needle which should be threaded from front to back.
- Pull about 6-8 inches of thread to the rear beyond the needle eye. Trim thread to length with built in thread cutter.
natural_image
Line drawing of a sewing machine with hands operating the base and using a tool (no text or symbols present)1

natural_image
Line drawing of a sewing machine needle and foot, showing mechanical components without any text or symbols2
natural_image
Line drawing of a sewing machine needle and foot (no text or symbols)3

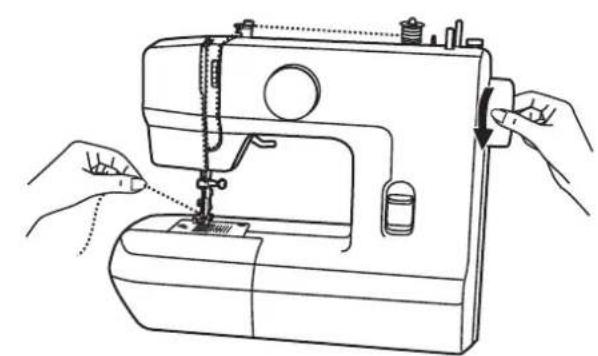
EN Raising the bobbin thread
Hold the upper thread with the left hand. Turn the handwheel (1) towards you (counterclockwise) lowering, then raising needle.
Remarque :
If it is difficult to raise the bobbin thread, check to make sure the thread is not trapped by the hinged cover or the sewing table.
Gently pull on the upper thread to bring the bobbin thread up through the needle plate hole. (2)
Poser les deux fils à l'arrière sous le pied- Leg beide draden onder de persvoet door de-biche. (3)inhas para trás com o pé naar achteren. (3) back under the presser calcador. (3) foot. (3)
Lay both threads to the back under the presser foot. (3)
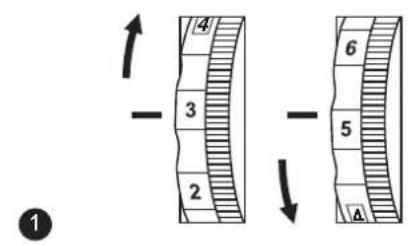
FR Point droit/Point Zig-Zag
EN Straight stitching
To select a stitch, simply turn the pattern selector dial.
The pattern selector dial may be turned in either direction.
Couture point droit
Sewing straight stitch
Turn the pattern selection dial so that the pointer is set to the straight stitch position.
Generally speaking, the thicker the fabric, thread and needle, the longer the stitch should be.
Note:
Select stitch "||" to fine-tune the straight stitch length.
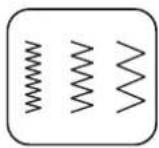
Zig-Zag stiching
Turn the stitch selector dial to ☐".
DE Verwahrstiche
To secure the beginning and the end of a seam, press down the reverse sewing lever (A).
Sew a few reverse stitches. Release the lever and the machine will sew forward again. (1)
Enlever l'ouvrage
Turn the handwheel toward you (counterclockwise) to bring the thread take up lever to its highest position, raise the presser foot and remove work behind the needle and presser foot. (2)
Couper le fil
Pull the threads under and behind the presser foot. Guide the threads to the side of the face plate and into thread cutter (B). Pull threads down to cut. (3)
natural_image
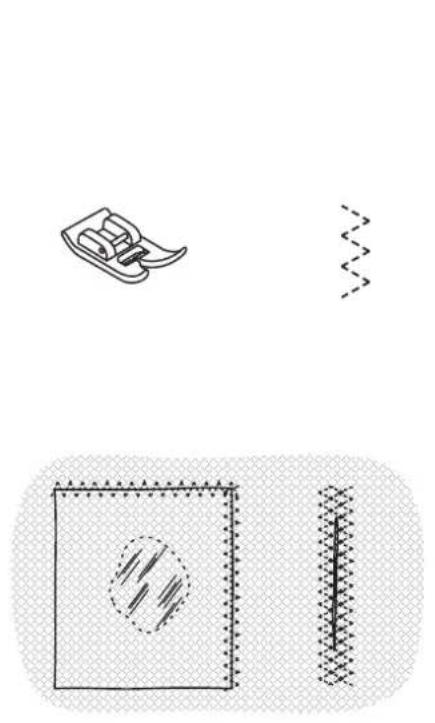
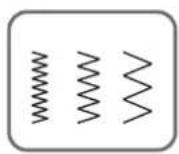
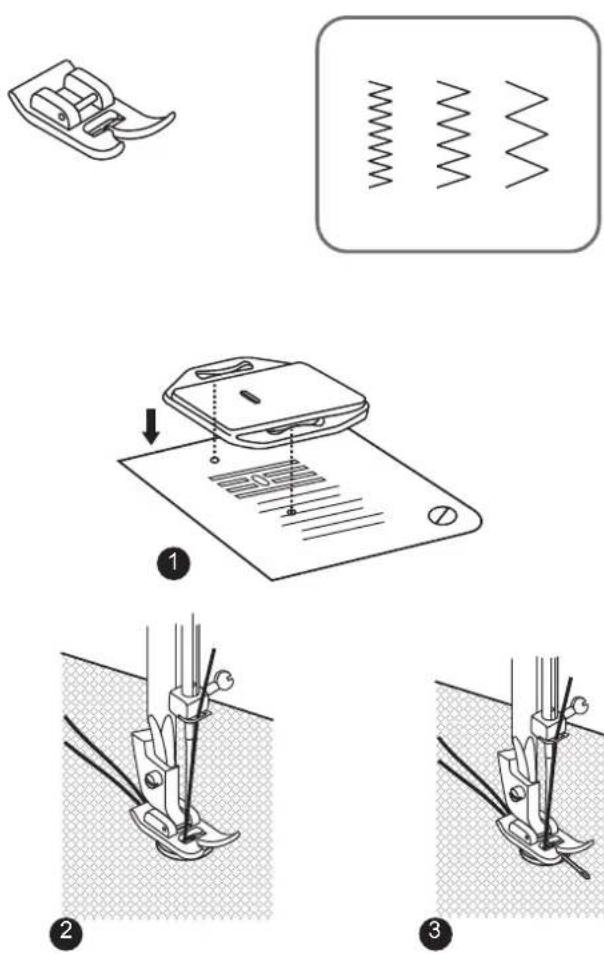
Simple line drawings of a notebook, a stylus, and a vertical strip on a textured background (no text or symbols)Zig zag stiching in 3 steps
oSpving non lace and elastic, darning, mending, reinforcing edges.
Set the machine as illustrated.
Place patch in position " ≧". The stitch length can be shortened to produce very close stitches.
When mending tears, it is advisable to use a piece of backing fabric to reinforce. The stitch density can be varied by adjusting the stitch length. First sew over the center and then overlap on both sides. Depending on the type of fabric and damage, sew between 3 and 5 rows.
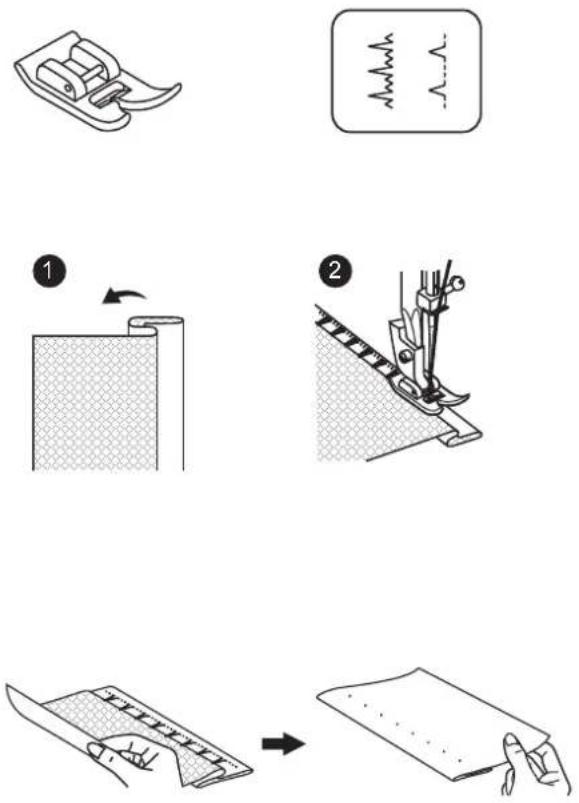
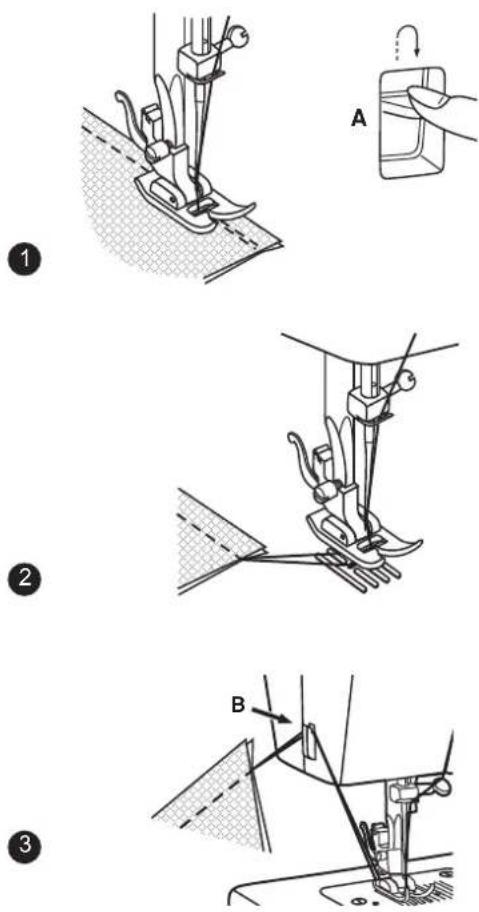
DE Blindsaum-Stich
For hems, curtains, trousers, skirts, etc.
Blind hem for stretch fabrics. Blind hem/ lingerie for firm fabrics.
Note:
It takes practice to sew blind hems. Always make a sewing test first.
Blind Hem:
^1 Turn up the hem to the desired width and press. Fold back (as shown in Fig. 1) against the right side of the fabric with the top edge of the hem extending about 7 mm (1/4") to the right side of the folded fabric.
Start to sew slowly on the fold, making sure the needle touches slightly the folded top to catch one or two fabric threads. (2)
Unfold the fabric when hemming is completed and press.
Lingerie Stitch:
Turn up the hem to the desired width and press. Place fabric right side up with edge of hem to the left. Begin sewing so the needle swings off the left edge of the fabric to form a small scallop. Tightening the tension slightly will produce a deeper scallop.
natural_image
Technical line drawing of a mechanical clamp or bracket component (no text or symbols)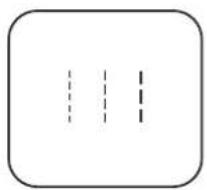
natural_image
Line drawing of a sewing machine needle stitching fabric (no text or symbols)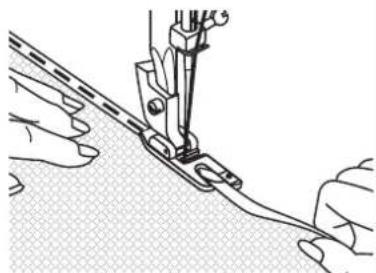
natural_image
Illustration of hands operating a sewing machine needle on a fabric (no text or symbols visible)1
2
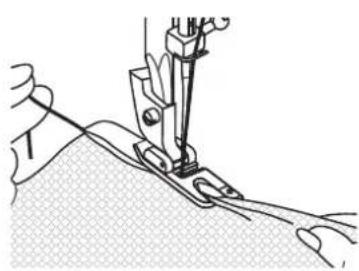
EN Sewing with the hemmer foot
* The hemmer foot is an optional accessory not supplied with your machine.
For hems in fine or sheer fabrics.
Set the machine as illustrated "";".
Neaten the edge of the fabric. At the beginning of the hem, turn under the edge twice by about 3 mm (1/8") and sew 4-5 stitches to secure. Pull the thread slightly towards the back. Insert the needle into the fabric, raise the presser foot and guide the fold into the scroll on the foot. (1)
Gently pull the fabric edge towards you and lower the presser foot. Begin sewing, guiding the fabric into the scroll by holding it upright and slightly to the left. (2)
natural_image
Illustration of a sewing machine needle stitching a duck (no text or symbols)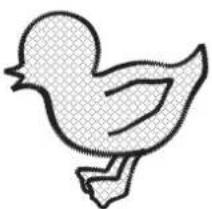
natural_image
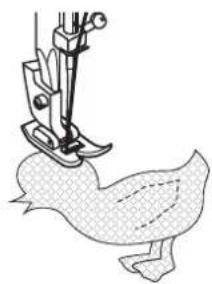
Simple line drawing of a duckling (no text or symbols)DE Applikation
Turn pattern selector dial to small zig zag width.
- Cut out the applique design and baste it to the fabric.
- Sew slowly around the edge of the design.
- Trim excess material outside the stitching. Make sure not to cut any stitches.
- Remove the basting thread.
- Tie top and bottom thread under the applique to avoid unraveling.
text_image
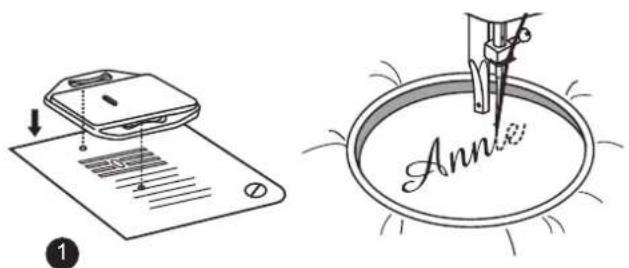
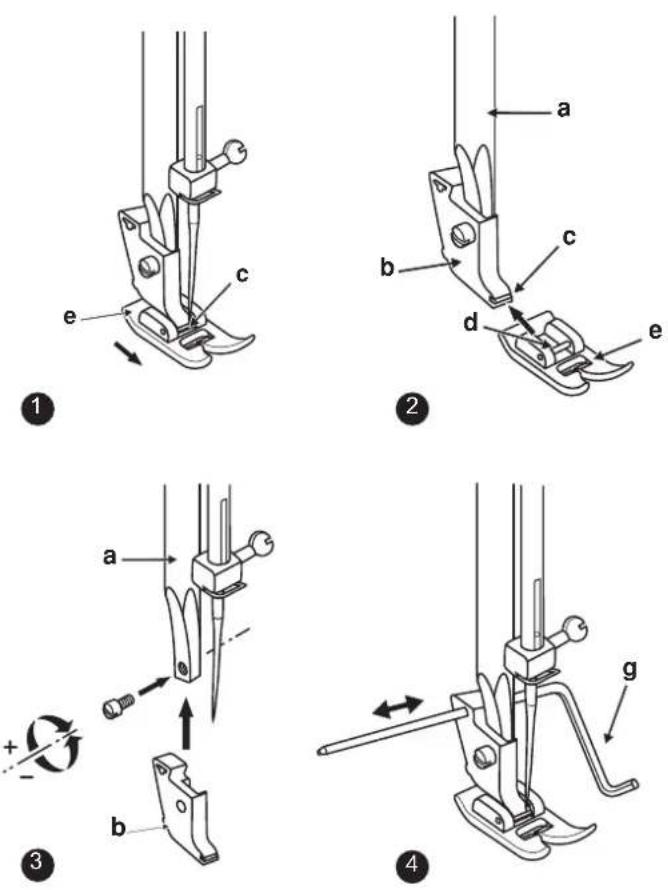
Diagram illustrating a sewing process: a printer being placed on paper with a mark and arrow, and the sewing process forming the word 'Ann' inside a circular container.Set the machine as illustrated above
- Remove the presser foot and the presser foot holder.
- Attach the darning plate.
- Lower presser foot lifter before starting to sew.
- Adjust the stitch width according to the size of lettering or design.
Preparation for Monogramming and Embroidering
- Draw the desired lettering or design on the right side of the fabric.
- Stretch the fabric between embroidery hoop as firmly as possible.
- Place the fabric under the needle. Make sure the presser foot bar is down in its lowest position.
- Turn the balance wheel towards you to bring up the lower thread through the fabric. Sew a few securing stitches at the starting point.
- Hold the hoop with thumb and forefingers of both hands while pressing the material with the middle and third fingers and supporting the outside of hoop with smaller finger.
* Embroidery hoop not included with machine.

- Take off the all purpose foot and attach the buttonhole foot.
- Measure diameter and thickness of button and add 0.3 cm (1/8") for bartacks to obtain correct buttonhole length; mark buttonhole size on fabric (a).
Place fabric under the foot, so that marking on the buttonhole foot aligns with starting marking on fabric. Lower the foot, so that the buttonhole center line marked on the fabric aligns with the center of the buttonhole foot (b).
Remarque :
Density varies according to the fabric. Always test sew a buttonhole on the fabric you are using to sew the buttonhole.
Follow the 4-step sequence changing from one step to another with the pattern selector dial. When moving from step to step through the buttonhole process, be sure that the needle is raised before turning the pattern selector dial to the next step. Take care not to sew too many stitches in steps (b) and (d). Use seam ripper and cut buttonhole open from both ends towards the middle.
Tips:
- Slightly reducing upper thread tension will produce better results.
- Use a stabilizer for fine or stretchy fabrics.
- It is advisable to use heavy thread or cord for stretch or knit fabrics. The zig-zag should sew over the heavy thread or cord. (5)
natural_image
Close-up of a sewing machine needle stitching fabric (no text or symbols visible)Annähen von Knöpfen
Install the darning plate. (1) Set the machine as illustrated. or de
Position the work under the foot.
Place the button in the desired position and lower the foot.
Set the Pattern Selector Dial for zig-zag pattern, which should correspond to the distance between the two holes of the button. Turn the handwheel toward you to check if the needle goes into the right and left hole of the button without hitting the button. Slowly sew on the button with about 10 stitches ≥slant ". (2)
Bring the thread tails to the back of the work, then tie off manually.
If a shank is required, place a darning needle on top of the button and sew. (3) For buttons with 4 holes, sew through the front two holes first, push the wor
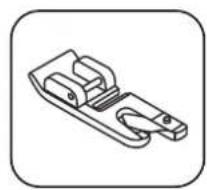
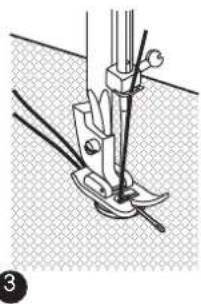
DE Reißverschlüsse
Set the machine as illustrated.
The zip foot can be inserted right or left, depending on which side of the foot you are going to sew. (1)
To sew past the zip pull, lower the needle into the fabric, raise the presser foot and push the zip pull behind the presser foot. Lower the foot and continue to sew.
It is also possible to sew in a length of cord, into a bias strip to form a 'welt'. (2)
Select stitch " | | | " to fine-tune the straight stitch length.
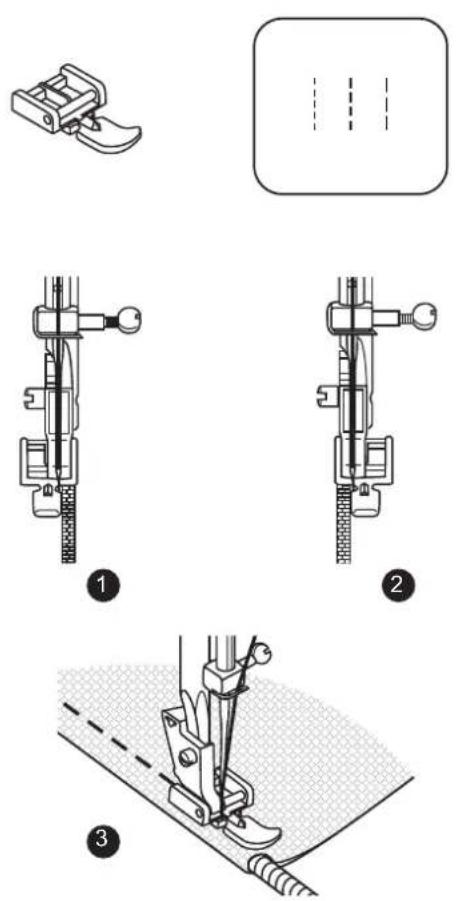
*The darning/ embroidery foot is an optional accessory not supplied with your machine.
Set the machine as illustrated(1):".
Install the darning plate. (2)
Remove the presser foot holder. (3)
Attach the darning/ embroidery foot to the presser foot bar. The lever (a) should be behind the needle clamp screw (b). Press the darning/ embroidery foot on firmly from behind with your index finger and tighten the screw (c). (4)
First sew round the edge of the hole (to secure the threads). (5)
First row: Always work from left to right. Turn work by 1/4 and oversew.
A darning ring is recommended for easier sewing and better results.e zipper, then remove the basting.
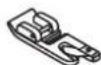
EN Changing the presser foot

Attention:
Turn power switch to off ("O") when carrying out any of the above operations!
Enlever le pied-de-biche
Removing the presser foot
Raise the presser foot using the presser foot lifter.
Raise the lever (e) and the foot disengages. (1)
Attaching the presser foot
Lower the presser foot shank (b) using the presser foot lifter, until the cut-out (c) is directly above the pin (d). (2) The presser foot (f) will engage automatically.
Removing and Attaching the presser foot shank
Raise the presser bar (a) with the presser foot lifter.
Removing and Attaching the presser foot shank (b) as illustrated. (3)
Attaching the edge/ quilting guide
^e Attach the edge/quilting guide (g) in the slot as illustrated. Adjust as needed for hems, pleats, quilting, etc. (4)
DE Nadel/Stoff/Faden Tabelle
| NEEDLE SIZE | FABRICS THREAD | |
| 9-11(65-75) | Lightweight fabrics-thin cottons, voile, serge, silk, muslin, Qiana, interlocks, cotton knits, tricot, jerseys, crepes, woven polyester, shirt & blouse fabrics. | Light-duty thread in cotton, nylon or polyester. |
| 12(80) | Medium weight fabrics-cotton, satin, kettleclote, sailcloth, double knits, lightweight woollens. | Most threads sold are medium size and suitable for these fabrics and needle sizes. Use polyester threads on synthetic materials and cotton on natural woven fabrics for best results. Always use the same thread on top and bottom. |
| 14(90) | Medium weight fabrics-cotton duck, woolen, heavier knits, terrycloth, denims. | |
| 16(100) | Heavyweight fabrics-canvas, woolens, outdoor tent and quilted fabrics, denims, upholstery material (light to medium). | |
| 18(110) | Heavy woollens, overcoat fabrics, upholstery fabrics, some leathers and vinyl | $heavy duty thread, carpet thread.(Use heavy foot pressure-large numbers.) |
IMPORTANT: Match needle size to thread size and weight of fabric
NEEDLE, FABRIC SELECTION
| NEEDLES | EXPLANATION | TYPE OF FABRIC |
| Hax115x1 | Standard sharp needles. Sizes range thin to large. 9 (65) to 18(110) | Natural woven fabrics-wool, cotton, silk, etc. Qiana. Not recommended for double knits. |
| 15x1/705H(SUK) | Semi-ball point needle, scarfed. 9(65) to 18(110) | Natural and synthetic woven fabrics, polyester blends. Knits-polyesters, interlocks, tricot, single and double knits. Can be used instead of 15 _i 1 for sewing all fabrics. |
| 15x1/705H(SUK) | Full ball point needle 9(65) to 18(110) | Sweater knits, Lycra, swimsuit fabric, elastic. |
| 130 PCL | Leather needles. 12(80) to 18(110) | Leather, vinyl, upholstery.(Leaves smaller hole than standard large needle.) |
Note: 1. Twin needles, can be purchased for utility and decorative work.
2. When sewing with twin needles, the stitch width dial should be set at less than "3".
3. European needles show sizes 65, 70, 80 etc. American and Japanese needles show size 9, 11, 12 etc.
4. Replace needle often (approximately every other garment) and / or at first thread breakage or skipped stitches.
5. Use a backing for fine or stretchy fabrics.
text_image
Diagram illustrating a hand operating a needle with labeled parts A, B, C, D and directional arrows indicating rotation or movement.1
text_image
B A C2

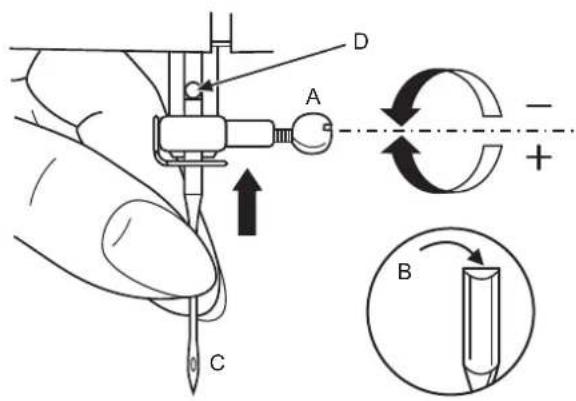
Nadel einsetzen

Achtung:
Inserting the needle

Attention:
Turn power switch to off ("O") before inserting or removing the needle.
Change the needle regularly, especially if it is showing signs of wear and causing problems.
A. Loosen the needle clamp screw and tighten again after inserting the new needle. (1)
B. The flat side of the shaft should be towards the back.
C/D.Insert the needle as far up as it will go.
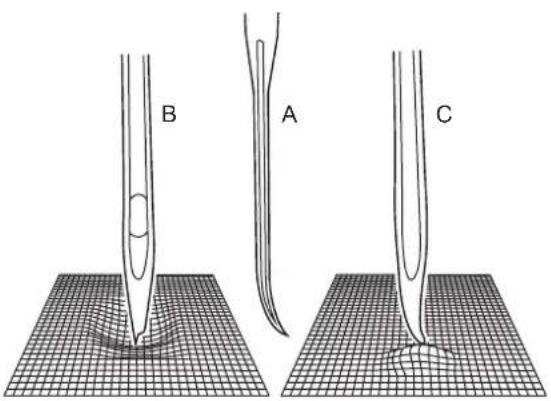
Needles must be in perfect condition. (2)
Problems can occur with:
A. Bent needles
B. Damaged points
C. Blunt needles
natural_image
Technical line drawing of a sewing machine needle and base (no text or symbols)
natural_image
Technical line drawing showing a hand using a tool to press or install a mechanical component, with no visible text or symbols.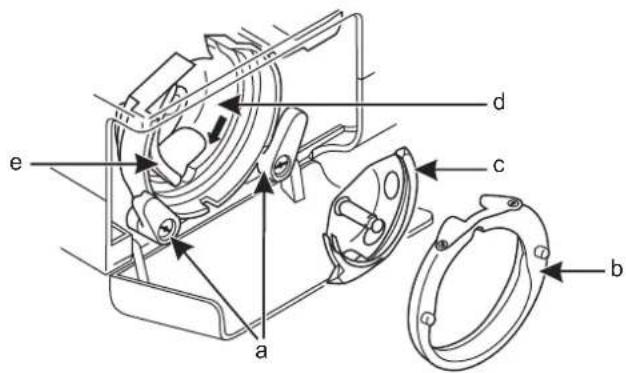
text_image
a b c d e
Wartung

Achtung:
Disconnect the machine from the electricity supply by removing the plug from the mains socket. When cleaning the machine, it must always be disconnected from the electricity supply.
Remove the needle plate:
Turn the handwheel until the needle is fully raised. Open the hinged front cover and unscrew the needle plate screws with the screw driver. (1)
Cleaning the feed dog:
Remove the bobbin case and use the brush supplied to clean the whole area. (2)
Cleaning and lubricating the hook:
Remove the bobbin case. Snap the two hook retaining arms (a) outwards. Remove the hook race cover (b) and the hook (c) and clean with a soft cloth. Lubricate at the point (d) (1-2 drops) with sewing machine oil. Turn the handwheel until the hook race (e) is in the left position. Replace the hook ©. Replace the hook race cover and snap back the two hook retaining arms. Insert the bobbin case and bobbin and replace the stitch plate.
Important:
Fabric fluff and threads must be removed regularly. Your machine should be serviced at regular intervals at one of our service agencies.ervals at one of our service agencies.
| Problem | Cause | Correction |
| Upper thread breaks | 1.The machine is not threaded correctly.2.The thread tension is too tight.3.The thread is too thick for the needle.4.The needle is not inserted correctly.5.The thread is round wound the spool holder pin.6.The needle is damaged. | 1.Rethread the machine.2.Reduce the thread tension (lower number).3.Select a larger needle.4.Remove and reinsert the needle (flat side towards the back).5.Remove the reel and wind thread onto reel.6.Replace the needle. |
| Lower thread breaks | 1.The bobbin case is not inserted correctly.2.The bobbin case is threaded wrongly.3.The lower thread tension is too tight. | 1.Remove and reinsert the bobbin case and pull on the thread.The thread should pull easily.2.Check both bobbin and bobbin case.3.Loosen lower thread tension as described. |
| Skipped stitches | 1.The needle is not inserted correctly.2.The needle is damaged.3.The wrong size needle has been used.4.The foot is not attached correctly. | 1.Remove and reinsert needle (flat side towards the back).2.Insert a new needle.3.Choose a needle to suit the thread and fabric.4.Check and attach correctly. |
| Needle breaks | 1.The needle is damaged.2.The needle is not correctly inserted.3.Wrong needle size for the fabric.4.The wrong foot is attached. | 1.Insert a new needle.2.Insert the needle correctly (flat side towards the back).3.Choose a needle to suit the thread and fabric.4.Select the correct foot. |
| Loose stitches | 1.The machine is not correctly threaded.2.The bobbin case is not correctly threaded.3.Needle/ fabric/ thread combination is wrong.4.Thread tension wrong. | 1.Check the threading.2.Thread the bobbin case as illustrated.3.The needle size must suit the fabric and thread.4.Correct the thread tension. |
| Seams gather or pucker | 1.The needle is too thick for the fabric.2.The stitch length is wrongly adjusted.3.The thread tension is too tight.4.Fabric puckers. | 1.Select a finer needle.2.Readjust the stitch length.3.Loosen the thread tension.4.Use a backing for fine or stretchy fabrics. |
| Uneven stitches, uneven feed | 1.Poor quality thread.2.The bobbin case is wrongly threaded.3.Fabric has been pulled. | 1.Select a better quality thread.2.Remove bobbin case and retread and insert correctly.3.Do not pull on the fabric while sewing, let it be taken up by the machine. |
| The machine is noisy | 1.The machine must be lubricated.2.Fluff or oil have collected on the hook or needle bar.3.Poor quality oil has been used.4.The needle is damaged. | 1.Lubricate as described.2.Clean the hook and feed dog as described.3.Only use good quality sewing machine oil.4.Replace the needle. |
| The machine jams | Thread is caught in the hook.Spool pin on the right position. | Remove the upper thread and bobbin case, turn the handwheel backwards and forwards by hand and remove the thread remandsLubricate as described.Press spool pin to the left postion. |
DE
Do not dispose of electrical appliances as unsorted municipal waste, use separate collection facilities.
Contact your local government for information regarding the collection systems available. If electrical appliances are disposed of in landfills or dumps, hazardous substances can leak into the groundwater and get into the food chain, damaging your health and well-being.
ELEKTRISCHE K E N N D A T E N DONNEES DE BASE ELECTRIQUES ELEKTRISCHE SPECIFICATIES ELECTRICAL CHARACTERITIC DATA
VERITAS JANIS
230V 50Hz 70W
Schutzklasse II
(Protection class II)
VERITAS®

www.veritas-sewing.com

facebook.com/veritassewing

twitter.com/veritas_sewing

youtube.com/user/veritas