USER MANUAL JSB21 VERITAS
The wires in this mains lead are coloured in accordance with the following code:
BLUE-NEUTRAL BROWN-LIVE (OR ACTIVE)
As the colours of the mains lead of this appliance may not correspond with the coloured markings identifying the terminals in your plug — PROCEED AS FOLLOWS: The earth plug pin is unnecessary. As the Machine is designed under double insulation structure, the earth wire is removed from the machine. The wire coloured BROWN must be connected to the terminal marked L or A or coloured RED. The wire coloured BLUE must be connected to the terminal marked N or coloured BLACK. Neither core is to be connected to the earth terminal of a three-pin plug.
IMPORTANT SAFETY INSTRUCTIONS
When using an electrical appliance, basic safety precautions should always be followed, including the following:
Read all instructions before using (this appliance). DANGER - To reduce the risk of electric shock:
An appliance should never be left unattended when plugged in. Always unplug this appliance from the electric outlet immediately after using and before cleaning.
WARNING - To reduce the risk of burns, fire, electric shock, or injury to persons:
- Do not allow to be used as a toy. Close attention is necessary when this appliance is used by or near children.
- Use this appliance only for its intended use as described in this manual. Use only attachments recommended by the manufacturer-er as contained in this manual.
- Never operate this appliance if it has a damaged cord or plug, if it is not working properly, if it has been dropped or damaged, or dropped into water. Return the appliance to the nearest authorized dealer or service center for examination, repair, electrical or mechanical adjustment.
-
Never operate the appliance with any air openings blocked. Keep ventilation openings of the sewing machine and foot controller free from the accumulation of lint, dust, and loose cloth.
-
Never drop or insert any object into any opening.
- Do not use outdoors.
- Do not operate where aerosol (spray) products are being used or where oxygen is being administered.
- To disconnect, turn all controls to the off ("O") position, then remove plug from outlet.
- Do not unplug by pulling on cord. To unplug, grasp the plug, not the cord.
- This appliance can be used by children aged from 8 years and above and persons with reduced physical, sensory or mental capabilities or lack of experience and knowledge if they have been given supervision or instruction concerning use of the appliance in a safe way and understand the hazards involved.
- The machine must only be used with designated foot controller, in order to avoid a hazard. If the foot controller is damaged or broken, it must be replaced by the manufacturer or its service agent or a similarly qualified person.
- The LED lamp maximum power is 0.3W, maximum voltage is DC 5V. If the LED light is damaged, you should not use the product and send it to the manufacture or service agent to repair or replace at once.
- Keep the instructions at a suitable place close to the machine and hand it over if you give the machine to a third party.
- Caution - to avoid injury:
a. Unplug the foot controller of the appliance when leaving it unattended.
b. Unplug the foot controller of the appliance before carrying out any maintenance.
DANGER
- Do not reach for an appliance that has fallen into water. Unplug immediately.
- Do not place or store appliance where it can fall or be pulled into a tub or sink. Do not place or drop into water or other liquid.
English
WARNING
- Keep fingers away from all moving parts. Special care is required around the sewing machine needle.
- Always use proper needle plate. The wrong plate can cause the needle to break.
- Do not use bent needles.
- Do not pull or push fabric while stitching. It may deflect the needle causing it to break.
- Switch the sewing machine off ("O") when making any adjustments in the needle area, such as threading needle, changing needle, threading bobbin, or changing presser foot, etc.
- Always unplug sewing machine from the electrical outlet when removing covers, lubricating, or when making any other user servicing adjustments mentioned in the instruction manual.
- Never operate on a soft surface such as a bed or couch where the air openings may be blocked.
SAVE THESE INSTRUCTIONS
Machine Specifications:
Dimensions: 41cm× 18cm× 31cm
Mass of the equipment: 6.4kg
Rated Voltage, Rated Frequency: 230V 50Hz
Rated input: 60W
Using ambient temperature: Normal temperature
Acoustic noise level: less than 72db(A)
English
RECOMMENDATIONS
You're just starting off on your machine...
Do you have any problems?
Check the following sections:
- Changing or fitting the needle (page 31)
Winding the spool (page 21)
Fitting the spool (pages 25)
Adjusting the bottom tension (page 101)
Maintaining the machine (page 85)
The graduated knob with settings 1 to 9 situated top left must be on 5.
The top thread and the bottom thread must be of the same thickness; before starting to sew, pull them together towards the back.
The needle has a flat side, which must be facing towards the back of the machine.
The needle must be raised before you select your stitch.
The top thread is threaded from right to left, taking care never to cross the threads (see diagram in the top lid).
Put the thread through the eye of the needle from the front (i.e. from front to back).
It is recommended that you keep this packaging so that the machine can be transported safely if necessary.
English
CONTENTS
- NAME OF PARTS 27-28
- ACCESSORIES 29-30
- BEFORE SEWING 31-32
DETACHABLE EXTENSION TABLE 33-34
CONNECTING FOOT CONTROLLER AND POWER CORD ...33-34
THREADING UPPER THREAD 33-34
DRAWING UP LOWER THREAD 35-36
TRIAL SEWING 35-37
ADJUSTING THREAD TENSION 37-39
- STARTING TO SEW 39-44
BOBBIN WINDING 45-46
INSERTING BOBBIN 47-48
CHANGING FOOT 49-52
CHANGING NEEDLE 52-54
FABRIC, THREAD AND NEEDLE TABLE 55-56
PATTERN SELECTION DIAL 57-60
TURNING A SQUARE CORNER 61-66
REVERSE SEWING 67-68
THICK FABRIC SEWING 69-72
DOUBLE PRESSER FOOT LIFTER 69-72
- SELECTING THE STITCH 73-74
STRAIGHT SEWING 75-76
ZIGZAG SEWING 77-80
Thread Tension For Zigzag Stitch 77-80
BLIND HEM STITCH 77-80
OVERCASTING 77-80
OVERLOCKING 79-82
STRETCH STITCHING 83-84
MAKING BUTTONHOLES .85-86
Determine Length 87-94
CuttingButtonholes .95-96
ZIPPER SEWING 97-98
MENDING 97-98
Patching 97-98
Mending a Rip 99-102
APPLIQUE WORK 103-108
EMBROIDERY 109-110
Darning Plate 109-110
Removing Foot Holder 111-114
6.MAINTENANCE 111-114
CLEANING 111-114
OILING 125-126
7.TROUBLECHART 127-130
LOWER TENSION ADJUSTMENT 131-132
CLEANING SHUTTLE CASE 132-133
CHANGING LIGHT BULB 133
- NEEDLE THREADER 134
a. Unplug the foot controller of the appliance when leaving it unattended.
b. Unplug the foot controller of the appliance before carrying out any maintenance.
GEVAAR
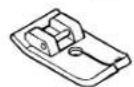
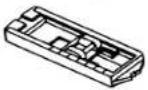
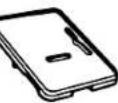
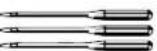
2. ACCESSORIES / ACCESSORIES / ACCESSORIES / ZUBEHÖR / TOEBEHOREN / ACCESSORI
(1)

(2)
③
(4)
(6)
⑦
(8)
(9)
10

⑪
12

13
(14)
2. ACCESSORIES / ACCESSORIES / ACCESSORIES / ZUBEHÖR / TOEBEHOREN / ACCESSORI
Deutsch
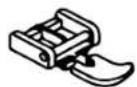
- Zigzag sewing foot (on machine)
- Zipper foot
- Straight Stitch foot
- Buttonhole foot
5.Darning Plate
- Organ Needles
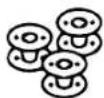
- Bobbins (3 pcs.)
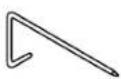
- Edge Guide
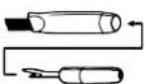
- Brush and Seam Ripper
- Screwdrive
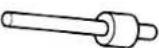
- Spool pin
- 2x Denim Needles
- Jeans Support
- Dust Cover
Francais
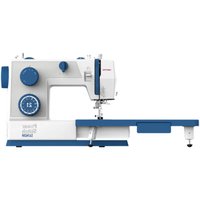
The machine is stored in flatbed style which makes your work easier for ordinary sewing.
3.ANTES DE EMPEZAR A COSER
Remove the table (accessory box) and the machine is used as a free-arm machine.
TABLEERO DE EXTENSION RETIRABLE
The free-arm is more convenient to sew or embroider; trousers, sleeves, cuffs of T-shirts, blouses, etc.
Reverse the above steps to attach the extension table.
To open the lid of the accessory box, pull it open, as illustrated.
Connect foot controller and power cord ① ② Before plugging in your machine, be sure that the voltage is the same as that of your machine (written on a plate at back of machine).
Switch on power to the machine and turn on the sewing light.
Switch off power to the machine and turn off the sewing light.
The more you press the foot controller, the faster the machine runs.
Raise the presser foot lifter. Raise the take-up lever to the highest position by turning the handwheel towards you. Thread following numbers ①-6 Pass the thread through guide ①
ENHEBRAMIENTO DEL HILO SUPERIOR
Lead thread through either side of tension disc ②. Hook the thread under the guide ③ as shown.
Thread take-up lever ④ Pass thread through ne guide ⑤ (use left one) through the needle ey from front to back.
Allow about 15 cm (6") of thread extra.
DRAWING UP LOWER THREAD
Hold the end of the upper thread with the left hand as illustrated.
Turn the handwheel slowly towards you until the needle moves down and up again to its highest position.
Pull the upper thread slowly and the lower thread will be brought up in a loop.
Pull out both threads to about 15cm (6") and place them together at the left under the presser foot.
Now that you have finished the first steps (page 1-13), you are familiar with the controls on your machine and with the accessories provided for the machine you are ready to start to sew with your new sewing machine.
COSTURA DE PRUEBA
Lets try to sew straight stitch.
- Make sure your machine is set completely as illustrated here.
- Pattern selection dial to ( ).
- Upper thread tension dial to 5.
- Place fabric under the presser foot.
Comenzaremos a probar la costura recta.
The desired stitch will be obtained by turning the Pattern Selection Dial.
- When operating the selector, make sure the needle is in the highest position.
5. ESCOGER LA PUNTADA
Set machine as shown, 4 kinds of straight stitch lengths can be selected as shown below.
| Stitch Selector | Stitch Length | Needle Position |
| No.5 | 2 mm | Left |
| No.6 | 2 mm | Centre |
| No.7 | 3.2 mm | Centre |
| No.8 | 5 mm | Centre |
COSTURA RECTA
Set the machine as shown.
To prevent seam ends unravelling, set machine for straight stitch and sew in reverse at beginning and ending of seam.
3 kinds of zigzag patterns can be selected as shown.
COSTURA EN ZIG-ZAG
Preparar laquina como se indica.
COUTURE AU POINT ZIGZAG
ADJUSTING THREAD TENSION
After you finish sewing the above stitches, check if upper and lower threads tension is equal and strong enough to lock both thread in centre as in figure @ .
If upper tension is too tight (loose), upper (lower) thread lies straight along upper (lower) surface of fabric () .
Correct by turning tension dial in the direction of arrow.
- Always check the balance of upper and lower tensions by test sewing using fabric, needle, thread and stitch pattern you plan to use.
(Correct combinations are described on page 35.)
AJUSTE DE LA TENSION DEL HILO
Set the needle in the highest position by turning the handwheel towards you. Open shuttle cover.
Espanol
4.COMENZARACOSER
BOBINADO
Open latch of bobbin case and pull it out.
Close latch of bobbin case and bobbin comes out easily.
Put a spool on spool pin. Draw thread from spool pin through thread guide and pretension device; following numbers 1 and 2.
Wind thread clockwise around bobbin several times.
Push bobbin on to spindle.
Move the declutch knob in the handwheel into the ( ) direction.
Note: Never touch declutch knob while sewing or it may cause trouble.
Push bobbin in the direction of arrow a
Press down foot controller for bobbin winding. When the bobbin is wound as shown stop the machine and push the bobbin to left as shown for disengaging from wheel.
Note: Watch the bobbin carefully to wind the correct volume of thread.
Take bobbin off the spindle and cut the thread.
Move the declutch knob in the handwheel into the ( ) direction.
INSERTING BOBBIN
Place the bobbin in its case with the thread running in direction of arrow (clockwise).
Guide thread into slot a of bobbin case.
Espanol
Pulling thread to left, bring it under tension spring then to delivery eye b.
Raise the needle to the highest position.
Leave end of thread of about 10cm(4^ ) from bobbin case.
Take hold of latch and push bobbin case into shuttle, as illustrated.
Release latch when bobbin case is fully inserted.
Raise presser foot lifter ①. Set needle in the highest position by turning the hand-wheel towards you ②.
CAMBIO DEL PIE PRENSATELA
@ Push button of holder towards you and foot will come off.
包 Position a new foot by aligning holding groove of shank with pin of foot. Lower presser foot lifter so that holder catches presser foot.
Set the needle in the highest position by turning the hand-wheel towards you.
Loosen needle clamp screw and take out needle.
CAMBIO DE LA AGUJA
With the flat side away from you, insert a new needle into groove of needle bar.
Push needle into clamp until it reaches stopper @ and tighten needle clamp screw firmly.
Always use a straight needle with a sharp point.
Using defective or worn needles not only causes stitch skipping, breakage of needles or snapping of thread; it also can damage shuttle and needle plate.
Note: Always use needle type 15x1/705
Legend:
x Straight shaft
y Sharp point
STOF, GAREN-EN NAALDTABLE
To turn a square corner 5 / 8 from the fabric edge, stop stitching with the needle tip piercing the fabric, when reaching the cornering guide as shown. Raise the presser foot, turn fabric. New stitching line will align with 5 / 8 seam guide on side of needle plate. Lower the presser foot and begin stitching in new direction.
Place fabric under foot about 1cm (0.4^ ) inside the edge. Lower presser foot lifter.
(Reverse sewing)
To reinforce seam, sew backwards to the edge of fabric by pushing reverse sewing button.
COSTURA EN REVERSAL (Empezar a coser)
Release button and commence forward sewing guiding fabric by hand as it is fed. Never pull material.
Sew reverse stitches for reinforcement at end of seam.
Draw fabric to left when sewing is finished.
For thick fabric sewing, it is important to follow the instructions carefully.
Make sure that the sewing is set flat. Needle must be perpendicular to the seam so that it penetrates the cloth properly.
Legend:
x Direction of needle
y Direction of cloth
COSTURA EN TELAS
GRUESAS
Improper setting causes deflection and possible breaking of the needle.
For sewing of very thick cloth, sew gently, maintaining the cloth perfectly by hand.
Breaking a needle is not a mechanical problem, but simply misuse.
Legend:
±bx Direction of needle
y Direction of cloth
In order to obtain a larger opening when using very thick materials, firmly push presser lifter up as far as it will go.
DOBLE ACCION DEL ELEVADOR DEL PIE PRENSATELA
The desired stitch will be obtained by turning the Pattern Selection Dial.
- When operating the selector, make sure the needle is in the highest position.
5. ESCOGER LA PUNTADA
Set machine as shown, 4 kinds of straight stitch lengths can be selected as shown below.
| Stitch Selector | Stitch Length | Needle Position |
| No.5 | 2 mm | Left |
| No.6 | 2 mm | Centre |
| No.7 | 3.2 mm | Centre |
| No.8 | 5 mm | Centre |
COSTURA RECTA
Set the machine as shown.
To prevent seam ends unravelling, set machine for straight stitch and sew in reverse at beginning and ending of seam.
3 kinds of zigzag patterns can be selected as shown.
COSTURA EN ZIG-ZAG
Preparar laquina como se indica.
COUTURE AU POINT ZIGZAG
| Stitch Selector | Zigzag Width | Stitch Length |
| No. 9 | 2 mm | 1 mm |
| No.10 | 3.5 mm | 2 mm |
| No.11 | 5 mm | 2.5 mm |
Thread Tension For Zigzag Stitch
Better-looking zigzag stitching requires less upper tension than straight stitching. Loosen upper tension slightly. Legend:
x Wrong side
y Right side
| LA SELECTION DE LA PUNTADA | EL ANCHO DEL ZIG-ZAG | ELLARGO DE LA PUNTADA |
| No. 9 | 2 mm | 1 mm |
| No.10 | 3 mm | 2 mm |
| No.11 | 5 mm | 4 mm |
Set machine as shown.
COSTURA INVISIBLE Y DOBLADILLO
Preparar laquina como se indica.
Francais Deutsch Duth Italiano
Fold material as shown and place it under foot. For a neater finish, it is preferable to baste or iron hem beforehand.
Legend:
x Wrong side
y Right side
Sew carefully, so that straight stitches are made on hem edge, and slanting stitches pierce only one or two threads of fold.
@ Correct seam.
Needle is catching edge of fold too much.
Needle is not catching edge of fold at all.
Legend:
x Wrong side
y Right side
For light-weight material:
Set machine as shown.
Overcasting prevents edge of fabric from fraying and produces neat finish.
Place the seam allowance under the presser foot with the edge of the seam in line with the side of the presser foot as illustrated.
Trim the fabric to the stitch line.
For thick and elastic, and also very fine material:
Set machine as shown.
Sew in the same way as above.
SOBRE COSTURA
Overlocking stitches make it possible to sew and overcast seams at the same time. Set machine as shown.
COSTURA "OVERLOCK"
Put two pieces of cloth together with the right sides facing and sew.
To prevent edges from fraying, sew so that right side stitches drop outside the edge of material.
In some cases overlapping stitches can be used for overcasting.
The stitches shown are all used with stretch and knit fabrics. These are special stitches built in the machine for your quick selection.
COSTURA ELASTICA DE DISEÑOS AUTOMÁTICOS
Set machine as shown.
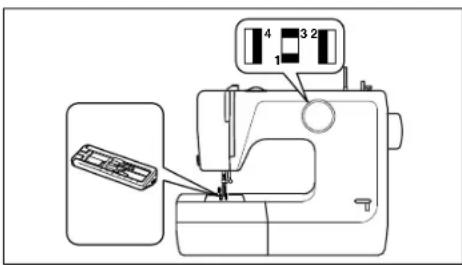
CONFECCION DE OJALES
Preparar laquina como se indica.
Determine Length
Measure the diameter and thickness of the button and add 0.3cm (1 / 8^ )
for bar tacks. Mark buttonhole size on material.
* For stretch fabrics, lay a piece of paper where the buttonhole will be placed.
Length of a buttonhole
d Diameter
t Thickness
m Marking
Leyenda:
Completely push back sliding part @ of buttonhole foot.
Place material under foot so that marking of buttonhole passes through centre of foot. Directions line b of foot indicates beginning line of marking.
Extra thread is placed under foot and then to left or back.
Bar tacking: Set pattern selection dial to 1 (and sew 5-6 stitches.
Left side: Change pattern to 2 (I). Sew left side from front to back until it reaches the end line.
Note at which line the centre marker points so that it is not necessary to mark the end lines for all buttonholes.
Bar tacking: Change the pattern to 3 (□) and sew 5-6 stitches.
Right side: Change pattern to 4 ( ) and sew right side until it catches first bar tack.
Place a pin through the bar tacks to prevent over-cutting. Cut the buttonhole along centre with the buttonhole cutter.
Corte del ojal
Occasionally the left and right buttonhole columns may need to be balanced on specialty fabric. In this case adjust stitch balance by turning adjusting dial located on the back of the machine.
If the right side of buttonhole is too dense, turn dial to left as shown.
If the left side of the button-hole is too dense, turn dial to right as shown.
Set machine as shown. By using a special zipper foot, zipper sewing can be easily done without turning the fabric.
COSTURA DE CIERRRES
Preparar laquina como se indica.
Set the zipper foot on the right of the needle.
Sew right side of zipper guiding fabric carefully so that right side teeth of zipper are parallel with left edge of foot.
Re-set zipper foot to the left of the needle.
Sew left side of zipper in the same way.
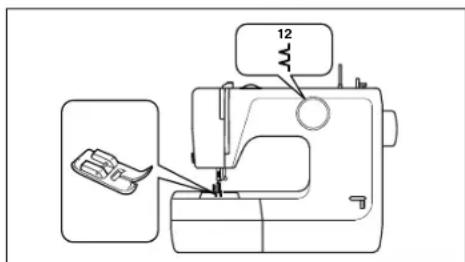
Set machine as shown.
COSTURA PARA
REMENDAR
Parchado
Preparar laquina como se indica.
Place the patch over the worn part.
Pull the thread ends toward back or left when starting sewing.
Sew along the edge of the patch on the right side. Trim away the worn part close to the seam on the wrong side.
Set the machine in the same way as for patching.
Sew the edges of tear together first. Then sew two more seams on either side.
A piece of gauze can be placed underneath to reinforce the rip.
Set machine as shown.
COSTURA DE APLICACION (PARCHES DE ADORNO)
Preparar laquina como se indica.
Francals Deutsch Duth Italiano
Draw design on material to be used as an applique and cut it out. Place cut-out on base material and baste it.
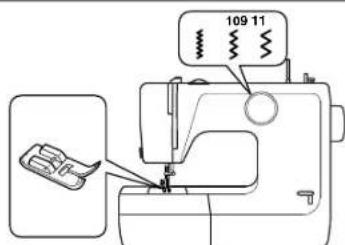
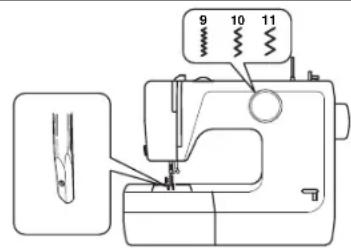
Sew around the outline with preset zigzag stitch, width and length either of pattern selection dial No.9, 10, or 11 according to the shape and size of cut-out and type of base material.
To change direction at corners, or to sew very small circles, stop machine, positioning needle just away from edge of cut-out, lift presser foot and turn material. Lower presser foot and continue sewing.
Set machine as shown.
Remove foot, and holder screw.
To avoid lower thread being pulled up, reduce upper thread tension.
COSTURA PARA BORDAR
Preparar laquina como se indica.
For good embroidery, it is important to use the correct needles and thread.
Use thin embroidery silk for upper thread and a thinner silk of same kind and color for lower thread.
Trace your design on material and centre it in embroidery hoop. Make sure material is taut.
| Needle | Thread |
| No. 9 | 120 ~100 |
| No. 11 | 100 ~ 80 |
| No. 14 | 60 ~ 50 |
| Aguja | Hilo |
| No. 9 | 120 ~100 |
| No. 11 | 100 ~ 80 |
| No. 14 | 60 ~ 50 |
English: See page 79 for the machine with Drop Feed function.
Francals Deutsch Duth Italiano
BRODERIE
| Nadel | Faden |
| No. 9/70 | 120 ~100 |
| No. 11/80 | 100 ~ 80 |
| No. 14/90 | 60 ~ 50 |
BORDUURWERK
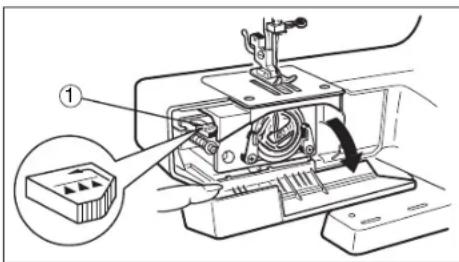
Drop feed lever ① is in the inside of shuttle cover. To lower feed dog, push the lever forward, then to the left. This position is used for button sewing, darning and embroidery. For normal sewing, push the lever to the right, then release it.
EMBROIDERY
Set machine as shown. Remove foot, and holder screw. To avoid lower thread bei pulled up, reduce upper thread tension.
For good embroidery, it is important to use the correct needles and thread.
Use thin embroidery silk for upper thread and a thinner silk of same kind and color for lower thread.
Trace your design on material and centre it in embroidery hoop. Make sure material is taut.
| Needle | Thread |
| No. 9 | 120 ~100 |
| No. 11 | 100 ~ 80 |
| No. 14 | 60 ~ 50 |
PALANCA PARA MOVER LOS DIENTES
| Aguja | Hilo |
| No. 9 | 120 ~100 |
| No. 11 | 100 ~ 80 |
| No. 14 | 60 ~ 50 |
English: See page 77 for the machine without Drop Feed function.
| Nadel | Faden |
| No. 9/70 | 120 ~100 |
| No. 11/80 | 100 ~ 80 |
| No. 14/90 | 60 ~ 50 |
TRANSPORTEURKNOP
Pull out lower thread by turning handwheel towards you while holding upper thread lightly.
Lower presser foot lifter. Grasp lower thread then make two or three stitches, snip off excess threads.
Start sewing along outline of design with satin stitch.
Continue sewing with guiding hoop by hand.
To finish filling, sew several straight stitches.
Lay typewriter paper underneath when embroidering sheer fabric.
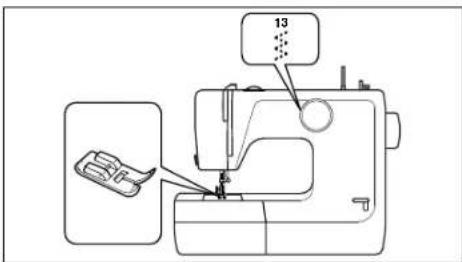
There are a few times when you want to control the feeding of the fabric yourself. Raise the needle to its highest position and raise presser foot. Place darning plate over needle plate aligning two pins of darning plate with holes of needle plate.
You may then determine the movement of the fabric yourself.
For the machine equipped with drop feed lever, see supplementary manual.
English: The machines with Drop Feed function does not contain Darning Plate.
Remove foot holder by loosening screw with screwdriver.
When fixing foot holder again, tighten it by the screw securely with screw driver.
Your machine requires regular cleaning and oiling for satisfactory sewing performance. A machine which is used for a few hours a day needs to be cleaned and oiled once a month.
Important:
Disconnect power supply before carrying out maintenance on machine.
6.MANTENIMIENTO
Remove foot and needle. Remove needle plate. Brush off all dust and lint feed dog with a cleaner brush.
Turn latches outwards.
LIMPIEZA
Remove shuttle race cover. Remove shuttle. Clean shuttle race with a cleaning brush and a soft cloth.
Espanol
Use oil manufactured specially for sewing machine use. Other oils will eventually cause mechanism to jam. Apply one drop of oil to part of shuttle where friction occurs.
ACIETADO
Francals Deutsch Duth Italiano
| PROBLEM | PROBABLE CAUSE | CORRECTION |
| Breaking lower thread | Thread not wound evenly on the bobbin or not drawn up correctly | P.25, P.9, 11 |
| Lower thread tension too tight | P.101, 103 |
| Lint stuck in the bobbin case and inside the tension spring | Remove lint and fluff with a cleaning brush |
| Skipping stitches | Needle not fully inserted | P.31 |
| Needle bent | P.31 |
| Size or type of needle and thread not suitable for the material | P.35 |
| Incorrect upper threading | P.9 |
| Too much oil on the machine | P.87 |
| Irregular stitches | Incorrect size of needle for the material | P.35 |
| Upper thread tension too loose | P.19 |
| Incorrect lower tension | P.101, 103 |
| The material not fed correctly | Pattern selection dial not set correctly | P.41 |
| Lint stuck on the feed dog | P.85 |
| Noisy machine | Check for thread in race, the slightest amount of thread in race may cause noise or binding, use material like tooth pick or cotton swab to clean. | P.85
P.105 |
English
| PROBLEM | PROBABLE CAUSE | CORRECTION |
| The material puckers | Upper or lower thread tension too tight | P.19, P.103 |
| Stitch too long for material | P.41 |
| Thread too thick | P.35 |
| Incorrect threading of upper or lower thread | P.9, P.27 |
| Breaking needle | Needle not correctly inserted | P.31 |
| Needle bent | P.31 |
| Needle clamp screw too loose | P.31 |
| Upper thread tension too tight | P.19 |
| Needle too fine for the material | P.35 |
| Dials have been changed while the needle was down in the material | P.41 |
- If trouble is still apparent in the machine, please consult your nearest dealer. Do not try to correct fault by yourself.
Espanol
7. TABLA DE PROBLEMAS
LOWER TENSION ADJUSTMENT
If your machine skips or loops stitches, it is not out of order. To check bobbin thread tension, suspend bobbin, bobbin case and shuttle all together by thread as illustrated. Move up and down vertically (like yo yo) always use correct bobbin. Then it is easy to adjust upper tension on the numbers 4, 5, 6.
① Push latches towards outside.
② Remove shuttle cover ③ Remove shuttle
④ xShuttle yBobbin and bobbin case All of them descend with light resistance.
Espanol
AJUSTE DE TENSION DE LA BOBINA
Francals Deutsch Duth Italiano
REGLAGE DE LA TENSION INFÉRIEURE
For tension adjustment, turn screw using small screwdriver.
Legend:
x Upper tension too tight y Upper tension too loose
Espanol
- Lay machine on its back to make it easier.
Thread stuck between shuttle and shuttle case causes sudden rapid running or sudden stopping of the machine. In this case you should proceed as follows:
① Lift presser foot and remove bobbin case.
Push latches a towards outside and remove shuttle cover and shuttle with fingers.
③ Clean shuttle and shuttle case and re-assemble them.
LIMPIEZA DE LA CAJA DEL CANGREJO
Francals Deutsch Duth Italiano
Unplug the machine. Loosen the screw 1as shown and open face cover as shown. Remove the bulb by unscrewing it in a counterclockwise direction. Install a new bulb by screwing it in clockwise.
CAMBIO DEL FOCO
Francals Deutsch Dufn Italiano
REEMPLACEMENT DE L'AMPOULE