Rubina - Sewing machine VERITAS - Free user manual and instructions
Find the device manual for free Rubina VERITAS in PDF.

| Product type | Electronic sewing machine |
| Brand | Veritas |
| Model | Rubina |
| Power supply | 100-240 V ~ 50/60 Hz |
| Number of stitches | 100 patterns (00-99) |
| Maximum stitch width | 7.0 mm |
| Maximum stitch length | 4.5 mm |
| Lamp | Integrated LED |
| Control pedal | Type C-8000 |
| Free arm | Yes, removable sliding extension table |
| Automatic needle threader | Yes |
| Buttonhole | Automatic 1-step (7 stitches) |
| Thread tension | Adjustable by dial (1-9, base 4) |
| Feed dogs | Drop feed for button sewing |
| Sewing speed | Variable by pedal |
| Sound level | 75 dB(A) |
| Included accessories | Universal foot, zipper foot, buttonhole foot, invisible hem foot, embroidery foot, button foot; bobbins (3x), screwdriver, brush, needles |
| Safety | Automatic stop in case of overload, ON/OFF switch, recommended disconnection |
| Maintenance | Cleaning feed dogs, oiling, needle replacement |
| Usage | Household |
| Weight | Approx. 7 kg (estimate) |
Frequently Asked Questions - Rubina VERITAS
User questions about Rubina VERITAS
0 question about this device. Answer the ones you know or ask your own.
Ask a new question about this device
Download the instructions for your Sewing machine in PDF format for free! Find your manual Rubina - VERITAS and take your electronic device back in hand. On this page are published all the documents necessary for the use of your device. Rubina by VERITAS.
USER MANUAL Rubina VERITAS
Dear Customer Stimate client
We congratulate you on your purchase of your sewing computer. You have bought a quality product which has been made with great care and, if serviced right, will serve you well for many years.
Before using it for the first time, we ask you to read the manual at hand carefully, paying special attention to the safety instructions.
Persons who are not familiar with this manual must not use the appliance.
In this manual, you will find everything there is to know about possible applications of your sewing computer. Should any questions remain unanswered, we kindly ask you to turn to your dealer.
We wish you much pleasure and great sewing successes!
Questions concerning machine, service and customer care
Toll-free
customer service number: 00800 333 00 777
service-uk@veritas-sewing.com
Service address: Veritas Service Center
c/o TekniHall GmbH
Breitefeld 15
DE-64839 Munster
GERMANY
service-ro@iveritas-sewing.com
Adresa de serviciu:
Veritas Service Center
c/o Teknihall GmbH
Breitefeld 15
DE-64839 Munster
GERMANIA
Important Safety Instructions
When using an electrical appliance, basic safety instructions should always be followed. Please read through this user manual thoroughly before using your sewing computer and keep these instructions for your reference.
DANGER - To reduce the risk of electrical shock:
- The sewing computer should never be left unattended when plugged in.
- Always unplug this appliance from the electric outlet immediately after using and before cleaning.
WARNING - To prevent burns, fire, electric shock or personal injury:
- Electrical appliances are no children's toys. Children must be supervised to prevent them from playing with the sewing computer. Increased caution is called for if the sewing computer is used by children or in the vicinity of children.
- This sewing computer must only be used as described in this manual. Accessories must only be used if they comply with the descriptions in this manual and the manufacturers recommendations, otherwise the appliance might be damaged.
- Never use the sewing computer if a cable or connector is damaged, not working properly or fault-free, after it being dropped or damaged or after it coming into contact with water. In every one of those cases, please bring the sewing computer to the nearest authorized specialty retailer or to the service centre to have it checked and repaired resp. to adjust electrical or mechanical parts.
-
Never use the sewing computer while the ventilation openings are blocked. Keep the ventilation openings of the appliance as well as the foot pedal free from fuzz, dust and cloth waste.
-
Keep your fingers away from all moving parts. Increased caution is called for in the vicinity of the sewing needle. Moving parts such as needle, presser foot lifter, etc. are especially dangerous for hands and fingers. The sewing area is to be watched constantly while the machine is in use. Adjustments on the machine, f.e. changing of the needle, threading, inserting the bobbin or changing the foot are only to be made while the machine is switched off (Main switch set to "O").
- Always disconnect the sewing computer from the power when maintenance is performed according to the manual, f.e. when the cover is removed, the appliance is oiled resp. cleaned or if the light bulb is changed. This means pulling the power plug. Also pull the power plug when the appliance is moved or out of use.
- To switch off, set the main switch to "0" and pull the plug. Always pull the plug from the socket when leaving the machine unsupervised to prevent injuries caused by accidental activation.
- Do not pull on the cord to disconnect the plug from the socket. Always use the plug itself, not the cord, to disconnect.
- The power cord must not be left to hang over corners or edges or be squashed (Risk of electric shock!). Place the cord in such a way that nobody can trip over it.
- Always use a correct needle plate cover that has been included with this sewing computer. Using the wrong needle plate cover can cause the needle to break.
- Do not use any crooked or broken needles.
- Always use the appliance on a dry, stable and level worktop. Keep it clear from hot surfaces and open flame.
Important Safety Instructions
- Neither tug nor rip on the cloth while sewing - that might overly bend the needle, causing it to break.
- Do not place or drop any items in the openings of the sewing computer.
- Do not use the sewing computer outdoors.
- Do not use the sewing computer in rooms in which propellants (f.e. sprays) or oxygen are used.
- Under normal operating conditions, the sound pressure/ noise level is 75 dB(A).
- Switch the sewing computer off or pull the plug if the sewing computer does not function properly.
- Never place anything on the foot pedal!
- This appliance is not intended to be used by persons (incl. children) with limited physical, sensorial or mental capabilities or persons lacking experience or skill unless they are supervised or precisely instructed on the safe usage of the appliance and the resulting risks by a person responsible for their safety.
- Children have to be supervised to prevent them from playing with the appliance.
- Never use the appliance in a wet state or environment.
- Never submerge the appliance in water or other liquids (Risk of electric shock!).
- Only connect the appliance to alternating currents (100-240 V).
-
We recommend using a ground fault circuit interruptor with the appliance.
-
Your sewing computer is equipped with a LED light. If the LED light is damaged, it has to be replaced by the manufacturer or its customer service to prevent danger.
- The sewing machine must only be used with the foot control type C-8000.
- If the connection cable connected to the foot pedal is damaged, it has to be replaced by the manufacturer and its customer service or a similarly qualified person to prevent danger.
- Keep this manual in a suitable space near the appliance. When giving the appliance to a third party, please pass this manual on.
KEEP SAFETY NOTES IN A SAFE PLACE.
This sewing computer is only designed for domestic use.
Correct Use
Danger! Electric shock due to humidity
- The sewing machine must only be stored and used in dry rooms.
- Humidity and dampness may cause an electric shock.
Danger! Eye injuries due to a broken needle
- Only soft, flexible textiles may be sewn.
The machine is not designed for sewing materials such as thick, hard or inflexible leather, tarpaulins, canvas, etc.; the needle may break. - The needle can break if the material is not transported by the motor and is instead pushed or held back by the user.
Danger! Needle-prick injuries if operated accidentally
- The machine may only be used by careful adults.
- Children from 8 years and persons with restricted abilities may only use the machine after thorough instruction and under constant supervision. They must have understood dangers with regard of the use of the machine.
- Children from 8 years and persons with restricted abilities may only do the maintenance and cleaning of the machine after thorough instruction and under constant supervision.
- Never leave an operational machine in areas to which children have access. It must be avoided that children play with the machine.
- The main switch must be turned off or power plug must be disconnected for all preparation or configuration tasks.
Danger! Risk of injury due to defects or modifications.
- The machine must not be modified.
- Repars must be carried out by the technical service.
Damage, modifications, or the use of non-original accessories can lead to injuries.
- Defective machines must no longer be used.
- Defective power cords must be replaced by original spare part.
Correct Use
Danger! Unsuitable installation sites (workplaces) can result in accidents.
- The machine must only be operated on a stable surface.
- Shaky, unstable or untidy workplaces can cause the machine to fall down or cause needle-prick injuries.
Danger! Persons without knowledge of these operating instructions may injure themselves or damage the sewing machine.
- Only use this sewing machine if you have a basic knowledge of how to use sewing machines.
Danger! Needle-prick injuries may occur if you do not pay attention.
- Take time, ensure the workplace is tidy and guide the material calmly through the machine without using force.
Caution! This machine is designed for use in a private home. The machine is not approved for professional or commercial use.
Instruţiuni importante de siguranta
Points patchwork. 109
Points de feston 111
Broderie de festons arrondis 111
Important safety instructions. 12
Principal parts of the machine 25
Machine control buttons 27
Stitch overview 29
Accessories 31
Before first use 33
Connecting the machine to the power source 35
Attaching the presser foot. 37
Winding the bobbin 39
Inserting the bobbin 43
Threading the upper thread 45
Using the needle threader 49
Drawing up the lower thread. 51
Adjustments 53
Cutting the thread. 53 Two-step pressor foot lifter.. 53
Starting sewing 55
Foot control. 55
Thread tension. 57
Presser foot chart 60
Matching needle/fabric/ thread 63
Replacing the needle. 65
Raise or lower the feed dogs 65
Operation buttons. 67
Reverse/ Auto-lock button 67
Mode selection/Sound button.. 67
Stitch length adjustment buttons 69
Stitch width adjustment button 69
Sewing tips 71
Sewing corners 71
Reverse. 71
Free arm 71
Sewing on heavy fabrics 73
Changing the needle position 75
Changing the stitch lenght. 75
Zigzag stitches 77
Stretch stiches. 79
Overcasting Stitches 81
Blind hems. 85
Button sewing. 87
Buttonhole sewing 89
Making cordes buttonholes 95
Bar tack stitch 97
Zipper insertion 99
Inserting a lapped zipper 101
Satin stitch sewing 103
Smacking 105
Fagoting 107
Decorative topstitching. 109
Scallop stitch 111
Scallop edging 111
Warning beeping sound 113
Maintenance. 115
Cleaning the hook 115
Trouble shooting guide 118
Disposal 120
Cuprins
Instrueti uni importante privind siguranta 16
Partle componente principale ale masinii. 25
Butoanele de comanda ale masinii 27
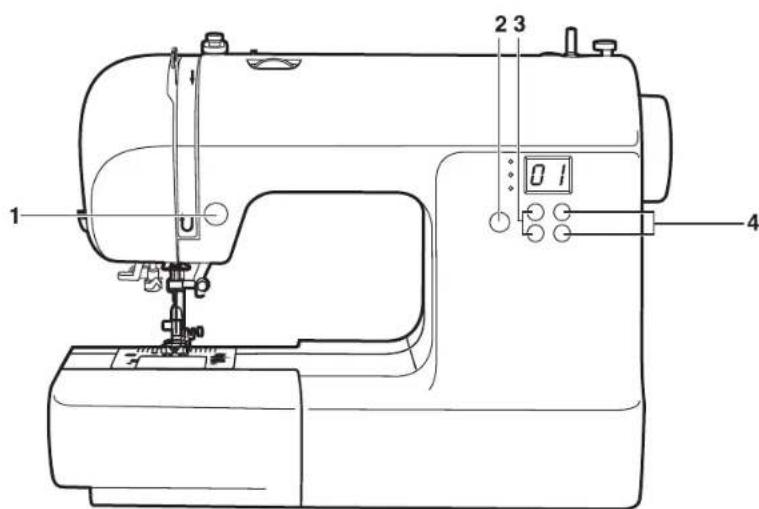
Principal Parts of the Machine
Detaliile Maşinii
Principal Parts of the Machine
1 Tension dial
2 Reverse/ Auto-lock button
3 Thread cutter
4 Buttonhole lever
5 Auto needle threads
6 Needle plate cover
7 Sewing table and accessory box
8 Bobbin winder spindle
9 Number display
10Stitch width adjustment buttons
11 Stitch length adjustment buttons
12 Mode selection / Sound button
13 Horizontal spool pin
14 Bobbin winder stopper
15 Hole for auxiliary spool pin
16 Handwheel
17 Main power switch
18 Power cord socket
19 Foot controller connector
20 Bobbin thread guide
21 Upper thread guide
22 Handle
23 Presser foot lifter
24 Drop feed lever
Detaliile Masinli
1 Tensiune fir
2 Buton Inversare/Buton Auto-lock
3 Täiere atà
4 Parghie pentru butoniere
5 Dispositiv automat pentru introducerea a tei in ac
6 Capac placac
7 Masa de cusut s cutie accesorii
8 Ax bobinator
9 Afisaj numeric
10 Butoane de reglare a latimii cusaturii
11 Butoane de reglare a lungimii cusaturii
12 Selectarea modului/butonul de reglare a sunetului
13 Ax orizontaI mosor
14 Dispositiv oprine bobinator
15 Suport pentru al doilea papiotă
16 Roata de mana
17 Buton de pornography
18 Prizá cablu de alimentare
19 Conector dispositiv comanda de pictor
20 Ghidaj fir bobina
21 Ghidaj fir superior
22 Maner
23 Dispositiv de ridicare a piciorusului presor
24 Parghie alimentare
Funktionstaten
1 Reverse button / Auto-lock button Hold down this button to sew stitches in reverse or sew reinforcement stitches at a low speed. When the patterns 01-05 are selected, the machine will sew reverse stitch at a low speed if the reverse button is pressed. The machine will sew forward after the button is released. When the patterns 06-19, 29-99 are selected, the machine will immediately sew 3 locking stitches when the reverse button is pressed, then automatically stop.
2 Mode selection button for stitch/ pattern selection Pressing this button toggles between stitch pattern selection, stitch length, and stitch modes. Stitch width. The display changes from the stitch number to the preset stitch width u.-length. If you press and hold this button for more than 2 seconds, you will turn the confirmation beep off or on again.
3 Stitch length adjustment buttons Press this button to adjust the pre-programmed length of the stitch.
4Stitch width adjustment buttons Press this button to adjust the width of the stitch.
1 Butonul invers / Buton de autoblocare
Tinei apasat acest buton penrua coase invers sau penetrate u coase cusaturile intaritoare la viteza redus. Atunci cand sunt selecate tiparele 01 - 05, masina va efectua o cusatura inversa la viteza redus, daca este apasat butonul de coasse inversa. Masina va coase in directia inante dupa eliberarea butonului. Atunci cand sunt selecate tiparele 06-19.29-99, masina va efectua imediat 3 cusaturi in punctele de suveica, daca este apasat butonul de coasse inversa, apo se va opri automat.
2 Buton de selectare a modului pentru alegerea cusaturii/tiparului Prin apasarea acestui buton puteti schimba intre selecTre tipar cusatura, lungime si latime cusatura. Simbolorule de pe afisaj se chimbba de la numarul de tipar cusatura, la lungimea sau latimea prestabilita a cusaturiPrin apasarea acestui buton pensu ma mult de doua secunde, puteti porn /opr soneria.
3 Butoanele de reglare a lungimiu cusaturii Apasati acest buton pertreu a regla lungimea programata in prealabil a cusaturii.
4 Butoane de reglare a latimii cusaturii Apasati acest buton pertreu a regla lungimea programata in prealabil a cusaturii.
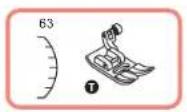
15 Pied overlock
16 Pied ourlet K
17 Pied pour cordonnet
18 Pied quilting P
19 Pied reprise
20 Pied a frones
21 Pied double transport
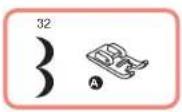
Accessories standard
1 All purpose foot 1
2 Zipper foot ①
3 Buttonhole foot D
4 Blind hem foot ①
5 Satin stitch foot A
6 Button sewing foot
7 Bobbin (3x)
8 Spool holder (large)
9 Spool holder (small)
10 Spool pin felt
11 Auxiliary spool pin
12 L-Screwdriver
13 Brush/Seam ripper
14 Pack of needles
Optional
15 Overcasting foot ③
16 Rolled hem foot
17 Cording foot 18
18 Quilting foot P
19 Darning / Embroidery foot
20 Gathering foot
21 Walking foot
Set standard
Please note that improper handling of electrical currents can be lethal. Therefore, please read the safety measures on page 12 and the following safety precautions:
Make sure that children do not get the opportunity to play with the sewing machine!
The moving needle is a safety hazard, do not touch!
- Manipulations in the movement area of the needle, the foot and the needle plate cover must only be performed while the machine is switched off (set power switch to "O").
Only remove and replace the thread spool while the appliance is switched off (set power switch to "0").
- Especially the correct inserting of the bobbin and the bobbin thread as well as threading the upper thread are crucial for smooth sewing. Please pay special attention to this and proceed step-by-step, as described.
Making the appliance operational
The accessory box can be found in the extension table. You can pull the extension table off to the left. In it, you can find the clip for the stitch pattern plate. Push the clip into the appliance handle sideways and push the plate into the slot of the clip.
Inaintea primelutilizari
CAUTION: Always make sure that the machine is unplugged from power source and the main switch is on. 0 when the machine is not in use and before inserting or removing parts (f.e. changing the needle).
Connecting the machine to the power source
Before connecting the power supply, make sure that the voltage and frequency shown on the machine is conforming with your electrical power.
- Place machine on a stable surface.
- Connect the foot control into the connector.
- Connect the power line cord to the machine by inserting the 2-hole plug into the power cord socket.
- Connect the power line plug to the electric outlet.
- Turn on the power switch to " - " position (ON).
- The sewing lamp will light up when the switch is turned on.
To disconnect, turn the power switch to the off position "O", then remove plug from outlet.

ATENTIE: Intotdeauna asiguratj-vacaparatul estedeconectat de la sursa de alimentare si comutatorul principal estpe "O"atunci cand aparatul nu estinuzsi inante de a introduc sucoate piese.
Conectarea masinii la sursa de alimentare cu energia
Inainite de a connecta la sursa de alimentare, asigurati-va ca tensiunea si frecventa afisate pe placuata this conform cu puterea de alimentare.
ATTENTION: Turn power switch to off (O^ ) position when changing the presser foot.
Attaching / changing the presser foot
Attaching the presser foot holder
- Raise the presser foot bar (a) by raising the presser foot ladder.
- Attach the presser foot holder (b) as illustrated.
Attaching the presser foot
- Lower the presser foot holder (b) until the cut-out (c) is directly above the pin.
- Raise the lever (d).
- Lower the presser foot holder (b) and the presser foot (f) will engage automatically.
Removing the presser foot
- Raise the presser foot. Raise the lever (e) and the foot will disengage.
4 Attaching the edge / guilting guide
- The edge / quilting guide (g) can be attached as illustrated. Adjust as needed for hems, pleats, quilting, etc.

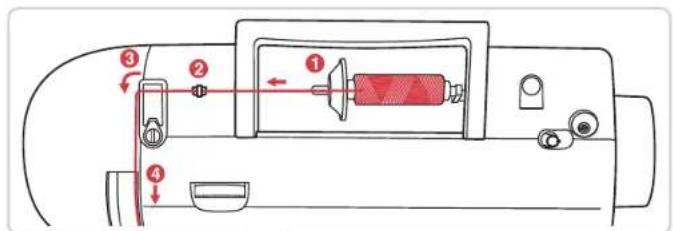
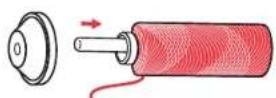
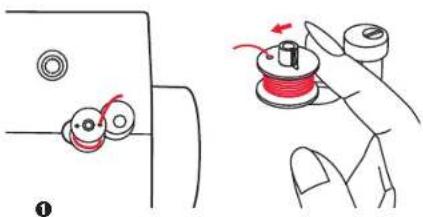
1 Place the thread and spool holder onto the spool pin. For larger spools of thread, place the large side of the spool holder toward the spool. For smaller spools of thread, place the small side of the spool holder toward the spool, or use the small spool holder. If the thread spool has a thread retaining slit, place this end of the spool toward the right, so the thread doesn't get caught while winding the bobbin.
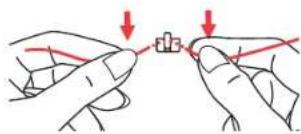
Snap the thread into the thread guide.
Wind the thread counter-clockwise around the bobbin.
winder tension disk (bobbin thread guide).
Place the thread end through one of the inner holes in the bobbin as illustrated and place empty bobbin on the spindle.
Push the bobbin to right.
Infasurarea bobinei
6 When the bobbin winder shaft is pushed to the right, the number display will show "SP".
Hold the thread tail securely in one hand.
Press on the foot control to start winding the bobbin.
After the bobbin has wound a few turns stop the machine and cut the thread near the hole of the bobbin. Continue filling the bobbin until it is full. The motor stops automatically when the bobbin is full. Release the foot control. Push the bobbin winder spindle to left.
Cut the thread and then remove the bobbin.
NOTE: When the bobbin winder switch is placed on the right, "bobbin winding position", the machine will not sew and the handwheel will not turn. To start sewing, push the bobbin winder switch to the left, "sewing position".
Infasurarea bobinei
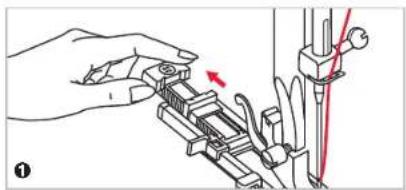
When inserting or removing the bobbin, the needle must be fully raised. Raise also the presser foot. Then turn off the machine.

ATTENTION:
Turn power switch to off (0^ ) before inserting or removing the bobbin.
Disengage the lever by pressing the lever to the right (arrow) and remove the transparent cover plate above the bobbin.
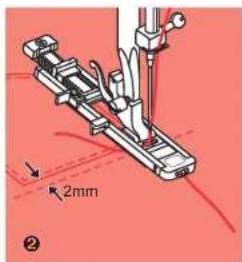
Insert the bobbin in the bobbin case with the thread running in a counter clockwise direction (arrow).
Pull the thread through the slit (A).
With a finger held gently on top of the bobbin. Draw the thread at the arrow markings into the stitch plate thread guide from (A) to (B).
Pull the thread at the arrow markings into the stitch plate thread guide from (B) to (C). To cut off excess thread pull thread back over the cutting off blade at point (C).
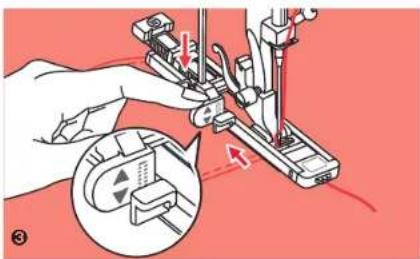
6 Close the bobbin cover plate. First insert cover plate on the left side, then press down right till it engages.
Introducerea bobinei
Atunci cand introduci ci cand scoateti bobina, acul trebuie sã fiere ridicat compleit, asadar apasati butonul "Ridicare/coborare ac". Ridicati si piciorusul presor. Apoi deconetata masina.

Deactivati parghia, apasand-o spre dreapta (sageata) sicoatei placac de acoperire transparenta deeaupara bobinei.
Introduciobina in caseta bobinei, trecand firul in sens antiorar (sageata).
3 Trageti firul prin sant (A).
Tineti un deget usoar apasat pe parteo superioara a bobine. Trageti firul de la marcajele cu sageata in ghidajul firului piacil de coasere de la (A) la (B).
Trageti firul de la marcajele de sageata pe placadec ac de la (B) la (C).Pentru a reduce excessul de fir trageti firul inapoi peste lama de taiere la punctul (C).
6 Inchidi placacde acoperire a bobinei.Mai intai introduceti placacde acoperire pe partea stangapoi apasati in jos panacand se activeaz.
Oberfaden

0
2
Oberfaden einfädeln
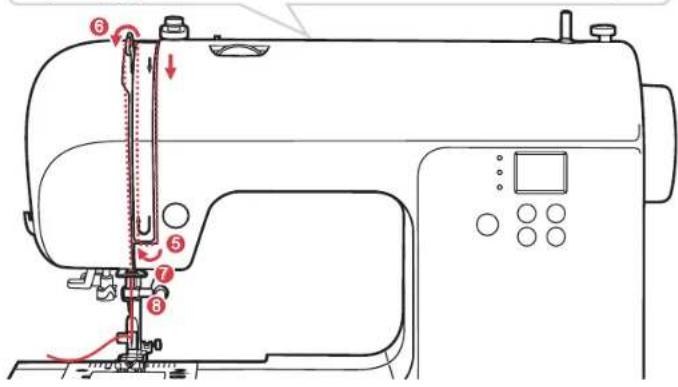
Threading the upper thread
NOTE: Threading the upper thread is very easy. It is important to carry out the threading correctly as by not doing so several sewing problems could result.
First turn on the machine with the power switch (position "-"). Start by raising the needle to its highest point by turning the hand wheel, and also raise the presser foot with the lever to release the tension discs. Then turn off the machine ("O" position) while threading for safety reasons.
Lift up the spool pin. Place the spool of thread on the spool pin so that the thread comes from the front of the spool, then place the spool cap at the end of the spool pin.
Draw the thread from the spool through the upper thread guide.
Threading the upper thread
Guide the thread around the thread guide pulling the thread through the pre-tension spring as illustrated.
Guide the thread into the right slot and pass it downwards.
Then, down and around the check spring holder and up again.
At the top of this movement, pass the thread from right to the left through the slotted eye of the take-up lever and then downwards again.
Pass the thread behind the flat, horizontal thread guide.
Pull the end of the thread through the needle from front to rear, and pull out about 10~cm of thread.
Use the needle threads to thread the needle. (On the next page).
IMPORTANT: The needle was raised before to its highest position by turning the handwheel. Lower the presser foot.
Using the needle threads
Lower the needle threader lever slowly and draw the thread through the thread guide as illustrated and then to the right.
The needle threader automatically turns to the threading position and the hook pin passes through the needle eye.
Take the thread in front of the needle.
Hold the thread loosely and release the lever slowly. The hook will turn and pass the thread through the needle eye forming a loop.
Pull the thread through the needle eye.
NOTES:
The needle threads does not function:
with crooked or faulty needles (see page 65)
- if the needle is not in its highest position, as the hook will not fit through the needle eye otherwise.
with double needles (not included)

ATENTIE: Rotiti intrerupatorul in positia oprit (^ 0^ )
Drawing up the lower thread
Hold the upper thread with the left hand. Turn the handwheel towards you (counterclockwise) lowering, then raising the needle.
Gently pull on the upper thread to bring the bobbin thread up through the needle plate hole. The bobbin thread will come up in a loop.
Pull both threads to the back under the presser foot.
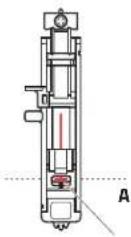
Threading control for bobbin thread
If the bobbin thread is correctly threaded, it is lead over the bobbin at a slight angle (1.).
Very important: If the thread is not visible at this point, heavy disturbances occur during sewing (thread tension completely wrong, "thread nests" on the bottom etc.). The bobbin and the bobbin thread have to be rethreaded (see page 45).
Tragerea firului inferior in sus
Raise the presser foot. Remove the fabric, draw the threads to the left side of the face cover and cut using the thread cutter. The threads are cut at the proper length to start the next seam.
Two-step pressor foot lifter
The presser foot lifter raises and lowers the presser foot.
When sewing several layers or thick fabrics, the presser foot can be raised a second stage for easy positioning of the work.
Talerea atel
With the sewing machine turned off, insert the foot control plug into its connector on the sewing machine.
The speed limiting adjustment lever can control the sewing speed.
To increase the sewing speed, slide the lever to the right. To decrease the sewing speed, slide the lever to the left.

ATTENTION: Consult a qualified electrician if in doubt as how to connect the machine to the power source. Unplug the power cord when the machine is not in use.
Inceperea coaserii
Pedală
Basic thread tension setting is 4^
- To increase the tension, turn the dial to the next number up.
To decrease the tension, turn the dial to the next number down. Proper setting of tension is important for good sewing.
There is no single tension setting appropriate for all the stitch functions and fabrics.
However, 90% of all sewing will be between the 3^ and 5^ (4^ is the basic setting).
- For decorative sewing you will always obtain a nicer stitch and less fabric puckering when the upper thread appears on the bottom side of your fabric.
Normal thread tension for straight stitch sewing.
Thread tension is too loose for straight stitch sewing. Turn dial to higher number.
Thread tension is too tight for straight stitch sewing. Tum dial to lower number.
4 Normal thread tension for zig zag and decorative sewing.
a) Surface
b) Reverse side
c) Upper thread
d) Bobbin thread
Tensiunea firului
The twin needle can be used for some stitches, offering more stitching options. For more information, go to the section "Using the twin needle".
| All purpose foot (T) | General sewing, Patchwork stitches, Decorative stitching, Smocking, Fagoting, etc. | Satin stitch foot (A) | Satin stitch sewing | ||
| Zipper foot (I) | Inserting zippers | ||||
| Buttonhole foot (D) | Buttonhole sewing, Darning-stitch sewing | Blind hem foot (F) | Blind hem stitching | ||
| Button sewing foot (H) | Button sewing |
Needle, fabric, thread selection guide
| 9-11 (70-80) | Lightweight fabrics: thin cottons, voile, silk, muslin, interlocks, cotton knits, tricot,jerseys, crepes, woven polyester, shirt & blouse fabrics. | Light-duty thread in cotton, nylon, polyester or cotton wrapped polyester. |
| 11-14 (80-90) Medium weight fabrics: cotton, satin, sailcloth, double knits, lightweight woolen. | Most threads sold are medium size and suitable for these fabrics and needle sizes.Use polyester threads on synthetic materials.Use cotton threads on natural woven fabrics.Always use the same thread on top and bottom. | |
| 14 (90) Medium weight fabrics: cotton duck, woolen, heavier knits, terrycloth, denims. | ||
| 16 (100) Heavyweight fabrics: canvas, woolens, outdoor tent and quilted fabrics, denims, upholstery material (light to medium). | ||
| 18 (110) Heavy woolens, overcoat fabrics, upholstery fabrics, some leathers and vinyls. | Heavy duty thread. |
NOTES:
In general, fine threads and needles are used for sewing fine fabrics, and thicker threads are used for sewing heavy fabrics.
- Always test thread and needle size on a small piece of fabric which will be used for actual sewing.
- Use the same thread for needle and bobbin.
Replacing the Needle / Feed Dogs
Replacing the needle

ATTENTION: Turn power switch of off (O^ ) position when carrying out any of the operations shown below.
Change the needle regularly, especially if it is showing signs of wear and causing problems.
Insert the needle following the illustrated instructions.
A Loosen the needle clamp screw.
B The flat side of the shaft should be towards the back. Insert the needle as far up as it will go.
Tighten again the needle clamp screw after inserting the new needle.
Needles must be in perfect condition.
Problems can occur with:
1 Bent needles
2 Blunt needles
3 Damaged points
Raise or lower the feed dogs

Sliding the lever to the b) will lower the feed dog, for example during button sewing. If you wish to continue sewing normally, slide the lever to a in order to raise the feed dogs.
Make a complete turn (one full revolution of the handwheel) to raise the feed dogs. The feed dogs will not raise up if you do not turn the handwheel, even if the lever is slid to the right.
Schimbarea acului

ATENTIE: Rotiti comutatorul POWER la off ('0'), la efectuarea operatjuni di mai jos!
Schimbai acul in mod regulat, mai ales in cazul in care prezinta semne de uzura si cauzeaza probleme. Introduci acul urmand instruunile ilustrate.
A Slabiti surubul clementeientru ac.
B Partea plana a arborelui trebuie sa fie indreptata spre partea anteroiara. Introduci acul in sus, pan in poziia maxima.
The most important functions at a glance
A Reverse/ Auto-lock button
B Mode selection/Sound button
C Stitch length adjustment buttons
D Stitch width adjustment buttons
Reverse/ Auto-lock button (A)
When the patterns 01-05 are selected, the machine will sew reverse stitch at a low speed if the reverse button is pressed. The machine will sew forward after the button is released.
When the patterns 06-19, 29-99 are selected, the machine will immediately sew 3 locking stitches when the reverse button is pressed, then automatically stop.
Mode selection/Sound button (B)
The LED light will be set at pattern mode "***" when the machine is turned on. The light will run by the sequence of pattern, stitch width, and stitch length mode.
** Utility and decorative pattern mode
There are 100 patterns for selection 00-99, stitch selection using the stitch width and length adjustment buttons.
~Stitch width mode
Adjust the width of the stitch using the stitch width adjustment buttons.
----Stitch length mode
Adjust the length of the stitch using the stitch length adjustment buttons.
Sound button
Default value for the buzzer is on.
To turn it off, press the sound button for two seconds until a short beep sound is delivered.
To turn it on again, press the button for two seconds until two short beep sounds are heard.
The most important functions at a glance
Stitch length adjustment button (C)
When you select a stitch the machine will automatically set the recommended stitch length.
If the pre-set stitch length need adjusting once the pattern is selected, push mode button " ⑦ "to move to the stitch length position.
To shorten the stitch length, press the " - " button. For a longer stitch length, press the "+" button. The stitch length can be adjusted between "0.0-4.5". Certain stitches have a limited length.
When the setting is at the auto position, the number display will blink 3 times.
When mode button is set on pattern, press stitch length adjustment buttons " + " or " - " for tens place 0-9.
Stitch width adjustment button (D)
When you select a stitch the machine will automatically set the recommended stitch width.
If the pre-set stitch width need adjusting once the pattern is selected, push mode button " ④ " to move to the stitch width position.
For a narrower stitch, press the " - " button. For a wider stitch, press the "+" button. The stitch width can be adjusted between "0.0-7.0". Certain stitches have a limited stitch width.
When the setting is at the auto position, the number display will blink 3 times.
When mode button is set on pattern, press stitch width adjustment buttons " + " or " - " for ones place 0~9.
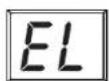
If the numbers are beyond the selections, the numbers in display will be flashing and voice warning. The machine can not start.
- Stop the sewing machine when you reach a corner.
- Lower the needle into the fabric manually by turning the handwheel.
- Raise the presser foot.
- Use the needle as a pivot and turn the fabric 90^ .
- Lower the presser foot and resume sewing.
Reverse
Reverse stitching is used to secure the threads at the beginning and at the end of a seam.
Press the reverse button and sew 4-5 stitches.
The machine will sew forward when the button is released.
Free arm
Free-arm sewing is convenient for sewing tubular areas such as pant hems and cuffs. You can remove the sewing table by pushing the table to the left.
Coaserea colturilor
- Opriti masina de cusut candid ajungetla un colt.
- Lower the needle into the fabric manually by turning the handwheel.
- Ridicati piciorusul.
- Folosiţ acul ca o axăși intoarecti materialul 90°.
- Coborati piciorusul si reluata coaserea.
Inversare
Sewing on heavy fabrics
The black button on the right side of the all purpose presser foot will lock the presser foot in a horizontal position if you push it in before lowering the presser foot.
This ensures even feeding at the beginning of a seam and helps when sewing multiple layers of fabric such as sewing over seams when hemming jeans.
When you reach the point of an increased thickness, lower the needle and raise the presser foot.
Press the toe of the foot to the horizontal line and push in the black button, then lower the foot and continue sewing.
The black button releases automatically after sewing few stitches.
You also can place another piece of fabric with the same thickness at the back of the seam. Or support the presser foot while feeding by hand and sewing toward the folded side.
Cardboard or thick fabric
Needle Position and Stitch Length
Changing the needle position and stitch length
Changing the needle position
These setting apply only to Direct Patterns 00-04. The pre-set position is 3.5^ center position. When you press the - of stitch width adjustment button, the needle position will be moved to the left. When you press the +^ of stitch width adjustment button, the needle position will be moved to the right.
Changing the stitch length
To shorten the stitch length, press the " - " of stitch length adjustment button. For a longer stitch length, press the "+" of stitch length adjustment button. Generally speaking, the thicker the fabric, thread and needle, the longer the stitch should be.
Adjusting the stitch width
The maximum stitch width for zigzag stitching is "7.0"; however, the width can be reduced for most patterns. The width increases or decreases as you press the "+" or "-" stitch width adjustment buttons from "0.0-7.0".
Adjusting the stitch length
The density of zigzag stitches increase as the setting of stitch length approaches "0.3".
Neat zigzag stitches are usually achieved at 1.0 - 2.5
Closed up zigzag stitches (close together) are referred to asa satin stitch.
Cusātura zigzag
Ajustarea latimii cusaturii
Stretch stitches are strong and flexible and will give with the fabric without breaking. Good for easy to ravel and knit fabrics.
It is good for joining durable fabric such as denims.
These stitches can also be used as a decorative top stitch.
A Stretch stiches
B Straight stitch
Straight stretch stitch is used to add triple reinforcement to stretch and hardwearing seams.
Triple zigzag stretch stitch is suitable for firm fabrics like denim, poplin, duck, etc.
Cusāṭuri stretch
Points overlock Overcasting Stitches Cusāturi Overcasting
Point de surjet
This is the same type stitch used by the garment industry in making sport swear - it forms and finishes the seam in one operation.
It is very effective for use in repairing raw or worn edges of garments.
Overedge stitch
This is the same type stitch used by the garment industry in making sport swear - it forms and finishes the seam in one operation.
It is very effective for use in repairing raw or worn edges of garments.
Point ric-rac
Ric-rac is primarily used for a decorative top-stitch. It is ideal for edging neck-bands, armholes, sleeves and hems. When manually adjusted to a very narrow width it also can be used for seaming in areas of great stress.
Picior de uz universal
Ric-rac is primarily used for a decorative top-stitch. It is ideal for edging neck-bands, armholes, sleeves and hems. When manually adjusted to a very narrow width it also can be used for seaming in areas of great stress.
Kantenumnahstiche

Stretch-Overlockstich
Points overlock Overcasting Stitches Cusāturi Overcasting
Slant overedge stitch
Seams and overcasts in one operation to produce a narrow, supple seam, particularly suited to swimwear, sportswear, T-shirts, babywear in stretch nylon, stretch towelling, jersey and cotton jersey.
NOTE: It takes practice to sew blind hems. Always make a sewing test first.
Fold the fabric as illustrated with the wrong side uppermost.
Place the fabric under the foot. Turn the handwheel counter-clockwise by hand until the needle swings fully to the left. It should just pierce the fold of the fabric. If it does not, adjust the stitch width accordingly.
Adjust the guide (b) by turning the knob (a) so that the guide just rests against the fold.
Sew slowly, guiding the fabric carefully along the edge of the guide.
Turn over the fabric.
A Reverse side
B Overcasting stitches
Tiv ascuns
1 Move the drop feed lever to over the feed dogs.
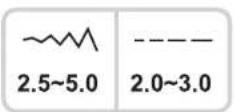
Position the work under the foot. Place the button in the desired position, lower the foot.
Adjust the stitch width to "2.5-4.5" according to the distance between the two holes of the button.
Turn the handwheel to check that the needle goes cleanly into the left and right holes of the button.
The machine sews two stitches into each hole and afterwards 3 reinforcement stitches. If a shank is required, place a darning needle on top of the button and sew.
For buttons with 4 holes, sew through the front two holes first, push work forward and then sew through the back two holes.
Coaserea nasturelor
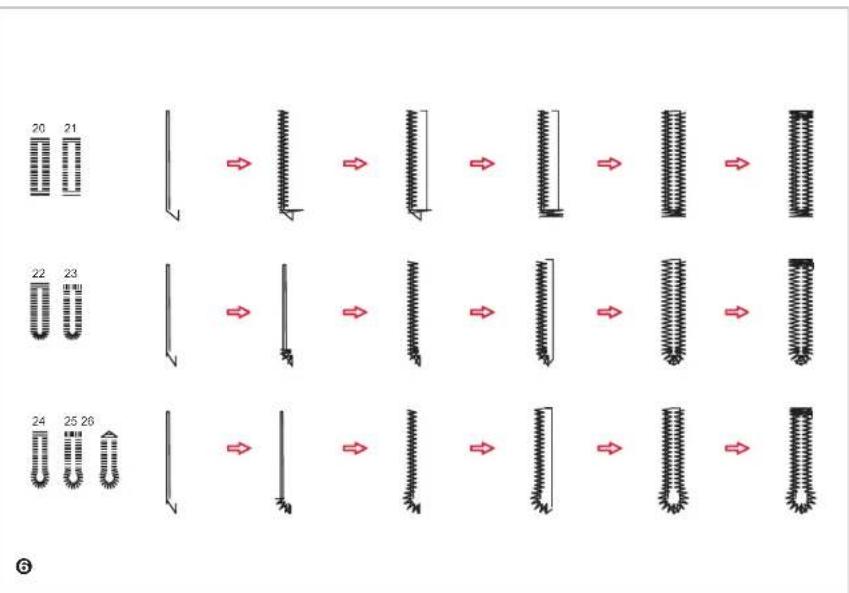
20 For thin or medium fabric
21 For thin or medium fabric
22 For horizontal hole on blouses or shirts made from thin or medium fabric
23 For horizontal buttonholes on thick fabrics
24 For suits or overcoats
25 For thick coats
26 For jeans or trousers
NOTE: Before sewing a buttonhole on your project, practice on a scrap piece of the same type of fabric.
Mark the positions of the buttonhole on the fabric. The maximum buttonhole length is 3cm (1 3/16"). (Total of diameter + thickness of button.)
Attach the buttonhole foot, then pull out the button holder plate and insert the button.
The size of the buttonhole is determined by the button inserted in the button plate.
The thread should be passed through the hole in the presser foot, then be placed under the foot.
Cusātura butoniera
Select the buttonhole stitch. Adjust the stitch width and the stitch length to the desired width and density. Position the fabric under the presser foot so that the centerline's mark is aligning with the center of the buttonhole foot. Lower the presser foot.
Lower the buttonhole lever, making sure it is positioned behind the bracket on the buttonhole foot, as illustrated.
Lightly hold the end of the upper thread and start sewing.
NOTE: Gently feed the fabric by hand. Before stopping, the machine will automatically sew a reinforcement stitch after the buttonhole is sewn.
Cusātura butoniera
Selectati cusatura butonierei. Reglati latimea cusaturii si lungimea pasulii la latimea dorita si densitatea. Pozitionati materialul sub piciorus, astfel incat linia centrala marcatata sa se alinieze cu central piciorusluii butonierei.
Coborati maneta butonierei, asigurandu-va ceste posizionat in spatele consolei de pe piciorusul pentru cusut butoniere, conform imaginii.
In timpe tinei usor capatul firului superior incepeti sa coaseti.
RUGAM NOTATI: Alimentati uor materialul cu mana. Inainte de a intrerupe, masina va coase in mod automat o cusatura de intarire dupa ce butonieria este cusut.
Knopflöcher nahlen
Knopflöcher nahlen
Buttonholes are sewn from the front of the presser foot to the back, as shown.
Cut the center of the buttonhole with the seam ripper being careful not to cut any stitches on either side. Use a pin as a stopper at the bar tack so you do not cut too much.
Cusātura butoniera
Making corded buttonholes
When sewing corded buttonholes, hook a heavy thread or cord under the buttonhole foot.
Attach the buttonhole foot and hook the gimp thread onto the back of the presser foot. Bring the two gimp thread ends to the front of the foot and insert them into the grooves, then temporarily tie them there. Lower the presser foot and start sewing.
Set the stitch width to match the diameter of the gimp thread.
Once sewing is completed, pull the gimp thread gently to remove any slack, then trim off any excess.
NOTE: It is suggested that you use interfacing on the backside of the fabric.
Butoniera pe materiale elastice
Cand faceti butoniera pe un material elastic prindei atagroasa sau snurul sub piciorusul de butoniera.
Atasati piciorusul pentru butoniera si agatai snurui pe partea din spate a piciorusului. Adunati celce doua capete de fir la parte din fata a piciorusului si introduceti-le in caneluri, apoil legati-le temporar acolo. Coborati piciorusul si incepetsi sa coaseti.
Seta i latimea cusaturi pursuant a se potriviametul firlui.
Odata ce ati terminat de cusut, trageti de snur incet, si apoitaiatiI penta a indeparta excesul de snur.
RUGAM NOTATI: Este sugerat sautilizati interfatape partea din spate a tesaturii.
Riegelstich
Riegelstich
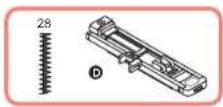
Select pattern 28 to get the bar tack stitch. Change the presser foot to the buttonhole foot.
Pull the button holder to the rear. Set the button guide plate on the buttonhole foot to the desired length.
Position the fabric so that the needle is 2mm (1 / 16^ ) in front of where you want the sewing to start, and then lower the presser foot.
A Starting point
Pass the upper thread down through the hole in the presser foot. Pull down the buttthole lever. The buttonhole lever is positioned behind the bracket on the buttthole foot. Gently hold the end of the upper thread in your left hand, and then start sewing.
4 Bar tack stitches are sewn.
As an example, the illustration shows the procedure for sewing bar tacks at pocket corners.
Cusatura in zig-zag
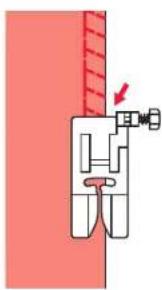
ATTENTION: Zipper foot should be used with machine set for straight stitch only. Care should be given when choosing needle position (choose 3.5, the center position) as the needle could hit the presser foot and break when sewing with an altered needle position or with any other pattern.
Baste the zipper opening on the garment.
Press open the seam allowance. Place the zipper face down on the seam allowance with the teeth against the seam line. Baste the zipper tape in place.
Attach the zipper foot. Attach the right side of the presser foot pin to the holder when sewing the left side of the zipper.
Attach the left side of the presser foot pin to the presser foot holder when sewing the right side of the zipper.
Stitch the left side of the zipper from the bottom of the zipper to the top.
6 Stitch across the lower end and right side of zipper. Remove the basting and press.
Aplicare fermoar

Inserting a lapped zipper
Baste the zipper opening on the garment.
Fold back to the left seam allowance. Turn under the right seam allowance to form 3 mm (1/8 inch) fold.
Attach the zipper foot. Attach the right side of the presser foot pin to the holder when sewing the left side of the zipper. Attach the left side of the presser foot pin to the presser foot holder when sewing the right side of the zipper.
4 Stitch the left side of zipper from bottom to top.
Turn the fabric right side out, stitch across the lower end and right side of zipper.
Stop about 5cm (2 inches) from the top of zipper. Remove the basting and open the zipper. Stitch the remainder of the seam.
Introducerea unui fermoar lateral
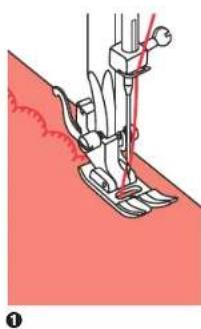
Broderies (point passé) Satin Stitch Sewing Cusătura satin
Use the satin stitch foot for satin stitching and sewing decorative stitches. This foot has a groove on the underside which allows dense stitching to pass freely underneath.
To change the satin or decorative stitch pattern, you may adjust the length and width of the pattern by pressing the stitch length and width adjustment buttons. Experiment by sewing on fabric scraps first, until you achieve the desired length and width.
NOTE: When sewing very light weight fabrics, it is recommended that you use interfacing or stabilizer on the backside of the fabric.
Cusaturasatin
Use the all purpose foot to sew straight lines 1 cm (3 / 8^ ) apart, across the area. It may be helpful to reduce the needle thread tension slightly, so that the bobbin thread may be drawn later to gather the fabric.
Knot the threads along one edge. Pull the bobbin threads and distribute the gathers evenly. Secure the threads at the other end.
Reduce the tension, if necessary and sew decorative pattern stitches between the straight seams.
Pull out the gathering stitches.
Smocking
1 Separate the folded edges of the fabric pieces with a gap of 4mm (1/8 inch) and baste them onto a piece of thin paper or water-soluble stabilizer sheet.
Align the center of the presser foot with the center of the two pieces of fabric and begin sewing.
After sewing, remove the stabilizer andasting stitches.
A Thin Paper
B Basting
Fagoting
Points patchwork Decorative Topstitching Cusătura Patchwork
Points patchwork
Decorative Topstitching
Place the two fabrics, right sides together, and sew using a straight stitch.
Open the seam allowance and press it flat.
Working on the right side of the fabric, place the center of the presser foot on the seam line of the joined fabrics and stitch over the seam.
Cusătura Patchwork
Asezati cele doua bucati de material cu partea dreapta impreunasi coaseti cu cusaturadreapt.
Deschideti cusatura si apasa sā fié platá.
Asezati centrul picioruslui pe linia de cusatura a pieselor unite de material si coaseti pe cusatura.
Muschelstiche
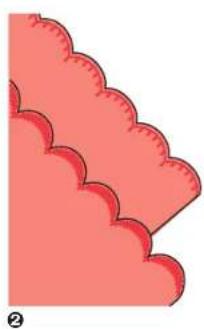
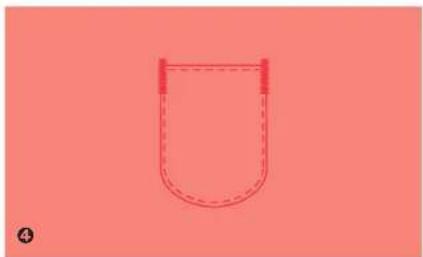
Sew on hem line.
Trim the fabric close to the stitching taking care not to cut the thread.
Festonarea marginli
Coaseti pe linia manseiei.
Aranjati cu grijà tesaturaaproape de cusatura,pentru a nu táia firul.
Warnfunktionen

2
Piepton generell:
Warning beeping sound:
- When operating correctly: 1 beep
- When operating incorrectly: 3-short beeps
- When the sewing machine is in trouble and can't sew 3-short beeps
It means that the thread is twisted or jammed and the hand wheel axle can't move. Please refer to the "Trouble shooting guide" on page 118 for solutions. After the problem has been solved, the machine will continue to sew.
Return bobbin winder shaft to left (3 beeps)
If the bobbin winder shaft is positioned to the right (engaged) and any button is pressed a 3-beep warning will be sounded.
Move bobbin winder shaft to the left (disengaged) to allow the buttons to be operational.
The sewing machine is in trouble
The animation message means that the thread is twisted or jammed and the hand wheel axle cannot move. Please look through the "Trouble shooting guide" on page 118 to find the solution. After the problem has been solved, the machine will continue to sew.
NOTE: If the problem is not resolved, please contact your local dealer.

ATTENTION: If the thread gets jammed inside the hook during sewing, stopping the needle from moving, the security switch will stop the machine completely. In order to restart the sewing machine, you will have to turn the on/off switch to the (n0^n) position and then ON (n-") again.
Sunet de avertizare:
- Atunci cand operati corect: 1 sunet
- Atunci cand operati incorcet: 3 sunete scurte
- Atunci candi masina de cusut are probleme si nu poate coase; 3 sunete scurte
Lint and bits of thread may accumulate in the hook and will interfere with the smooth operation of the machine. Check regularly and clean the stitching mechanism when necessary.

ATTENTION: Disconnect the machine from the wall outlet before carrying out any maintenance.
Remove the bobbin cover plate and bobbin.
Remove the needle, presser foot and presser foot holder. With help of the L-screwdriver remove the screws holding the needle plate and remove the needle plate.
Clean the feed dog and bobbin case with a brush. Also clean them, using a soft, dry cloth.
Intretinere
| Problem | Cause Correction Page | ||
| Upper thread breaks | 1. The machine is not threaded correctly. | 1. Rethread the machine. | 37 |
| 2. The thread tension is too tight. 2. | Reduce the thread tension (lower number). | 49 | |
| 3. The thread is too thick for the needle. | 3. Select a larger needle. | 55 | |
| 4. The needle is not inserted correctly. | 4. Remove and reinsert the needle (flat side towards the back). | 57 | |
| 5. The thread is wound around the spool holder pin. | 5. Remove the spool holder and unwind the thread from the spool holder pin. | 37 | |
| 6. The needle is damaged. 6. Replace the needle. 57 | |||
| Lower thread breaks | 1. The bobbin case is not inserted correctly. | 1. Remove and reinsert the bobbin case and pull on the thread. The thread should pull easily. | 35 |
| 2. The bobbin case is threaded wrong. | 2. Check both bobbin and bobbin case. | 35 | |
| Skipped stitches | 1. The needle is not inserted correctly. | 1. Remove and reinsert needle (flat side towards the back). | 57 |
| 2. The needle is damaged. 2. Insert a new needle. 57 | |||
| 3. The wrong size needle has been used. | 3. Choose a needle to suit the thread. | 55 | |
| 4. The foot is not attached correctly. | 4. Check and attach correctly. 29 | ||
| 5. The machine is not threaded correctly. | 5. Rethread the machine. | 37 | |
| Needle breaks | 1. The needle is damaged. 1. Insert a new needle. 57 | ||
| 2. The needle is not correctly inserted. | 2. Insert the needle correctly (flat side towards the back). | 57 | |
| 3. Wrong needle size for the fabric. | 3. Choose a needle to suit the thread and fabric. | 55 | |
| 4. The wrong foot is attached. | 4. Select the correct foot. | 51 | |
| 5. The needle clamp screw is loose. | 5. Use the screwdriver to firmly tighten the screw. | 57 | |
| 6. The presser foot that is used is not appropriate for the type of stitch that you wish to sew. | 6. Attach the presser foot that is appropriate for the type of stitch that you wish to sew. | 51 | |
| 7. The upper thread tension is too tight. | 7. Loosen the upper thread tension. | 49 |
| Problem Cause Correction Page | ||
| Loose stitches | 1. The machine is not correctly threaded. | 1. Check the threading. 37 |
| 2. The bobbin case is not correctly threaded. | 2. Thread the bobbin case as illustrated. 35 | |
| 3. Needle/fabric/ thread combination is wrong. | 3. The needle size must suit the fabric and thread. 55 | |
| 4. Thread tension is wrong. 4. Correct the thread tension. 49 | ||
| Seam gather or pucker | 1. The needle is too thick for the fabric. | 1. Select a finer needle. 55 |
| 2. The stitch length is adjusted wrong. | 2. Readjust the stitch length. 61 | |
| 3. The thread tension is too tight. 3. Loosen the thread tension. 49 | ||
| Seam puckering | 1. The needle thread tension is too tight. | 1. Loosen the thread tension. 49 |
| 2. The needle thread is not threaded correctly. | 2. Rethread the machine. 37 | |
| 3. The needle is too heavy for the fabric being sewn. | 3. Choose a needle to suit the thread and fabric. 55 | |
| 4. Stitch length is too long for the fabric. | 4. Shorten stitch length 61 | |
| The machine jams | 1. Thread is caught in the hook. Remove the upper thread and bobbin case. Turn the handwheel backwards and forwards by hand and remove the thread remnants. | 107 |
| 2. The feed dogs are packed with lint. | ||
| The machine is noisy | 1. Lint or oil have collected on the hook or needle bar. | 1. Clean the hook and feed dog as described. 107 |
| 2. The needle is damaged. 2. Replace the needle. 57 | ||
| 3. Slight humming sound coming from internal motor. | 3. Normal. / | |
| 4. Thread is caught in the hook. Remove the upper thread and bobbin case. Turn the handwheel backwards and forwards by hand and remove the thread remnants. | 107 | |
| 5. The feed dogs are packed with lint. |
Before calling for service, check the following items. If the problem still persists, contact the place of purchase or your nearest authorized dealer.
Ghid de remediere defeche
Do not dispose of electrical appliances as unsorted municipal waste, use separate collection facilities.
Contact your local government for information regarding the collection systems available.
If electrical appliances are disposed of in land fills or dumps, hazardous substances can leak into the groundwater and get into the food chain, tarnaging your health and well-being.
When replacing old appliances with new once, the retailer is legally obligated to take back your old appliance for disposal at least for free of charge.
Eliminarea
Nu eliminati aparatura electrica sub forma deseurilor municipale nesortate,utilizati miliocoe de colectare separate.