Melanie - Sewing machine VERITAS - Free user manual and instructions
Find the device manual for free Melanie VERITAS in PDF.

| Product type | Overlock sewing machine |
| Brand | Veritas |
| Model | Melanie |
| Dimensions (approx.) | 40 x 30 x 30 cm |
| Weight (approx.) | 7 kg |
| Power supply | 230-240 V, 50/60 Hz |
| Light bulb power | 15 W (replacement bulb) |
| Number of threads | 3 or 4 threads (overlock) |
| Stitch length | 1 to 4 mm (adjustable) |
| Cutting width | Adjustable (knife screw) |
| Differential feed | Yes, adjustable (N to 8) |
| Needle type | ELx705 (standard) |
| Included accessories | Screwdriver, tweezers, brush, oiler, upper knife, deflection discs, needle assortment, hex key, nets |
| Maintenance | Regular cleaning of lint, oiling at indicated points |
| Noise level (approx.) | 75 dB (A) |
| Safety instructions | Unplug before maintenance, do not use if damaged, household use only |
| Spare parts available | Needles ELx705, 15W bulb, knives, motor belt, etc. |
| Repairability | Repairs by authorized after-sales service |
| Customer service | Toll-free: 00800 333 00 777, email: service-fr@veritas-sewing.com |
| Intended use | Household (non-professional) |
Frequently Asked Questions - Melanie VERITAS
User questions about Melanie VERITAS
0 question about this device. Answer the ones you know or ask your own.
Ask a new question about this device
Download the instructions for your Sewing machine in PDF format for free! Find your manual Melanie - VERITAS and take your electronic device back in hand. On this page are published all the documents necessary for the use of your device. Melanie by VERITAS.
USER MANUAL Melanie VERITAS
text_image
VERITAS MELANIED Bedienungsanleitung
F Mode d'emploi
IT Manuale di istruzioni
EN Manual
natural_image
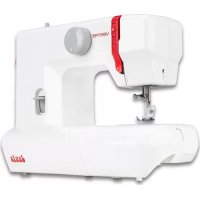
White sewing machine with visible branding and mounting bracket (no readable text or symbols beyond brand name)DIE MUTTER DER PSYCHOANALYSE/ MOTHER OF PSYCHOANALYSIS
Melanie

natural_image
Black-and-white photo of an adult and a child painting on easels in a modest room, no visible text or symbolsShe set an important milestone in the still young science of psychotherapy: Melanie Klein was the first to uncover the psychic life of children. Her work in the 1920th discovered and then defined the essential significance of the relation between infants and their attachment figures like their mother. With her groundbreaking studies, she is recognized as the founder of object relation theory and – together with Sigmund Freud – as one of the main pioneers in psychoanalysis.
We congratulate you on your purchase of your sewing machiner. You have bought a quality product which has been made with great care and, if serviced right, will serve you well for many years.
Before using it for the frist time, we ask you to read the manual at hand carefully, paying special attention to the safety instructions. Persons who are not familiar with this manual must not use the appliance.
In this manual, you will find everything there is to know about possible applications of your sewing machine. Should any questions remain unanswered, we kindly ask you to turn to your dealer.
We wish you much pleasure and great sewing successes!
Questions concerning machine, service and customer care.
Toll-free
customer service number: 00800 333 00 777 service-uk@veritas-sewing.com
Service address:
Veritas Service Center c/o Teknihall GmbH Breitefeld 15 DE-64839 Münster GERMANY
"IMPORTANT SAFETY INSTRUCTIONS"
When using an electrical appliance, basic safety precautions should always be followed, including the following: Read all instructions before using this overlock sewing machine.
“DANGER” To reduce the risk of electric shock:
- The appliance should never be left unattended when plugged in.
- Always unplug this appliance from the electric outlet immediately after using and before cleaning.
- Always unplug before re-lamping. Replace bulb with same type rated max. 110V\~240V/15W.
“WARNING” To reduce the risk of burns, fire, electric shock, or injury to persons:
- Do not allow this appliance to be used as a toy. Close attention is necessary when this appliance is used by or near children and infirm persons.
- Use this appliance only for its intended use as described in this manual. Use only attachments recommended by the manufacturer as contained in this manual.
- Never operate this appliance if it has a damaged cord or plug, if it is not working properly, if it has been dropped or damaged, or dropped into water. Return the appliance to the nearest authorized dealer or service center for examination, repair, electrical or mechanical adjustment.
- Never operate the appliance with any air openings blocked. Keep ventilation openings of the sewing machine and foot control free from the accumulation of lint, dust, and loose cloth.
- Keep fingers away from all moving parts. Special care is required around the sewing machine needle and cutter.
- Always use the proper stitch plate. The wrong plate can cause the needle to break.
- Do not use bent needles.
- Do not pull or push fabric while stitching. It may deflect the needle causing it to break.
- Switch the sewing machine off “O” when making any adjustments in the needle area, such as threading needle area changing needle, threading looper, or changing presser foot and the like.
- Always unplug the machine from the electrical outlet when removing covers, when covers are opened to raise the upper cutter or thread the loopers, when lubricating or when making any other user servicing adjustments mentioned in the instruction manual.
- Never drop or insert any abject into any opening.
- Do not use outdoors.
- Do not operate where aerosol (spray) products are being used or where oxygen is being administered.
- To disconnect, turn all controls to the off "O" position, then remove plug from outlet.
- Do not unplug by pulling on cord. To unplug, grasp the plug, not the cord.
-
If the power cord of this appliance is damaged, it must be replaced with a special cord by your nearest authorized dealer or service center.
-
If oil gets in eyes, immediately, rinse the oil out with water. If you swallow oil by mistake, immediately consult a medical doctor.
- To reduce risk of injury, switch off before servicing. Close looper cover before operating.
"SAVE THESE INSTRUCTIONS"
"This overlock sewing machine is intended for household use only."
* Keep the instructions at a suitable place close to the machine and hand it over if you give the machine to a third party.
* Use the machine only in dry locations.
* Never leave the machine unattended with children or elderly people due to they may not be able to estimate the risk.
* Don't let children play with the machine.
* This appliance is not intended for use by persons (including children) with reduced physical, sensory or mental capabilities, or lack of experience and knowledge, unless they have been given supervision or instruction concerning use of the appliance by a person responsible for their safety.
* Children should be supervised to ensure that they do not play with the appliance.
* Always unplug the machine if you leave it unattended, to avoid injury by expediently switch on the machine.
* Always unplug the machine if you carry out maintenance (oiling, cleaning).
* Don't use the machine if it's wet or in humid environment.
* Never pull at the cord, always unplug the machine by gripping the plug.
* Never place anything on the pedal.
* Never use the machine if the air vents are blocked keep the air vents of the machine and the foot pedal free from dust, fusel and leftovers.
* The machine may only be used with foot pedal manufactured by Wakaho. Type 4C-316B for USA and Canada, 4C-316C/4C-326G/4C-345G for other countries.
* If the supply cord connected with foot pedal is damaged, it must be replaced by the manufacturer or its service agent or a similarly qualified person, in order to avoid a hazard.
Correct Use
Danger! Electric shock due to humidity
The sewing machine must only be stored and used in dry rooms.
- Humidity and dampness may cause an electric shock.
Danger! Eye injuries due to a broken needle
- Only soft, flexible textiles may be sewn.
- The machine is not designed for sewing materials such as thick, hard or inflexible leather, tarpaulins, canvas, etc.; the needle may break.
- The needle can break if the material is not transported by the motor and is instead pushed or held back by the user.
Danger! Needle-prick injuries if operated accidentally
- The machine may only be used by careful adults.
- Children from 8 years and persons with restricted abilities may only use the machine after thorough instruction and under constant supervision. They must have understood dangers with regard of the use of the machine.
- Children from 8 years and persons with restricted abilities may only do the maintenance and cleaning of the machine after thorough instruction and under constant supervision.
- Never leave an operational machine in areas to which children have access.
It must be avoided that children play with the machine.
- The main switch must be turned off or power plug must be disconnected for all preparation or configuration tasks.
Danger! Risk of injury due to defects or modifications.
- The machine must not be modified.
- Repairs must be carried out by the technical service.
Damage, modifications, or the use of non-original accessories can lead to injuries.
- Defective machines must no longer be used.
- Defective power cords must be replaced by original spare part.
Danger! Unsuitable installation sites (workplaces) can result in accidents.
- The machine must only be operated on a stable surface.
- Shaky, unstable or untidy workplaces can cause the machine to fall down or cause needle-prick injuries.
Danger! Persons without knowledge of these operating instructions may injure themselves or damage the sewing machine.
- Only use this sewing machine if you have a basic knowledge of how to use sewing machines.
Danger! Needle-prick injuries may occur if you do not pay attention.
- Take time, ensure the workplace is tidy and guide the material calmly through the machine without using force.
Caution! This machine is designed for use in a private home.
The machine is not approved for professional or commercial use.

Congratulazioni!
Veritas Service Center
c/o Teknihall GmbH
Breitefeld 15
DE-64839 Münster
GERMANY
"IMPORTANTI NORME DI SICUREZZA"
(1) Accessories....20
(2) Accessory box....20
(3) Looper cover....20
(4) Waste collector....20
(5) Cloth plate cover....20
- Preparing the machine....22
(1) Attaching the foot control....22
(2) Sewing speed....22
(3) Assembling the thread stand....22
(4) Thread cones....22
(5) Power/ light switch....22
- Using the machine.... 24
(1) Handwheel....24
(2) Presser foot lifter....24
(3) Changing the presser foot....24
(4) Inserting needles....26
(5) Raising the upper knife....26
(6) To lower the upper knife....26
- Threading....28
(1) Threading / Preparation......28
(2) Upper looper (Green)....28
(3) Lower looper (Red).... 30
(4) Right needle (Blue)....32
(5) Left needle (Yellow)....34
(6) After threading....34
- Trial sewing/ thread tension....36
(1) Sewing test....36
(2) Check your trial run....36
-
Adjusting the thread tension....38
-
Adjustmentsandsettings....40
(1) Stitch length....40
(2) Cutting width....40
-
Differential feed....42
-
Practical sewing....44
(1) 3 Thread overlock.....44
(2) 3 Thread roll hem....44
- Maintenance....46
(1) Changing light bulb....46
(2) Cleaning and lubricating....46
- Trouble shooting guide......48
- Technical data....50
text_image
Labeled diagram of a sewing machine with numbered parts for identificationtext_image
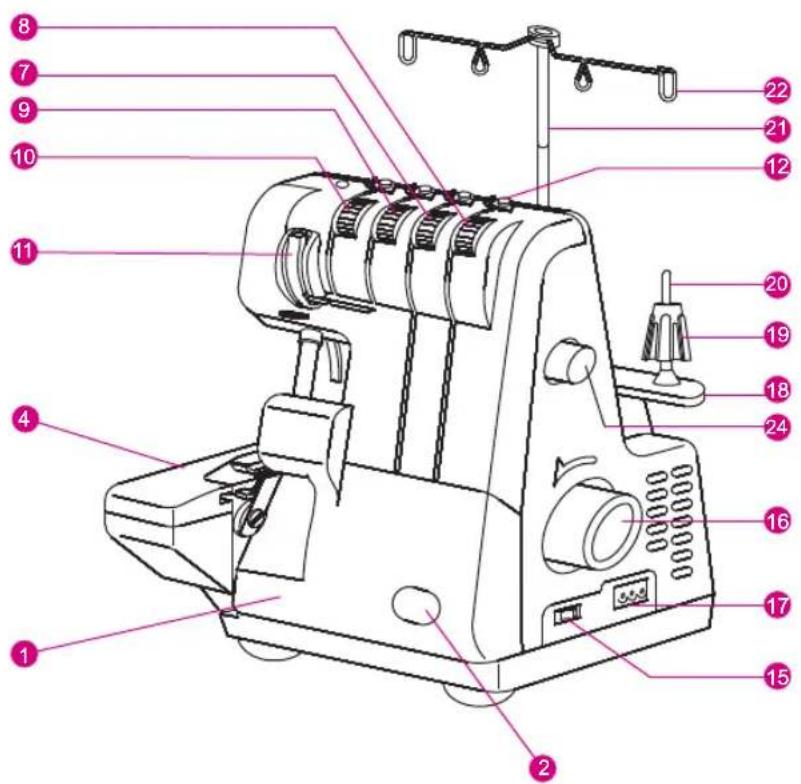
Technical diagram of a sewing machine with numbered parts labeled for identification.Details of the machine
- Looper cover
- Looper cover opening indent
- Knife guard
- Cloth plate
- Stitch plate
- Presser foot
- Upper looper tension dial
- Lower looper tension dial
- Right needle tension dial
- Left needle tension dial
- Thread take up cover
- Thread guide plate
- Accessory box
14.Bulb cover
15.Power / light switch
16.Handwheel - Machine socket
18.Thread stand - Anti-vibration cone
20.Spool holder pin - Retractable support rod
22.Open thread guide
23.Presser foot lifter - Stitch length dial
- Differential feed dial
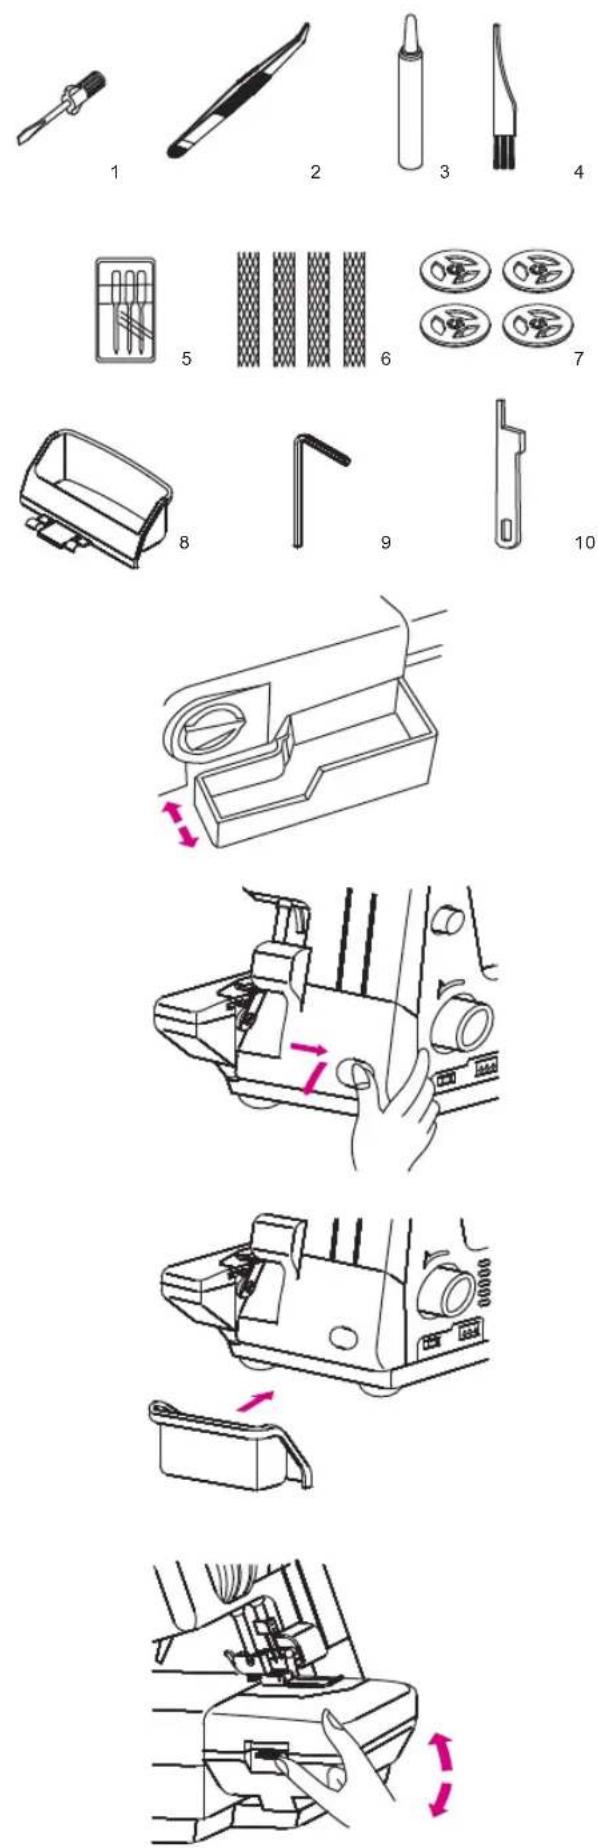
Zubehör
| All standard accessories are stored in the box. Pull out to open. Push in to close. |
| To open, push to the right with your thumb in the indent and tilt towards you.To close push it up and the cover engages automatically.(FOR CERTAIN TYPE ONLY)when you open the panel in front of the loopers the machine stops automatically-FINGER PROTECTION. |
| Fabric waste will be collected as you sew.Push the waste collector under the front of the machine and slightly to the left towards the cloth plate cover. |
Plateau de travail
| To open, push the lever up. |
| To close, push the cover up to the right, it snaps into position automatically. |

text_image
ON I OFF OFussanlasser anschliessen
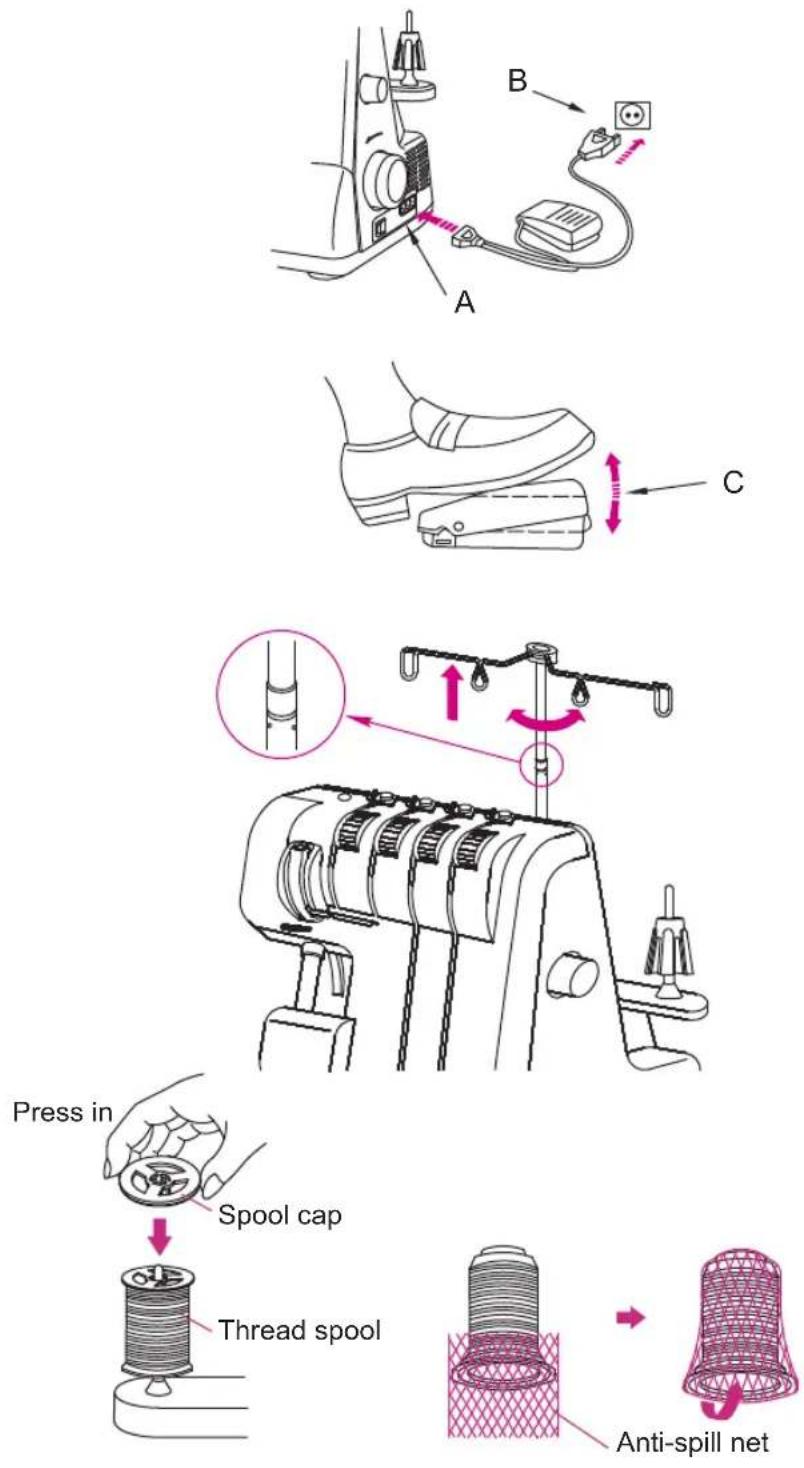
Preparing the machine
Attaching the foot control
Plug foot control into machine socket (A) and then into main socket (B).
Vitesse de couture
The sewing speed can be adjusted by increasing or decreasing the pressure on the foot control (C).
Assembling the thread stand
Raise the support rod fully, turning slightly until the positioning catches engage.
The anti-vibration cone should be used with the wider edge to the botton on the spool holder pin when sewing with cones. When using household spools remove the anti-vibration cones. Place spool on spool holder pins and push the spool caps on. If threads slip and get twisted, cover the spools with the nets supplied in the accessory box.
The power switch is conveniently placed on the handwheel side of the machine.
"I" - MARCHE
"l" - Acceso
"l" - ON
"O"-ARRET
"O"-Spento
"O"-OFF
Handrad
natural_image
Line drawing of a car interior panel with no visible text or symbolsNähfusslifterhebel
natural_image
Illustration of a robotic device with motion arrows indicating movement (no text or symbols)Nähfuss auswechseln
The handwheel turns counterclockwise.
To raise the presser foot, raise the lever on the rear og the machine until it engages.
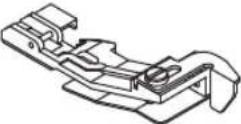
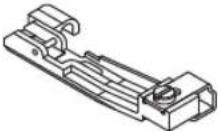
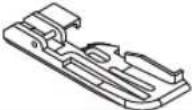
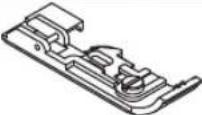
Remplacement du pied-de-biche
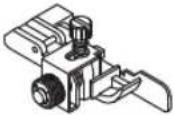
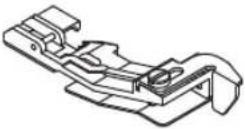
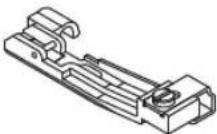
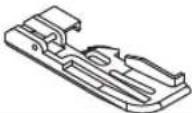
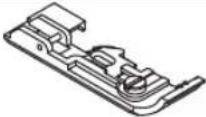
Changing the presser foot
-Switch the machine off "O". -Raise the presser foot.
Press the catch (A) to release the presser foot from the clamp.
Raise the presser foot lifter to the highest position and remove the presser foot sole to the left.
To attach the presser foot sole, place it under the shaft. The groove in the shaft should line up exactly with the presser foot pin.
Lower the shank and the presser foot will engage automatically.

natural_image
Technical illustration of a sewing machine with two arrows indicating motion (no text or symbols)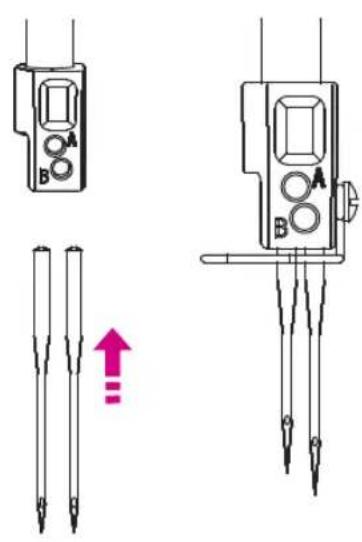
text_image
Technical diagram showing two types of electronic devices with labeled ports A and B, including a pink arrow indicating a downward trend or change.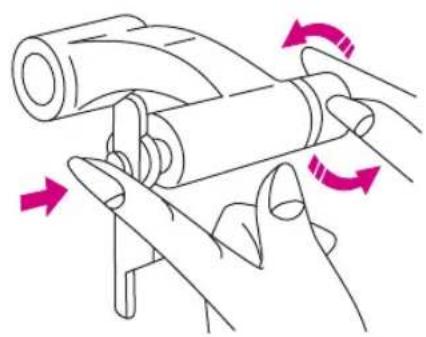
natural_image
Illustration of hands using a tool to lift a cylindrical object, with pink arrows indicating rotation (no text or symbols)Nadeln ersetzen
- Switch the machine off "O". Disconnect machine from electricity supply.
- Turn the handwheel until needles are fully raised.
- Lower the presser foot.
- Use the hexagon wrench to loosen the needle setscrew. Remove needle.
- Insert the needle flat side towards the back, as far as possible into the needle clamp.
Tighten the screw. - The left needle is set higher than the right needle.
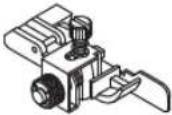
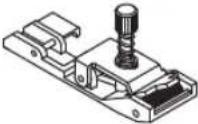
Raising the upper knife
- Turn the handwheel to raise the needles.
- Open the looper cover.
- Press the upper knife holder to the right. Turn the knob clockwise until the knife engages.
- Close the looper cover.
To lower the upper knife
- Turn the knob anti-clockwise. The knife snaps automatically into its lower position. Close the looper cover.
text_image
Technical diagram of a sewing machine with numbered parts labeled 1 to 4, showing internal components and wiring connections.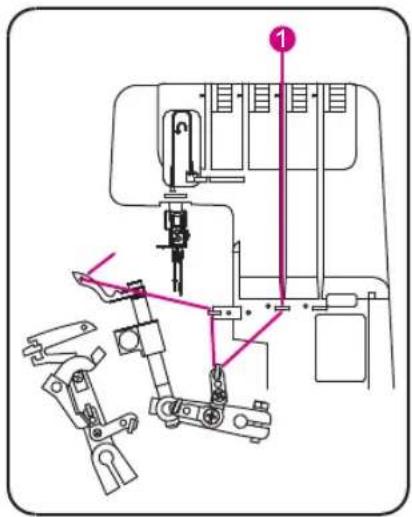
text_image
Technical diagram of a sewing machine with labeled parts and numbered connection point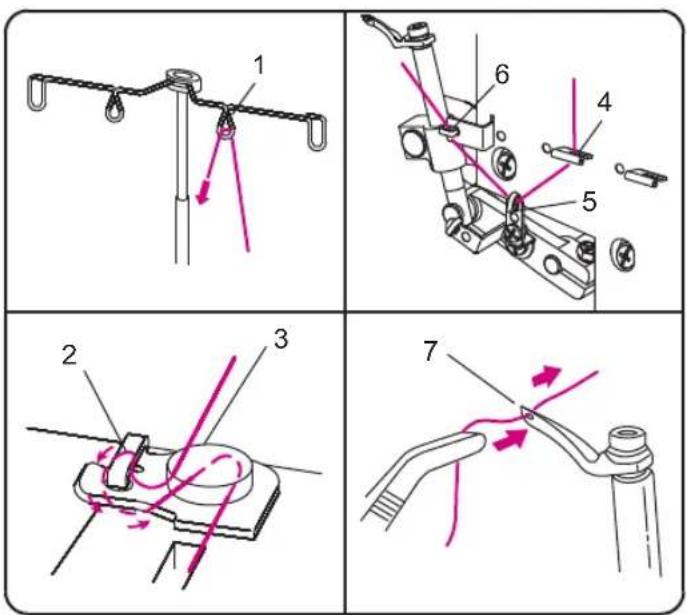
text_image
Technical diagram showing seven different mechanical or electrical component assembly steps with numbered labels.Threading / Preparation
- Disconnect machine from electricity supply.
- Support rod with thread guide must be fully raised.
- Open the looper cover and the colth plate cover.
- Turn the handwheel towards you until needles are fully raised.
- Thread the machine in the correct sequence.
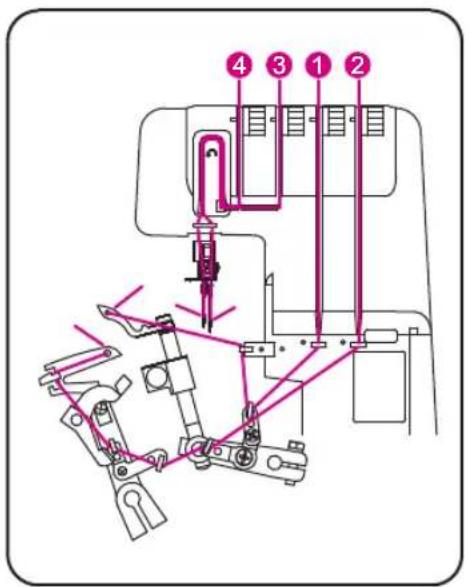
Upper looper (Green/ 1)
Place the spool on the spool holder pin.
a. Bring thread up from back to front through guide (1).
b. Pull the thread under the guider (2) up to go around the pre-tension (3).
b. Thread guide (4,5,6).
d. Thread looper eye (7).
text_image
Technical diagram of a sewing machine with labeled parts and connection lines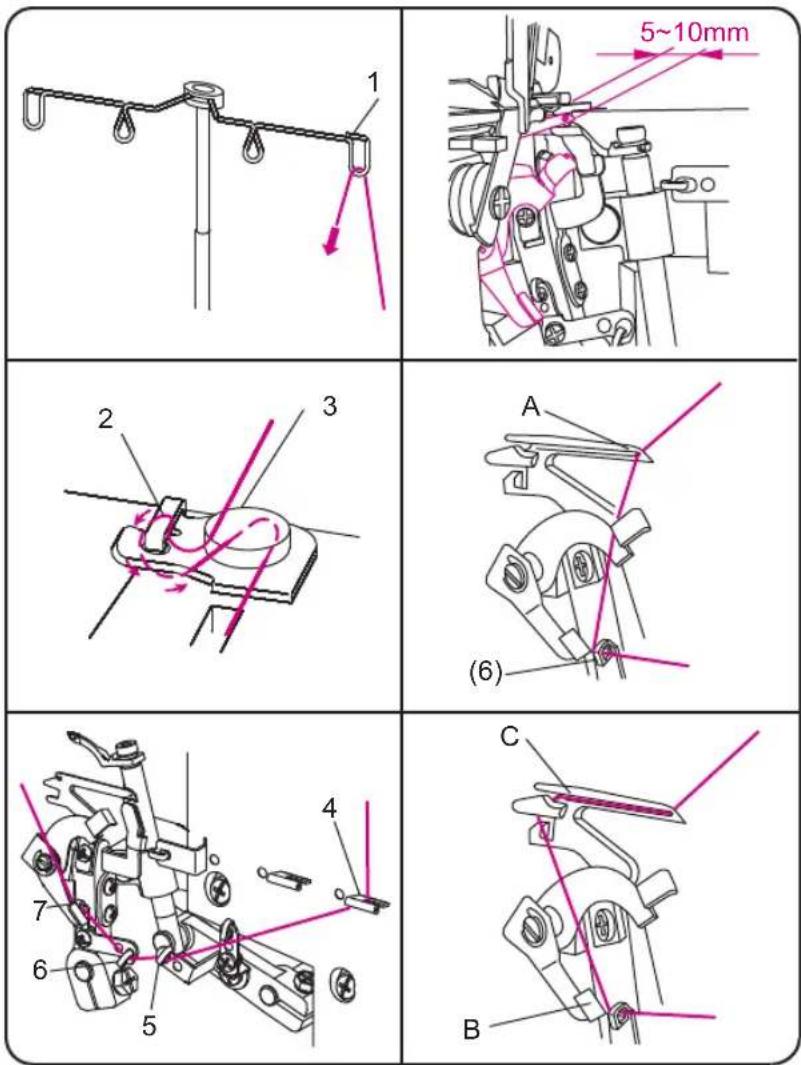
text_image
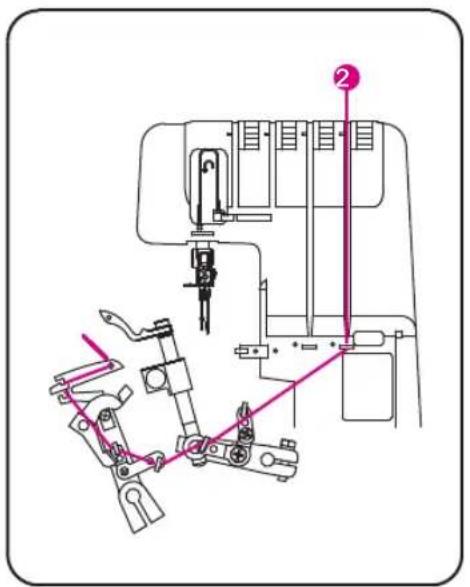
1 2 3 4 5 6 7 8 9 A (6) B 5~10mmLower looper (Red/ 2)
- Place the spool on the spool holder pin.
- Bring thread up from back to front through guide (1).
- Pull the thread under the protector (2) and pass under the guider up to go around the pre-tension (3).
- Thread guide (4,5,6,7).
- Turn the balance wheel toward you until the lower looper extending out 5-10mm from the needle plate edge.
- Pull the thread with tweezers to pass the lower looper hole (A).
- Draw the therad with your left hand tightly.
- Use your finger to push the automatic threader (B) up to the topmost, and then thread goes through the lower looper (C) automatically.
text_image
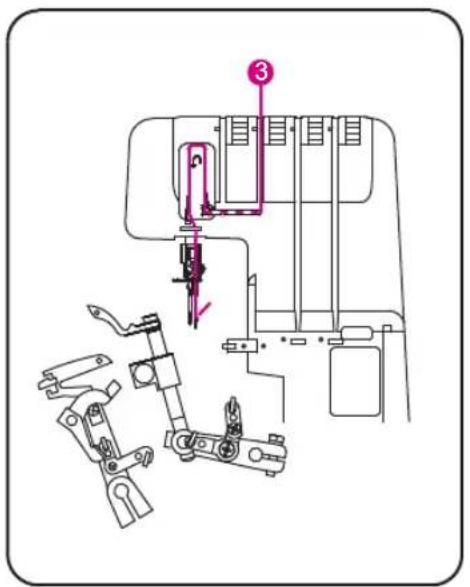
Technical diagram of a sewing machine with labeled parts and directional arrows indicating assembly or repair.Rechter Nadelfaden (Blau/ 3)
text_image
Technical diagram showing six different mechanical or electrical component assembly steps with numbered components and directional arrows indicating motion.Right needle (Blue/ 3)
Place the spool on the spool holder pin.
- Bring thread up through guide (1).
- Pull the thread under the guider (2) up to go around the pretension (3).
- Thread guide (4,5).
- Thread right needle eye (6)
- Place thread under presser foot.
text_image
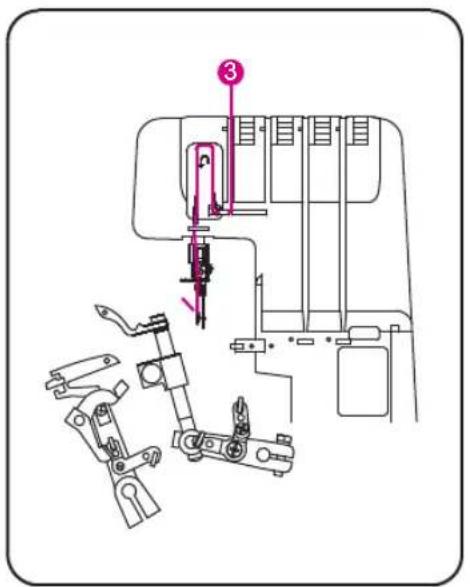
Technical diagram of a sewing machine with numbered component and labeled partsLinker Nadelfaden (Gelb)
Fadenspule auf den
text_image
Technical diagram showing six different mechanical or electrical component configurations with numbered parts and directional arrows indicating motion or assembly.Left needle (Yellow)
- Place the spool on the spool holder pin.
- Bring thread up through guide (1).
- Pull the thread under the protector (2) and pass under the guider up to go around the pre-tension (3).
- Thread guide (4,5).
- Thread left needle eye (6)
- Place thread under presser foot.(7)
Après l'enfilage
When threading is complete, lower the presser foot and close the looper cover and cloth plate.
Indications:
If the lower looper has to be re-threaded, cut both needle threads off at the needle eye and remove surplus thread from below.
Thread the looper and then re-thread the needles.
Nähprobe
Trial sewing/threadtension
Echantillon de couture
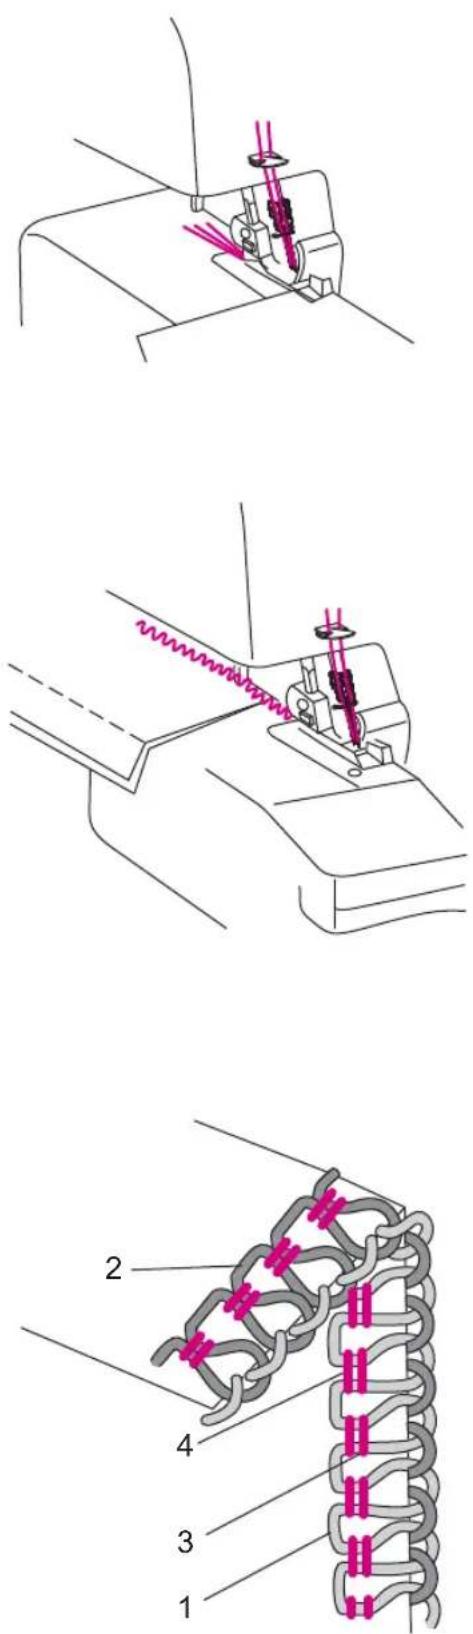
After threading make a trial run. Always use a double layer of fabric in order to be able to check the stitch formation and thread tension properly.
- Switch the machine on "I".
- Set all tension dials to 3.
- Raise the front of the presser foot slightly with your thumb and position the fabric under the foot just up to the knife.
- Sew.
- At the end of the seam continue sewing a 8cm (4") long thread chain.
- Cut the thread chain and remove work.
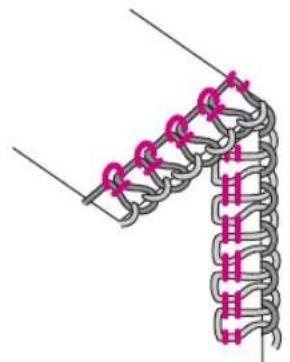
Check your trial run
1 Upper looper thread (green)
2 Lower looper thread (red)
3 Right needle thread (blue)
4 Left needle thread (yellow)
Perfect stitch formation is when both looper threads meet at the fabric edge. The needle threads form straight stitches for a stretchy and durable seam.
Thread tension adjustments may be required depending on the type of fabric and thread being used.
natural_image
Diagram of a knotted chain with pink circular markers and zigzag ends, no text or symbols present
natural_image
Pure technical diagram of a mechanical assembly with no visible text, numbers, or symbolsnatural_image
Diagram of a knotted rope or cable structure with pink zigzag elements, no text or symbols present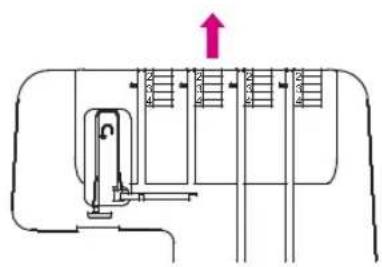
text_image
Technical diagram showing a mechanical or electrical component with labeled parts and an upward arrow indicating direction.natural_image
Diagram of a mechanical or electrical component with interlocking rings and pink star-shaped elements (no text or symbols)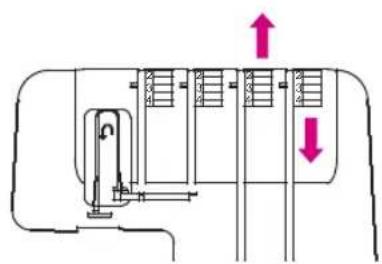
text_image
Technical diagram showing a mechanical or electrical component with labeled parts and directional arrows indicating movement or flow.natural_image
Diagram of a mechanical linkage or chain assembly with pink star-shaped components (no text or symbols)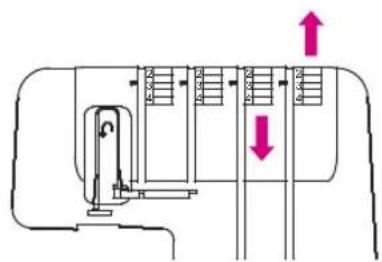
text_image
Technical diagram showing a mechanical assembly with labeled components and directional arrows indicating movement or force.Adjusting the thread tension
The left needle thread forms loops on the underside:
Tighten the left needle thread tension (yellow).
The right needle thread forms loops on the underside:
Tighten the right needle thread tension (blue).
The looper loops are formed on the underside:
Tighten the upper looper tension (green), or loosen the lower looper tension (red).
The looper loops are formed on the upper side:
Tighten the lower looper tension (red), or loosen the upper looper tension (green).

text_image
2 N 3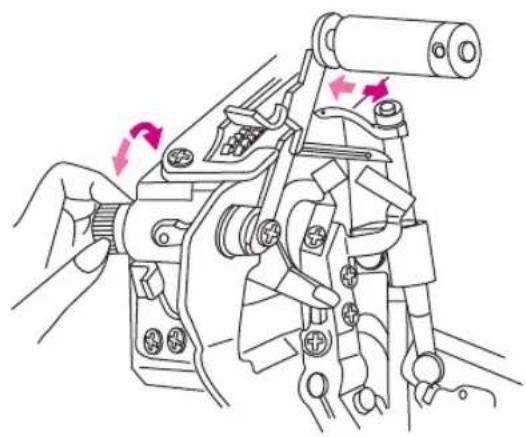
natural_image
Mechanical assembly diagram showing hand operating a motor with rotation arrows (no text or labels)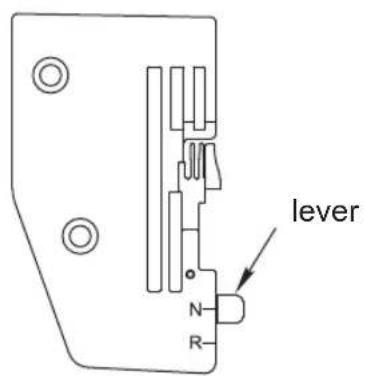
text_image
lever N R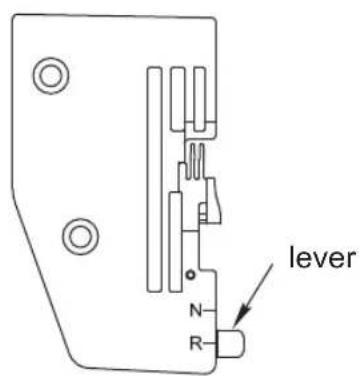
text_image
lever N RStichlänge
- The stitch length can be adjusted from 1 to 4 mm.
- Higher number = longer stitch, lower number = shorter stitch.
- Basic stitch length = N.
Largeur de coupe
- The cutting width should be adjusted according to the type of fabric being sewn. Check the seam each time and adjust the cutting width accordingly.
Adjusting the cutting width:
- Open cloth plate cover.
- Turn cutting width dial.
- Clockwise to move knife to the left (for heavier fabrics).
- Counter-clockwise to move the knife to the right (for lighter fabrics).
How to use the needle plate
Switch the lever to select the regular or rolled hem and narrow hem sewing.
"N" for regular sewing.
“R” for rolled and narrow hem sewing.
text_image
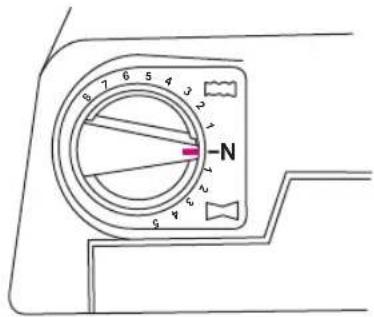
8 7 6 5 4 3 N 1 2 3 4 5Differentialtransport \*
natural_image
Diagram showing a curved structure with pink helical elements being rotated, resulting in a rectangular section (no text or symbols)Dehneffekt:
natural_image
Diagram showing a transformation of a coiled spring-like structure into a rectangular frame, with no text or symbols present.Kräuseleffekt:
natural_image
Diagram of a coiled structure with layered elements and a central pink line (no text or symbols)Kräuseln:
There are two feed dogs: one front and one rear. The two feed dogs move independently and the distance each feed dog travels during one complete movement can be adjusted. Note: When sewing without differential feed the dial should be on position N.
Allongement
To stretch the fabric select a number from N to 5 in the section . " " This prevents fine nylon jerseys or closely woven fabrics from puckering.
Effet de fronçage
To prevent waving or to gather select a number from N to 8 in the section " [\~\~]". This prevents waving or fluting in knits or puckers in fine woven fabrics. It also can be used to gather single layers of fine woven fabric.
Fronçage \*
Use the differential feed to gather a single layer of fabric. For example sleeve heads, yokes, lace edging or frills.
Réglage:
Stitch: 4-thread overlock Differential Feed: 8 Stitch length: 3-4 Thread tension: 3-5

natural_image
Diagram of a knitted rope or cord structure with pink markers indicating points of interest (no text or symbols present)3-Faden Overlock
natural_image
Diagram of a mechanical assembly with zigzag elements and a vertical bar, no text or symbols present3-Faden Rollsaum.
Den
natural_image
Diagram of a knitted rope or cord with pink connectors, no text or symbols presentEinstellung:
Stich: 3-Faden Rollsaum
Nadel: rechte
Fadenspannung
Nadelfaden: 3
Obergreiferfaden: 3
For a 3-5 mm wide 3 thread overlock, remove the left needle. Thread both loopers and then the right needle.
For a 5-7 mm wide 3 thread overlock, remove the right needle.
Thread both loopers and then the left needle.
the tensions may need to be adjusted depending on the type of fabric or thread being used.
Réglage:
Differential feed: N (depending on fabric)
Cut the loops with sharp scissors.
Pull the needle thread and the stitches will come undone.
text_image
AMesser
text_image
Technical diagram of a mechanical assembly with labeled component B and directional arrows indicating movement or flow.Reinigen und Ölen
The knives are made from special material and are very durable. They can be replaced if the blades become dull or damaged.
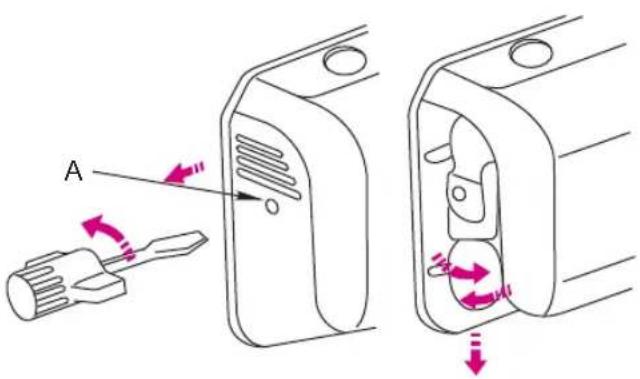
Remplacer l'ampoule
- Switch the machine off "O" and disconnect it from electricity supply by removing the mains plug.
- Loosen the bulb cover setscrew (A) and remove the bulb cover.
- Unscrew the bulb and replace it with a new one.
- Attach bulb cover and re-tighten the setscrew.
Indication:
Always use 230V/240V/15W bulbs. Bulbs are available from your local dealer.
Cleaning and lubricating
- Disconnect machine from electricity supply.
- During sewing dust and fluff collect in and on the machine. This should be removed regularly.
- Your overlocker requires very little lubrication but if used frequently, lubricate the points illustrated (B) with a drop of oil.
| Thread breaks | Thread tension is too tight for thread used.The machine is not threaded correctly.Needles are incorrectly inserted. | Reduce thread tension.Check the threading.Insert needles fully into needle clamp with flat side to the back. | 3827~3426 |
| Needles break | Needles are bent, blunt or the points are damaged.Needles not inserted correctly.Fabric was pulled while sewing. | Replace the needles.Insert needles fully into needle clamp with flat side to the back.Guide fabric gently with bothhands. | 262636 |
| Skipped stitches | Needles are bent or blunt.Wrong needles used. | Replace the needles.Use system ELx705 needles. | 26 |
| Poor stitch formation | Thread is not wound correctly round tension dials. | Check threading. | 27~34 |
| Seams flute or ware (knits) | Differential feed is set incorrectly.Fabric was pulled while sewing. | Adjust differential feed between N and 8 “ ” | 42 |
| Seams pucker | Differential feed is set incorrectly. | Adjust differential feed between N and 5 “ ” | 42 |
| Fabric edges curl | Too much fabric in the stitch formation. | Reduce cutting width, knife to the left. | 40 |
| Thread loops are loose | Too little fabric in the stitch formation. | Increase the cutting width, knife to the right. | 40 |
| Machine does not sew | Cord not plugged in correctly.Main switch not on. | Check plug.Switch machine on “ 1 ”. | 22 |
| Stichmöglichkeiten:- 2 Nadeln, 4-Faden Overlock mit integrierter Sicherheitsnaht- 1 Nadel, 3-Faden Overlock, 3-Faden Rollsaum.Nadelsystem:ELx705Nahtbreite:3-7mmStichlänge:1-4mmNähfusshub:max. 6 mmHandrad:Dreht im GegenuhrzeigersinnNähgeschwindigkeit:bis 1300 Stiche/MinGewicht:6,7kgMasse:292 (B)x 295 (D)x 290 (H) mm. | Points réalisabels:- 2 aiguilles, surjet à 4 fils a avec point de sécurité intégré- 1 aiguille, surjet à 3 fils Ourlet roulé à 3 filsSystème d'aiguille:ELX705Largeur de couture:3-7mmLongueur de point:1-4mmElèvateur de pied-de biche:6 mm au max.Rotation du volant:En sens inverse des aiguilles d'une montreVitesse de travaill:Jusqu'à 1300 points, omite/miPoids:6,7kgDimensions:292 (L) x 295 (P) x 290 (H) mm. | ||
| Standardzubehöre:Staubschutzhülle | Accessoires standard:Housse de piotection | ||
| Spezialzubehöre | Accessoires spéciaux: | ||
 | Blindstichfuss | Pied pour points invisibels | |
 | Gummibandfuss | Pied pour poser des élastiques | |
 | Kräuselfuß | Pied fronceur | |
 | Perlen-Annähfuß | Pied pose perle | |
 | Paspel-/ Kordonnierfuß | Pied ganseur | |
 | Bandaufnähfuß | Pied pose ruban | |
| Spezialzubehöre sind beim Händler erhältich | Les accessoires ad speciaux sont disponibles auprès de lágent. | ||
| Punti realizzabili:- 2 aghi, overlock a 4 fili con punto di sicurezza integrato- 1 ago, overlock a 3 fili con orlo arrotolatoSistema di aghi:ELx705Ampiezza della cucitura:3-7mmLunghezza del punto:1-4mmElevazione del reostato:6mm maxVolantino:Rotazione in senso anti-orarioVelocità di cucitura:Fino a 1300 giri al minutoPeso:6.7kgDimensioni:292(L)x295(P)x290(A) mm | Stitch types:- 2 needles, 4 thread overlock with integrated safety seam- 1 needle. 3-thread overlock, 3 thread rollhem.Needle system:ELX705Seam width:3-7 mmStitch length:1-4 mmPresser foot lift:Max. 6mmHandwheel:rotates counter-clockwiseSewing speed:up to 1300 s.p.m.Weight:6.7kgDimensions:292 ( ) x 295 ( ) x 290 (H) mmWD | ||
| Accessori in dotazione:Coperchio di protezione da polvere | Standard accessory:Dust cover | ||
| Accessori speciali | Special accessories | ||
 | Piedino per punto invisibile | Blind stitch foot | |
 | Piedino per cucire elastici | Elasticator foot | |
 | Piedino increspatore | Gathering foot | |
 | Piedino per applicazione di perline | Beading foot | |
 | Piedino cordonatore | Cording foot | |
 | Piedino per nastri | Taping foot | |
| Potrete trovare gli accessori speciali presso il vostro rivenditore | Special accessories are available from your dealer | ||
Deutsch
Please pay attention on the needle area: The needle area can not be completely protected, as a totally protection will spoil the fundamental function of the overlock machine.
Great caution should be shown when working in the needle area. It is recommended to disconnect the overlock machine by remove plug from outlet when changing needle, bulb or whenother work in the needle area is required.
The right to change in specification and specification reserved.
WIEDERVERWERTUNG

Do not dispose of electrical appliances as unsorted municipal waste. Use separate collection facilities.
Contact your local government for information regarding the collection systems available.
If electrical appliances are disposed of in landfills or dumps, hazardous substances can leak into the groundwater and get into the food chain, damaging your health and well-being.
When replacing old appliances with new one, the retailer is legally obligated to take back your old appliance for disposal at least for free of charge.

www.veritas-sewing.com

facebook.com/veritassewing

twitter.com/veritas_sewing

youtube.com/user/veritas