AH555 - Humidifier Venta - Free user manual and instructions
Find the device manual for free AH555 Venta in PDF.

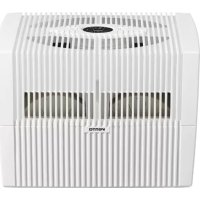
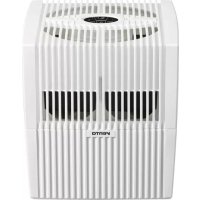
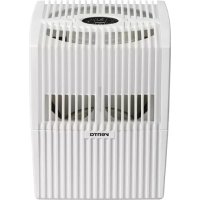
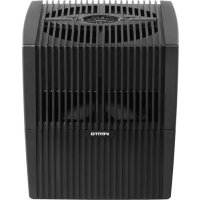
| Product type | Cold evaporation humidifier |
| Brand | Venta |
| Model | AH555 |
| Use | Indoor, rooms up to 60 m² (height 2.5 m) |
| Dimensions (W x D x H) | 45 × 30 × 33 cm |
| Weight | Approx. 5.2 kg |
| Water tank capacity | 10 liters |
| Mains voltage | 100-240 V, 50/60 Hz |
| Power consumption | 3/5/8 W (depending on power level) |
| Noise level | 24/35/45 dB(A) (levels 1-3) |
| Power levels | 3 (1, 2, 3) + automatic mode |
| Interactive touchscreen | Yes, with humidity display and functions |
| Connectivity | WiFi 2.4 GHz, Venta Home app |
| Operating principle | Natural evaporation by rotating discs, no steam or ultrasound |
| Special features | Night mode (SLEEP), automatic mode, adjustable target humidity (30-70%) |
| Maintenance | Drain and clean tank every 14 days (SERVICE reminder), add Venta hygiene agent |
| Safety | Automatic shut-off in case of water shortage (WATER), motor block (E2), incorrect locking (E1) |
| Included accessories | 1 bottle of hygiene agent 50 ml, manual, power cable |
| Warranty | 2 years (subject to proper use) |
| Country of manufacture | Germany (Venta-Luftwäscher GmbH) |
Frequently Asked Questions - AH555 Venta
User questions about AH555 Venta
0 question about this device. Answer the ones you know or ask your own.
Ask a new question about this device
Download the instructions for your Humidifier in PDF format for free! Find your manual AH555 - Venta and take your electronic device back in hand. On this page are published all the documents necessary for the use of your device. AH555 by Venta.
USER MANUAL AH555 Venta
natural_image
Three white rectangular electronic devices labeled 'PENTO' against a blue background, no visible text or symbols on the devices themselves.VEREINFACHTE
SIMPLIFIED EU DECLARATION OF CONFORMITY
Herewith, Venta-LuftwŠscher GmbH declares that the radio equipments
AW510 / AW515 / AW530 / AW535 / AW550 / AW555
comply with Directive 2014/53/EU. The full text of the EU Declaration of
Conformity is available at the Internet address:
ÜBERSICHT
natural_image
3D rendering of a white rectangular device with ventilation slots and a central opening, showing two black arrows pointing to features (no text or symbols)
natural_image
3D rendering of a modern building with vertical slats and a central opening, no visible text or symbols
natural_image
3D rendered mechanical assembly with open lid and internal components (no visible text or symbols)


REINIGUNG VOM GERÄTE-OBERTEIL

We are confident that this Venta model will exceed your expectations and hope that you enjoy it.
Please register your Venta appliance here:
www.venta-air.com
DE

Please read this operating manual in its entirety, keep it for later reference and note all safety instructions as well as instructions for the proper use of the appliance. You can find the latest version of the operating manual on our website www.venta-air.com
DEAR CUSTOMER,
With the Original Connect series, you have purchased a high-performance humidifier, which gives you even more convenient operation with the addition of a touch display and Venta AirConnect compatibility.
The Venta Home app allows you to operate your appliances remotely as well as to access information. The Original Connect supports healthy humidity and the natural reduction of pollutants in the air.
Here's how the Venta principle works
A fan directs the ambient air into the water-filled humidifier, where it flows through specially arrayed disk stacks. Hygienically clean air evaporates from their surfaces into the room. Simultaneously, the disks trap harmful substances such as dust or pollen, which are then washed off in the water and collected in the humidifier.
TABLE OF CONTENTS
| Safety Instructions 22 | Cleaning & maintenance 31 | ||
| Scope of delivery 24 | Cleaning of 33 | ||
| Symbols | 24 | the upper housing 33 | |
| Intended use 24 | Technical data | 34 | |
| Improper use 24 | Accessories | 35 | |
| Overview | 25 | Privacy Policy | 35 |
| Before the first use 25 | Guarantee | 35 | |
| Putting into operation 26 | Recycling and disposal | 35 | |
| Displays, functions & settings 27 | What to do if É | 36 | |
| Wifi / hotspot 29 | Venta Service Team | 37 | |
| Configuration & Venta app 30 |

SAFETY INSTRUCTIONS
á This appliance is suitable for use by children over the age of 8 years and people with restricted physical, sensory, or mental capacities or lack of experience and knowledge, providing they are supervised or have received instructions on the safe use of the appliance and understand the existing hazards.
á Read the operating instructions completely before putting the appliance into operation and keep them for later reference.
á The appliance is not a toy for children.
á Cleaning and user maintenance may not be performed by children under the age of 8 years or without supervision.
á Keep the appliance and its switching power supply out of the reach of children under the age of 8 years.
á Improper use can damage the appliance and cause physical injuries.
á Plug the appliance into suitable power outlets only – the mains voltage must correspond to the nameplate data on the appliance.
á This appliance can only be operated with the "Model No. BI13-240050-Cd / FJSW1982400500Ó switching power supply.
á Never use the appliance if it has a damaged switching power supply plug or cable, or after it has malfunctioned or if it has been dropped or damaged in any other way.
á Disconnect the power plug before every cleaning or maintenance operation or transportation of the appliance.
á Never use the appliance if it has been dropped or damaged in any other way.
á Electrical appliances should only be repaired by professional specialists. Amateur repairs could result in considerable danger to the user.
á Do not sit on the appliance and do not place any objects on it.
á Do not put any foreign objects into the appliance.
á Do not immerse the upper housing in water or any other liquid.
á Never overfill the appliance.
á Never transport or tilt the appliance when the tank is full.
á Never unplug the appliance by pulling on the cable or pulling the switching power supply out with wet hands.
á The appliance should only be operated when it is completely assembled.
á Place the appliance on a stable surface which is flat and dry.
á Set up the appliance so that it cannot be knocked over, and so that no one can trip over it or its cable.
á Ensure the appliance is at least 50 cm from any objects such as furniture or walls.
á Maximum installation altitude: 2000 metres
á Never cover or block the vents to prevent overheating/damage to the appliance.
á A persistent relative ambient humidity of more than 60 %, especially in winter, can enable the formation of biological organisms.
á The design of the appliance and the cold evaporation technology make it impossible for water to leak directly from it in the form of droplets, vapour, mist or lime deposits, providing you use it correctly.
á Only operate the appliance with original Venta accessories designed for the purpose. Venta LuftwŠscher GmbH does not accept any liability for damage caused by the use of third-party accessories.
á If you do not use the appliance for several days or put it into storage for a longer period, empty the water tray completely, clean it and dry thoroughly to prevent odours or biological organisms from developing in standing water or water residues.
á Unplug the appliance when it is not in use.
á Ensure the area surrounding the appliance does not become damp or wet. If moisture leaks out, switch to a lower setting. If it is not possible to switch to a lower setting, use the appliance with interruptions. Make sure no absorbent material such as carpets, curtains, net curtains or tablecloths get damp.
SCOPE OF DELIVERY
1 Venta appliance
1 bottle of hygiene additive 50 ml
1 quick-start guide
1 safety instruction sheet
If any parts are missing or damaged, please contact the Venta Service Team or your local dealer.
SYMBOLS

Please read the Safety Instructions carefully. Follow the instructions to prevent injuries or damage to property.

Additional information

Helpful tips
INTENDED USE
This Venta appliance is a domestic appliance for humidifying the air in interior rooms. The appliance is not suitable for outdoor areas. Any other use or modification of the appliance is considered to be improper use. Venta is not liable for damage or injuries resulting from improper use.
IMPROPER USE
Using the appliance for something other than the intended purpose can endanger health and lives. This includes use under the following conditions:
á in rooms or locations where there is risk of explosion and/or where there is an aggressive atmosphere
á in rooms where there is a high concentration of solvents
á in the vicinity of swimming pools or other wet areas
á outdoors
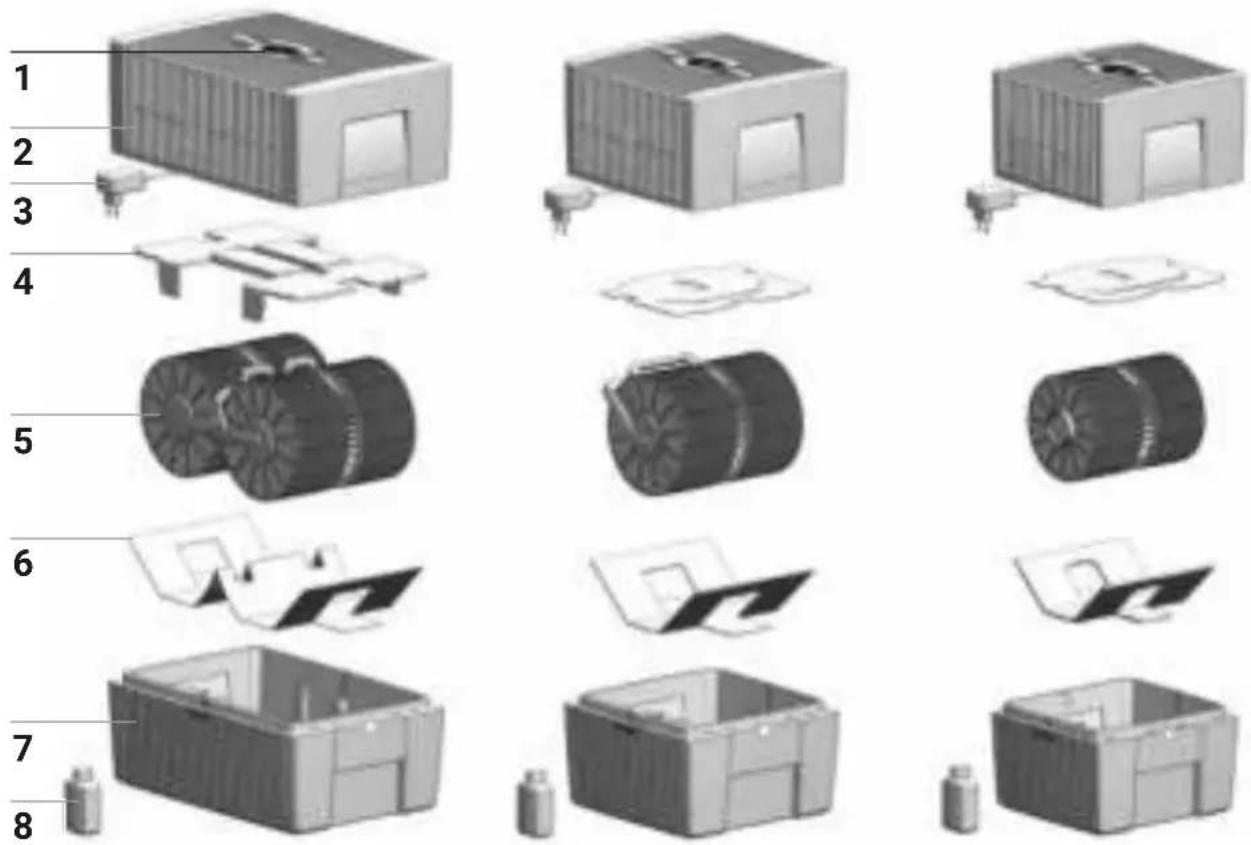
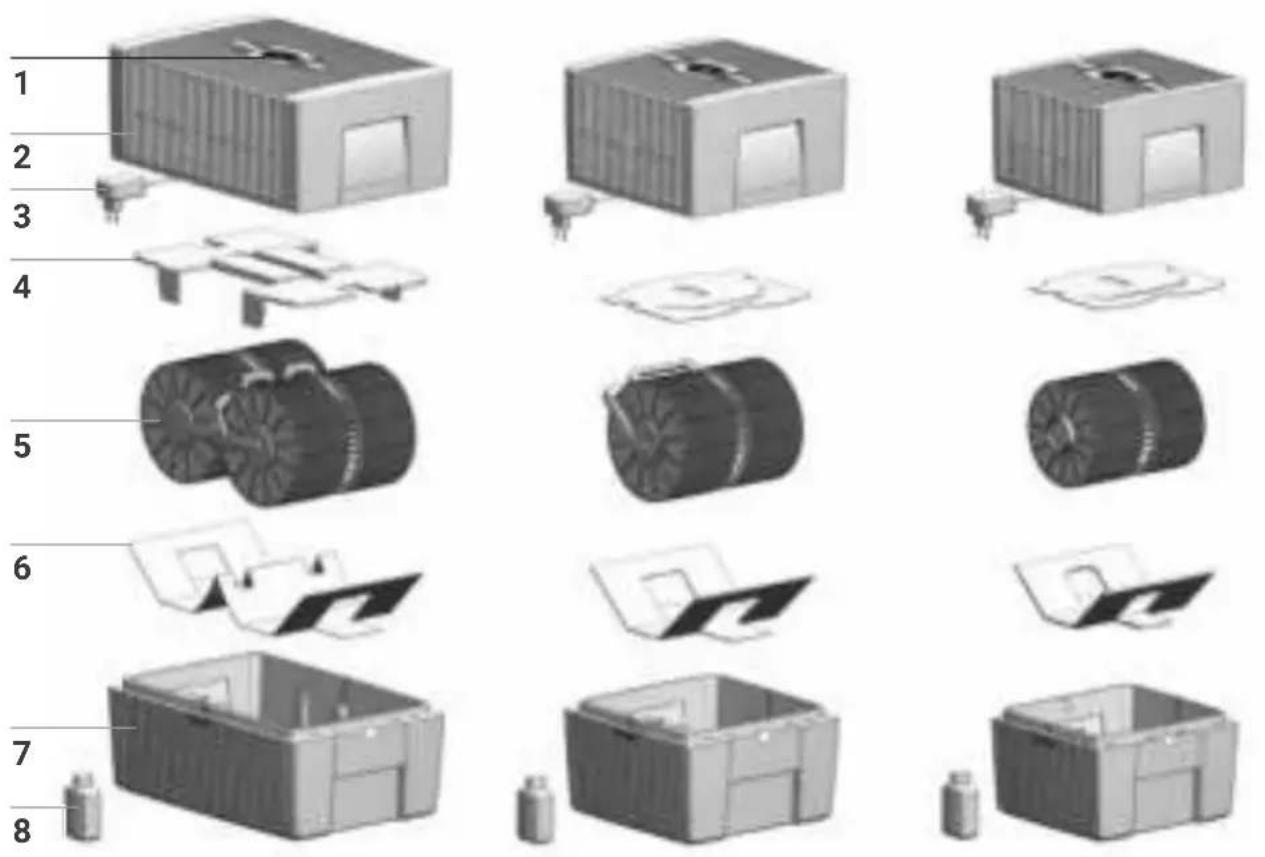
OVERVIEW
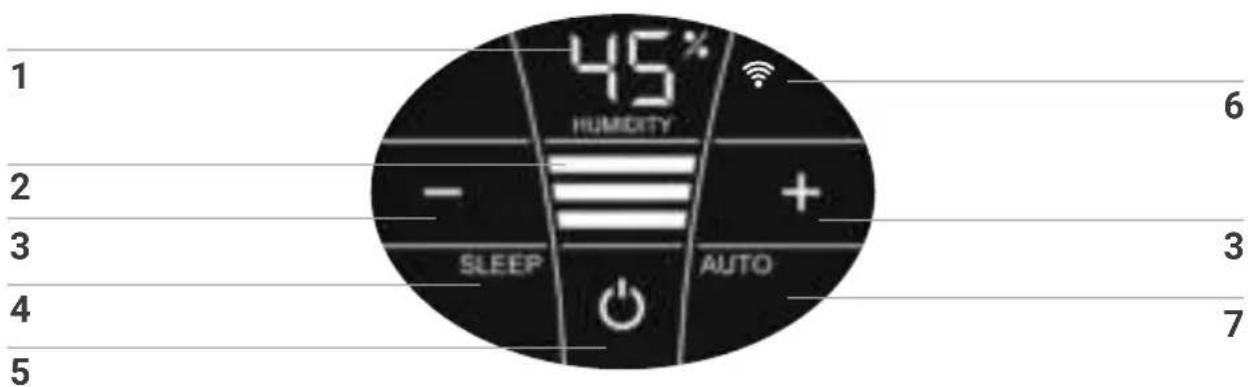
1 Display
2 Upper housing
3 Switching power supply (assembled)
4 Transport protection
5 Disk stack
6 Transport protection
7 Lower housing
8 Bottle of hygiene additive 50 ml
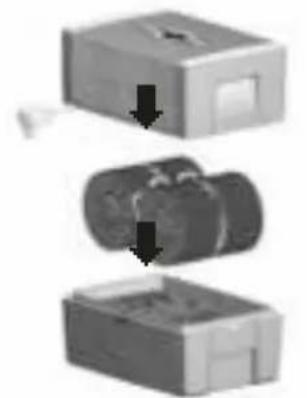
BEFORE THE FIRST USE
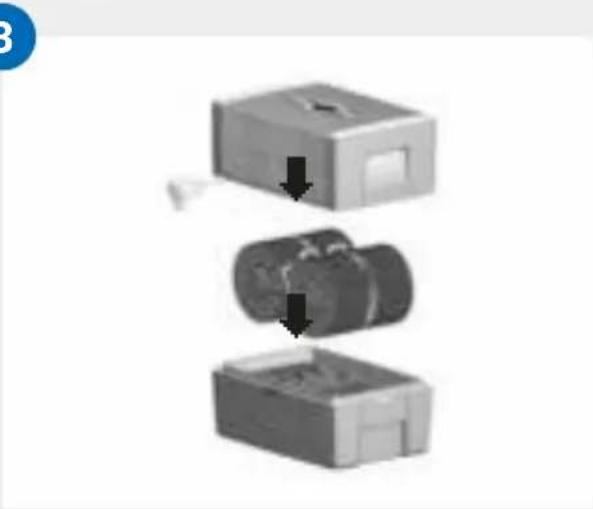
Unpack and set up the appliance. Remove the 50 ml bottle of hygiene additive 8 from the carton. Remove upper housing 2. Remove transport protection 4 from upper housing 2. Remove disk stack 5 from lower housing 7 and remove transport protection 6.
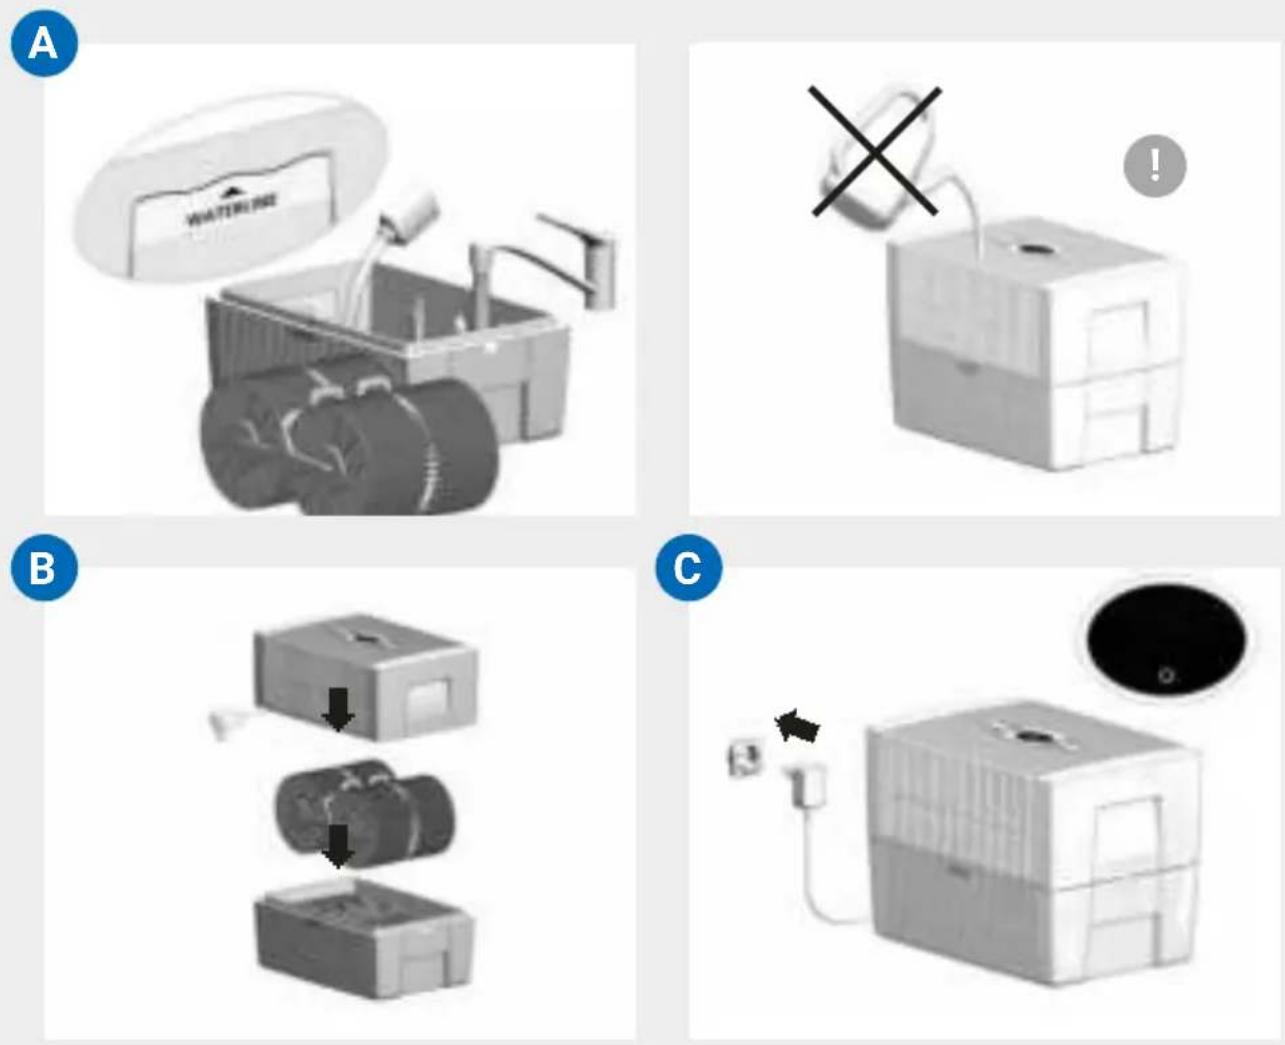
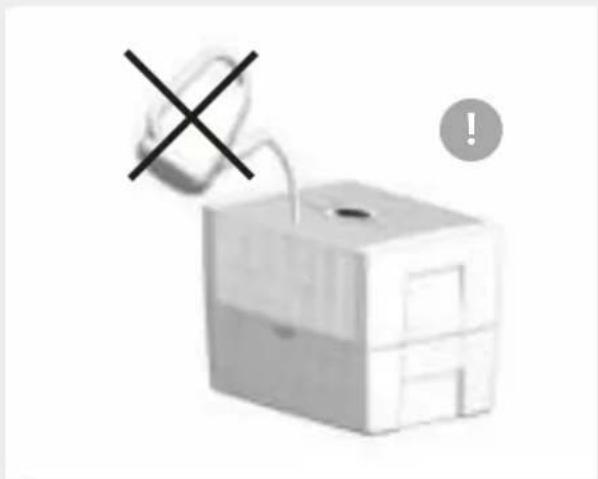
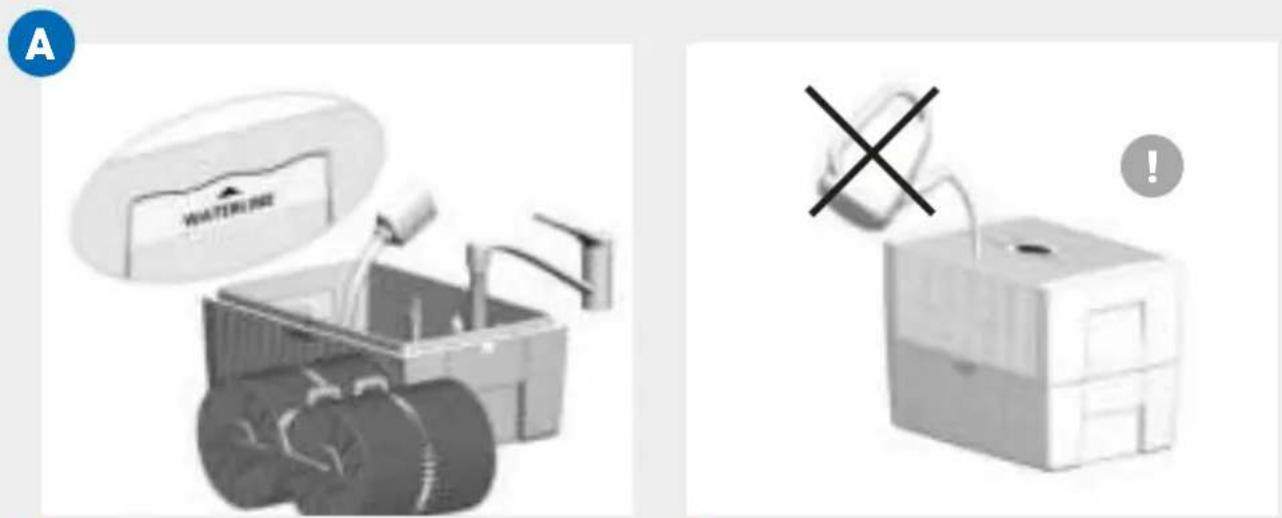
A Fill lower housing 7 with tap water up to maximum WATERLINE marking and add 50 ml hygiene additive 8 (complete content of bottle).

Never fill the appliance before taking off the upper housing!

Adding the hygiene additive is very important, because this optimally humidifies the air.
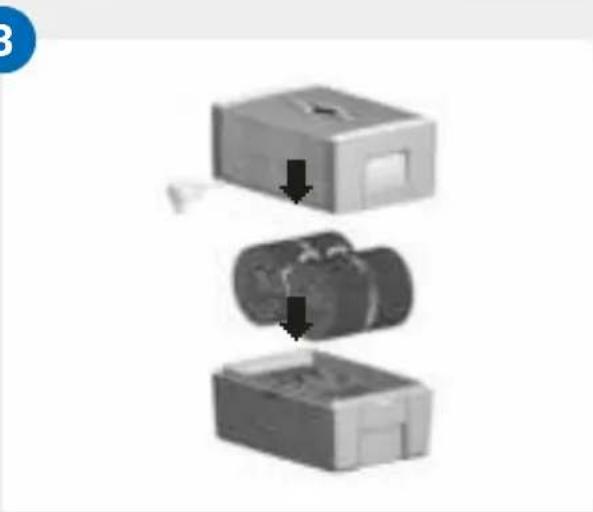
B Insert disk stack 5 into lower housing 7 and place upper housing 2 onto lower housing 7.
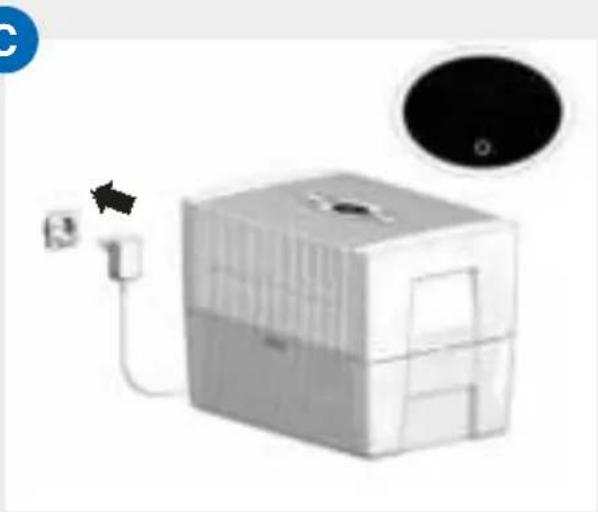
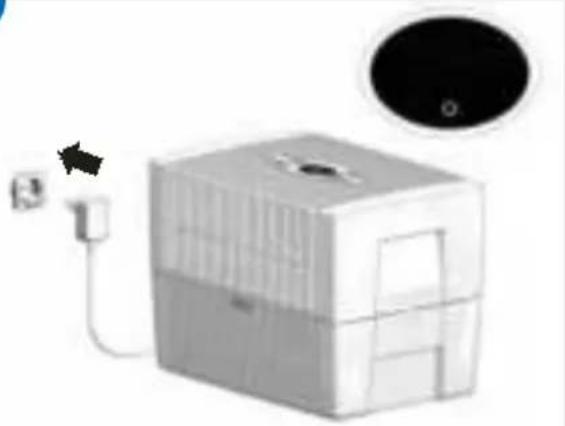
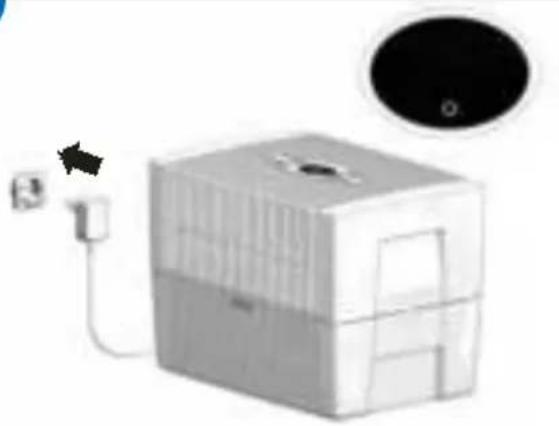
C Connect the switching power supply 3 to the mains and switch on the appliance by tapping the power button in the display 1.

Only once the appliance is connected to the mains will the power button ⏻ light up to switch the appliance on and off.
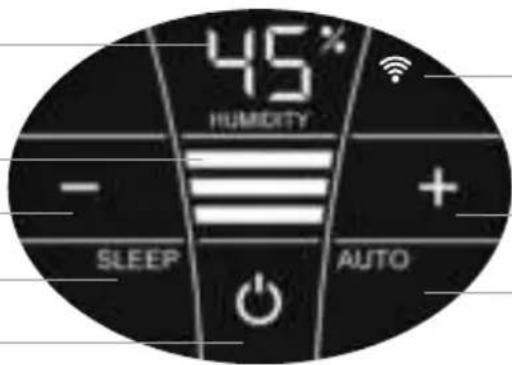
DISPLAYS, FUNCTIONS & SETTINGS
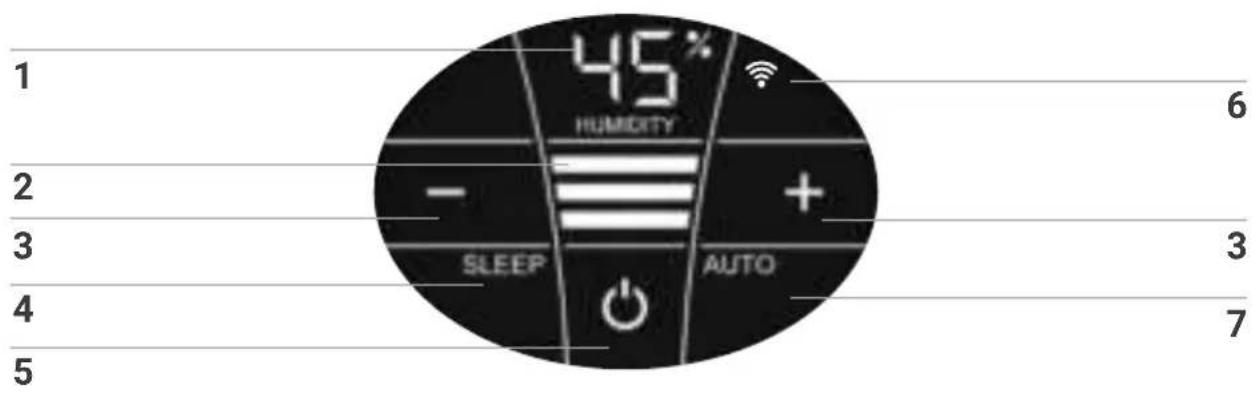
Display Function
| 1 | Humidity | Display the humidity in the room (0 - 99 %). |
| 2 | Power level | Display speeds 1 - 2 - 3. |
| 3 | - and + | Set the power level by tapping:- reduces and + increases the speed. |
| 4 | SLEEP | Tap to turn the sleep mode on or off.ON: The appliance dims the display lighting and reduces the power level to 1.i Power level 2 can be changed manually with the + or - button 3. Automatic mode 7 is not possible.Set the display brightness you want for sleep mode:press the SLEEP button for 3 sec. until the readings HUMIDITY 1 and SLEEP 4 flash. Set the brightness of the display between 0 and 10 with the - or + button 3, which is indicated by flashing in HUMIDITY 1. Press the SLEEP button again for 3 sec. until the readings HUMIDITY 1 and SLEEP 4 are continuously illuminated and the humidity reading for the room is displayed again in HUMIDITY 1.OFF: Bright display illumination and appliance runs in power levels 1 - 3. |
| 5 | ◎ | Switch the appliance on or off by tapping the power button. |
Display Function
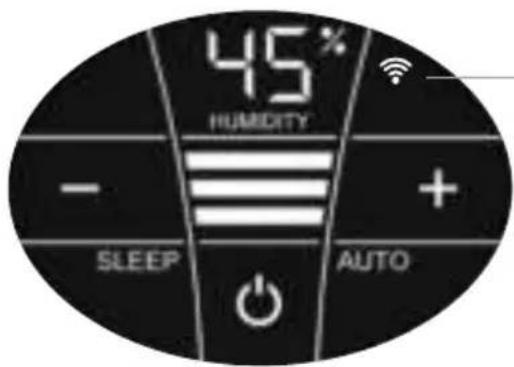
| 6 WIFI | Switch the WiFi connection on and off by tapping.Activate the HOTSPOT mode by touching and holding for 3 sec. You will find a detailed description in the section "WiFi / hotspotÓ. |
| 7 AUTO | Switch Automatic mode on or off by tapping the AUTO button.ON: In the display, AUTO flashes continuously and the appliance automatically regulates the power level according to the humidity in the room.When switching on AUTO, the desired humidity (50 % pre-set) flashes twice and then the measured humidity in the room is shown in the HUMIDITY display1.When the preset humidity is exceeded by more than 5 %, the fan shuts off after approx. 60 sec. and no power level appears in the speed reading2. No humidifi-cation occurs.OFF: AUTO in the display is continuously illuminated and the appliance operates with the power level set at 1 – 3.Set desired humidity 30 – 70 %:Hold AUTO button for 3 seconds. The HUMIDITY 1 display flashes continuously. Set the desired humidity (in 5 % increments) using the - or + buttons3. Hold AUTO button for 3 seconds again until the flashing in display HUMIDITY 1 stops and the humidity measured in the room is shown again. Please make sure that automatic mode is switched on: AUTO flashes continuously in the display! |
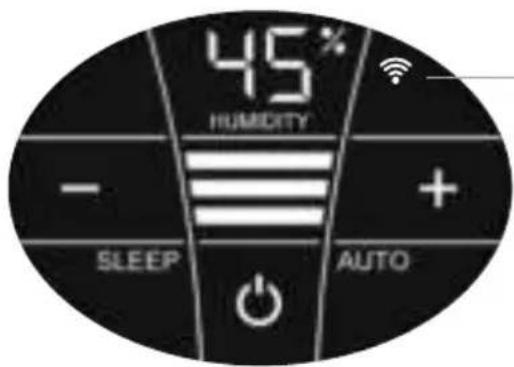
WIFI / HOTSPOT

WiFi
Display Functions & settings
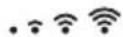
| Switch the WiFi connection on and off or (de)activate it by tapping the WiFi symbol. | |
| WiFi connection ON or activated. | |
| Illuminated | WiFi connection to the Venta server established. |
| Flashes slowly | WiFi connection to the local network established. |
| Flashes rapidly | WiFi connection disabled or waiting for WiFi connection. |
| Illuminated | The WiFi connection is OFF or deactivated. |
| The WiFi module does not send or receive any data and is not connected to any network or appliance. | |
| ... | The Venta appliance is in hotspot mode and is ready for the configuration or network setup. |
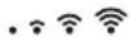
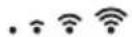
| The four individual segments of the WiFi symbol consecutively light up from the bottom to the top. | |
| The hotspot mode can be activated at any time during device operation by touching the WiFi symbol and holding it for 3 sec. |
CONFIGURATION & VENTA APP
WiFi
1. Activate the hotspot mode on the Venta appliance
To do this, the four individual segments of the WiFi symbol in the appliance display must light up consecutively from bottom to top .

This mode is automatically activated the first time the appliance is operated.

The hotspot mode can be activated any time by touching and holding the WiFi symbol for 3 sec.
2. Activate WLAN on smartphone or tablet
Make sure that your smartphone or tablet is connected to your WLAN home network.
3. Download the VENTA app or install and open it
You can easily operate your Venta appliance remotely plus use and monitor extra appliance functions with the free Venta app.


4. Set up the WiFi function using the VENTA app
Now please follow the instructions on the screen of your smartphone or tablet.

If problems occur during the WiFi setup, please read the section, "What happens if a WiFi connection can't be established?".
Further information at www.venta-air.com/en_gb/Service/Venta-Home-App/
CLEANING & MAINTENANCE
Caution! Ensure the appliance is switched off during all actions and the switching power supply is disconnected from the power outlet!
Display Actions
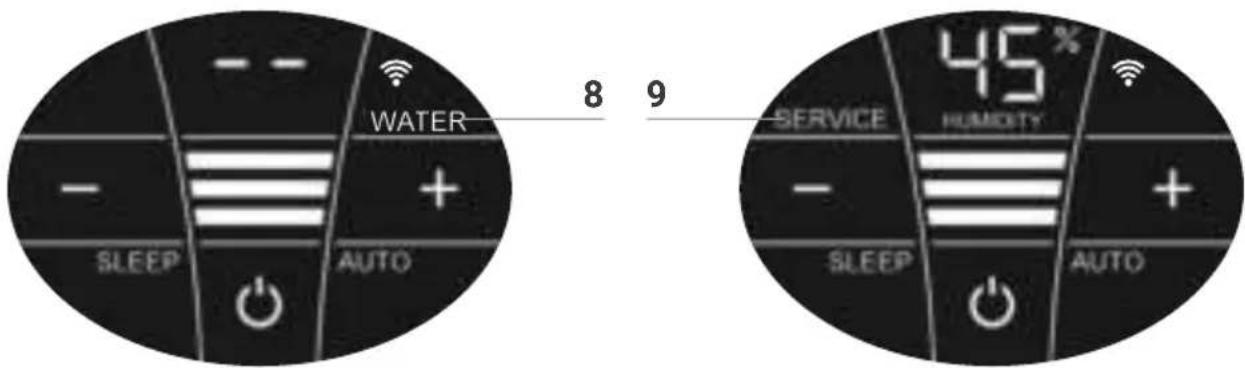
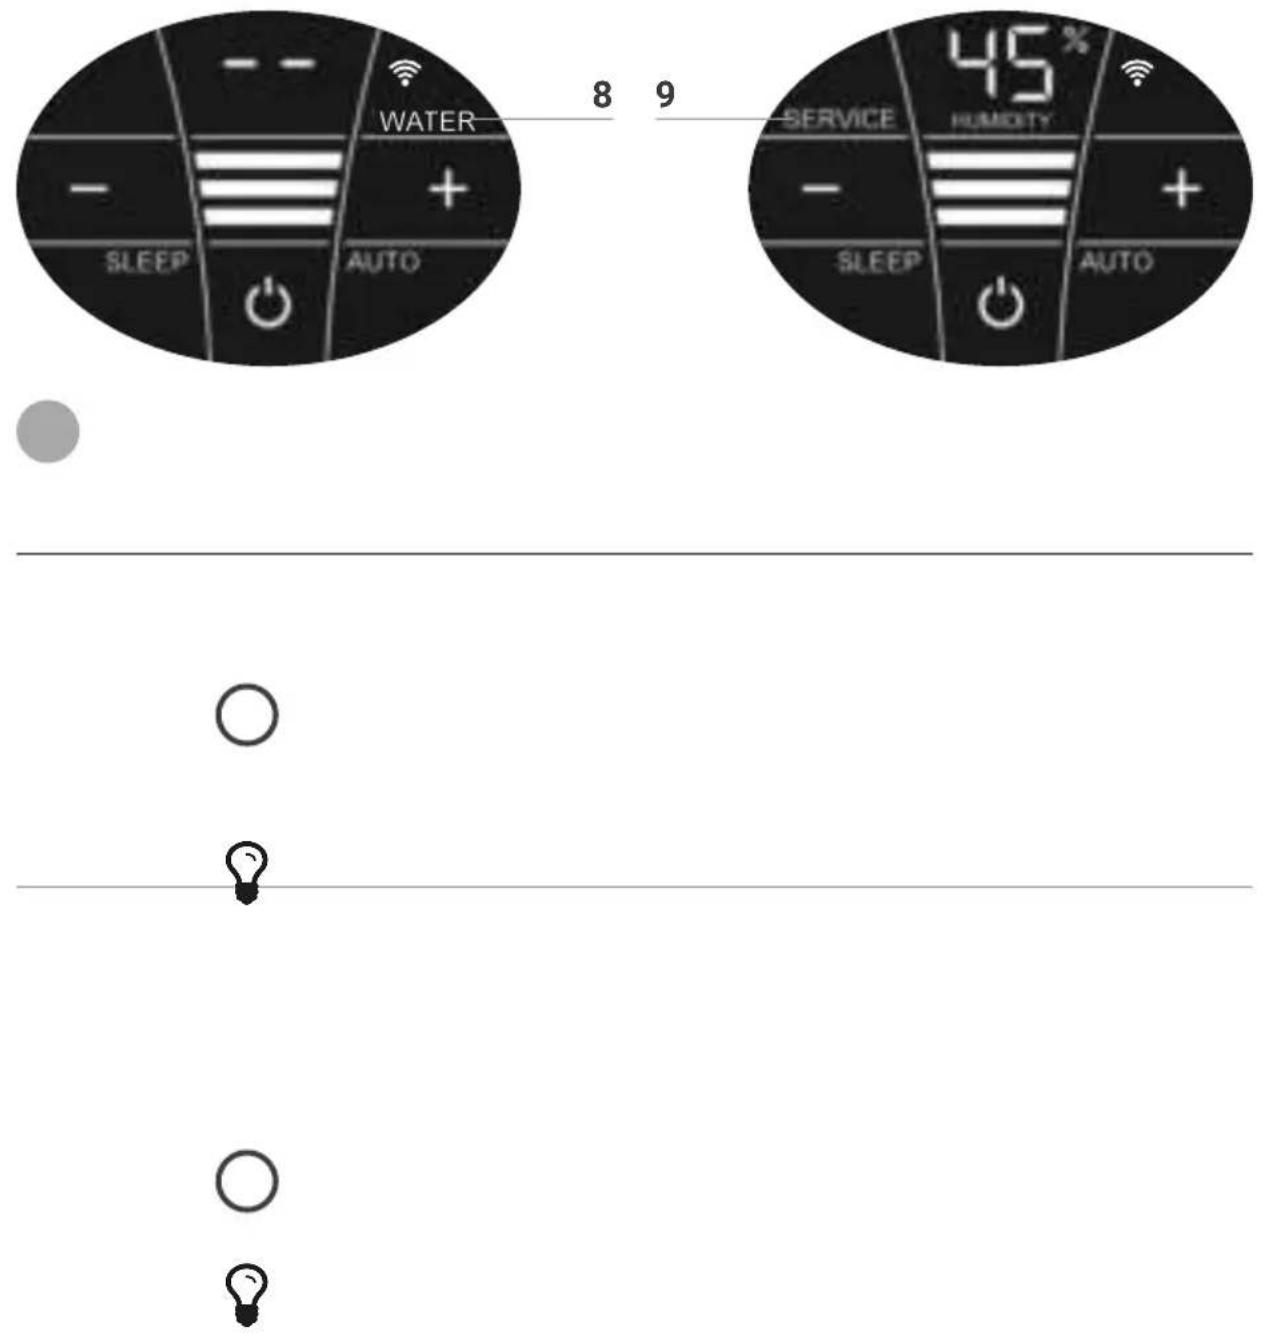
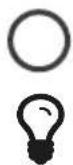
8 WATER
Remove upper housing. Fill lower housing with tap water to the WATERLINE marking. Place upper housing on lower housing and put appliance in operation again.
As soon as there is not enough water in the lower housing, the appliance is switched off automatically and the WATER display appears. In the HUMIDITY display 1, two lines will flash and the humidity in the room is not shown.

To humidify and clean the indoor air continuously, we recommend refilling the water in a timely manner.
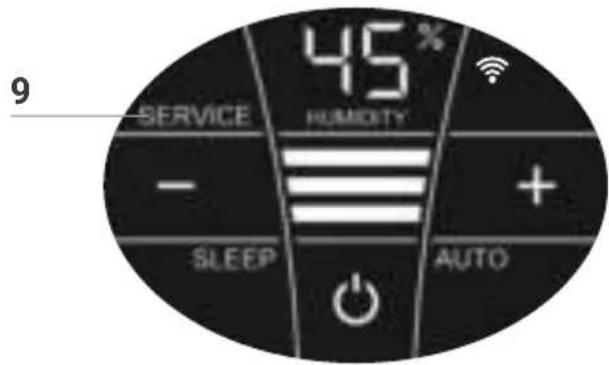
9 SERVICE
Remove upper housing. Drain residual water from lower housing. Rinse lower housing and disk stack. Fill lower housing with tap water up to the WATERLINE marking maximum and add the Venta hygiene additive (for dosage see scale on rear of bottle). Re-assemble the appliance. Touch the SERVICE indicator 9 on the display and hold for 3 sec. until it switches off.
For flawlessly hygienic continuous operation, the SERVICE display indicates a reminder every 14 days that this action needs to be carried out.
This action can be carried out if required, even if the SERVICE message is not shown. When it is completed, simply touch the SERVICE indicator 9 and hold for 3 sec. The next reminder will now be shown again in 14 days with the SERVICE message
Any remaining liquid in the water tray and on the disk stack (white, green-yellow or brown deposits or discolorations) do NOT impair the function of the appliance. For the six-monthly cleaning, we recommend the Venta Cleaner. Please note the instruction manual included with the Venta Cleaner.

natural_image
3D rendering of a white rectangular device with ventilation slots and a central opening, showing two black arrows pointing to features (no text or symbols)
natural_image
3D rendering of a modern building with vertical slats and a central opening, no visible text or symbols
natural_image
3D rendered mechanical assembly with open lid and internal components (no visible text or symbols)


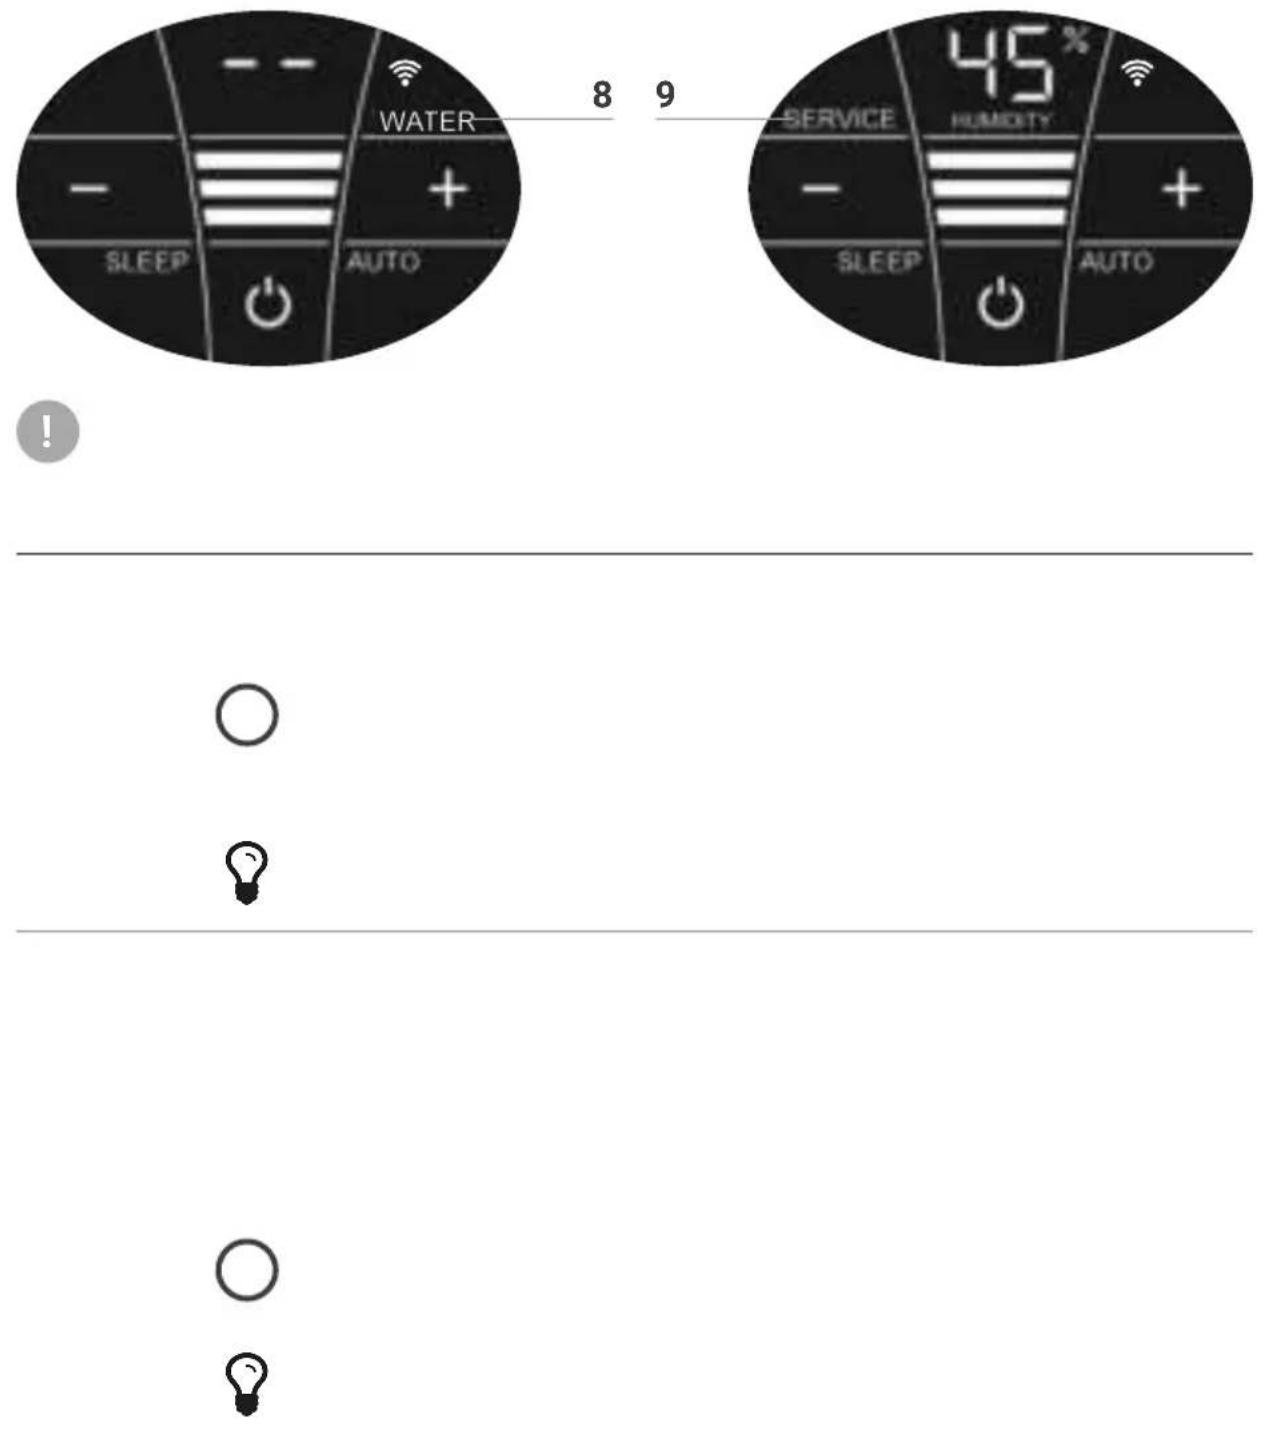
CLEANING OF
THE UPPER HOUSING

Caution! Ensure the appliance is switched off during all actions and the switching power supply is disconnected from the power outlet!
01 Detach upper housing from lower housing. Press locking buttons so that the ends stand up.
02 Fold side parts out of the way.
03 Fold ribbed wings out of the way.
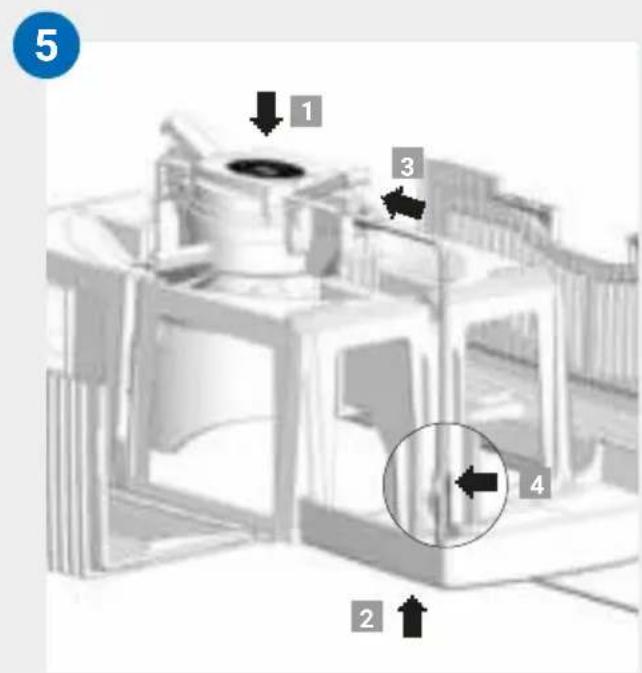
04 Unplug the switching power supply from the drive unit 1. Lift the drive unit upwards and out 2. Disconnect the switching power supply cable by releasing the bracket 3 and pull downward and out through the opening of the upper housing 4.

- Do not disassemble the drive unit and the switching power supply, immerse them in water or bring them into contact with liquids!
- Only clean the drive unit with fan blades and gear with a dry cloth!
- The disassembled upper housing can be cleaned under running water!
- The disassembled upper housing must be absolutely dry before assembly!
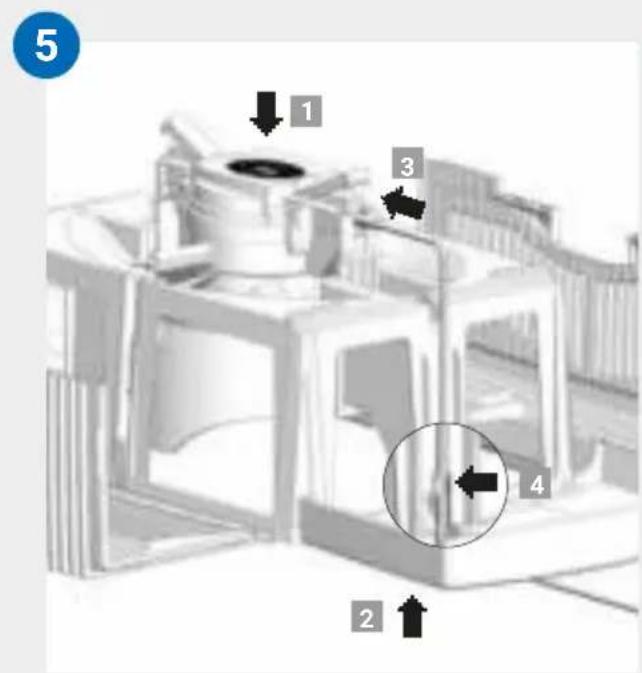
05 Insert the drive unit into the upper housing from the correct side 1. Pull the switching power supply from the bottom upwards and through the opening of the upper housing 2 and plug it into the drive unit until it clicks into place 3. Affix the cable with the bracket 4.
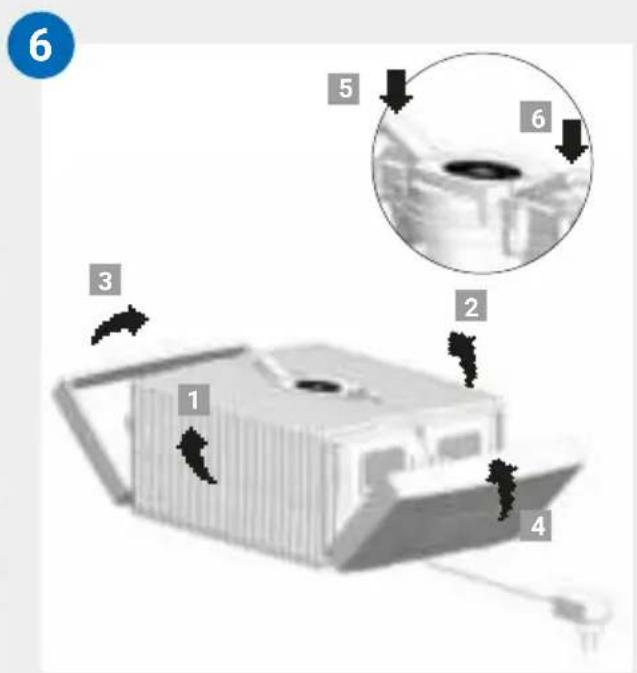
06 The outer ends of the locking buttons must be standing up. Fold the ribbed side wings 1 and 2 upwards, then the side elements 3 and 4. Close the upper housing correctly by pressing down on the outer ends of the locking latches 5 and 6.
TECHNICAL DATA
| Model | AH510 / AH515 | AH530 / AH535 | AH550 / AH555 |
| For room sizes* ≤ 35 m2≤ | 45 m2≤ 60 m2 | ||
| Interactive touch display | Standard | ||
| App control Standard WiFi | |||
| Colours brilliant white / brillant black | |||
| Power levels 3 + Automatic | |||
| Noise emission(speeds 1-3) | 24/34/44 dB(A) | 24/34/44 dB(A) | 24/35/45 dB(A) |
| Power consumption(speeds 1-3) | 3/5/8 watts | ||
| Mains voltage 100-240 V, 50 / 60 Hz | |||
| Water capacity (max.) | 5 litres | 7 litres | 10 litres |
| Dimensions (L x W x H) | 26×28×31 cm | 30×30×33 cm | 45×30×33 cm |
| Weight | approx. 3 kg | approx. 3.5 kg | approx. 5.2 kg |
| WLAN frequency range | 2.4 GHz | ||
| WLAN transmission power | Maximum 20 dBm | ||
* based on a ceiling height of max. 2.5 metres
May be subject to modifications and errors
ACCESSORIES
You can order accessories by phone or online at www.venta-air.com.
PRIVACY POLICY
Venta LuftwŠscher GmbH treats your data confidentially. You can find more information about data protection in our Privacy Policy at www.venta-air.com
GUARANTEE
Due to the high quality of our products, Venta-LuftwŠscher GmbH guarantees that this product will remain defect-free for two years as from the purchase date, provided it is used correctly. If a material or processing error should occur anyway, please contact the Venta Service Team or your dealer. Venta's general guarantee conditions also apply: www.venta-air.com
RECYCLING AND DISPOSAL

The packaging material is recyclable. Please dispose of the packaging in an eco-friendly way using the recycling scheme at your location.
The “crossed-out bin” symbol indicates that you must dispose of waste electrical and electronic equipment (WEEE) separately. Such equipment may contain dangerous and environmentally hazardous substances.
These products should be disposed of at an appropriate collecting point
for recycling electrical and electronic equipment and may not be disposed of in unsorted household waste. This way you can help to protect resources and the environment. For more information, please contact your local authorities.
Children must not be allowed to play with plastic bags and packaging material as there is a danger of injury or suffocation. Store such materials safely or dispose of them in an environmentally friendly way.
WHAT TO DO IF É

Ensure the appliance is switched off during all actions and the switching power supply is disconnected from the power outlet!
É E1 is shown in the display?
The appliance has switched off automatically because the locking latches on the upper housing are not closed properly.

Close upper housing properly again by pushing on the outer ends of the locking latches. Switch appliance off and on with the power button ⏻.
É E2 is shown in the display?
The appliance has switched off automatically, because the motor is overstrained (e.g. through the intrusion of foreign objects or similar).

Action: Remove upper housing. Check whether the disk stack in the lower housing as well as fan blades in the upper housing are freely movable. Then switch the appliance on again.
É white spots appear in the background when you touch the display?
In dry rooms, electrostatic charging can cause white areas to appear in the background on the display. These do not affect the functioning or ability to control the appliance and do not constitute a defect.
É the power button ⏻ to switch on the appliance does not appear in the display?
Please check whether the switching power supply is connected to the mains.
É the power button ⏻ to switch on the appliance does not appear in the display, even though the switching power supply is connected to the mains?

Please check whether the switching power supply is firmly plugged into the drive unit.
Action: Remove upper housing. Check for correct positioning (see cleaning instructions for the upper housing). Then switch the appliance on again.
É WATER is shown in the display, even though there is water in the lower housing?
Please check whether there is sufficient water in the lower housing and/or whether the upper housing is placed correctly on the lower housing.

Action: Remove upper housing. Fill lower housing with tap water to the WATERLINE mark. Place upper housing correctly on lower housing.
Make sure that the switching power supply cable is not trapped between the upper and lower housings. Then switch the appliance on again.
É WiFi connection is not possible
Please check that:
á you are using a 2.4-GHz or a combined 2.4/5-GHz network. This is important because the WiFi/WLAN module in the appliance does not support 5-GHz networks.
á your router supports 802.11b/g/n.
á iOS version 13.0 or higher or Android version 8.0 or higher is installed in your phone or tablet.

If necessary, update the operating system of your phone or tablet.
VENTA SERVICE TEAM
Do you need additional information about your Venta appliance, do you want advice or to order accessories? Our Service Team is there for you! Call us directly, or visit the Venta website: www.venta-air.com
DE +49 751 5008 88
MERCI BEAUCOUP!
APERÇU
WIFI / POINT D'ACCÈS

WiFi
natural_image
3D rendering of a white rectangular device with ventilation slots and a central opening, showing two black arrows pointing to features (no text or symbols)
natural_image
3D rendering of a modern building with vertical slats and a central opening, no visible text or symbols
natural_image
3D rendered mechanical assembly with open lid and internal components (no visible text or symbols)


NETTOYAGE DE LA PARTIE SUPÉRIEURE DE L'APPAREIL

PANORAMICA
natural_image
3D rendering of a white industrial machine casing with ventilation grilles and a central vent (no text or symbols visible)
natural_image
3D rendering of a modern building with vertical slats and a central opening, no visible text or symbols
natural_image
3D rendered mechanical assembly with open lid and internal components (no visible text or symbols)


PULIZIA DELLA PARTE SUPERIORE DELL'APPARECCHIO

Venta-serviceteam 88
! VEILIGHEIDSINSTRUCTIES
OVERZICHT
natural_image
3D rendering of a white rectangular device with ventilation slots and a central opening, showing two black arrows pointing to features (no text or symbols)
natural_image
3D rendering of a modern building with vertical slats and a central opening, no visible text or symbols
natural_image
3D rendered mechanical assembly with open lid and internal components (no visible text or symbols)


REINIGING VAN HET BOVENSTE DEEL

VISTA GENERAL
natural_image
3D rendered object with a cross mark and an exclamation mark, no visible text or symbolsB
natural_image
Three-step diagram showing a device being processed into a housing, with arrows indicating the process (no text or symbols present)C
natural_image
Illustration of a portable air conditioner unit connected to a power outlet, with a circular inset showing a dark oval (no text or symbols)PUESTA EN MARCHA
natural_image
3D rendering of a white rectangular device with ventilation slots and a central opening, showing two black arrows pointing to features (no text or symbols)
natural_image
3D rendering of a modern building with vertical slats and a central opening, no visible text or symbols
natural_image
3D rendered mechanical assembly with open lid and internal components (no visible text or symbols)


LIMPIEZA DE LA PARTE SUPERIOR DEL APARATO

0БЗОР
natural_image
3D printer icon with a black X mark and a warning symbol (no text or labels)B
natural_image
Three-step diagram showing a device being processed into a housing, with arrows indicating the process (no text or symbols present)C

natural_image
Illustration of a portable air conditioner unit connected to a power outlet, with a circular ceiling light visible (no text or symbols)ВВОД В ЭКСПЛУАТАЦИЮ
natural_image
3D rendering of a white rectangular device with ventilation slots and a central opening, showing two black arrows pointing to features (no text or symbols)
natural_image
3D rendering of a modern building with vertical slats and a central opening, no visible text or symbols
natural_image
3D rendered mechanical assembly with open lid and internal components (no visible text or symbols)


ЧИСТКА
INFORMACJE PODSTAWOWE
natural_image
3D rendered object with a cross mark and a warning symbol (no text or labels)B

natural_image
Three-step diagram showing a device being processed into a box, with arrows indicating the process (no text or symbols present)C

natural_image
Illustration of a portable air conditioner unit connected to a power outlet, with a circular inset showing a dark oval (no text or symbols)URUCHOMIENIE
KONFIGURACJA I APLIKACJA
VENTA

Wi-fi
natural_image
3D rendering of a white rectangular device with ventilation slots and a central opening, showing two black arrows pointing to features (no text or symbols)
natural_image
3D rendering of a modern building with vertical slats and a central opening, no visible text or symbols
natural_image
3D rendered mechanical assembly with open lid and internal components (no visible text or symbols)


CZYSZCZENIE GÓRNEJ CZĘŚCI URZĄDZENIA

PRIVIRE DE ANSAMBLU
natural_image
3D rendered object with a cross mark and an exclamation mark symbol, no readable text or labels present.B

natural_image
Three-step diagram showing a device being processed into a container, with arrows indicating the process (no text or symbols present)C

natural_image
Illustration of a portable air conditioner unit connected to a power outlet, with a circular inset showing a dark oval (no text or symbols)PUNEREA ÎN FUNCȚIUNE
natural_image
3D rendering of a white rectangular device with ventilation slots and a central opening, showing two black arrows pointing to features (no text or symbols)
natural_image
3D rendering of a modern building with vertical slats and a central opening, no visible text or symbols
natural_image
3D rendered mechanical assembly with open lid and internal components (no visible text or symbols)

CURĂȚAREA PĂRȚII SUPERIOARE A APARATULUI

PREH'LAD
natural_image
3D rendering of a white rectangular device with ventilation slots and a central opening, showing two black arrows pointing to features (no text or symbols)
natural_image
3D rendering of a modern building with vertical slats and a central opening, no visible text or symbols
natural_image
3D rendered mechanical assembly with open lid and internal components (no visible text or symbols)


ČISTENIE
PŘEHLED
KONFIGURACE & APLIKACE
VENTA

Wi-Fi
natural_image
3D rendering of a white rectangular device with ventilation slots and a central opening, showing two black arrows pointing to features (no text or symbols)
natural_image
3D rendering of a modern building with vertical slats and a central opening, no visible text or symbols
natural_image
3D rendered mechanical assembly with open lid and internal components (no visible text or symbols)


ČIŠTĚNÍ HORNÍ ČÁSTI PŘÍSTROJE

RECYKLACE A LIKVIDACE

ÁTTEKINTÉS
natural_image
3D rendering of a white rectangular device with ventilation slots and a central opening, showing two black arrows pointing to features (no text or symbols)
natural_image
3D rendering of a modern building with vertical slats and a central opening, no visible text or symbols
natural_image
3D rendered mechanical assembly with open lid and internal components (no visible text or symbols)


OVERSIGT
1 Display
2 Apparatets overdel
3 Stiknetdel (monteret)
4 Transportsikring
5 Pladestak
6 Transportsikring
7 Apparatets underdel
8 Flaske med 50 ml hygiejnemiddel
INDEN F∅RSTE IBRUGTAGNING
natural_image
3D rendering of a white rectangular device with ventilation slots and a central opening, showing two black arrows pointing to features (no text or symbols)
natural_image
3D rendering of a modern building with vertical slats and a central opening, no visible text or symbols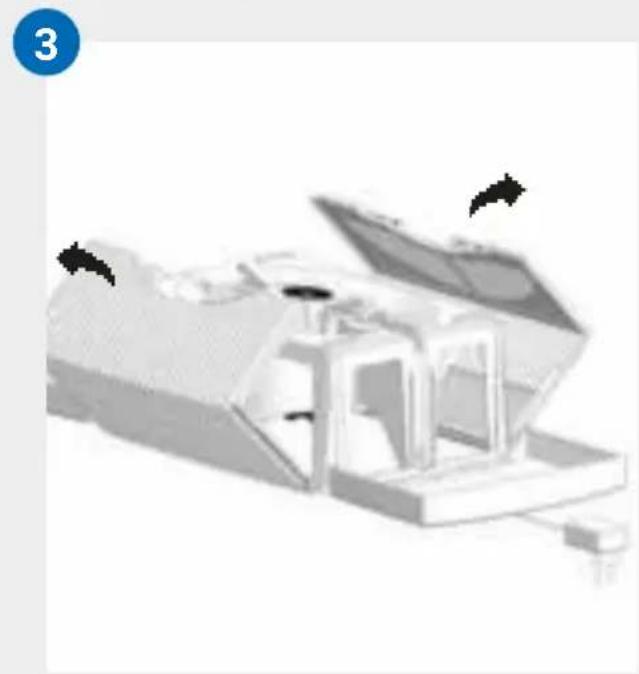
natural_image
3D rendered mechanical assembly with open lid and internal components (no visible text or symbols)


RENG∅RING AF APPARATETS OVERDEL

OBS! Sørg ved alle foranstaltninger for, at apparatet er slukket, og at stiknetdelen er trukket ud af stikdåsen!
HVAD SKAL JEG G∅RE, HVIS...?

LAITTEEN OSAT
natural_image
3D rendering of a white rectangular device with ventilation slots and a central opening, showing two black arrows pointing to features (no text or symbols)
natural_image
3D rendering of a modern building with vertical slats and a central opening, no visible text or symbols
natural_image
3D rendered mechanical assembly with open lid and internal components (no visible text or symbols)


LAITTEEN YLÄOSAN PUHDISTUS

ÖVERSIKT
natural_image
3D rendering of a white rectangular device with ventilation slots and a central opening, showing two black arrows pointing to features (no text or symbols)
natural_image
3D rendering of a modern building with vertical slats and a central opening, no visible text or symbols
natural_image
3D rendered mechanical assembly with open lid and internal components (no visible text or symbols)

RENGÖRING AV
ENHETENS ÖVERDEL

OVERSIKT
1 Display
2 Apparatets overdel
3 Nettadapter (montert)
4 Transportsikring
5 Platestabel
6 Transportsikring
7 Apparatets underdel
8 Flaske hygienemiddel 50 ml
F∅R F∅RSTEGANGS BRUK
natural_image
3D rendering of a white rectangular device with ventilation slots and a central opening, showing two black arrows pointing to features (no text or symbols)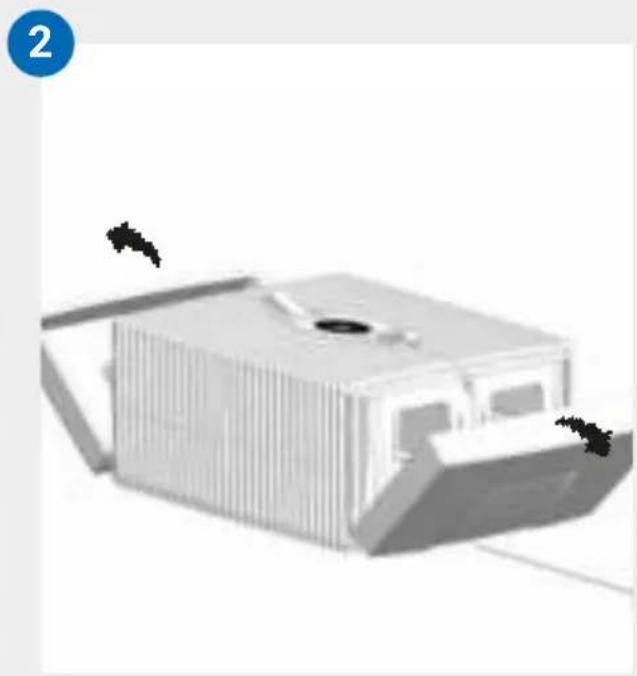
natural_image
3D rendering of a modern building with vertical slats and a central opening, no visible text or symbols
natural_image
3D rendered mechanical assembly with open lid and internal components (no visible text or symbols)

RENGJ∅RING AV
APPARATETS OVERDEL

GAMBARAN KESELURUHAN
1 Paparan
2 Bahagian atas peranti
3 Bekalan kuasa (dipasang)
4 Kunci pengangkutan
5 Paket plat
6 Kunci pengangkutan
7 Bahagian bawah peranti
8 Botol ejen kebersihan 50 ml
SEBELUM PENGGUNAAN KALI PERTAMA
natural_image
3D rendered object with a cross mark and an exclamation mark, no visible text or symbolsB

natural_image
Three-step diagram showing a device being processed into a container, with arrows indicating the process (no text or symbols present)C

natural_image
Illustration of a portable air conditioner unit connected to a power outlet, with a circular inset showing a dark oval (no text or symbols)PERMULAAN
natural_image
3D rendering of a white rectangular device with ventilation slots and a central opening, showing two black arrows pointing to features (no text or symbols)
natural_image
3D rendering of a modern building with vertical slats and a central opening, no visible text or symbols
natural_image
3D rendered mechanical assembly with open lid and internal components (no visible text or symbols)


PEMBERSIHAN DARIPADA BAHAGIAN ATAS PERANTI

natural_image
3D rendering of a white rectangular device with ventilation slots and a central opening, showing two black arrows pointing to features (no text or symbols)
natural_image
3D rendering of a modern building with vertical slats and a central opening, no visible text or symbols
natural_image
3D rendered mechanical assembly with open lid and internal components (no visible text or symbols)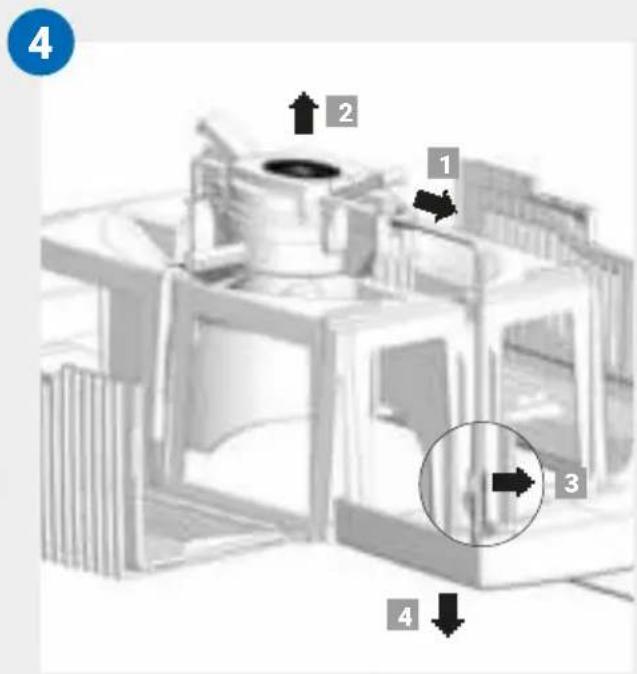


scatter
| Point | X | Y | |-------|---|---| | ● | 0 | 1 | | ● | 0 | 0 | | ■ | 0 | 0 | | ■ | 0 | 1 | | ■ | 0 | 2 | | ■ | 0 | 3 | | ■ | 0 | 4 | | ■ | 0 | 5 | | ■ | 0 | 6 | | ■ | 0 | 7 | | ■ | 0 | 8 | | ■ | 0 | 9 | | ■ | 0 | 10 | The chart displays a scatter plot with no explicit title or axis labels. The data points are scattered across the chart, but the legend is not explicitly labeled in the image.
www.venta-air.com


B
natural_image
Three-step diagram showing a mechanical component with downward arrows indicating motion (no text or symbols)C
natural_image
Illustration of a portable electronic device with a power outlet and a circular screen (no text or symbols)!

O
[Non-Text]
1
95
6
2 - +
3
SLEEP AUTO 3
4
7
5

5


• • •

. ◯ Wi-Fi


WiFi


App Store에서 다운로드 하기

다운트하기 Google Play


natural_image
3D rendering of a white rectangular device with ventilation slots and a central opening, showing two black arrows pointing to features (no text or symbols)
natural_image
3D rendering of a modern building with vertical slats and a central opening, no visible text or symbols
natural_image
3D rendered mechanical assembly with open lid and internal components (no visible text or symbols)


!
!


www.venta-air.com


[Non-Text]
[Non-Text]
[Non-Text]
www.venta-air.com


50 ml
B

natural_image
Three-step diagram showing a mechanical component being processed into a cylindrical housing (no text or symbols visible)C
natural_image
Illustration of a portable electronic device with a power outlet and a circular screen (no text or symbols)i
!


5


WiFi
#
#
[Non-Text]
•


WiFi


www.venta-air.com/Service/Venta-Home-App/
8
9
!
natural_image
3D rendering of a white rectangular device with ventilation slots and a central opening, showing two black arrows pointing to features (no text or symbols)
natural_image
3D rendering of a modern building with vertical slats and a central opening, no visible text or symbols
natural_image
3D rendered mechanical assembly with open lid and internal components (no visible text or symbols)


!

scatter
| Point | X | Y | |-------|----|----| | ● | 0 | 1 | | ■ | 0 | 2 | | ■ | 0 | 3 | | ■ | 0 | 4 | | ■ | 0 | 5 | | ■ | 0 | 6 | | ■ | 0 | 7 | | ■ | 0 | 8 | | ■ | 0 | 9 | | ■ | 0 | 10 | | ■ | 0 | 11 | | ■ | 0 | 12 | | ■ | 0 | 13 | | ■ | 0 | 14 | | ■ | 0 | 15 | | ■ | 0 | 16 | | ■ | 0 | 17 | | ■ | 0 | 18 | | ■ | 0 | 19 | | ■ | 0 | 20 | | ■ | 0 | 21 | | ■ | 0 | 22 | | ■ | 0 | 23 | | ■ | 0 | 24 | | ■ | 0 | 25 | | ■ | 0 | 26 | | ■ | 0 | 27 | | ■ | 0 | 28 | | ■ | 0 | 29 | | ■ | 0 | 30 | | ■ | 0 | 31 | | ■ | 0 | 32 | | ■ | 0 | 33 | | ■ | 0 | 34 | | ■ | 0 | 35 | | ■ | 0 | 36 | | ■ | 0 | 37 | | ■ | 0 | 38 | | ■ | 0 | 39 | | ■ | 0 | 40 | | ■ | 0 | 41 | | ■ | 0 | 42 | | ■ | 0 | 43 | | ■ | 0 | 44 | | ■ | 0 | 45 | | ■ | 0 | 46 | | ■ | 0 | 47 | | ■ | 0 | 48 | | ■ | 0 | 49 | | ■ | 0 | 50 | | ■ | 0 | 51 | | ■ | 0 | 52 | | ■ | 0 | 53 | | ■ | 0 | 54 | | ■ | 0 | 55 | | ■ | 0 | 56 | | ■ | 0 | 57 | | ■ | 0 | 58 | | ■ | 0 | 59 | | ■ | 0 | 60 | | ■ | -1 | -1 | | ■ | -1 | -2 | | ■ | -1 | -3 | | ■ | -1 | -4 | | ■ | -1 | -5 | | ■ | -1 | -6 | | ■ | -1 | -7 | | ■ | -1 | -8 | | ■ | -1 | -9 | | ■ | -1 | -10 | | ■ | -1 | -11 | | ■ | -1 | -12 | | ■ | -1 | -13 | | ■ | -1 | -14 | | ■ | -1 | -15 | | ■ | -1 | -16 | | ■ | -1 | -17 | | ■ | -1 | -18 | | ■ | -1 | -19 | | ■ | -1 | -20 | | ■ | -2 | -2 | | ■ | -2 | -3 | | ■ | -2 | -4 | | ■ | -2 | -5 | | ■ | -2 | -6 | | ■ | -2 | -7 | | ■ | -2 | -8 | | ■ | -2 | -9 | | ■ | -2 | -10 | | ■ | -2 | -11 | | ■ | -2 | -12 | | ■ | -2 | -13 | | ■ | -2 | -14 | | ■ | -2 | -15 | | ■ | -2 | -16 | | ■ | -2 | -17 | | ■ | -2 | -18 | | ■ | -2.5| -2.5| | ■ | -2.5| -3.5| | ■ | -2.5| -4.5| | ■ | -2.5| -5.5| | ■ | -2.5| -6.5| | ■ | -2.5| -7.5| | ■ | -2.5| -8.5| | ■ | -2.5| -9.5| | ■ | -2.5| -10.5| | ■ | -2.5| -11.5| | ■ | -2.5| -12.5| | ■ | -2.5| -13.5| | ■ | -2.5| -14.5| | ■ | -2.5| -15.5| | ■ | -2.5| -16.5| | ■ | -2.5| -17.5| | ■ | -2.5| -18.5| | ■ | -2.5| -19.5| | ■ | -2.5| -20.5|


[Non-Text]
á

SERVICE AND SUPPORT
GERMANY
service-hu@venta-air.com
www.letmerepair.com
ITALY
LetMeRepair GmbH
Fichtestrasse 1a
02625 Bautzen
service-it@venta-air.com
www.letmerepair.com
MONGOLIA
AERIS LLC
SUITE 316, Barilga Archi-
tecture Building, Chinggis
Avenue, Oron Suuts Street,
2nd horoo, Khan-Uul
district, Ulaanbaatar,
Mongolia 17032
Tel.: +976-99101185,
+976-99096696
sales@aeris.mn
www.aeris.mn
PORTUGAL
LetMeRepair GmbH
Fichtestrasse 1a
02625 Bautzen
service-pt@venta-air.com
www.letmerepair.com
CHILE
Venta Air Technologies, Inc.
US Headquarters
1111 North Plaza Drive
Suite 715
Schaumburg, IL 60173
Address Service Co., Ltd.
17-9, Shinoda, Togane-shi,
Chiba, 283-0013 Japan
Tel.: 0120-407-554
venta_support@adservice.
co.jp
CZECH REPUBLIC
LetMeRepair GmbH
Fichtestrasse 1a
02625 Bautzen
service-cz@venta-air.com
www.letmerepair.com
LATVIA / LITHUANIA
SIA ,BALTIJAS
TIRDZNIECÍBAS
UZNÉMUMS*
Dārzauglu iela 1-201,
Riga LV-1012, Latvia
Tel.: +371 67790720
info@btu.lv
RUSSIA
Venta Russia TSK IMPORT
Kelvin South Business
Park, East Kilbride, G75
OYB, Scotland, UK
Tel.: +44 (0) 1355 241 222
service-uk@venta-air.com
Fax +44 1355 246575
SLOVAKIA
LetMeRepair GmbH
Fichtestrasse 1a
02625 Bautzen
service-sk@venta-air.com
www.letmerepair.com
SPAIN
LetMeRepair GmbH
Fichtestrasse 1a
02625 Bautzen
service-es@venta-air.com
www.letmerepair.com
SOUTH AFRICA
EUROCARE Wellness
5 Star Business Park,
Unit 2, Persimmon Close,
Honeydew, Johannesburg
Südafrika
Tel.: +27 11 888 3255
Fax: +27 11 888 9874
info@eurocarewellness.
co.za
SOUTH KOREA
VENTA KOREA CO., LTD.
3/F., Seojin Bldg., 754,
Seolleung-ro, Gangnam-
Gu, Seoul 135-948, Korea
Tel.: +82 22 03 40 114
Fax: +82 22 03 40 119
UKRAINE
Venta-Centre Ukrain
Schlichtera, 11
Kharkov, Ukraine
Tel.: +38 057 752 72 72
Fax: +38 057 768 01 57
venta@venta.com.ua
FINLAND
No. 27, Jalan PP 11/4,
Alam Perdana Indust-
rial Park, Taman Putra
Perdana, 47130 Puchong,
Selangor, Malaysia
Tel.: +603-8322 6628
Fax: +603-8322 6066
info@gasales.com.my
SERVICE AND SUPPORT
www.venta-air.com/Service/Service-Support/
VENTA WORLD WIDE
www.venta-air.com/en_de/Venta-worldwide/
EAC CE