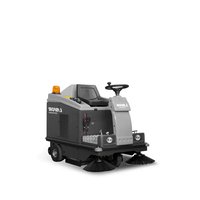
SWL700ST - Sweeper Lavor - Free user manual and instructions
Find the device manual for free SWL700ST Lavor in PDF.
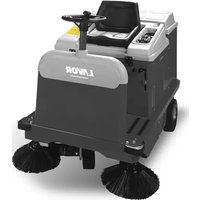
| Product type | Self-propelled sweeper (ride-on sweeper) with internal combustion engine |
| Brand | Lavor |
| Model | SWL700ST |
| Power supply | Petrol (Honda 4-stroke engine, 3.4 kW) |
| Working width (main brush) | 510 mm |
| Working width (main brush + side brush) | 680 mm |
| Cleaning capacity | 2600 m²/h |
| Collection hopper capacity | 45 L |
| Filter surface | 2 m² |
| Filter cleaning | Manual (mechanical shaking) |
| Forward speed | 1.1 m/s |
| Dimensions (L × W × H) | 1400 × 730 × 945 mm |
| Weight (without battery) | 77 kg |
| Engine type | Honda GX (petrol) |
| Engine power | 3.4 kW |
| Measured sound power level (LwA) | 93 dB |
| Guaranteed sound power level (LwA) | 95 dB |
| Sound pressure level (LpA) | 79 dB |
| Minimum operating temperature | -28 °C |
| Maximum operating temperature | +38 °C |
| Intended use | Outdoor, hard surfaces (asphalt, concrete, wood, metal, ceramic, marble, plastic, short-pile carpet) |
| Maximum permissible slope | 2% |
| Periodic maintenance | Engine oil change every 50 h, air filter cleaning every 25 h, check dust seals every 40-70 h |
| Safety | Front wheel brake, safety guards (cover, casing, nets, bumpers), emergency stop via engine cut-off |
Frequently Asked Questions - SWL700ST Lavor
User questions about SWL700ST Lavor
0 question about this device. Answer the ones you know or ask your own.
Ask a new question about this device
Download the instructions for your Sweeper in PDF format for free! Find your manual SWL700ST - Lavor and take your electronic device back in hand. On this page are published all the documents necessary for the use of your device. SWL700ST by Lavor.
USER MANUAL SWL700ST Lavor
INSTRUCTIONS AND OPERATING MANUAL Sweeper
EN pag. 25
MANUEL D'INSTRUCTION Motobalayeuse
FR page 43
Technical data plate
IT
index . pag.
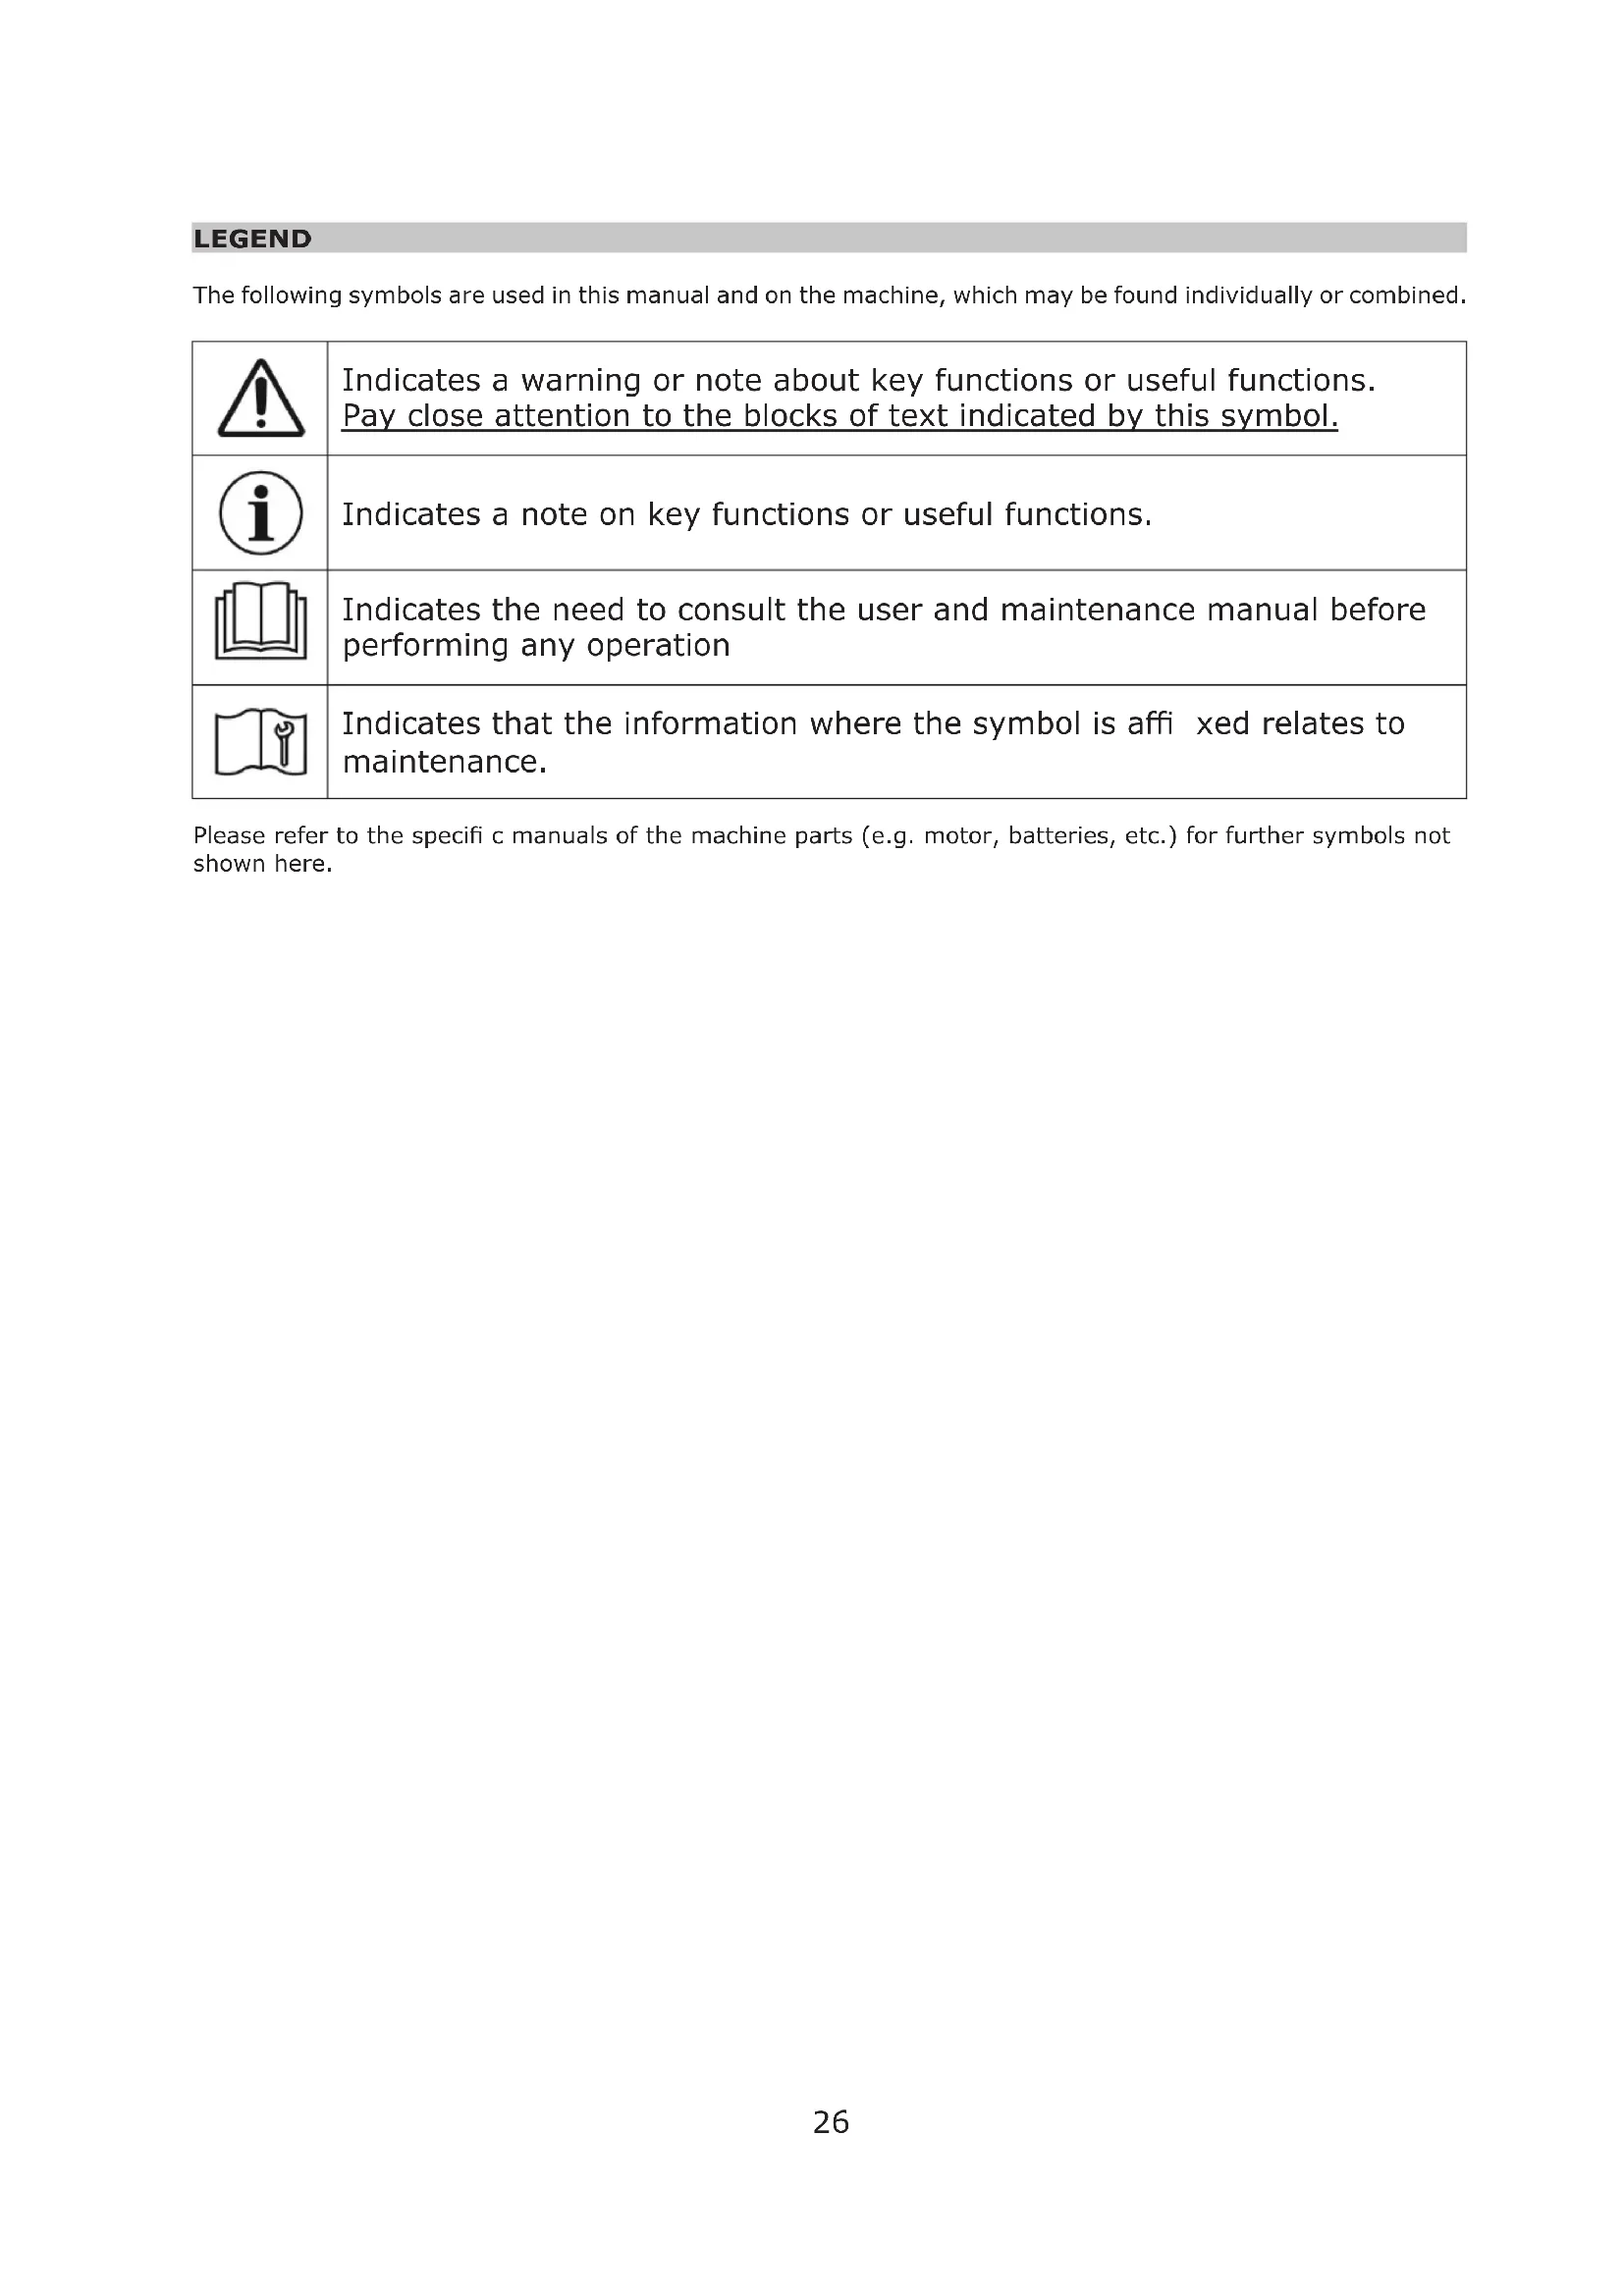
The following symbols are used in this manual and on the machine, which may be found individually or combined.
| ! | Indicates a warning or note about key functions or useful functions. Pay close attention to the blocks of text indicated by this symbol. |
| i | Indicates a note on key functions or useful functions. |
| Indicates the need to consult the user and maintenance manual before performing any operation | |
| Indicates that the information where the symbol is affixed relates to maintenance. |
Please refer to the specific manuals of the machine parts (e.g. motor, batteries, etc.) for further symbols not shown here.

BEFORE USING THE MACHINE, READ THIS INSTRUCTION MANUAL CAREFULL
THE MANUFACTURER
DISCLAIMS ALL LIABILITY FOR DAMAGE TO THINGS AND / OR INJURY TO PERSONS RESULTING FROM FAILURE TO COMPLY WITH THE INSTRUCTIONS IN THIS MANUAL AND FROM INCORRECT AND / OR IMPROPER MACHINE USE.
ALL THE EQUIPMENT NEEDED FOR PERSONAL PROTECTION (GLOVES, MASKS, WHITE-LENS GLASSES, KEYS, TOOLS, ETC.) MUST BE PROVIDED BY THE USER.
THE MACHINE IS NOT INTENDED FOR USE BY PERSONS (INCLUDING CHILDREN) WITH REDUCED PHYSICAL, SENSORY OR MENTAL CAPABILITIES, OR LACK OF EXPERIENCE AND KNOWLEDGE.
CHILDREN BEING SUPERVISED NOT TO PLAY WITH THE APPLIANCE.
THIS MACHINE IS INTENDED FOR COMMERCIAL USE, FOR EXAMPLE IN HOTELS, SCHOOLS, HOSPITALS, FACTORIES, SHOPS, OFFICES, RENTAL BUSINESSES AND LARGE SPACES IN GENERAL. FUTHERMORE, THE MACHINE:
- CAN BE USED INDOORS WITHOUT RESTRICTIONS (FOR THE BATTERY VERSIONS ONLY);
- MUST NOT BE USED OR KEPT OUTDOORS, IN DAMP CONDITIONS OR DIRECTLY EXPOSED TO RAIN;
- SHALL BE STORED INDOORS ONLY.
FOR EASIER READING, REFER TO THE CONTENTS PAGE.
ALWAYS KEEP THIS MANUAL HANDY FOR QUICK REFERENCE (IN CASE OF LOSS, ASK YOUR DEALER FOR ANOTHER COPY)
THE MANUFACTURER
RESERVES THE RIGHT TO MAKE CHANGES OR UPGRADE ITS MACHINES, WITHOUT ANY OBLIGATION TO UPGRADE PREVIOUSLY-SOLD MACHINES.
ALL SWEEPERS CONFORM TO EEC STANDARDS AND ARE LABELLED:

CHAPTER 2 - PURPOSE OF THE SWEEPER
The manufacturer. is pleased to be able to count you among the owners of the sweepers.
By following the instructions below, we are sure you will fully appreciate the working possibilities of the sweepers.
This instruction manual is provided to instruct and defi ne as clearly as possible, the purposes and intentions for which the machine was built and for safe operation.
You will also find listed all those small operations that are necessary to keep the motor-sweepers efficient and safe, easy to perform within the reach of anyone.
Always call on specialised personnel for extraordinary maintenance work.
You will find information on residual hazards or risks, i.e. all those risks that cannot be eliminated, with instructions tailored to the individual case; there will be information on permitted and non-permitted uses; instructions on commissioning, technical indications and permitted performance; instructions on the use of the sweepers and its maintenance; instructions on decommissioning and dismantling or demolition.
- UNPACKING:
Having eliminated the outer packaging, free the machine from the pallet as follows:
- Release the front wheel brake (WITH THE FOOT, NOT WITH THE HANDS !!!)
- Remove the sticky tape Detail C blocking the handlebar
- Open the bin Detail A and pull out the two handlebar supports Detail B Fig.1
- Screw the handlebar supports Part. B into the holes Part. E Fig. 1
- Screw the ends of the handle into the holes Detail D on the supports as shown in Fig.1
- Take the machine off the pallet: according to the machine weight, written on the CE label, this can be done in different ways:
a. according to the machine weight, written on the CE. With the aid of one or more people provided with gloves, lift the machine, holding it by handle at the front, and stand it on the ground.
b. With the aid of a slanting board (not longer than 80~cm not to damage the dust flaps) placed against the narrowest side of the bench, slide the machine down until the floor.

IMPORTANT:Check that the machine has not been damaged. In the case of apparent faults, do not attempt to use the machine and inform the supplier or the manufacturer.

CIT IS DUTY OF THE USER TO ENSURE THAT THE WASTE PACKAGING IS DISPOSED OF AND DESTROYED ACCORDING TO THE SPECIFIC REGULATIONS.
ASSEMBLING THE SIDE BRUSH:
- Take the side brush Detail 2 Fig. 2 out of the bin Detail A Fig. 1
- Unscrew and remove the three bolts Detail 1 Fig. 1; assemble the brush so that the three pins fit into the holes Detail 3 Fig. 2
- Replace the three bolts Detail 1 and screw on tightly to block the brush.
- Once assembled, the side brush makes contact with Detail 2 Fig. 2 blocking the pulley where to place the elastic belt Detail 5 Fig. 1
- Pull the belt Detail 5 forwards and fit it into the plastic pulley Detail 4.
- Unscrew the screws Detail 6: the purpose of these screws is to keep the belt taut while assembling the brush. Once the brush has been assembled these screws are no more needed.
- Secure the cover Detail 1 Fig. 3 using the three screws Detail 2 Fig. 3.
CHAPTER 4 - PERMITTED ENVIRONMENTAL CONDITIONS

Consult the attached motor instructions booklet, and nevertheless:
FOR THE ENDOTHERMIC VERSIONS:
MINIMUM WORKING TEMPERATURE - 28^ C (-18,4° F)
MAXIMUM WORKING TEMPERATURE +38^(+100^)
FOR THE ELECTRIC VERSIONS:
MINIMUM WORKING TEMPERATURE - 20^ C (-4° F)
MAXIMUM WORKING TEMPERATURE +40^(+104^)

CHAPTER 5 - PERMITTED AND FORBIDDEN USES
PERMITTED USES:
The sweeping machines are designed for cleaning ground surfaces under the following conditions: types of material to be swept up from ground: machining residues, dust, grit, dirt in general; types and features of working surfaces (ground): hard, fl at and compact surfaces such as: asphalt, concrete, wood surfaces, metallic surfaces, ceramics, marble, smooth or rusticated plastic materials fibre or synthetic (to avoid electrostatic charges on these surfaces, natural fi bre brushes are essential.) cut moquette; type of environment: closed environments (electric versions), open environments (endothermic versions).
FORBIDDEN USES:
The sweeping machines must not be used under the following conditions:
The machine must not be used on surfaces with a gradient of more than 2% .
- The machine must not be used in the presence of explosive or inflammable materials (in these circumstances machines bearing FLP certifi cates must be used).
- The endothermic version of the machine (with an internal combustion engine) must not be used in enclosed environments since the exhaust fumes from the motor contain carbon monoxide, a lethal odourless gas.
The machine must not be used on surfaces which are particularly loose, broken up or gravely.
- For gathering up oils, toxic dust or materials and chemical in general (specific authorisation must be requested from the manufacturer or supplier if the machine is to used in chemical plants or in environments where toxic waste is to be removed from the floors).
The machine must not be used on public highways as it is not equipped for highway homologation.
The machine must not be used in badly lit environments unless fitted with their own lighting unit.
The machine must not be towed or used for towing anything.
- The machine must not be used for clearing snow, for washing any type of surface or for use on particularly wet or damp surfaces.
- The machine must not be used for collecting filiform materials (for example, waste threads from textile production, or long chips from mechanical machining) since material in this form would be incompatible with the mechanical rotary action of the central brush.
The machine must not be used as a raised surface or resting surface for persons or objects.
- Sweeping up lighted cigarette butts or any other object which could cause the combustion of the deposits in the container or fiiter cartridges.
The machine must not be used without the protective casing with which it is fit tted.
CHAPTER 6 - TECHNICAL FEATURES AND NOISE LEVELS
| DESCRIPTION | U.M. | SLG 700 ST | SLG 700 ET | SWL 700 ST, SW 2600 SC, CSW 568 G | SWL 700 ET, SW 2600 BT, CSW 568 BT | SWL 900 ST, SW 3700 SC, CSW 788 G | SWL 900 ET, SW 3700 BT, CSW 788 BT |
| POWER | - | Petrol Battery Petrol Battery | |||||
| CLEANING WIDTH WITH MAIN BRUSH | mm | 510 510 | 510 510 700 | 700 | |||
| CLEANING WIDTH WITH MAIN BRUSH + SIDE BRUSH | mm | 680 680 | 680 680 880 | 880 | |||
| CLEANING CAPACITY | m²/h | 2600 260 | 2600 2600 | 3550 | 3550 | ||
| TRACTION | Standard | Standard | Standard | Standard | Standard | Standard | |
| SPEED | m/s | 1,1 | 1,1 | 1,1 | 1,1 | 1,1 | 1,1 |
| FILTERING SURFACE | m² | 2 | 2 | 2 | 2 | 3 | 3 |
| FILTER CLEANING | - | Manual | Electric | Manual | Electric | Manual | Electric |
| CONTAINER CAPACITY | L | 45 | 45 | 45 | 45 | 55 | 55 |
| ELECTRIC MOTOR | kW | - | 0,7 | - | 0,4 | - | 0,4 |
| ENDOTHERMIC MOTOR Honda | kW | 3,4 | - | ||||
| SPANNUNG | V. | 12 | - | - | 12 | - | 12 |
| LENGTH | mm | 1400 140 | 0 1260 1260 | 1260 | 1260 | ||
| WIDTH | mm | 730 730 | 630 630 820 | 820 | |||
| HEIGHT | mm | 945 945 | 850 850 850 | 850 | |||
| WEIGHT (WITHOUT BATTERIES) | kg | 77 | 78 | 76 | 78 | 87 | 89 |
| MAX. OPERATING AUTONOMY | h | - | 4,5 1,5 | -- 4 | 1,5 --4 | 1,5 --4 | 1,5 --4 |
| ACOUSTIC PRESSURE LPA | dB | 79 | 65 | 79 | 65 | 79 | 65 |
| ACOUSTIC POWER MEASURED LwA | dB | 93 | 81 | 93 | 81 | 93 | 81 |
| ACOUSTIC POWER GRANTED LwA | dB | 95 | 83 | 95 | 83 | 95 | 83 |
| VIBRATION HAND-ARM (K=UNCERTAINTY) | m/s² | 13,27 (K=1,17) | 1,03 (K=0,19) | 13,27 (K=1,17) | 1,03 (K=0,19) | 13,27 (K=1,17) | 1,03 (K=0,19) |
CHAPTER 7 - DESCRIPTION OF THE MACHINE
DETAIL FIG.DESCRIPTION
| 1 | 4 | Central cover | 1 4\B | Central cover |
| 2 | 4 | Rh side Protective case | 2 4\B | Rh side Protective case |
| 2 | 4 | Lh side Protective case | 2 4\B | Lh side Protective case |
| 3 | 4 | Rh side safety net | 3 4\B | Rh side safety net |
| 3 | 4 | Lh side safety net | 3 4\B | Lh side safety net |
| 4 | 4 | Front bumper | 4 4\B | Front bumper |
| 5 | 4 | Cover for side brush | 5 4\B | Cover for side brush |
| 6 | 4 | Case switch (SLG 700 ET ONLY) | 6 4\B | Case switch (BATTERY ONLY) |
| 7 | 4 | Motor safety net (SLG 700 ET ONLY) | 7 4\B | Motor safety net (WITH ENDOTHERMIC ENGINES ONLY) |
| 8 | 4 | Motor safety net (SLG 700 ET ONLY) | Motor safety net (WITH ENDOTHERMIC ENGINE S ONLY) |
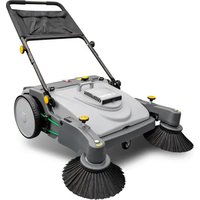
SIDE BRUSH:
The side brush, Detail 1 Fig. 5, acts as a conveyor of the dust and rubbish and is only used to clean edges, corners and borders; after these operations it has to be lifted up to avoid raising dust and also because the cleaning effect of the side brush is always less than that of the main broom.
CENTRAL BRUSH:
The main brush, Detail 2 Fig. 5 is the main part of the sweeper. This brush collects and loads dust and rubbish in the refuse container; it is available with diff erent types of bristles of diff erent harnesses according to the material to be collected; it can be adjusted in height when it is worn.

IMPORTANT: Never collect string, wires, packaging straps, sticks etc., that are longer than 25~cm as they could wind around the side and main brushes.
- FILTERING SYSTEM:
Thanks to the sweeper's filtering effect no dust is seen in the environment when it is working. This is achieved by means of filters Detail 3 Fig. 5; the filter system can be disengaged by pulling the knob Detail 4 Fig. 6 upwards.

IMPORTANT: Disengage the fi iter when going over damp surfaces (if the machine is running) otherwise the paper fi liters will get damp causing them to deteriorate quickly.
DUST FLAPS:
See Details 4 of Fig. 5. These flaps are all around the main brush and are extremely important to ensure that the sweeper works properly thanks to their suction effect; check them often to make sure they are always in a good state of repair.
- REFUSE CONTAINER:
The refuse collector or container Detail A Fig. 1, is made in strong and resistant plastic and holds all the material collected by the main brush and dust from the fi Iters.

IMPORTANT: Always empty the container after the motor has been turned off, wearing gloves and even a mask to protect your lungs from the dust which is always present in this operation.
BATTERY CHARGER (only for SLG 700 ET);
The battery charger (Detail 1 Fig. 5/B) is located on board the machine and can be accessed by lifting the central casing Detail 1 Fig. 4.
The battery can be recharged by opening this casing and using the dedicated socket.
DESCRIPTION OF THE MANUAL COMMANDS
SLG 700 ST/SWL 700 ST/SWL 900 ST, SW 2600 SC, SW 3700 SC : Part. 1 - 4 - 5 - 6 - 9
FORWARDSLEVER(FORALLVERSIONS):
By pulling the forwards lever, Detail 1 Fig. 6 towards the handle, an internal mechanism is activated which causes the moving of the sweepers at its own speed (forwards only). Traction will stop when you let go of this lever.
SIDE BRUSH ENGAGEMENT LEVER (FOR ALL VERSIONS):
The engagement lever Detail 6 Fig. 6 makes possible to lower the brush from the driving seat. Remember that the side brush must only be used for cleaning edges, prof les and corners and that it continues to rotate when the machine motor is working.

IMPORTANT: Never touch the side brush with your hands and never pick up threaded materials.
- FILTER SHAKING KNOB (endothermic motor only):
This knob is used to shake (clean) the filter, Detail 3 Fig. 5 : pull it and leave it suddenly 5 or 6 times to mechanically shake the fi Iters; the dust on the fi Iters will fall inside the container.

IMPORTANT: This operation must be carried out before starting works and before emptying the container with the motor off or with suction disengaged.
SUCTION OFF KNOB (FOR ALL VERSIONS):
Detail 4 Fig. 6. When this knob is pulled outwards, suction is disengaged. Disengage the suction every time the fi liters need shaking or when passing over damp areas (with the motor on).
FLAP-LIFT LEVER (FOR ALL VERSIONS):
By pressing the flap-lift lever Part. 9 Fig. 6, the front seal lifts up for picking up a large objects. Suitable for collecting leaves, cigarette packets, etc.
SPECIFIC DESCRIPTION FOR BATTERY SWEEPERS
- START KEY (FOR ALL VERSIONS):
Detail 3 Fig. 6, to start and stop the sweeper's motor that activates all the movements and rotations at a steady state.
- FLAT BATTERY INDICATOR LIGHT: (SWL 700 ET/SW 900 ET/SWL 2600 BT/SWL 3700 BT/CSW 788 BT CSW 568 BT)
Detail 2 Fig. 6. This indicator light signals fully charged battery with a green light, low battery with an intermittent red light which means it must be recharged and flat battery with a permanent red light.
- LOW BATTERY WARNING LIGHT (only for SLG 700 ET):
Det. 2 Fig. 6. Warning light:
green light: the battery is charged,
yellow light: battery low (PLEASE RECHARGE).
red light: battery discharged (PLEASE RECHARGE).
BATTERY CHARGER PLUG (CONNECTOR)SWL 700 ET/SW 900 ET/SWL 2600 BT/SWL 3700 BT/CSW 788 BT CSW 568 BT)
Detail 8 Fig. 6, used to activate a battery charger fitted with the same type of plug for recharging.
WORKING POSITION:
When using the machine the operator must be in the working position shown in Fig. 7.
EMERGENCY STOP: PETROL VERSION
Release the forwards lever Detail 1 Fig. 6 and brake the sweeper with the force of Your arms, now put the accelerator lever (on the motor) on the STOP position.
- EMERGENCY STOP: BATTERY VERSION
Release the forwards lever Detail 1 Fig. 6 and brake the sweeper with the force of Your arms, now turn the start key from right to left Detail 3 Fig. 6.
CHAPTER 9 - SAFETY RULES AND REGULATIONS
RESIDUAL RISKS VALID FOR ALL MODEL AND VERSIONS

Although the machine conforms to all the safety regulations, there is always a certain degree of risk involved with any type of machine, either due to incorrect use (see paragraph relative to forbidden use) or inevitable risks due to the nature of the machine. These risks are defined as "residual risks". The chapter shows a list of foreseeable residual risks and how to minimize the deriving dangers.
- Risk of lesions to limbs and eyes through using the machine without the supplied safety protections correctly assembled and not damaged.
- Risk of lesions to limbs through contact with the side brush or with the central brush in rotation. The brushes may only be touched when the machine is off and with the added protection of heavy duty gloves to avoid lesions caused by any sharp material remained in the brushes.
- Risk of inhaling harmful substances or causing lesions to hands and eyes while emptying the refuse container if this operation is made without suitable protections such as heavy duty gloves, glasses and a protective breathing mask.
- Risk of loss of control of the machine if used on gradients of more than 2% or if left parked on slopes, as the machine is not fitted with a braking device.
RESIDUAL RISKS: VALID FOR MODELS WITH ENDOTHERMIC ENGINES


Concerning risks involving the engine, the chapter "Safety rules and regulations" of the hand-book enclosed with the documentation of the machine, must be studied carefully.
- Risks of explosion or fire while filling the engine with fuel if carried out while the engine is running or not completely cooled. Make sure that, while fi lling the engine, there are no naked fl ames or sparks caused by grinders, welders or other.
- Risk of severe burns if any type of operation is carried out on the engine while it is running or not completely cooled.
- Risk of inhalation of exhaust gas in case of use in not adequately aired spaces.
RESIDUAL RISKS: VALID FOR MODELS WITH BATTERIES
-
Before re-charging the batteries make sure the room is well-ventilated or re-charge the batteries in facilities set up specifically for this purpose.
-
Do not smoke, do not approach open flames, do not use emery wheels and welding machines; in any case, do not cause sparks near the batteries.
- Do not draw current from the battery with clamps, plugs and provisional contacts.
- Make sure that all connections (wire terminals, plugs, sockets, etc.) are tightened correctly and in good working conditions.
- Do not place metal tools on the battery.
- Keep the battery clean and dry, possibly with the use of anti-static cloths.
- Top-up with distilled water every time the electrolyte level drops to 5 - 10 mm from the splash-guard.
- Avoid charging it too much it and keep the battery temperature below 45^ C .
- Keep any centralized topping-up systems in perfect working order by performing periodic maintenance.
- The risk of electrocution and short circuiting; for safety, before carrying out any maintenance or repairs on the batteries (or the machine), disconnect the + / - clamps from the battery poles.
- The risk of explosion during charging; this may occur if you attempt to use an unsuitable battery charger (based on the Amperes of the battery).
for nr. 2: the 12V 110 - 140Ah tubular or flat plate battery, use an automatic electronic 12V 20A model fitted with an SB50 connector. For the 6V 240Ah tubular or fl at plate batteries (2 units connected in serial), use an automatic electronic 12V 40A model fitted with an SB50 connector. - While charging the battery, or, nevertheless, when the battery charger plug is plugged in, it is forbidden to turn the machine on and it is forbidden to move it (including manually).
RESIDUAL RISKS: VALID FOR MODELS WITH GEL BATTERIES (SLG 700 ET ONLY)

IMPORTANT: Use a battery charger suitable to the capacity and features of the battery:
- Before starting the operation of recharging the battery, make sure that the room is well ventilated, or recharge it in a room specially fitted out for this purpose.
- Ensure that only qualified and properly trained staff carry out maintenance work on the battery;
Always use acid-proof gloves and clothing, safety glasses and a face mask when carrying out any type of work on the battery; - The risk of electrocution and short circuiting; for safety, before carrying out any maintenance or repairs on the batteries (or the machine), disconnect the + / - clamps from the battery poles.
- Do not remove or tamper with the internal pressure regulating valve or the bleed valve;
STORE THE MACHINE OUT OF REACH OF CHILDREN; - Do not smoke or go near a naked flame or any other apparatus that can produce sparks ((e.g. from emery wheels and welding machines);
- Avoid sparks from cables, electrical equipment or electrostatic charges;
- Avoid overloads and keep the temperature of the batteries below 45 - 50^ C.
- In case of accidental liquid spill from the batteries due to any reason, stem the leakages with absorbent material and wear acid-proof safety gloves, safety glasses and acid suit before having consulted battery manual. Wash parts of the body that have come into contact with accidental splashes with generous amounts of water and seek medical attention immediately.
- Clothing contaminated by liquid that is accidentally spilled from the battery must be washed.
- Risk of explosion or fire: avoid short circuits resulting from the use of uninsulated components. Avoid wearing clothing containing metal parts that may accidentally come into contact with the battery electrodes.
- Do not expose the battery to direct sunlight without shielding;
- Protect the battery from frost;
- Do not draw current from the battery with clamps, plugs and provisional contacts.
-
Make sure that all connections (wire terminals, plugs, sockets, etc.) are tightened correctly and in good working conditions.
-
Do not rest tools or metallic objects on top of the batteries.
- Keep the battery clean and dry, possibly with the use of anti-static cloths.
- Do not top up with distilled water.
- The risk of explosion during charging; this may occur if you attempt to use an unsuitable battery charger (based on the Amperes of the battery).
- While charging the battery, or, nevertheless, when the battery charger plug is plugged in, it is forbidden to turn the machine on and it is forbidden to move it (including manually).
CHAPTER 10 - CHECKS PRIOR TO STARTING UP
SPECIFIC CHECKS FOR MODELS WITH ENDOTHERMIC ENGINES


Carefully read use and maintenance handbook for the motor, enclosed with the documentation supplied with the machine.
- Check the oil level of the engine and top up if necessary (wear nitril safety gloves throughout the operation). For type of oil and amount, see indications in the handbook for the engine.
- Fill up with petrol (with the engine off and cold, and using the type of fuel recommended by the manufacturer of the engine - see engine user handbook).

STORE THE FUEL IN A FRESH AIRY PLACE, AWAY FROM SOURCES OF HEAT AND OUT OF REACH OF CHILDREN.

IMPORTANT: The container used for storing the petrol must be suitable for this purpose and perfectly clean so as to avoid damage to the petrol fiiter caused by impurities. Use a petrol container of a capacity in proportion to the amount consumed, so that in a period of 2 - 3 months the fuel is all used in this way it will always be fresh.
SPECIFIC CHECK FOR MACHINES POWERED BY BATTERY

Acquire the following instruments and personal protections: Safety glasses, protective gloves, 1 pair of scissors, 1 receptable for the transfer (clean), 1 funnel (clean). Carefully read the chapter "Safety rules and regulations", which specifies the risks involved with fi lling the elements with the sulphuric acid solution
Check if the battery contains the sulphuric acid solution and if it is charged. If not, proceed as follows:
- Use the scissors to cut off the end of the plastic container holding the sulphuric acid solution and pour it into the transfer container.
- Remove the cap to the chambers of the battery elements. With the aid of the funnel, pour in the solution until it reaches the level shown on the outside of the battery.
- Wait at least 12 hours leaving the battery inactive and then, if necessary, top up the solution bringing the levels, of the various elements to the same conditions.
- Carefully read, in the chapter "Safety rules and regulations", the risks involved in charging or discharging the battery. Charge the battery.

STARTING THE MACHINE, IT IS INEXPENSABLE TO HAVE READ THE PREVIOUS CHAPTERS.
SPECIFIC SEQUENCE FOR MODELS WITH ENDOTHERMIC ENGINES


Consult the attached motor instructions booklet previous.
STARTING:
- When the engine is cold, pull the spring-loaded STARTER lever outwards to the CLOSED position (CHOKE SHUT).
- Move the accelerator lever upwards from the SLOW position towards the FAST position;
- Pull lightly on the starting handle until you feel some resistance, then pull forcefully. Gently push the starting handle back into position. Do not allow the knob of the cord to return forcefully and strike the engine. Slowly move it back into position to prevent damage to the start-up.
- Push the starter spring lever to the OPEN position (CHOKE OPEN) as soon as the engine has warmed up enough to run smoothly
RUNNING:
- Once the engine is running return the accelerator lever to the low speed position " SLOW " and warm the engine for a few minutes. Gradually move the accelerator lever towards the high speed position until the required speed is reached.

IMPORTANT: If there is no need to keep the engine accelerating, slow it down gradually by moving the accelerator lever to the idle running speed: this will reduce fuel consumption and prolong the engine life.
TURING THE ENGINE OFF:
- Move the accelerator lever to Minimum and keep the engine running for 30/40 seconds before turning it off.
- Lower the lever fully down to the "STOP" position. The engine will stop.
- Once it has stopped, lift the accelerator lever slightly.
SPECIFIC SEQUENCE FOR BATTERY POWERED MODELS
START:
- Turn the key in the clockwise direction Detail 3 Fig. 6.
STOP:
- Turn the key in the anticlockwise direction, Detail 3 Fig. 6.

IMPORTANT: Before starting the job, make sure that the surface to be swept is free of objects such as ropes, strips of plastic or metal, rags, stick, live electric cables or other similar articles. If such object are present, remove them to avoid damage to the machine or, in the case of live electric cables, risks of electrocution.
- Crossing over rails, small steps or guides which stick up from the floor can damage the flaps on the central brush vacuum chamber; this being one of the most frequent causes of damage, if such object have to be crossed, lift the front part of the machine at the moment of crossing by pressing down on the handle to gain leverage.
- Avoid crossing over wet or particular damp surfaces in order to avoid damage to the paper filters. In cases of strict necessity, before crossing stop suction pulling the lever Detail 4 Fig. 6.
- If the area to be cleaned is very dirty owing to the quantity and quality of the dirt to be eliminated, it is advisable to pass over the first time to get rid of the majority of the dirt, then pass over a second time with the refuse container and the suction filters clean. If the machine is used methodically and correctly, it is not necessary to carry out multiple passes.
- The side brush is used for removing dirt from edges, skirting, corners, etc. and therefore it should be kept in the raised position when it is not carrying out this function Detail 6 fig. 6. If it is left on the ground, it will raise dust and in this case, the cleaning power of the central brush will be jeopardised.
- For the use in small spaces or for moving round close curves, it is advisable not to use the mechanical traction so that the machine is easier to manoeuvre Detail 1 fi g. 6.
- To keep the machine efficient and consequently obtain top performance, the vacuum filters must be shaken and cleaned periodically and the refuse container emptied frequently.
- For battery powered machines, keep a close check on the condition of the battery and recharge it as soon as the needle on the volt meter moves onto the red zone.
NEVER LET THE BATTERIES RUN COMPLETELY FLAT AND ALWAYS LET THE BATTERY CHARGER RUN A FULL CYCLE WHEN RECHARGING THE BATTERIES.
CHAPTER 13 - ROUTINE MAINTENANCE

ANY MAINTENANCE OPERATION MUST BE CARRIED OUT WITH THE ENGINE OFF AND COLD IN THE CASE OF ENDOTHERMIC VERSIONS OF THE MACHINE AND WITH THE BATTERY DISCONNECTED IN THE ELECTRIC VERSIONS.
- CLEANING THE DUST FILTER:
Check the dust filter Detail 4 Fig. 8 every 40-70 working hours or as necessary. Open the cover Detail 1 Fig.1 to access the fi lter compartment.
Cleaning the filter: with the bin Detail A Fig.1 in place, point the compressed air gun towards the top of the fi liter so that the dust falls into the bin. Make sure the fi liter is in good condition and replace it if necessary.
DUST SEALS:
Check the condition of the flaps Detail 4 Fig. 9 every 40/70 hours. Damage or inefficiency of the flaps jeopardises the performance of the machine in terms of cleaning quality

IMPORTANT: To replace the side flaps, make sure that their lower edge is 2-3 mm from the ground.
SIDE BRUSH:
Detail 1 Fig. 9. Keep raised from the ground when not in use to avoid raising dust unnecessarily. Keep raised from the ground when the machine is not in use and make sure it does not come into contact with other objects which could bend it making it unserviceable.
CENTRE BRUSH:
To clean the centre brush.
The following implements are necessary for carrying out this operation: heavy duty gloves, breathing mask, pliers, scissors
Check the condition of the central brush every 50/80 running hours, or more frequently if the machine is used for particularly heavy duties.
To gain visual access to the central brush,
remove the refuse container (Detail A Fig. 1)
and tip the machine as shown in Fig. 9,
by pressing down the handle.
If any ropes, wires or other refuse of this type has been inadvertently collected up, wear the heavy duty gloves and the protective mask to eliminate any refuse that has been wound in the brush.

FOR ELECTRIC MACHINES, REMOVE THE BATTERIES BEFORE TILTING SO AS TO AVOID SPILLAGE OF THE SULPHURIC ACID SOLUTION.
ADJUSTMENTS
CENTRE BRUSH:
To adjust the centre brush
If the machine removes dirt and debris ineffi ciently or leaves dirt behind, it needs to be adjust.
Lower the centre brush and proceed as follows:
- Remove the protective case Detail 2 Fig.4
- Loosen the bolt Detail 1 Fig.10 in the slot at the front
- Tighten bolt Detail 2 Fig.10 until the three bolts Detail 1, 2 and 3 Fig.10 make contact
If the brush is too flat on the ground, loosen bolt Detail 2 and tighten bolt Detail 1.

N.B.: To ensure the centre brush is correctly adjusted, measure its "Track" as follows:
- After making adjustments, start the machine up and, without moving either forwards or backwards, leave it standing in the same place for at least 10 / 15 sec. with the centre brush lowered.
- Turn off the motor, raise the centre brush and move the machine forwards manually until the mark left by the rotation centre brush on the floor is visible, as shown in Fig. 11.

N.B.: The width of the track must not be under 3 cm.
FORWARD REGULATION:
If a machine with mechanical forward drive has lost power, regulate the forward drive as follows:
Loosen bolt Detail 1 Fig. 12, move the driving wheel Detail 3 closer to the hub of the driving pulley Detail 4 and unscrew the threaded adjusting screw Detail 2 Fig.12 as required.

IMPORTANT: After regulation the wheel Detail 3 must be as close as possible to the driving pulley Detail 4 WITHOUT ACTUALLY TOUCHING IT.
REFUSE CONTAINER:
To carry out this operation, with the machine off, the following articles are necessary: heavy duty gloves, detergent. Every 50-60 working hours, or more often if the machine is used for particular heavy duties, the container must be washed to avoid the formation of un-hygienic conditions which could be dangerous because of the high concentrations of bacteria.
- REPLACING THE CENTRE BRUSH:
ALWAYS WEAR GLOVES AND A BREATHING MASK WHEN REPLACING THE CENTRE BRUSH AND ONLY CARRY OUT THIS MANOEUVRE WITH THE ENGINE AT A STAND STILL AND COLD.
- Remove the bin Detail A Fig.1 and push the handle to bring the machine into the position illustrated in Fig.13.
- Unscrew and remove the two screws Detail A and B Fig. 13.
- Before removing the brush from the machine note the direction of the bristles (see Fig.13).
- Remove the worn brush and replace it with a new one.
- Replace and tighten the screws Detail A and B Fig. 13 and adjust the height of the brush (see paragraph ADJUSTMENTS: CENTRE BRUSH on the previous pages).
REPLACING THE SIDE BRUSH:
- Remove the bin Detail A Fig.1 and tilt the machine as shown in Fig.13.
- Unscrew and remove the three screws Detail C that hold the side brush Detail 1 in place.
- Remove the brush belt from the plastic pulley
- Remove the side brush using a screwdriver for leverage in the groove on the pulley race (see Fig.14) Assemble a new brush and secure it by carrying out the above operations in reverse order.
- REPLACING THE DUST FILTER:
Check the dust filter Detail 1 Fig. 8 every 40 - 70 working hours or as necessary. Take the filter out of its seat by unscrewing bolt Detail 2 Fig.8. Position the new filter and tighten the bolt Detail 2 Fig. 8 making sure the fi iter-pressure bracket Detail 3 Fig.8 is sufficiently compressed.
SPECIFIC OPERATIONS FOR ENDOTHERMIC MODELS

Carry out the operations for checking the engines or changing the while wearing protective nitrile gloves. Used oil must be disposed of according to the standards enforced by the law.


FOR OPERATIONS RELATIVE TO THE ENGINES, IT IS NECESSARY TO READ THE SPECIFIC USE AND MAINTENANCE HAND BOOK ENCLOSED.
1) Check the oil level every 20 hours of operation.
2) First oil change after 10 hours of operation, or after 1 month; the recommended oil for temperate climates is 10W-30 multi-grade for motors that run on petrol. When operating the machine in non-temperate climate zones, identify the suitable type of oil from the motor booklet. Use the designated oil discharge pipe for oil changes.
3) Change oil every 50 hours of operation thereafter, or every 6 months.
4) Clean the motor air cartridge every 25 hours of operation, or every 3 months, or sooner if necessary, and replace when necessary (see motor booklet).
SPECIFIC OPERATIONS FOR BATTERY POWERED MODELS

FOR OPERATIONS RELATIVE TO THE BATTERY, FOLLOW THE INSTRUCTIONS DESCRIBED IN CHAPTER SAFETY RULES AND REGULATIONS IN THE PARAGRAPH RESIDUAL RISKS FOR BATTERY POWERED MODELS.
- In order for the batteries to last for a suitable amount of time, whether they are flat or tubular, never
let them go completely fl at. COMPLETELY FLAT BATTERIES (INCLUDING NEW ONES) CANNOT BE RE-CHARGED.
- Check the level of battery solution frequently, and add distilled water only, as needed.
- Always re-charge the batteries without interrupting the cycle.
- DISPOSE OF THE EXHAUST BATTERIES IN ACCORDANCE TO THE LAWS IN FORCE.
CLEANING OF THE MACHINE
Use soft and dampen rags or brushes for the cleaning of the external parts of the machine.

DO NOT CLEAN THE MACHINE BY JET OF WATER

DO NOT USE CLEANSERS OR CHEMICAL SUBSTANCES AGGRESSIVE, ABRASIVE DUSTS OR SIMILAR FOR THE CLEANING THE CONTROL PANEL AND PRINTED LABELS TO AVOID ANY DAMAGE AND TO MAKE THEY INCOMPREHENSIBLE AND ILLEGIBLE.
CHAPTER 14 - EXTRAORDINARY MAINTENANCE

EXTRAORDINARY MAINTENANCE MEANS ANY OPERATION NOT INCLUDED IN THE CHAPTER ROUTINE MAINTENANCE. ALL SPECIAL MAINTENANCE OPERATIONS HAVE TO BE MADE BY MANUFACTURER'S OR DEALER'S QUALIFIED STAFF ONLY.
CHAPTER 15 - LEAVING THE MACHINE UNUSED FOR LONG PERIODS
- MODELS IN ENDOTHERMIC VERSIONS
Leave the machine running to use all the petrol in the tank. Once the machine stops for lack of fuel, wait for the motor to cool down and then clean the fi liters and refill the container thoroughly.
- MODELS IN ELECTRIC VERSION
Remove the batteries from their housing and store them in a cool ventilated place. The batteries, even if not used, must be recharged every 30 - 40 days. After the same period check the level of sulphuric acid solution and top up if necessary.
Thoroughly clean the fi iters and refuse container.
Remove the batteries from their housing and store them in a cool ventilated place. The batteries, even if not used, must be recharged every 30 - 40 days. FOR OPERATIONS RELATIVE TO THE BATTERY, FOLLOW THE INSTRUCTIONS DESCRIBED IN CHAPTER SAFETY RULES AND REGULATIONS OF BATTERY.
After the same period check the level of sulphuric acid solution and top up if necessary.
Thoroughly clean the fi iters and refuse container.
CHAPTER 16 - DISMANTLING/DEMOLITION

THE DESTRUCTION OR DEMOLITION OF THE MACHINE MUST BE CARRIED OUT BY THE OWNER WITH TOTAL OBSERVATION OF THE LAWS IN FORCE. IT IS ADVISIBLE TO UTILISE COMPANIES SPECIALISED IN THIS SECTOR.
As the owner of electrical or electronic equipment, the law (in accordance with the EU Directive 2012/19/EU on waste from electrical and electronic equipment and the national laws of the EU Member States that have
implemented this Directive) prohibits you from disposing of this product or its electrical / electronic accessories as municipal solid waste and obliges you to make use of the appropriate waste collection facilities.
The product can be disposed of by returning it to the distributor when a new product is purchased. The new product must be equivalent to that being disposed of.
Disposing of the product in the environment can cause great harm to the environment itself and human health.

The symbol in the figure indicates the urban waste containers and it is strictly prohibited to dispose of the equipment in these containers. Non-compliance with the regulations stipulated in the Directive 2012/19/EU and the decrees implemented in the various EU Member States is administratively punishable.
SCRAPPING OF THE MACHINE
If the machine will no longer be used, remove the batteries and dispose of them in accordance with
the eco-compatibility regulations as set forth in European standard 2013/56/EU or deposit them in an authorized collection centre.
To dispose of the machine, comply with the current laws where it is used:
-disconnect the machine from the mains and clean it after emptying any liquids;
-separate the machine into groups of homogeneous materials (plastics in accordance with the recycling symbol, metals, rubber, packing).
For parts containing different materials, contact the competent authorities; Each homogeneous group must be disposed of in accordance with recycling laws.
In addition, it is recommended to eliminate those parts of the machine that may be dangerous, especially for children
CHAPTER 17 - EMERGENCY SITUATIONS
In any kind of emergency situation such as, for example, if You have accidentally driven the sweeper over current-carrying cables on the floor which have wound around the main or side broom, or there are strange noises coming from inside the machine or motor, or You have accidentally picked up incandescent materials or flammable liquids, chemical products in general, poisons, etc.
YOU WILL HAVE TO:
- Release the lever to stop traction.
- Turn engine off in the explosion engine models, putting the accelerator lever, that is on the engine, onto STOP; or in the case of battery powered sweepers, turn the start key, on the control panel, from right to left.
- If You have collected any of the material described above, extract the container (bin) and clean it wearing gloves and a mask to protect Your lungs. In all events, please follow the instructions given on the paragraph Collection container.
CHAPTER 18 - FAULTS / CAUSES / REMEDIES
Two main faults may occur in the sweepers: the machine causes dust during use or leaves dirt on the floor; there can be many reasons for this but if the machine is used correctly and routine maintenance is carried out regularly, they should not occur very often. Therefore:
| FAULTSCAUSESREMEDEIS | |
| THE MACHINE CAUSES DUST LEVER IN POSITION TO STOP SUCTION PUSH THE KNOB TO OPEN THE SUCTION | |
| FILTER CLOGGED CLEAN THEM BY SHAKING IT WITH THE FILTER-SHAKER AND IF NECESSARY REMOVE AND CLEAN IT THOROUGHLY | |
| FILTER DAMAGED REPLACE IT | |
| FILTER BADLY INSTALLED MAKE SURE IS CORRECTLY INSERTED | |
| SIDE DUST FLAP(S) DAMAGED REPLACE IT (THEM) | |
| CONTINUOUS USE OF THE SIDE BROOM USE THE SIDE BROOM ONLY FOR THE EDGES, BORDERS AND CORNERS |
| THE MACHINE LEAVES TRACES OF DIRT ON THE FLOOR | THE MAIN BROOM IS NOT CORRECTLY ADJUSTED OR IS WORN | CHECK THE MAIN BROOM AND IT "TRACK" |
| YOU HAVE COLLECTED WIRES, CABLES ETC. REMOVE THEM | ||
| SIDE FLAP(S) DAMAGED REPLACE IT (THEM) | ||
| THE COLLECTION BIN IS FULL EMPTY IT | ||
| THE EXPLOSION ENGINE IS NOT PERFORMING CORRECLTY | ENGINE AIR FILTER IS DIRTY CLEAN OR REPLACE IT | |
| CARBURATION WRONG RECARBURATE | ||
| THE BATTERY-POWERED SWEEPER IS NOT PERFORMING CORRECTLY; IT IS SLOW AND IS NOT CLEANING WELL | FLAT BATTERY OR NOT FULLY CHARGED CHECK THE LEVER OF THE ELECTROLYTE AND CARRY OUT A NEW COMPLETE BATTERY CHARGING CYCLE | |
| THE RECOMMENDED BATTERY CHARGER HAS NOT BEEN USED | USE AN APPROPRIATE BATTERY CHARGER | |
CHAPTER 19 - WARRANTY
This machine is guaranteed against defects in workmanship or installation for 12 months from the date of sale. The warranty covers exclusively the replacement or repair parts that are defective. Any other request will not be accepted.
This does not include damage caused by normal wear, use different from that reported on this manual, damage caused by wrong settings, technical operations not carried out properly, acts of vandalism.
FR
- ARRET D'URGENCE: version electrique
- REMPLACEMENT DE LA BROSSE CENTRALE:

REEMPLACEMENT DE LA BROSSE LATERALE:
WAZNE:PO ZAMONTOWANIU USCZELEK, UPEWNIC SIÉ ABY TE BOCZNE, KROTSZE SZT.2 BYLY UNIESIONE OK. 2mm NAD PODLOZEM.
SZCZOTKA BOCZNA:
Pkt. 1 rys. 9.KIEDY JEST NIE UZYWANA, MA BYC WYLACZONA UNIESIONA DO GORY TAK ABY NIE PODNOSIKA KURSU.PODCZAS POSTOJU MASZYNY POWINNA BYC ROWNIEZ UNIESIONA ABY NIE BYLA NARAZONA NA USZKODZENIE (WYGIECIE).
SZCZOTKA CENTRALNA:
Pkt. 2 Rys.9 CO 50/80 GODZIN PRACY W RAZIE POTRZEBY SPRAWDZIC STAN SZCZOTKI CENTRALNEJ. SZCZEGOLNIE KIEDY MOGA BYC WKRECONE W NIA LINKI, SZNUREK ITD.
W CELU OZYSZCZENIA SZCZOTKI Z W/W ODPADKOW POWINNISMY:
- OLDALSO KEFE CSERÉJE
KAPITOLA 4 - POVOLENÉ PODMINKY PROSTČRÍDÍ

Proctete si prilozeny navod k obslze motoru, nicmene:
(NepaTKN, MaCKN, OOKN N T.D.), NOCTABJRAETCNOJIb3OBaTeJeM.
TpeMHbI nepeHnH, 3aHnH, IeBbI, npabH, HcnoJIb3yOTcB DaHHOM N3daHnOTHOCHTeHbHO noloxhen onepaTopa.
YTo6bI 06ecneuHT MaKcImaJIbHbI cPOK CnyX6bl KOMIOHErOB MaINHbI, Heo6xOIMTO TOHO CNeOBAbYKa3aHnA, npBedeHHbIM B HaCTOaUeM pyKOBoDCTBe, u NCNoJIb3OBAbT ToJIbKO OpuINHaJIbHbIe DeTaII.
DaHHbIe, coepkaunecB daHHOM dokymente, moryt 6bItb n3meHbI, TAK KAK POn3BOJnteB coXpaHReT 3a co6oB npABO B IIO6oB MoMeT BHeCTN B MaunHy MoDnФkaCn C cJIbTO yCOBepseHCTBOBaHn.
IBAXKHO:Y6eHNTecb,HTO MaunHa He NOBpeXdeHa. Pn O6hApyKeHN YABHO pa3NnuMbIX deΦeKToB He nbTaIteCb NcNoJIb3OBaTb MaunHy I NOCTaBbTe B N3BeCTHOCTb NOCTaBzNKa HnnpoN3BOdntela.

IIOJIb3OBATEJIb O6R3AH Y6EINITbcr, YTO IyCTAR YNAKOBKA YTNJIN3HPOBAHA N YHNHTOKeHA B COOTBETCTBnC YCTAHOBJIeHHbIM NOPaKOM.
- UCTAHOBKA BOKOBOI ΜEΤΚ:
- ɪnBʌŋkeɪnte 6oKɔbʊyɪ ΚεTkɪy (Dætənb 2, Pnc. 2)ɪs 6yHkepa (Dætənb A, Pnc. 1)
- OTBnHTte n ydaIte 60JIb1, Pnc.1); yCTaHOBInTe tKy TaKIM 06pa3OM, TTO6bl TPN Wtbpra BOJIN B OTBepCTnA (Etanb 3, Pnc.2)
- YctahOBHTepn6oNTaHaMeTO(DetaB1)N Kpenko 3aTAHHTe,YTO6bI 3aΦNKcnpoBaTbLcETky.
- Iocne yctahOBKn 6ydt cponkacatbca c Detalb2, Pnc. 2, 6Iokpyuopei shKNB, rde dOnjKeH HaxoDntbc 3naCTnHyb peMeH (Detalb 5, Pnc.1)
- Notarynte peMeHb (Aetanb 5) Bnpei n yctaHOBte ero Ha nlaCTNKOBbl uKNB (Aetanb 4).
- OTBnHTte BnHTbI (Deta6: daHHbIe BnHTbI npdHa3HaeHb IaToro, yTo6bl ydepKNaBaTpeMeHb BO Bpemr yCTAHOBKn 10cne TOrO Ka Kc 10eTKa YCTAHOBNeHa, daHHbIe BnHTbl 6oJee He HxKHbl.
- 3aФИКСИРУТЕ КрБИШКу (Дeталь 1, Рс. 3) пи пOMОПИ ТгEx BИНTOВ (Дeталь 2, Рс. 3).
Tem He MeHee, 6paTntecb K npnlaeraMomy 6yKleTy c HNCTpyKunmno DnBnateIIO:
PA3PEUHEHHOE NcNoJIb3OBAHNE:
IopMaTalbHbI MaunHbI npedHa3HaueHbI Iy60pKn NIOB u yInu B cneDyUxN yCNOBnX: TIN CMeTaemoro MaTePnAna: otXoDbI NocLe MexaHnueckO o6pa6oTKn, nbIb, MeTaNueckne OOnIKn, 6ooee 3arpy3HeHne; Tnbl n XapaKtepncTNk pa6oUnx (NoMaTaembIX) nobepxHocTei: TBepdIe, PNOCKNe u Ytpam6oBaHHbIe NobepxHocTN,
Takne KaK: acphiabT, 6eToH, DepeBHHbIe NOBepxHOCTN, MeTaJIINueCKNe NOBepxHOCTN, KepaMnKa, MpaMOp, rnaJKe NII IePOXOBaTBle NlactIKOBbIe MaTePnAbl, BOJOKHNCTbI NII CNHTeNTUeCKN PIIIOW C pa3pe3HbIM BOPcOM (BO n36exAHne O6pa3OBAHnE 3JeKTPoCtATuYeCKORO 3apraIa Pn KOHTaKTe C daHHbIMN NOBepxHOCTAM Heo6xOdmo NCNoB3OBaTB 8eTKn 13 HAtypalnbHbIX BOLOKOH); TIN cpebl: 3aMKHyTOe npoctpaHCTBO (dJIy 3JeKTPnuCecknx Bercn), OTKpbIToe pnoCTpAHCTBO (dJIY eHDoTEpmuuececknx Bercn).
3AIPPEUENHOE NcNoJIb3OBAHNE:
3anpeaaetcnoBb0BaTb noMeTaIbHbIe MaunHb B cNeDyUOxuX yCNOBnX:
-Дя y60рки Macen, TOKcHNoI nbIи nI MaTePnaIOB xIMNKaTOB B ueIOM (ecI npednoIaraeTcR nCNoIb3ObaTb MaunHy Ha XIMueckOM npednpnTm nI TaM, rIe Heo6xOdima y60pKa TOKcHbIX OTxOIOB, Heo6xOdmo 3anPoCnTB oc6oe pa3peWeHne OT npOn3BOJnteJI nI NOCTabUka).
3anpeaaetc HcnoIb30BaTb MaunHy Iy6opKn HnteBnHbIX MaTePnaNoB (Haepmep, OTxOoB TeKCTnIbHoro npOn3BOcTba nn DnHHoN CTpykKn OT MexaHuecko o6pa6oTk), TAK KAc MaTePnaTakoi fOpMbI MoKeT HamotaTcRa Ha zentpaJbHyO MexaHueckyOBpaauOuYIOc 8eTKy.
-Дя y60ркн HeNoTyWeHHbIX CnIrapTeHbIX OkypKOB, a TAKKe IIO6bIX pyrNIX npeMeTOB, KOToPbIE MOryT Bbl3BaTb Bo3ropaHHe COePKMOrO KOTheHepa NIn NaTpOHaФnIbTpA.
3anpeaaetca nCnONb3OBaTb MaunHy dIy6OpKn Chera, MblbIIO6bIX TINOB NOBepxHOCTei, a TaKKe Ha oco6o BnaXhix NobepxHOCTx.
3anpeaaetcnaonb30BaTb MaunHy Ha nobepxHocTcx c yknohom 6oJee 2 %.
3aPpeaaetcNcNoIb3OBAtB MaunHy Ha nobepxHocTax, KOtopbie RaJIyOTc Oco6eHHo pbIXbIMn, IMeIO MHoro TpeuIN HIN NOKpbITb IpaBneM.
3aPpeaaetcnaonb30BaTbMaunHy B6n3n B3pbBvatabx n ropounx MaTepnaIob (B daHHbIX 06ctoTeBCTbax Heo6xoDmIO nCnoJb30BaTb MaunHbI C ceptnfNkataMn FLP).
3aPpeaaetcnaonb30BaTbMaunHyHaDoporax 6oJero noIb3OBAHnB CnlyOTcyTCTBncooTBETCTByuOe npa3peweHn.
3aPpeaaetcNcNoB3OBaTbMaunHy B yCIOBnX nIOXoBnBnMocTn,ecnOHa He OCHAeHa CBOIM co6CTBeHHbIMOCBeNTeIbHbIMyCTPOINCTBOM.
3anpeaetcncnoB30BaTb 3HDoTePmNueckyUo BepCnMoAunHbI (cBnraTeJeM BHyTpehero CropaHn) B 3akpbTbIX NomeeHnX, TAK KaK BbIXNoHNbIe Ra3bl DnraTeJr CoepKaT MoHOKcnd YrlepOda, OTPaBnIOuN ra3, He NMeIoN 3aNaXa.
3anpeaetc6yKcnpoBaTbMaunHynnncnoBtBeeJny6ykCnpOBKnDpyrnx npedMeTOB.
3anpeaetcnaonb3oBaTbMaunHyBkaueCTBe onopHnoBepxHOCTnIJIIOeNnpedMeTOB.
3anpeaetcnaonb3oBaTb MaunHy 6e3 3aunTHoro Koxyxa, KOtbpIM OHa OchaueHa.
HeIb3nIObn3OBaTb nIy IIOJMeTHnI 3aXKeHHbIX OKypKOB nIIN IIOO6HOrO, YTO MOKeT BblBaTb BO3ropaHne OTNoKeHn B 6ake dIry c6op a nn B fNlbTpax.
HeIb3a IcNoIb3ObA Tb 6e3 npedymOTpeHHbIX 3aunT.
ГЛABA6-TEXHNUECKNEXAPAKTEPNCTIKN UYPOBEHBшUMA
OTHOCNTCA KO BCEM MODEJIAM
MEpbI INPEDOCTOPOXHOCTN:
3aunthbIe npncoc6nHn, n3o6paKeHHbIe Ha Pnc. 4, Pnc. 4/B,doJXhbl 6bItb aKKypaTHO yCTaHOBneHbI N 6bItb B INcnpabHom COCTOHN.
3aPpeaaetcnaonb30BaTb MaunHy, ecn Ondno nn 6oJe 3aunTHbIX npncnoc6neHn oTCyTCTBYOT nnn NOBpeKdHebl; cncock 3aunTHbIX npncnoc6leHn npBeHn Hxke:
KoHTeHep dIy Mycopa (TeA, Pnc. 1) n3roTOBJIeH n3 npOuHOro nnactnKa n ydePknBaet Becb MaTepnaI, co6paHHbI OCHOBHO uEkoI, n PbIb, noCTyNAIOUO OT hnBtPOB.

IBAXHQ: OnopoxHnTe KOHTeHep TOnbKO npN BbIKIOueHHOM DBratene. Npeed BbINONHeHem DaHHoI ONepaunn Heo6XoHMo HaeBaTb NepuATKn N daKe MaCKy, YTO6bl 3aunNTb Baun JERKne OT bInn, KOTOPYIO BBI MOKeTe BDOxHyTb B XOe BbINONHeHn DaHHoI ONepaunn.
3APRAHOE YCTPOINCTBO IIA AKKUMYIATOPA (Tolbko IJI SLG 700 ET):
3apndoe yctpoCTBO (TeTalb.1 Pnc.5/B) paCnoJIOKeHO Ha MaunHe, IN DOCTyn K HeMy MOxH0 NOJyHTb npn NDHrTN CEHTpaJIbHOrO KapTepa Detalb.1 Pnc.4.
3apnykayakmylntopa moKHO BbInoHnHtB,OTKpbIB KapTe np nCnoJb3yra CneuaIbHyIO pO3eTky.
ONICAHNE PUYHOrO UYPABJIEHNIA
SWL 700 ST, SWL 900 ST, SW 2600 SC, SW 3700 SC: Yactb. 1 - 4 - 5 - 6 - 9
SLG 700 ET/SWL 700 ET/SW 900 ET, SWL 2600 BT, SWL 3700 BT: Yactb. 1 - 2 - 3 - 4 - 6 - 7 - 8 - 9
PbIyAF IEPEDHrO XODA (Bce Moedn):
IOTaHyb pbiur nepeHero xOda, Deta1b 1, Pnc.6, B HnpaBneHN pyuKN, Bbl npnbDeTe B DeiCTBne BHyTpehnn MexAHn3M, KOTOpBb BBIOBET DBNXeHne MaunHb BnpeD C ONpeJeHHo CKopocTbO (ToIbKO BnpeD). Tera BbIOBET OCTAHOBky, KOrDa Bbl OTNyCTnte daHHb pbiuar.
PbIyAR UYPABLEHnB EOKOBoN IETKoN (Bce MoeHn):
PbUar ynpabHeHnA, DetaB 6, Pnc. 6, daet Bo3MOxHOCTb ONyCTNb 6OKOByo 8eTKy C BODInTeJbCKORO cnDeHbY.
PomHnTE, YTO 6OKOBa JIeTKa IcNoJIb3yETc TOnbKO dJa YnCTKn KpaEB, npoHneN u yrIOB u YTO OH npoDoJXaET
pa60TaTb, noka pa60Taet DBIrataeMbMaunHbl.

BAXKHO: HnKOrda He dOtpaRnBaenTecb do 60koBo n eTKn pyKaMn Hne nCnoNb3yIte ee da c6opa HnteBuHbIX MaTePnaNoB.
- PPyKAДЛЯ BCTPAXNBAHNФИьТРА:
Данная руна Incnoь3уETСДЯ BCТРХИВHNY (OuNTK) ΦиьТра,ДeТаль 3,пс.5: notянITE u peЗко OTNCTIte 5 nIn 6 pa3 ДЯ МexанчecKO BCTPaxINBaHNY ΦиьТpoB; nbInb, cKoINBwAЯСЯ NaΦиьТраx, ynaTeB KONTeHep.

BAKHO: DaHHyO onepaunIO cneayet BbINOHNrB do hauana pa6oTb i nepeq OnpoxHeHem KOHTeHepa npu BbIKNoeyHHom DBNrTeNe HIN OTKnIOueHHoYHKnN BCacbIBAHn.

HA MODEJX, PABOTAOUx OT BATAPEN, DAHHA PYUKA 3AMEHEBA BNBPAUHOHON H 3NEKTPUeCKO KHONKO, DETAJIb 7, PNC.6. JIy ONUCTKN FNIbTPA UDEPKNAITE DAHHYIO KHONKY B TEUEHNE 4 / 6 CEKYH; NOBTOPUTE DAHHYIO ONEPAUIO 5/6 PA3.
- PUYKAДЛЯ OTKПIOYEHNY BCACbIBAHNY (Bce moeI):
DeTalb 4, Pnc. 6. Korda pyka BbITaHTa, fYHKnra BCaCbIBaHnry OTKIOHeA. OTKIOaIte fYHKnIO BCaCbIBaHnRAkDbl pa3, KOrda Bam Heo6xoJIMBOCTpXHyTB fNlbTpbl nIN npn npoxxJeHHupe3 BlaxHyTO nobepxHOCTb (C BKIOUeHHbIM DnIRaTeMe).
PbIyAR IIOJbEMA 3ACJHOHK (Bce moJen):
Pn Haxattn Ha pbyar noDbema 3acIIOHok (Yactb 9, Pnc. 6) nepeJHee yIIOHTHeHne IOnHMetcra, YTO6bl o6ecneHTB BO3MOXHOCTb dIg c6opa KpyNbIX o6beKToB. IOnxoIIT dIg c6opa JInCTbeB, NaueK n3-NOc Cnrapet N T.D.
ONHCAHNIOJMDMTALbHOIMAMHHbI,PABOTAIOUENOTBATAPEN
KJIIOU3AXINRAHNA:
DetaB 3, Pnc. 6, n 3anycka n octaHOba Dnuratela MaunHbI, 3anyckaet Dnuratelb Ha yCTaHOJIeHHbIX o6opotax.
- HNDAKATOP PA3PRAXEHHO BATAPEI:
DeTalb 2, Pnc.6. DAnHbI INHnKATOp CnHrHaN3npye T O NoHocTbIO 3apJxehHo 6aTapee 3eJeHbIM CBetOM, O Hn3KOM yPoBHe 3apJa - MrrAIOUm KpaChbIM CBetOM, 4TO O3Haayet Heo6XoDnMoCTb NOn3apJdKn, n O pa3pJxehHo 6aTapee
-
HEMURAQUIM KpaChbIM CBeTOM.
-
AДАПТЕР ДЛЯ 3APЯДНОУ YСТРОИCTBA (KOHHEKTOP):
DeTalb 8, Pnc.6, nCnoJIb3yeTcA dIy IoKJIuOeHnIaPraHOrO yCTpoiCTBa, Cha6XeHHOrO BUNKO TAKORO Xe TnIa, dIy Ioo3apraKn aKKymJlTopHo 6atapei.
ΓJIABA 8 - PAБОчEE MECTO ONEPATOPA И ABAPИнHAЯ OCTAHOBKA
PA6O4EE MECTO:
PnncnoB0aHmMaHHbIonepatoDooJKeH haoOnTbcHa pa6ooyMeCte, 3o6paKeHHom Ha Pnc.7.
ABAPINHAROCTAHOBKA:BEH3MHOBARBEPCNIA
OTnyCTnTe pbIar nepeHero xOa (Etalb 1, Pnc. 6) n octaHOBITE MaunHy cInOn CBOx pyK, NOTOM nepeBeIDeTbe pbIar akcenepaTopa (Ha dBratene) B noLoKeHne STOP (CTON).
ABAPNHAOCTAHOBKA: BEPCNA, PABOTAOUJA OT BATAPEI
OTnyctnte pbiur npeedhro xoda (Etalb 1, Pnc.6) u octaHOBHTe MaunHy cNoI CBOUX pyK, 3aTeM NOBepHNTe KIOU 3axnHnna cnpaBa HaIeBO (Etalb 3, Pnc.6).
ГЛABA 9 - HOPMbI И ПРABИА TEXнКИ БEЗОПACHOCTN

Hecmotpna To, cyo Maunha COOTBETCTBYET Bcem HopMa 6e3onacHOCTn, C Maunhoi IIO6oro Tnna Bcerda CyuaceTByet onpeJeHHa CTeneHb PnCKa, CBraHHa JNo6o C HnpabNlbHbIM NcnoJb3OBAHNEM (cm. naparpaΦ o 3anpeueHHom nCNOJb3OBAHnn), Nn6o BBI3BaHHa cAmo npnpoDo Maunhbl. DaHHbIe PNCKn NOyHInn ONpeJeHne «OCTaToCHbIX PnCKOB». B daHOn rnaBe nepeucJIeHb BO3MOXHbIe OCTaToCHbIe PNCKn, a TAKKe daHbYkA3AHn O TOM, KAK CBeCTn K MmHmMy NOTeHuaJIbHyIO OnaCHOCTb.
ДЯ BCEX MODEJIEN I BEPCN
OCTATOUHbIE PNCKN:
Pnck TpaBmbl KOheuHocTe n rla3 npn nCnoJb3oBaHnn MaunHb1 6e3 HaJeXaum 06pa30m yCTaHOBJIeHHbIX nncpabHBix 3aunTHbIX npncnoc6JIeHn.
PnCK TpaBmbl KOHeuHocTe OT KOHTaKTA C 60KOBOI IINI CEHTpaJIbHOI UeTKo BO BpeM BAueHHN. PpIKacatbcra K UeTKam MOxHO ToIbKO B NepaTkax N ToIbKO ToIgda, KOrDa MaunHa OCTaHOBJeHa, BO n36exKaHne TpaBM, PpUHNHeHHbIX OCTpbIMn FpaMaHTAmOCTaBUnmncr B uTeKax.
PnCK BDbixAHN TOKCNHbIX BeueCTB NIN NOnyehn TpaBM KInTe pyK n rna3 npn OnopoxHeHN KOHTeHepa dIy Mycopa, ecnn DaHHa onepauun npoBOuNTc 6e3 COOTBeTcTBYIOuee 3aunTbI, taKo Ka 3aunTHbIe nepaATKn, ouKn n 3aunTHaer bIxTaTeNbHa Macka.
Pnck notepn KOHTpOJa Haid MaunHoi npi pa6oTe Ha NOBepxHocTg C yKIOHOm 60Jee 2% nn napKOBke Ha HAKIOHHo NOBepxHocTn, TAK KAK MaunHa He 606pydoBaHa TOPMO3hIM YCTPOINCTBOM.
ДЛЯ MONDEЛСЗнОТЕРМИЧЕСКIMДВИГATEЛЕМ
OCTATOUHbIE PNCKN:
PnCKn, Cb3aHHbIe C dBnraTeJIeM, NpOboHo OnPcHbI B rnaBe «HopMbI n npabNla TexHnKn 6e3oNaChocTn» pyKOBOdCTBa, BXoJauero B COCTaB DOkymentaun Ha MaunHy.
Pnck B3pbBa nn Bo3ropaHn npn 3anpaBke DnRaTeIeTOnnBOM, ecn 3anpaBka npoun3BoDntc npn pa6oTaOuem nnn He do KOHca ocTbIBweM DnRaTeIe. Bo Bpema 3anpaBkn y6eAnTEcb B oTCyTCTBm OTKpbIToro PnlaMeHN nn NCKp, Bbl3BaHHbIX WnΦOBaJIbHbIMn CtaHKamn, CBapouHbIMn annapatamn n npoum m obopydoaHne.
PnCK noJyehn CnIbHbIX OXoROB npn npoBeHnn KaKnx-1n6o onepaun c pa6oTaUm Hn He do KOHua ocTBbWIM DnuratTeJeM.
PnCK BbIXaHnB bIXNoHbIX ra3OB B Cnyae HcNoIb3ObaHnB NomeueHN C HeoCTaTOHn BeHTnJIaUnei.
ДЛЯ MOДЕЛÉN, PABOTAOUIX OT BATAPEN
OCTATOUHbIE PNCKN:
Pnck npaxeHn 3neKtpnueckm TOKOM nnn noyehn CnIbHbIX OXOROB BCJeCTBNE KOPOTKO 3ambikahn. Npeed Tem KaK npoBOuNTb KaKne-Jn6o onepun No peMOHTy nn TexHNueCKomy 06cnykHBnIO 6aTapeu nnn MaunHbIB CEJOM, KNeMMbl 6aTapeu Heo6xOUMO oTCoeDnHTb. HNKOrda He NCNoJIb3yTe KLeu, TnCKN dpyrHe NMnpOBu3npoBaHHbIE KOHTaKTbI, YTObBI BOCNOJIb3OBAbCra TOKOM OT 6aTapeu.
PnCK cnIbHbIX OXOROB n HHTOKCnKaun OprAHOB dbIXaHn npn 3anpaBke 3JeMeHTOB 6aTape npactbopor cepHOKNCIObI B Cnyae C HOBO cyxO 6atapee. Pnp npoBeHeHN daHHoonepaunn Heo6xOIMO o6ecneuHTcNeDyUOuyo 3aunTy: nepaTKN, ouKN n 3aunTHaMacka. Pactbop cepHOJ KNCIObl Heo6xOIMO depKATB B HeoocTyHOM dna dete MeCTe; npn nonadHnn pactbopa B rna3a TuaTeJIbHO npomOnTe IN BODo n 6paTntEc b Kbpay.
PnCK cnIbHbIX OXOROB n HHTOKcKauuIN opraHOB dIbxAHN B pe3yIbTaTe yTeUKN paCTbopa cepHoKnCNoTbI, ecn npnpoBeHeHN ONpeJeHeHHbIX ONepaun NTO texHnueckOMy 06cIyXnBaHnIO MaUNHa 6blna HaKNOHeHa C yCTaHOBJIeHHbIMn 6atapeMn.
PnCK B3pbBa B6Iu3N OTKpbITOro IaMeHN nn NcKp.
PnckB3pbBa,Bo3ropaHnIINnoJyehnTpaBM npn 3apKe 6aTapen.HTo6bl MNHMn3npoBaTb pncn TaKOro poDa, cneDyIte yka3aHnM, npNBedeHHbIM Hnke:
i
BAKHO: NcnoIb3yIte 3apAHOe yCTpoIcTBO B COOTBcTcBn C cMKoCTbIO n xapaKTePepNtKam6atapen:
- 6atapen 12B 110 - 140 a-чс trpy6aTbIMn Илп паCTHuaTbIMn 3JIeKTPoDAMN nCNoIb3yIte ABTomaTnueckyo 3JIeKTPoHHyIO moelb 12B 20A c KOHHeKTopoM SB50.
- Дя 6атpen 6B 240 a-ч c Trpy6uatbIMn nIn nIaCTnHuaTbIMn 3JleKtpoJaMn (2 nocneIOBaTeIbHo coeAnHeHHbIX 6lOKa), nCnoJIb3yIte aBTOMaTnueckyIg 3JleKtpoHHyO moIeIb 12B 20A c KOHHeKTopoM SB50.
- Ipeqn Hauanom onepaunn no 3apjke 6atapen y6eintecb, yTO B nomeeHHN XopoWJ BENTINJIaH, nn6o 3apjkaTe 6atapeoB nomeeHHN, cneuaIbHO npedHa3HaueHHOM dnaaHHbx ceJe.
He Kypnte Hn np6nkaTecb 6aTapeeK OTkpBtOMy nIameHn nn KaKOMy-1n6o 60bO o6pydoBaHNO, KOtOpoe MoKET CTaTB NCTOCHNKOM NCKp. - Y6eHNTecb, YTO BCE coeHHeHn (KJIeMMbl, BUNKN, pa3beMbI n T.D.) XopoOo NDoOrHaHbI n HaxOaTcB INCpABHom COCTOHN.
He KlaIaIte HnHCTpyMeHTbI Nm MeTaJIInueckne npEeMTebHa 6aTaapeHo. - 136eraiTe H36bIToHOn 3apAkn 6aTapeu n noDaePknBaIe Te Tempeatypy 6aTapeu Hnke 45 - 50^
- Пониьду Дзлравky ДИСТИПОВАнHоь,ΚаК TOnько уровьг Эл ektrponiTa ypaTeHa 5-10 MM Hxke OTMeTkn.
CopeKHTe CEHTpaHIN3OBAHHyU CNTeMy 3aIpaBKn B UcTOTE N B IcnpaBHOM COCTOHN.
He TporaIte MaunHy pykamn H He 3anyckaIte ee BHe 3aBNCIMocTn OT npuHbI BO BpeM 3anpaBkn 6atapen.
OBUHE PNCKN DnA AKKUMYJATOPOB (FENEBbIX) - TOJIbKO DnA SLG 700 ET
- IpeD hauanom onepaunno 3apnke 6atapen y6eintecb, yTO B nomeuenn xopoowar BEHTNJLJUIN, N6o 3apxkaTe 6atapeIO B nomeuenn, cneuaIbHO npedHa3HaeHHOM dAaHHbIX ueien.
- Y6eInTeSc, yTO TOnbKO KBAIINΦHnCIPoBaHHb I NaJIeKAsm O6pa3OM 6ByeHHbI NepcoHaI BblONHReT onepaunn no TexHnueckomy 6cIyJnBaHHIO AKkymyIaTopa;
Bcerda nCnoIb3yIte npoTnBOKnCIOThbIe nepaTKn OJExdy, 3aunTHbIe ouKn mACKy npn BblOnHeHnn IIO6bIX onepaun C aKKymyIaTOPOM;
PnCKn nopaxKeHna 3JIeKTpnuecknM TOKOM n PnCKn KOPOTKOro 3aMbikaHnra: B cIeJx 6eOanachocTn nepeBbIOnHeHem IIO6bIX Oepaun No TexHueckomy 0cCnykBaHNIO nn peMOHTy aKKymyIaTOPa nnMaunHb IB cIeLOm, OTcoEduHInTe KJIeMMbl + / - OT NOnOCOB aKKymyIaTOPa.
HnKOrda He ChnMaTe n He BMeuBaTecb Ba6OTo peryIInpoBOUHO KlaNaHa BHyTpEHHero daBHeHn nn BblNyCKHOro KlanaHa;
XpaHnTe B HeoctynHom IJr DeTei MecTe;
He Kypnte Hn np6nkaTecb 6aTapeen K OTKpbITOMy nIameHn nn KaKOMy-Jn6o o6opydoBaHHo, KOtOpoe MoKeT CTaTB NCTOCHNKOM NCKp. - 136eraIte nckp ot Ka6eJe, 3JNeKtpoo6OpyObaHnN i 3JNeKtpoCTaTnCTUHeCKnx 3apYIOB;
- 136eraTe n36bToHOn 3apAn 6aTapeu n noDepKnBaTep Tempeatpy 6aTapeu Hnke 45 - 50^
B cnyae cnyaHoro BbITEkAHnJ KNDKOCTN 3 aKKyMylrTopOB no KaKoJ-Ni6o npuHne yctpaHnte
yTeUky C nOmoIbI O abCop6npuyoero MaTePnIa, IcNoIb3yI nepuAtK, aHTNKnCLOTHyO OdekIy N 3aunTHbIe OUY B COOTBeTCTBUN C pyKOBOdCTBOM NO 3KcNpyaTaunn AKKyMylrTOPOB. IpomOnTe DOCTaTOHbIM KOINueCTBOM BObl YaCTN TeJa, Ha KOTOpblie NonaII CNyuaHbIe 6pbI3Rn, H MeJeHHO 6paTntecb K BpaY.
Odekny,3arpz3HeHHa cnyauHn npoJntoJxuKocTbU, cJeDyET noCTnpaTb.
Pnck B3pbBa n noxapa: n36eraTe KOPOTKnx 3aMbKaHm N3-3a NCIOJIb3OBAHHa HEN3OJInpoBAHHbIX DeTanei. N36eraTe HoWeHn ODeXdbI C MetaJIInueCKMn DeTaJAMn, KOTOpBle MOryT CnyaHNO KOHTAKTIpOBaTb C 3neKtpoDAmn AKKMyJrTopa.
He noDBepraTe aKKyMylTOp BO3dEiCTBnIO npMbIX cOnHeuHbIX Lyuee 6e3 3aunTbI;
Bepere TaKymyTop o6neHeHn;
He BbINOJIHnIe OT6Op TOka c aKKyMylAToPa C NOMOuBIO NIOCKORY6ueB, 3aXIMOB IN BpeMeHHbIX KOHTaKTOB.
- Y6eINTEcB, yTO BCE COeINHeHnRA (KJIeMMbl, BUNKN, pa3beMbI n T.I.) XopoOo NODOrHaHbI n HaxOJaTcB INCpABHom COCTOHN.
He KnaDnte HNCTpymEnTbI Nm MetaJIInueckne npedMeTbI Ha 6aTaapeH.
He KnaIaIte MeTaJIInueckne INHCTpyMeHTbI Ha aKKyMyJrTOp.
Copeknte akkyjTOp uCTbIM n cyxim, no Bo3MOXHOCTn HcNoJb3yra TkaHb c aHTncENTnuecko nponntkoi.
He doniBaTe dNCTnllnpoBaHHyIO BDOy.
- Onachoctn B3pbIbA Bo Bpem 3apdKn - OHN MoryT Bo3HkAtb KaJdb pa3 npn NcNoIb3OBAHH HeNoDxOJaIeero 3apdHoro yctpoiCTBa dIy aKKymyIaTopa, B 3abNCIMoCTn OT 3JeKTpuYeCKnx XapaKTePncTnK aKKymyIaTopa.
Bo Bpemr onepaun 3apn knytoPOB nH, BO BCKOM clyae, npn BCTabEnHOBnIke 3apndoro yctpojCTBa, 3anpeaaetcBKnOuAtb MaunHy n 3anpeaaetc nepemeuaTbe ee, daXe BpyHyIO.
ГЛABA 10 - ПОВЕРKA ПЕД 3АNYСКOM
OCOBARIOBEPKAДЛМODEJIENC3HDOTEPMUQECKMDBNFGATEJEM
| BHHMaTeJbHo IpoUHTaIte pyKOBODCTBO NO 3KcPJIyAtauIN I TexHnueCKOMY 06cJIyXKNBaHnIO DBrIaTeJIa, BXOJaUeE B COCTAB DOKUMENTaUIN, NOCTABJRAEMOIM C MaunHOJ. |
- NpOBePntb yPoBeHb MaCna B DnBraTeNe, DoJIHTb, ecn OH Hn3Kn, nCNoIb3yra 3aunTHbIe nepuATkn, NO BO3MOxHOCTN XlonuaTo6yMaXHbIe C HnTpInIOBbIM NOKpbITHeM; CM. Yka3AHn B INHCTpyKcHn No 3KcPiYaTaCuN DnBraTeJIa.
- 3anpaBIAHTe 6eHNHom (npn BbIKNoueHHom XoJOnHOM Dnuratene) n cnoJIb3yIte TIN TOJIINBA, peKOMeHNDoBaHHb I npOu3BOuNTeJeM Dnuratela (CM.pyKOBoDCTBO NO 3KcNpyaTauNN IN TEXHueCKOM 06CnykunBaHnn Dnuratela).

XPAHNTE TOIINBO B IPOXIAHOM, XOPOIIO POBETPBAEMOM NOMEUHNI, BDAJIOTNCTOCHNKOB TEPJI, BHEOCTYINHOM JIJA DETEN MECTE.

BAKHO: BaK dJa 6eH3nHa dOJXeH 6bItb XopoW OuyIeH N IOxOJaIe I DaT OTo cJIH, yTO oBecneuT dOJIrN CpOK cIyX6bl TOnIIIBHO fIbItpa DInrataTeI; nCnoJIb3yIte 6ak DOCTaTOUHO EMKoCTH, YTO6bl 6eH3nHa 6blIO dOCTaTOUHO Ira 2/3 MeCAUEB pa60TBI, YTO6bl 6eH3IN BcERda 6bl CBEXHM.

Ppno6peTne cIeNyIOuIe HNCTpyMeHTbI 3aunTHbIe npncnOco6JeHn: 3auNTbIe ouKn, 3aunTHbIe nepaATkn, 1 napa HOxHNu, 1 nepeaTOUHbIKoHTeHep (uCTa), 1 BOpONKa (uCTa).
IpoBepbTe HAnuue B 6aTapee pactbopa cepHoi KncnObl n ypoBeh 3apra. B cnUyae oTpuaTeNbHorpe3yIbTaT A BiINoHnA Te CJeDyUOune DeiCTBn:
BnMaTeIbHo npOHTaIe rIaby «HopMbI n npaBnla TexHKn 6e3oNaChOCTN», B KOTopoJ o6o3HaueHbI
PnCKN, CBaHHbIe C 3anpaBKO 3neKMeHToB 6aTapeu pactBOpom cepHO KNCIoTbI
- Pn nmoH NOxHnO TpeKbTe KOHeu NpactNKOBOro KOHTeHepa c pactBOPOM cepHO KNCIObl H nepeJeTe ee B nepeDaToHybIKoHTeHep.
CHIMnTe KpbIiKy C KaMep 3JeMeHToB 6aTapeu. - Пи поши Воронки Заловайп pactьор do Тх пор, поka уpoBEнь He DoCTnHET OTMeTkn, yka3aHHo chapyкбатaven.
- IIOJOKIHTe He MeHee 12 YacOB, He NOKJIHoua 6aTapeo, 3aTeM, Pn HE0xOIMocTN, DOnJe Tpe pCTBOp, UTO6bI DOBecTN yPOBeHb BO Bcex 3eJMeHTax Do Toi Je OTMeTKN.
BHNMaTeIbHo npOHTaTe pa3dEn rIaBbl «HopMbI n npaBnla TexHKn 6exOnacHOCTN», NOCBraeHHbIM pNcKaM, CB3aHHbIM c3apJdkoN pa3pJdko 6atapen.
3apAnTe6aTapeo.
IIOIMETAJbHAR MAUNHA CAKKUMYJTOPOM (TNEJBbIM)
PpOBepbTe,3apJxKeHnAkkymyIaTOp.B npOTuBHom Cnyuae,BblONHInTe 3apJky aKKymyIaTopa,CneDyAnHCTpyKcIaM,piBBeDeHHbIM B ΓJIABE9-IPABUNLA TEXHNI6E3OPIACHOCTN.
ГЛABA 11 - 3ANYCK N OCTAHOBKA

NEPED3ANYCKOMMAUNHbI PPOHTAITE BCE NPEJSECTBYIOUNE TJIABBI.
OCOBII NOPAOK DEICTBNI DIA MODELECN 3HNDOTEPMNUECKMN DBNATATELEM


BHHMaTeIbHo IpoUHTaIe pyKOBOcTBo NO 3KcNlyaTaunn N TexHnueckomy 06cnyxHBaHIO dBnraTeJ, BXoJaUee B COCTAB DOkymeHTaunn, NOCTABJeMoC n.
3ANYCK:
1.певаде opraн урален STOP (CTOП) в поожене 1
2. OTKpoTe TOIINBHyI KpaH
3. YctaHOBnTe pblar ynpabneHnCKOpocTbIO B nONKeHnE S (nyck)
4. 3aMKHnTe nycKOBo pBuHa
EcnBnraTeIb yke DoCTaTOUHO nporpeIcA, a TAKKe npu TenoI horOde, nepeBeIte pbIar Ha noBHyero dnaana3oHa KnapyN nn Octabe erO He3amKHyTbIM
Enn DbrarteIb xoIOnHbI, a TAKKe npxOIOHOH norOe, 3aMKHnte NyCKOB0B pbIar.
-
Octopokho notaHTe pykoTky dla cmo3aOda do ynpa. 3Ta Toka 03Haayet Haayo Komnpeccnn. BepHnte pykoTky B nCxOJHoe noLoKeHne u pe3KO noTAYHte ee. He BbITraNBte Tpoc n3 o6oJouKn. 3anyCTHe DnuraneB h BepHnte pykoTky dla cmo3aObaB nCxOJHoe noLoKeHne, He donyckar ee pe3Koro nepemeuenia.
-
3anyctnte Dbrarteb nIaBHO pa3OMKHnTe nyCKOBpbyar, octabNB ero noJIHOCTbIO pa3OMKHytbIM. He onyckaTe nonHoro pa3MbikAHna pyiura, ecnn Dbrarteb BCE eue xOJOnHbI nn npxONdHoi norode, Tak kak Dbrarteb MoKeT 3actOpNTbcra.
PABOTA:
- Pn pa6oTaHouem DnIraTeNe BepHnTe pbyar akcepepatopa B noLoXeHne Hn3Knx 6opotob L n porpeTe DnIraTeB TeueHne HeckonbKnx MInHyT. PnaBHO nepeMeaJte pbyar akcepepatopa no HanpaBHeHIO K noLoXeHnO BlicOKnx 60pOToB H do tex nop, Noka He 6ydt DocuHyta HyxhAa CKOpocTb.

BAKHO: Ecn Heo6xOaHmocn B pa3roHe DnRaTeJr HeT, PnaBHO 3aMeJnte ero pa60Ty, nepemaa pbiar akcenepatopa K noNoXeHHIO o6OpOTOB XOnocTO rO XoA: 3TO cOKpaHT pacxoq TonIbBa H npOaNt Cpok cnX6bI DnRaTeJra.
OTKJIIOUeyHNE DBNIGATEJIA:
- IpebeDte pbyar akcelepaTopa K OTMeTke Minimum (MHNmym) n nepeoTKIOUeHnem daTe DBNrAteIIO nop6OraTb B TeueHne 2-3 MNHT.
- Nobeprhnte opran ynpablenia STOP (CTON) npotnb yacoboi ctpelkn do OTMeTkn O.
- 3akpoTe TOnnBHykpaH
4.Octopoxho noTAHnTe pyKoRTky IaI caMo3aOda n BepHnTe ee B NcXoHDoe noLoxHe,do ynpa.

BAxHO: DaaHn anepaun npedotbpatnt o6pa3OBaHne KOHehcaTa B Kamepe cropaHn.
OCOBII NOPRAOK DEIHTCTBNI JIA MOJEJIEN, PABOTAOUNX OT BATAPEI
3ANYCK:
EcnMaunHa nCnoB3yeTcMToDnUHo N npaBnIbHO,JeNaTb HeckOboN pOxoOBo He 06aTeNbHO.
YTo6bI noDpeKINBaT MaunHy B XopoWeM COCTOHN H, KaC CneCDTBNE, DcTnue MaKNCMaJIbHOJ pOn3BODInTeNbHocTN, Heo6XoIMNo nepnoDnueckN BCTPaxINBaT N OUYMaT BaKYyMHbI N ONOpOXHrTb KOHTeHep dJa Mycopa.
Bokobai 3eTka nCnoIb3yETcA JnydaneHn 3aqr3HeHn C KpaEB, rpaHnU, n3 yrNoB nT.D., TaKm o6pa3oM, KOrda OHa He BblOnHnE T daHHo FyHKuH, ee Heo6xOAnMo depKaTb B NoDHnTOM NIOXKeHN. EcIn OCTaBtB ee BHn3y, OHa NoDHNMeT PbIb B BO3dyx, CHN3VB TaKm O6pa30 m pe3yIbTaT pa60tBu CEHTpAlbHoN 5eTKn.
Ipi pa6oTe Ha MaIeHbKOM npocTpaHCTBe HnI nepeMeueHnNo KpyToI dyre, IcnoJIb3ObaTb MexAHnueckyIO Tary He peKoMeHdyETcA, YTO6bl MaunHe 6bIIO IerYe MaHeBpnpoBaTb.
EcnMaunHa pa6oTaET OT 6aTapeu, BnHMaTeIbHo CneIte 3a COCTOHNEM 6aTapeu IN PPOBOITe NOd3apRky, KaK TOnbKO nrrA BOJIbTMetpa DOCTINHT KpachOH 30Hbl.
HNKORDA HE DONYCKAITE NOJHOI PA3PRAKI BATAPEN, I INPN 3APRAKE 3APRHOE YCTPOICTBO BCEDA DOJXHO DEJATb POJIHBI UIKI.
ГЛABA 13 - ПЛАHOBOE TEXHNUECKOE OBCJYKNBAHNE

BCE ONEPAUINI NO TEXHNUECKOMY OBCJNYKBAHNUO CJEYET IPOUN3BODHTB INP BBIKJIIOUEHHom N OCTbIBWEM DBNATATEJE, ECIN Y BAC MAUNHA C 3HDOTEPMNUECKM DBNATATELEM, IN COTCOEDINHEHHOH BATAPEEN, ECIN Y BAC 3JEKTPNUECKA MAUNHA.
OuHCTKA NblJIeBbIX ΦNJIbTPOB:
IpoBepaTe nbIeBbIe 0JIbTpbl (Deta1b1, Pnc.8) KaKbIe 40-70 pa6OuX lacOB nIi no Mepe Heo6xOumoctn. OTKpOte KpbIshky (Deta1b1, Pnc.1), TTO6bl NOnyUHTb DoCTyn B OTCEk FInlbTPOB.
OuNTKa 6yHKepe (A, Pnc.1) Ha MeCTe, HApBaBte CtpyIO CxAToRO BO3DyXa Ha BepXHOU OCTb 6yHKepe. Y6eIITecb, YTO 6yHKepe. HxOJITcB HcnpaBHOM COCTOHN, npn Heo6xoUmocTn npOn3BeJeTne 3aMeHy.
ПьIE3AиTHOEУПЛOTHEHNE:
PpOBepaTe coCToHHe 3acNoHok KaKdbIe 40/70 yacob. NObepKdEHHbIe nn He3ΦΦeKTHBbIe KlaNaHbI cHxKaIO T pON3BOIDNTeNbHOCTb MaunHbI B nlaHe KaueCTBa y6OpKn, Detanb 4, Pnc. 6.

BAKHO: 3aMeHHTe 6OKOBbIe 3acLOHN, eCIn Ix HxHHN KpaHaxOHTcB 2-3 MM HaD 3emJe.
BOKOBARIETKA:
Teanb 1, Pnc. 9. Korda ueKa He nCnoB3yeTcra, noHnMnte ee Bo n36ekaHne HeHyxHoro 3aNbIeHHa. TaKxe depKnTE ueTKy B noDnHrTom noIOXKeHHn, Korda mAsuHa He nCnoB3yeTcra, u y6eHntecb, yTO OHa He conpNkacaetc C npYmU oBeKeTAMU, ot KOHTaKtCA c KOTOpbIMn OHa MOKe TnORHyTbcn I npInTu B HerOdHocTb.
UEHTPAJIbHAR UETKA:
Iy ouhctkn ceHTpaHbHOI 1eTKn Bam noHaIO6ntc CneDyIOoee: 3aunTHbIe nepaTKN, DbIXaTeNbHa MaCKa, KLeuH, HOXHNzbl.
PpOBepeTc coCToHHe zENTpaIbHOJ uTeKn Uepe3 KaXdIe 50/80 cAcob pa6Otbl IIn YaIe, eCIn MaunHa NcNoJIb3yEeTc B TReKeJIbIX yCIOBnIX. UTo6bl nOlyuHTb Bu3YaJIbHbI DoCTyn K ceHTpaJIbHOJ uTeTke, CHIMITE KOHTeHep dIy Mycopa (DeTALb A, Pnc.1) npepebpHte MaunHy kak nokaaho Ha Pnc.9, Haxab Ha pyKOraTKy.
EcnB MaunHy nonanf parmentb I BepeBok, npoBodn nn Dpyne OTxOdb noo6horo poa, HaeHbTe CneunabHbIe 3aunTHbIe nepaTkn 3aunTHyIO Macky, yTo6bl ydauntb 3actpawbn B uetke Mycop.

ECINY BAC 3NEKTPNUECKAR MAUNHA, INPED TEM, KAK HAKJIOHHTb EE, CHIMNTE BATAPEIO BO N36EXKAHNE PA3JNTNPACTBOPA CEPHO KNCLOTbl.
HACTPOKKA
LHTPAJIbHAR LETKA:
Korda MaunHa ydaIaer Tp3b n MycOp He3ΦΦeKTHBHO Jn6o OCTaBnE rP3b N03aDn Ce6ra, Heo6xOIMo OTpeYlnpoBaTb IonoKeHne ceHTpaIbHo 8eTKn. OnyCTnte ceHTpaIbHyIO 8eTKy n BblOnHnTe cNe dyUoiue DeiCTBna:
- CHIMMTE 3aunTHbI KOKyX (TeTalb 2, Pnc.4)
2.Ocna6bTe 6oT (Eetalb1,Pnc.10) B OTBepCTnB nepeDHeu qactn MaunHbI - 3aTahHe 60NT (Aetanb 2, Pnc.10)do KOHTaKTa C TpeMg 60NTamn (Aetanb 1, 2 n 3, Pnc.10)
- Ecn n tKa npnneraet K 3eMne cnnkom cnIbHo, ocna6bTe 6oT (Deta2) n 3aTnHte 6oT (Deta1b 1).

IPIMUEAHHE: yTo6bl y6eHntbC B TOM, yTo ceHtpaBHa aetKa npabHbHO OTpeYlnpObaHa, ouehnte ee «cneJ» cJeDyUoUm 06pa3OM:
- Nocne perynipobkn 3anyctnte MaunHy n, He Dnuragcb Hn Bpeed, Hn Ha3ad, daTe en npa6oTaTb Ha MeCTe KaK MInHmym 10 / 15 cek. c onyueHHo CEHTpaBHOI ueTKO.
- OTKJIIOHTe DnIraTeIb, NOdHMnTe YeHTpaIbHyU YeTKy I nepeMeCTIte MaunHy BnepeD BPuyHyO Ha DOCTaTOHoe paCtOHaHne, YTo6bl CTaI BnDEH CneIe, OCTaBJeHHbI Ha NoIy BpaueHHeM ZeHTpaIbHOJ 1eTKn, KaK NOKa3aHo H a Pnc. 11.

MoxHo cdaT npOyKT HeNocpeDCTBeHHo DnCTpN6bIOTpy B3aMeH HOBOr 3KBNAeHTHO rpoDyKta.
Bb6poc npodykTa B OKpykaHou cypeMy MoKeT HHeCTn cepbe3hbl yueep6 camoI cpeNe 3doPobbU qelOBeka.
Ha pncyHke n3o6paXeH KOHTeHep IJIa MyHnCnIaNbHbIX OTxOIOB; Ctporo 3anpeuaetc Bbl6paCbBaTb annapat B 3TN KOHTeHepbl.

Heco6IIOHeHne pykoOJauei dapeKTHBbI 2012/19/EU u nCnoJIHnTeJbHbIX deKepeTOB pa3InuHbIX cTpaH CoooCTBa noIeXHT aMmHHCTpaTHBOMy Haka3aHIO.
YTNIN3AUNMAUINHbI
Ecn He npednojaraetc daIbHee IcnoJb3ObaHne MaunHb, Heo6xoImo ChrTb C Hee aKKyMnyTopHbie 6aTapen n yTnIn3npoBaT bX B COOTBeTCTBn C npipOdo0xpaHHbIMn HopMaMn, KaK yKa3aHO B eBponeckom cTaHapTe 2013/56/EU, nn nepeDaT bX B aBtOpn3ObaHHbI ueHTp npneMKn.
Pn ytni3aun MaunHb CneyET co6nOdaTb DeIcTBYIOuee B MeTe npmeneHn o6opyoBaHn 3aKoHOaTeJIbCTBO:
-OTcoeHNHTb MaunHy OT cETn 3JeKtpOnHTaHn, CInTb BCE XnIDKOCTN OOHCTNTb;
-pa3o6paTb MaunHy Ha rpynnbl OndHopOndhix MaTePnaIaOB (nlaCTMaCCbI B COOTBcTcBn CmMBOLOMpepepa60TK, MeTaJIbI, pe3Ha, yNaKOBka).
Ecn n deTann coepkata pa3nHbIe MaTePnaJIb, o6paNTbcra K KomneTeHTbIM OprAH3aunM; KaKdA ODHOpOHa rpynnn daonka 6bITb yTNnHnPOBaHa B COOTBcTbN C 3aKoHOaTeNbCTBOM no nepepa60Ke MaTePnaJIOB.
PekomeHnyetc TaKke ydaJIntb Te DeTaN MaunHbl, KOtOpbIe MOryT PpeCTabJIaRb ONaCHOCTb, B Oco6eHHOCTn dJeTei.
ГЛABA 17 - ABAPИньIE CNTYAЦИN
B IIO60I abapHHO cnTyauHH, HApnMep, ecn Ba7a MaunHa clyuHa nepeexana npoBOID noD HAnpXeHHeM, HaxOJaunCra Ha NoIy, KOToPbI HAOTaCLs Ha OCHOBHyO nII 6OKOBYU 9ETKy, IIN60 ecn Bblwnte NOCTOPOHHe WymbI BHyTpN MaunHbI NII DBrAteJI, IIN60 ecn BHyTpB MaunHbI CnyaHNO nonan packaJIeHNbI MaTePnaIbI INI rOpIOue XnIKOCTN, XmHKaTbIB CELOM, JADOBNTbIE BeueCTBa NT.D.
BAM CJIEJYET:
- Otnnyctntb pbuar, yto6bi octaHOBNb Tary.
- BbIKHouHTb DnurateJIb, ecn y Bac MaunHbI C DBnuratEnem BHyTpeHrero CropaHn, nepeBcIpaH aKceIepaTopa, haxoJauuNcra Ha Dnuratene, B noLoXeHne STOP (CTO); IIO6o, B clyuae c MaunHOi, pa60taUoe ot 6aTaPeH, NOBepHyTB KJIou 3axnHaHn, HaxoJauuNcra Ha naHeH ynpabHeHn, cnpaBA HaneBO.
- EcIn BHytpb MaunHbI nonaI KaKoi-Jin6o MaTePnA1 n3 nepeuNCleHHbIX Bblwe, n3BLeKeTIe KOHTeHep (6yHkep) n ouNCTte erO, npedBaPnteJbHO Haede nepaTkn I Macky dIra 3aunTbI JerKnx. B liIO6om clyuae DeIcTBByTe yka3aHnma, npuBeDeHHbIM B pa3dene «KOHTeHep dIy Mycopa».
ГЛABA 18 - HENСРАВHOCTN / ПИЧУнbl / YCTPAHEHNE
C MaunHou MoryT Bo3HKnHyTb, B OCHOBHom, DBe npo6IeMbI: MaunHa BbyNcKae TblB npocece pa60tbn6o octabnre Tp83b Ha noLy; npuynHbMoYr 6bItb pa3nHbIMn, Ho ecIn MaunHa nCNoJb3yETc npaBnHOn peryLapHO npoxOHT texHueckoe o6cIyXnBaHne, TaKne HeucnPabHOCTn He dONxHb BO3HnKaTb CnWkoM qacto. TaKm 6pa3om:
ГЛABA 19 - ГАРАТИА
| HENCSIPABHOCTh ПИЧИHA | YCTPAHEHNE | |
| MAШИHA ПОДнIMАТ Пыль Рыча | ГВ ПОLOЖЕНМБЛOKИРОВКИ BCASСВИBAHЯ | HAЖМITE рУЧКУ,ЧTOБКIAKТИВИРОВАТСВСАВИBAHЯ |
| ЗАСОРЕНИЕ ФИльТЮВ OЧИСТИTE | ФИльТЮВ, ВСТРЯХΥВПRI ПОМОЦИ СПЕЦАЛБНОУСТЮСТВА, ПRIНEOБХODIMOCKТИ N3ВLEКИTE ИТSUATEЛБНО ПРOMОЙТЕ | |
| ПОВPEЖDEHINE ФИльТРА 3AMEHNT | ФИльТР | |
| HEPNPABIVHBAN YCTAHOBKAФИльТРА | УБЕДITESCB, УTO ФИльТРУСТАНовлиEN ПРавINьНО | |
| ПOTИВОПБЛЕВА(BIE)3ACLOHKA(И) ПОВPEЖDEHA(ы) | ЗАМЕНITEПOTИВОПБЛЕВУ(OBIE)3ACLOHKN(И) | |
| ПОДOLJЖITEЛБНOEICПOLБ3OBAHNE BOKOBОIшETКI | ИСПОЛБ3УЛTE BOKOBUYU ZIETKUYOЛБКО ДЛЯ UBOPКИ MYCOPA CKPAEB, ГАПИЦИ ИЗ YTGЛOB | |
| MAШИHA OCTABЛЯТСLEДыГРЯЗИ HA ПОЛУ | ОCHOВHA JIETKA HEOTPERUGILPOBAHA ИЛСИЛБON3HZHOSEHA | ПОВЕРБTE OCHOВHUYO ZIETKUYIOCTABЛЯЕМБИЕЮСLEД |
| В MAШИну ПОПАЛПОВODA,KABEЛи N T.D. | УДАЛITE IVX | |
| ПOTИВОПБЛЕВОй KJIAPANH(bI)ПОВPEЖDEH(ы) | ЗАМЕНITE ПOTИВОПБЛЕВОй KJIAPANH(bI) | |
| KOHTECHДЯ MUCOPA ПОJOH | ФИОPOЖНITE EGO | |
| ДВИГATEЛь PABOTАТHEПРABIVЛьНО | BO3ДУSHьД ПИльТРДВИГATEЛЯ 3ACOPEH | ОчИСТИTE ИЛN 3AMEHNTEPИльТР |
| HEPNPABIVHBAN KAPБЮРAZИ ПОВESTE ПОВТOPHYOUKAPБЮРAZИО | ||
| БATERЕ RAЗРЯЖЕHA ИЛIN3APRAЖЕHA HE ДО KOHUSA | ПОВЕРБTE UPOBEHBЛЕКТРОЛNTA И ПОВЕДITEПОЛь CHIKЛ 3APRAДКIBATAPEN | |
| HEPNPABIVHBAN PABOTAKATAPEI; MAШИHA PABOTАТMEДЛECHNO I ПLOXO OCHIIAZETPOBEPHXHOCTb | ИСПОЛБ3YETСАЗРДНOSEUCTPOICTBO, OTПИЧОЕ OTPEKOMEHДУEMOTO | ИСПОЛБ3YETTE ПОДХODЯUCEE3APRAДНOE YCTPOICTBO |
JaHnMaunHa NOKpbIbAeTcra rapaHTne Ha OTCyTCTBne DepeKToB MaTePnAna n I3roTOBHeHn Cpokom Ha 12 MecaueB C DaTbI NOKynK.
TapaHTne NOKpbIBaOTc TToIbKO Te Te TaII, NOJIeKAsue peMOHTy IIN 3aMeHe, KOToPbIE 6bln npN3HaHbI DeΦeKTNBbIM. 3anpocbl dpyrOro poJa He paccMatpNbAHOCTc.
IapaHTn He pacnpoctpaHareTc H na NobpeXdeHn, noJyHeHHbIe B pe3yJIbTaTe eCTecBeHHoro n3HOca, IcNoJIb3OBAHn, OTnHOro OT npedycMOtePHHOrO HaCToAIm pyKOBoDCTBOM, nobpeXdeHn, Bbl3BaHHbIe HnPaBnBHo
HacpoKo, HnpaBnIbHo npoBeeHHbIM TxHnueckmN OepaunMn N aKTam BaHaJIn3Ma.