
GXP2170 - Phone GRANDSTREAM - Free user manual and instructions
Find the device manual for free GXP2170 GRANDSTREAM in PDF.

| Product Type | IP Phone for Business |
| Brand | Grandstream |
| Model | GXP2170 |
| Screen | 4.3-inch color TFT |
| Line Keys | 12 dual-color keys, expandable to 48 BLF/speed dial keys |
| Context-sensitive Keys | 5 programmable keys |
| Network Ports | 2 Gigabit ports (LAN and PC) |
| Power Supply | 12V DC adapter included or PoE (Power over Ethernet) |
| Bluetooth | Built-in |
| Audio Quality | HD (high definition) |
| Conference | Up to 5 participants |
| EHS Support | Electronic hook switch for wireless headset |
| Expansion Module | Compatible with GXP2200EXT (up to 4 modules, 160 additional keys) |
| Package Contents | Device, handset, 12V adapter, Ethernet cable, phone cable, phone stand, quick installation guide |
| Approximate Dimensions | 222 x 195 x 44 mm |
| Approximate Weight | 0.95 kg |
| Protocol | SIP |
| Security | Advanced encryption, GNU GPL license included |
| Precautions | Do not restart during update; use only the provided adapter |
| Maintenance | Clean with a soft, dry cloth; avoid liquids |
| Repairability | Spare parts available through Grandstream; expansion module sold separately |
Frequently Asked Questions - GXP2170 GRANDSTREAM
User questions about GXP2170 GRANDSTREAM
0 question about this device. Answer the ones you know or ask your own.
Ask a new question about this device
Download the instructions for your Phone in PDF format for free! Find your manual GXP2170 - GRANDSTREAM and take your electronic device back in hand. On this page are published all the documents necessary for the use of your device. GXP2170 by GRANDSTREAM.
USER MANUAL GXP2170 GRANDSTREAM
Grandstream Networks, Inc.
126 Brookline Ave, 3rd Floor
Boston, MA 02215 USA
Voice: (617) 566-9300
Fax: (617) 249-1987
www.grandstream.com


natural_image
Three black office telephones with display screens, shown from different angles (no visible text or labels)GXP2170 Enterprise IP Phone Quick Installation Guide
For Warranty and RMA information, please visit www.grandstream.com
Content
English....1
简体中文....10
Español....19
Français....27
Deutsch....35
Italiano....43
Русский....51
Português....59
Polski....67
EN
The GXP2170 is not pre-configured to support or carry emergency calls to any type of hospital, law enforcement agency, medical care unit ("Emergency Service(s)") or any other kind of Emergency Service. You must make additional arrangements to access Emergency Services. It is Your responsibility to purchase SIP-compliant Internet telephone service, properly configure the GXP2170 to use that service, and periodically test your configuration to confirm that it works as You expect. If You do not do so, it is Your responsibility to purchase traditional wireless or landline telephone services to access Emergency Services.
GRANDSTREAM DOES NOT PROVIDE CONNECTIONS TO EMERGENCY SERVICES VIA THE GXP2170. NE-THER GRANDSTREAM NOR ITS OFFICERS, EMPLOY-EES OR AFFILIATES MAY BE HELD LIABLE FOR ANY CLAIM, DAMAGE, OR LOSS, AND YOU HEREBY WAIVE ANY AND ALL SUCH CLAIMS OR CAUSES OF ACTION ARISING FROM OR RELATING TO YOUR INABILITY TO USE THE GXP2170 TO CONTACT EMERGENCY SERVICES, AND YOUR FAILURE TO MAKE ADDITIONAL ARRANGEMENTS TO ACCESS EMERGENCY SERVICES IN ACCORDANCE WITH THE IMMEDIATELY PRE-CEDING PARAGRAPH.
The GNU GPL license terms are incorporated into the device firmware and can be accessed via the Web user interface of the device at http(s)://IP/gpl_license.
To obtain a CD with GPL source code information please submit a written request to info@grandstream.com
PRECAUTIONS:
WARNING: Please DO NOT power cycle the GXP2170 during system boot up or firmware upgrade. You may corrupt firmware images and cause the unit to malfunction.
WARNING: Use only the power adapter included in the GXP2170 package. Using an alternative non-qualified power adapter may possibly damage the unit.
OVERVIEW:
GXP2170 is a next generation enterprise IP Phone featuring 12 dual-color line keys (can be digitally programmed as up to 48 provisional BLF/fast-dial keys), 4.3 inch TFT color LCD, 5 programmable context-sensitive soft keys, dual Gigabit network ports, integrated PoE and Bluetooth, 5-way conference, and Electronic Hook Switch(EHS). The GXP2170 delivers superior HD audio quality, rich and leading edge telephony features, protection for privacy, and broad interoperability with most 3rd party SIP devices and leading SIP/NGN/IMS platforms. GXP2170 is the perfect choice for enterprise users looking for a high quality, feature rich multi-line executive IP phone with advanced functionalities and performance.
PACKAGE CONTENTS:


1 x Phone Cord1 x Ethernet Cable 1 x High Stand

1 x Quick Installation Guide
PHONE SETUP:
text_image
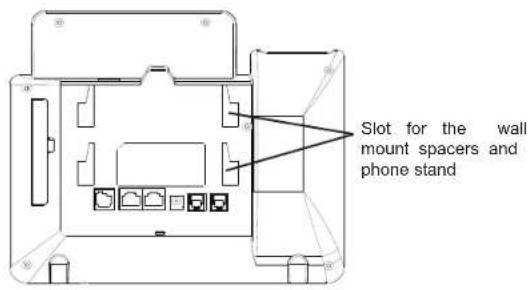
Slot for the wall mount spacers and phone standInstalling the phone (Wall Mount\*sold separately):
- Attach the wall mount spacers to the slot for wall mount spacers on the back of the phone.
- Attach the phone to the wall via the wall mount hole.
- Pull out the tab from the handset cradle (See figure below).
- Rotate the tab and plug it back into the slot with the extension up to hold the handset while the phone is mounted on the wall (See figure below).

text_image
Handset Rest Tab with extension up Tab with extension downInstalling the phone (Phone Stand) :
For installing the phone on the table with the phone stand, attach the phone stand to the bottom of the phone where there is a slot for the phone stand. (Upper half, bottom part).
CONNECTING THE PHONE:
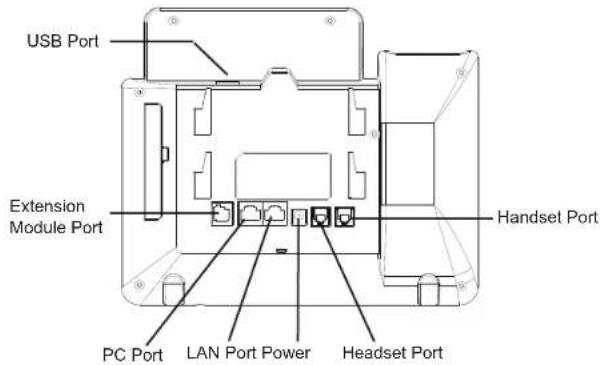
text_image
USB Port Extension Module Port Handset Port PC Port LAN Port Power Headset PortTo setup the GXP2170, follow the steps below:
- Connect the handset and main phone case with the phone cord.
- Connect the LAN port of the phone to the RJ-45 socket of a hub/switch or a router (LAN side of the router) using the Ethernet cable.
- Connect the 12V DC output plug to the power jack on the phone; plug the power adapter into an electrical outlet.
- The LCD will display provisioning or firmware upgrade information. Before continuing, please wait for the date/time display to show up.
- Using the phone embedded web server or keypad configuration menu, you can further configure the phone using either a static IP or DHCP.
Tips For Using the Keypad:
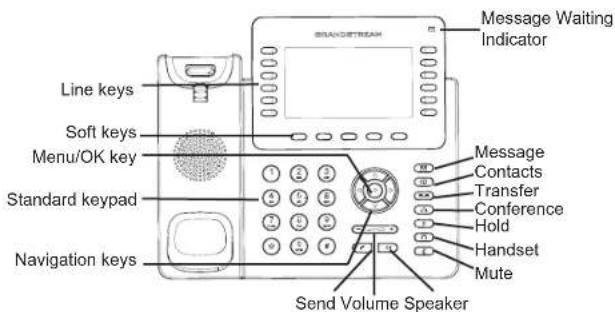
text_image
Black-and-Black Line keys Soft keys Menu/OK key Standard keypad Navigation keys Message Waiting Indicator Message Contacts Transfer Conference Hold Handset Mute Send Volume Speaker- To access the MENU, press the round MENU button.
- Navigate the menu by using the UP/DOWN and LEFT/RIGHT buttons.
- Press the round MENU button to confirm a menu selection.
- The phone automatically exits MENU mode when there is an incoming call, the phone goes off-hook or when the MENU mode is left idle for 60 seconds.
PHONE CONFIGURATION:
Configure the GXP2170 using a Web Browser:
- Ensure your phone is powered up and connected to the Internet.
- Press the UP button to see the IP address.
- Type the phone's IP address in your PC browser. (See Figure in next page)
- The default administrator username and password are "admin"; the default end-user username is "user" and the password is "123".

text_image
GRANDSTREAM CONNECTING THE WORLD GXP2170 Username: Password Language EnglishConfigure the GXP2170 using the Keypad:
- Make sure the phone is idle.
- Press the MENU button to access the keypad MENU to configure the phone.
- Select MENU-> Phone-> SIP-> Account to configure settings for SIP Proxy, Outbound Proxy, SIP User ID, SIP Auth ID and SIP Password.
- Follow MENU options to configure the basic features of the phone. For example: the IP address if using a static IP. For details, please check GXP2170 User Manual.
- Please contact your ITSP for additional settings that may be necessary to configure the phone.
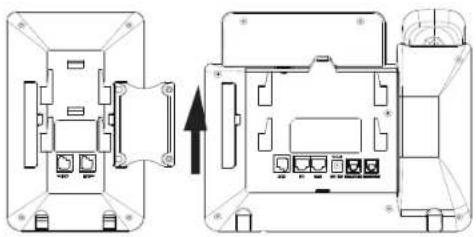
GXP2170 EXTENSION MODULE-- GXP2200EXT:
GXP2200EXT is an ideal solution for the busy enterprise environment looking to add the ability to receive and dispatch calls efficiently. Each extension module has 20 programmable buttons, Left and Right buttons, supporting 40 Multiple Purpose Keys to be configured. GXP2170 supports up to 4 extension modules, adding 160 fully programmable phone extensions to the phone.
Note: GXP2200EXT is an additional accessory for the GXP2170 and is not included in the GXP2170 box.
GXP2200EXT Package Content:
1 X GXP2200EXT Stand


1 X RJ11-RJ11 Cable
1 X GXP2200EXT Board

1 X GXP2200EXT
Connector Plate

4 X Screws
natural_image
Technical diagram showing two views of a device housing with internal components and mounting points (no text or labels)Installing GXP2200EXT:
- On the back of GXP2170 and GXP2200EXT there are slots for the connector plate. Attach the connector plate between the slots for GXP2170 and GX-P2200EXT;
- Apply the screws provided and securely tighten them in (see Figure in this page);
- Connect GXP2200EXT Board to GXP2170 via the EXT port using the RJ11-RJ11 cable provided;
- Install the phone stand on GXP2170 and GXP2200EXT;
- Power up the GXP2170. The GXP2200EXT will show the booting up screen with version information and connecting status;
- After successfully booting up, GXP2200EXT will stay in idle. Press and hold the Left button for 3 seconds to check the version information and status.
Configuring GXP2200EXT:
- Log into the GXP2170's web GUI and configure Multiple Purpose Keys for the GXP2200EXT 1/2/3/4 following the GXP2170 web GUI tabs;
- On the GXP2200EXT press Left or Right button to browse all the MPKs' status in different pages;
- For more information, please refer to the GXP2170 user manual.
Note: For the detailed user manual, please download from: http://www.grandstream.com/support
This product is covered by one or more of the U.S. patents (and any foreign patent counterparts thereto) identified at www.cmspatents.com.
ZH
natural_image
Line drawings of a classic telephone receiver, a telephone handset, and a cord with cable (no text or symbols)natural_image
Three types of hoses and a bracket, no text or symbols presentnatural_image
Technical line drawing of a device housing with internal components and an arrow indicating assembly or connection (no text or symbols present)配置GXP2200EXT:
natural_image
Architectural floor plan showing room layouts and equipment layout (no text or labels)natural_image
Technical line drawing of two electronic device modules with internal components and a directional arrow indicating assembly (no text or symbols)natural_image
Architectural floor plan showing two views of a device layout with no visible text or symbolsnatural_image
Technical line drawing of a device rear panel with internal components and an arrow indicating assembly (no text or symbols)\~49 \~ \~ 50 \~
natural_image
Diagram of a device interior showing two views of a device with labeled components and an arrow indicating transformation (no text or symbols present)\~ 57 \~ \~ 58 \~

1 x GXP2170 Base Principal

1 x Handset
text_image
Line keys Soft keys Menu/OK key Standard keypad Navigation keys Indicator de mensagem em Message Contacts Transfer Conference Hold Handset Mute Send Volume Speakernatural_image
Technical line drawing of a device housing with internal components and an arrow indicating assembly or transformation (no text or symbols present)65 66
natural_image
Pure technical diagram of a mechanical or electrical component without any text, numbers, or symbols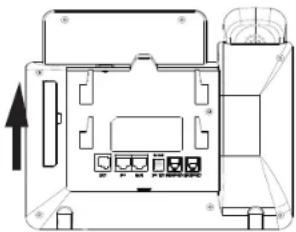
text_image
Technical diagram of a device rear panel with labeled ports and an arrow indicating direction\~ 73 \~ \~ 74 \~
This equipment complies with radiation exposure limits set forth for an uncontrolled environment. This transmitter must not be co-located or operating in conjunction with any other antenna or transmitter. This equipment should be installed and operated with minimum distance 20cm between the radiator& your body. Après examen de ce matériel aux conformité ou aux limites d'intensité de champ RF, les utilisateurs peuvent sur l'exposition aux radiofréquences et la conformité and compliance d'acquérir les informations correspondantes. La distance minimale du corps à utiliser le dispositif est de 20cm. The earpiece is easy to absorb small object, please take care to avoid scratching.
U.S. FCC Part 15 Regulatory Information
This device complies with part 15 of the FCC Rules. Operation is subject to the following two conditions: (1) this device may not cause harmful interference, and (2) this device must accept any interference received, including interference that may cause undesired operation. Any Changes or modifications not expressly approved by the party responsible for compliance could void the user's authority to operate the equipment. Note: This equipment has been tested and found to comply with the limits for a Class B digital device, pursuant to part 15 of the FCC Rules. These limits are designed to provide reasonable protection against harmful interference in a residential installation. This equipment generates, uses and can radiate radio frequency energy and, if not installed and used in accordance with the instructions, may cause harmful interference to radio communications. However, there is no guarantee that interference will not occur in a particular installation. If this equipment does cause harmful interference to radio or television reception, which can be determined by turning the equipment off and on, the user is encouraged to try to correct the interference by one or more of the following measures: —Reorient or relocate the receiving antenna. —Increase the separation between the equipment and receiver. —Connect the equipment into an outlet on a circuit different from that to which the receiver is connected. —Consult the dealer or an experienced radio/TV technician for help.
U.S. FCC Part 68 Regulatory Information
This equipment complies with Part 68 of the FCC rules. Located on the equipment is a label that contains, among other information, the ACTA registration number and ringer equivalence number (REN.) If requested, this information must be provided to the telephone company.
The REN is used to determine the quantity of devices which may be connected to the telephone line. Excessive REN's on the telephone line may result in the devices not ringing in response to an incoming call. In most, but not all areas, the sum of the REN's should not exceed five (5.0). To be certain of the number of devices that may be connected to the line, as determined by the total REN's contact the
telephone company to determine the maximum REN for the calling area.
This equipment cannot be used on the telephone company-provided coin service. Connection to Party Line Service is subject to State Tariffs.
If this equipment causes harm to the telephone network, the telephone company will notify you in advance that temporary discontinuance of service may be required. If advance notice isn't practical, the telephone company will notify the customer as soon as possible. Also, you will be advised of your right the file a complaint with the FCC if you believe it is necessary. The telephone company may make changes in its facilities, equipment, operations, or procedures that could affect the operation of the equipment. If this happens, the telephone company will provide advance notice in order for you to make the necessary modifications in order to maintain uninterrupted service.
If the trouble is causing harm to the telephone network, the telephone company may request you to remove the equipment from the network until the problem is resolved.
This equipment uses the following USOC jacks: RJ45C.
It is recommended that the customer install an AC surge arrester in the AC outlet to which this device is connected. This is to avoid damaging the equipment caused by local lightening strikes and other electrical surges.
If trouble is experienced with this equipment, please contact (Agent in the US): Company Name: Grandstream Networks, Inc.
Address: 126 Brookline Ave, 3rd Floor Boston, MA 02215, USA Tel: 1-617-5669300
Fax: 1-617-2491987
Canada Regulatory Information
Radio equipment
This device contains licence-exempt transmitter(s)/receiver(s) that comply with Innovation, Science and Economic Development Canada's licence-exempt RSS(s). Operation is subject to the following two conditions:
(1) This device may not cause interference.
(2) This device must accept any interference, including interference that may cause undesired operation of the device.
This product meets the applicable Innovation, Science and Economic Development Canada technical specifications.
This product meets the applicable Innovation, Science and Economic Development Canada technical specifications.
The Ringer Equivalence Number (REN) indicates the maximum number of devices allowed to be connected to a telephone interface. The termination of an interface may consist of any combination of devices subject only to the requirement that the sum of the RENs of all the devices not exceed five.
EU Regulatory Information
Support Frequency Bands and Power:
BT 2402-2480 MHz < 4 dBm;
The simplified EU declaration of conformity referred to in Article 10(9) shall be provided as follows:
Hereby, [Grandstream Networks, Inc.] declares that the radio equipment type [GXP2170] is in compliance with Directive 2014/53/EU.
The full text of the EU declaration of conformity is available at the following internet address: www.grandstream.com
UK Regulatory Information
Support Frequency Bands and Power:
BT 2402-2480 MHz < 4 dBm;
The simplified UK declaration of conformity referred to in Regulation 8& 14 shall be provided as follows:
Hereby, [Grandstream Networks, Inc.] declares that the radio equipment type [GXP2170] is in compliance with Directive RER 2017 (S.I.2017/1206).
The full text of the UK declaration of conformity is available at the following internet address: www.grandstream.com