
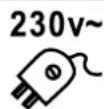
RCR779D+ - Hi-fi system ROADSTAR - Free user manual and instructions
Find the device manual for free RCR779D+ ROADSTAR in PDF.
| Product type | Hi-fi system |
| Brand | ROADSTAR |
| Model | RCR779D+ |
| AC power supply | 230 V ~ 50 Hz |
| DC power supply | 6 V (4 batteries LR14) |
| DAB+ radio | Band III: 174.928 - 239.200 MHz |
| FM radio | 87.5 - 108 MHz |
| CD/MP3 player | Yes |
| Cassette player | Yes |
| USB port | USB 2.0 |
| Auxiliary input (AUX) | 3.5 mm jack socket |
| Headphone output | 3.5 mm jack socket |
| Radio functions | Presets (30 DAB/FM stations), auto search, text info (DLS/RT) |
| Equalizer (EQ) | Flat, Rock, Pop, Jazz, Classical |
| Alarm / Sleep timer | Alarm 1 and 2, Sleep (15/30/45/60/90 min) |
| Display | LCD with adjustable backlight |
| Remote control | Yes (additional functions: MUTE, SCAN, PROG, STOP) |
| Antenna | Built-in (repositionable for better reception) |
| Warranty | Compliant with directive 99/44/EC |
| Recycling | Compliant with WEEE (do not dispose with household waste) |
| Safety | Do not open the casing, avoid moisture, ensure ventilation |
| Cleaning | Wipe with a dry, soft cloth |
Frequently Asked Questions - RCR779D+ ROADSTAR
User questions about RCR779D+ ROADSTAR
0 question about this device. Answer the ones you know or ask your own.
Ask a new question about this device
Download the instructions for your Hi-fi system in PDF format for free! Find your manual RCR779D+ - ROADSTAR and take your electronic device back in hand. On this page are published all the documents necessary for the use of your device. RCR779D+ by ROADSTAR.
USER MANUAL RCR779D+ ROADSTAR
- INSTRUCTIONS - All the safety and operating instructions should be read before the radio is operated. The manual should be retained for future reference.
- HEED WARNINGS - All warnings on the appliance and in the operating instructions should be adhered to.
- WATER AND MOISTURE - The appliance should not be used near liquids or in rooms with a high level of humidity.
- VENTILATION - The appliance should be situated so that its location or position does not interfere with its proper ventilation.
- HEAT - The appliance should be situated away from heat sources such as radiators, stoves or other appliances that produce heat.
- POWER SOURCE - The radio should be connected to power supply only of the type described in the operating instructions or as marked on the appliance.
- POWER CORD PROTECTION - Power supply cords should be routed so that they are not likely to be walked on or pinched by items placed upon/against them.
- OBJECT AND LIQUID ENTRY - Care should be taken so that objects do not fall and liquids are not spilled into the enclosure through openings.
- DAMAGE REQUIRING SERVICE
The appliance should be serviced by qualified service personnel when:
The power supply cord or plug has been damaged;
Objects have fallen into or liquids has been spilled into the radio;
The appliance has been exposed to rain;
The appliance has been dropped or the enclosure damaged;
The appliance does not appear to operate normally.
SERVICING - The user should not attempt to service the appliance beyond that descrive in the user operating instructions. All the servicing should be referred to qualified service personnel
Note: If the display does not function properly or no reaction to operation of any control may due to the electrostatic discharge. Switch off and disconnect the AC cord and remove all the batteries, then turn the power back on after a few seconds.
POWER SOURCES
AC POWER: You can power your portable stereo system by plugging the AC power cord into the AC plug (19) at the back of the unit and into a wall AC power outlet.
Check that the rated voltage of your appliance matches your local voltage.
Make sure that the AC power cord is fully inserted into the appliance.
BATTERY POWER: To use the radio with batteries, disconnect the AC power cord and insert 4 × "C" batteries into the compartment (20).
Be sure that the batteries are inserted correctly to avoid damage to the appliance.
Remove the batteries when the radio will not be used for a long period of time, as this will cause leakage to the batteries and subsequently damage to your radio.
TO USE THE RADIO
Press the [FUNCTION] button (2) to power on the unit;
Select the desired audio source pressing [FUNCTION] button (2) (DAB/FM/USB/AUX IN/CASSETTE/CD);
(Pleasesee detailed instructions for each Source in the following chapters);
Adjust the volume with the [VOLUME -/+] buttons (7/8) to the desired level;
Press & hold the [FUNCTION] button (2) to turn OFF the unit.
DAB RADIO OPERATION
Select "DAB" mode by pressing the [FUNCTION] button (2);
(The first time you select this function, the radio will scan the DAB radio stations automatically. It will display and play the first station after the scan is done);
In case the display shows "No DAB Service", press & hold the [PLAY] button (3) to start automatic scan;
To select the desired radio station press repeatedly the [TUNE -/+] buttons (5/6).
Preset
You can program a maximum of 30 preset radio stations.
Select your favourite station as explained before;
Press and hold [MENU] button (4). Select with [TUNE -/+] buttons (5/6) "Preset Store";
Press [PLAY] button (3) to confirm;
Press [TUNE -/+] (5/6) to select the preset number;
Press [PLAY] (3) to confirm.
INFO
When the radio station is playing, press the [INFO] button (4) repeatedly to cycle through the information broadcasted by the radio as follow:
UNDER DAB
DLS (Dynamic Label Segmenting): Radio text broadcasted from the DAB station such as the news, songs being played...etc.
PTY (Programme Type): shows which type of programme you are listening to, "Music", "Talk", "News" etc. If there is no information, it will display "Program Type".
Channel/Frequency: The frequency of DAB is displayed such as "11C 220.352MHz".
Audio info: The display shows the digital audio bit rate of the current reception.
Signal error: The signal strength is displayed graphically.
Time/Date: The time and date are set automatically.
UNDER FM
RT (Radio text): Text broadcasted from the FM station
Program type: shows which type of programme you are listening to.
Time/Date: The time and date are set automatically.
Frequency: the FM frequency for the radio station in playing.
Mono / Stereo: Automatic switching between mono and stereo reception.
SYSTEM SETTINGS
In FM / DAB mode there is an option menu.
Press and hold [MENU] (4) to access to the options.
Press the [TUNE -/+] buttons (5/6) to navigate into the options.
Press [ENTER] (3) to select the options.
DRC (Dynamic Range Compression): This function reduces the differences between teleoudes and quietest audio being broadcast.
PRUNE: Removes all invalid stations indicated in the station list with a “?” in front of the station name.
EQ: press [EQ] button (10) to change in flat, rock, pop, jazz, classic.
SYSTEM SETTINGS menu you can choose:
TIME:
(to confirm press the [ENTER] (3) button each time)
Press and hold [MENU] (2) to access to the menu;
Press the [TUNE -/+] buttons (5) to select "System SETTINGS";
Press the [TUNE -/+] buttons (5/6) to select "Set Time/Date";
Press the [TUNE -/+] buttons (5/6) to adjust the hour;
Press the [TUNE -/+] buttons (5/6) to adjust the minutes;
Press the [TUNE -/+] buttons (5/6) to set Date;
Set 12/24 Hour: Press the [TUNE -/+] buttons (5/6) to set 12 or 24hour;
Set Date format: Press the [TUNE -/+] buttons (5/6) to set DD-MM-YYYY or MM-DD-YYYY.
ALARM: Select Alarm 1 or 2;
Press [ENTER] button (3)to run Alarm wizard.
Press the [TUNE -/+] buttons (5/6) to select "On or OFF;
Confirm with the [ENTER] button (3);
You navigate in this menu with [TUNE -/+] buttons (5/6), Confirm with the [ENTER] button (3);
Select Alarm ON, , Frequency of alarm (daily, once etc), Wake up time, Source (Buzzer/DAB/FM), Volume setting, Duration (15/30/45 etc).
After select Alarm on to confirm all previous operations .
To turn ON or OFF alarm (in stand by mode): In stand by mode, press [EQ/RPT] (10) button tu turn ON/OFF alarms.
SLEEP: in ON mode, enter MENU mode, SLEEP setting, you can select 15/30/45/60/90 minutes, press [ENTER] button (3) to confirm.
Auto Update: you can choose radio can update Date/time.
Press the [TUNE -/+] buttons (5/6) to select From Any/DAB/FM or no update;
BACKLIGHT: select with [TUNE -/+] button (5) BACKLIGHT, press [ENTER] (3) to enter, select with [TUNE -/+] button (5/6) following info:
DIM LEVEL: you can choose dimmer level. select with [TUNE -/+] button (5/6) desired level.
On level: indicates the brightness level of the display when the device receives commands.
FACTORY RESET: in SYSTEM SETTINGS, select with [TUNE -/+] button (5/6) YES to Factory settings.
FM RADIO OPERATION
Select "FM" mode by pressing the [FUNCTION] button (2);
Adjust radio frequency to your desired station as follows:
MANUAL SCAN: Use the [TUNE -/+] buttons (5/6) to fine tune your desired station in a step of 0.05 MHz or press and hold the [TUNE -/+] buttons (5/6) to scan the next/ previous available station.
AUTO SCAN: Press & Hold [PLAY] button (3) to start automatic scan.
Preset
The PROGRAMMING operation is the same as that of DAB Preset.
Note: For a better reception, reorient the antenna (13).
TAPE OPERATION
Select "TAPE" mode by pressing the [FUNCTION] button (2);
Press [STOP/EJECT] (15.2) to open the cassette door (12) and insert your tape;
Close the cassette door (12);
Press PLAY to start playing tape.
Press [PAUSE] (15.1) when you want to stop playing tape operation temporarily, press again to resume tape operation.
Press [STOP/EJECT] (15.2) when finished, press again to open the cassette door.
Press [F.FWD] (15.3) or [RWD] (15.4) to start rapid tape winding either forward or reverse direction.
CD-MP3 OPERATION
Select "CD" mode by pressing the [FUNCTION] button (2);
Open the CD door (14) and place a CD-MP3 disc with the label up in the CD compartment.
Close the CD door (14). Focus search is performed and playback will start automatically from the first track.
REPEAT
To play a single track continuously, disk continuously or folder (MP3 only) press [EQ/RPT] button (10), you can select Rep-1, REP-ALL or REP-DIR (MP3 only).
Pressing again [EQ/RPT] button (10), you can select RANDOM function..
PROGRAMMING
You can program tracks for disc play in any order.
Stop the playback by pressing [STOP] (4);
Press [PROG] (21), the display (1) will show "P01" and flash;
Select desired track by using [TUNE -/+] buttons (5/6);
Press [PROG] (21) again to confirm desired track into the program memory;
Repeat step 3 and 4 to enter additional tracks into the program memory;
When all the desired tracks have been programmed, press [PLAY] (3) to play the disc in the order you have programmed;
Press [STOP] (4) twice to terminate programmed play.
USB OPERATION
Select "CD" mode by pressing the [FUNCTION] button (2);
Plug an USB device into the [USB SOCKET] (16);
Playback will start automatically from the first track.
PROGRAMMING
The PROGRAMMING operation is the same as that of CD-MP3.
Note: Some mp3 player may not be able to play via the usb socket. this is not a maulfunction of the system.
Note: To avoid damage to USB memory, remove it only when the radio is turned off.
AUX IN OPERATION
Select "AUX" mode by pressing the [FUNCTION] button (2);
Use one male to male 3.5mm jack cable (not included) to connect any external audio device to the AUX-IN socket (17).
Note: Music control (play, pause, etc) must be done from your external device.
TECHNICAL SPECIFICATIONS
Power Supply: AC 230V ~ 50Hz.
DC 6V = (4 x "LR14" Batteries).
Radio Frequency Coverage
BAND III 174.928 - 239.200 MHz.
DAB+/DAB:
FM: 87.5 - 108 MHz.
Speaker
Output Power: 2 × 2 Wrms.
General
Headphones Out: 3.5mm jack plug.
Specifications and design are subject to possible modifications without notice due to improvement.
·WARNINGS

The exclamation point within the triangle is a warning sign alerting the user of important instructions accompanying the product.

The lightening flash with arrowhead symbol within the triangle is a warning sign alerting the user of "dangerous voltage" inside the unit.
To reduce the risk of electric shock, do not remove the cover. No user serviceable parts inside the unit. Refer all servicing to qualified personnel.
This unit operates on 230V 50Hz . If the unit is not used for a long period of time, remove the plug from the AC mains.

Ensure all connections are properly made before operating the unit.

This unit must not be exposed to moisture or rain.

This unit should be positioned so that it is properly ventilated. Avoid placing it, for example, close to curtains, on the carpet or in a built-in installation such as a bookcase.
Do not expose this unit to direct sunlight or heat radiating sources.

CORRECT DISPOSAL OF THIS PRODUCT (Waste Electrical & Electronic Equipment)
This marking shown on the product or its literature, indicates that it should not be disposed with other household wastes at the end of its working life. To prevent possible harm to the environment or human health from uncontrolled waste disposal, please separate this from other types of wastes and recycle it responsibly to promote the sustainable reuse of material resources. Household users should contact the retailer where they purchased this product, or their local government office, for details of where and how they can take this item for environmentally safe recycling. Business users should contact their supplier and check the terms and conditions of the purchase contract. This product should not be mixed with other commercial wastes for disposal.
ORT DER BEDIENELEMENTE
DC 6V = (4 x "LR14" Battery).
Puisance: 2× 2 Wrms
Général
Ingresso Aux-In 3.5mm jack.
USB USB 2.0
conector 3.5mm jack.
Headphone conector 3.5mm jack.
USB USB 2.0
ALARM: Selecteer Alarm 1 of 2;
Druk op de [ENTER] knop (3) om de Alarm wizard te starten.
Druk op de [TUNE -/+] knoppen (5/6) om "On of OFF" te kiezen;
Hereby, Roadstar Management SA declares that the radio equipment type RCR-779D+ is in compliance with Directive 2014/53/EU. The full text of the EU declaration of conformity is available at the following internet address: http://roadstar.com/images/ce/RCR-779D+.pdf or by scanning the following QR Code.
ENGLISH Roadstar Warranty Terms and Conditions
Roadstar- by means of its sales organisation, representative or distributor- guarantees its products against manufacturing defects in material and/or workmanship throughout the period of warranty. Should the product fail to work or shows manufacturing defect within the warranty period, Roadstar-by means of its sales organisation, representative or distributor - will take the necessary actions to restore the perfect functioning of the product. To repair or to replace is at discretion of Roadstar or it's representative or distributor. The warranty period is in accordance with directive 99/44/CE of the European Union. For all non EU members, please refer to the local law of each country. This warranty does not cover normal wear and tear of the product and/or its parts, any damage, failure, or loss caused by accident, misuse, and any other failure not directly related to a defect of the product. This warranty does not void consumer's rights in accordance with EU Directive99/44/CE. For further information please visit the website www.roadstar.com, or write to aftersales@roadstar.com.
DEUTsCH Allgemeine "Roadstar" Garantiebedingungen
Roadstar Management SA, via Passegiata 7 CH 6883 Novazzano (Switzerland)
- - DAMAGE REQUIRING SERVICE
- POWER SOURCES
- TO USE THE RADIO
- DAB RADIO OPERATION
- Preset
- INFO
- UNDER DAB
- UNDER FM
- SYSTEM SETTINGS
- TIME:
- FM RADIO OPERATION
- TAPE OPERATION
- CD-MP3 OPERATION
- REPEAT
- PROGRAMMING
- USB OPERATION
- AUX IN OPERATION
- TECHNICAL SPECIFICATIONS
- Radio Frequency Coverage
- General
- ·WARNINGS
- CORRECT DISPOSAL OF THIS PRODUCT (Waste Electrical & Electronic Equipment)
- ORT DER BEDIENELEMENTE
- ENGLISH Roadstar Warranty Terms and Conditions
- DEUTsCH Allgemeine "Roadstar" Garantiebedingungen
Brand : ROADSTAR
Model : RCR779D+
Category : Hi-fi system