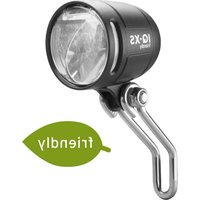
IXON Core 2 - Lighting Busch + Müller - Free user manual and instructions
Find the device manual for free IXON Core 2 Busch + Müller in PDF.

| Product type | Rechargeable bicycle headlight |
| Brand | Busch + Müller |
| Model | IXON Core 2 |
| Dimensions (H x W x D) | 44 mm x 117 mm x 37 mm |
| Weight | 125 g |
| Battery type | Replaceable lithium-ion (3000 mAh) |
| Runtime | More than 2.5 h (70 lux), 6.5 h (35 lux), 18 h (15 lux) |
| Brightness | 70 lux (high), 35 lux (medium), 15 lux (low) |
| Powerbank function | Up to 1500 mAh, 5 V / 1.3 A max |
| Charging | USB-C, fast charging (1.5 h from 20% to 80% optional) |
| Charge indicator | 5 blue LEDs + 1 red on top surface |
| Mounting | On handlebar or suspension (optional mounts) |
| Dynamo charging compatibility | With E-Werk or USB-Werk (models 361/361BW) |
| Water resistance | Splash protected (not waterproof during charging) |
| Cleaning | Avoid pressurized water; use a damp cloth |
| Warranty | Excludes damage from opening the housing |
| Spare parts | Available at www.bumm-shop.de |
| Customer service | +49 2354 915-7111 / service@bumm.de |
Frequently Asked Questions - IXON Core 2 Busch + Müller
User questions about IXON Core 2 Busch + Müller
0 question about this device. Answer the ones you know or ask your own.
Ask a new question about this device
Download the instructions for your Lighting in PDF format for free! Find your manual IXON Core 2 - Busch + Müller and take your electronic device back in hand. On this page are published all the documents necessary for the use of your device. IXON Core 2 by Busch + Müller.
USER MANUAL IXON Core 2 Busch + Müller
Assembly and Operation Instructions for Busch+Muller Re-chargeable Headlight IXON Core 2
1. General Information
These instructions are directed at persons with knowledge and experience in the assembly of bicycle components. Specialist tools may be required. Should you not have such experience or the required tools please enlist the service of a cycle specialist to ensure that this assembly is carried out correctly. Improper assembly may result in a fall or crash resulting in serious injury. Please read these instructions thoroughly and retain them for future reference, follow all the steps described and keep it in a safe place.
Busch+ Muller produce an extensive product range of bicycle components. Not every component is suitable for each application or every terrain. Should you be unsure about which type of light component you require for your intended use, you may either contact our service hotline under +49 2354 915 711, or by E-mail to service@bumm.de or request advice from a specialist retailer.
2. Packaging contents
Headlight IXON Core 2 | Handlebar bracket | Busch-Muller handlebar switch with cable and mounting clamp | Assembly and Instruction Manual
3. Safety information
These instructions implement signal words to highlight potential dangers or important information. The meaning of the signal words is listed below:
WARNING Describes a hazardous situation which, if not avoided, could result in a fatal accident or serious injury.
NOTICE Indicates information considered important, but not hazard-related (e.g., information related to property damage).
The symbol is used to provide other useful information about your new bicycle component.
WARNING
the battery to fire. Improper use such as overcharging or short circuit may result in explosion or fire.

NOTICEBicycle components from Busch+Muller are suited to riding conditions on a firm riding terrain.Avoid use under extreme circumstances and never ride down steps or stairs.Do not use B+M components while performing jumps, stunts, tricks, hops or fast descents on uneven terrain.


4. Legal regulations
Before you operate your vehicle in public traffic, you are obliged to ensure that your vehicle complies with national and local laws and regulations, and you, as a traffic participant must abide by the traffic regulations that apply. These can be found in the Highway Code or national equivalent, and depending on the country, also at other sources.
In Germany, the prescribed mounting height for headlights is between 40 and 120~cm . For details, consult your national Road Traffic Regulations or contact a local bicycle specialist retailer. Always make sure the headlight is mounted and aligned in a way to ensure that oncoming traffic is not blinded.
- Make sure the headlight is not covered under any circumstances. Also, take care that the headlight has been mounted and aligned as prescribed.
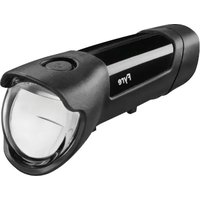
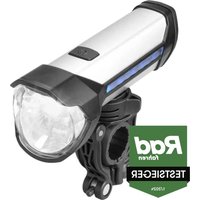
5. Technical specification
Headlight dimensions: Height: 44 mm | Length: 117 mm | Width: 37 mm | Weight: 125 g | Brightness: 7Q/35/15 lux Replaceable lithium battery, 3,000 mAh, quick-charging function via USB-C, power bank function with 1,500 mAh
6. Assembly
6.1. General assembly instructions
Make sure the headlight is not covered under any circumstances. Also, take care that the headlight has been correctly mounted and aligned as prescribed.
WARNING To avoid falls, accidents and severe injuries, always use the enclosed handlebar bracket assembly 2. If unsuitable or improperly positioned brackets are used, the headlight may loosen and change position, slide down and, in the worst case, get caught in the wheel spokes.
NOTICE Never mount brackets on conical components!
Make sure to tighten all screws just sufficiently to ensure the headlight cannot move inadvertently. This is particularly important when travelling on uneven terrain.

6.2. Headlight alignment
WARNING Do not use the bicycle if the light beam of your headlight is misaligned or the headlight is too loose. Blinding oncoming traffic can cause accidents. Before aligning the bicycle headlight, loosen the bracket retaining screw first. Make sure to retighten this screw again afterwards.
WARNING Never adjust the light range of your headlight while cycling! This may result in serious falls
WARNING Never look directly into the light of the bicycle headlight 1 when switched on.
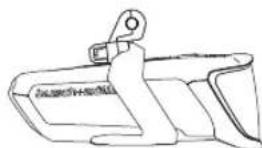
Attention: Ensure a non-blind orientation of the beam path
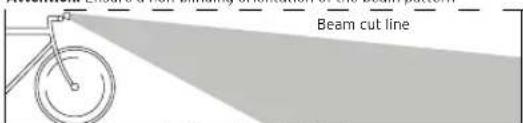
Image: correct beam orientation with light switched on
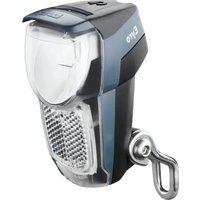
6.3. Mounting instructions IXON Core 2
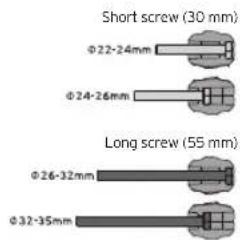
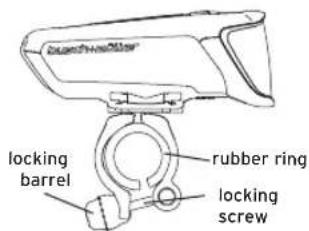
Place the rubber ring provided around the handlebar. Select the locking screw to fit the handlebar diameter and push it into the suitable end of the locking barrel (also according to Handlebar diameter). Insert the attachment cylinder into the bracket axle and screw the remaining open end of the locking screw into the thread of the cylinder. Place the handlebar bracket over the rubber ring on the handlebar with the locking barrel facing the saddle. Position the legs of the bracket 2 around the rubber ring and screw the barrel into the retaining hollow on the rear leg. Tighten until a secure clamping is attained.


Please note: The locking barrel can be used for shallow or deep insertion to suit handlebar diameter (simply invert as required).
If the rubber ring supplied is too thick for your handlebar, please contact our service team. (Mail: service@bumm.de, Tel: +49 2354 915-711) We will send you a thinner rubber ring free of charge.
Insert the headlight into the upper plate of the headlight bracket from the left (looking in the direction of travel) and firmly push it into place until it audibly engages. Be sure to check that it is securely seated. To remove the headlight press the release button on the bracket located to the right of the headlight.
To remove the headlight, press the release button for the bracketed located to the right of the headlight. 1 In the direction of travel), while firmly holding the headlight, and pull it off to the left. We exclude liability for any damage caused by disconnection and drop-falling, e.g. because the headlight was not held tight while it was removed.
Adjustment:
Vertically: The headlight can be adjusted vertically (e.g. to adjust for handlebar angle) by tilting around the rubber ring.
Horizontally: The headlight can be swivelled (to a limited extent) to the left or right on the rubber ring (eq. to centre beam on the roadway).
In both cases, the locking screw of the bracket must be loosened and after adjustment re-tightened.
6.4. Suspended mounting IXON Core 2
Should assembly with the standard handlebar bracket not be preferred, a suspended mount for the headlight 1 be used. This can be mounted under the handlebar to suit the bicycle cockpit situation (but not inverted) by using one of a number of other B+M brackets instead of the one supplied. One that is often used is: 48IGFPB for Assembly on e.g GoPro, Garmin or selected Wahoo-Adapter.
For further bracket options please consult our spare parts shop: www.bumm-shop.de.
- Operation
Switch incl. light level indicator:
To switch ON/OFF: push switch 5 for 2 seconds.
To switch between Low Power/Mid-Power/High Power modes: Short press to switch5
| Brightness level Brightness | Lighting duration (consistently bright) | Light level indication in the button (LED lights up blue) |
| Low-Power 15 Lux more than 18 hours | ||
| Mid-Power 35 Lux more than 6.5 hours | ||
| High-Power 70 Lux more than 2.5 hours |
Low-Power 15 Lux, run-time more than 18 hours with maintained brightness. The left LED (blue) in the switch
5 is active.
Mid-Power 35 Lux, run-time more than 6.5 hours with maintained brightness. The left and central LED's (blue)
in the switch5 are active.
High-Power: 70 Lux, run-time more than 2.5 hours with maintained brightness. All three LED's (blue) in the
switch5 are active. The light level mode is automatically switched down to low power at reduced battery
charge level.
| Number of LED's alight Continuously on Flashing Charge | Level |
| 5 blue 80-100 % | |
| 4 blue 60-80 % | |
| 3 blue 40-60 % | |
| 2 blue 20-40 % | |
| 1 blue 10-20 % | |
| 1 blue +1 red < 10 % |
Charge level indicator:
The top side of the headlight 1 has an integrated charge level indicator 3
This displays the charge level in steps of 20% capacity.
Should the battery be further depleted, both a blue and red LED will pulse together. It is then vital that
the headlight battery be charged.
Once the battery level sinks below a certain capacity, the headlight will switch into the next lower light mode.
WARNING If an automatic switch into low-power mode due to low battery level takes place, the headlight may remain alight for appr. 1 hr before going out. This may vary due to external temperature differences, and an abrupt extinguishment may occur. This can lead to serious accidents and injury so always charge the light battery at the latest when the red LED illuminates.
7.1. Charging the battery
The headlight contains a replaceable lithium-ion battery of 3,000 mAh. Before first use, the battery must be charged. To charge the battery open the cap at the rear side of the headlight. Connect an (optionally available) USB-C cable to the port revealed. Connect the 2nd end of the USB cable to the B+M USB - charger (also optionally available), a standard USB - charger or a computer USB port. During the charging process, the charge level indicator will display the charge level of the headlight battery. As soon as the battery has reached full charge, stop the charging process. During the charging process, the headlight will show the charging speed. This will depend on the charger used.
At slow charging speed, the left LED (blue) in the switch 5 is active. At medium charging speed, the left and central LED's (blue) in the switch 5 are active. At fast charging speed, all three LED's (blue) in the switch 5 are active.
38 39
| Charging speed Indication via blue light level LED in the button | |
| slow | |
| medium | |
| fast | |


If the charge level falls below 10% , a red LED in the charge level indicator will illuminate. In order to use the headlight for a longer duration charge immediately.
To improve performance longevity of the battery, a comfort charge function can be activated. This results in halving the power input to the headlight. To activate the comfort charge function, press the switch twice in rapid succession while the headlight is being charged. The left and right LED's in the switch will alight blue continuously, while the central LED will pulse.
The comfort charge function can only be activated when charging with a quick-charger. The comfort charge function must be reactivated with each charge process if required. The charge time will double when using the comfort charge function.
Charge time
Standard-Charger: appr. 2.5 h bis 5 hr (depending on power output of the charger)
Quick-charger: appr.1,5 h (20% to 80% possible in less than 1 hr)
If incompatible USB chargers are used, Busch+ Müller can offer no guarantee and cannot be made liable for any damage caused to either charger or headlight!
WARNING As a security measure place the headlight 1 on to a fireproof surface while charging and do not leave the charging component unattended.
During the charging process, there is no protection against water ingress. The headlight can be charged while in use, but any damage caused by water ingress while charging is not covered by warranty.
Tip: To Improve performance longevity of the battery, Should the headlight remain unused for longer periods store in a cool and dry place with appr. 30 - 50% remaining capacity. If the remaining capacity sinks below 10% and is then fully charged, the battery will recalibrate itself. Occasional recalibration allows the remaining run-time to be shown with best possible exactness.
The cover cap on the back of the headlight is a deliberate tight fit to protect against moisture and dirt. The cap is easier to re-insert if you pressure is applied working from bottom to top.
Charging the battery with dynamo energy:
In combination with Busch+Mullers E-Werk (Type 361), K-Werk (Type 362) or USB-Werk (Type 361Bw) the headlight can be charged while riding using the converted energy of a hub-dynamo.
7.2 Changing the battery
The re-chargeable battery can be replaced by specialised personnel.
For a complete product check and repair, please contact the Busch+ Müller service department on +49 2354 915-7111 or email service@bumm.de.
Replacement re-chargeable batteries can be purchased from our spare parts shop. Should any attempt by non specialised personnel be made at the replacement of this part, then this is at your own risk and invalidates any warranty.
The headlight 1 can also be used as a power bank. 1500mAh of the replaceable Lithium-ion battery can be used to charge USB devices with 5V max 1.3A.
In order to activate the power bank function press the switch 54 times in rapid succession. Activation/deactivation of the power bank function is indicated by the charge level indicator 3 flashing 3 times.
1 Activate the Powerbank-Function before connecting a device to be charged to the headlight. Otherwise, the headlight may be recognised as the device to be charged and the Powerbank-Function cannot be started.
4243
If no device is connected to the USB-C port 4 within 5 minutes of activation, the power bank function will switch itself off.
If the charge level sinks below a certain capacity the headlight will automatically switch off the power bank function to allow the headlight function priority. If the power bank function is used simultaneously to the headlight function, the maximum charge current is 0.5A.
8. Further information
Cleaning: Protect your headlight against exposure to water under high pressure. For example, never point a water hose or high-pressure cleaner directly at the head
Transport: If you transport your bike on your car in the rain, cover the headlight, with a plastic bag, for example, to prevent moisture penetration.
Radio speedometers: The electronics of radio speedometers and LED headlights may interfere with each other. Interference can be reduced by maximising the distance between the LED headlight and the radio speedometer and minimising the distance between the transmitter and receiver of the radio speedometer.
Disposal: Electronic components must not be handled as household waste but are to be disposed of as hazardous waste.
Repairs: In case of defects, please contact your specialist bicycle dealer or our service department at service@bummm.de oder +492354 915-711.

9. Liability
We do not assume liability for any and all damage caused by improper use (e.g. dropping the headlight, inadequate safety of assembly and its consequences, immersion in water or other liquids etc.). The guarantee is rendered invalid if the headlight is opened.
Have fun with your new headlight and enjoy safe cycling!
For spare parts please visit our spare part shop at www.bumm-shop.de
Technical modifications reserved.
Busch+Muller KG · 58540 Meinerzhagen, Germany · Tel. +49 2354 915-711 · service@bumm.de · www.bumm.de