IQ-XS - Lighting Busch + Müller - Free user manual and instructions
Find the device manual for free IQ-XS Busch + Müller in PDF.


User questions about IQ-XS Busch + Müller
0 question about this device. Answer the ones you know or ask your own.
Ask a new question about this device
Download the instructions for your Lighting in PDF format for free! Find your manual IQ-XS - Busch + Müller and take your electronic device back in hand. On this page are published all the documents necessary for the use of your device. IQ-XS by Busch + Müller.
USER MANUAL IQ-XS Busch + Müller
1. Instruction Manual for headlights of the LUMOTEC IQ series with high beam light function for bicycles with pedal assistance (e-bikes)
Not approved for vehicles that must carry licence plates (fast e-bikes)
IQ-XSH DC voltage source 9 to 48V
Requirements for high beam mode 11 W min. nominal power at the light connection of the drive system.
IQ-XM DC voltage source 9 to 48V
Requirements for high beam mode 16 W min. nominal power at the light connection of the drive system.
IQ-XL DC voltage source 11 to 48V
Requirements for high beam mode 16 W min. nominal power at the light connection of the drive system.
This Instruction Manual is intended for users with knowledge and experience in assembling and installing bicycle components. You need to have the suitable tools. If you do not know how to assemble or install bicycle components or do not have all the necessary tools for the job, you must consult with a bicycle specialist to have the installation done properly. Otherwise, the bicycle rider may fall off and be seriously injured due to improper assembly or installation of the light. Read this Instruction Manual, follow all the steps described and keep it in a safe place.
- Safety information
This Instruction Manual uses the following signal words to alert you to potential hazards. The meaning of the signal words is listed below.
WARNING Indicates a hazardous situation that, if not avoided, could result in death or serious injury.
NOTICE Indicates information considered important, but not hazard-related (e.g. information related to property damage).
The symbol is used to provide other useful information about your new bicycle lights.
3. Intended use
Busch + Müller offer a range of different types of bicycle lights. Not every bicycle light can be used for every application and for riding bicycles on every surface. There are limitations. If you are not sure what type of bicycle light you have, either call our service hotline at +49 2354/9157111, send an e-mail to service@bumm.de or consult a local specialist bicycle retailer.
NOTICE Bicycle lights made by Busch + Muller are suitable for use on bicycles that are ridden on a firm surface. Riding on uneven ground such as country tracks can cause severe damage to the bicycle light due to vibrations and shocks. Avoid any extreme use, and never ride down stairs or perform jumps, stunts, tricks, bunny hops or vertical descents on rough terrain.

4. Legal Regulations
Before riding your bicycle on public roads, you must learn about and observe all applicable national, state and local laws and regulations. These may be found in the Highway Code, or other sources depending on your country of residence.
1 Never cover or conceal bicycle lights. Always make sure the bicycle lights are correctly adjusted. In Germany, the prescribed mounting height ranges between 400 und 1,200mm . In other countries, the respective applicable regulations must be observed accordingly. You will find more details in the relevant regulations of your country, e.g. in the Road Traffic Licensing Regulations, or the Instruction Manual of your bicycle or e-bike. If necessary, contact a local bicycle specialist retailer. Make sure your lights are positioned and adjusted in accordance with all legal regulations and to ensure they do not blind oncoming traffic.
5. Package contents
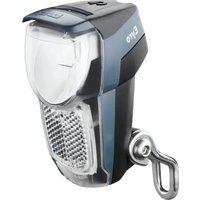
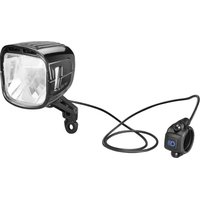
High beam headlight with connector cable | high beam button with cable | handlebar bracket | mounting screws | mounting tools | front reflector (not for IQ-XL)
6. Assembly
General notes:
Ensure that the headlight and cabling - especially the cable leading from the handlebar switch to the
headlight - are securely fixated on the e-bike, so as not to impede or jeopardize riding. If, for example, a cable or headlight is caught in the spokes there is a risk of Injury and death.
6.1. Headlight assembly
Safely affix the headlight on the bike's fork head using the enclosed Busch + Müller Bracke 1 in a way to ensure that it does not move all by itself and cannot change its position on the bike. For headlamps with a separate reflector (IQ-XSH and IQ-XM) please ensure to align the reflector vertically to the riding surface.
WARNING In order to avoid falls, accidents and serious injuries, use only pre-installed mounting bracket or other appropriate Busch + Muller bicycle light mounting brackets. Installing a bicycle light on a bicycle using brackets which are not suitable or are positioned inappropriately, can lead to the light becoming loose, slipping and getting caught in the spokes of the wheels.
WARNING Never install brackets on the fork legs or struts!
No mounting underneath the handlebar: if the headlight is suspended underneath the handlebar, the light field is reversed and oncoming traffic blinded which is a violation of traffic regulations. Neither do we assume any liability for possible splash water damage.
WARNING Never install a bracket on conical fork legs or strut substructure! Tighten all screws so that the bicycle light cannot move. This is especially important when riding on uneven surfaces. The light has a sufficiently tight seat when it is difficult to adjust its position.
Height adjustments of the light
Adjust the bicycle light so that oncoming traffic is not blinded or startled. On a completely even road, the horizontal light cut-off line must always be visible in the distance!
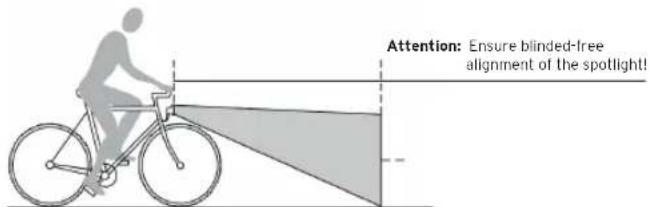
Fig. Example of bicycle light position with dimmed beam
NOICE Ensure the headlight is connected to a DC voltage source with suitable voltages only, e.g. light output or a range of other powerful connections of the e-bike. Connection to an AC voltage source (e.g. dynamo) is not permitted! Due to the complex technology of e-bike systems, compatibility with every
model cannot be guaranteed. Please consult your specialist dealer for advice. If your e-bike has a dynamo to supply the lighting system, you need a standard dynamo headlight.
To connect to an e-bike battery, use the internally mounted double cable (black/white wire = plus, black wire = minus) and shorten it as may be necessary. However, do not sever the handlebar button cable!
6.2. Assembly of handlebar button with clamp
Attach the button securely and easily accessible to the handlebar using the enclosed clamp so that it allows cyclists to activate it without having to take their hand off the handlebar. The button can be mounted on handlebars with a diameter of 22mm (± 0.2mm)
Press the handlebar button into the upper part of the fastening clamp from below, guide the cable through the groove in the clamp and place the button on the handlebar in a way to allow the cable to exit downwards (if the cable exit is at the top, moisture can enter the inside of the button and cause damage). Attach the lower part of the clamp from below and screw it to the upper part using the enclosed self-tapping screws.
Alternatively, the upper part of the mounting clamp can also be screwed directly onto suitable brake lever mountings to replace the upper part of the brake lever mounting clamp. This works for selected Magura brakes. For some Tektro brake lever mountings, a compatible upper part of the mounting clamp can be ordered from Busch + Müller. (Busch + Müller REF: 460HTGT-1)
7. Operation
The headlight (dimmed beam) is switched on and off via the bicycle display or by pressing the handlebar button for a defined period of time (approx. 2 sec.). The high beam function is switched on or off by briefly pressing the button. The LED in the handlebar button lights up green when the dimmed beam light is on, and blue when the high beam function is switched on. In case other road users are likely to be dazzled, do not use the main beam function. Always watch out to dim the headlights in good time.
When pushing the handlebar button twice shortly and in quick procession, the headlight emits a warning flash. Using this function is only permitted in situations where another traffic participants should be warned that they are endangering others or themselves.
8. Miscellaneous
If the e-bike is cleaned with water, positioned upside down or transported on a car in rainy weather, both the headlight and the handlebar button must be covered (e.g. using plastic bags) to prevent moisture from entering.
Disposal: Electronic parts are no regular waste. They have to be disposed of as special waste! Please note: The operation of sensitive, radio-controlled odometers may be impaired by LED headaches.
9. Liability
In addition to the above-mentioned exclusions of warranty, we do not assume liability for any and all other damage caused by improper handling (e.g. dropping the headlight, inadequate safety of mounting and its consequences, submersion in water or other liquids etc.). Neither do we assume any liability if the headlamp is opened or dismantled at any point other than the rear cover. Have fun and enjoy safe cycling with your new headlight!
Technical modifications reserved.
Busch + Muller KG
58540 Meinerzhagen, Germany · Tel. +49 2354 915-6000 · info@bumm.de · www.bumm.de