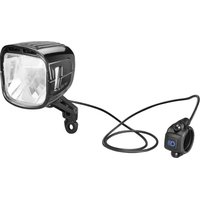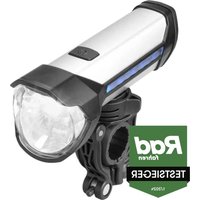
IXON Rock - Lighting Busch + Müller - Free user manual and instructions
Find the device manual for free IXON Rock Busch + Müller in PDF.


User questions about IXON Rock Busch + Müller
0 question about this device. Answer the ones you know or ask your own.
Ask a new question about this device
Download the instructions for your Lighting in PDF format for free! Find your manual IXON Rock - Busch + Müller and take your electronic device back in hand. On this page are published all the documents necessary for the use of your device. IXON Rock by Busch + Müller.
USER MANUAL IXON Rock Busch + Müller
5 blaue LEDs = 100-80% 4 blaue LEDs = 80-60%
3 blaue LEDs = 60-40 % 2 blaue LEDs = 40-20 %
1 blau LED = 20-10 % 1 blau & rote LED = < 10 %

Battery level indicator for lateral indicator LEDs
5 blue LEDs = 100-80 % 4 blue LEDs = 80-60 %
3 blue LEDs = 60-40% 2 blue LEDs = 40-20%
1 blue LED = 20-10 % 1 blue & red LED = < 10 %

3 blauwe LED's = 60-40% 2 blauwe LED's = 40-20%
3 LEDs azules = 60-40 % 2 LEDs azules = 40-20 %
1 LED azul = 20-10 % 1 LED azul & rojo = < 10 %

3 blaue LEDs = 60-40 % 2 blaue LEDs = 40-20 %
1 blaue LED = 20-10 % 1 blaue & rote LED = < 10 %
1 Instruction Manual for IXON Rock - Battery LED headlamp with IQ lighting technology and Power bank function
These use and installation instructions are intended for users with knowledge and experience in assembling and installing bicycle components. You need to have the suitable tools. If you do not know how to assemble or install bicycle components or do not have all the necessary tools for the job, you must consult with a bicycle specialist to have the installation done properly. Otherwise, the bicycle rider may fall off and be seriously injured due to improper assembly or installation of the light. Read these use and installation instructions, follow all the steps described and keep them in a safe place.
2 Safety Information
These use and installation instructions use the following signal words to alert you to potential hazards. The meaning of the signal words is listed below.
WARNING Indicates a hazardous situation that, if not avoided, could result in death or serious injury.
NOTE Indicates information considered important, but not hazard-related (e.g. information related to property damage).
The symbol is used to provide other useful information about your new bicycle lights.
3 Intended use
busch+müller offer different types of bicycle lights. Not every bicycle light can be used for every application and for riding bicycles on every surface. There are limitations. If you are not sure what type of bicycle light you have, either call our service hotline at +49 2354 915-7111, send an e-mail to service@bumm.de or consult a local specialist bicycle retailer.
NOTE Bicycle lights made by busch+müller are suitable for use on bicycles that are ridden on a firm surface. Avoid any extreme use, and never ride down stairs or perform jumps, stunts, tricks, bunny hops or steep descents on rough terrain.
4 Legal regulations
Before riding your bicycle on public roads, you must learn about and obey all applicable national, state and local laws and regulations. These may be found in the Highway Code, DMV Handbook or other sources depending on your state or location. If you are not sure about the applicable regulations, consult a local bicycle specialist retailer.
Never cover or conceal bicycle lights. Always make sure the bicycle lights are correctly adjusted. In general, the prescribed mounting height ranges between about 16^ to 48^ . For details consult the Highway Code or DMV Handbook or inquire with a local bicycle specialist retailer. Make sure your lights are positioned and adjusted in a way to ensure they do not blind oncoming traffic.
5 Package content
Headlight | Mains charger for USB | USB-C to USB-A socket adapter | USB-A to USB-C cable | Handlebar bracket | Short & long screw | screw socket | Mounting instructions
6 Assembly!
Make sure that the headlight is mounted to the handlebar.
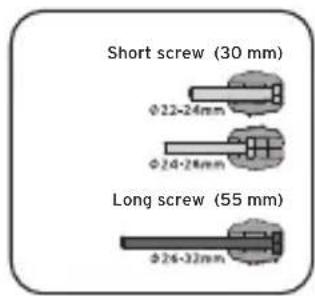
Place the enclosed rubber ring around the handlebars. Select the locking screw and locking knob to fit the handlebar diameter and screw them into the handlebar bracket. Place the handlebar bracket over the rubber ring with the locking knob facing the saddle. Join the brackets under the handlebar and fix them with the locking screw.
Please note: The locking knob can be used as a short or long version (simply turn as required)!
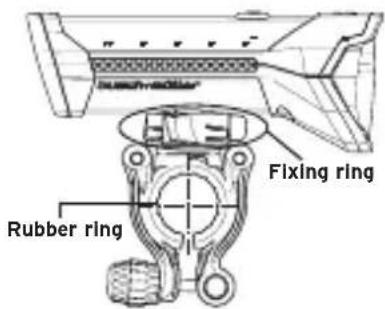
Insert the headlight vertically from above into the headlight bracket and press down firmly. It audibly engages in the locking ring. Make sure it is firmly seated in place. To remove the headlight, turn the locking ring clockwise, hold the headlight firmly and pull it upwards. We do not assume any liability in case of drop damage, e.g. because the headlight was not held in place while releasing the locking ring. If the assembly situation on the bicycle only allows the locking knob to point away from the cyclist rather than towards him/her, use a screwdriver to unbolt the bracket on the underside of the headlight, turn by 180^ and then fasten again.

WARNING Only the original screw may be used for this. A screw that is too long can damage the integrated battery.
The headlight can pivot vertically and, for a few degrees, also horizontally. In both cases, the locking screw of the bracket must be loosened.
Vertical: The slant of the headlamp depends on its position on the handlebar.
Horizontal: The headlight is allowed to pivot on the rubber ring (to a limited extent) continuously to the left or right.
Mounting height according to regulations. In Germany, this ranges between 400 and 1,200mm
Lighting components must never be concealed during cycling!
No mounting underneath the handlebar: If the headlight is suspended underneath the handlebar, the light field is reversed and oncoming traffic blinded which is a violation of traffic regulations. Also, we do we assume any liability for possible splash water damage likely to occur when the headlight is mounted underneath the handlebar.
WARNING Avoid falls, accidents and serious injuries. Use only the pre-installed Busch+müller bicycle light mounting brackets. Installing a bicycle light on a bicycle using brackets which are not suitable or are positioned inappropriately, can lead to the light becoming loose, slipping and getting caught in the spokes of the wheels.
NOTE Never install brackets on the fork legs or seat stays!
NOTE Never install a bracket on conical components!
Fasten the mounting bracket in a way to ensure the bicycle light cannot move. This is especially important when riding on uneven surfaces. Enough tightening is achieved when it is difficult to adjust the position of the light.
WARNING Never adjust the bicycle light while riding! Severe falls and injuries may result. Do not ride the bicycle if the beam issued by your bicycle light is misaligned, or the light is too loose. Only straighten or fasten the bicycle light when the bicycle is not moving. Dazzling oncoming traffic can cause accidents. Prior to adjusting the bicycle light, always loosen the bracket screw. Afterwards, make sure to securely re-tighten the bracket screw again.
WARNING Never look into the bicycle light when it is turned on.
Height adjustments of the light
Adjust the bicycle light so that oncoming traffic is not blinded or startled. On a completely even road, the horizontal light cut-off line must always be visible in the distance!
Attention: Ensure a non-blinding orientation of the beam pattern
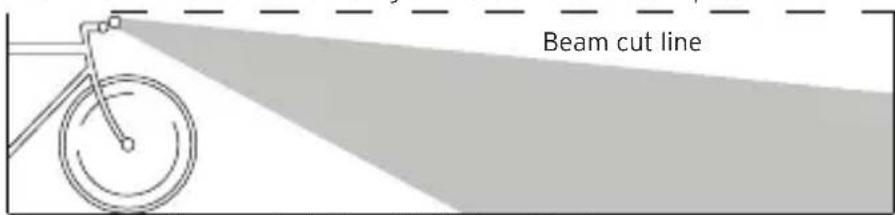
Image: correct beam orientation with light switched on
7 Charging the battery
The IXON Rock has an integral lithium-ion battery that must be charged before first use.
To charge, open the rear cover on the headlight. Connect the enclosed USB cable to the USB socket on the headlight. Connect the USB cable to the enclosed power supply unit, to another standard USB power supply unit (max. 1,000 mA, 5 V) or to a computer.
During the charging process, the LED on the switch shines blue. When the LED light is off, the charging process is complete. When charging with an alternative device or computer, the LED on the switch flashes blue.
Overcharging is basically impossible as the power supply is automatically switched off. Ensure to charge the battery at temperatures above 0^ only.

WARNING
As a precaution, never leave the battery unattended during the charging process in a fireproof surface.

WARNING
During the charging process, the headlight is not protected against splash and headlight can also be charged when switched on. We do not assume any liability to be caused by moisture entering the headlight during the charging process.
How to preserve the battery: When not in use over an extended period of time, store the headlight in a cool and dry environment as well as with approx. 30 - 50% residual capacity. If the battery is discharged to below 10% capacity and then fully charged again, the battery recalibrates itself. Occasional calibration helps to ensure that the remaining lighting capacity is always displayed as accurately as possible.
Duration of charging
Original busch+ muller power supply unit: approx. 2.5 h We do not assume any liability for damage caused when using alternative power supply units. The charging time can be reduced to up to 2.5 hours with Power Delivery power supply units.
Battery charging with energy generated by cycling
With E-WERK (type 361) or USB-WERK (type 361BW) from Busch+muller, the current of a hub dynamo can be used to charge the IXON Rock while cycling.
8 Operation & display
High-Power: abt. 100 Lux, more than 2.5 h run time, consistently bright light
Mid-Power: abt. 50 Lux, more than 6 h run time, consistently bright light
Low-Power: abt. 15 Lux, 25 h approx. run time, consistently bright light
When the battery is low, the light mode is automatically switched off. Higher light modes and the power bank function are therefore no longer possible for protection against exhaustive discharge.
Switch ON/OFF
ON/OFF: Press switch for 2 seconds
To switch between High Power/Mid Power/Low Power functions: Press button briefly.
Battery level indicator for lateral indicator LEDs
5 blue LEDs = 100-80 % 4 blue LEDs = 80-60 %
3 blue LEDs = 60-40 % 2 blue LEDs = 40-20 %
1 blue LED = 20-10 % 1 blue & red LED = < 10 %
The accuracy of this display depends on the charge level, temperature and operating mode. When the headlight is switched off, the battery level can be displayed by briefly pressing the switch.
Light mode indication by LED in switch
High-Power mode: Indicator LED in switch light up blue.
Mid-Power mode: Indicator LED in switch light up blue & red.
Low-Power mode: Indicator LED in switch lights up red.
When the battery is low, the system automatically switches to a lower light mode. To protect the battery from exhaustive discharge, higher light modes and the power bank function are no longer possible. If the red LED in the switch starts to flash continuously, the light intensity will soon fall below the legally prescribed minimum. The battery must be charged! Otherwise, the light intensity drops continuously.
WARNING The headlight will finally switch off after about an hour. This may take longer or shorter depending on the outside temperature, so that the headlight switches off abruptly at some point. Severe falls and injuries may result. Do not ride the bicycle, if the red LED in the switch flashes continuously.
9 Power bank function
In the power bank mode, the energy stored in the headlight battery can be used to charge other mobile devices (e.g. a smartphone or navigation device) via the enclosed USB adaptor. When the headlight battery is full and the light function inactive, approximately 1,500 mAh is available.
Up to 1.3 A can be made available with the light function inactive, and up to 0.5 A when the light function has been activated. Please always use the supplied cable from USB-C to USB-A socket to ensure proper power bank function.
Activate/deactivate power bank
Briefly press switch 4 times at high frequency. The lateral indicator LEDs as wells as the LEDs in the switch flash as the power bank indicator. When the light is off, the LED in the switch remains off while the power
bank is activated/deactivated. The lateral indicator LEDs light up when the power bank function is activated.
Automatic switch-off:
a) If no appliance is connected 5 minutes after activation.
b) If no current flows for 5 seconds during use.
c) If battery level is low.
Switch-off: LED display flashes outwards 3 times in succession from the central LED. If the capacity falls below a certain level, the headlight automatically switches off the power bank as a first step, as the lighting function has priority, and then changes to the Mid-Power or Low-Power mode.
Please note: If a cable other than the enclosed adapter cable (USB-C plug to USB-A socket) is connected directly to the headlight's charging socket, current may flow in the opposite direction so that the mobile device charges the headlamp. Otherwise, it may not be possible to activate the power bank function. To avoid this, always use the enclosed adapter! We do not assume any liability for possible damage to the headlight or mobile device, e.g. exhaustive discharge of the mobile device battery likely to be caused by such a faulty connection.
Please note: In the rain or under wet conditions, close the rear cap of the headlight to prevent moisture from entering the USB connector. Further charging via the power bank function is then only possible if the headlight is removed from the handlebars and stowed in a waterproof environment together with the mobile device for charging. We do not assume any liability for damage to the headlight or the mobile device caused by moisture penetration.
WARNING Headlight and wiring, especially the cable to connect electrical devices to the Power bank must always be fixed to the bike so that they neither impede the ride nor constitute a hazard. If, for example, a cable or headlight gets into the spokes, there is the risk of injury or death.
10 Additional information
Cleaning: Protect your headlight against exposure to water under high pressure.
For example, never point a water hose or high-pressure cleaner directly at the headlight.
Transport: If you transport your bike on your car in the rain, cover the headlight, with a plastic bag, for example, to prevent moisture penetration.
Radio speedometers: The electronics of radio speedometers and LED headlights may interfere with each other. Interference can be reduced by maximising the distance between the LED headlight and the radio speedometer and minimising the distance between the transmitter and receiver of the radio speedometer.
Disposal: Electronic rear lights are not household waste. They are to be disposed of at the intended collection depots.
11 Liability
We do not assume liability for any and all damage caused by improper handling (e.g. dropping the headlight, inadequate safety of assembly and its consequences, immersion in water or other liquids etc.).
Have fun with your new headlight and enjoy safe cycling!
For spare parts please visit our spare part shop at www.bumm-shop.de
Technical modifications reserved.
busch+müller KG · 58540 Meinerzhagen, Germany · Tel. +49 2354 915-7111 · service@bumm.de · www.bumm.de