
WCW9O7PHTSB - Electric oven WHIRLPOOL - Free user manual and instructions
Find the device manual for free WCW9O7PHTSB WHIRLPOOL in PDF.
| Product Type | Electric Oven |
| Brand | Whirlpool |
| Model | WCW9O7PHTSB |
| Power supply | 220-240 V, 50/60 Hz, 16 A (adjustable to 13 A) |
| Control type | Touch screen |
| Manual cooking functions | Microwave, Crisp, Crisp Fry, Rapid preheat, Grill, Grill + Microwave, Turbo grill, Turbo grill + Microwave, Natural convection, Natural convection + MW, Hot air, Hot air + MW, Circulating heat, Forced convection + MW |
| Automatic modes | 6th Sense Defrost, Crispy bread, 6th Sense Reheat, 6th Sense Melt & Soften, Sous Vide MW |
| Special functions | Keep warm, Rising, Yogurt, Dehydration, Large piece cooking, Eco program, Cook 3, Cookies, Pie, Pizza |
| Provided accessories | Metal rack, Drip tray, Crisp pan handle, Crisp pan, Freestanding probe, Steamer (depending on model) |
| Cleaning | Smart Clean (steam), manual cleaning |
| Safety | Control lock, Sabbath mode, DEMO mode |
| Maximum microwave power | 950 W |
| Maximum temperature | Up to 250 °C (estimate) |
| Interior lighting | Bulb, separate control |
Frequently Asked Questions - WCW9O7PHTSB WHIRLPOOL
User questions about WCW9O7PHTSB WHIRLPOOL
0 question about this device. Answer the ones you know or ask your own.
Ask a new question about this device
Download the instructions for your Electric oven in PDF format for free! Find your manual WCW9O7PHTSB - WHIRLPOOL and take your electronic device back in hand. On this page are published all the documents necessary for the use of your device. WCW9O7PHTSB by WHIRLPOOL.
USER MANUAL WCW9O7PHTSB WHIRLPOOL
THANK YOU FOR BUYING A WHIRLPOOL PRODUCT
In order to receive a more complete assistance, please register your product on www.register10.eu

Before using the appliance carefully read the Safety Instruction.
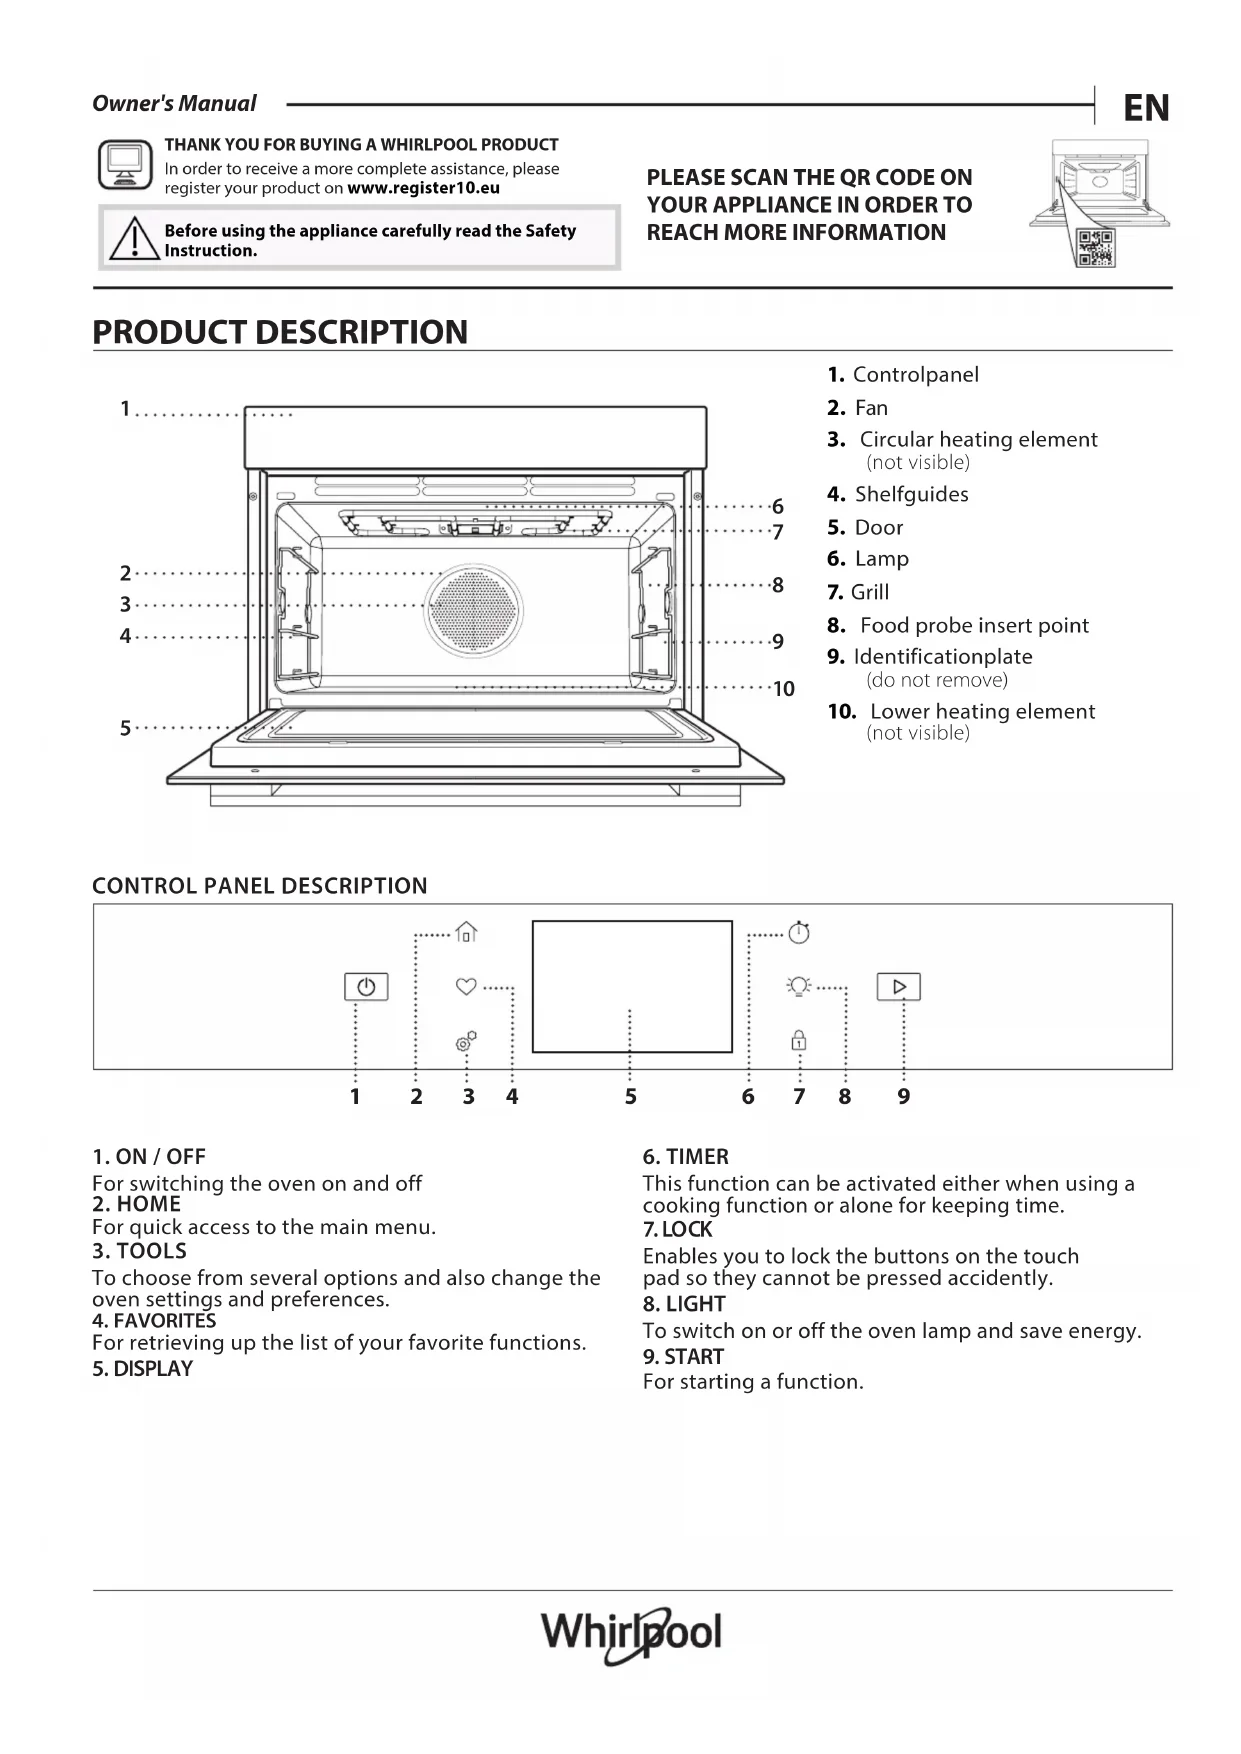
PLEASE SCAN THE QR CODE ON YOUR APPLIANCE IN ORDER TO REACH MORE INFORMATION
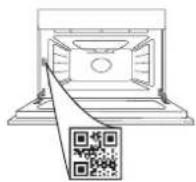
PRODUCT DESCRIPTION
- Controlpanel
- Fan
- Circular heating element (not visible)
- Shelfguides
- Door
- Lamp
- Grill
- Food probe insert point
- Identificationplate (do not remove)
- Lower heating element (not visible)
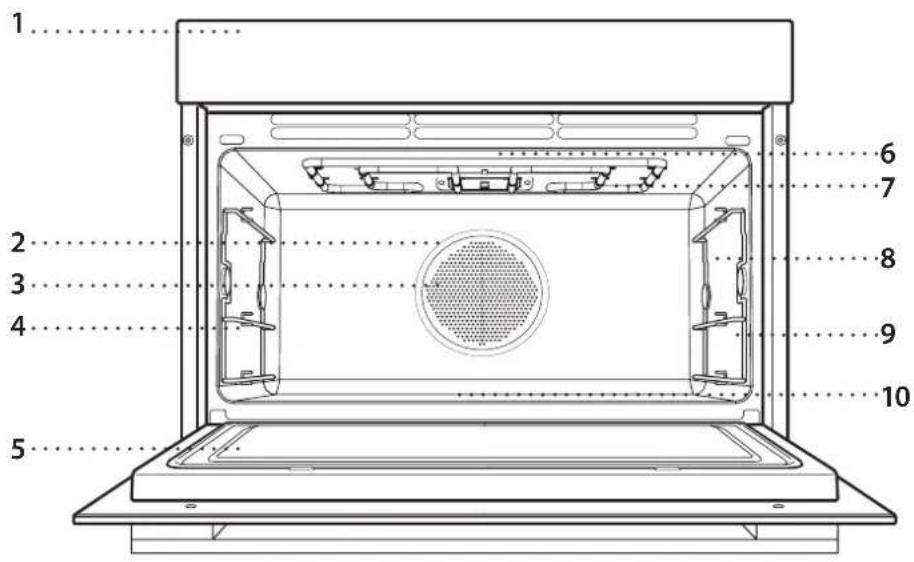
CONTROL PANEL DESCRIPTION
flowchart
graph TD
    A["1"] --> B["2"]
    B --> C["3"]
    C --> D["4"]
    D --> E["5"]
    E --> F["6"]
    F --> G["7"]
    G --> H["8"]
    H --> I["9"]
    style A fill:#f9f,stroke:#333
    style B fill:#f9f,stroke:#333
    style C fill:#f9f,stroke:#333
    style D fill:#f9f,stroke:#333
    style E fill:#f9f,stroke:#333
    style F fill:#f9f,stroke:#333
    style G fill:#f9f,stroke:#333
    style H fill:#f9f,stroke:#333
    style I fill:#f9f,stroke:#333
- ON / OFF
For switching the oven on and off
2. HOME
For quick access to the main menu.
3. TOOLS
To choose from several options and also change the oven settings and preferences.
4. FAVORITES
For retrieving up the list of your favorite functions.
5. DISPLAY
- TIMER
This function can be activated either when using a cooking function or alone for keeping time.
- LOCK
Enables you to lock the buttons on the touch pad so they cannot be pressed accidentally.
- LIGHT
To switch on or off the oven lamp and save energy.
- START
For starting a function.
ACCESSORIES
Before purchasing other accessories that are available on the market, make sure that they are heat-resistant and suitable for steaming.
Make sure that there is a gap of at least 30 mm between the top of any container and the walls of the
cooking compartment in order to allow steam to flow sufficiently.
Accessories during microwave function may raise in temperature. It is recommended to use protection to handle accessories at the end of the cycle.
| WIRE SHELFThe wire shelf is suitable for all cooking modes, also in Microwave cooking. When using microwaves place the wire shelf always on level 1 (the lower one). You can place food directly on the wire shelf or use it to support baking trays and tins or other oven-ware resistant to heat and microwaves. | |
| BAKING TRAYThe baking tray is suitable for all cooking modes except for “Microwave” functions.Can be used to cook all kind of foods without container.Use it to collects the cooking juices, placing it below the wire shelf. | |
| HANDLE FOR CRISP PLATEUseful for removing the hot Crisp plate from the oven. | |
| STEAMER*(ONLY IN SOME MODELS)To steam foods such as fish or vegetables, place these in the basket (2) and pour drinking water (100 ml) into the bottom of the steamer (3) to achieve the right amount of steam.To boil foods such as potatoes, pasta, rice or cereals, place these directly on the bottom of the steamer (the basket is not required) and add an appropriate amount of drinking water for the amount you are cooking.For best results, cover the steamer with the lid (1) provided.Always place the steamer on the wire shelf at level 1 and only use it with the appropriate cooking functions, or with microwave function. |
| FOOD PROBETo accurately measure the core temperature of food during cooking.Thanks to its rigid support, it can be used for meat and fish. | |
 | CRISP PLATEOnly for use with the designated functions.The Crisp plate must always be placed in the center of the wire shelf and can be pre-heated when empty, using the special function for this purpose only. Place the food directly on the Crisp plate. Place the silicone feet between the bars of the wire shelf for added stability. |
The number of accessories may vary depending on which model is purchased.
*Other accessories can be purchased separately from the After-sales Service.
INSERTING THE WIRE SHELF AND OTHER ACCESSORIES
Insert the wire shelf onto the level you require by holding it tilted slightly upwards and resting the raised rear side (pointing upwards) down first.
Then slide it horizontally along the runners as far as possible. Other accessories, like the baking tray, are to be inserted horizontally, letting them slide on the runners
Push the accessories all the way in, making sure, that it does not touch the appliance door.
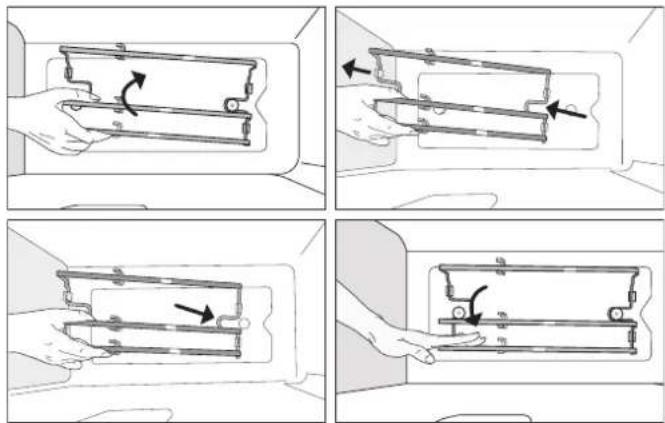
REMOVING AND REFITTING THE LADDER RACKS
There are two ladder racks on both sides of the oven cavity, anchored on two button-shaped supports. The ladder racks are removable to make cleaning more convenient.
- To remove the ladder racks, firmly grip the external part of the guide, and pull it upwards to extract it from the frontal support while rotating on the rear support, then slide out the whole part from the cavity.
- To reposition the ladder racks, slide the back part onto the rear support. Then, once anchored, push the assy down until the ladder rack is inserted into the frontal support.
FUNCTIONS
MANUAL MODES

MICROWAVE
For quickly cooking and reheating food or drinks.
Required accessories: wire shelf, microwave-safe and heatproof container.
POWER (W) RECOMMENED FOR
| 950 | Quickly reheating drinks or other foods with a high water content. If the food contains egg or cream choose a lower power. |
| 750 Cooking vegetables. | |
| 600 Cooking meat, fish and dishes that cannot be stirred. | |
| 500 | Cooking meaty sauces, or sauces containing cheese or egg. Finishing off meat pies or pasta bakes. |
| 350 | Slow, gently cooking. Perfect for melting butter or chocolate. |
| 160 | Defrosting frozen foods or softening butter and cheese. |
90 Softening ice cream.
| ACTION FOOD POWER (W) DURATION (min) | ||
| Reheat 2 cups 950 1 - 2 | ||
| Cook Sponge cake 750 5 - 6 | ||
| Cook | Egg custard | 750 |
| Cook | Meat loaf | 600 |

CRISP
For perfectly browning a dish, both on the top and bottom of the food. This function must only be used with the special Crisp plate.
Required accessories: wire shelf at level 1, Crisp plate, handle for the Crisp plate.
| FOOD | DURATION (min) |
| Leavened cake | 10 - 12 |
| Hamburgers* | 9 - 15 |
*Turn food halfway through cooking
CRISP FRY: Fresh Foods and Frozen Foods
This healthy and exclusive function combines the quality of crisp function with the properties of the warm air circulation. It allows crunchy, tasty frying results to be achieved, with a remarkable reduction of oil needed compared to the traditional way of cooking, even removing the need for oil in some recipes.
To achieve best results with fresh foods brush or season with a little quantity of oil. Cook frozen food directly without any addition of oil.
Required accessories: wire shelf at level 1, Crisp plate, handle for the Crisp plate.

FAST PREHEAT
For quickly preheating the oven before a cooking cycle. Wait for the function to finish before placing food inside the oven. Once preheating has finished, the oven will select the "Forced Air" function automatically.
Required accessories: wire shelf with pan or baking tray

GRILL
For browning, grilling and gratins. We recommend turning the food during cooking. Recommended accessories: wire shelf
| FOOD | GRILL LEVEL | DURATION (min) |
| Toast | High | 5 - 6 |

GRILL + MW
For quickly cooking and gratinating dishes, combining the microwave and grill functions.
Required accessories: wire shelf at level 1, microwave-safe and heatproof container.

TURBO GRILL
For perfect results, combining the grill and oven air convection. We recommend turning the food during cooking.
Recommended accessories: wire shelf

TURBO GRILL + MW
For quickly cooking and browning your food, combining the microwave, grill and the oven air convection.
Required accessories: wire shelf at level 1, microwave-safe and heatproof container.
FOOD POWER (W) GRILL LEVEL DURATION (min)
| Roast Chicken | 350 | Medium | 20 - 30 |
*Turn food halfway through cooking

CONVENTIONAL
For perfectly cooking and browning both on the top and bottom any kind of dish on one shelf only. To achieve best results this function have the preheating phase: wait the end of preheat to insert the food.
Required accessories: baking tray or wire shelf and heatproof container.
FOOD TEMP. (°C) DURATION (min)
Cupcake / Smallcake 160 20 - 25
Cookies 165 15 - 20

CONVENTIONAL + MW
For preparing baked dishes more quickly by combining the conventional oven and the microwave. Required accessories: wire shelf at level 1, microwave-safe and heatproof container.

FORCED AIR
For cooking sweets and meats with hot air circulation. To achieve best results this function have the preheating phase: wait the end of preheat to insert the food. Is possible to use it for cooking different foods that require the same cooking temperature on several shelves at the same time. This function can be used to cook different foods without odours being transferred from one food to another. Required accessories: baking tray or wire shelf and heatproof container.

FORCED AIR + MW
For cooking any kind of dish on one shelf only combining hot air circulation and the microwave. Required accessories: wire shelf at level 1, microwave-safe and heatproof container.

CONVECTION BAKE
For cooking meat, baking cakes and pies with fillings on one shelf only. To achieve best results this function have the preheating phase: wait the end of preheat to insert the food. Required accessories: wire shelf with pan or baking tray

CONVENCTION BAKE + MW
For quickly cooking all food with a liquid filling, by combining the microwave, conventional heating and air convection. Required accessories: wire shelf at level 1, microwave-safe and heatproof container.

SPECIAL FUNCTIONS

KEEP WARM
For keeping just-cooked food hot and crisp, including meat, fried foods or cakes.

RISING
For optimal proving of sweet or savoury dough. To maintain the quality of proving, do not activate the function if the oven is still hot following a cooking cycle.
Required accessories: wire shelf and heatproof container.

YOGURT
For making yogurt.
Required accessories: wire shelf and heatproof container.

DEHYDRATION
To dehydrate fruits and vegetables. Cut in thin slices and place directly on wire shelf.
Required accessories: wire shelf

MAXI-COOKING
For cooking large joints of meat (above 2.5 kg). It is advisable to turn the meat over during cooking, to obtain even browning on both sides. It is best to baste the meat every now and again to prevent it from drying out.
Required accessories: baking tray at level 2.

ECO CYCLE
For cooking stuffed roasting joints and fillets of meat on a single shelf. When this ECO function is in use, the light will remain switched off during cooking. To use the ECO cycle and therefore optimise power consumption, the oven door should not be opened until the food is completely cooked.
Required accessories: wire shelf with pan or baking tray.

COOK 3
For cooking different foods that require the same cooking temperature on three levels at the same time without mixing flavors and smells.
This function can be used to cook cookies, tarts, frozen pizzas and to prepare a complete meals. The oven does have to be preheated.

COOKIES
Use this function to cook three trays of similar shortbread biscuits to maximize results. The function includes a preheat. Take the three trays out of the oven at the same time.

TART
Use this function to cook three trays of similar tarts to maximize results. The function includes a preheat. Take the three trays out of the oven at the same time.

PIZZA (FROZEN)
Use this function to cook three trays of similar frozen pizzas to maximize results. The function includes a preheat. Take the three trays out of the oven at the same time.

COOK 3 MENU 1
This cycle is designed to cook a complete meat-based meal and a dessert. The oven requires preheating.
Example of complete meal
Prepare a fruit tart according to your preferences in a round pan to be placed on the wire shelf at level 3. Prepare a lasagna according to your preferences (1.5 - 2 kg) in a pan to be placed on the wire shelf at level two. Prepare 6-10 chicken drumsticks with diced potatoes (500 - 800 g) directly in the baking tray to be placed on level 1. After preheating, bake all the dishes at the same time. After 50-60 minutes take out the tart, after 60-70 minutes take out the lasagna, after 80-90 minutes take out the chicken with potatoes.

COOK 3 MENU 2
This cycle is designed to cook a complete fish or vegetarian meal and a dessert. The oven requires preheating.
Example of complete meal
Prepare a fruit tart according to your preferences in a round pan to be placed on the wire shelf at level 3. Prepare pesto lasagna or cannelloni according to your preference (1.5 - 2 kg) in a metal or pyrex tray to be placed on the wire shelf at level two. Prepare fish

AUTO MODES
With the Auto Modes, simply select the type and weight or the quantity of the food items to obtain the best results. The oven will automatically calculate the optimum settings and continue to change them as cooking progresses.
To use at best this function, follow the indications on the relative cooking table.
Due to food variability, the cooking duration is set on an average grade. We always recommend to check the internal doneness of food and in case prolong the cooking time to achieve proper doneness.
6 ^TH SENSE DEFROST
For quickly defrosting various different types of food. Always place the food in a container directly on the wire shelf for best results, except for Crisp Bread Defrost. At the end let the food stand for 5 minutes.
CRISP BREAD DEFROST
This exclusive function allows you to defrost frozen bread. Combining both Defrost and Crisp technologies, your bread will taste and feel as if it were freshly baked. Use this function to quickly defrost and heat frozen rolls, baguettes & croissants. The Crisp Plate must be used in combination with this function, directly placed on wire shelf.
| FOOD WEIGHT | |
| Timed Defrost - | |
| Meat 100 g - 2.0 kg | |
| Poultry 100 g - 3.0 kg | |
| Fish 100 g - 2.0 kg |
Crisp Bread Defrost 50 - 800 g
6 ^TH SENSE REHEAT
For reheating ready-made food that is either frozen or at room temperature. The oven automatically calculates the settings required to achieve the best results in the shortest amount of time. Place food on a microwave-safe and heatproof dinner plate or dish directly on wire shelf at level 1.
| Food Weight/portions/pieces Note | ||
| Plated Meal 250 - 800 g | Take out from packaging being careful to remove any aluminium foil. At the end of reheating process 1-2 minutes standing time always improves the result. | |
| Lasagna [frozen] 400 g - 1.5 kg | Take out from packaging being careful to remove any aluminium foil. | |
| Soup 100 - 800 g | Heat uncovered in a single container. | |
| Milk 100 - 500 g | Heat uncovered in a single container. | |
fillets in foil (700 - 900 g) with sliced vegetables (600 - 900 g) directly in the baking tray to be placed on level 1. After preheating, bake all the dishes at the same time. After 45-55 minutes take out the tart, after 55-65 minutes take out the lasagna, after 60-70 minutes take out the fish with vegetables.
| Food Weight/portions/pieces Note | ||
| Water 100 - 500 g | Heat uncovered in a single container. | |
6 ^TH SENSE SOFT & MELT
For melting and softening food. The oven automatically calculates the settings required to achieve the best results in the shortest amount of time. Place food on a microwave-safe and heatproof container directly on the wire shelf at level 1.
| Food Weight/portions/pieces Note | ||
| Butter Soften | 100 - 500 g | Place the butter on a container directly on the wire shelf for best results. |
| Ice Cream Soften | 100 - 500 g | If you put the ice cream container directly in the oven, be sure that the container is microwave safe. |
| Chocolate Melting | 100 - 500 g | Cut the chocolate in pieces for best results. At the end stir the chocolate to complete the melt process. |
| Cheese Melting | 100 - 500 g | Cut the cheese in pieces for best results. At the end stir the cheese to complete the melt process. |
6 ^TH SENSE MW SOUS VIDE
Sous vide is a professional cooking technique that requires the use of vacuumized food grade plastic pouches, cooking at precisely controlled temperatures. This innovative function uses microwaves to accelerate the cooking process without losing the accuracy and performance guaranteed by this cooking method. The gradual and accurate cooking process contributes to the development of exceptional tenderness, flavor, and also ensures cooking uniformity within the whole food. This function allows you to cook meat, fish, vegetables and fruits, achieving chef's results. Check the Sous Vide cooking table to properly use the function.
OTHER FUNCTIONS MENU

FAVORITES
For retrieving the list of favorite functions.

SETTINGS
For adjusting the oven settings.
When "DEMO" is "On" all commands are active and menus available but the oven doesn't heat up. To deactivate this mode, access "DEMO" from "SETTINGS" menu and select "Off". By selecting "FACTORY RESET", the product switches off and then it returns to first switch on. All settings will be deleted.

KITCHEN TIMER
This function can be activated either when using a cooking function or alone for keeping time. Once started, the timer will continue to count down independently without interfering with the function itself. Once the timer has been activated, you can also select and activate a function.
The timer will continue counting down at the top-right corner of the screen.
To retrieve or change the kitchen timer:
- Press kitchen timer option.
An audible signal will sound and the display will indicate once the timer has finished counting down the selected time.
- Tap "PAUSE" if you want to pause the timer. You can then tap "RESUME" to restart the timer.
- Tap "CANCEL" to cancel the timer or set a new timer duration.
- Tap “+1 min” to increase the duration of 1 minute.

LIGHT
To switch on or off the oven lamp.

CONTROL LOCK
The "Control Lock" enables you to lock the buttons on the touch pad so they cannot be pressed accidentally.
To unlock the appliance, long press the lock key on the touch pad.
AUTO MODES COOKING TABLE
For cooking several kinds of dishes and foods and achieving optimal results in the easiest and quickest way. To get the best from this function, follow the indications on the relative cooking table.
| Category Food | Weight/ portions/pieces | Notes Accessories | ||
| PASTA & CEREALS | Pasta Boil 1 - 3 portions | Set recommended cook time for the pasta. Add salted water and pasta all together into the steamer bottom and cover with steamer lid. Consider around 100g of pasta for each portion. Use 400g of water for each portion of pasta. | 1......+ | |
| Lasagna 600 g - 2.0 kg | Prepare according to your favorite recipe. Pour bechamel sauce on top and sprinkle with cheese to get perfect browning. | 1......+ | ||
| Rice 1 - 4 portions | Set recommended cook time for rice. Add water and rice all together into the steamer bottom and cover with lid. Consider around100g of rice for each portion. Use 300g of water for each portion of rice. | 1......+ | ||
| Spelt 1 - 4 portions | Set recommended cook time for spelt. Add water and spelt all together into the steamer bottom and cover with lid. Consider around100g of spelt for each portion. Use 300g of water for each portion of spelt. | 1......+ | ||
| Barley 1 - 4 portions | Set recommended cook time for barley. Add water and barley all together into the steamer bottom and cover with lid. Consider around100g of barley for each portion. Use 300g of water for each portion of barley. | 1......+ | ||
| ACCESSORIES | Wire shelf | Heathproof tray on wire shelf | Drip tray / Baking tray | Heath and MW-proof container | Food Probe | Steamer bottom and lid | Entire steamer | Crisp plate |
| Category Food | Weight/ portions/pieces | Notes Accessories | ||
| MEAT | Roast Beef - | Brush with oil and rub with salt and pepper. Season with garlic and herbs as you prefer. At the end of cooking let rest for at least 15 minutes before carving. | 1......+ + 🌐 | |
| Burger Patties | 100 - 500 g | Lightly grease the crisp plate before preheating.The crisp plate needs to be preheated before inserting the food. The oven will notify you when it's time to insert the food. To get perfect results, during cooking you will be asked to turn food. | 1......+ 🌐 | |
| Roast Beef - Slow cooking | - | Brush with oil and rub with salt and pepper. Season with garlic and herbs as you prefer. At the end of cooking let rest for at least 15 minutes before carving. | 1......+ + 🌐 | |
| Roast Pork - | Brush with oil and rub with salt and pepper. Season with garlic and herbs as you prefer. At the end of cooking let rest for at least 15 minutes before carving. | 1......+ + 🌐 | ||
| Pork Shank - | Brush with oil and rub with salt and pepper. Season with garlic and herbs as you prefer. At the end of cooking let rest for at least 15 minutes before carving. | 1......+ + 🌐 | ||
| Pork Ribs 400 g - 1.5 kg | Brush with oil and season as you prefer. Rub with salt and pepper. Distribute evenly in the container with the bone side downwards. | 1......+ 🌐 | ||
| Bacon 50 - 400 g | The crisp plate needs to be preheated before inserting the food. The oven will notify you when it's time to insert the food. Distribute evenly in the crisp plate after preheat. To get perfect results, during cooking you will be asked to turn food. | 1......+ 🌐 | ||
| Sausages & Wurstel | 200 g - 1.0 kg | Distribute evenly on the crisp plate. Pierce the sausages with a fork to prevent bursting. To get perfect results, during cooking you will be asked to turn food. | 1......+ 🌐 | |
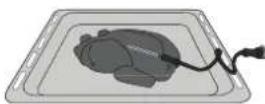
| Roast Chicken | 800 g - 2.5 kg | Brush with oil and season as you prefer. Rub with salt and pepper. Insert into the oven with the breast side up. | 1......+ 🌐 | |
| Poultry Pieces | 1 batch | Brush with oil and season as you prefer. Distribute evenly on the wire shelf. Use wire shelf on level 2 and baking tray with one cup of water on level 1 to collect foods essudates. | 2......+ 🌐 | |
| Poultry Breast Steamed | - | Add around 100g of water in the steamer bottom and distribute evenly the food in the steamer basket. Cover with lid. This cycle uses sensors: do not open the door during cooking. | 1......+ 🌐 | |
| Breaded Fried Chicken | 100 - 500 g Brush with oil. Distribute evenly in the crisp plate. | 1......+ 🌐 | ||
| ACCESSORIES | Wire shelf | Heathproof tray on wire shelf | Drip tray / Baking tray | Heath and MW-proof container | Food Probe | Steamer bottom and lid | Entire steamer | Crisp plate |
| Category Food | Weight/ portions/pieces | Notes Accessories | ||
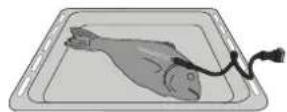
| FISH | Roasted Whole Fish | - Brush with oil and season as you prefer. | 1 | |
| Whole Fish Steamed | - | Add around 100g of water in the steamer bottom and position the fish in the center of the steamer basket. Cover with lid. This cycle uses sensors: do not open the door during cooking. | 1 | |
| Roasted Fish Steak | 200 - 800 g Brush with oil and season as you prefer. | 1 | ||
| Fish Fillets Steamed | - | Add around 100g of water in the steamer bottom and distribute evenly the food in the steamer basket. Cover with lid. This cycle uses sensors: do not open the door during cooking. | 1 | |
| Mussels Steamed | - | Add around 100g of water in the steamer bottom and distribute evenly the food in the steamer basket. Cover with lid. This cycle uses sensors: do not open the door during cooking. | 1 | |
| Shrimps Steamed | - | Add around 100g of water in the steamer bottom and distribute evenly the food in the steamer basket. Cover with lid. This cycle uses sensors: do not open the door during cooking. | 1 | |
| Fish and Chips [*] | 1-3 portions | Distribute evenly in the crisp plate alternating the fish fillets and the potatoes. Consider around 100g of fish and 100g of chips for each portion. | 1 | |
| Fried Seafood [*] | 200 - 800 g Distribute evenly in the crisp plate. | 1 | ||
| Fish Fingers [*] | 200 - 800 g | Distribute evenly in the crisp plate.To get perfect results, during cooking you will be asked to turn food. | 1 | |
| VEGETABLES | Roasted Potatoes | 300 g - 1 kg | Cut in pieces, season with oil, salt and flavor with herbs. Distribute evenly in the crisp plate. To get perfect results, during cooking you will be asked to stir food. | 1 |
| Stuffed Vegetables | 600 g - 2.0 kg | Scoop out the vegetable and fill with a mixture of the vegetable flesh itself, minced meat and shredded cheese. Season with garlic, salt and flavor with herbs as you prefer. | 1 | |
| Potatoes Gratin | 400 g - 1.5 kg | Slice and place into a large container. Season with salt, pepper and pour over cream. Sprinkle cheese on top. | 1 | |
| Potatoes Pieces Steamed | - | Add around 100g of water in the steamer bottom. Cut in pieces and distribute evenly the food in the steamer basket. Cover with lid. This cycle uses sensors: do not open the door during cooking. | 1 | |
| Roots Vegetables Steamed | - | Add around 100g of water in the steamer bottom. Cut in pieces and distribute evenly the food in the steamer basket. Cover with lid. This cycle uses sensors: do not open the door during cooking. | 1 | |
| Soft Vegetables Steamed | - | Add around 100g of water in the steamer bottom. Cut in pieces and distribute evenly the food in the steamer basket. Cover with lid. This cycle uses sensors: do not open the door during cooking. | 1 | |
| Fruit Pieces Steamed | - | Add around 100g of water in the steamer bottom. Cut in pieces and distribute evenly the food in the steamer basket. Cover with lid. This cycle uses sensors: do not open the door during cooking. | 1 | |
| Vegetables Steamed [*] | - | Add around 100g of water in the steamer bottom and distribute evenly the food in the steamer basket. Cover with lid. | 1 | |
| Fried Potatoes [*] | 200 - 600 g Distribute evenly in the crisp plate. | 1 | ||
| Potato Croquettes [*] | 200 - 600 g Distribute evenly in the crisp plate. | 1 | ||
| Fried Pepper | 100 - 500 g | Cut in pieces and season with oil. Distribute evenly in the crisp plate. | 1 | |
| ACCESSORIES | Wire shelf | Heathproof tray on wire shelf | Drip tray / Baking tray | Heath and MW-proof container | Food Probe | Steamer bottom and lid | Entire steamer | Crisp plate |
| Category Food | Weight/ portions/pieces | Notes Accessories | ||
| SALTY BAKERY | Sandwich Loaf | 400 g - 1.0 kg | Prepare dough according to your favorite recipe for a light bread. Form into a loaf container before rise. Use the oven's dedicated rise function. | 1 |
| Pizza 400 g | 1.2 kg | Prepare pizza dough according to your favorite recipe. Leave it to rise using the oven's dedicated function. Roll out the dough into a lightly greased baking tray. Add topping as you prefer. | 2 | |
| Pizza [*] 250 | -700 g | Take out from packaging being careful to remove any aluminium foil. | 1 | |
| Salty Cake 800 g - 1.5 kg | Line a pie dish for 8-10 portions with a pastry and pierce it with a fork. Fill the pastry according to your favorite recipe. | 1 | ||
| SWEET BAKERY | Sponge Cake | 400 g - 1.2 kg | Prepare a fatless sponge cake batter. Pour into lined and greased baking pan. | 1 |
| Marble Cake | 400 g - 1.2 kg | Prepare a marble cake batter according to your favorite recipe. Pour into lined and greased baking pan. | 2 | |
| Muffins 1 batch | Prepare a batter for 16-18 pieces according to your favorite recipe and fill in paper moulds. Distribute evenly on the baking tray. | 2 | ||
| Cookies 1 batch | Make a batch of 500g flour, 200g salted butter, 200g sugar, 2 egg. Flavor with fruit essence. Let cool down. Stretch evenly the dough and shape as you prefer. Lay the cookies on a baking tray. | 2 | ||
| Brownies 1 batch | Prepare according to your favorite recipe. Spread batter on the baking pan covered with baking paper. | 1 | ||
| Strudel 1 batch | Prepare a mix of diced apple, pine nuts, cinnamon and nutmeg. Put some butter in a pan, sprinkle with sugar and cook for 10-15 minutes. Roll it into a pastry and fold the external part. | 2 | ||
| Apple Pie - | Line a pie dish with the pastry and sprinkle the bottom with bread crumbs to absorb the juice from the fruit. Fill with chopped fresh fruit mixed with sugar and cinnamon. Roll out the pastry scraps to make a lid, seal the edges and brush with egg. | 1 | ||
| EGGS | Scrambled Eggs | 2 - 10 pieces | Prepare according to your favorite recipe into a single container. To get perfect results, during cooking you will be asked to stir food. | 1 |
| SNACKS | Popcorn - | Always place the bag directly on the wire shelf. Pop only one bag at a time. This cycle uses sensors: do not open the door during cooking. | 1 | |
| Chicken Nuggets [*] | 200 - 700 g | Distribute evenly in the crisp plate. | 1 | |
| ACCESSORIES | Wire shelf | Heathproof tray on wire shelf | Drip tray / Baking tray | Heath and MW-proof container | Food Probe | Steamer bottom and lid | Entire steamer | Crisp plate |
MW SOUS VIDE TABLE
This function allows you to cook meat, fish, vegetables and fruits, achieving chef's results. Check this cooking table to properly use the function.
Select the food category you want to cook and follow the suggested settings. Select the food weight (and the cooking temperature, only for beef) and follow thickness indications if present. Enter the suggested cooking time: this is the specific cooking time for the type of food and its quantity and will start after a Sensing phase in which the oven brings the food to the optimal temperature condition to begin cooking in order to ensure optimal performance. The Sensing phase will be longer for heavier weights. To better plan your meals, use the column in the table indicating the approximate times of the Sensing phase.
Use a maximum of 2 bags with similar amounts of food and select the total weight of the two in the function. Remember that suggested cooking times are referred to refrigerated food. Results are dependent on the quality of the ingredients and good hygiene manners. Prefer to use fresh and high quality food to experience the best results. Do not use this function to reheat the food. Place the vacuum-sealed food on the wire shelf at level 1. Do not place the bags on top of one other to ensure the heat is evenly distributed.
| Recipe Food | Thickness (not selectable) | Weight (selectable) | Temperature [°C] | Sensing Phase (time to reach temperature - not editable) | Cooking time* | |
| Beef | Tender cuts (tenderloin) | 2 - 3 cm 100 - 250 g | 60 - 65 | 25 - 45 min 40 - 60 min | ||
| 4 - 5 cm 275 - 500 g 50 - 70 min | 70 - 120 min | |||||
| Tough cuts (chuck) | 2 - 3 cm 100 - 250 g | 65 - 70 | 25 - 45 min 60 - 80 min | |||
| 4 - 5 cm 275 - 500 g 50 - 70 min | 70 - 120 min | |||||
| Pork | Tender cuts (tenderloin) | 3 - 5 cm | 100 - 250 g - 30 - 50 min 40 - 60min | |||
| 275 - 500 g - 55 - 75 min 70 - 90 min | ||||||
| Tough cuts (shoulder) | 2 - 3 cm 100 - 250 g - 30 - 50 min 50 - 80 min | |||||
| 4 - 5 cm 275 - 500 g - 55 - 75 min 90 - 120 min | ||||||
| Fish | Fatty (salmon) | 2 - 3 cm 100 - 250 g - 20 - 40 min 40 - 60 min | ||||
| 4 - 5 cm 275 - 500 g - 45 - 65 min 40 - 60 min | ||||||
| Lean (cod) | 2 - 3 cm 100 - 250 g - 20 - 40 min 30 - 60 min | |||||
| 4 - 5 cm 275 - 500 g - 45 - 65 min 30 - 60 min | ||||||
| Vegetables | Root (potatoes, carrots) | pieces | 100 - 225 g - | 10 min | 5 min | |
| 250 - 350 g - | 15 min | 10 min | ||||
| 375 - 500 g - | 20 min | 15 min | ||||
| Soft (asparagus, zucchini) | whole, pieces | 100 - 225 g - | 10 min | 3 min | ||
| 250 - 350 g - | 15 min | 8 min | ||||
| 375 - 500 g - | 20 min | 12 min | ||||
| Fruit | Apple, pear, pineapple | pieces, wedges | 100 - 250 g - | 35 min | 5 min | |
| 275 - 500 g - | 45 min | 5 min | ||||
* Cooking time: lower values refer to lower weights and doneness; higher values refer to higher weights and doneness.
HOW TO COOK BY COOKING METHOD
To increase the ease of use of the product, following menus groups together all the functions sharing the same cooking method which are already present in the menus divided by food.
Crisp Recipes
Crisp cooking method allows you to automatically achieve a perfect golden brown results both on the top and bottom of the food. Crisp plate is always needed. To get the best results from this function, follow the indications on the relative cooking table.
Crisp Fry Recipes
Crisp Fry cooking method combines the quality of crisp function with the properties of the warm air circulation. It allows crunchy, tasty frying results to be achieved, with a remarkable reduction of oil needed compared to the traditional way of cooking. Crisp plate is always needed. To get the best results from this function, follow the indications on the relative cooking table.
MW Steam Recipes
MW Steam cooking method allows you to achieve optimal results, similar to traditional Steam cooking method, but in easier and quicker way. Steamer accessory is always required. To get the best results from this function, follow the indications on the relative cooking table or oven display.
HOW TO USE THE TOUCH DISPLAY

To select or confirm:
Tap the screen to select the value or menu item you require.

To scroll through a menu or a list:
Simply swipe your finger across the display to scroll through the items or values.
To confirm settings or access the next screen:
Tap "SET" or "NEXT".
To go back to the previous screen:
Tap. ←
FIRST TIME USE
You will need to configure the product when you switch on the appliance for the first time.
The settings can be changed subsequently by pressing to access the "Tools" menu.
1. SELECT THE LANGUAGE PREFERENCES
You will need to set the language and the time when you switch on the appliance for the first time.
Language
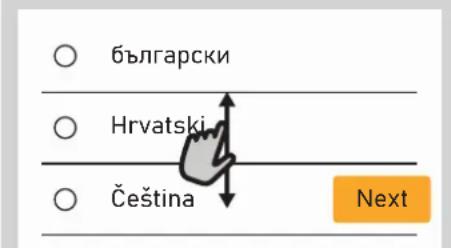
- Swipe across the screen to scroll through the list of available languages.
- Tap the language you require.
You can change the language lately by opening the settings menu.
2. SETTING THE TIME AND DATE
- Tap the relevant numbers to set the time.
- Tap "SET" to confirm.
Once you have set the time, you will need to set the date
- Tap the relevant numbers to set the date.
- Tap "SET" to confirm.
After a long power loss, you need to set the time and date again.
3. SET THE POWER CONSUMPTION
The oven is programmed to consume a level of electrical power that is compatible with a domestic network that has a rating of more than 3 kW (16 Ampere): If your household uses a lower power, you will need to decrease this value (13 Ampere).
- Tap the value on the right to select the power.
- Tap "OKAY" to complete initial setup.
4. HEAT THE OVEN
A new oven may release odours that have been left behind during manufacturing: this is completely normal. Before starting to cook food, we therefore recommend heating the oven with it empty in order to remove any possible odours.
Remove any protective cardboard or transparent film from the oven and remove any accessories from inside it. Heat the oven to 200 °C for around one hour, using the "Fast Preheat" function. Follow the instructions for setting the function correctly.
Please note: It is advisable to air the room after using the appliance for the first time.
DAILY USE
1. SELECT A FUNCTION
To switch on the oven, press or touch anywhere on the screen.
The display allows you to choose between Manual Modes and Auto Modes.
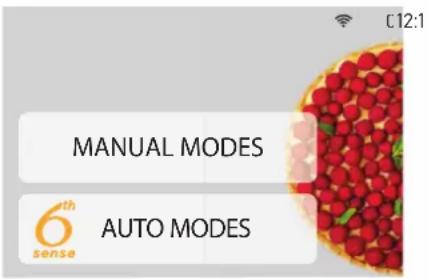
- Tap the main function you require to access the corresponding menu.
- Scroll up or down to explore the list.
- Select the function you require by tapping it.
JET START
When the oven is switched off, press to activate cooking with the microwave function set at full power (1000 W) for 30 seconds.
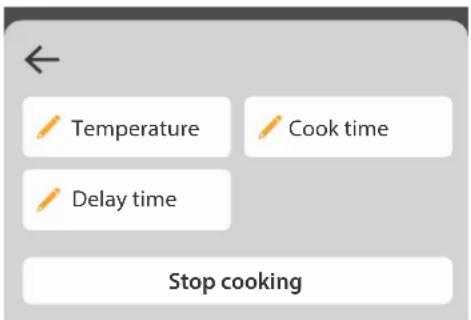
2. SET MANUAL FUNCTIONS
After having selected the function you require, you can change its settings. The display will show the settings that can be changed.
According to the selected function, you can activate or deactivate the preheat with a specific toggle.
DURATION
You do not have to set the cooking time if you want to manage cooking manually. In timed mode, the oven cooks for the length of time you select. At the end of the cooking time, the cooking is stopped automatically.
- To set the duration, tap the Time section or the "Set Cook Time" after pressing START.
- Tap the relevant numbers to set the cooking time you require.
- Tap "NEXT" to confirm.
To cancel a set duration during cooking and so manage manually the end of cooking, you can tap the duration value and set "0" or you can open the three dots ⋯ menu and edit the cooking time.
If you want to stop the cycle, open the three dots menu and select "Stop Cooking".
3. SET AUTO MODES
The Auto Modes enable you to prepare a wide variety of dishes, choosing from those shown in the list. Most cooking settings are automatically selected by the
appliance in order to achieve the best results.
Furthermore, thanks to a special sensor able to recognize the moisture content of the food, some of the AUTO MODES functions allow you to achieve optimal cooking for any kind of food without any setting: the sensor will stop the cooking at the perfect time. During the last few minutes of cooking only, a countdown will appear on the display, indicating the remaining cooking time.
- Choose a recipe from the list.
Functions are displayed by food categories in the "Auto Modes" menu (see relative tables). - Once you have selected a function, simply indicate the characteristic of the food (quantity, weight, etc.) you want to cook to achieve the perfect result.
4. SET START TIME DELAY
You can delay cooking before starting a function: The function will start at the time you select in advance.
- Tap "DELAY" to set the start time you require. You can either select the start time or the time at which you would like the food to be ready according to the selected functions.
- Once you have set the required delay, tap "SET" to start the waiting time.
- Place the food in the oven and close the door: The function will start automatically after the period of time that has been calculated.
Programming a delayed cooking start time will disable the oven preheating phase: The oven will reach the temperature your require gradually, meaning that cooking times will be slightly longer than those listed in the cooking table.
- To activate the function immediately and cancel the programmed delay time, tap "SKIP DELAY".
5. START THE FUNCTION
- Once you have configured the settings, tap "START" to activate the function.
If the oven is hot and the function requires a specific maximum temperature, a message will be shown on the display. You can change the values that have been set at any time during cooking by tapping the value you want to amend.
All the options available to be modified can be explored by opening the three dots • menu in the bottom left part of the display.
At any time you can stop the function that has been activated by pressing.
6. PREHEATING
If previously activated, once the function has been started the display indicates the status of preheating phase. Once this phase has been finished, an audible signal will sound and the display will indicate "OVEN READY."
- Open the door.
- Place the food in the oven.
- Close the door and tap the "Start now" or the "START" button to start cooking.
Placing the food in the oven before preheating has finished may have an adverse effect on the final cooking result. Opening the door during the preheating phase will pause it. The cooking time does not include a preheating phase.
You can change the default setting of the preheating option for cooking functions that allow you to do that manually.
- Select a function that allows you to select the preheating function manually.
- Use the Preheating dedicated toggle in the bottom right of the display to activate or deactivate preheating. It will be set as a default option.
7. TURN OR CHECK FOOD
Some Auto Modes will require the food to be turned during cooking. An audible signal will sound and the display shows the action to be done.
- Open the door.
- Carry out the action prompted by the display.
- Close the door, then tap "START" to resume cooking.
In the same way, in the last 5% of the cook time, before the end of cooking, the oven prompts you to check the food.
An audible signal will sound and the display shows the action to be done.
- Check the food
- Close the door, then tap "START" to resume cooking.
8. END OF COOKING
An audible signal will sound and the display will indicate that cooking is complete. With some functions, once cooking has finished you can extend the cooking time or save the function as a favorite.
- Tap “+ 5 min” to prolong the cooking
- Tap "ADD TO FAV" to save it as a favorite.
9. FAVORITES
The Favorites feature stores the oven settings for your favorite recipe.
The oven automatically recognizes the most used functions. After a certain number of uses, you will be prompted to add the function to your favorites.
HOW TO SAVE A FUNCTION
Once a function has finished, tap "ADD TO FAV" to save it as a favourite. This will enable you to use it quickly in the future, keeping the same settings.
ONCE SAVED
To view the favorite menu, press All the saved functions will be listed in this Menu. Tap "START" to activate the selected cooking function.
CHANGING THE SETTINGS
In the favorite screen, you can add an image or name to the favorite to customize it to your preferences.
- Select the function you want to change.
- Tap the three dots icon on the top right corner.
- Select the attribute you want to change.
- Tap "SAVE" to confirm your changes.
If you want to remove a specific function you will find in this Menu the "DELETE FAVORITE" option.
10. TOOLS
Press to open the "Tools" menu at any time. This menu enables you to choose from several options and also change the settings or preferences for your product or the display.
MUTE
To quickly turn your device's sounds on or off.
Other specific sound volume settings can be managed in the Preferences menu, under Sound & Volume.
SMART CLEAN
The action of water vapor released during this special cycle of cleaning by means of a low temperature, facilitates removal of grime. Activate the function when the oven is cold.
Press to activate the function: the display will prompt you to carry out all actions needed to obtain the best cleaning results.
Please note: It is recommended to do not open the oven door during the cleaning cycle to avoid a loss of water vapor that could get an adverse effect on the final cleaning result.
An appropriate message will start flashing on the display once the cycle has finished. Leave the oven to cool down and then wipe and dry the interior surfaces with a cloth or a sponge.
PREFERENCES
For changing several oven settings, selecting Sabbath Mode and switching off "Demo Mode".
i INFO
For obtaining further information about the product.
FOOD PROBE
Using the probe enables you to measure the core temperature of different food types during cooking to ensure that it reaches the optimum temperature. The temperature of the oven varies according to the function that you have selected, but cooking is always programmed to finish once the specified temperature has been reached. Place food in the oven and connect the food probe to the socket. Keep the probe as far away from the heat source as possible. Close the oven door. You can choose between the manual (by cooking method) and AUTO MODES (by food type) functions if use of the probe is allowed or required.
Once a cooking function has been started, it will be cancelled if the probe is removed.
Always unplug and remove the probe from the oven when taking out the food.
USING THE FOOD PROBE
Place the food in the oven and connect the plug by inserting it into the connection provided on the righthand side of the oven's cooking compartment.
Make sure that the cable does not touch the top heating element during cooking.
MEAT: Insert the probe deep into the meat, avoiding bones or fatty areas. For poultry, insert the probe lengthways into the centre of the breast, avoiding hollow areas.
FISH (whole): Position the tip in the thickest part, avoiding the thorns.
AUTO MODES functions in order to perform a probe controlled cooking for these food types. If you use the probe when cooking with the AUTO MODES functions, cooking will be stopped automatically when the selected recipe reaches the ideal core temperature, without the need to set the oven temperature.
ATTENTION!
Observe these instructions when using the microwave.
- If metal comes into contact with the cooking compartment wall, sparks occur which can damage the appliance or destroy the internal glass of the door.
- Metal components, for example teaspoons contained in glasses, must remain at a distance of no less than 2 cm from the walls of the cooking compartment and from the inside of the door. Accessories placed directly on top of each other
generate sparks.
- Insert accessories only at their respective heights. Sparks could form and damage the cooking compartment.
- The appliance is damaged due to the formation of sparks.
- Do not use aluminum trays in the appliance.
- Operating the appliance without food inside the cooking compartment leads to an overload.
- Never start the microwave oven without first placing the food in it. The only exception allowed is that of a short test for dishes.
USEFUL TIPS
Microwaves only penetrate food to a certain depth, so when cooking several items at the same time space them out as much as possible to allow the maximum surface area to be exposed to the microwaves.
Small pieces cook more quickly than large pieces: in order to ensure uniform cooking, cut the food items into pieces of equal size.
Most foods will continue to cook after microwave has finished cooking it. Therefore, always allow for standing time to complete the cooking.
Remove any twist ties from paper or plastic bags before placing them in the oven for microwave cooking.
Plastic film should be scored or perforated with a fork in order to relieve the pressure and prevent bursting due to the steam building up during the cooking process.
LIQUIDS
Liquids may overheat beyond boiling point without visibly bubbling. This could cause hot liquids to suddenly boil over. To prevent this, avoid using narrow-necked containers, stir the liquid before placing the container in the microwave oven and leave a teaspoon immersed in the container.
After heating, stir again before carefully removing the container from the microwave oven.
FROZEN FOOD
For best results, we recommend defrosting directly on the wire shelf. If needed, it is possible to use a light-plastic container that is suitable for microwave.
CLEANING AND MAINTENANCE
Make sure that the oven has cooled down before carrying out any maintenance or cleaning.
Do not use steam cleaners.
Wear protective gloves.
EXTERIOR SURFACES
- Clean the surfaces with a damp microfibre cloth. If they are very dirty, add a few drops of pH-neutral detergent. Finish off with a dry cloth.
- Do not use corrosive or abrasive detergents. If any of these products inadvertently comes into contact with the surfaces of the appliance, clean immediately with a damp microfibre cloth.
INTERIOR SURFACES
- After every use, leave the oven to cool and then clean it, preferably while it is still warm, to remove any deposits or stains caused by food residues. To dry any condensation that has formed as a result of cooking foods with a high water content, let the oven to cool completely and then wipe it with a cloth or sponge.
- Activate the "Smart Clean" function for optimum cleaning of the internal surfaces.
Boiled foods, stews and meat-based sauces will defrost better if stirred occasionally while defrosting. Separate the food items once they begin to defrost: the separated portions will defrost more quickly.
FOOD FOR INFANTS
When heating food or liquids in a baby food container or a baby bottle, always stir and check the temperature before serving. This will ensure that the heat is evenly distributed and avoid the risk of scalding or burns.
Ensure that the container lid or bottle teat are removed before heating.
CAKES AND BREAD
For cakes and bread products we recommend using the "Forced Air" function, while for cakes containing liquid we recommend the "Convection bake" function. Alternatively, to shorten the cooking times, select "Forced Air + microwave", with the microwave set to a maximum power of 160 W in order to keep the products soft and fragrant.
With the "Forced Air" and "Convection Bake" functions use dark metal cake tins and place them on the wire shelf supplied.
MEAT AND FISH
To obtain perfect surface browning quickly while keeping the inside of the meat or fish soft and juicy, we recommend using functions combining convection heating and microwave cooking.
In order to obtain the best possible cooking results, set the microwave power level to the value of 160 W.
Do not use wire wool, abrasive scourers or abrasive/corrosive cleaning agents, as these could damage the surfaces of the appliance.
The oven must be disconnected from the mains before carrying out any kind of maintenance work.
- Clean the glass in the door with a suitable liquid detergent.
ACCESSORIES
- Soak the accessories in a washing-up liquid solution after use, handling them with oven gloves if they are still hot. Food residues can be removed using a washing-up brush or a sponge.
- The steamer can be washed either by hand or in a dishwasher.
- Never clean Food Probe and Crisp plate in the dishwasher.
- The Crisp plate should be cleaned using water and a mild detergent. For stubborn dirt, rub gently with a cloth. Always leave the Crisp plate to cool down before cleaning.
TROUBLESHOOTING
| Problem Possible cause Solution | ||
| The oven is not working. | Power cut.Disconnection from the mains. | Check for the presence of mains electrical power and whether the oven is connected to the electricity supply.Turn off the oven and restart it to see if the fault persists. |
| The oven makes noises, even when it is switched off. | Cooling fan active. | Open the door or hold or wait until the cooling process has finished. |
| The display shows the letter “F” followed by a number. | Software fault. | Contact you nearest Client After-sales Service Centre and state the number following the letter “F”.Press tap “Info” and then select “Factory Reset”. All settings saved will be deleted. |
| The display shows F3E3. | The probe is not well connected or may not be making contact properly. | First of all check the probe; if it is entered correctly but the error persists, please call After-sales Service Centre.Notify the error that appears on the display. |
| The oven does not heat up. | When “DEMO” is “On” all commands are active and menus available but the oven doesn’t heat up.DEMO appears on display every 60 seconds. | Access “DEMO” from “SETTINGS” and select “Off”. |
Policies, standard documentation and additional product information can be found by:
• Using the QR code in your appliance
- Visiting our website docs.whirlpool.eu/docs
• Alternatively, contact our After-sales Service (See phone number in the warranty booklet). When contacting our After-sales Service, please state the codes provided on your product's identification plate.
®/TM/© 2025 Whirlpool. Produced under license.


MERCI D'AVOIR CHOISI UN PRODUIT WHIRLPOOL
Cupcake / Smallcake 160 20 - 25
Biscuits 165 15 - 20

CONVECTION NATURELLE + MICRO-ONDES
natural_image
Simple line drawing of a soldering iron with a curved wire and terminal plug (no text or symbols)TERMOSONDA
Cupcake/Smallcake 160 20 - 25
Biscotti 165 15 - 20

STATICO + MICROONDE
Toccare "IMPOSTA" o "AVANTI".
natural_image
Simple line drawing of a soldering iron with a curved wire and terminal plug (no text or symbols)A SONDA DE TEMPERATURA
natural_image
Simple line drawing of a soldering iron with a coiled cable and terminal plug (no text or symbols)PEČICÍ SONDA
TAK FORDI DU HAR K∅BT ET WHIRLPOOL PRODUKT
INDSÆT OVNRIST OG ANDET TILBEH∅R
natural_image
Simple line drawing of a soldering iron with a curved wire and terminal connector (no text or symbols)TOIDUTERMOMEETER
natural_image
Simple line drawing of a soldering iron with a probe and terminal connector (no text or symbols)LÄMPÖMITTARI
6 ^TH SENSE SULATUS & PEHMENNYS
2. ASETA MANUAALISET TOIMINNOT
5. TOIMINNON KÄYNNISTYS
natural_image
Simple line drawing of a medical or electrical device with a coiled cable and terminal connector (no text or symbols)ÉTELSZONDA
natural_image
Simple line drawing of a soldering iron with a probe and terminal connector (no text or symbols)ÉDIENA ZONDE
natural_image
Line drawing of a soldering iron with a coiled cable and terminal connector (no text or symbols)MAISTO TERMOMETRAS
TAKK FOR AT DU HAR KJ∅PT ET WHIRLPOOL-PRODUKT
TRADISJONELL STEKING
TRADISJONELL STEKING + MB
natural_image
Simple line drawing of a thermometer with a probe inserted (no text or symbols)SONDA DO POTRAW
natural_image
Simple line drawing of a soldering iron with a coiled cable and terminal plug (no text or symbols)POTRAVINOVÁ SONDA
6 ^TH SENSE SOFT & MELT (ZMÄKNUTIE A ROZTOPENIE)

[Non-Text]
[Non-Text]
[Non-Text]
[Non-Text]
[Non-Text]
AKO POUŽÍVAŤ DOTYKOVÝ DISPLEJ

2. NASTAVENIE MANUÁLNYCH FUNKCIÍ
TACK FÖR ATT DU HAR KÖPT EN PRODUKT FRÄN WHIRLPOOL
natural_image
Simple line drawing of a soldering iron with a probe inserted (no text or symbols)INSTICKSTERMOMETER
natural_image
Simple 3D illustration of a circular bowl or petri dish (no text or symbols)CRISPPANNA
TURBO GRILL + MW (TURBOGRILL +
MIKRO)
6:TH SENSE UPPTINING
SNABBSTART (JET START)
natural_image
Hand holding a mechanical device with a rotating arrow indicating rotation (no text or symbols)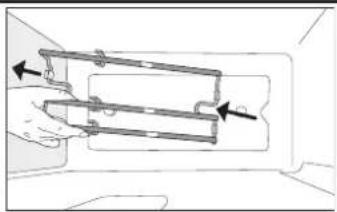
natural_image
Diagram of a hand holding two rectangular metal components with arrows indicating direction (no text or symbols)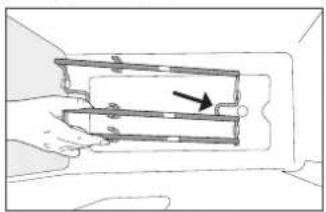
natural_image
Diagram of a mechanical assembly with two parallel plates and a directional arrow indicating motion (no text or symbols)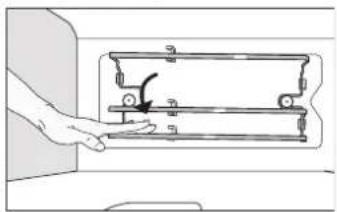
natural_image
Hand pressing a component on a machine (no text or symbols visible)
- THANK YOU FOR BUYING A WHIRLPOOL PRODUCT
- PLEASE SCAN THE QR CODE ON YOUR APPLIANCE IN ORDER TO REACH MORE INFORMATION
- PRODUCT DESCRIPTION
- CONTROL PANEL DESCRIPTION
- ACCESSORIES
- INSERTING THE WIRE SHELF AND OTHER ACCESSORIES
- REMOVING AND REFITTING THE LADDER RACKS
- FUNCTIONS
- MANUAL MODES
- MICROWAVE
- CRISP
- CRISP FRY: Fresh Foods and Frozen Foods
- FAST PREHEAT
- GRILL
- GRILL + MW
- TURBO GRILL
- TURBO GRILL + MW
- CONVENTIONAL
- CONVENTIONAL + MW
- FORCED AIR
- FORCED AIR + MW
- CONVECTION BAKE
- CONVENCTION BAKE + MW
- SPECIAL FUNCTIONS
- KEEP WARM
- RISING
- YOGURT
- DEHYDRATION
- MAXI-COOKING
- ECO CYCLE
- COOK 3
- COOKIES
- TART
- PIZZA (FROZEN)
- COOK 3 MENU 1
- COOK 3 MENU 2
- Example of complete meal
- AUTO MODES
- TH SENSE DEFROST
- CRISP BREAD DEFROST
- TH SENSE REHEAT
- TH SENSE SOFT & MELT
- TH SENSE MW SOUS VIDE
- OTHER FUNCTIONS MENU
- FAVORITES
- SETTINGS
- KITCHEN TIMER
- LIGHT
- CONTROL LOCK
- AUTO MODES COOKING TABLE
- MW SOUS VIDE TABLE
- HOW TO COOK BY COOKING METHOD
- Crisp Recipes
- Crisp Fry Recipes
- MW Steam Recipes
- HOW TO USE THE TOUCH DISPLAY
- To select or confirm:
- To scroll through a menu or a list:
- To confirm settings or access the next screen:
- To go back to the previous screen:
- FIRST TIME USE
- SELECT THE LANGUAGE PREFERENCES
- SETTING THE TIME AND DATE
- SET THE POWER CONSUMPTION
- HEAT THE OVEN
- DAILY USE
- SELECT A FUNCTION
- JET START
- SET MANUAL FUNCTIONS
- DURATION
- SET AUTO MODES
- SET START TIME DELAY
- START THE FUNCTION
- PREHEATING
- TURN OR CHECK FOOD
- END OF COOKING
- FAVORITES
- HOW TO SAVE A FUNCTION
- ONCE SAVED
- CHANGING THE SETTINGS
- TOOLS
- MUTE
- SMART CLEAN
- PREFERENCES
- i INFO
- FOOD PROBE
- USING THE FOOD PROBE
- ATTENTION!
- USEFUL TIPS
- LIQUIDS
- FROZEN FOOD
- CLEANING AND MAINTENANCE
- EXTERIOR SURFACES
- INTERIOR SURFACES
- FOOD FOR INFANTS
- CAKES AND BREAD
- MEAT AND FISH
- TROUBLESHOOTING
- MERCI D'AVOIR CHOISI UN PRODUIT WHIRLPOOL
- CONVECTION NATURELLE + MICRO-ONDES
- TERMOSONDA
- STATICO + MICROONDE
- A SONDA DE TEMPERATURA
- PEČICÍ SONDA
- TAK FORDI DU HAR K∅BT ET WHIRLPOOL PRODUKT
- INDSÆT OVNRIST OG ANDET TILBEH∅R
- TOIDUTERMOMEETER
- LÄMPÖMITTARI
- TH SENSE SULATUS & PEHMENNYS
- ASETA MANUAALISET TOIMINNOT
- TOIMINNON KÄYNNISTYS
- ÉTELSZONDA
- ÉDIENA ZONDE
- MAISTO TERMOMETRAS
- TAKK FOR AT DU HAR KJ∅PT ET WHIRLPOOL-PRODUKT
- TRADISJONELL STEKING
- TRADISJONELL STEKING + MB
- SONDA DO POTRAW
- POTRAVINOVÁ SONDA
- TH SENSE SOFT & MELT (ZMÄKNUTIE A ROZTOPENIE)
- AKO POUŽÍVAŤ DOTYKOVÝ DISPLEJ
- NASTAVENIE MANUÁLNYCH FUNKCIÍ
- TACK FÖR ATT DU HAR KÖPT EN PRODUKT FRÄN WHIRLPOOL
- INSTICKSTERMOMETER
- CRISPPANNA
- TURBO GRILL + MW (TURBOGRILL +
- MIKRO)
- 6:TH SENSE UPPTINING
- SNABBSTART (JET START)
Brand : WHIRLPOOL
Model : WCW9O7PHTSB
Category : Electric oven