OBS100A - Sander Holzmann - Free user manual and instructions
Find the device manual for free OBS100A Holzmann in PDF.
| Product Type | Belt and Spindle Sander |
| Brand | Holzmann |
| Model | OBS100A |
| Power Supply | 230 V / 50 Hz |
| Motor Power | Estimated: 500-750 W |
| Rotation Speed | Not specified, variable depending on tool |
| Approximate Dimensions (L x W x H) | 400 x 300 x 350 mm |
| Approximate Weight | 12 kg |
| Machinable Materials | Wood, composite materials, wood-like materials |
| Sanding Tools | Abrasive belt, sanding sleeves (Ø 15, 21, 28, 40, 53 mm) |
| Tilting Table | Yes, adjustable angle |
| Parallel Fence | Yes, included |
| On/Off Switch | Green (on) and red (off) buttons |
| Electrical Protection | Residual current circuit breaker recommended |
| Noise Level | Not specified, estimated < 80 dB |
| Dust Extraction System | Connection possible for external extraction |
| Regular Maintenance | Cleaning of ventilation slots, checking cables and sanding tool |
| Spare Parts | Available on Holzmann website (service@holzmann-maschinen.at) |
| Warranty | 2 years non-commercial use, 1 year commercial use |
| Safety Standards | Mandatory PPE: goggles, dust mask, close-fitting clothing |
Frequently Asked Questions - OBS100A Holzmann
User questions about OBS100A Holzmann
0 question about this device. Answer the ones you know or ask your own.
Ask a new question about this device
Download the instructions for your Sander in PDF format for free! Find your manual OBS100A - Holzmann and take your electronic device back in hand. On this page are published all the documents necessary for the use of your device. OBS100A by Holzmann.
USER MANUAL OBS100A Holzmann
OSCILLATING 2INT SANDING MACHINE
EN EC-CONFORM: This product complies with the EC-directives.
READ THE MANUAL! Read the user and maintenance carefully and get familiar with the controls in order to use the machine correctly and to avoid injuries and machine defects.
ES
EN Wear protective equipment!
Stop and pull out the power plug before any break and engine maintenance!
ES
EN Missing or non-readable security stickers have to be replaced immediately.
This manual contains information and important notes for safe commissioning and handling of the OSCILLATING 2INI SANDING MACHINE OBS100A_230V, hereinafter referred to as "machine" in this document.

This manual is part of the machine and must not be removed. Save it for later reference and if you let other people use the machine, add this manual to the machine.
Please read and note the safety instructions!
Before first use read this manual carefully. It eases the correct use of the machine and prevents misunderstanding and damages of machine.
Due to constant advancements in product design, construction, illustrations and contents may deviate slightly. If you notice any errors, please inform us.
We reserve the right to make technical changes!
Check the goods immediately after receipt and note any complaints on the consignment note when taking over the goods from the deliverer!
Transport damage must be reported to us separately to us within 24 hours.
HOLZMANN MASCHINEN GmbH cannot accept any liability for transport damage that has not been reported.
Copyright
2022
This documentation is protected by copyright. All rights reserved! In particular, the reprint, translation and extraction of photos and illustrations will be prosecuted.
The place of jurisdiction is the regional court Linz or the court responsible for 4170 Haslach is valid.
Customer service contact
This section contains information and important notes on the safe commissioning and handling of the machine.

For your safety, read this manual carefully before commissioning. This will enable you to handle the machine safely and thus prevent misunderstandings as well as personal injury and damage to property. Pay special attention to the symbols and pictograms used on the machine as well as the safety information and danger warnings!
11.1 Intended use of the machine
The machine is designed exclusively for the following activities:
Sanding wood, wood composites or materials with similar physical properties to wood, within the prescribed technical limits.
NOTE

HOLZMANN MASCHINEN GmbH assumes no responsibility or warranty for any other use or use beyond this and for any resulting damage to property or injury.
11.1.1 Technical restrictions
The machine is designed for the work under the following conditions:
Relative humidity max. 70%
Temperature (operation) +5^ to +40^
Temperature (storage, transport) -25 °C to +55 °C
11.1.2 Prohibited applications / Dangerous misuse
- Operating the machine outdoors.
- Operating the machine without adequate physical and mental fitness.
- Operating the machine without knowledge of the manual.
- Modifying the machine design.
- Operating the machine outside the technical limits specified in this manual.
- Removing of the safety markings attached to the machine.
- Modifying, circumventing or disabling the safety devices of the machine.
The non-intended use or the disregard of the explanations and instructions described in this manual will result in the expiration of all warranty claims and compensation claims for damages against HOLZMANN MASCHINEN GmbH.
11.2 User requirements
The machine is designed to be operated by one person. The prerequisites for operating the machine are physical and mental fitness as well as knowledge and understanding of the operating instructions. Persons who, due to their physical, sensory or mental capabilities, inexperience or lack of knowledge, are unable to operate the machine safely must not use the machine without supervision or instruction by a responsible person.
Please note that locally applicable laws and regulations determine the minimum age of the operator and may restrict the use of this machine!
Work on electrical components or equipment may only be carried out by a qualified electrician or under the guidance and supervision of a qualified electrician.
Put on your personal protective equipment before working on the machine.
11.3 General safety instructions
To avoid malfunctions, damage and health impairments when working with the machine, the following points must be observed in addition to the general rules for safe working:
- Check the machine for completeness and function before starting.
- Select a level, vibration-free surface as the installation area.
- Ensure sufficient space around the machine.
- Ensure sufficient lighting conditions at the workplace to avoid stroboscopic effects.
- Ensure a clean working environment.
- Keep the area around the machine free of obstacles (e.g. dust, chips, cut-off workpiece parts, etc.).
- Only use tools that are in perfect condition and free of cracks and other defects (e.g. deformations).
- Remove tool keys and other setting tools before switching on the machine.
-
Never leave the running machine unattended. Switch off the machine before leaving the working area and secure it against unintentional or unauthorized restarting.
-
The machine may only be operated, maintained or repaired by persons who are familiar and who have been informed about the dangers arising from this work.
- Ensure that unauthorized persons keep a safety distance from the machine and keep children away from the machine.
Always work with care and the necessary caution and never use excessive force. - Do not overload the machine.
- Hide long hair under hair protection.
- Wear close fitting protective work clothing and suitable protective equipment (eye protection, dust mask).
- Never wear loose jewellery, loose clothing or accessories (e.g. tie, scarf).
- Do not work on the machine if you are tired, not concentrated or under the influence of medication, alcohol or drugs!
- Connect the machine to a suitable dust collection system.
- Do not use the machine in areas where vapours of paints, solvents or flammable liquids represent a potential danger (danger of fire or explosion!).
- Shut down the machine and disconnect it from the power supply, before adjustment, changeover, cleaning, maintenance or repair work, etc. Before starting work on the machine, wait until all tools or machine parts have come to a complete standstill and secure the machine against unintentional restart.
11.4 Electrical safety
Only use suitable extension cables.
- A damaged or tangled cable increases the risk of electric shock. Handle the cable with care. Never use the cable to carry, pull or disconnect the power tool. Keep the cable away from heat, oil, sharp edges or moving parts.
- Proper plugs and outlets reduce the risk of electric shock.
Water entry into the machine increases the risk of electric shock. Do not expose the machine to rain or moisture.
- The machine may only be used if the power supply is protected by a residual current circuit breaker.
- Use the machine only when the ON-OFF switch is in good working order.
11.5 Special safety instructions for this machine
- Never touch a moving sanding tool.
- Do not use the machine if the sanding tool is damaged
- Keep the ventilation slots on the housing clear to prevent the motor from overheating.
- Never sand an unsupported workpiece. Secure the workpiece with the table or a fence.
11.6 Hazard warnings
11.6.1 Residual risks
Despite intended use, certain residual risk factors remain.
- Risk of injury to hands/fingers from moving sanding tool during operation.
11.6.2 Hazardous situations
Due to the structure and construction of the machine, hazardous situations may occur which are identified in this manual as follows:
| DANGER | |
| ! | A safety instruction designed in this way indicates an imminently hazardous situation which, if not avoided, will result in death or serious injury. |
| WARNING | |
| ! | A safety instruction designed in this way indicates a potentially hazardous situation which, if not avoided, could result in death or serious injury. |
| CAUTION | |
| ! | A safety instruction designed in this way indicates a possibly hazardous situation which, if not avoided, may result in minor or moderate injury. |
| NOTE | |
| ! | A safety notice designed in this way indicates a potentially hazardous situation which, if not avoided, may result in property damage. |
Regardless of all safety regulations, your common sense and your appropriate technical aptitude/training are and remain the most important safety factor in the error-free operation of the machine. Safe working depends on you!
12 ASSEMBLY
12.1 Preparation
12.1.1 Check delivery content
Check the delivery immediately for transport damage and missing parts. Report any damage or missing parts to your dealer or the shipping company immediately. Visible transport damage must also be noted immediately on the delivery note in accordance with the provisions of the warranty, otherwise the goods are deemed to have been properly accepted.
12.1.2 Requirements for the installation site
The selected installation site must ensure a suitable connection to the power supply, as well as (e.g.) connection to an extraction system. Observe the safety requirements and the dimensions of the machine.
The base of the machine has fixing holes by means of which the machine is firmly connected to a workbench or machine table. This prevents movement of the machine during operation and possible damage or injury.
NOTE

Required mounting material is not included in the scope of delivery.
12.2 Assemble / changing sanding tool
The machine has been disassembled for transport and must be reassembled before use. Follow the instructions below:
WARNING

Danger due to electrical voltage!
Handling the machine with connected power supply may result in serious injury or death.
Always disconnect the machine from the power supply before carrying out any modification or adjustment work and secure it against unintentional reconnection.
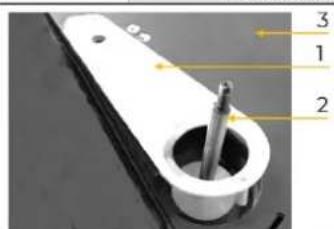
- Slide the cover (1) over the spindle (2) and place it in the recess of the table (3)
- Insert table inlay (4) into the cover (4)
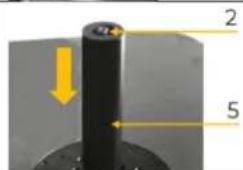
- Push the rubber sanding roll (5) onto the spindle (2)
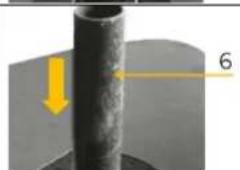
- Push the sanding sleeve (6) onto the rubber sanding roll
NOTE: The sanding sleeve with 15mm is mount directly onto the spindle!
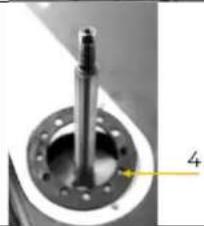
| 8 7 6 9 | 5. Put on the spindle disc (7) with the correct dimension and spindle nut (8) | |
| 9 | 6. Tighten the spindle nut with the wrench (9) | |
| NOTE: When changing the sanding sleeves, always use the matching parts (see table). The table inlays (4) must always be larger than the grinding sleeves (6)! | ||
| Sanding sleeve Ø | Table inlay inside-Ø | Ø Spindle disc |
| 15 mm | 18 mm | small 14 mm |
| 21 mm | 25 mm | small 14 mm |
| 28 mm | 31 mm | medium 24 mm |
| 40mm | 44mm | medium 24 mm |
| 53 mm | 57 mm | large 44 mm |
12.2.1 Converting to sanding belt attachment
| 10 12 11 2 11a | 1. Remove sanding sleeve, rubber sanding roll, Ttable inlay and cover 2. Guide the sanding belt attachment (10) over the spindle (2) and the stud (12) into the grove 3. Make sure that the recesses (11) are inserted into the notches of the driving disc (11a) NOTE: If the recesses do not engage immediately, turn the sanding belt by hand until they engage |
| 13 14 | 4. Screw sanding belt fixing screw (13) and washer (14) onto the spindle |
| 20 19 18 | 5. Insert the stop (18) into the recess provided and fix it with the stop fixing screw (19) 6. Slide the metre fence (20) into the groove |
12.2.2 Changing sanding belt
| 17 16 | 1. Push the sansing belt tensioner (15) to the right to release the sanding belt (16) 2. Remove the sanding belt 3. Mount the new sanding belt (pay attention to the running direction)! 4. Move the sanding belt by hand in the running direction and adjust the sanding belt with the sanding belt setting (17) so that it runs centrally on the sanding surface |
13 OPERATION
Only operate the machine when it is in a perfect condition. Before each operation, a visual inspection of the machine must be carried out. Power cord and operating elements must be checked carefully. Check screw connections for damage and tight fit.
13.1 Operating instructions
Before switching on the machine check the faultlessly move of the sanding tool
- Never start the machine with a workpiece pressed down
Workpieces should always be sanded with the grain
13.1.1 Bevel sanding
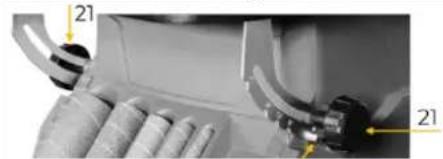
- Loosen fixing screws table (21)
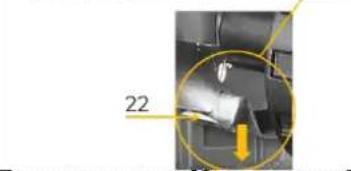
- Push angle lock (22) down
- Set the table in desired angle position and let engage the angle lock
- Retighten the fixing screws table (21)
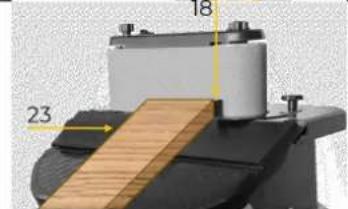
- Place the workpiece (23) against the fence (18)
- Start bevel sanding
13.1.2 Surface sanding
- Hold the workpiece firmly
- Press the workpiece against the table and guide it evenly over the sanding belt.
Caution: Special care must be taken when sanding particularly thin or long workpieces.
- Apply only enough pressure to allow the sanding belt to remove the material
13.2 Handling
- Switch on the machine.
- Once the machine has reached its maximum speed you may start sanding process.
- Move the work piece slowly in the direction contrary to the running direction of the sanding tool.
- Do not overload the machine by too much pressure against the sanding tool.
After finishing the sanding process switch off the machine and disconnect from power supply.
13.2.1 Switch the machine on and off

Switch on
Press the green switch-on button (I).
Switch off
Press the red switch-off (0)
14 CLEANING, MAINTENANCE, STORAGE, DISPOSAL
WARNING

Danger due to electrical voltage!
Handling the machine with connected power supply may result in serious injury or death.
Always disconnect the machine from the power supply before cleaning, maintenance or repair work and secure it against unintentional reconnection.
14.1 Cleaning
NOTE

Incorrect cleaning products can attack the finish of the machine. Do not use any solvents, nitro thinners or other cleaning products that could damage the machine's finish.
Observe the specifications and instructions of the cleaning agent manufacturer.
Regular cleaning is a prerequisite for the safe operation of the machine and its long service life. Keep the surfaces and ventilation slots of the machine free of dust and dirt. For cleaning, use a soft cloth and a mild soap solution and, if necessary, a damp-free jet of compressed air.
14.2 Maintenance
The machine is low-maintenance and only a few parts have to be serviced. Nevertheless, malfunctions or defects which could impair the safety of the user must be rectified immediately!
- Regularly check that the safety devices on the machine are in perfect and functional condition.
Only use perfect and suitable tools.
Only use original spare parts recommended by the manufacturer.
14.2.1 Maintenance plan
The type and degree of machine wear depends to a large extent on the operating conditions. The following intervals apply when the machine is used within the technical limits:
| Interval | Components | Action |
| before usage | Sanding tool | Check and replace, if damaged. |
| Power cord | ||
| Each time after completion of work | Surfaces | Remove dust and dirt |
| Air vents | ||
| if required | Sanding tool | Replace |
14.3 Storage
Store the machine in a dry, frost-proof and lockable place when not in use. Disconnect the machine from the power supply. Make sure that unauthorised persons and especially children do not have access to the machine.
NOTE

Improper storage can damage and destroy important components. Only store packed or already unpacked parts under the intended ambient conditions!
14.4 Disposal

Observe the national waste disposal regulations. Never dispose of the machine, machine components or operating equipment in the residual waste. If necessary, contact your local authorities for information regarding available disposal options. If you purchase a new machine or equivalent equipment from your specialist dealer, he is obliged in certain countries to dispose of your old machine properly.
15 TROUBLESHOOTING
WARNING

Danger due to electrical voltage!
Handling the machine with connected power supply may result in serious injury or death.
→ Always disconnect the machine from the power supply before maintenance or repair work and secure it against unintentional reconnection.
Many possible sources of error can be eliminated in advance if the machine is properly connected to the power supply. If you are unable to carry out the necessary repairs properly and/or do not have the required training, always consult a specialist to solve the problem.
| Trouble | Possible cause | Solution |
| Machine does not run | ON-OFF switch defective | Repair/replace switch |
| Fuse defective | Replace fuse | |
| Motor defective | Repair/replace motor | |
| Power cord damaged | Replace power cord | |
| Machine slows down during working | Too much pressure put on the workpiece | Reduce the pressure on the workpiece |
| Work piece burns during the working process | Sanding tool covered with grease | Replace sanding tool |
| Excessive pressure on workpiece | Reduce the pressure | |
| Strong vibrations | Loosely sanding tool | Tighten sanding tool |
| Sanding tool defective | Replace sanding tool | |
| Spindle knocks | Repair/replace spindle | |
| Loosely machine | Refix machine | |
| Sanding belt does not run centrally | Sanding belt track is not set correct | Reset the track |
16 PROLOGO (ES)
jEstimado cliente!
Cher client, chere clientele!
23.1.1 Restrictions techniques
Temperature (stockage, transport)
-25°C à +55°C
23.1.2 Applications interdites / Mauvaises applications dangereuses
(EN) With original HOLZMANN spare parts you use parts that are attuned to each other shorten the installation time and elongate your products lifespan.
NOTE

The installation of parts other than original spare parts leads to the loss of the guarantee! Therefore: When replacing components/parts, only use spare parts recommended by the manufacturer.
Order the spare parts directly on our homepage - category SPARE PARTS or contact our customer service via our Homepage - category SERVICE - SPARE PARTS REQUEST, by e-mail to service@holzmann-maschinen.at.
Always state the machine type, spare part number and designation. To prevent misunderstandings, we recommend that you add a copy of the spare parts drawing with the spare parts order, on which the required spare parts are clearly marked, especially when not using the online-spare-part catalogue.
| No. | Description | Qty. | No | Description | |
| 1 | Base | 1 | 51 | Sand cylinder | 1 |
| 2 | Baseplate | 1 | 52 | Sand cylinder | 1 |
| 3 | Fixed table | 1 | 53 | Washer 8 | 1 |
| 4 | Movable table | 1 | 54 | Nut M8 | 1 |
| 5 | Axis pin | 2 | 55 | Wrench | 1 |
| 6 | Screw, spring washer and flat washer M5x12 | 12 56 | Power cord 1 | ||
| 7 | Rubber ring | 1 | 57 | Spring | 1 |
| 8 | Dust port | 1 | 58 | Axle sleeve | 1 |
| 9 | Switch | 1 | 59 | Left table support | 1 |
| 10 | Motor | 1 | 60 | Right table support | 1 |
| 11 | Deep groove ball bearing | 2 | 61 | Belt work table plate | 1 |
| 12 | Pressing plate | 2 | 62 | Nut M8 | 2 |
| 13 | Screw | 32 | 63 | Screws M8x25 | 2 |
| 14 | Rubber blanket | 2 | 64 | Tension handle | 2 |
| 15 | Felt blanket | 2 | 65 | Leaf spring | 1 |
| 16 | Shaft sleeve | 1 | 66 | Screw,spring washer and flat washer M5x8 | 3 |
| 17 | Spindle | 1 | 67 | Fixed the slider | 1 |
| 18 | 69 teeth synchronous belt wheel | 1 | 68 | Screws M6x14 | 2 |
| 19 | Press plate with wheel | 2 | 69 | Limit board | 1 |
| 20 | Circlip for shaft | 2 | 70 | Index plate handle | 1 |
| 21 | 70 teeth synchronous belt wheel | 1 | 71 | Belt support | 1 |
| 22 | Spring backed plate | 2 | 72 | Support plate | 1 |
| 23 | Backpanels | 1 | 73 | Guide frame | 1 |
| 24 | Screw ST4,2x25 | 4 | 74 | Sand belt tension handle | 1 |
| 25 | Motor wheel | 1 | 75 | Driven shaft | 1 |
| 26 | Synchronous belt | 1 | 76 | Drive roller | 1 |
| 27 | Synchronous belt | 1 | 77 | Driven roller | 1 |
| 28 | Tightening rack assembly | 1 | 78 | Sand belt adjusting handle | 1 |
| 29 | Tightening wheel assembly | 1 | 79 | Washer | 3 |
| 30 | Nut M5 | 1 | 80 | Sand belt lock handle | 1 |
| 31 | Connector 1 81 | Deep groove ball bearing 6001-2RS | 2 | ||
| 32 | Sand cylinder pressing plate | 1 | 82 | Circlip for shaft 12 | 1 |
| 33 | Sand cylinder roller | 1 | 83 | Deep groove ball bearing 6004-2RS | 2 |
| 34 | Screw, spring washer and flat washer M6x16 | 8 84 | Screws M5x35 5 | ||
| 35 | Foot | 4 | 85 | Nut M5 | 5 |
| 36 | Cable joint | 1 | 86 | Washer 5 | 2 |
| 37 | Half round key 5 x6,5 | 1 | 87 | Screws M5x16 | 1 |
| 38 | Install wire fixing button | 2 | 88 | Regulating spring | 1 |
| 39 | Ply-yarn drill | 1 | 89 | Extension spring | 1 |
| 40 | Sand cylinder roller | 1 | 90 | Washer 5 | 2 |
| 41 | Sand cylinder roller | 1 | 91 | Rubber washer | 1 |
| 42 | Sand cylinder roller | 1 | 92 | Screws M5x8 | 2 |
| 43 | 13mm Work table plate | 1 | 93 | Belt | 1 |
| 44 | 38mm Work table plate | 1 | 94 | Miter rods | 1 |
| 45 | 26mm Work table plate | 1 | 95 | Index plate | 1 |
| 46 | 19mm Work table plate | 1 | 96 | Washer 6 | 1 |
| 47 | 51mm Work table plate | 1 | 97 | Handle | 1 |
| 48 | Sand cylinder | 1 | 98 | Pointer | 1 |
| 49 | Sand cylinder | 1 | 99 | Circuit board | 1 |
| 50 | Sand cylinder | 1 | |||
30 ZUBEHÖR / ACCESSORIES / ACCESSORIES / ACCESSORIES
(DE) Optionales Zubehor finden Sie online auf der Produktseite, Kategorie EMPFOHLENES ZUBEHOR ZUM PRODUKT.
(EN) Optional accessories can be found online on the product page, category RECOMMENDED PRODUCT ACCESSORIES.
(ES) Los accesos.optionales se encontraran en la page del producto en internet, en la categoria ACCESORIOS RECOMENDADOS PARA EL PRODUCTO.
(FR) Des accessoires en option sont disponibles en ligne sur la page produit, catégorie ACCESSOIRES RECOMMANDÉS POUR LE PRODUIT.
31 EG-KONFORMITÄTSERKLÄRUNG / CE-CERTIFICATE OF CONFORMITY DECLARATION DE CONFORMIDAD CE / DÉclaration DE CONFORMITE UE
| CE | HOLZMANN MASCHINEN® GmbH 4170 Haslach, Marktplatz 4, AUSTRIA Tel.: +43 7289 71562-0 www.holzmann-maschinen.at |
| Bezeichnung / name / Denominación / Düsseldorf | |
| OSZ. BAND- U. SPINDELSCHLEIFMASCHINE / OSCILLATING 2INI SANDING MACHINE / LIJADORA OSC. DE CINTA Y HUSILLO / PONCEUSE À BANDE ET À BROCHE OSCILLANTE | |
| Typ / model / Modelo / Type | |
| OBS100A_230V | |
| EU-Richtlinien / EC-directives / Directivas de la EU / Directives UE | |
| 2006/42/EC | |
| 2014/30/EC | |
| 2011/65/EC | |
| Angewandte Normen / applicable Standards / Normas aplicables / Normes applicables | |
| EN ISO 12100:2010; EN 62841-1:2015 | |
| EN 61000-3-3:2013+A1+A2, EN IEC 61000-3-2:2019+A1, EN IEC 55014-2:2021, EN IEC 55014-1:2021 | |
(DE) Hiermit erklaren wir, dass die oben genannten Maschinen aufgrund ihrer Bauart in der von uns in Verkehr gebrachten Version den grundlegenden Sicherheits- und Gesundheitsanforderungen der angeführten EU-Richtlinien entsprechen. Diese Erklärung verliert ihre Gültigkeit, wenn Veränderungen an der Maschine vorgenommen werden, die nicht mit uns abgestimmt wurden.
(EN) Hereby we declare that the above mentioned machines meet the essential safety and health requirements of the above stated EC directives. Any manipulation or change of the machine not being explicitly authorized by us in advance renders this document null and void.
(ES) Por medio de la presente, declaramos que las migunas arribas Mentionadas deben a su conceccion y construccion en la version commercializada por nosotros cumplen todos los requisitos esenciales en materia de seguidad y de salute de las directivas UE mentionadas.Estadeclaracionperdera su validez en caso de que se lleven a cabo modificaciones en laquina que no hayan sido acordadas con nosotros.
(FR) Nous déclarons par la présence qu'en raison de leur conception, les machines susmentionnées dans la version que nous commercialisons sont conformes aux exigences fondamentales de sécurité et de santé des directives CE mentionnées. Cette déclaration perd sa validité en cas de modifications non convenues avec nous apportées à la machine.
For mechanical and electrical components Company HOLZMANN MASCHINEN GmbH grants a warranty period of 2 years for DIY use and a warranty period of 1 year for professional/industrial use - starting with the purchase of the final consumer (invoice date).
In case of defects during this period which are not excluded by paragraph 3, Holzmann will repair or replace the machine at its own discretion.
2.) Report
In order to check the legitimacy of warranty claims, the final consumer must contact his dealer. The dealer has to report in written form the occurred defect to HOLZMANN MASCHINEN GmbH. If the warranty claim is legitimate, HOLZMANN MASCHINEN GmbH will pick up the defective machine from the dealer. Return shipments by dealers which have not been coordinated with HOLZMANN MASCHINEN GmbH will not be accepted. A RMA number is an absolute must-have for us - we won't accept returned goods without an RMA number!
3.) Regulations
a) Warranty claims will only be accepted when a copy of the original invoice or cash voucher from the trading partner of HOLZMANN MASCHINEN GmbH is enclosed to the machine. The warranty claim expires if the accessories belonging to the machine are missing.
b) The warranty does not include free checking, maintenance, inspection or service works on the machine. Defects due to incorrect usage through the final consumer or his dealer will not be accepted as warranty claims either.
c) Excluded are defects on wearing parts such as carbon brushes, fangers, knives, rollers, cutting plates, cutting devices, guides, couplings, seals, impellers, blades, hydraulic oils, oil filters, sliding jaws, switches, belts, etc.
d) Also excluded are damages on the machine caused by incorrect or inappropriate usage, if it was used for a purpose which the machine is not supposed to, ignoring the user manual, force majeure, repairs or technical manipulations by not authorized workshops or by the customer himself, usage of non-original Holzmann spare parts or accessories.
e) After inspection by our qualified staff, resulted costs (like freight charges) and expenses for not legitimated warranty claims will be charged to the final customer or dealer.
f) In case of defective machines outside the warranty period, we will only repair after advance payment or dealer's invoice according to the cost estimate (incl. freight costs) of HOLZMANN MASCHINEN GmbH.
g) Warranty claims can only be granted for customers of an authorized HOLZMANN MASCHINEN GmbH dealer who directly purchased the machine from HOLZMANN MASCHINEN GmbH. These claims are not transferable in case of multiple sales of the machine.
4.) Claims for compensation and other liabilities
The liability of company HOLZMANN MASCHINEN GmbH is limited to the value of goods in all cases.
Claims for compensation because of poor performance, lacks, damages or loss of earnings due to defects during the warranty period will not be accepted.
HOLZMANN MASCHINEN GmbH insists on its right to subsequent improvement of the machine.
SERVICE
After Guarantee and warranty expiration specialist repair shops can perform maintenance and repair jobs. But we are still at your service as well with spare parts and/or product service. Place your spare part/repair service cost inquiry by
Mail to service@holzmann-maschinen.at.
Or use the online complaint order formula provided on our homepage - category service.
34 DECLARACION DE GARANTIA (ES)
1.) Carantia
(EN) We monitor the quality of our delivered products in the frame of a Quality Management policy.
Your opinion is essential for further product development and product choice. Please let us know about your:
Impressions and suggestions for improvement.
- Experiences that may be useful for other users and for product design
- Experiences with malfunctions that occur in specific operation modes
We would like to ask you to note down your experiences and observations and send them to us via E-mail or by post: