Pizza Maker Pro - Pizza oven Create - Free user manual and instructions
Find the device manual for free Pizza Maker Pro Create in PDF.
User questions about Pizza Maker Pro Create
0 question about this device. Answer the ones you know or ask your own.
Ask a new question about this device
Download the instructions for your Pizza oven in PDF format for free! Find your manual Pizza Maker Pro - Create and take your electronic device back in hand. On this page are published all the documents necessary for the use of your device. Pizza Maker Pro by Create.
USER MANUAL Pizza Maker Pro Create
natural_image
Line drawing of a simple geometric table with legs and feet, no text or symbols presentGAS PIZZA OVEN
HORNO A GAS PARA PIZZAS
USER MANUAL
CREATE CREATE CREATE ATE CREATE CREATE CRE CREATE CREATE CREATE ATE CREATE CREATE CRE CREATE CREATE CREATE ATE CREATE CREATE CRE CREATE CREATE CREATE ATE CREATE CREATE CRE CREATE CREATE CREATE ATE CREATE CREATE CRE CREATE CREATE CREATE ATE CREATE CREATE CRE CREATE CREATE CREATE ATE CREATE CREATE CRE CREATE CREATE CREATE ATE CREATE CREATE CRE CREATE CREATE CREATE ATE CREATE CREATE CRE CREATE CREATE CREATE ATE CREATE CREATE CRE CREATE CREATE CREATE ATE CREATE CREATE CRE CREATE CREATE CRE CREATE CREATE CRE ATE CREATE CRE
CREATE CREATE CREATE ATE CREATE CREATE CRE CREATE CREATE CREATE ATE CREATE CREATE CRE CREATE CREATE CREATE ATE CREATE CREATE CRE CREATE CREATE CREATE ATE CREATE CREATE CRE CREATE CREATE CREATE ATE CREATE CREATE CRE
Appliance Name PIZZA MAKER PRO CE PIN: 2575DM29062 Model No. 97911 - 192454 Appliance Category 13+(28-30/37) ☑ 13B/P(30) □ 13B/P(50) Type of Gas Butane Propane Butane, propane or their mixture Butane, propane or their mixture Gas Pressure 28-30mbar 37mbar 30mbar 50mbar Country of Destination BE, CH, CY, CZ, ES, FR, GB, GR, IE, IT, LT, PT, SI CY, DK, EE, HU, IT, LT, NL, N O, SE, SI, RO, HR, TR, FI AT, CH, DE Total Heat Input (kW) 8 Gas Consumption(g/h) 582 Injector Main grill 1,4mm 1,4mm 1,23mm ATTENTION: - Use outdoors only. - Read the instruct bns before using the appliance. - Warning: Accessible parts may be very hot. Keep away from young children. - This appliance must be kept away from flammable materials during use. - Do not move the appliance during use. Supplier: CREATE WOODS & GO DESIGN S.L. · B98944986 C/ Polígono 4, P18 - 46722 Beniarjó (Valencia) Spain
| Appliance Name | PIZZA MAKER PRO | CEPIN: 2575DM29062 | ||||
| Model No. | 97911 - 192454 | |||||
| Appliance Category | I3+(28-30/37) ☑ | I3B/P(30) ☐ | I3B/P(50) | |||
| Type of Gas | Butane | Propane | Butane, propane or their mixture | Butane, propane or their mixture | ||
| Gas Pressure | 28-30mbar | 37mbar | 30mbar | 50mbar | ||
| Country of Destination | BE, CH, CY, CZ, ES, FR, GB, GR, IE, IT, LT,PT,SI | CY, DK, EE, HU, IT, LT, NL, N O, SE, SI, RO, HR, TR, FI | AT, CH, DE | |||
| Total Heat Input (kW) | 8 | |||||
| Gas Consumption(g/h) | 582 | |||||
| Injector | Main grill | 1,4mm | 1,4mm | 1,23mm | ||
ATTENTION:
- Use outdoors only.
- Read the instruct bns before using the appliance.
- Warning: Accessible parts may be very hot. Keep away from young children.
- This appliance must be kept away from flammable materials during use.
- Do not move the appliance during use.
Supplier: CREATE
WOODS & GO DESIGN S.L. · B98944986
Security instructions
Before turning it on
Cylinder warnings
Safety practices to avoid injuries
List of parts
Mounting
Leak test
Instructions for use
Lighting instructions
Care and maintenance
Lighting instructions
6
8
8
8
9
9
11
11
11
12
13
ESPAÑOL
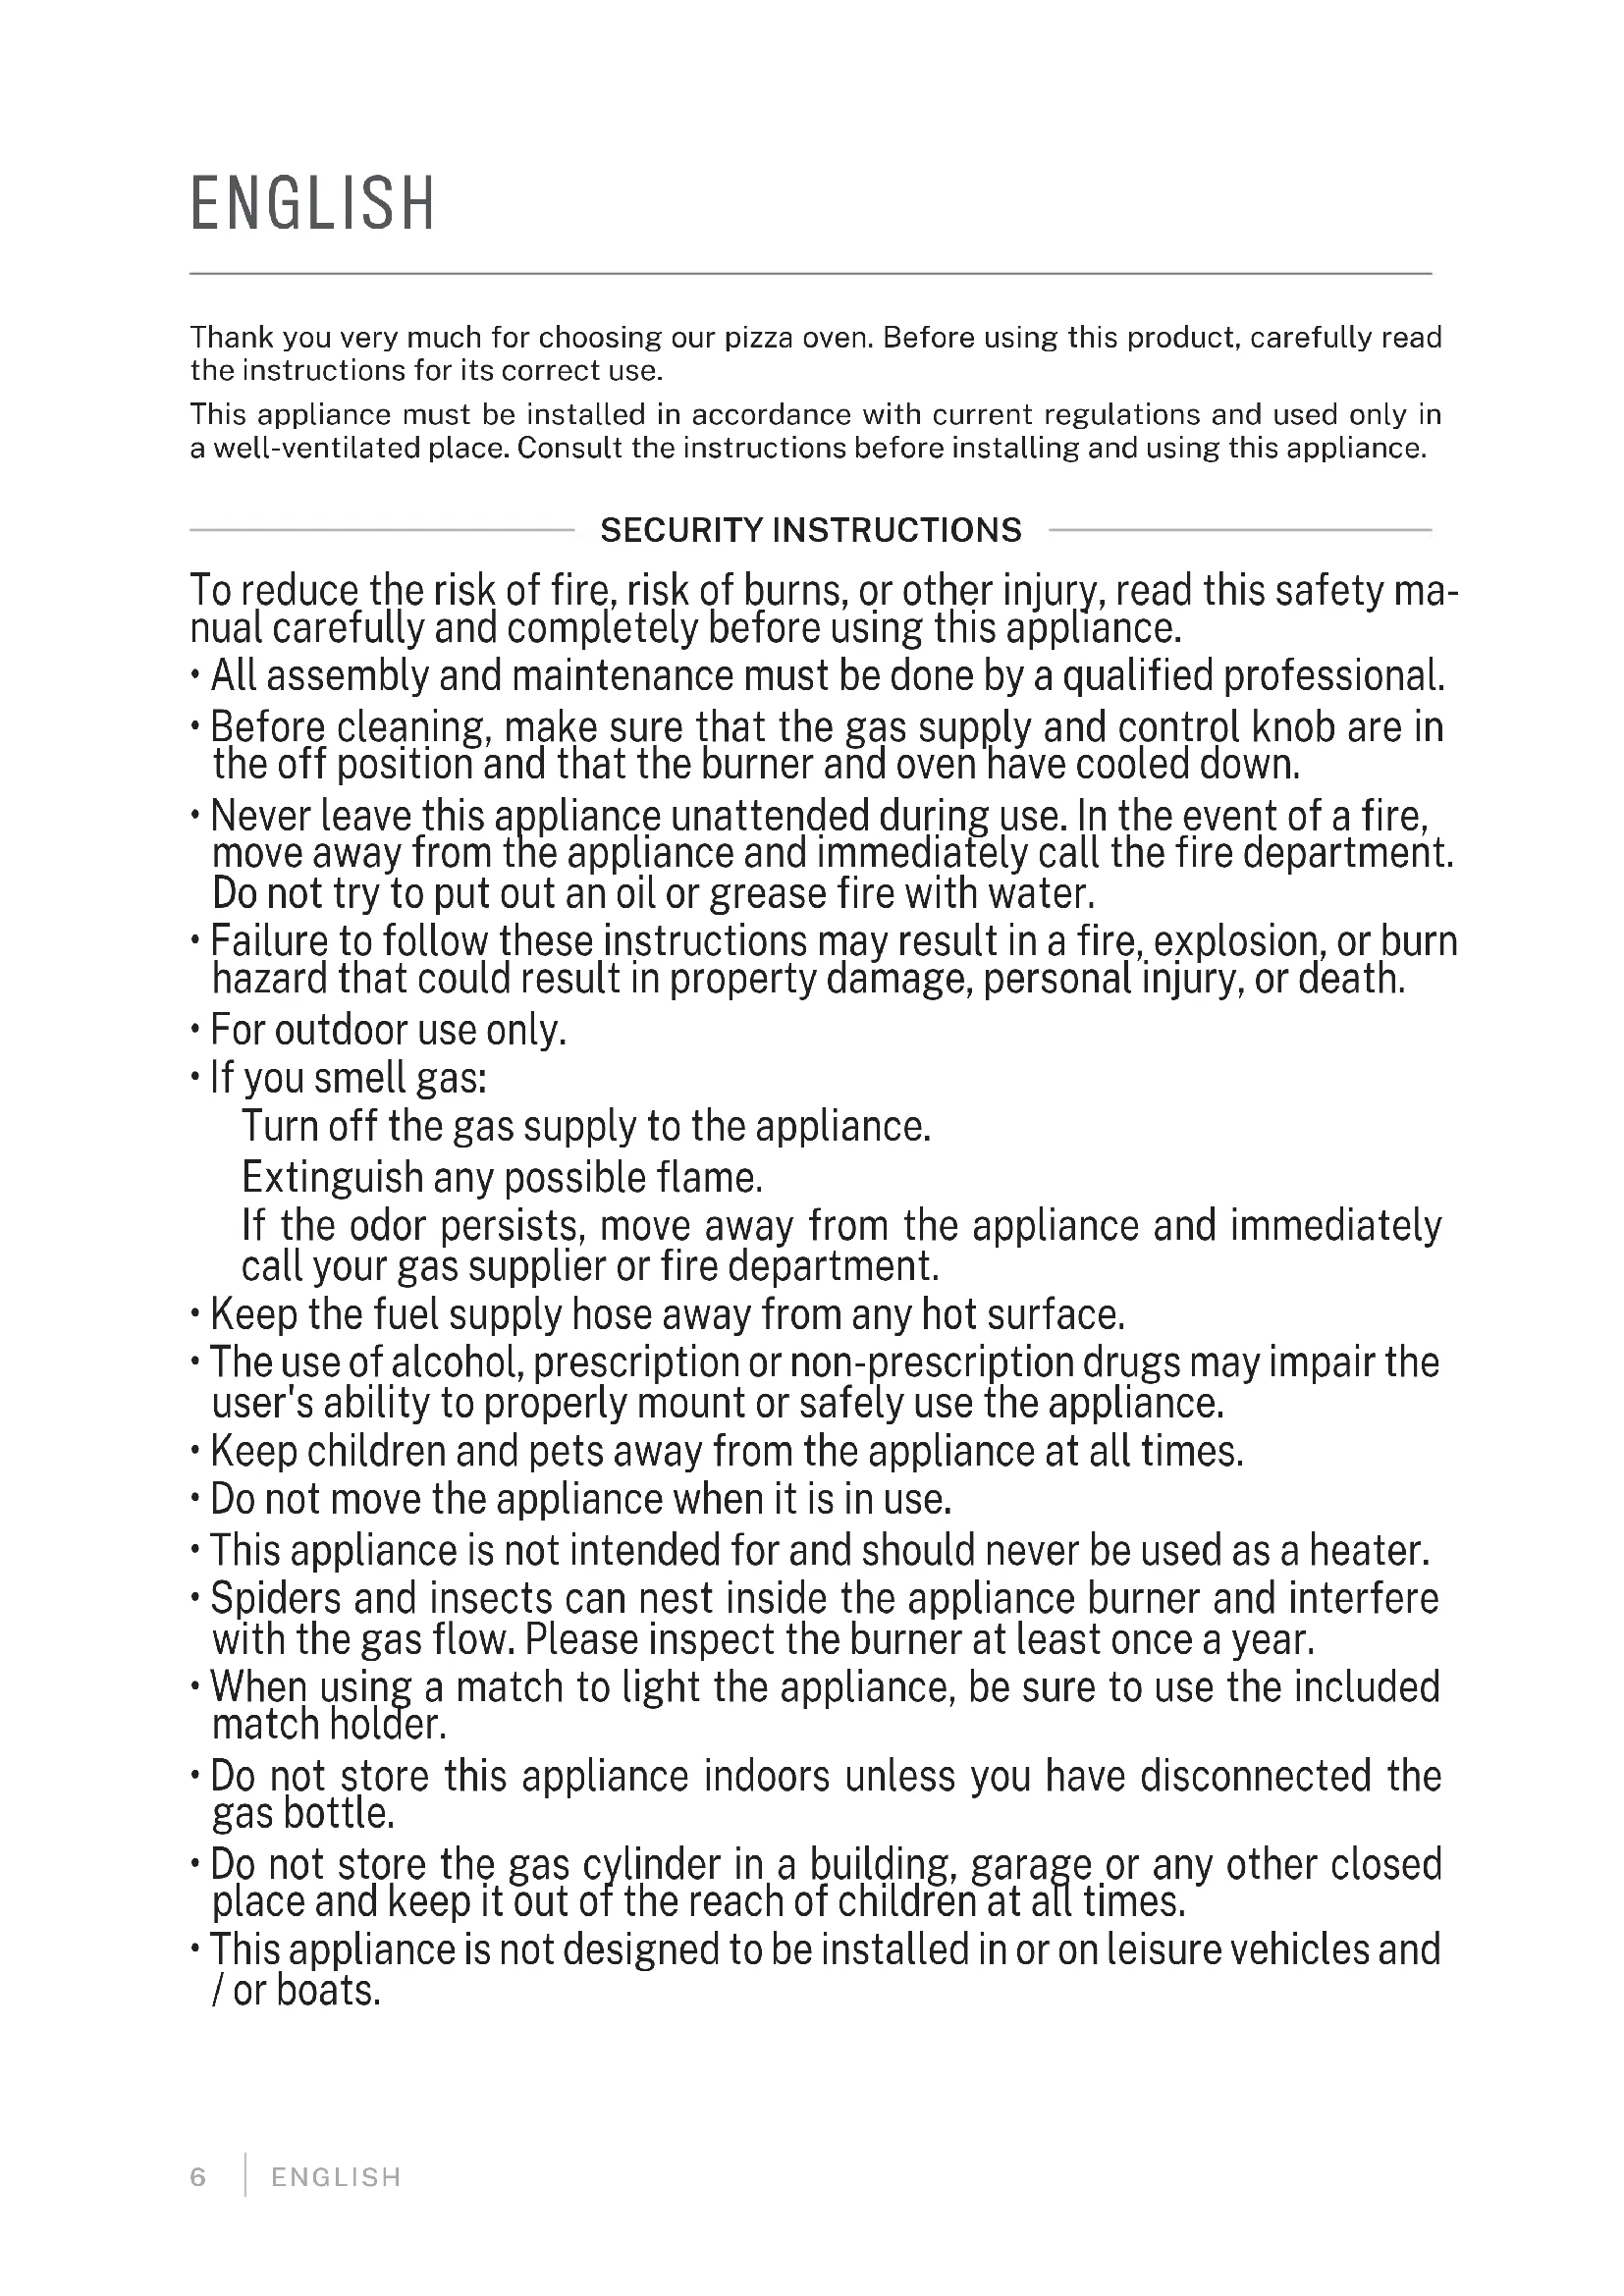
Thank you very much for choosing our pizza oven. Before using this product, carefully read the instructions for its correct use.
This appliance must be installed in accordance with current regulations and used only in a well-ventilated place. Consult the instructions before installing and using this appliance.
SECURITY INSTRUCTIONS
To reduce the risk of fire, risk of burns, or other injury, read this safety manual carefully and completely before using this appliance.
- All assembly and maintenance must be done by a qualified professional.
- Before cleaning, make sure that the gas supply and control knob are in the off position and that the burner and oven have cooled down.
- Never leave this appliance unattended during use. In the event of a fire, move away from the appliance and immediately call the fire department. Do not try to put out an oil or grease fire with water.
- Failure to follow these instructions may result in a fire, explosion, or burn hazard that could result in property damage, personal injury, or death.
- For outdoor use only.
- If you smell gas:
Turn off the gas supply to the appliance.
Extinguish any possible flame.
If the odor persists, move away from the appliance and immediately call your gas supplier or fire department.
- Keep the fuel supply hose away from any hot surface.
- The use of alcohol, prescription or non-prescription drugs may impair the user's ability to properly mount or safely use the appliance.
- Keep children and pets away from the appliance at all times.
- Do not move the appliance when it is in use.
- This appliance is not intended for and should never be used as a heater.
- Spiders and insects can nest inside the appliance burner and interfere with the gas flow. Please inspect the burner at least once a year.
- When using a match to light the appliance, be sure to use the included match holder.
- Do not store this appliance indoors unless you have disconnected the gas bottle.
- Do not store the gas cylinder in a building, garage or any other closed place and keep it out of the reach of children at all times.
-
This appliance is not designed to be installed in or on leisure vehicles and / or boats.
-
Before each use, check the tightness of all gas supply connections. Do not use the appliance until all connections have been checked and there are no leaks.
- Do not smoke during the leak test. Never carry out the tightness test if there is an open flame.
- When turning on the oven, keep your face and hands as far away from the appliance as possible.
- The appliance must be installed with a distance from combustible materials greater than 609 mm (24 inches) on the sides.
- The user must not alter or modify any part of the appliance, as it may pose a safety risk and will void the warranty.
- Cylinder size: maximum diameter -350mm, maximum height -400mm.
- The appliance must be installed with sufficient ventilation to avoid unacceptable concentrations of harmful substances in the room where it is installed.
- The minimum distance between the appliance and adjacent walls is 0.5 M.
• The appliance hose must not exceed 1.5 M. - The appliance must be installed in a well ventilated room. Make sure there is a permanent supply of fresh air and that there is no accumulation of unburned gases.
- The gas supply pipe or hose must comply with current national requirements, must be periodically inspected and replaced if necessary.
• The hose must comply with the en16436 standard.
• The regulator must comply with the en16129 standard. - Regulator and hose assembly may not be supplied with the appliance in some regions.
- Check and clean the inside of the oven before turning it on to avoid the emission of fire by the oils that may have accumulated during the previous cooking.
- Check the burner outlets to make sure they were not clogged during the previous cooking.
- Regularly clean the burner outlets with a soft metal brush to avoid clogging and allow good combustion.
- Make sure that the connecting hose is not kinked or pinched.
BEFORE TURNING IT ON
Inspect the gas supply hose before turning on the gas. If there are signs of cut, wear or abrasion, it must be replaced before use. Screw the regulator onto the gas bottle. Check the hose and regulator connections with a soap and water solution before turning on the oven.
CYLINDER WARNINGS
- Do not store replacement bottles under or near this appliance.
- Never fill the cylinder above 80% of its capacity.
- Liquid propane cylinders must be equipped with an overfill protection device (OPD).
- Failure to strictly follow the above information could result in a fire resulting in death or serious injury.
- This gas pizza oven uses exclusively butane gas cylinders with 28-30mbar (millibar pressure) and 37mb propane cylinders. Make sure you are using the gas cylinder with these specifications.
SAFETY PRACTICES TO AVOID INJURIES
If properly cared for, your oven will provide you with safe and reliable service for many years to come. However, you must be very careful, as the oven produces intense heat that can increase the risk of accidents.
When using this oven, you will need to follow certain basic guidelines, including the following:
- Do not repair or replace any part of the oven. All assembly and maintenance must be carried out by a qualified professional, please contact after-sales service.
- Children should not be left alone or unattended in an area where the oven is in use. Do not allow children to sit, stand, or play around the oven at any time.
- Never let clothing or other flammable materials come into contact with or near any burner or hot surface until it has cooled down. The fabric could catch fire, causing serious personal injury.
- For your personal safety, wear suitable clothing. You should never wear loose clothing or sleeves while using the oven. Some synthetic fabrics are highly flammable and should not be worn while cooking.
- Do not heat unopened food containers, as this could cause a build-up of pressure that could cause the containers to burst. Always pay close attention when lighting the burner, to avoid possible injury.
- When using the oven, do not touch the outer casing, the stone cooktop, or the immediate surroundings, as these areas become very hot and can cause burns.
- Do not use the oven to cook very fatty meats or other products that can increase the possibility of flare-ups.
- Keep the area around the oven free of combustible materials, including fluids, garbage, and fumes such as gasoline or charcoal.
- Do not obstruct the flow of combustion and ventilation air.
- Never use the oven in windy conditions.
- The base of the oven reaches extremely high temperatures. Do not place the oven on a table with flammable tablecloths, plastics, or any other flammable material.
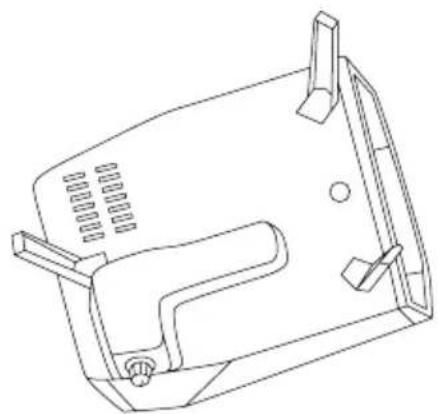
LIST OF PARTS
- Pizza oven
- Stone firing table
natural_image
Line drawing of a simple wooden table with four legs and a side panel (no text or symbols)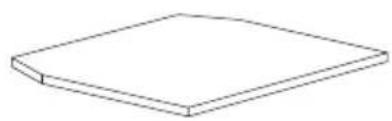
natural_image
Simple line drawing of a rectangular block with a flat top and a rounded bottom edge (no text or symbols)MOUNTING
All assembly and maintenance must be carried out by a qualified professional, please contact after-sales service.
Before assembling the oven, make sure all parts are present. If any parts are missing or damaged, do not attempt to assemble the appliance. Contact customer service for replacement parts.
- Unfold the legs.
natural_image
Technical line drawing of a mechanical component with no visible text or symbols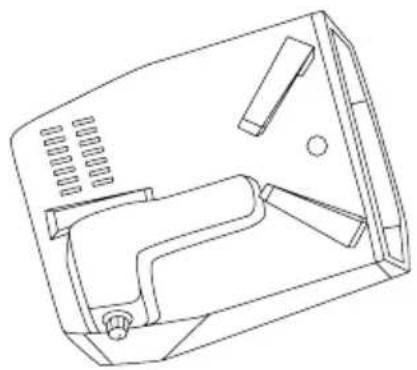
natural_image
Technical line drawing of a 3D mechanical component with internal cavities and mounting holes (no text or symbols)- Enter the stone firing table.
Insert the stone with a slight upward inclination, from the bottom, until it fits inside the oven.
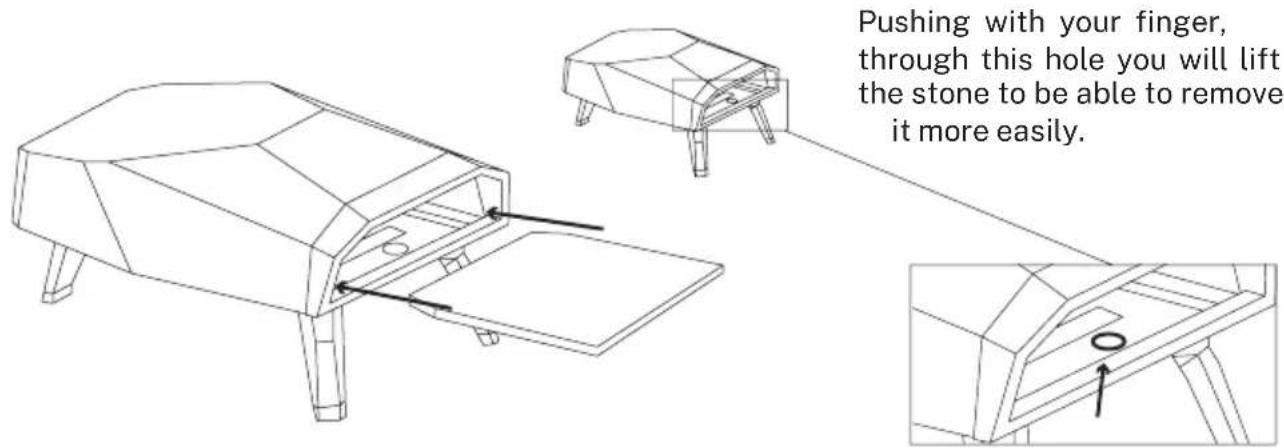
text_image
Pushing with your finger, through this hole you will lift the stone to be able to remove it more easily.- Connect the gas hose to the pizza oven.
Connect the gas hose to the inlet pipe and secure it using a metal clamp.
natural_image
Diagram of a hand pressing down on a device with circular arrows indicating motion (no text or symbols)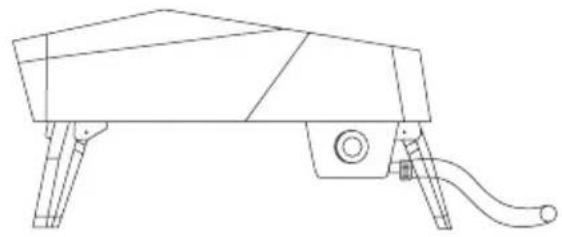
natural_image
Line drawing of a mechanical device with legs and a curved handle (no text or symbols)- Connect the hose to the cylinder.
WARNING Always keep the cylinder in an upright position.
The size of the 9L cylinder is 31cm in diameter and 45.5cm high.
If you are not using the appliance, you must turn off the gas from the bottle.
The cylinder used must include a collar to protect the valve.
The minimum distance between the oven and the 9L cylinder is 1m.

natural_image
Diagram of a medical device with a central device and tubing, enclosed in a circle (no text or labels)
natural_image
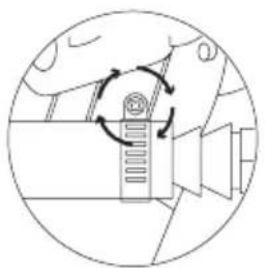
Diagram of a mechanical device with a tool inserted, showing no text or symbolsThis type of regulator has a press fit. Make sure the black switch is horizontal. Squeeze the base and push the regulator onto the cylinder valve until it clicks.
This regulator has a threaded coupling that is adjusted by turning it counterclockwise. Make sure the cylinder is completely off and screw the regulator as far as possible onto the cylinder valve.
CONNECT THE LP GAS CYLINDER
To connect the gas cylinder:
- The cylinder valve should be in the OFF position.
- Make sure the oven control knob is in the OFF position.
- Inspect the valve connections, port, and regulator assembly. Remove dirt and inspect hose for damage.
- When connecting the regulator assembly to the cylinder valve, use your hand to tighten the nut clockwise until it stops. Using a wrench could damage the quick coupling nut and cause a hazardous situation.
- Fully open the cylinder valve by turning the regulator counterclockwise.
- Before turning on the oven, use a soap and water solution to check any of the connections for leaks.
- If a leak is found, close the cylinder valve and do not use the oven until your local supplier can make repairs.
DISCONNECT THE LP GAS CYLINDER
- Turn off the oven and make sure the oven is cool.
- Close the cylinder valve by turning the regulator clockwise until it stops.
- Detach the regulator from the cylinder valve by turning the quick coupling nut counterclockwise.
- Put a dust protection cap on the cylinder valve outlet whenever you are not using it.
LEAK TEST
Although the gas connections of the appliance are tested for tightness before packing and shipping, a full test must be carried out at the installation site.
Before each use, check the tightness of all gas connections by following the procedure below. If you smell gas at any time, you should stop using the appliance immediately and check the entire system for leaks.
BEFORE THE TESTS
Make sure you have removed all packing material from the appliance.
Prepare a solution of one part liquid detergent and one part water. You will need a spray bottle, brush, or rag to apply the solution to the components.
HOW TO PERFORM A LEAK TEST
- Turn off the oven and open the cylinder valve by turning the regulator counterclockwise.
- Apply the soap solution to all gas connections. Soap bubbles will appear where there is a leak.
- If there is a leak, immediately shut off the gas supply and tighten any leaking connections.
- Turn the gas back on and check again.
- If the gas leak persists at any of the connections, turn off the gas supply and contact customer service.
INSTRUCTIONS FOR USE
USE THE OVEN
Each burner has a nominal power of 4.0KW. To get started:
- Remove all packing material.
- Make sure the oven has undergone a leak test and is properly seated.
- Light the burner by following the lighting instructions below.
LIGHTING INSTRUCTIONS
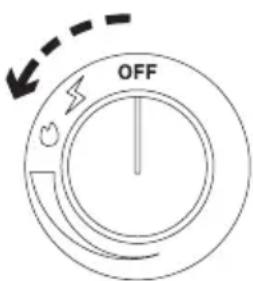
LIGHTING USING THE BURNER VALVE
- Make sure the control knob is in the OFF position and open the cylinder valve by slowly turning the regulator counterclockwise.
- Push and slowly turn the oven control knob counterclockwise until you hear a click and the burner ignites.
- If the burner does not light, turn the knob to the OFF position, wait 5 minutes and repeat the lighting process.
text_image
OFFLIGHTING USING A MATCH
- If after several attempts to light the oven with the control knob the burner does not light, it can also be lit with a match.
- If you have already tried unsuccessfully to light the burner with the control knob, wait 5 minutes for the gas to dissipate.
- Place a match in the match holder, light it and feed it through the oven opening to the burner.
- Push and slowly turn the control knob to HI, and the burner should light immediately.
- If the burner does not light within a few seconds, turn the control knob to the OFF position, wait 5 minutes, and try again.

CARE AND MAINTENANCE
Store your pizza oven out of direct sunlight and indoors whenever possible and when stored for long periods of time. The oven should not be exposed to adverse weather conditions such as snow, heavy rain, and strong winds.
Wait for the oven to cool completely before moving it.
The outer lining of the oven may discolor with time and use. This will not affect its performance.
BAKING STONE
Over time the stone darkens and acquires patina, it is a normal and beneficial process for the stone.
Never use soap to clean the stone, as it is porous and will absorb it and give off a soapy smell when cooking.
Also, do not cure the stone with oil, the stone will heal itself over time. To clean it, first use a wooden spatula and then wipe it with a damp cloth.
- Do not use the stone on an open flame.
- Avoid extreme temperature changes in the stone. DO NOT put frozen food on the hot stone.
- The stone is brittle and can break if struck or dropped.
- The stone becomes very hot during use and remains hot for a long time after use.
- Do not cool the stone with water when it is hot.
- After cleaning the stone with water, dry it before use. You can do it in a conventional oven at 60^ C for 2 hours.
LIGHTING INSTRUCTIONS
PROBLEM POSSIBLE CAUSE PREVENTION / SOLUTION
| The burner does not light. | 1. There is no gas flow.2. Coupling nut and regulator are not fully connected.3. Gas flow obstruction.4. Disconnection of the burner to the valve.5. Incorrect mounting. | 1. Check if the cylinder is empty.2. Turn the coupling nut half to three-quarters more until it makes a solid stop. Hand tighten only - do not use any tools.3. Clean burner tube.4. Reconnect the burner and valve.5. Check the steps in the assembly instructions. |
| Sudden drop in gas flow or low flame. | 1. There is no gas left. | 1. Check the cylinder.2. Turn the oven off, wait 30 seconds, and turn it back on. If the flames are still low, turn the oven off and close the cylinder valve.Disconnect the regulator. Reconnect the regulator and perform a leak test. Open the cylinder valve, wait 30 seconds and turn the oven on. |
| The flames go out. | 1. Strong or gusty winds.2. Low gas level. | 1. Move the front of the oven away from the wind.2. Fill the cylinder.3. See “No Gas Flow” section above. |
| Flames. | 1. Fat accumulation.2. Excessively fatty meat.3. Cooking temperature too high.4. Too much flour on the cooking surface. | 1. Move the front of the oven away from the wind.2. Fill the cylinder.3. See “No Gas Flow” section above. |
| Fogonazos (fire in burner tube, burner roaring sound) | 1. The burner / burner tubes are blocked.2. Pressure drops during ignition. | 1. Clean the oven.2. Trim fat from meat before cooking.3. Adjust (lower) the temperature.4. Remove any remaining flour from the cooking surface.5. Turn the stone. |
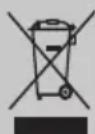
In compliance with Directives: 2012/19/EU and 2015/863/EU on the restriction of the use of dangerous substances in electric and electronic equipment as well as their waste disposal. The symbol with the crossed dustbin shown on the package indicates that the product at the end of its service life shall be collected as separate waste. Therefore, any products that have reached the end of their useful life must be given to waste disposal centres specialising in separate collection of waste electrical and electronic equipment, or given back to the retailer at the time of purchasing new similar equipment, on a one for one basis. The adequate separate collection for the subsequent start-up of the equipment sent to be recycled, treated and disposed of in an environmentally compatible way contributes to preventing possible negative effects on the environment and health and optimises the recycling and reuse of components making up the apparatus. Abusive disposal of the product by the user involves application of the administrative sanctions according to the laws.
ESPAÑOL
natural_image
Line drawing of a simple furniture piece with two views: one open and one flat (no text or symbols)MONTAJE
natural_image
Technical line drawing of a mechanical device with a circular inset showing a hand operating a component (no text or symbols present)- Conecte la manguera a la bombona.
ADVERTENCIA
natural_image
Diagram of a medical or laboratory setup with a device connected to a central component, enclosed in a circle (no text or symbols)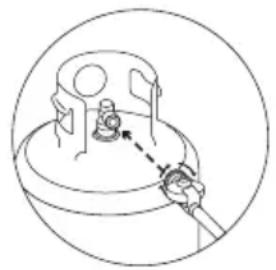
natural_image
Diagram of a mechanical device with a hand operating a tool, enclosed in a circular frame (no text or symbols)natural_image
Line drawing of a simple furniture piece with two legs and a flat base (no text or symbols)MONTAGEM
1 Desdobre as pernas.

natural_image
Diagram of a camera with directional arrows indicating rotation and sound wave (no text or symbols)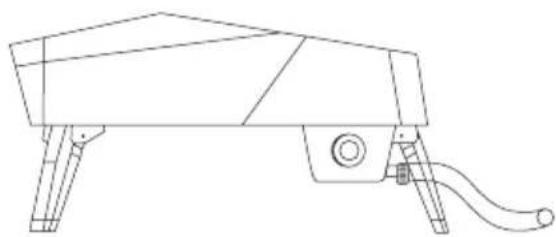
natural_image
Line drawing of a quadruped robot with articulated legs and handle (no text or symbols)natural_image
Diagram of a medical device with a central component and a dashed line indicating a connection or alignment (no text or symbols present)natural_image
Technical line drawing of a mechanical component with a dashed arrow indicating motion (no text or symbols)REGULADOR DE GÁS LP
natural_image
Line drawing of a simple wooden table with legs and a side panel, no text or symbols presentMONTAGE
natural_image
Diagram of a mechanical device with rotating components and directional arrows (no text or symbols)
natural_image
Line drawing of a robotic dog with legs, arm, and handle (no text or symbols)natural_image
Diagram of a medical or laboratory setup with a device connected to a central bowl, enclosed in a circle (no text or symbols)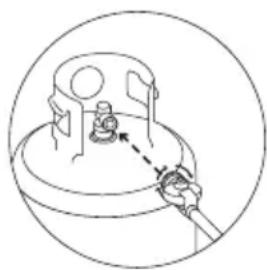
natural_image
Diagram of a mechanical component with a tool inserted, showing a circular outline and no text or symbols.RÉGULATEUR DE GAZ BUTANE RÉGULATEUR DE GAZ LP
INSTRUCTIONS D'ALLUMAGE
ALLUMAGE PAR LA VANNE DU BRLEUR
PROBLÈME CAUSE POSSIBLE PRÉVENTION / SOLUTION
natural_image
Line drawing of a simple wooden table with legs and a flat base (no text or symbols)MONTAGGIO
natural_image
Diagram of a hand holding a device with circular arrows indicating rotation or movement (no text or symbols)
natural_image
Line drawing of a quadruped robot with articulated legs and a curved handle (no text or symbols)natural_image
Diagram of a medical or laboratory setup with a device connected to a central component, enclosed in a circle (no text or symbols)
text_image
Diagram showing a hand holding a tool interacting with a device, labeled with Chinese characters for 'work' and 'air'.natural_image
Line drawing of a simple 3D object resembling a bench or table with legs and a flat base, shown in two orthogonal views (no text or symbols)MONTAGE
natural_image
Technical line drawing of a mechanical component with slots and mounting brackets (no text or symbols)
natural_image
Technical line drawing of a mechanical housing or enclosure with internal components (no text or symbols)natural_image
Diagram of a hand holding a device with circular arrows indicating rotation or movement (no text or symbols)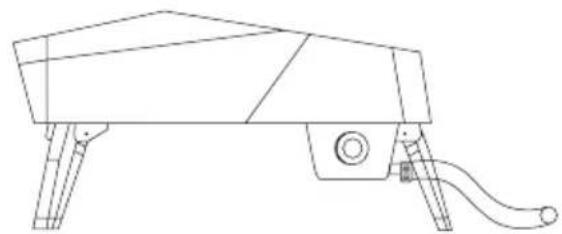
natural_image
Line drawing of a robotic dog with legs and arm, no text or symbols presentnatural_image
Diagram of a medical or laboratory setup with a device connected to a central bowl, enclosed in a circle (no text or symbols)
natural_image
Technical line drawing of a mechanical component with a tool, no visible text or symbols- pizza oven
- Stenen stooktafel

natural_image
Line drawing of a simple furniture item with a flat base and a curved top panel (no text or symbols)MONTAGE
natural_image
Diagram of a hand holding a device with a circular arrow indicating rotation or movement (no text or symbols present)
natural_image
Line drawing of a quadruped robot with legs and a curved handle (no text or symbols)natural_image
Diagram of a medical device with a central device and tubing, no text or symbols present
natural_image
Technical line drawing of a mechanical component with a tool, no visible text or symbolsBUTAANGASREGELAAR LP-REGULATOR
natural_image
Line drawing of a simple outdoor table with legs and a side table, no text or symbols presentMONTOWANIE
natural_image
Technical line drawings of two 3D mechanical components with internal cutouts and mounting holes (no text or symbols)natural_image
Technical line drawing of a mechanical device with a circular inset showing a camera interacting with a vertical screen (no text or symbols present)natural_image
Diagram of a medical device with a central device and tubing, no text or symbols present