USER MANUAL PBS 2 E5 PARKSIDE
Translation of the original instructions
FR/BE
DEBROUSSAILLEUSE THERMIQUE
Before reading, unfold both pages containing illustrations and familiarise yourself with all functions of the device.
DE/AT/CH
GB/IE Translation of the original instructions Page 1
| DE/AT/CH Originalbetriebsanleitung | Seite | 29 | | |
| FR/BE Traduction des instructions d'origine Page 59 |
| NL/BE Vertaling van de originele gebruiksaanwijzing Page 93 |
| CZ Préklad originánho provozniho návodu Strana 123 |
| PL Tłumaczenia oryginalej instrukcji obstugi | Strona | 151 |
| SK Préklad originálneho námovodu na obsluhu | Strana 181 | | |
| ES Traduzione del manual de instrucciones original | Págrina | 211 |
| DK Oversættelse af den originale driftsvejledning | Side | 241 |
| IT Traduzione delle istruzioni d'uso originali | Pagina | 269 |
| HU Az originál használati utasítás fordításá | Oldal | 301 |


Contents
| Introduction | 2 |
| Intended use | 2 |
| Features | 2 |
| Package contents | 3 |
| Technical data | 3 |
| General power tool safety warnings | 6 |
| Additional safety instructions | 8 |
| Blade thrust causes and related warnings | 10 |
| Assembly | 10 |
| Fitting the guard (Fig. B) | 10 |
| Fitting the two-part tube (Fig. C) | 10 |
| Fitting the multifunction handle (Fig. D) | 11 |
| Fitting the cutting tool (Fig. N) | 11 |
| Getting started | 12 |
| Adding fuel (Fig. E) | 12 |
| Putting on the shoulder strap (Fig. F) | 13 |
| Starting the engine (Fig. G) | 13 |
| Use | 14 |
| Using the appliance | 14 |
| Moving the eyelet for the carry harness / balancing the appliance (Fig. Q) | 15 |
| Working with the line spool | 15 |
| Lengthening the line | 15 |
| Working with the 3-tooth blade | 16 |
| Maintenance and care | 16 |
| Cleaning the appliance | 16 |
| Changing the spool | 17 |
| Replacing the blade (Fig. N) | 17 |
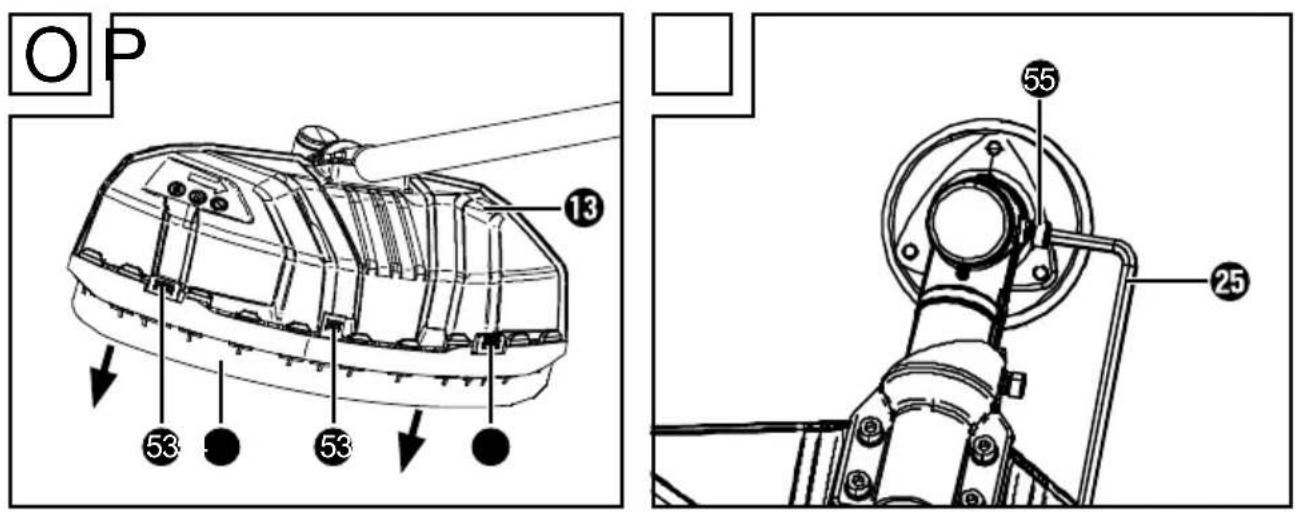
| Guard extension (removing/fitting) (Fig. O) | 17 |
| Cleaning the air filter (Fig. I) | 18 |
| Replacing/adjusting the spark plug (Fig. J) | 18 |
| Sharpening the line cutter (Fig. K) | 18 |
| Replacing the fuel filter (Fig. L) | 19 |
| Winding the line spool (Fig. M) | 19 |
| Lubricating the gearbox (Fig. P) | 19 |
| Replacing the fuel filter | 19 |
| Removing blockages | 19 |
| Checking the clutch | 20 |
| Maintenance intervals | 20 |
| St or a g e | |
| General storage instructions | 21 |
| Storage during periods of disuse | 21 |
| Storage for up to 3 months | 21 |
| Storage for longer than 3 months | 21 |
| Transport | 21 |
| Ordering replacement parts | 22 |
| Troubleshooting | 23 |
| Disposal / environmental protection | 24 |
| Kompernass Handels GmbH warranty | 25 |
| Service | 26 |
| Importer | 26 |
| Translation of the original Conformity Declaration | 27 |
Introduction
Congratulations on the purchase of your new appliance. You have selected a high-quality product. The operating instructions are part of this product. They contain important information about safety, usage and disposal. Before using the product, please familiarise yourself with all instructions regarding safety and use. Use the product only as described and for the specified range of applications. Please also pass on all documents to any future owner.
Intended use
The appliance is suitable for mowing grass in gardens, along the edges of beds, around trees or fenceposts and light undergrowth.
Any other use which is not expressly permitted in these operating instructions may damage the appliance and represents a serious risk for the user. The appliance is not intended for cutting bushes, small trees or similar plants.
The appliance is designed for use by adults. Young people under 16 years of age may only use the appliance under supervision. The manufacturer accepts no liability for damages caused by improper use or incorrect operation of the appliance. This appliance is not suitable for commercial use. Commercial use will invalidate the guarantee.
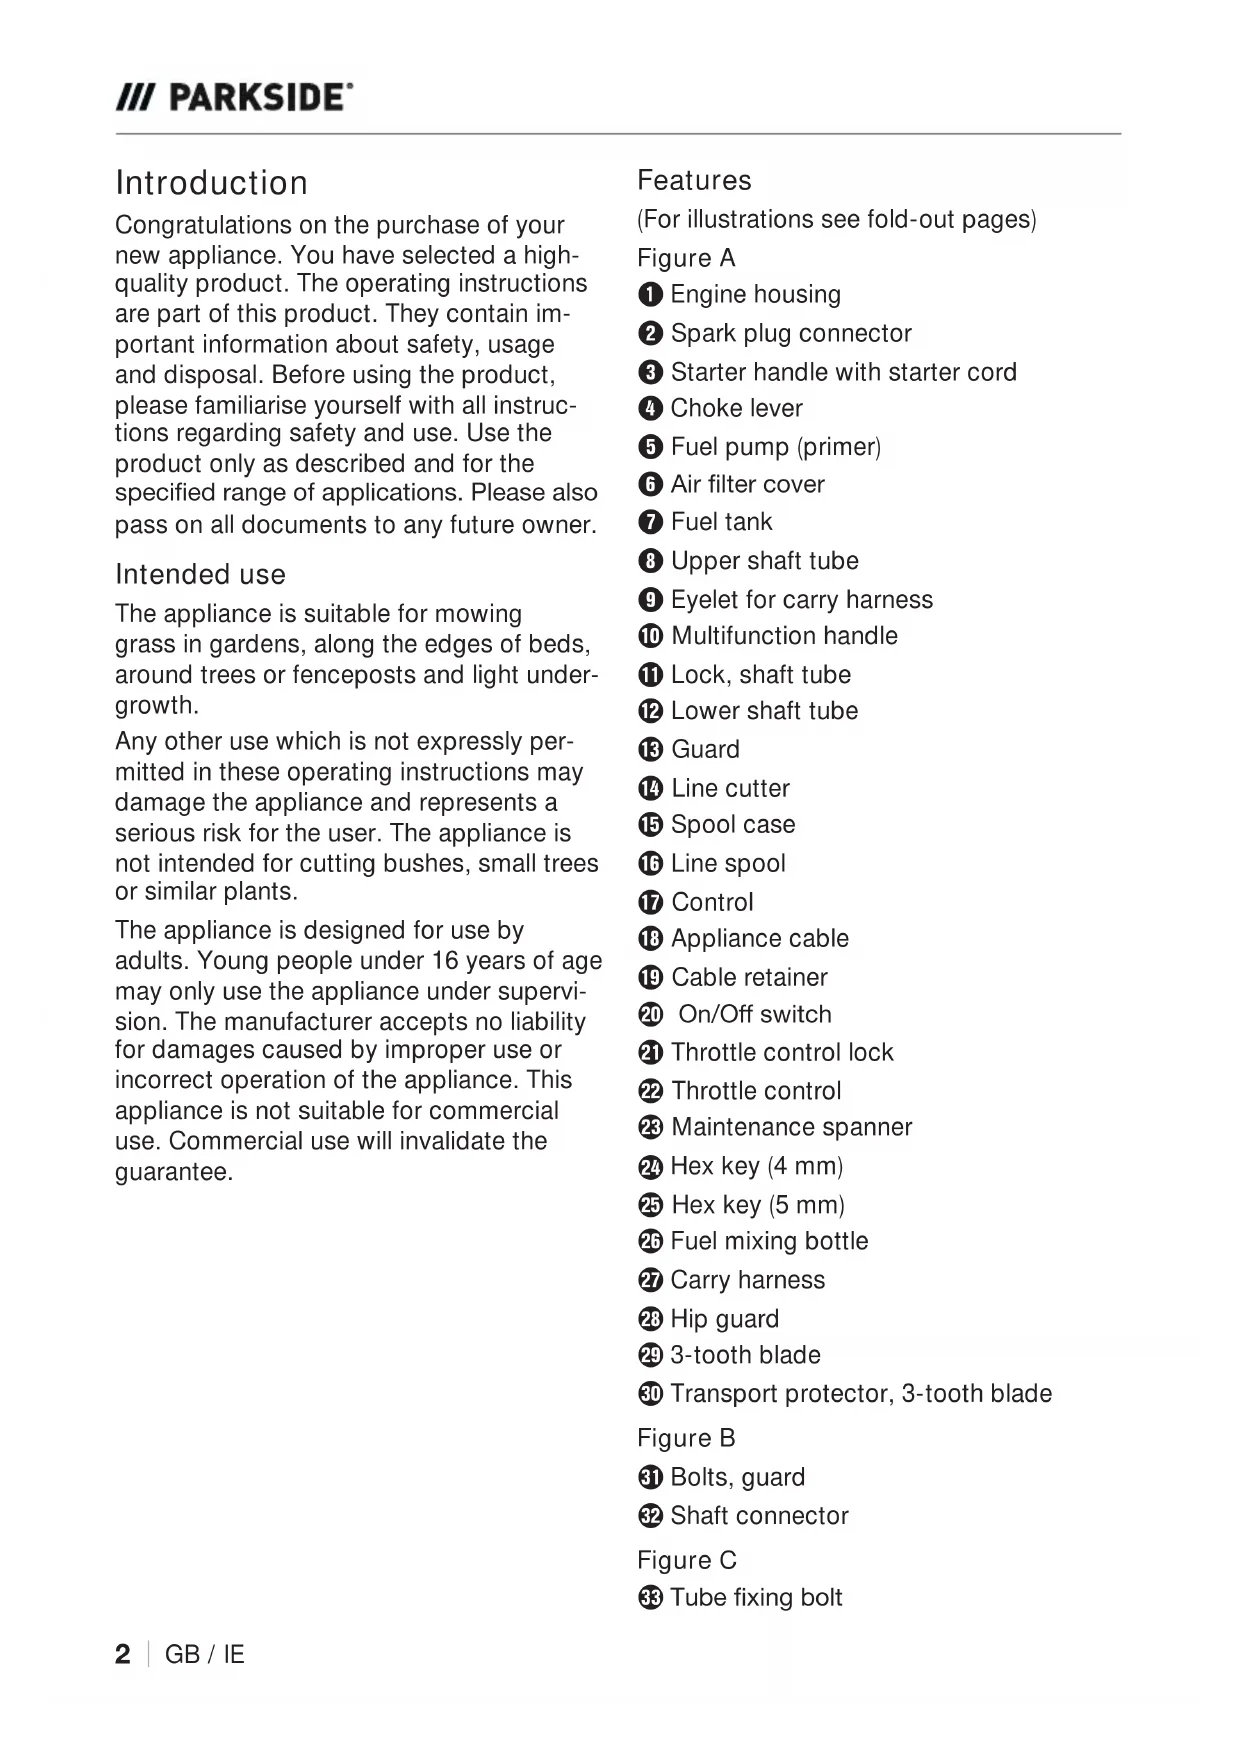
Features
(For illustrations see fold-out pages)
Engine housing
Spark plug connector
3 Starter handle with starter cord
Choke lever
Fuel pump (primer)
6 Air filter cover
Fuel tank
Upper shaft tube
Eyelet for carry harness
10 Multifunction handle
Lock, shaft tube
Lower shaft tube
Guard
14 Line cutter
Spool case
16 Line spool
17 Control
18 Appliance cable
19 Cable retainer
20 On/Off switch
21 Throttle control lock
22 Throttle control
23 Maintenance spanner
2 Hex key (4 mm)
Hex key (5 mm)
26 Fuel mixing bottle
Carry harness
Hip guard
23- tooth blade
Transport protector, 3-tooth blade
3 Bolts, guard
Shaft connector
Tube fixing bolt
Star bolt, multifunction handle
35 Grip connector
36 Receiver, grip connector
Figure E
Tank cap
Figure F
33 Clip
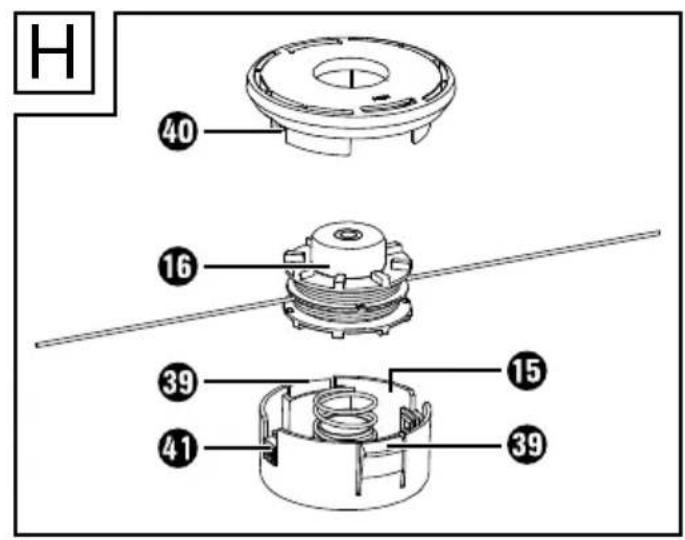
Figure H
39 Click lock, spool case
40 Line opening
4 Outlet, line spool
Figure I
Bolt, air filter cover
Air filter housing
Air filter
Figure J
Spark plug
Figure L
4 Fuel filter
Figure M
Notch, line spool
Groove, line spool
Figure N
49 Mounting spindle
50 Washer
Tension disc
2 Nut
Figure O
3 Click lock, guard
4 Extension, guard
Figure P
5 Bolt, gearbox lubrication
6 Bolt, eyelet
Package contents
1 engine housing with upper shaft tube and unattached multifunction handle
1 lower shaft tube
1 line spool
1 3-tooth blade with transport protector
1 guard
1 carry harness with hip guard
1 maintenance spanner
2 x hex keys, 4 mm & 5 mm
1 fuel mixing bottle, volume 500 ml
1 accessory bag
1 set of operating instructions
Technical data
Engine 2-stroke engine, air-cooled
Displacement 42.7 cm³
Engine output (max.) 1.35 kW / 1.8 hp
Fuel mixture 40:1
Engine idle
speed 3000rpm
Max. engine speed
With 3-tooth blade 9500rpm
With line spool 9300rpm
Max. cutting speed
With 3-tooth blade 7125rpm
With line spool 6975rpm
Ignition Electronic
Spark plug L8RTC
Drive Centrifugal
Weight
(without fuel, cutting equipment and protective cover) approx. 7kg
Tank capacity /
tank volume 1200 ml/1200 cm
clu
Line spool with cutting line
Line cutting diameter : 430 mm
Line length: 2 × 3 ~m
Line diameter : 2.4 mm
3-tooth cutting blade (IAN 482150):
Cutting blade
cutting diameter : 255 mm
Noise measurement determined in accordance with ISO 22868.
The A-weighted noise level is typically as follows:
Noise emission value
3-tooth cutting blade:
Sound pressure level L _pA = 91.7 dB
Uncertainty K_pA^pA = 3 ~dB
Sound power level
measured L_WA = 104.7 dB
Uncertainty K_WA = 3 dB
Line spool:
Sound pressure level L = 94.0 dB
Uncertainty K_D A^PA = 3 ~dB
Sound power level
measured L_WA = 105.5 dB
Uncertainty K_WA = 3 dB
Directives on noise emission
(2000/14/EC), amended by (2005/88/EC)
Sound power level LWA:
3-tooth cutting blade:
Measured L_WA = 108.2 dB
Line spool:
Measured L_WA = 108.3 dB
Guaranteed L_WA = 110 ~dB

Wear ear muffs to prevent
hearing damage!
Total vibration value
Vibration values (vector sum of three directions) determined in accordance
with EN 22867:
3-tooth cutting blade:
Vibration on the
left handle a_b = 7.706m / s^2
Uncertainty = K = 1.5m / s
Vibration on the
right handle a_n = 4.947m / s^2
Uncertainty = K = 1.5 m/s
Line spool:
Vibration on the
left handle a_h = 7.602m / s^2
Uncertainty = K = 1.5m / s
Vibration on the
right handle a_h = 6.420m / s^2
Uncertainty = K = 1.5 m/s
NOTE
The vibration emission values and noise emission values given in these instructions have been measured in accordance with a standardised test procedure and can be used for comparison of the power tool with another tool.
The specified total vibration values and the noise emission values can also be used to make a provisional load estimate.
WARNING!
Depending on the manner in which the power tool is being used, and in particular the kind of workpiece being worked, the vibration and noise emission values can deviate from the values given in these instructions during actual use of the power tool.
WARNING!
It is necessary to establish safety measures to protect the operator based on an estimation of the vibration load during actual use (wherein all states of operation must be included, e.g. times when the power tool is switched off and times where the power tool is switched on but running without load).
Explanation of the symbols used
| Read these operating instruc-tions thoroughly before using the tool for the first time, and retain them for future reference. |
| WARNING! Special safety precautions are required when working with the appliance. Read and observe all warnings. |
| Wear a hard hat! |
| Wear hearing protection! |
| Wear safety goggles! |
| Wear protective gloves! |
| Wear safety shoes! |
| Beware of flying objects! |
| Beware of blade thrust! |
| Keep bystanders away from the appliance! |
| A distance of 15 metres must be maintained between the appliance and any third parties! |
| Caution! Hot parts.
Maintain a safe distance! |
| Warning! Do not use circular saw blades for the cutting blade function. |
| 40:1 | Fuel tank; mixing ratio:
40 parts petrol to 1 part oil |
| Open flames and smoking in the vicinity of the appliance are strictly prohibited! |
| 110 | Guaranteed sound power level of the appliance |
| Choke lever position |
| FUL | Fill fuel pump (primer) |
| push x 6 | Press fuel pump (primer) 6x |
| PULL | Pull the starter pull cord |
| PULL x 3-4 | Pull the starter pull cord 3-4x |
| press | Press the throttle control and throttle control lock |
| 20 h | Add gear grease |

Save all warnings and instructions for future reference.
NOTE
Children as well as ill and infirm persons must be kept away from the appliance. Children in the area of the machine must be carefully supervised. Observe the applicable regional and local accident prevention regulations. The same applies to all provisions on safety and health at the workplace. The manufacturer cannot be made liable if the machine is modified without authorisation or if such a modification results in personal injuries or property damage.
WARNING!
Thorough precautions must always be taken when using the machine. Please also observe all tips and instructions in the additional safety instructions.
Pay attention to the conditions under which you are working. The engine produces toxic fumes as soon as it begins running. These gases can be odourless and invisible. For this reason, working with the appliance in closed or poorly ventilated rooms is prohibited. Ensure adequate ventilation during the work. In the case of wet conditions, snow, ice, slopes or uneven ground, make sure that you have secure footing.
- Do not allow unauthorised persons near the appliance. Visitors and onlookers, especially children and ill or infirm persons, should be kept away from the work area. Prevent other persons from coming into contact with the tools. Do not provide the appliance to persons who are not familiar with the appliance and its use.
Ensure that tools are stored securely. Tools that are not in use must be stored in a dry, ideally elevated, location or in a closed and inaccessible location.
Always use the correct tool for all work. For example, do not use small tools or accessories for work that should actually be performed with heavier tools. Only use tools for the purposes for which they were made.
Wear appropriate clothing. The clothing must be fit for the purpose and may not impede the work. Wear clothing with cut-resistant lining.
Wear personal protective equipment. Wear safety shoes with steel toes/soles and good traction. Wear a safety helmet if the work poses a risk of falling objects.
Wear safety goggles. Objects can be flung into the air. Severe injuries could result.
Wear hearing protection. Wear personal hearing protection, such as ear plugs.
Hand protection
Wear heavy gloves - leather gloves offer good protection.
Operating the appliance
Never work with the cutting tool without the protection elements in place. There is a risk of injury from objects flung into the air.
Remove any adjustment keys, etc.
All keys or the like must be removed before the appliance is switched on.
Always remain attentive.
Pay attention to what you are doing. Use your common sense. Do not use power tools when you are tired. The appliance may not be used while under the influence of alcohol, drugs or medications that impair reaction time.
Adding fuel
Always comply with the applicable fire safety regulations and the respective regional/national regulations on fire prevention.
Fuels and fuel vapours are highly flammable. Never add any fuel when the engine is still running or still hot. Ensure good ventilation when adding fuel. Smoking and open flame are prohibited.
Always switch off the engine before
adding fuel. Open the tank cap carefully so that any pressure can escape slowly and no fuel sprays out. Working with the appliance results in high temperatures on the housing. Allow the appliance to cool down before filling. Otherwise, the fuel could ignite, resulting in severe burns.
- When adding fuel, take care not to add too much. If liquid is spilled, remove it immediately and clean the appliance.
After filling, ensure that the screw cap is firmly seated to prevent it coming lose during work due to the resulting vibrations.
Check for leaks. If fuel is leaking, do not start the engine. Risk of fatal burns!
Usage duration and pauses.
Using the power tool for a long time can lead to vibration-related circulation disorders of the hands (Raynaud's syndrome). You can extend the usage duration by using appropriate gloves or by taking regular breaks. Note that any personal predisposition to poor blood circulation, low external temperatures or large gripping forces can reduce the usage period.
Watch for damaged parts.
Before starting up the appliance and after any heavy impacts or falls, inspect the appliance for signs of damage and wear. Are individual parts damaged? In the case of minor damage, ask yourself honestly whether the tool will still function safely and without problems. Ensure the correct orientation and adjustment of movable parts. Are the parts engaging with each other correctly? Are parts damaged? Is everything installed correctly? Are all the conditions for proper functioning met? Damaged protective devices, etc. must be properly repaired by authorised persons or replaced, unless otherwise specified in the operating manual. Defective switches must be replaced by an authorised party. If repairs are necessary, please contact a customer service centre authorised by us.
Always switch off the engine before
making adjustments or carrying out maintenance work.
This applies in particular for work on the line spool.
Only use authorised parts. Only use identical replacement parts for maintenance and repair. Replacement parts can be obtained via our online shop (see "Replacement parts / accessories").
WARNING!
The use of other mowing heads, accessories or attachments that are not explicitly recommended can result in dangers to people and property. The tool may only be used for the intended purpose. Use for any other purpose is considered improper use. The manufacturer shall in no case be liable for property damage or injuries resulting from such improper use; only the user is liable in such cases. The manufacturer cannot be made liable if the machine is modified or used improperly and if such actions result in damages.
ATTENTION!
Even in the case of proper use of the tool, a certain residual risk always remains that cannot be entirely excluded. The type and design of the tool results in the following potential dangers:
- Contact with the unprotected line spool (cutting injuries).
- Reaching into the running line spool (cutting injuries).
Hearing damage if suitable protection is not worn.
Production of harmful dust or gas during use of the appliance in enclosed spaces (nausea).
Additional safety instructions
To avoid personal injury and property damage:
Attention! Always keep hands and feet away from the cutting area, especially when starting the appliance. Always keep one hand free to hold the additional handle.
Always hold the appliance with both hands on the multifunction handles. Always hold the appliance at a reasonable, safe distance from the body and maintain a stable posture.
Always wear safety goggles.
The appliance may only be operated in daylight or with good artificial lighting.
Do not use the appliance in the rain or on damp grass.
Before use or after an impact, inspect the appliance for any damage, and have it repaired if necessary.
Do not use the appliance if protective devices have been damaged or are not attached correctly.
Ensure that the ventilation slits of the engine, the guard and the cutting unit area always free of dirt or residues.
When using the appliance, stones and other objects can be flung into the air and potentially cause severe injuries. During work, always ensure that no people or animals are present within a distance of at least 15m . Immediately switch off the appliance if anyone, especially children, come into range of the machine.
When the appliance is in operation, do not approach the moving parts (in the area of the cutting units). After switching off, the cutting head continues to rotate for a few seconds.
Before using the appliance, remove any stones, branches or any other solid material from the work area. Only start the machine as described in the instructions. It may not be turned over or in the operating position during starting. Do not cross any gravel roads or paths with the running appliance.
Extreme caution is advised when extending the cutting line. There is a risk of cutting injuries. After performing these operations, the appliance must be placed into the correct working position before putting it back into use.
- Do not use any metallic cutting lines. Note that the appliance remains in operation for a few seconds after releasing the switch.
Switch off the engine (On/Off switch) when: adding fuel,
- not using the appliance,
- leaving the appliance unattended,
- cleaning the appliance,
- transporting the appliance from one location to another,
- removing or replacing the cutting unit or adjusting the length of the cutting line by hand.
Usage duration and pauses Using the power tool for a long time can lead to vibration-related circulation disorders of the hands. You can extend the usage duration by using appropriate gloves or by taking regular breaks. Note that any personal predisposition to poor blood circulation, low external temperatures or large gripping forces can reduce the usage period.
Using the power tool for a long time can lead to hearing damage if no suitable hearing protection is worn. Wear personal hearing protection, such as ear plugs, to reduce the risk of hearing damage.
To avoid cutting injuries, carry the strimmer by the upper and lower shaft tubes while switched off, with the cutting unit facing away from your body. After switching off, the engine head of the strimmer is hot. Take care not to touch the engine head.
Regularly check whether the cutting equipment has come to an idling stop.
National regulations may set an age limit for the user.
Note that the following circumstances can lead to damage to the appliance and severe injuries to the user:
-improper maintenance,
- the use of incompatible replacement parts,
- the removal or modification of safety devices.
Attention! Local regulations may restrict the use of the machine.
Always keep the appliance with cutting tool in good condition.
Before use, inspect the appliance for loose fastenings, fuel leaks and damaged parts, such as cracks in the cutting attachments.
Take breaks and change your working position regularly.
Warning! There are sharp edges on the brush cutter. It is necessary to wear gloves.
To identify any major defects, the appliance must be visually inspected before use and after falls or other impacts.
Wear non-slip footwear and protective clothing.
Never use the machine when you are tired, ill or under the influence of alcohol or other drugs.
Warning: exhaust emissions!
Take a firm stance and maintain your balance during operation. Also use the supplied carry harness.
Blade thrust is a sudden sideways, forwards or backwards movement of the machine that can occur when the cutting tool jams or gets caught in an object such as a young tree or stump. It can be so violent that the machine and/or the operator is propelled in any direction and ultimately leads to loss of control of the machine.
Blade thrust and its related hazards can be avoided by taking proper precautions as given below.
a) Hold the machine firmly with both hands and bring your arms into a position in which you can absorb the blade thrust forces. Keep to the left of the machine. Blade thrust can increase the risk of injury due to the unexpected movement of the machine. The operator can control the blade thrust forces by taking suitable precautions.
b) If the cutting tool jams or you pause your work, switch off the machine and hold it still in the material until the cutting tool has come to a standstill. If the cutting tool is jammed, never attempt to remove the machine from the material or pull it backwards while the cutting tool is moving; otherwise blade thrust may occur. Investigate and take corrective actions to eliminate the cause of the jammed cutting tool.
c) Do not use any blunt or damaged cutting tools. Blunt or damaged cutting tools increase the risk of jamming or catching on an object and can lead to blade thrust.
d) Always ensure a good view of the material to be cut. Blade thrust is more likely in areas where it is difficult to see the material to be cut.
e) Switch off the machine if another person approaches while you are working. Other people can be hit and injured more easily by the rotating saw blade in the event of a blade thrust.
Assembly
Fitting the guard (Fig. B)
WARNING!
Never use the appliance without the guard 13 correctly attached. There is a risk of personal injury.
Position the guard 13 on the shaft connector 32.
Screw the bolts 31 into the guard 13 using the (smaller) 4-mm hex key 24.
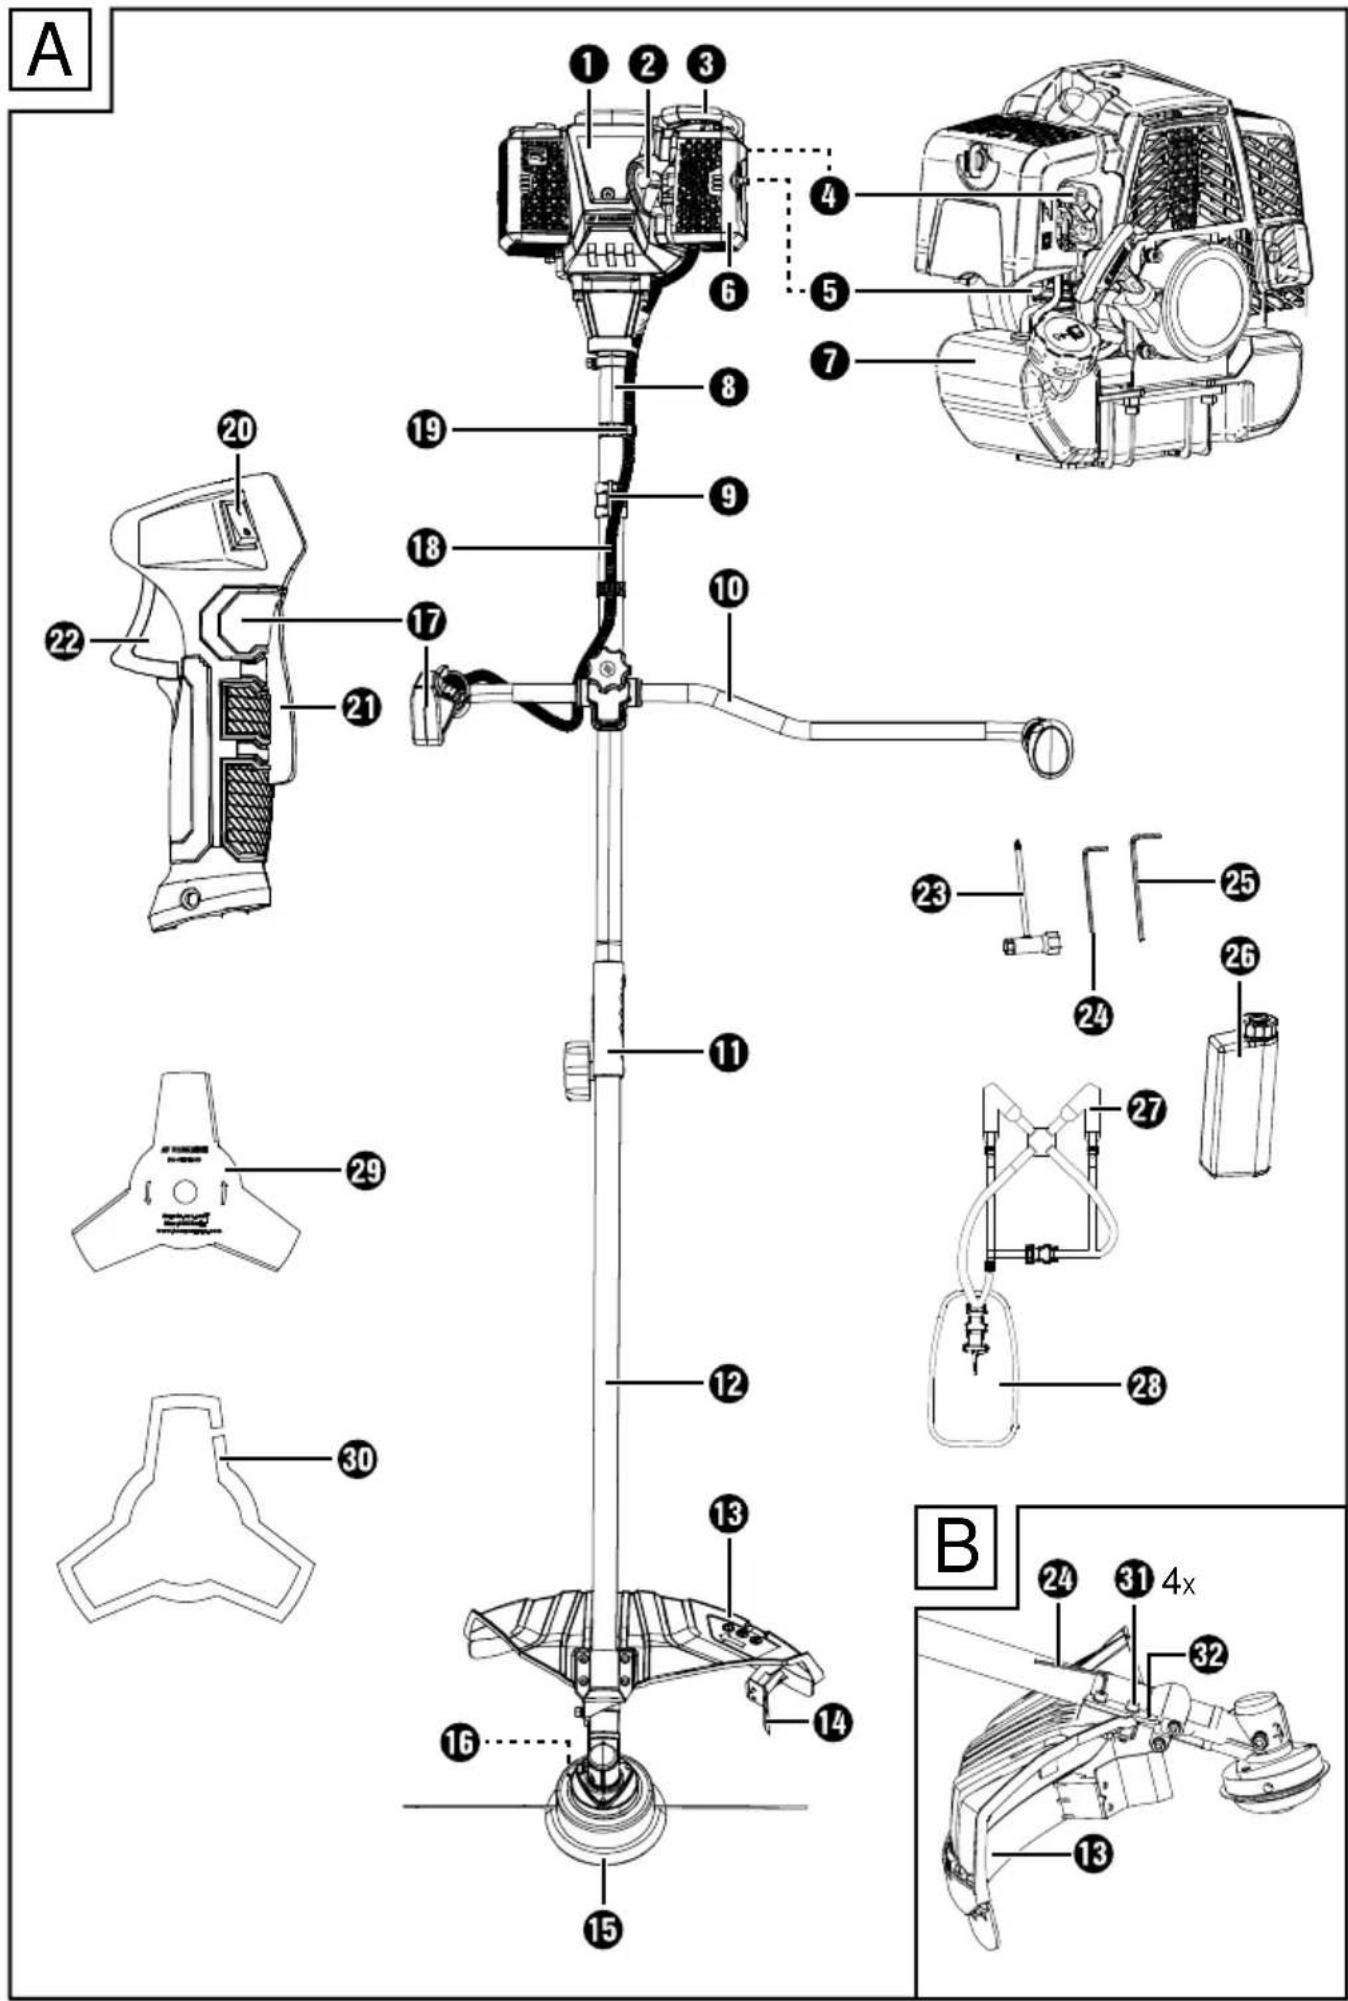
Fitting the two-part tube (Fig. C)
Loosen the tube fixing bolt on the upper shaft tube 8.
Slide the lower shaft tube 12 as far as possible into the upper shaft tube 8.
Press the lock 11 and push the lower shaft tube 12 into the upper shaft tube 8 as far as it will go.
Turn the lower shaft tube 12 with a light rotating movement until the lock 11 engages with the hole in the upper shaft tube 8.
Re-tighten the tube fixing bolt 33 hand-tight.
NOTE
Before starting the appliance, make sure that the lower shaft tube 12 is firmly and securely seated in the correct position.
Dismantling
Loosen the tube fixing bolt 38.
Press the lock 11.
Pull apart the shaft tubes.
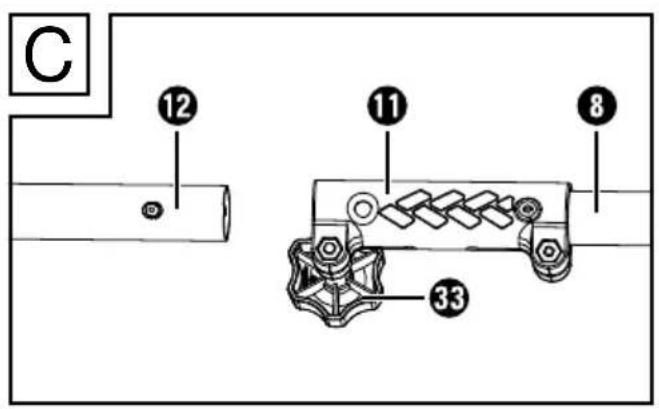
Fitting the multifunction handle (Fig. D)
Loosen the star bolt 34 and remove the grip connector 5 from the upper shaft tube 8.
Insert the multifunction handle 10 into the receiver 36 on the upper shaft tube 8. The plastic ring on the multifunction handle must lie within the guide rail in the receiver 36.
Fasten the multifunction handle with the handle connector 5 and the star bolt 34. Tighten the star bolt 34 hand-tight.
NOTE
Check and make sure that the appliance cable 18 (see Fig. A) is held in position by the cable retainer 19 (see Fig. A).

WARNING!
When using the line spool 16, the guard 13 must be completely fitted. When using the 3-tooth blade 29, the guard 13 must be shortened (see section: "Guard extension (removing/ fitting)").
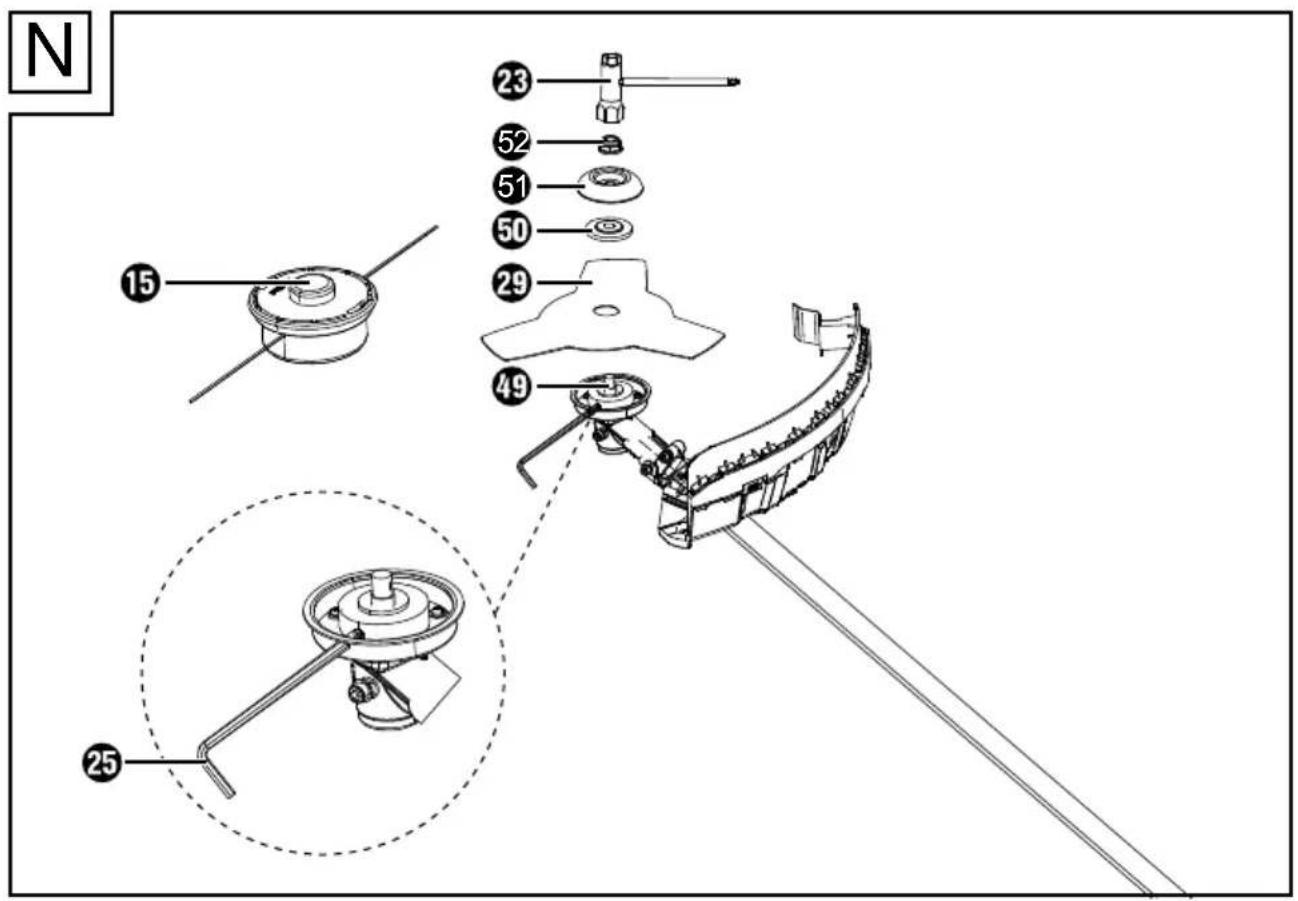
Block the mounting spindle with the hex key as shown. Use the larger of the two hex keys (5 mm).
Fitting the spool
Screw the spool case 15 anti-clockwise onto the mounting spindle 49. Remove the hex key 25.
Pull the two ends of the line to release the lines from the grooves.
Trim the line to about 15~cm to reduce the load on the engine during the starting and warm-up phase.
NOTE
The washer 50, the tensioning disc 51 and the nut 52 are not needed for fitting the spool.
Fitting the 3-tooth blade
Place the 3-tooth blade on the mounting spindle. The blade can be used with either side facing out.
Fasten the 3-tooth blade with the washer 50 , tensioning disc and nut 52 . The maintenance spanner can be used to tighten the nut 52 .
Remove the hex key 25.
Getting started
WARNING!
Before starting up the appliance, it must be checked for operational safety. If you have any doubts whatsoever, do not start the appliance!
NOTE
Before using the appliance for the first time, remove the protective film from the line cutter 14.
Pay particular attention to the following points:
Check the cutting tools for damage and wear.
Correct fitting of the cutting head.
Easy movement of all switches.
Firmly seated spark plug connector. A loose connector could result in sparks, which could ignite any escaping fuel-air mixture.
Cleanliness of the handles to ensure safe control of the appliance.
All safety and protective devices must be properly attached and in place before the appliance can be started.
The cutting head must be able to move freely. Before starting the appliance, make sure that the cutting head is correctly seated and that the moving parts are free of obstructions.
WARNING!
If you have any doubts whatsoever, consult an expert at an authorised service centre regarding operation of the appliance.
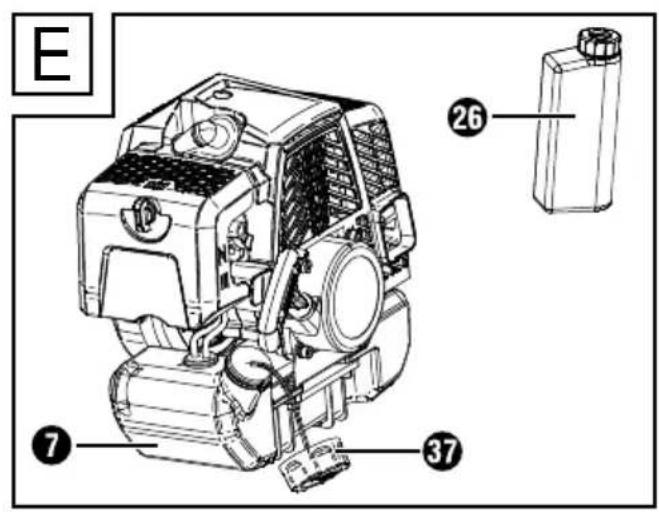
Adding fuel (Fig. E)
WARNING!
Always ensure good ventilation when handling fuel. Do not smoke while fuelling, and keep away any sources of heat. Never add fuel while the engine is running. Carefully open the tank cap so that any pressure can be released slowly. Start the appliance at a distance of at least 3m from the filling location of the fuel. Ignoring this warning can lead to a risk of fire or explosion.
NOTE
The capacity of the fuel tank 7 is 1200ml
Use only the fuel mixture recommended in the instructions. The fuel mixture is subject to ageing. Therefore never use a fuel mixture that is older than 3 months. Failure to observe this instruction could result in damage to the engine and void the warranty.
ATTENTION!
Avoid direct skin contact with petrol and inhalation of petrol vapours. There are potential health hazards!
The appliance is equipped with a two-stroke engine and is therefore operated exclusively with a mixture of petrol and two-stroke motor oil in a ratio of 40:1.
Fuel mixture table
| Petrol 2-stroke oi | |
| 1.00 litres 25 ml | |
| 3.00 litres 75 ml | |
| 5.00 litres 125 ml | |
| Mixing procedure 40 | parts petrol +
1 part oil |
NOTE
Use unleaded, high-quality petrol with an octane rating of at least 90.
- Optimal performance will be achieved when using oil intended for air-cooled two-stroke engines.
Mix the petrol and oil in the fuel mixing bottle. Use the scale on the container.
First add petrol to the fuel mixing bottle up to the PETROL "PETROL" line. Then add oil up to the second mark ("OIL") on the scale in the upper right. Close and shake the container.
Unscrew the tank cap 37 and add the fuel mixture to the fuel tank ⑦. Wipe off any fuel residue around the tank cap and close the tank cap again.
Putting on the shoulder strap (Fig. F)

ATTENTION!
Always wear the carry harness when working with the appliance. Always switch off the appliance before taking off the carry harness. There is a risk of accidents.
The carry harness is equipped with a quick-release mechanism. By opening the clip, the appliance can be quickly detached from the carry harness in a dangerous situation.
Put on the carry harness 27.
Adjust the strap length so that the snap hook is about 10~cm below the hip.
Attach the snap hook to the eyelet on the upper shaft tube of the appliance.
NOTE
- Detach the appliance before starting the engine, and attach it to the carry harness 27 when the engine is running.
- Place the hip guard 28 on the hip between your body and the appliance.
Starting the engine (Fig. G)

WARNING!
Always start the engine at least 3 metres away from the fuelling location.
NOTE
- Place the appliance on a firm, level surface. Make sure that the cutting tool is not touching any objects or the ground.
When using the line spool 16
Make sure that the protective cap on the line cutter (see Fig. A) has been removed.
When using the 3-tooth blade 29
Make sure that the guard extension 54 has been removed.
Cold start
Place the appliance on a firm, level surface. Make sure that the cutting tool is not touching any objects or the ground.
Set the On/Off switch 20 to position I.
Set the choke lever to position
Press the fuel pump (Primer) 6 times (see Fig. A).
Hold the appliance firmly with one hand on the upper shaft tube 8. With the other hand, pull multiple times quickly on the starter cord by the starting handle 3 until the engine starts.
Attention! Do not pull out the starter cord too far - it may break!
NOTE
If the appliance does not start after 3-4 pulls, manually adjust the choke lever to position
Press the throttle control lock 21 and briefly press the throttle control 22 so that the choke lever 4 springs to position | | |. The appliance runs at idle speed. Allow the appliance to warm up for a short time.
For mowing, hold the throttle control lock 1 pressed and actuate the throttle control 2.
To switch off the engine, set the On/Off switch 20 to position O.
Warm start
Set the On/Off switch 20 to position I.
Leave the choke lever 4 in its position
Hold the appliance firmly with one hand on the upper shaft tube 8. With the other hand, pull multiple times quickly on the starter cord by the starting handle 3 until the engine starts. Attention! Do not pull out the starter cord too far - it may break! The appliance now runs at idle speed.
To switch off the engine, set the On/Off switch 20 to position O.
NOTE
If the engine does not start after the second attempt, try again without the choke in the warm start position. If this does not succeed, follow the instructions in the section "Troubleshooting".
Use
Using the appliance
NOTE
Work safely and carefully!
Pay attention to the country-specific or municipal regulations when cutting.
Do not trim or cut during normal quiet hours.
Solid objects such as stones, metal parts etc. must be removed. These can be flung away and cause personal injury or damage to property.
When cutting in high bushes or hedges, maintain a working height of at least 15 cm. This means that animals such as hedgehogs are not placed in danger.
Always hold the appliance firmly and securely with both hands!
Only cut grass and weeds! Watch out for roots or tree stumps, as there is a risk of tripping.
■ Work carefully and do not endanger anyone when cutting.
Only work when visibility and light conditions are adequate!
Keep an eye on the cutting head!
Never cut above shoulder height!
Never replace the plastic cord with a steel wire - risk of injury and destruction!
Do not work on a ladder!
Only work on firm and stable surfaces!
Do not overreach. Keep proper footing and balance at all times.
Change your working position at regular intervals to prevent one-sided fatigue.
If the cutting head is blocked, switch off the appliance immediately, remove the spark plug connector and then remove the blockage.
Moving the eyelet for the carry harness / balancing the appliance (Fig. Q)
Depending on whether you are using the line spool 6 or the 3-tooth blade 29, select the respective correct position of the eyelet for the carry harness 9. When the strimmer is attached to the carry harness 27 and your hand is not touching it,
1 the line spool 16 should rest lightly on the ground.
2 the 3-tooth blade should be balanced about 20cm above the ground.
Loosen the bolt 56 on the eyelet for the carry harness 9. Do this with the 4-mm hex key 24, which is the smaller of the two. Only tighten the bolt 56 lightly.
Depending on the tool used, balance the strimmer as described above by moving the eyelet along the upper shaft tube.
Tighten the bolt 56 when the strimmer is in the desired position.
Working with the line spool
On small lawns, hold the appliance at an angle of about 30^ and swing the cutting head evenly right and left in a semicircular motion.
The best results are achieved when the grass is no taller than 15cm . If the grass is taller, it is recommended to mow in several passes.
To cut around trees, fenceposts or other obstacles, move the appliance slowly around the obstacle and cut with the tips of the line.
Avoid touching solid obstacles (stones, walls, lattice fences, etc.). This would quickly wear down the line. Use the edge of the guard to hold the appliance at the correct distance.
ATTENTION!
Do not lay the cutting head on the ground during operation!
Lengthening the line
Your appliance is equipped with an automatic tap-actuated dual line extender. This means that both lines are extended when you tap the cutting head on the ground.
Hold the appliance over a grassy area while it is running and tap the cutting head a few times lightly on the ground. This will extend the line.
The thread cutter 14 inserted into in the guard 13 (see Fig. A) will cut the line to the desired length.
If the line ends do not extend
Switch off the appliance.
Push the spool insert up to the stop and pull hard on the line end.
If the line ends are no longer visible:
Replace the line spool 16 (see section "Changing the spool").
ATTENTION!
Bits of line can be flung off and cause injuries.
Working with the 3-tooth blade
ATTENTION!
While working, always wear the carry harness and suitable protective clothing. Wear eye, hearing and head protection. Make sure that the blade is properly installed.
Replace damaged or blunt tools. There is a risk of personal injury.
NOTE
- Only use the blade to work clear, level areas. Inspect the surface to be cut carefully and remove any obstructions. Avoid hitting stones, metal or other obstacles. The blade could be damaged and there is a risk of a kickback.
While working, hold the cutting head over the ground and swing the appliance slowly back and forth in a steady arc like a scythe.
Do not hold the cutting head at an angle.
Do not use the appliance to cut wild vegetation or brushwood.
Check the blade regularly for damage, and replace damaged blades.
If the appliance vibrates Clean the appliance, remove any grass adhering to the cutting head and the guard (see section "Maintenance and care").
Maintenance and care
ATTENTION!
Always switch off the engine and remove the spark plug connector (see Fig. A) before performing any maintenance or cleaning work.
Have any work that is not described in these instructions carried out by a customer service centre authorised by us.
Use only original parts, and never use metallic line.
The use of non-original parts can result in personal injuries and irreparable damage to the appliance and will immediately void the warranty.
Cleaning the appliance
Clean any grass and soil from the cutting unit and the guard ③ after every use.
Keep the handles clean and free of grass.
Clean the appliance with a soft brush or a cloth.
NOTE
- Protect your appliance from damage!
Do not spray the appliance or place it in water. Do not use cleaning agents or solvents.
Changing the spool

ATTENTION!
When using the line spool 16, the guard 13 must be completely fitted (see section "Guard extension (removing/fitting)").
Switch off the engine.
Place the appliance on the ground and make certain that no fuel is leaking and that the appliance is resting firmly.
Block the mounting spindle with the hex key as shown (see Fig. N).
Use the larger of the two hex keys (5 mm). Unscrew the spool case 15 clockwise from the mounting spindle 49.
Open the spool case 15 by pressing the click lock firmly inwards on both sides of the spool case 15 and removing the cover of the spool case 15 (see Fig. H).
A flat-head screwdriver can be helpful for opening the spool case 15. Proceed carefully to avoid damaging the spool.
Insert the new line spool 16 into the cover of the spool case 15 and insert the two line ends through the line openings 40 (see Fig. H).
Place the line spool 16 in the cover of the spool case 15 and snap the cover back onto the spool case 15. Take care that the line openings 40 match up with the two outlets 41 in the spool case 15; otherwise, the cover will not fit (see Fig. H).
Screw the spool case 15 anti-clockwise back onto the mounting spindle 43. Remove the hex key 25 (see Fig. N).
Pull the two ends of the line to release the lines from the grooves 48.
Trim the line to about 15~cm to reduce the load on the engine during the starting and warm-up phase.
Replacing the blade (Fig. N)

CAUTION! RISK OF INJURY!
■ Be careful of the sharp edges! Wear gloves.

ATTENTION!
When using the 3-tooth blade 29, the guard 13 must be shortened (see section: "Guard extension (removing/ fitting)".
Switch off the engine.
Place the appliance on the ground and make certain that no fuel is leaking and that the appliance is resting firmly.
Block the mounting spindle 49 with the hex key 25 as shown. Use the larger of the two hex keys (5 mm). Loosen the nut 52 clockwise and remove the nut 52, tensioning disc 51, washer 50 and the 3-tooth blade 29 from the mounting spindle 49.
Place the 3-tooth blade on the mounting spindle. The 3-tooth blade can be used with either side facing out.
Fasten the 3-tooth blade with the washer, tensioning disc and nut
Remove the hex key 25.
Guard extension (removing/fitting) (Fig. O)
NOTE
- When using the 3-tooth blade 29, the guard extension 54 must be removed.
- When using the line spool 16, the guard extension 54 must be fitted.
Removing the guard extension
Unclip the three tabs of the click lock using a flat-head screwdriver.
Pull off the guard extension 54.
Fitting the guard extension
Clip in the three tabs of the click lock using a flat-head screwdriver.
NOTE
Clean the guard extension of the appliance after every use.
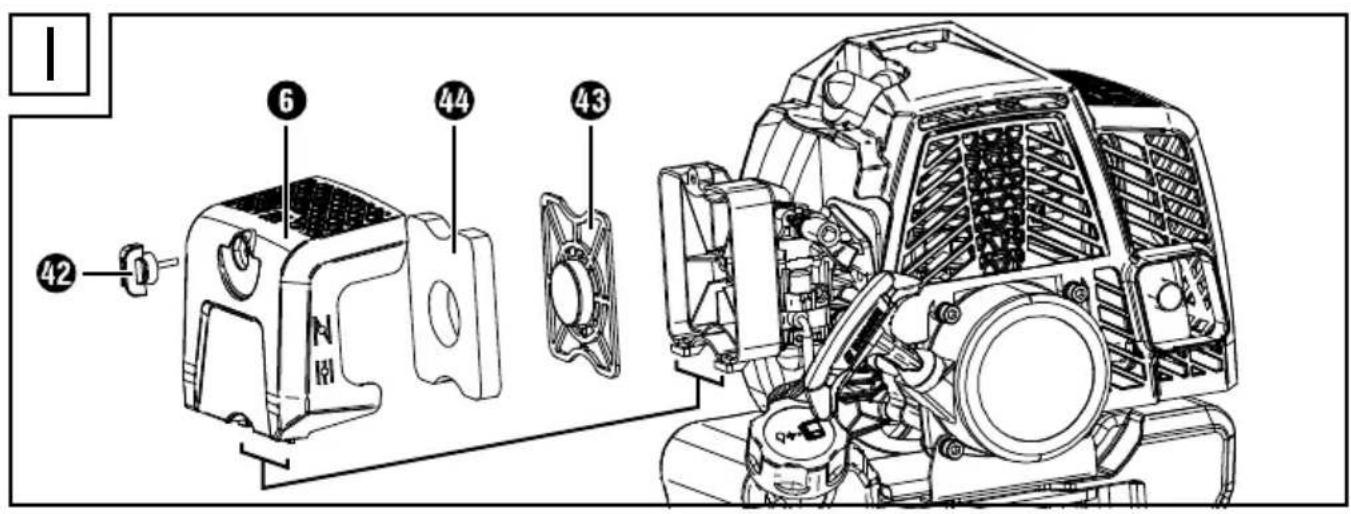
Cleaning the air filter (Fig. I)
ATTENTION!
- Do not operate the appliance without the air filter. Otherwise, dust and dirt will get into the engine and damage the machine. Keep the air filter clean.
Switch off the engine.
Loosen the bolt 42 on the air filter cover 6 and remove the air filter cover 6 from the air filter housing 43.
Remove the air filter 44 from the air filter housing 43.
Clean the air filter 44 with soap and water and let it air dry. Never use petrol for cleaning!
NOTE
Replace the air filter 44 when it is worn, damaged or heavily soiled.
The grate serves as a spacer and must be inserted first into the air filter housing 43 if it falls out when removing the air filter 44.
Place both tabs of the air filter cover 6 into the clips on the air filter housing 43.
Pivot the air filter cover 6 onto the air filter housing 43.
Fasten the air filter cover 6 with the bolt 42.
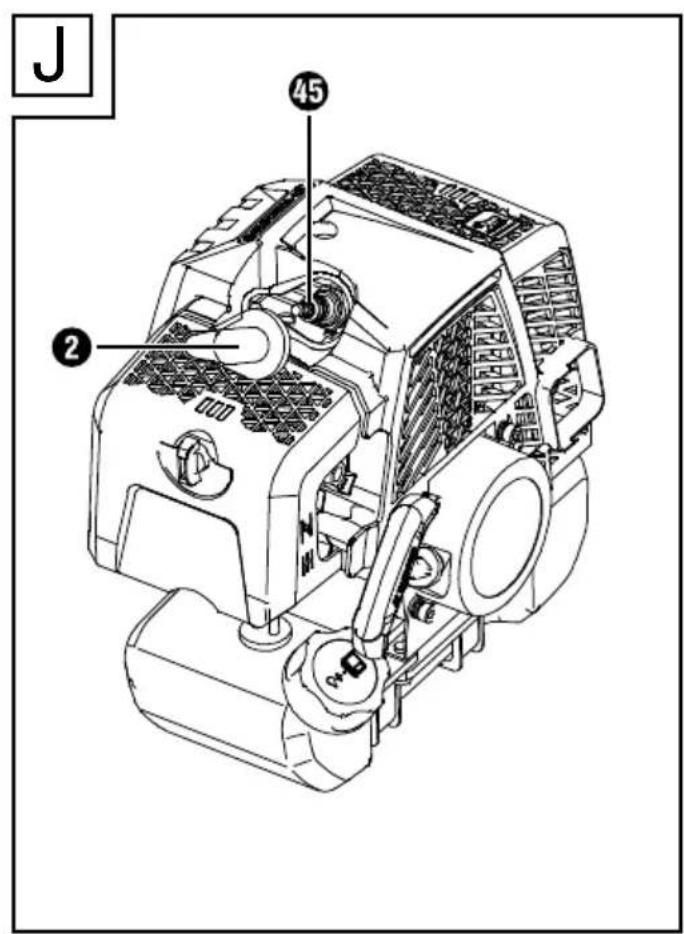
Replacing/adjusting the spark plug (Fig. J)
NOTE
Worn-out spark plugs or too large a spark gap will reduce the performance of the engine.
Switch off the engine.
Pull the spark plug connector 2 off the spark plug 45.
Unscrew the spark plug 5 anti-clockwise using the enclosed maintenance spanner (see Fig. A).
Check the spark plug gap with a feeler gauge (available from specialised retailers). The electrode gap must be 0.6-0.7 mm.
If necessary, adjust the gap by carefully bending the earth electrode of the spark plug 45.
Clean the spark plug 45 with a wire brush.
Insert the cleaned and adjusted spark plug 45 or replace a damaged spark plug 45 with a new spark plug (e.g. spark plug "NST L8RTC").
Reconnect the spark plug connector 2.
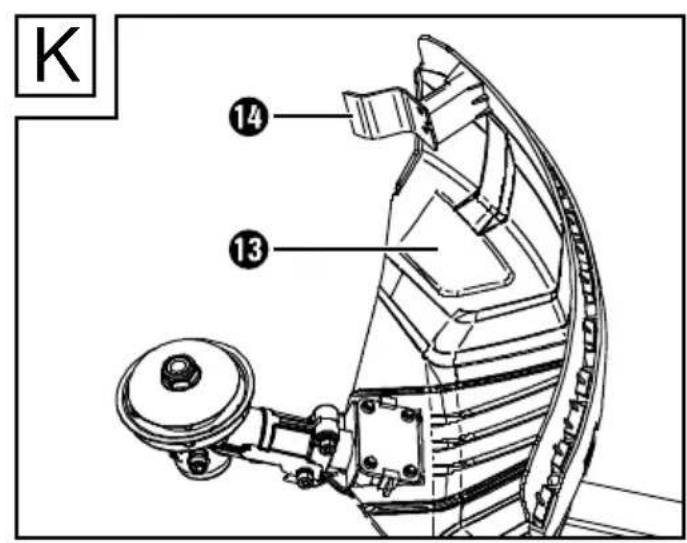
Sharpening the line cutter (Fig. K)
ATTENTION!
- Never use the appliance without a line cutter or with a defective line cutter. There is a risk of personal injury.
Wear protective gloves to avoid cutting injuries.
Switch off the engine.
Unscrew the line cutter 14 from the guard 13.
Clamp the line cutter in a vice and sharpen the blade with a flat file. File carefully and only in one direction.
Screw the line cutter 14 back onto the guard 13.
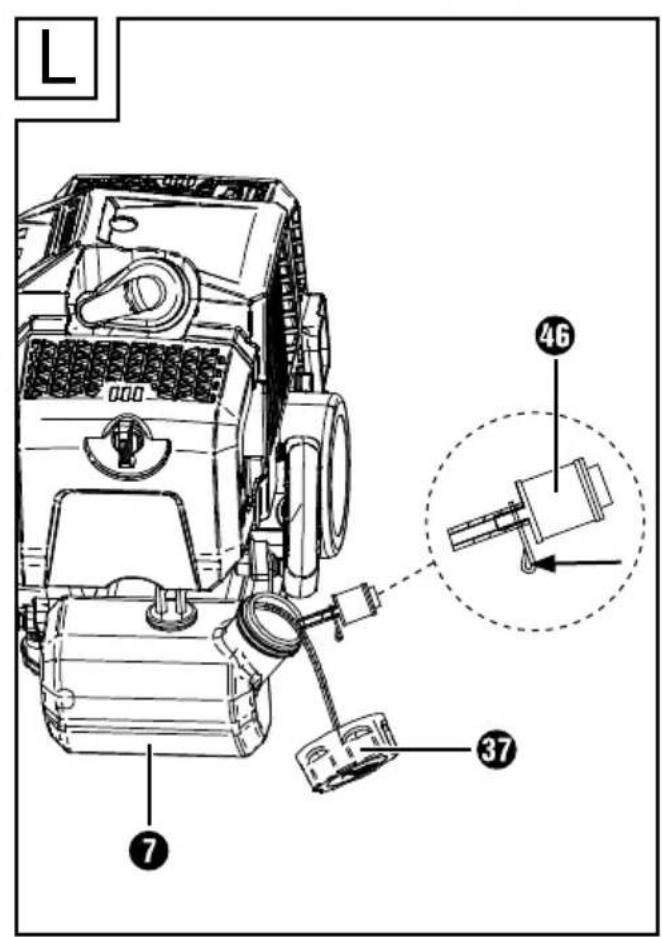
Replacing the fuel filter (Fig. L)
NOTE
- Do not operate the appliance without the fuel filter. Regularly replace the fuel filter.
Unscrew the tank cap 37.
Empty the fuel tank into a suitable container.
Pull the fuel filter 46 out of the fuel tank with a hook and pull it off by loosening the small clip.
Replace the fuel filter 45 and place it back in the fuel tank 7 with the connected suction head.
Close the fuel tank ⑦ again with the tank cap ③7.
NOTE
Fuel filter specifications: Connection 4mm Outer diameter: approx. 16~mm
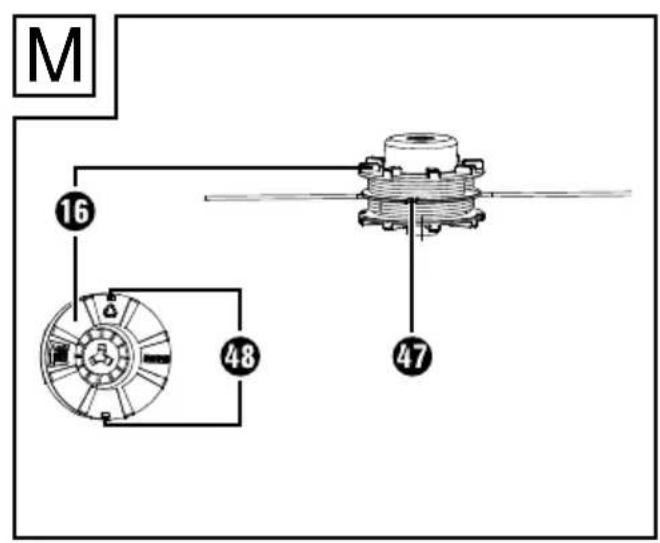
Winding the line spool (Fig. M)
As an alternative to a new line spool 16, you can purchase a 2.4mm thick, 6m long nylon line from a specialised retailer and wind it around the line spool 16 yourself.
Fold the line in the middle and lay the middle of the line in the notch of the line spool 15. Wind up the two ends in the direction of the arrow shown on the underside of the line spool 16.
Then clamp each end of the line in the respective groove 48 in the line spool 16.
NOTE
Pull the lines taught and make sure that the lines lie parallel in the two line channels. In addition, the line spool 6 may not be filled with more than 3m of line per line channel; otherwise, the automatic line mechanism will not function correctly.
Lubricating the gearbox (Fig. P)
NOTE
The gearbox must be lubricated after about 10 operating hours.
Loosen the bolt 55 on the gearbox with the larger 5-mm hex key 25.
Press about 5g of standard grease into the lubrication opening on the gearbox housing.
Close the gearbox again with the bolt 55.
Replacing the fuel filter
NOTE
The carburettor was adjusted for optimal performance at the factory. If re-adjustment is necessary, have the adjustments performed by a specialised workshop.
Removing blockages

ATTENTION!
Switch off the appliance and pull off the spark plug connector (see Fig. A) before working on the cutting unit.
Wear protective gloves to avoid cutting injuries.
Checking the clutch
NOTE
- Place the appliance on a firm, level surface. Make sure that the cutting tool is not touching any objects or the ground.
Before every use, check the functionality of the clutch while the appliance is idling.
- Start the appliance (see "Starting the engine") and visually check, while keeping a safe distance, that the line spool does not turn while idling.
Maintenance intervals
Regularly perform the maintenance work listed in the table "Maintenance intervals". Regular maintenance prolongs the service life of the appliance. You will also achieve optimal cutting performance and avoid accidents.
Maintenance intervals table
| Machine part Action | | Before every use | Operating hours |
| 10 | 20 |
| Screws, nuts, bolts Check, tighten | | | X | |
| Air filter Clean or replace | | | | X |
| Fuel filter Replace | | | X | |
| Spark plug Clean/replace/adjust | | | X | |
| Fuel hoses Check, replace if necessary | X | | | |
| Entire machine Check, clean if necessary | X | | | |
| Operating handle Check for function | X | | | |
| Cutting head Check correct installation | X | | | |
| Clutch Check lack of movement while idling | X | | | |
| Gearbox Lubricate | | | X | |
Storage
General storage instructions
Carefully clean and maintain the appliance and accessories before storing them.
Store the appliance in a dry and dust-protected place, out of the reach of children.
Do not wrap the appliance in plastic bags since this could trap moisture and encourage mould.
Do not lie the appliance on the guard.
When storing the blade, use the transport protector (see Fig. A).
The cable retainer 19 should keep the appliance cable 18 in position (see Fig. A). Do not remove the cable retainer 19, even when storing the appliance.
Storage during periods of disuse
NOTE
Failure to observe the storage instructions can result in starting problems or permanent damage due to fuel residue in the carburettor.
Storage for up to 3 months
Empty the fuel tank 7 in a well ventilated location.
Start the engine and let it idle until the engine stops and the carburettor is free of fuel.
Let the engine cool (about 5 minutes).
Storage for longer than 3 months
Empty the fuel tank 7 in a well ventilated location.
Start the engine and let it idle until the engine stops and the carburettor is free of fuel.
Let the engine cool (about 5 minutes).
Remove the spark plug (see Fig. J) with the maintenance spanner (see "Replacing/adjusting the spark plug").
Add one teaspoon of pure 2-stroke oil to the combustion chamber and pull the starter cord slowly several times to distribute the oil inside the engine.
Re-insert the spark plug 45.
Transport
During transport, the appliance must be switched off and the spark plug connector 2 removed. Do not transport the appliance while idling.
Carry the appliance with one hand on the upper and one on the lower shaft tube ⑧ + 12 . This will help avoid coming into contact with hazardous parts (e.g. hot engine, cutting unit) during transport.
Use the transport protector 30 when transporting the blade.
During transport, maintain a safe distance from other persons.
Do not transport the appliance upside down as this could lead to fuel leaks. Before transporting between usage locations, empty the fuel tank with a petrol suction pump. Do empty the fuel tank in enclosed rooms, in the vicinity of fire or while smoking. Gas vapours can cause explosions or fire. Transport in a motor vehicle: Secure the appliance against tipping over and protect it from damage. Make sure that the appliance is situated safely.
Ordering replacement parts
You can order replacement parts for this product on the internet at www.kompernass.com.

Scan the QR code with your smartphone/tablet. You can use this QR code to go directly to our website to view and order the available replacement parts.
NOTE
If you have problems with your online order, you can contact our Service Centre by phone or email.
Always include the article number (IAN) 482150_2410 with your order.
- Please note that online ordering of replacement parts is not possible for all countries.
Troubleshooting
| Fault Cause Solution | | |
| Engine does not start | Tank empty Fill the tank | |
| Incorrect starting sequence | Follow the instructions for starting the machine in these instructions |
| Engine "flooded" | Release the throttle, start multiple times and remove, clean and dry the spark plug if necessary |
| Sooty spark plug, incorrect spark plug gap | Clean, adjust or replace spark plug |
| Spark plug connection, ignition cable faulty | Replace |
| Carburettor, carburettor jet dirty, incorrectly adjusted carburettor mixture | Have the carburettor cleaned and adjusted by a specialised workshop |
| Clogged fuel filter Replace or clean fuel filter |
| Engine runs too fast while idling | Engine cold Let engine warm up slowly |
| Engine does not reach peak power | Sooty spark plug, incorrect spark plug gap | Clean, adjust or replace spark plug |
| Contaminated air filter Clean or replace air filter |
| Carburettor, carburettor jet dirty, incorrectly adjusted carburettor mixture | Have the carburettor cleaned and adjusted by a specialised workshop |
| Incorrect fuel mixture Add fuel as per instructions |
| Leaky gasket in crankcase | Have defect repaired by a specialised workshop |
| Cylinder, piston rings worn out |
| Incorrect ignition |
| Excess production of exhaust/smoke | Incorrectly adjusted carburettor mixture | Have carburettor adjusted by a specialised workshop |
| Incorrect fuel mixture Add fuel as per instructions |
Disposal / environmental protection
Applies only to France:


The product, its packaging and the operating instructions are recyclable. They are subject to an extended manufacturer responsibility and will be collected separately.
Do not dispose of the appliance in the normal domestic waste!
The adjacent symbol of a crossed-out wheelie bin means that this appliance is subject to Directive 2012/19/EU. This directive states that this appliance may not be disposed of in the normal household waste at the end of its useful life, but should be handed in at specially set-up collection locations, recycling depots or disposal companies.
This disposal is free of charge for the user. Protect the environment and dispose of this appliance properly.

The packaging is made from environmentally friendly material and can be disposed of at your local recycling plant. The appli
ance and its accessories are made from various materials, such as metal and plastic.
Your local community or municipal authorities can provide information on how to dispose of the worn-out appliance.

Dispose of the packaging in an environmentally friendly manner. Note the labelling on the packaging and separate the packaging
material components for disposal, if necessary. The packaging material is labelled with abbreviations (a) and numbers (b) with the following meanings: 1-7: plastics, 20-22: paper and cardboard, 80-98: composites.
Applies only to Spain:

The packaging contains paper and/or cardboard components.

The packaging contains plastic and/ or metal components.

Your local community or municipal authorities can provide information on how to dispose of the worn-out product.
Environmental protection
Carefully empty the petrol and oil tank and dispose of your appliance at a recycling plant. The plastic and metal parts used can be separated and recycled.
- Dispose of waste oil and petrol at a waste collection centre and do not dump them into the sewerage or drainage system.
- Dispose of contaminated maintenance material and consumables at a collection point provided for this purpose.
This appliance has a 3-year warranty valid from the date of purchase. If included with the product on delivery, the battery packs of the X12V and X20V Team series also come with a 3-year warranty from the date of purchase. If this product has any faults, you, the buyer, have certain statutory rights. Your statutory rights are not restricted in any way by the warranty described below.
Warranty conditions
The warranty period starts on the date of purchase. Please keep your receipt in a safe place. This will be required as proof of purchase.
If any material or manufacturing fault occurs within three years of the date of purchase of the product, we will either repair or replace the product for you or refund the purchase price (at our discretion). This warranty service requires that you present the defective appliance and the proof of purchase (receipt) within the three-year warranty period, along with a brief written description of the fault and of when it occurred.
If the defect is covered by the warranty, your product will either be repaired or replaced by us. The repair or replacement of a product does not signify the beginning of a new warranty period.
Warranty period and statutory claims for defects
The warranty period is not prolonged by repairs effected under the warranty. This also applies to replaced and repaired components. Any damage and defects present at the time of purchase must be reported immediately after unpacking. Repairs carried out after expiry of the warranty period shall be subject to a fee.
Scope of the warranty
This appliance has been manufactured in accordance with strict quality guidelines and inspected meticulously prior to delivery. The warranty covers material faults or production faults. The warranty does not cover product parts that are subject to normal wear and tear and can therefore be considered wearing parts, such as saw blades, replacement blades, abrasive papers, etc. or for damage to fragile parts, such as switches or parts made of glass.
The warranty does not apply if the product has been damaged, improperly used or improperly maintained. The directions in the operating instructions for the product regarding proper use of the product are to be strictly followed. Uses and actions that are discouraged in the operating instructions or which are warned against must be avoided.
This product is intended solely for private use and not for commercial purposes. The warranty shall be deemed void in cases of misuse or improper handling, use of force and modifications/repairs which have not been carried out by one of our authorised Service centres.
The warranty does not apply to
Normal reduction of the battery capacity over time
Commercial use of the product
Damage to or alteration of the product by the customer
Non-compliance with safety and maintenance instructions, operating errors
Damage caused by natural hazards
Warranty claim procedure
To ensure quick processing of your case, please observe the following instructions:
Please have the till receipt and the item number (IAN) 482150_2410 available as proof of purchase.
You will find the item number on the type plate on the product, an engraving on the product, on the front page of the operating instructions (below left) or on the sticker on the rear or bottom of the product.
If functional faults or other defects occur, please first contact the service department listed below by telephone or use our contact form, which you can find on parkside-diy.com in the Service category.
You can return a defective product to us free of charge to the service address that will be provided to you. Ensure that you enclose the proof of purchase (till receipt) and information about what the defect is and when it occurred.

You can view and download these instructions along with many other manuals at parkside-diy.com. This QR code will take you directly to parkside-diy.com. Select your
country and use the search box to search for the operating instructions. Enter the article number (IAN) 482150_2410 to find the operating instructions for your article.
Service
GB Service Great Britain
Tel.: 0800 051 897 0
Contact form on parkside-diy.com
IE Service Ireland
Tel.: 1800 851251
Contact form on parkside-diy.com
IAN482150_2410
Importer
Please note that the following address is not the service address. Please use the service address provided in the operating instructions.
KOMPERNASS HANDELS GMBH
BURGSTRASSE 21
44867 BOCHUM
GERMANY
www.kompernass.com
We, KOMPERNASS HANDELS GMBH, document officer: Mr Semi Uguzlu, BURGSTR. 21, 44867 BOCHUM, GERMANY, hereby declare that this product complies with the following standards, normative documents and EC directives:
Machinery Directive (2006/42/EC)
EMC (Electromagnetic Compatibility) (2014/30/EU)
Directives on noise emission (2000/14/EC), amended by (2005/88/EC)
Sound power level LWA:
3-tooth cutting blade:
Measured L_WA = 108.2 dB
Line spool: Measured & LWA = 108.3dB & LWA = 110dB Guaranteed
Emissions Directive (2016/1628/EU)
RoHS Directive (2011/65/EU)*
- The manufacturer bears the sole responsibility for compliance with this conformity declaration. The subject of the declaration described above meets the requirements of Directive 2011/65/EU of the European Parliament and Council of 8 June 2011 on the limitations of use of certain hazardous substances in electrical and electronic equipment.
Applied harmonised standards
EN ISO 11806-1:2022
EN ISO 14982:2009
EN IEC 63000:2018
Type designation of machine: Petrol grass trimmer PBS 2 E5
Year of manufacture: 03-2025
Serial number: IAN 482150_2410
Bochum, 27/11/2024

Semi Uguzlu
We reserve the right to make technical changes in the context of further product development.
Inhaltsverzeichnis
KOMPERNASS HANDELS GMBH
BURGSTRASSE 21
44867 BOCHUM
DEUTSCHLAND
www.kompernass.com
Chere cliente, cher client,
KOMPERNASS HANDELS GMBH
BURGSTRASSE 21
44867 BOCHUM
ALLEMAGNE
www.kompernass.com
Directive relative aux machines (2006/42/CE)
Directive RoHS (2011/65/EU)*
KOMPERNASS HANDELS GMBH
BURGSTRASSE 21
44867 BOCHUM
DUITSLAND
www.kompernass.com
KOMPERNASS HANDELS GMBH
BURGSTRASSE 21
44867 BOCHUM
NÉMECKO
www.kompernass.com
KOMPERNASS HANDELS GMBH
BURGSTRASSE 21
44867 BOCHUM
NIEMCY
www.kompernass.com
Neurcitost=K WA =3 dB
Smernica o emisiach hluku
Mazanie prevodovsky (obr. P)
UPOZORNENIE
Po cca 10 prevádkovych hodinach je potrebné prevodovku namazaf.
Povolte skrutku 55 na prevodovke pomocou 5mm ,vacseio,kluca s vnutornym sesthranom 25.
Do mazacieho otvoru na tele prevodovky natlachte cca 5 g bezné dostupného mazacieho tuku.
Potom prevodovku znova zatvorte skrutkou 55.
KOMPERNASS HANDELS GMBH
BURGSTRASSE 21
44867 BOCHUM
NEMECKO
www.kompernass.com
Preklad originalneho vyhlasyenia o zhode
My, spolocnost KOMPERNASS HANDELS GMBH, osoba zodpovedna za dokumentaciu: pán Semi Uguzlu, BURGSTR. 21, 44867 BOCHUM, DEUTSCHLAND/NEMECKO, vyhlasujeme, ze tento vyrobok je v sulade s nasledujucimi normami, normativnymi dokumentmi a smernicami ES:
Smernica o strojovych zariadeniach (2006/42/EC)
Smernica o elektromagnetickej kompatibilite (2014/30/EU)
Sernica o RoHS (2011/65/EU)*
Opbevaring under driftspauser
BEMERK
KOMPERNASS HANDELS GMBH
BURGSTRASSE 21
44867 BOCHUM
TYSKLAND
www.kompernass.com
RoHS-directivet (2011/65/EU)*
KOMPERNASS HANDELS GMBH
BURGSTRASSE 21
44867 BOCHUM
GERMANIA
www.kompernass.com
Uzemanyag-keverek 40:1
KOMPERNASS HANDELS GMBH
BURGSTRASSE 21
44867 BOCHUM
GERMANY
www.kompernass.com